



Vauxhall/Opel Zafira
Owners Workshop Manual
Models covered
Zatira·B MPV modOIS
Petrol: 1.6 Utre (1598cc), 1.8 litre (1796cc) & 2.2 ll tre (2198cc)
Turbo-diesel: 1.9 lltre (1910cc)
Does NOT cove, 2.0 litre turbo petrol engine, 1.71/tre d/ese/ engine or dual fuel models
Contents
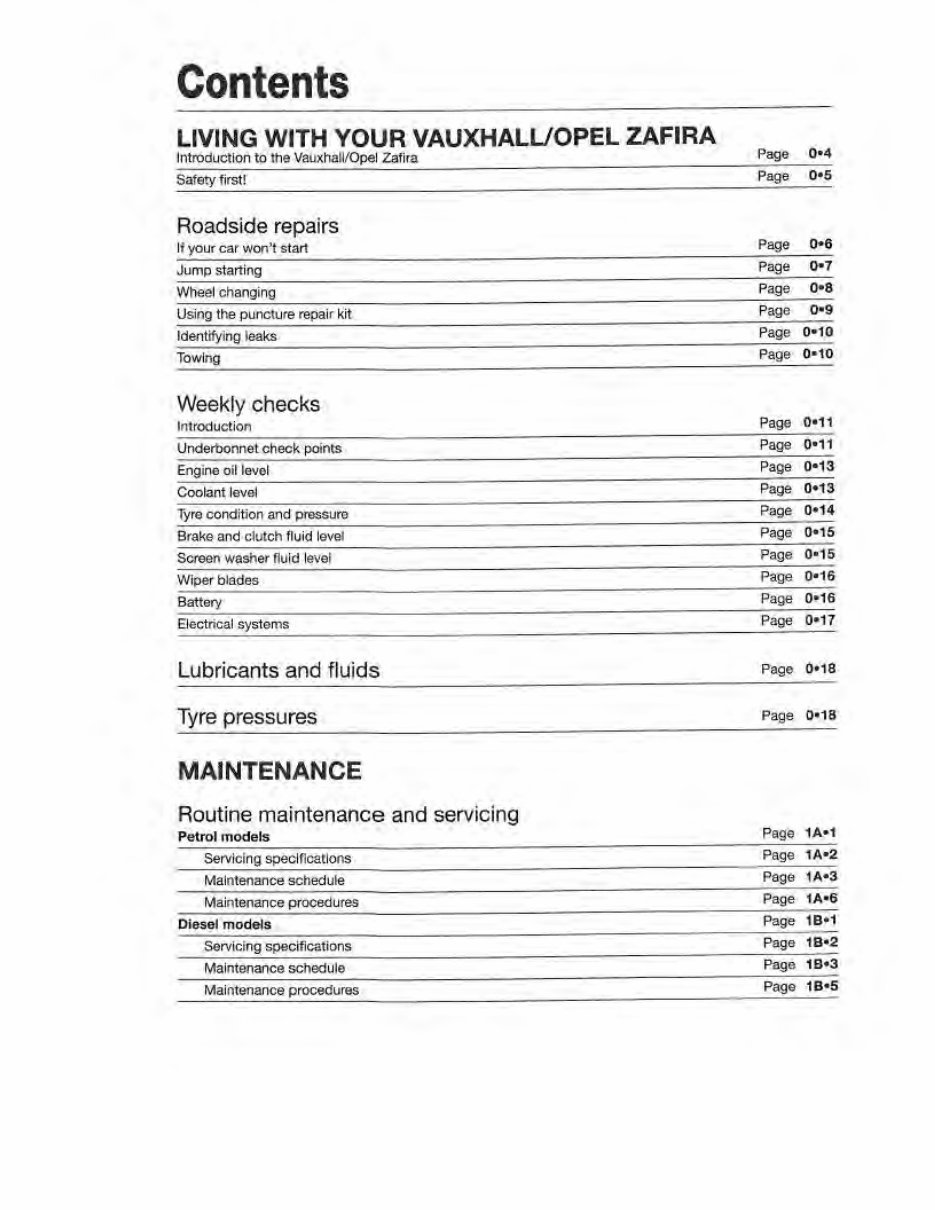
LIVING WITH YOUR VAUXHALL/OPEL ZAFIRA
Introduction to the Vauxhall/Opel Zafira
Safety first!
Roadside repairs
If your car won't start
Jump starting
Wheel changing
Using the puncture repair kit
Identifyi ng leaks
Towing
Weekly checks
Introduction
Underbonnet check points
Engine oil level
Coolant level
Tyre con dition and pressure
Brake and clut ch fluid level
Screen washer fluid level
Wiper blades
Battery
El ec trical systems
Lubricants and fluids
Tyre pressures
MAINTENANCE
Routine maintenance and servicing
Petrol models
Servicing specifications
Maintenance schedule
Maintenance procedures
Diesel models
Servici ng specifications
Maintenance schedule
Maintenance procedures
Pa ge 0•4
Page 0•5
Page
0•6
Page
0•7
Page 0•8
Page 0•9
Page 0•10
Page 0•10
Page 0•11
Page 0•11
Page 0•13
Page
0•13
Page
0•14
Page 0•15
Page 0•15
Page 0•16
Page
0•16
Page 0•17
Page 0•18
Page
0•18
Page 1A•1
Page 1A• 2
Page
1A•3
Page
1A•6
Page
18•1
Page
18•2
Page 18•3
Page 18•5
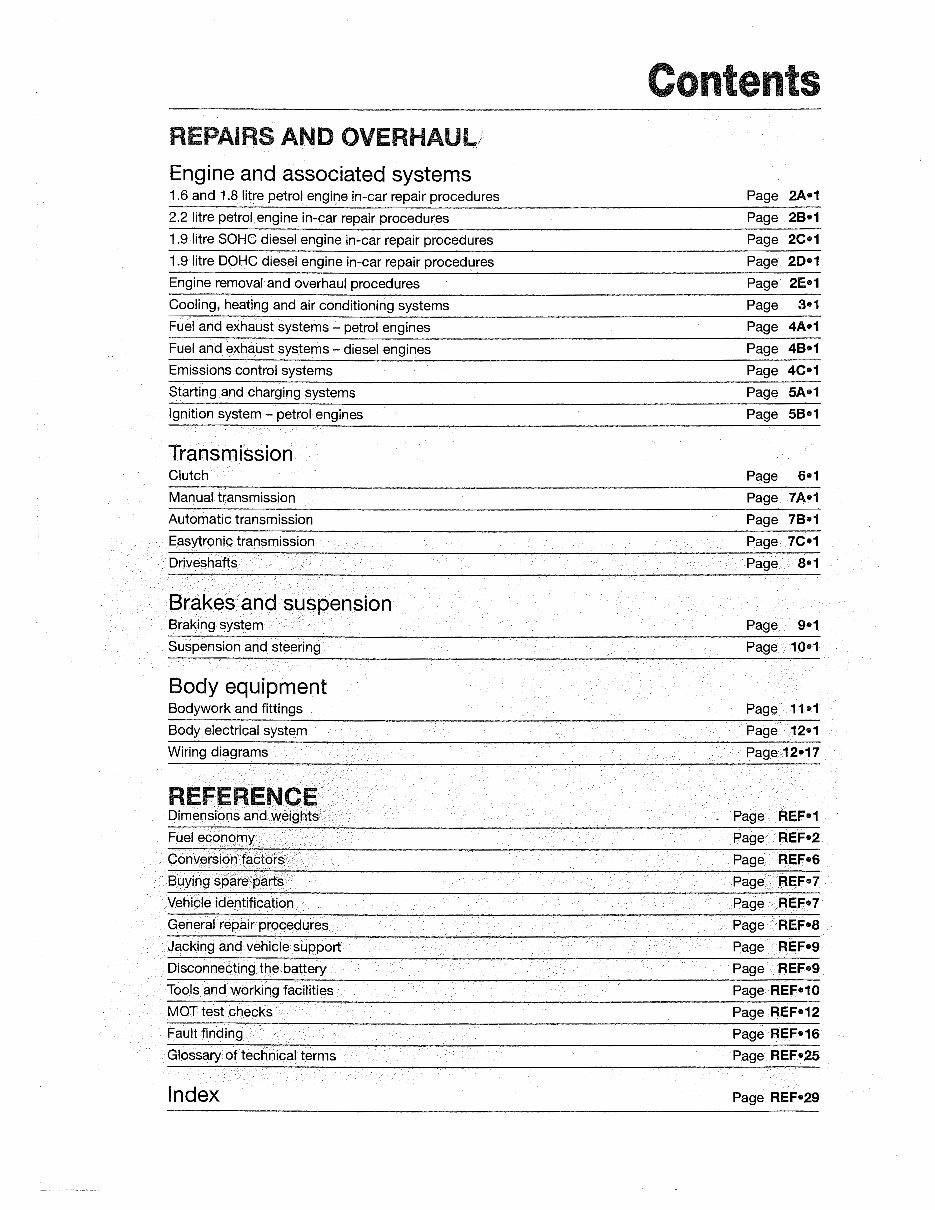
REPAIRS AND OVERHAU
Engine and associated systems
1.6 and 1.8 litre petrol engine in-car repair procedures
2.2 litre petrol engine in-car repair procedures
1.9 litre SOHC diesel engine in-car repair procedures
1.9 litre DOHC diesel engine in-car repair procedures
Engine removal and overhaul procedures
Cooling, heating and air conditioning systems
Fuel and exhaust systems - petrol engines
Fuel and exhaust systems - diesel engines
Emissions control systems
Starting and charging systems
Ignition system - petrol engines
Transmission
Clutch
transmission
Automatic transmission
Easytronic transmission
Driveshafts
Brakes and suspension
Braking system
Suspension and steering
Body equipment
Bodywork and fittings
Body electrical system
Wiring diagrams
REFERENCE
Dimensions and weights
Fuel economy
Buying spare parts
Vehicle identification
General repair procedures
Jacking and vehicle support
Disconnecting the battery
Tools and working facilities
MOT test checks
Fault finding
Glossary of technical terms
Index
ontents
Page 2A•1
Page 28•1
Page 2C•1
Page 2D•1
Page
2E•1
Page
3•1
Page
4A•1
Page
48•1
Page 4C•1
Page 5A•1
Page 58•1
Page 6•1
Page
7A•1
Page 78•1
Page 7C•1
8•1
Page 9•1
Page 11•1
Page REF•1
REF•2
Page REF•6
Page REF•7
Page REF•7
Page REF•8
Page REF•9
Page
REF•9
Page REF•10
Page REF•12
Page REF•16
REF•25
Page REF•29
o·4 Introduction
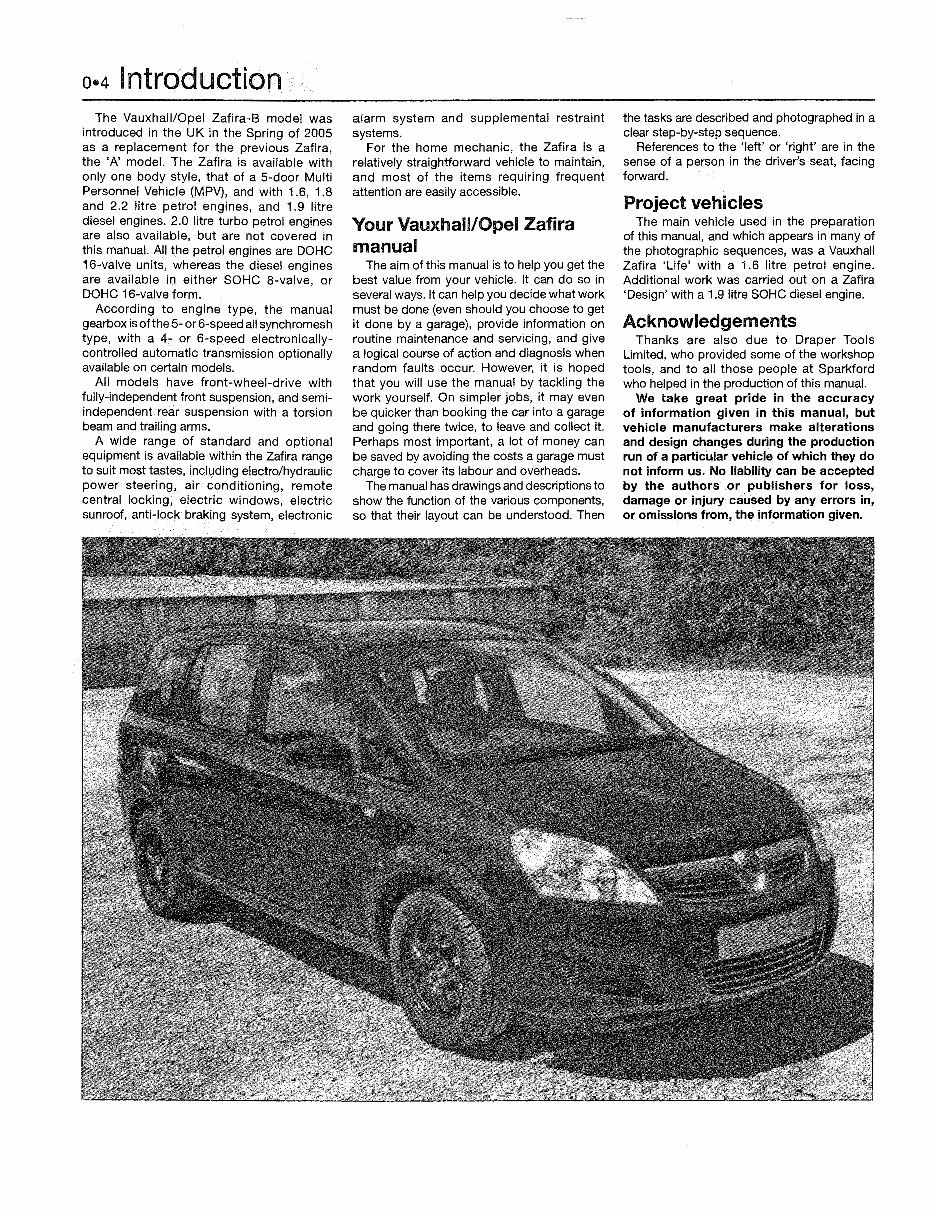
The Vauxhall/Opel Zafira-8 model was
introduced in the UK in the Spring of 2005
as a replacement for the previous Zafira,
the 'A' model. The Zafira is available with
only one body style, that of a 5-door Multi
Personnel Vehicle (MPV), and with 1.6, i .8
and 2.2 litre petrol engines, and 1.9 litre
diesel engines. 2.0 litre turbo petrol engines
are also available, but are not covered in
this manual. All the petrol engines are DOHC
16-valve units, whereas the diesel engines
are available in either SOHC 8-valve, or
DOHC 16-valve form.
According to engine type, the manual
gearbox is of the 5- or 6-speed all synchromesh
type, with a 4- or 6-speed electronically-
controlled automatic transmission optionally
available on certain models.
All models have front-wheel-drive with
fully-independent front suspension, and semi-
independent rear suspension with a torsion
beam and trailing arms.
A wide range of standard and optional
equipment is available within the Zafira range
to suit most tastes, including electro/hydraulic
power steering, air conditioning, remote
central locking, electric windows, electric
sunroof, anti-lock braking system, electronic
alarm system and supplemental restraint
systems.
For the home mechanic, the Zafira is a
relatively straightforward vehicle to maintain,
and most of the items requiring frequent
attention are easily accessible.
Your Vauxhall/Opel Zafira
manual
The aim of this manual is to help you get the
best value from your vehicle. It can do so in
several ways. It can help you decide what work
must be done (even should you choose to get
it done by a garage), provide information on
routine maintenance and servicing, and give
a logical course of action and diagnosis when
random faults occur. However, it is hoped
that you will use the manual by tackling the
work yourself. On simpler jobs, it may even
be quicker than booking the car into a garage
and going there twice, to leave and collect it.
Perhaps most important, a lot of money can
be saved by avoiding the costs a garage must
charge to cover its labour and overheads.
The manual has drawings and descriptions to
show the function of the various components,
so that their layout can be understood. Then
the tasks are described and photographed in a
clear step-by-step sequence.
References to the 'left' or 'right' are in the
sense of a person in the driver's seat, facing
forward.
Project vehicles
The main vehicle used in the preparation
of this manual, and which appears in many of
the photographic sequences, was a Vauxhall
Zafira 'Life' with a 1.6 litre petrol engine.
Additional work was carried out on a Zafira
'Design' with a 1.9 litre SOHC diesel engine.
Acknowledgements
Thanks are also due to Draper Tools
Limited, who provided some of the workshop
tools, and to all those people at Sparkford
who helped in the production of this manual.
We take great pride in the accuracy
of information given in this manual, but
vehicle manufacturers make alterations
and design changes during the production
run of a particular vehicle of which they do
not inform us. No liability can be accepted
by the authors or publishers for loss,
damage or injury caused by any errors in,
or omissions from, the information given.
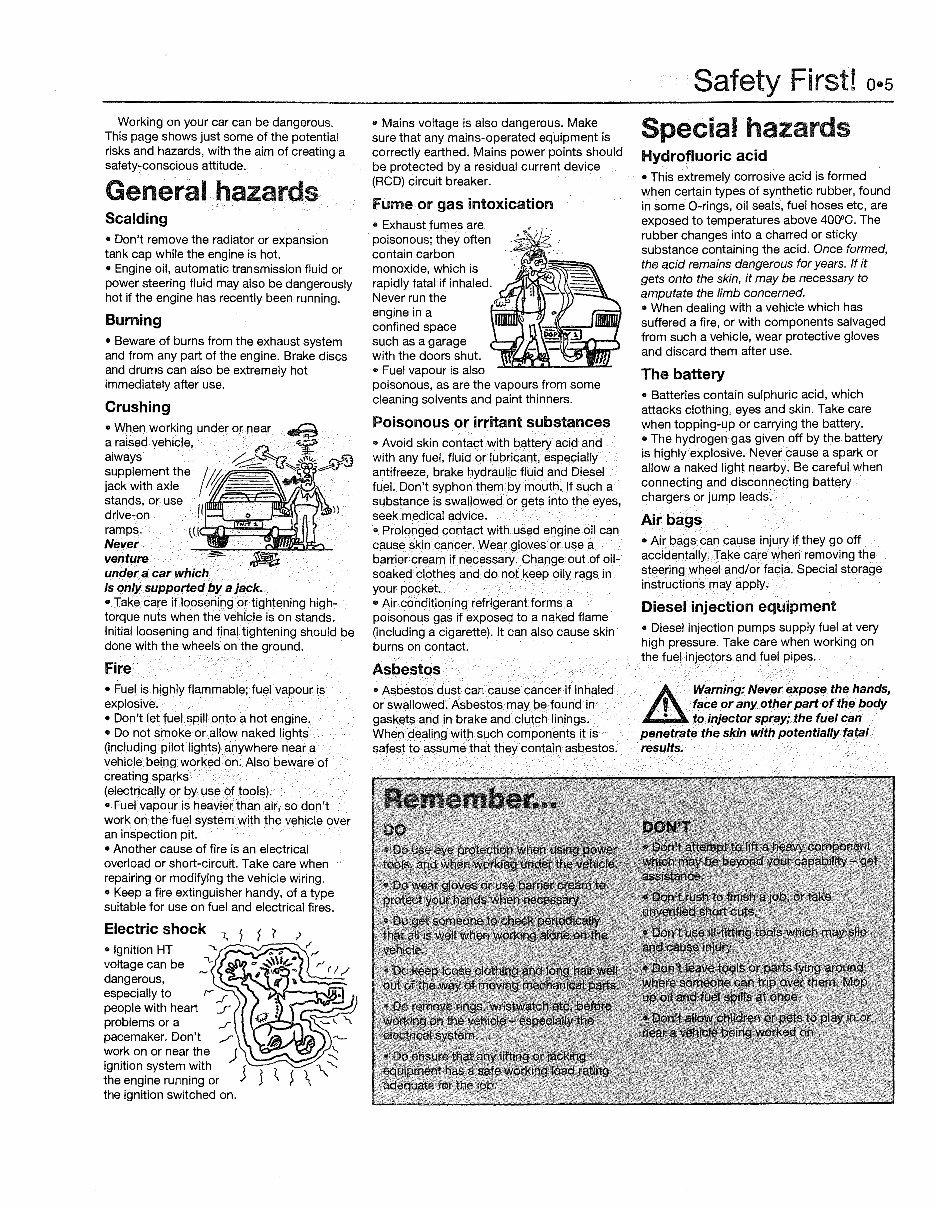
Working on your car can be dangerous.
This page shows just some of the potential
risks and hazards, with the aim of creating a
safety-conscious attitude.
General hazards
Scalding
• Don't remove the radiator or expansion
tank cap while the engine is hot.
• Engine oil, automatic transmission fluid or
power steering fluid may also be dangerously
hot if the engine has recently been running.
Burning
• Beware of burns from the exhaust system
and from any part of the engine. Brake discs
and drums can also be extremely hot
immediately after use.
Crushing
• When working under or near -3
a raised vehicle, n ~
always ~..,£...... "(], }t.,_ @©
supplement the /1@ - ~~ -~
jack with axle 'ill!J.~f~f§[~~~~
st~nds, or use /I'~
dnve-on - \)
ramps. ~((,~ILJ...-~
Never
venture
under a car which
is only supported by a jack.
• Take care if loosening or tightening high-
torque nuts when the vehicle is on stands.
Initial loosening and final tightening should be
done with the wheels on the ground.
Fire
• Fuel is highly flammable; fuel vapour is
explosive.
• Don't let fuel spill onto a hot engine.
• Do not smoke or allow naked lights
{including pilot lights) anywhere near a
vehicle being worked on. Also beware of
creating sparks
(electrically or by use of tools).
• Fuel vapour is heavier than air, so don't
work on the fuel system with the vehicle over
an inspection pit.
• Another cause of fire is an electrical
overload or short-circuit. Take care when
repairing or modifying the vehicle wiring.
• Keep a fire extinguisher handy, of a type
suitable for use on fuel and electrical fires.
Electric shock 1..
1
1
? ,,
• Ignition HT
voltage can be
dangerous,
especially to f-'" ,.r
people with heart f
problems or a ,..r
pacemaker. Don't ./
work on or near the ) ~
ignition system with J
1
1
< ) "\,._'
the engine running or J \ , ,
the ignition switched on.
• Mains voltage is also dangerous. Make
sure that any mains-operated equipment is
correctly earthed. Mains power points should
be protected by a residual current device
(RCD) circuit breaker.
Fume or gas intoxication
• Exhaust fumes are
poisonous; they often
contain carbon
monoxide, which is
rapidly fatal if inhaled.
Never run the
engine in a
confined space
such as a garage
with the doors shut.
• Fuel vapour is also
poisonous, as are the vapours from some
cleaning solvents and paint thinners.
Poisonous or irritant substances
• Avoid skin contact with battery acid and
with any fuel, fluid or lubricant, especially
antifreeze, brake hydraulic fluid and Diesel
fuel. Don't syphon them by mouth. If such a
substance is swallowed or gets into the eyes,
seek medical advice.
• Prolonged contact with used engine oil can
cause skin cancer. Wear gloves or use a
barrier cream if necessary. Change out of oil-
soaked clothes and do not keep oily rags in
your pocket.
• Air conditioning refrigerant forms a
poisonous gas if exposed to a naked flame
(including a cigarette). It can also cause skin
burns on contact.
Asbestos
• Asbestos dust can cause cancer if inhaled
or swallowed. Asbestos may be found in
gaskets and in brake and clutch linings.
When dealing with such components it is
safest to assume that they contain asbestos.
Safety First! o·s
Special hazards
Hydrofluoric acid
• This extremely corrosive acid is formed
when certain types of synthetic rubber, found
in some 0-rings, oil seals, fuel hoses etc, are
exposed to temperatures above 400°C. The
rubber changes into a charred or sticky
substance containing the acid. Once formed,
the acid remains dangerous for years. If it
gets onto the skin, it may be necessary to
amputate the limb concerned.
• When dealing with a vehicle which has
suffered a fire, or with components salvaged
from such a vehicle, wear protective gloves
and discard them after use.
The battery
• Batteries contain sulphuric acid, which
attacks clothing, eyes and skin. Take care
when topping-up or carrying the battery.
• The hydrogen gas given off by the battery
is highly explosive. Never cause a spark or
allow a naked light nearby. Be careful when
connecting and disconnecting battery
chargers or jump leads.
Air bags
• Air bags can cause injury if they go off
accidentally. Take care when removing the
steering wheel and/or facia. Special storage
instructions may apply.
Diesel injection equipment
• Diesel injection pumps supply fuel at very
high pressure. Take care when working on
the fuel injectors and fuel pipes.
Warning: Never expose the hands,
face or any other part of the body
to injector spray; the fuel can
penetrate the skin with potentially fatal
results.
o•6 Roadside repairs
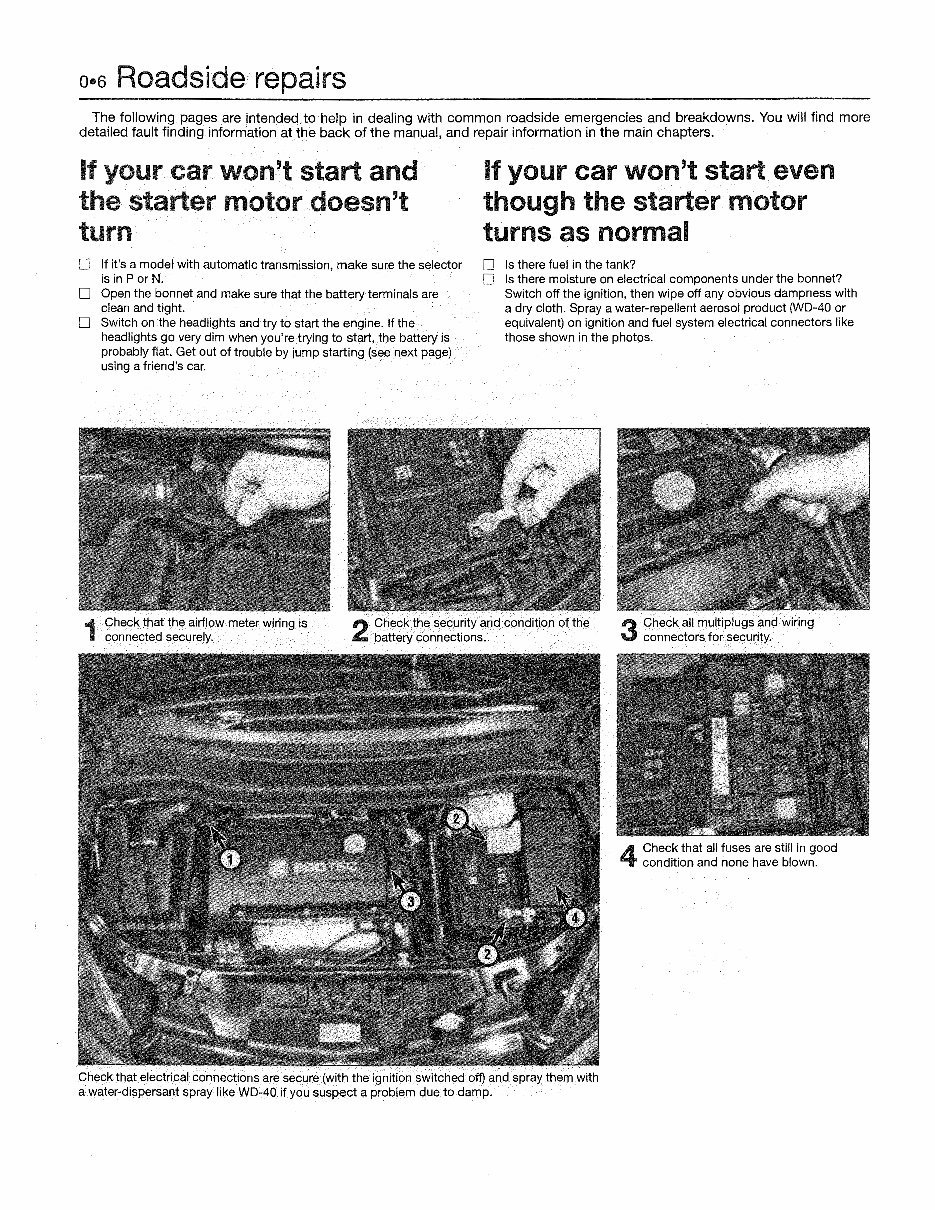
The following pages are intended to help in dealing with common roadside emergencies and breakdowns. You will find more
detailed fault finding information at the back of the manual, and repair information in the main chapters.
car won't start and
.............. _ motor doesn't
[::] If it's a model with automatic transmission, make sure the selector
is in P or N.
O Open the bonnet and make sure that the battery terminals are
clean and tight.
O Switch on the headlights and try to start the engine. If the
headlights go very dim when you're trying to start, the battery is
probably flat. Get out of trouble by jump starting (see next page)
using a friend's car.
If your car won't start even
though the starter motor
turns as normal
O Is there fuel in the tank?
O Is there moisture on electrical components under the bonnet?
Switch off the ignition, then wipe off any obvious dampness with
a dry cloth. Spray a water-repellent aerosol product (WD-40 or
equivalent} on ignition and fuel system electrical connectors like
those shown in the photos.
3
Check all multiplugs and wiring
connectors for security.
4
Check that all fuses are still in good
condition and none have blown.
Check that electrical connections are secure (with the ignition switched off) and spray them with
a water-dispersant spray like WD-40 if you suspect a problem due to damp.
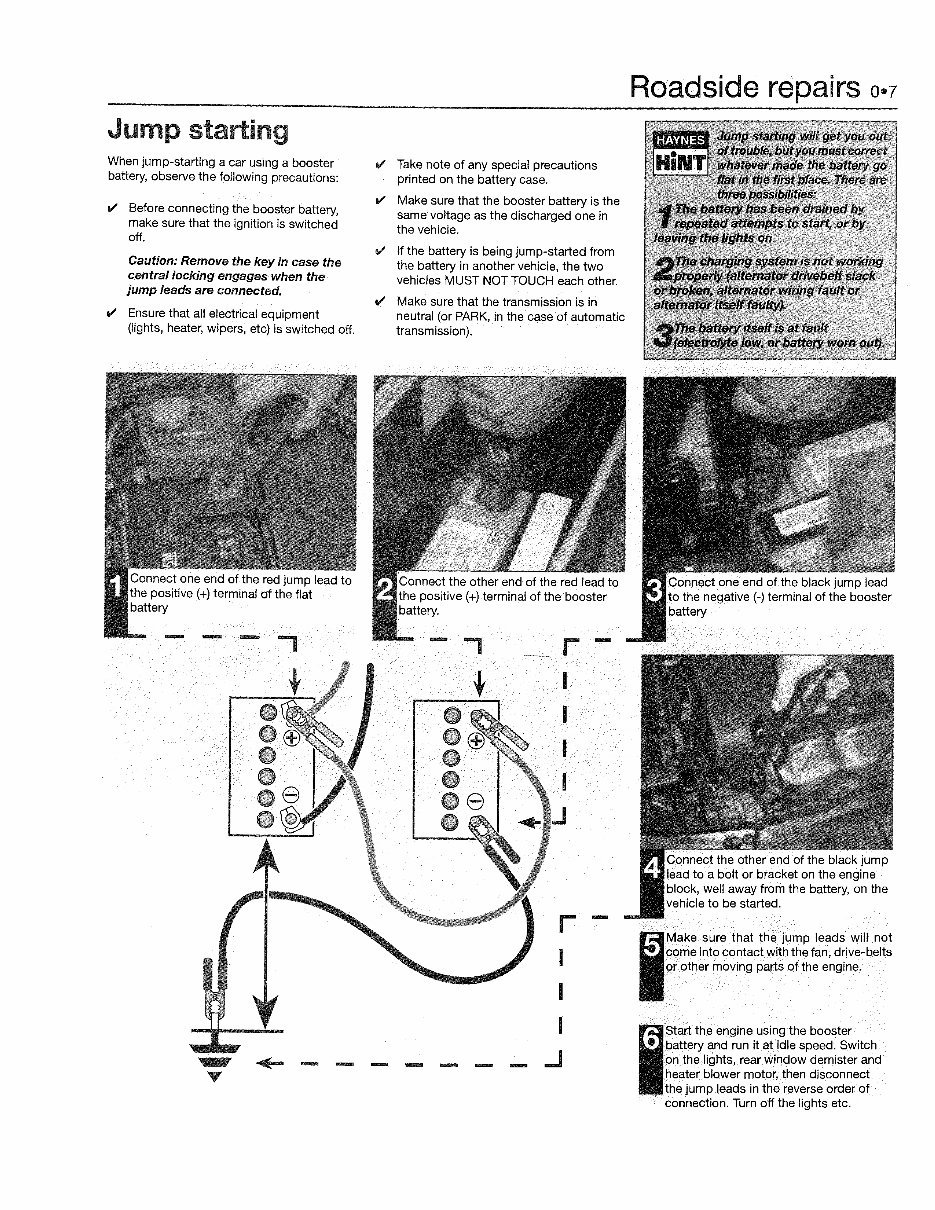
When jump-starting a car using a booster
battery, observe the following precautions:
II' Before connecting the booster battery,
make sure that the ignition is switched
off.
Caution: Remove the key in case the
central locking engages when the
jump leads are connected.
II' Ensure that all electrical equipment
(lights, heater, wipers, etc) is switched off.
II' Take note of any special precautions
printed on the battery case.
II' Make sure that the booster battery is the
same voltage as the discharged one in
the vehicle.
v If the battery is being jump-started from
the battery in another vehicle, the two
vehicles MUST NOT TOUCH each other.
e/ Make sure that the transmission is in
neutral (or PARK, in the case of automatic
transmission).
Connect the other end of the red lead to
the positive(+) terminal of the booster
battery.
r
Roadside repairs o•?
Connect the other end of the black jump
lead to a bolt or bracket on the engine
block, well away from the battery, on the
vehicle to be started.
Make sure that the jump leads will not
come into contact with the fan, drjve-belts
or other moving parts of the engine.
Start the engine using the booster
battery and run it at idle speed. Switch
on the lights, rear window demister and
heater blower motor, then disconnect
the jump leads in the reverse order of
connection. Turn off the lights etc.
o·s Roadside repairs
Wheel changing
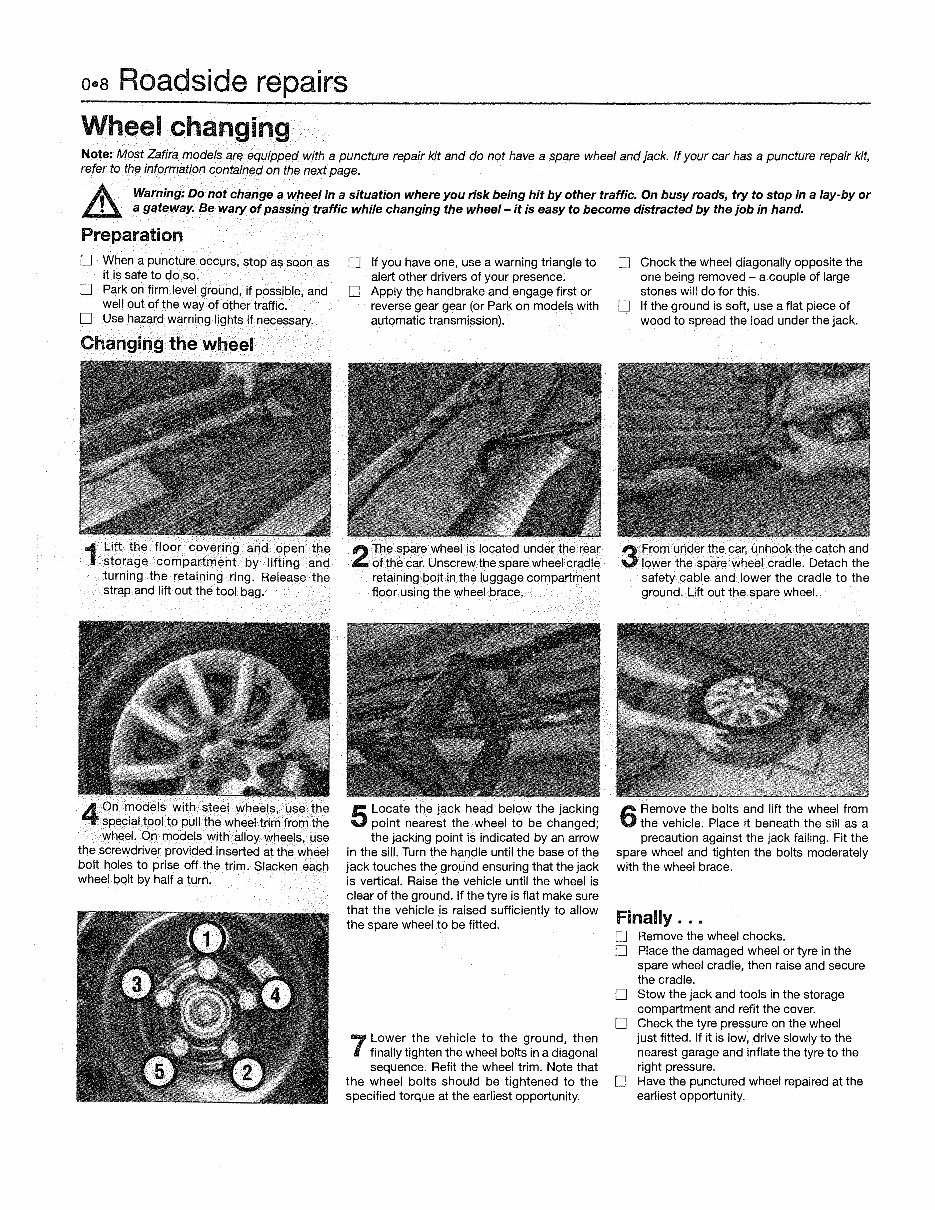
Note: Most Zafira models are equipped with a puncture repair kit and do not have a spare wheel and jack. If your car has a puncture repair kit,
refer to the information contained on the next page.
A\. Warning: Do not change a wheel in a situation where you risk being hit by other traffic. On busy roads, try to stop in a Jay-by or
.£ll.. a gateway. Be wary of passing traffic while changing the wheel - it is easy to become distracted by the job in hand.
Preparation
[] When a puncture occurs, stop as soon as
it is safe to do so.
D Park on firm level ground, if possible, and
well out of the way of other traffic.
D Use hazard warning lights if necessary.
Changing the wheel
1
Lift the floor covering and open the
storage compartment by lifting and
turning the retaining ring. Release the
strap and lift out the tool bag.
4
On models with steel wheels, use the
special tool to pull the wheel trim from the
wheel. On models with alloy wheels, use
the screwdriver provided inserted at the wheel
bolt holes to prise off the trim. Slacken each
wheel bolt by half a turn.
D If you have one, use a warning triangle to
alert other drivers of your presence.
D Apply the handbrake and engage first or
reverse gear gear (or Park on models with
automatic transmission).
2
The spare wheel is located under the rear
of the car. Unscrew the spare wheel cradle
retaining bolt in the luggage compartment
floor using the wheel brace.
5
Locate the jack head below the jacking
point nearest the wheel to be changed;
the jacking point is indicated by an arrow
in the sill. Turn the handle until the base of the
jack touches the ground ensuring that the jack
is vertical. Raise the vehicle until the wheel is
clear of the ground. If the tyre is flat make sure
that the vehicle is raised sufficiently to allow
the spare wheel to be fitted.
7
Lower the vehicle to the ground, then
finally tighten the wheel bolts in a diagonal
sequence. Refit the wheel trim. Note that
the wheel bolts should be tightened to the
specified torque at the earliest opportunity.
[] Chock the wheel diagonally opposite the
one being removed - a couple of large
stones will do for this.
D If the ground is soft, use a flat piece of
wood to spread the load under the jack.
3
From under the car, unhook the catch and
lower the spare wheel cradle. Detach the
safety cable and lower the cradle to the
ground. Lift out the spare wheel.
6
Remove the bolts and lift the wheel from
the vehicle. Place it beneath the sill as a
precaution against the jack failing. Fit the
spare wheel and tighten the bolts moderately
with the wheel brace.
Finally ...
D Remove the wheel chocks.
f.J Place the damaged wheel or tyre in the
spare wheel cradle, then raise and secure
the cradle.
~ Stow the jack and tools in the storage
compartment and refit the cover.
D Check the tyre pressure on the wheel
just fitted. If it is low, drive slowly to the
nearest garage and inflate the tyre to the
right pressure.
D Have the punctured wheel repaired at the
earliest opportunity.
Roadside repairs o•9
Using the puncture repair kit
/:... Warning: Do not attempt to repair a punctured tyre in a situation where you risk being hit by other traffic. On busy roads, try to
L..!l., stop in a lay-by or a gateway. Be wary of passing traffic while using the kit - it is easy to become distracted by the job in hand.
+. Warning: Repair of a tyre using the puncture repair kit must be regarded as a 'get you home' emergency repair only. A new tyre
~ must be fitted as soon as possible.
Preparation
O When a puncture occurs, stop as soon as
it is safe to do so.
D Park on firm level ground, if possible, and
well out of the way of other traffic.
Repairing the puncture
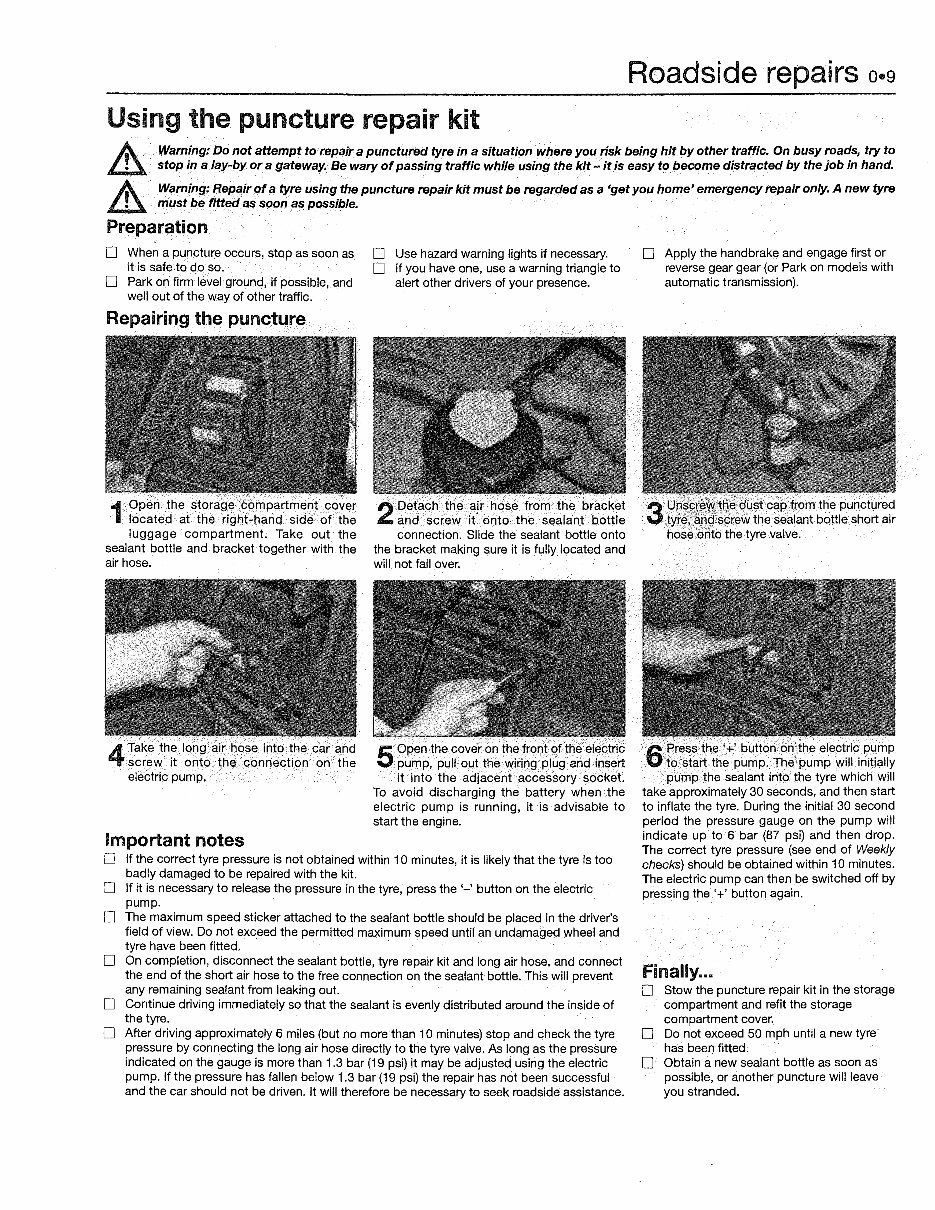
1
Open the storage compartment cover
located at the right-hand side of the
luggage compartment. Take out the
sealant bottle and bracket together with the
air hose.
4
Take the long air hose into the car and
screw it onto the connection on the
electric pump.
Important notes
D Use hazard warning lights if necessary.
D If you have one, use a warning triangle to
alert other drivers of your presence.
2
Detach the air hose from the bracket
and screw it onto the sealant bottle
connection. Slide the sealant bottle onto
the bracket making sure it is fully located and
will not fall over.
5
Open the cover on the front of the electric
pump, pull out the wiring plug and insert
it into the adjacent accessory socket.
To avoid discharging the battery when the
electric pump is running, it is advisable to
start the engine.
D If the correct tyre pressure is not obtained within 10 minutes, it is likely that the tyre is too
badly damaged to be repaired with the kit.
D If it is necessary to release the pressure in the tyre, press the '-' button on the electric
pump.
l] The maximum speed sticker attached to the sealant bottle should be placed in the driver's
field of view. Do not exceed the permitted maximum speed until an undamaged wheel and
tyre have been fitted.
O On completion, disconnect the sealant bottle, tyre repair kit and long air hose, and connect
the end of the short air hose to the free connection on the sealant bottle. This will prevent
any remaining sealant from leaking out.
D Continue driving immediately so that the sealant is evenly distributed around the inside of
the tyre.
[] After driving approximately 6 miles (but no more than 1 O minutes) stop and check the tyre
pressure by connecting the long air hose directly to the tyre valve. As long as the pressure
indicated on the gauge is more than 1 .3 bar (19 psi) it may be adjusted using the electric
pump. If the pressure has fallen below 1.3 bar (19 psi) the repair has not been successful
and the car should not be driven. It will therefore be necessary to seek roadside assistance.
O Apply the handbrake and engage first or
reverse gear gear (or Park on models with
automatic transmission).
3
Unscr~wJhe dust cap from the punctured
tyre, and screw the sealant bottle short air
hose onto the tyre valve.
6
Press the '+' button on the electric pump
to start the pump. The pump will initially
pump the sealant into the tyre which will
take approximately 30 seconds, and then start
to inflate the tyre. During the initial 30 second
period the pressure gauge on the pump will
indicate up to 6 bar (87 psi) and then drop.
The correct tyre pressure (see end of Weekly
checks) should be obtained within 10 minutes.
The electric pump can then be switched off by
pressing the'+' button again.
Finally ..•
D Stow the puncture repair kit in the storage
compartment and refit the storage
compartment cover.
O Do not exceed 50 mph until a new tyre
has been fitted.
O Obtain a new sealant bottle as soon as
possible, or another puncture will leave
you stranded.
0·10 Weekly checks
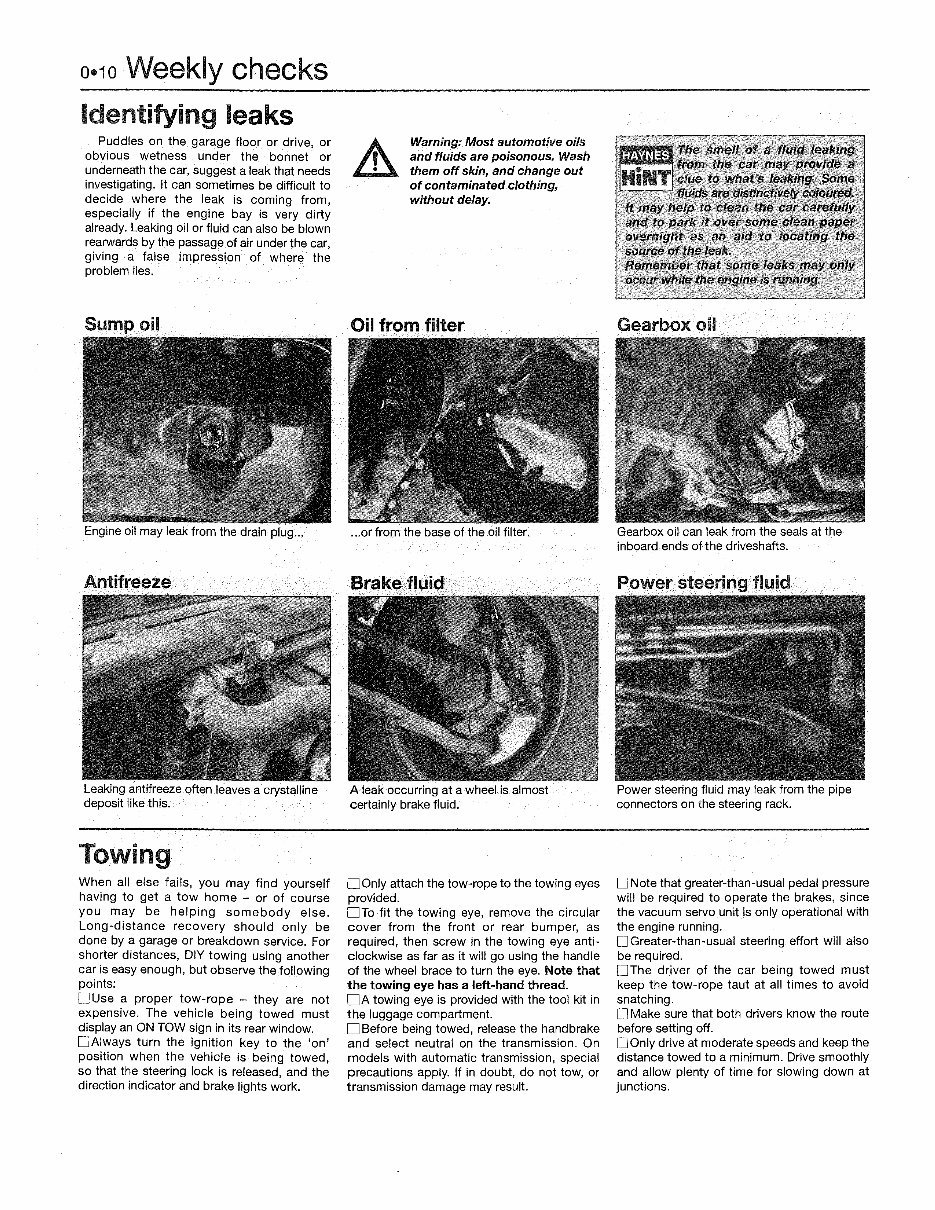
Identifying leaks
Puddles on the garage floor or drive, or
obvious wetness under the bonnet or
underneath the car, suggest a leak that needs
investigating. It can sometimes be difficult to
decide where the leak is coming from,
especially if the engine bay is very dirty
already. Leaking oil or fluid can also be blown
rearwards by the passage of air under the car,
giving a false impression of where the
problem lies.
Sump oil
Engine oil may leak from the drain plug ...
Antifreeze
Leaking antifreeze often leaves a crystalline
deposit like this.
Towing
When all else fails, you may find yourself
having to get a tow home - or of course
you may be helping somebody else.
Long-distance recovery should only be
done by a garage or breakdown service. For
shorter distances, DIY towing using another
car is easy enough, but observe the following
points:
D Use a proper tow-rope they are not
expensive. The vehicle being towed must
display an ON TOW sign in its rear window.
DAlways turn the ignition key to the 'on'
position when the vehicle is being towed,
so that the steering lock is released, and the
direction indicator and brake lights work.
Warning: Most automotive oils
and fluids are poisonous. Wash
them off skin, and change out
of contaminated clothing,
without delay.
Oil from filter
... or from the base of the oil filter.
Brake fluid
A leak occurring at a wheel is almost
certainly brake fluid.
D Only attach the tow-rope to the towing eyes
provided.
DTo fit the towing eye, remove the circular
cover from the front or rear bumper, as
required, then screw in the towing eye anti-
clockwise as far as it will go using the handle
of the wheel brace to turn the eye. Note that
the towing eye has a left-hand thread.
DA towing eye is provided with the tool kit in
the luggage compartment.
D Before being towed, release the handbrake
and select neutral on the transmission. On
models with automatic transmission, special
precautions apply. If in doubt, do not tow, or
transmission damage may result.
'the smell of a. fluid leahtng
from the car may provld~.a
clue to .what's Ieakin{l, So1m1
t '----" fluids are distinct.lvefy coloured.
It may help to clean ·tne· car carefully
and to park it over some ~ean paper
overnight as an aid to locating the
source of the fttatt •.
Remember that some leaks may only
isnmnjng.
Gearbox oil
Gearbox oil can leak from the seals at the
inboard ends of the driveshafts.
Power steering fluid
Power steering fluid may leak from the pipe
connectors on the steering rack.
D Note that greater-than-usual pedal pressure
will be required to operate the brakes, since
the vacuum servo unit is only operational with
the engine running.
D Greater-than-usual steering effort will also
be required.
[]The driver of the car being towed must
keep the tow-rope taut at all times to avoid
snatching.
D Make sure that both drivers know the route
before setting off.
LJ Only drive at moderate speeds and keep the
distance towed to a minimum. Drive smoothly
and allow plenty of time for slowing down at
junctions.
You're Reading a Preview
What's Included?
 Lifetime Access
Fast Download Speeds
Online & Offline Access
Access PDF Contents & Bookmarks
Full Search Facility
Print one or all pages of your manual
$33.99
2005-2010 Opel Vauxhall Zafira Petrol Diesel Service & Repair Manual
Viewed 60 Times Today

What's Included?
Lifetime Access
Fast Download Speeds
Online & Offline Access
Access PDF Contents & Bookmarks
Full Search Facility
Print one or all pages of your manual
$33.99

Secure transaction
What's Included?
Lifetime Access
Fast Download Speeds
Online & Offline Access
Access PDF Contents & Bookmarks
Full Search Facility
Print one or all pages of your manual
Description
Fix your 2005-2010 Opel Vauxhall Zafira petrol or diesel yourself. This service and repair manual gives you the exact procedures mechanics use, from routine maintenance to complete overhauls. Step-by-step instructions and detailed diagrams mean you can tackle engine work, electrics, transmission, suspension, and braking systems with confidence.
Download instantly and start your repair today. No subscriptions, no waiting. Print it out, keep it in your pocket, or pull it up on screen whenever you need it. Save hundreds in labour costs and get to know your Zafira inside out.


