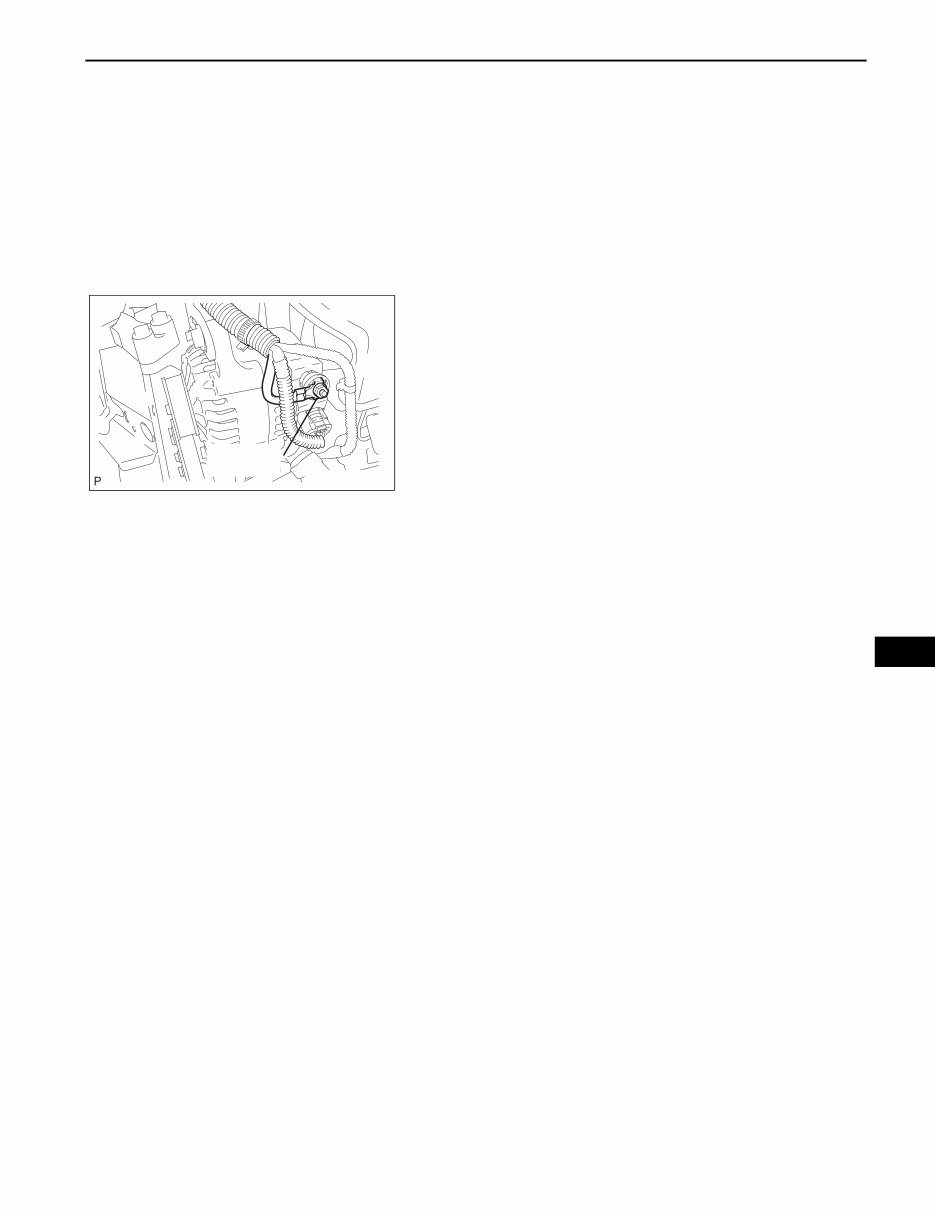
1NZ-FE CHARGING – CHARGING SYSTEM CH–1 CH CHARGING SYSTEM PRECAUTION 1. Check that the battery cables are connected to the correct terminals. 2. Disconnect the battery cables when the battery is given a quick charge. 3. Never disconnect the battery while the engine is running. 4. Check that the charging cable is tightly connected to terminal B of the generator. Terminal B A125204E01
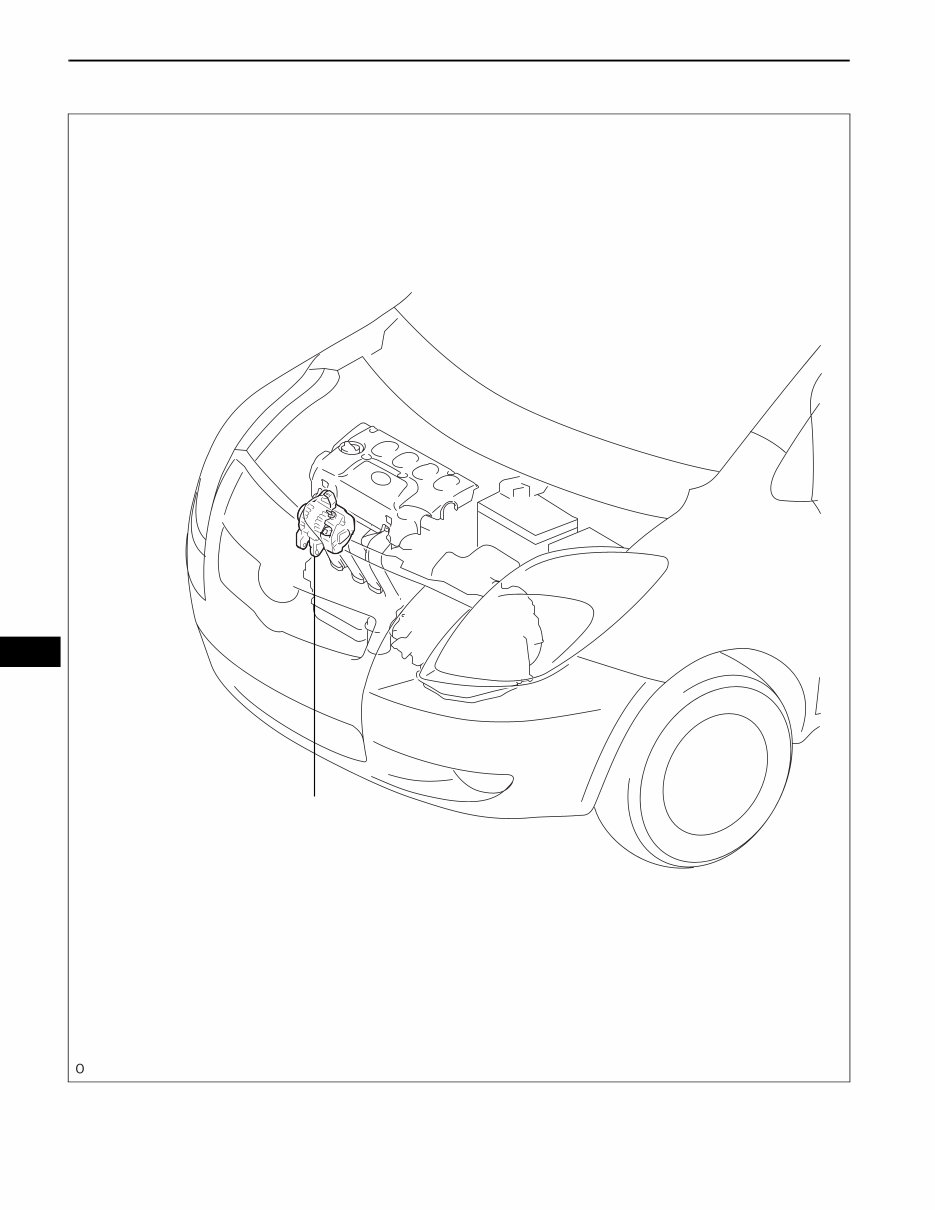
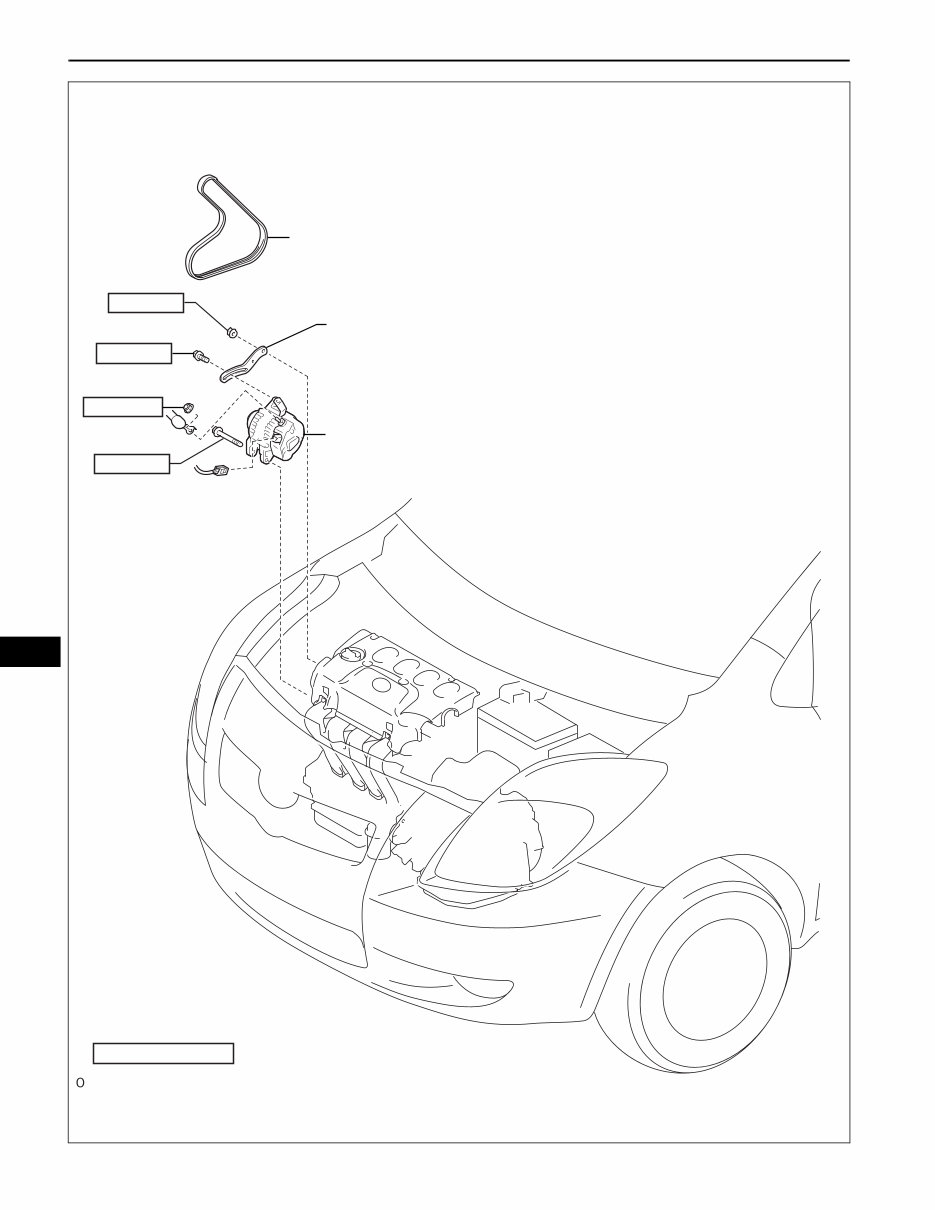
CH–2 1NZ-FE CHARGING – CHARGING SYSTEM CH PARTS LOCATION GENERATOR A119213E01
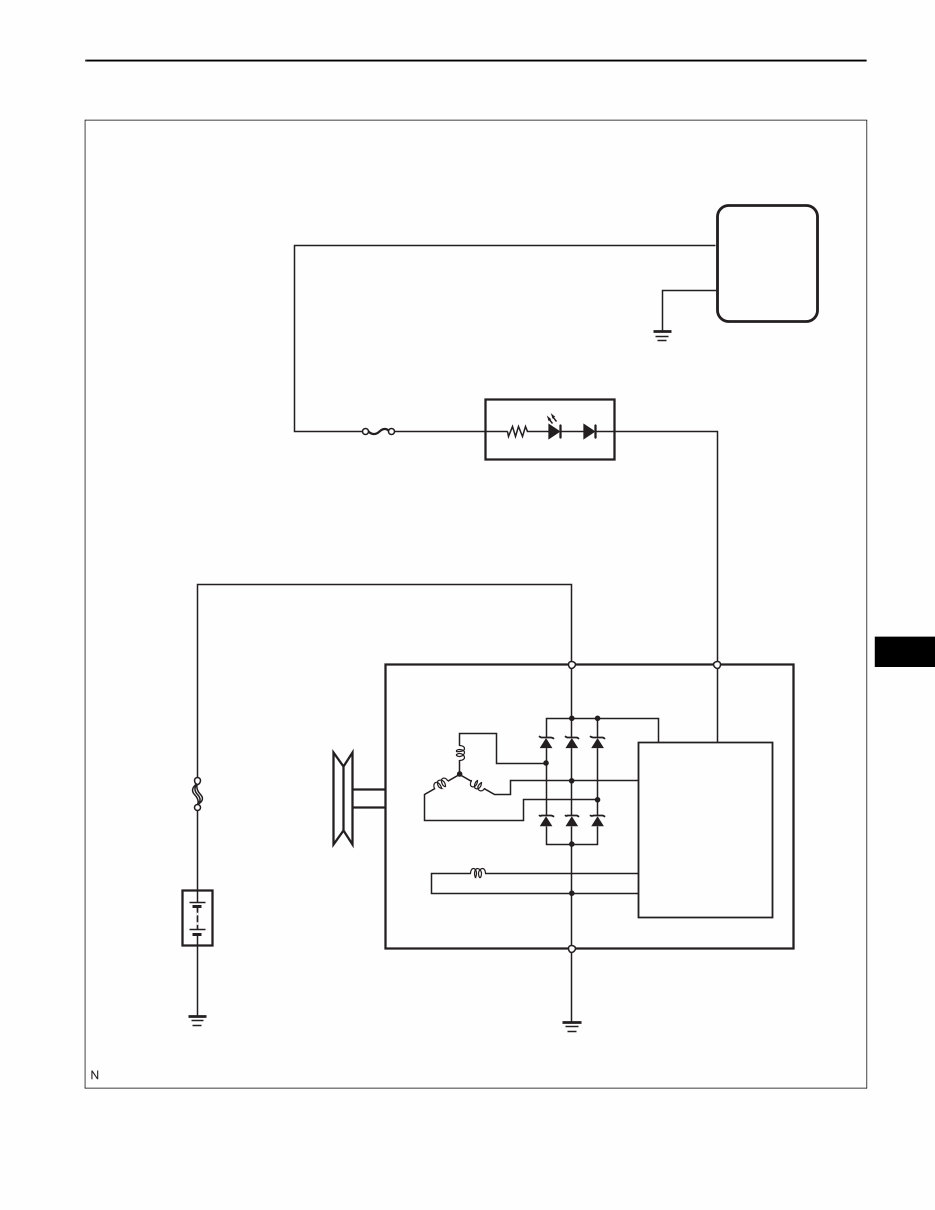
1NZ-FE CHARGING – CHARGING SYSTEM CH–3 CH SYSTEM DIAGRAM W Combination Meter 7.5A MET Charge Generator FL MAIN Battery IC Regulator EC ECM B L E A119142E01
CH–4 1NZ-FE CHARGING – CHARGING SYSTEM CH ON-VEHICLE INSPECTION CAUTION: If the battery is weak or if the engine is difficult to start, recharge the battery and perform the inspections again before returning the vehicle to the customer. 1. CHECK BATTERY CONDITION (a) Check the battery for damage and deformation. If severe damage, deformation or leakage is found, replace the battery. (b) Check the volume of electrolyte in each cell. (1) For batteries that are maintenance-free: • If the electrolyte volume is below the lower line, replace the battery. • If the electrolyte volume is above the lower line, check the battery voltage when cranking the engine. • If the voltage is less than 9.6 V, recharge or replace the battery. HINT: Before checking the battery voltage, turn off all the electrical systems (headlights, blower motor, etc.). (2) For batteries that are not maintenance-free: • If the electrolyte volume is below the lower line, add distilled water to each cell. Then, recharge the battery and check the specific gravity of the electrolyte. Standard specific gravity: 1.25 to 1.29 at 20 °C ( 68 °F) If the electrolyte volume is above the lower line, check the battery voltage when cranking the engine. If the voltage is less than 9.6 V, recharge or replace the battery. HINT: Before checking the battery voltage, turn off all the electrical systems (headlights, blower motor, rear defogger, etc.). 2. CHECK BATTERY TERMINAL AND FUSE (a) Check that the battery terminals are not loose or corroded. If the terminals are corroded, clean the terminals. (b) Measure the resistance of the H-fuse and fuses. Standard resistance: Below 1 Ω If the results are not as specified, replace the fuses as necessary.
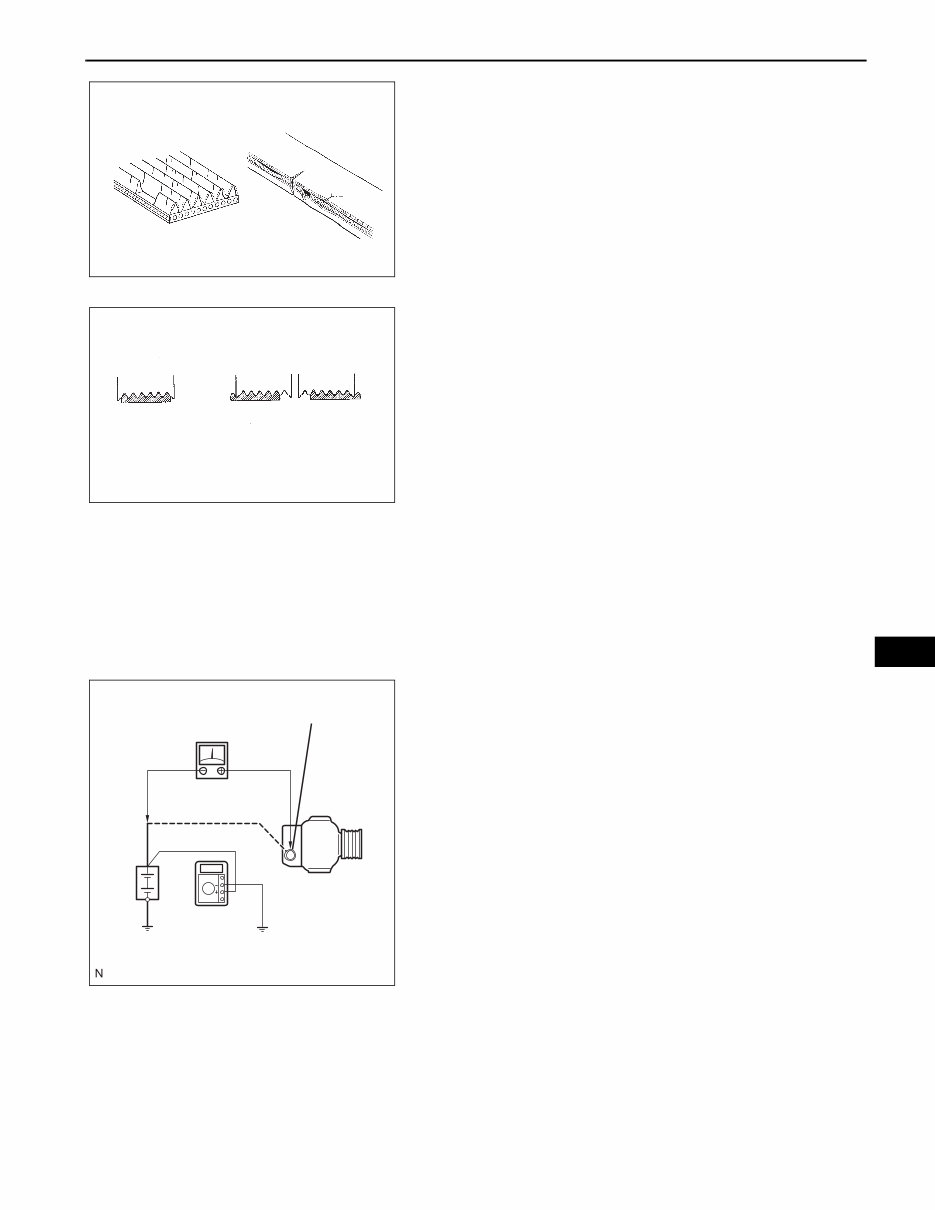
1NZ-FE CHARGING – CHARGING SYSTEM CH–5 CH 3. CHECK V-RIBBED BELT (a) Check the belt for wear, cracks and other signs of damage. If any defects are found, replace the V-ribbed belt. HINT: Replace the drive belt if any of the following defects are found: • The belt is worn out and the wire is exposed. • The cracks reach the wire in more than one place. • The belt has pieces missing from the ribs. (b) Check that the belt fits properly into the ribbed grooves. HINT: With your hand, confirm that the belt has not slipped out of the grooves on the bottom of the pulley. 4. VISUALLY CHECK GENERATOR WIRING (a) Check that the wiring is in good condition. 5. LISTEN FOR ABNORMAL NOISES FROM GENERATOR (a) Check that the generator does not emit any abnormal noise while the engine is running. 6. CHECK CHARGE WARNING LIGHT CIRCUIT (a) Turn the ignition switch on (IG). Check that the charge warning light turns on. (b) Start the engine and check that the light turns off. If the light does not operate as specified, troubleshoot the charge warning light circuit. 7. CHECK CHARGING CIRCUIT WITHOUT LOAD (a) Connect a voltmeter and an ammeter to the charging circuit as follows. HINT: If a battery/generator tester is available, connect the tester to the charging circuit in accordance with the manufacturer's instructions. (1) Disconnect the wire from terminal B of the generator and connect it to the negative (-) ammeter lead. (2) Connect the positive (+) ammeter lead to terminal B of the generator. (3) Connect the positive (+) voltmeter lead to positive (+) battery terminal. (4) Ground the negative (-) voltmeter lead. (b) Check the charging circuit. (1) Keep the engine speed at 2,000 rpm and check the reading on the ammeter and voltmeter. Standard current: 10 A or less Standard voltage: 13.2 to 14.8 V If the result is not as specified, replace the generator. INCORRECT B000543E03 CORRECT INCORRECT B075171E06 V A Ammeter Battery Voltmeter Generator Terminal B A125200E01
CH–6 1NZ-FE CHARGING – CHARGING SYSTEM CH HINT: If the battery is not fully charged, the ammeter reading will sometimes be more than the standard amperage. 8. CHECK CHARGING CIRCUIT WITH LOAD (a) With the engine running at 2,000 rpm, turn on the high beam headlights and turn the heater blower switch to the HI position. (b) Check the reading on the ammeter. Standard current: 30 A or more If the ammeter reading is less than the standard current, replace the generator. HINT: If the battery is fully charged, the ammeter reading will sometimes be less than the standard current. In this case, operate the wiper motor and the window defogger to increase the load and then check the charging circuit again.
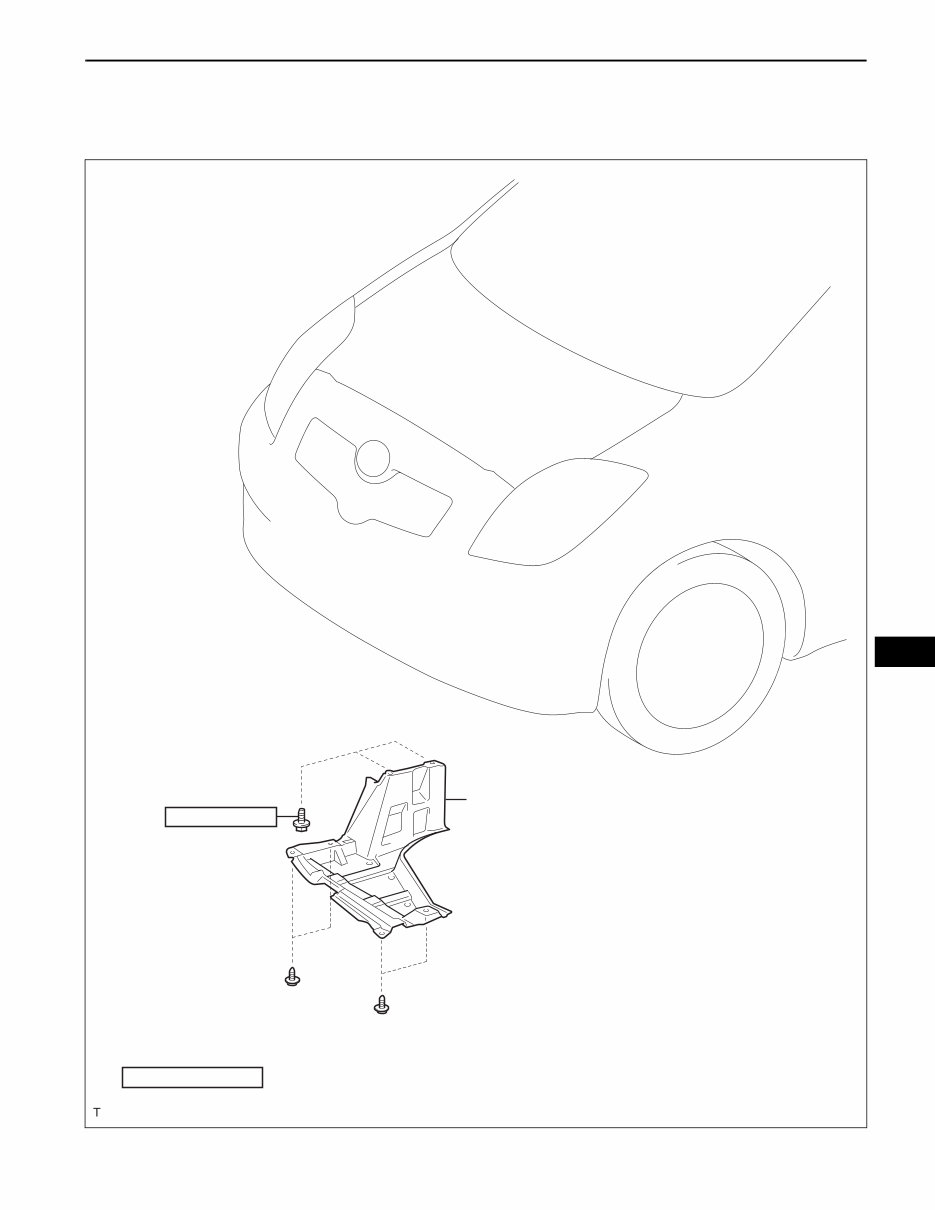
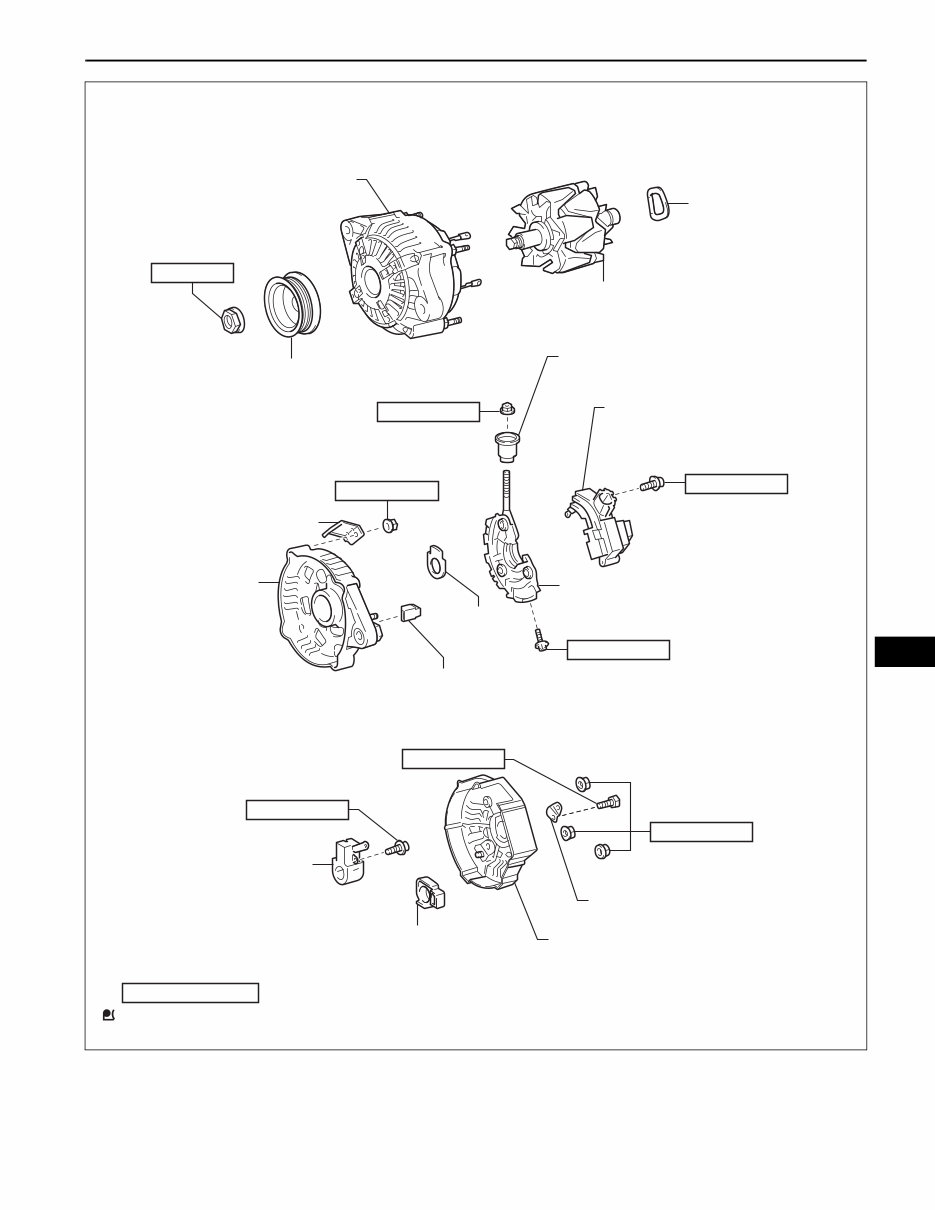
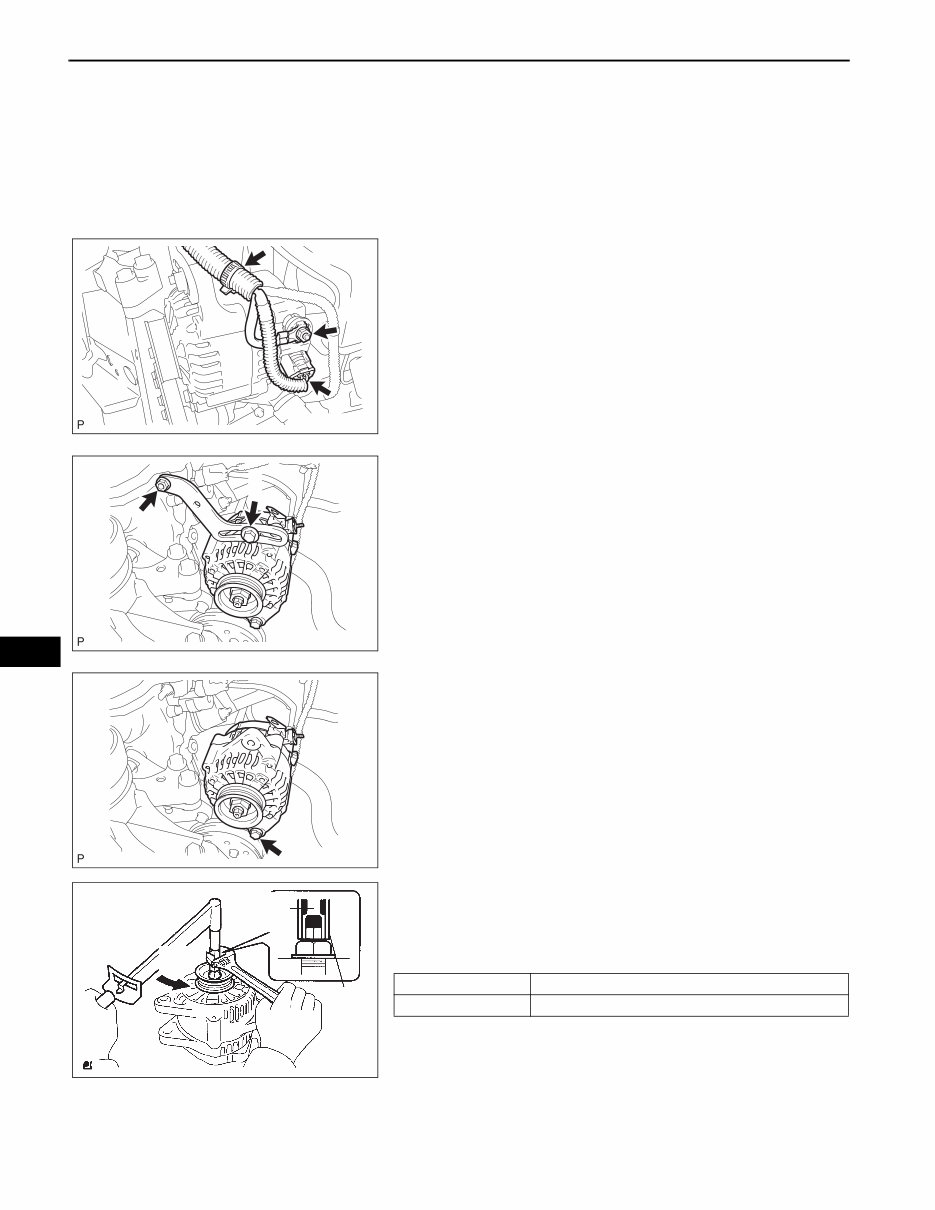
CH–10 1NZ-FE CHARGING – GENERATOR CH REMOVAL 1. DISCONNECT CABLE FROM NEGATIVE BATTERY TERMINAL 2. REMOVE ENGINE UNDER COVER RH 3. REMOVE FAN AND GENERATOR V BELT (See page EM-7) 4. REMOVE GENERATOR ASSEMBLY (a) Remove the terminal cap. (b) Separate the connector and the harness clamp. (c) Remove the nut and remove terminal B. (d) Remove fan belt adjusting slider fixing bolts A and B and remove the fan belt adjusting slider. (e) Remove fixing bolt B and remove the generator. DISASSEMBLY 1. REMOVE GENERATOR PULLEY SST 09820-63010 (09820-06010, 09820-06020) HINT: (a) Hold SST 1-A with a torque wrench, and tighten SST 1-B clockwise to the specified torque. Torque: 39 N*m (400 kgf*cm, 29 ft.*lbf) NOTICE: Check that SST is securely fitted onto the generator rotor shaft. A115418 B A A115419E01 B A115420E01 Turn Hold SST 1-B SST 1-A A067417E01 SST 1-A and B 09820 - 06010 SST 2 09820 - 06020
The 2006-2011 Toyota Yaris Service & Repair Manual is an essential resource for maintaining and repairing your Toyota Yaris. Developed by Toyota, this manual provides detailed instructions and precise specifications to ensure accurate maintenance and effective troubleshooting.
Inside, you'll find comprehensive procedures for routine maintenance tasks such as oil changes, brake inspections, and tire rotations. The manual also covers more complex repairs, including engine diagnostics, transmission servicing, and electrical system troubleshooting. Detailed diagrams and illustrations help identify components and ensure that repairs are performed correctly and efficiently.
Designed for professional technicians and experienced DIY enthusiasts, this manual delivers the critical technical information needed to keep your 2006-2011 Toyota Yaris running smoothly. By following the detailed guidance provided, you can ensure long-term reliability and optimal performance, maximizing the operational lifespan of your vehicle.
Printable: Yes Language: English Compatibility: Pretty much any electronic device, incl. PC & Mac computers, Android and Apple smartphones & tablet, etc. Requirements: Adobe Reader (free)