1995-2000 Toyota Avalon Workshop Repair And Service Manual
What's Included?
Lifetime Access
Fast Download Speeds
Offline Viewing
Access Contents & Bookmarks
Full Search Facility
Print one or all pages of your manual
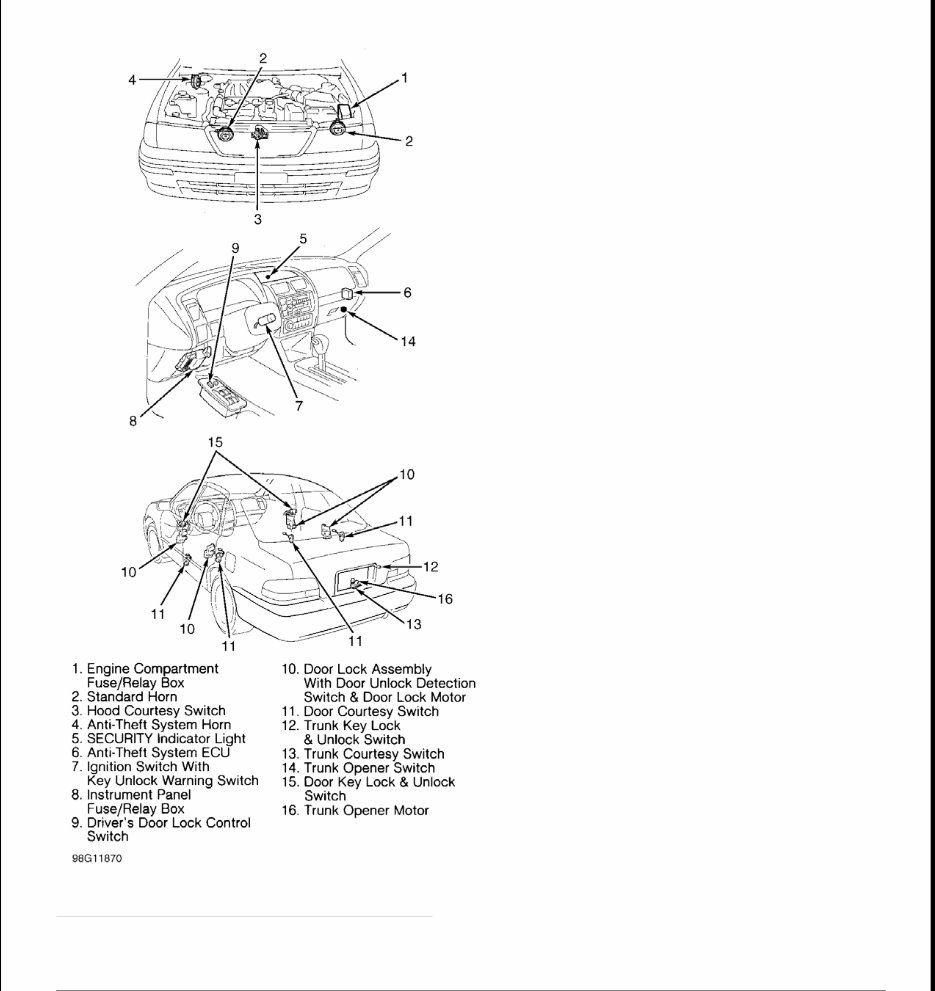
1998 ACCESSORIES & EQUIPMENT Anti-Theft Systems - Avalon DESCRIPTION Anti-theft system is designed to sound horns, and flash headlights and taillights for one minute if any door or trunk is opened without using ignition key or remote control for keyless entry system, hood is opened, or if battery is disconnected and reconnected when vehicle is locked. Anti-theft system will also lock any door not previously locked. Anti-theft system consists of standard horns, anti-theft system horn, hood courtesy switch, anti-theft system Electronic Control Unit (ECU), SECURITY indicator light, ignition switch with key unlock warning switch, door lock assemblies with door unlock detection switches and door lock motors, door courtesy switches, door key lock and unlock switches, trunk opener switch, trunk key lock and unlock switch, and trunk courtesy switch. See Fig. 1 . WARNING: Deactivate air bag system before performing any service operation. See AIR BAG RESTRAINT SYSTEMS article. DO NOT apply electrical power to any component on steering column without first deactivating air bag system. Air bag may deploy. NOTE: Anti-theft system may also be referred to as theft deterrent system.
Fig. 1: Locating Anti - Theft System Components Courtesy of TOYOTA MOTOR SALES, U.S.A., INC. OPERATION
Anti-theft system sets when ignition key is removed from ignition, passengers are removed and hood is closed, and all doors and trunk are closed and locked. On models with power door locks, doors may not be locked if key is in ignition. There is a 30-second preparation time period while doors are locked before system is set. SECURITY indicator light will come on when all doors, trunk and hood are closed. SECURITY indicator light is located on center of instrument panel, just above air outlets above stereo. After 30 seconds, anti-theft system will automatically set and SECURITY indicator light will flash. When anti-theft system is set and SECURITY indicator light is flashing, ignition key or remote control for keyless entry system must be used to open any door or trunk. If SECURITY indicator light is off, anti-theft system is inactive and any door, trunk or hood may be opened without activating anti-theft system. If any door or trunk is opened without using ignition key or remote control for keyless entry system, hood is opened, if battery is disconnected and reconnected when vehicle is locked, or panic signal is received from remote control for keyless entry system, anti-theft system will sound horns, and flash headlights and taillights for one minute. Anti-theft system will also lock any door not previously locked. If all doors are not locked at once, anti-theft system will repeat door locking operation every .55 second during one-minute alarm interval. After one minute, alarm and flashing headlights and taillights will stop and SECURITY indicator light will start flashing again. Anti-theft system operation may be cancelled by turning ignition switch from LOCK to ON position, unlocking any door using ignition key or remote control for keyless entry system, or by opening trunk using ignition key or remote control for keyless entry system. Anti-theft system operation may also be cancelled if an unlock signal is received when system is set by signal from PANIC button on remote control for keyless entry system. Anti-theft system has an active arming mode and a passive arming mode. In active arming mode, anti-theft system will set once ignition key is removed from ignition, hood is closed and all doors and trunk are closed and locked by using ignition key or remote control for keyless entry system. For additional information on active arming mode, see ACTIVE ARMING MODE under SYSTEM PRELIMINARY INSPECTION under TROUBLE SHOOTING. In passive arming mode, anti-theft system will set automatically once ignition key is removed from ignition, and all doors, trunk and hood are closed. Passive arming mode may be turned on or off by programming of passive arming mode. For additional information on passive arming mode, see PASSIVE ARMING MODE under SYSTEM PRELIMINARY INSPECTION under TROUBLE SHOOTING. For additional information for programming of passive arming mode, see PASSIVE ARMING MODE under PROGRAMMING. PROGRAMMING PASSIVE ARMING MODE 1. Remove ignition key from ignition lock cylinder. Ensure all doors, hood and trunk are closed and unlocked. NOTE: Passive arming mode may be turned on or off by performing programming procedure. When passive arming mode is turned off, anti-theft system will be in active arming mode.
2. Lock and unlock any of the doors 3 times by using ignition key or remote control for keyless entry system. Open driver's door. Lock and unlock driver's door 3 times by using door lock knob on door. After 2 seconds, anti-theft system will now start force lock. 3. To turn passive mode on, go to next step. To turn passive mode off, go to step 5 . 4. Within 10 seconds, unlock driver's door by using door lock knob on door. Open and close driver's door 4 times, and then lock and unlock driver's door by using door lock knob on door. After 2 seconds, anti-theft system will now start force lock and passive arming mode will be turned on. 5. Within 10 seconds, unlock driver's door by using door lock knob on door. Open and close driver's door 2 times, and then lock and unlock driver's door by using door lock knob on door. After 2 seconds, anti-theft system will now start force lock and passive arming mode will be turned off. TROUBLE SHOOTING SYSTEM PRELIMINARY INSPECTION Active Arming Mode 1. Remove ignition key from ignition. Ensure all doors, hood and trunk are closed and unlocked. Use any of the following methods to lock doors: z Use ignition key to lock driver's or passenger's door. This will lock all remaining doors, trunk and hood. z Use remote control for keyless entry system to lock any door. This will lock all remaining doors, trunk and hood. z If driver's or passenger's front door is unlocked when both rear doors are already locked, lock and close remaining unlocked door. This will lock all remaining doors, trunk and hood. z If all doors are closed and locked, with hood and/or trunk open, close hood and/or trunk. All doors and hood and trunk will now be locked. 2. After 30 seconds, anti-theft system will automatically set and SECURITY indicator light will flash. SECURITY indicator light is located on center of instrument panel, just above air outlets above stereo. NOTE: Step 2 must be fully performed within 30 seconds to obtain proper programming. NOTE: Before trouble shooting anti-theft system, ensure power door locks and keyless entry system operate properly and then perform system preliminary inspection to ensure proper operation of anti-theft system. See DOOR LOCKS - POWER and KEYLESS ENTRY SYSTEM articles. NOTE: Anti-theft system has an active arming mode and a passive arming mode. In active arming mode, anti-theft system will set once ignition key is removed from ignition, hood is closed, and all doors and trunk are closed and locked by using ignition key or remote control for keyless entry system. In passive arming mode, anti-theft system will set automatically once ignition key is removed from ignition, and all doors, trunk and hood are closed.
3. If any door or trunk is opened without using ignition key or remote control for keyless entry system, hood is opened, battery is disconnected and reconnected when vehicle is locked, or panic signal is received from remote control for keyless entry system, anti-theft system will sound horns, and flash headlights and taillights for one minute. Anti-theft system will also lock any door not previously locked. If anti-theft system is not operating properly, determine under what conditions that system does not operate or malfunctions and then perform specified test listed under SYSTEM TESTS. See TROUBLE SHOOTING SYMPTOMS table. Passive Arming Mode 1. Remove ignition key from ignition. Open and close any door, hood or trunk. Ensure all doors, hood and trunk are closed. 2. After 30 seconds, anti-theft system will automatically set and SECURITY indicator light will flash. SECURITY indicator light is located on center of instrument panel, just above air outlets above stereo. 3. If any door or trunk is opened without using ignition key or remote control for keyless entry system, hood is opened, battery is disconnected and reconnected when vehicle is locked, or panic signal is received from remote control for keyless entry system, anti-theft system will sound horns, and flash headlights and taillights for one minute. Anti-theft system will also lock any door not previously locked. If anti-theft system is not operating properly, determine under what conditions that system does not operate or malfunctions and then perform specified system test listed under SYSTEM TESTS . See TROUBLE SHOOTING SYMPTOMS table. TROUBLE SHOOTING SYMPTOMS NOTE: If any door is locked using ignition key or remote control for keyless entry system, anti-theft system will be set to active arming mode. NOTE: Passive arming mode may be turned on or off by performing programming procedure so that passive arming mode does not automatically operate. See PASSIVE ARMING MODE under PROGRAMMING. Problem Circuit To Inspect (1) Test Anti-Theft System Cannot Be Set SECURITY Light Ckt 1 Anti-Theft ECU Power Source Ckt 2 Key Unlock Warning Switch Ckt 8 Trunk Key Lock & Unlock Switch Ckt 9 Trunk Courtesy Switch Ckt 10 Door Key Lock & Unlock Switch Ckt 13 Door Courtesy Switch Ckt 15 Hood Courtesy Switch Ckt 16
This highly detailed repair manual contains everything you will ever need to repair, maintain, rebuild, refurbish, and restore your Toyota Avalon.
This service repair and workshop manual consists of hundreds of pages including the following topics:
Complete Engine Service
Fuel System Service
Wiring Diagrams
Gearbox
Exhaust System
Suspension
Clutch Removal and Installation
Bodywork
Gearbox Service, Removal and Installation
Cooling System
Factory Maintenance Schedules
Plus More
Save hundreds if not thousands of pounds in repair and maintenance costs.
This manual covers:
All diagnostic and repair procedures and gives you access to the same information that professional technicians and mechanics have. You can view and print out the complete repair procedures with this manual.
Highly detailed printable diagrams:
Once you have found your information, just print it out and start work. No more messy manuals that you have to keep replacing or canÕt use any more due to wear and tear. Now you can print a fresh page as and when you need it.
Recently Viewed
5,521,897Happy Clients
2,594,462eManuals
1,120,453Trusted Sellers
15Years in Business
Price:
Actual Price:
1995-2000 Toyota Avalon Workshop Repair And Service Manual