

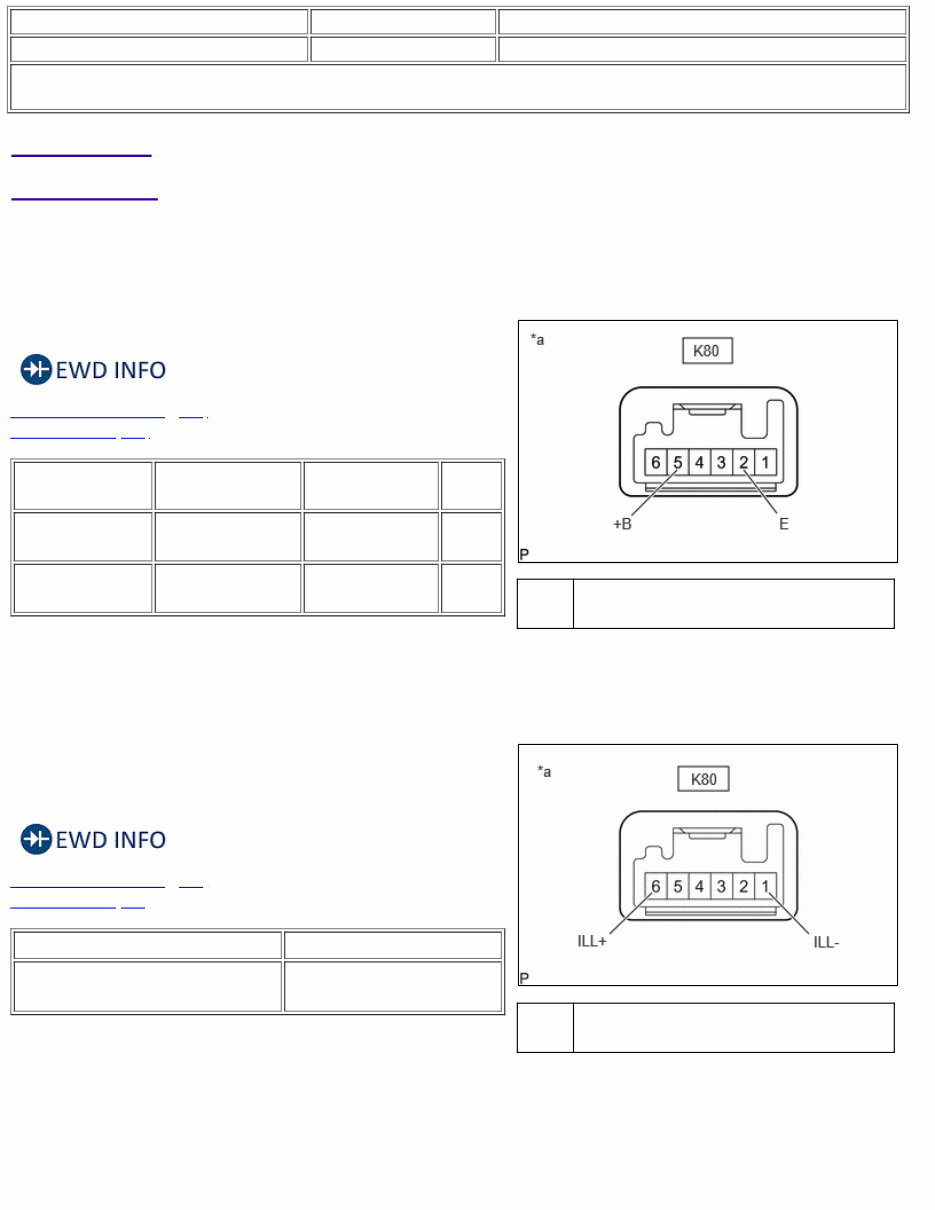
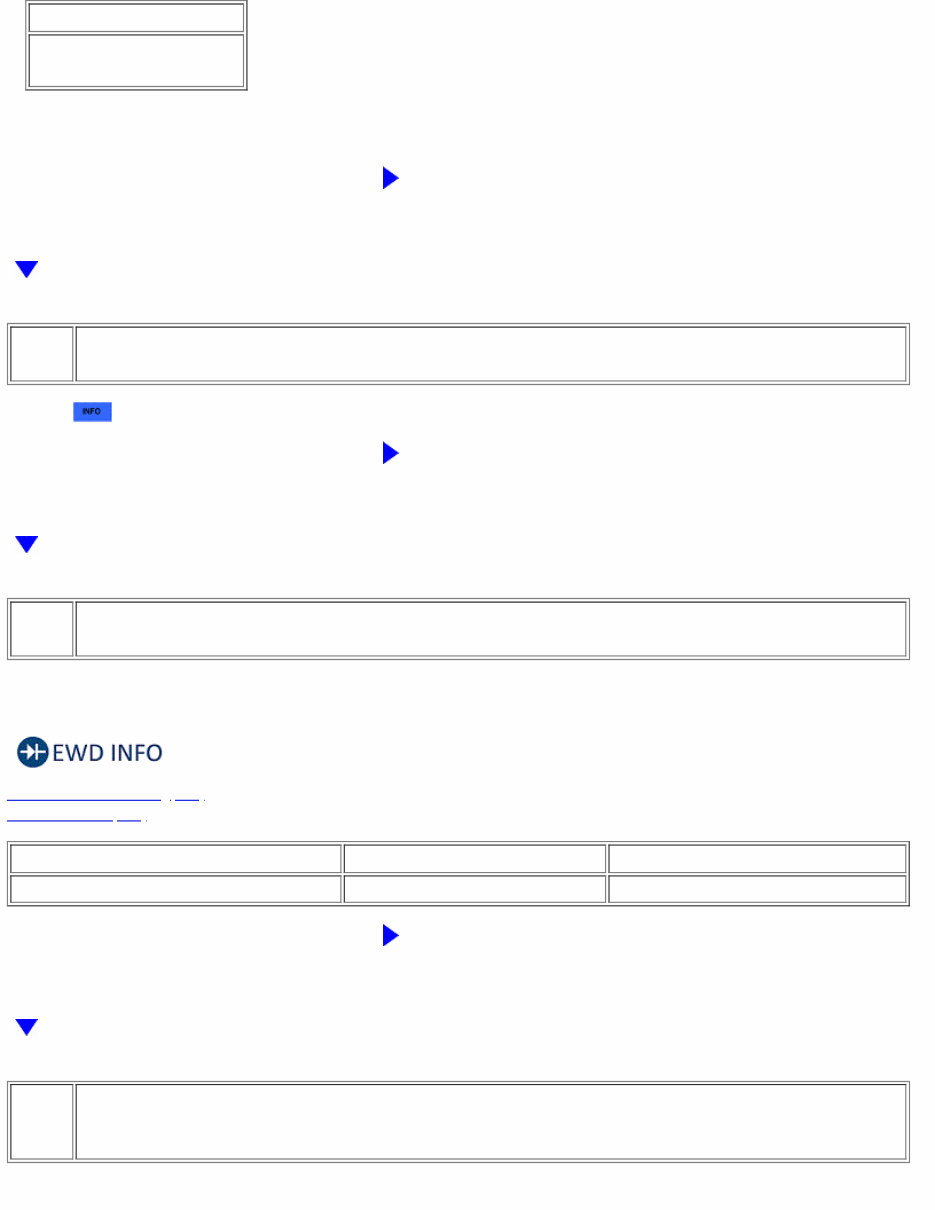
*a
Component without harness connected
(Auto High Beam Switch)
*a
Component without harness connected
(Auto High Beam Switch)
Last Modified: 11-21-2024 6.11:8.1.0 Doc ID: RM100000002OXUS
Model Year Start: 2025 Model: 4Runner Prod Date Range: [12/2024 - ]
Title: ADVANCED DRIVER ASSISTANCE SYSTEM: AUTOMATIC HIGH BEAM MAIN SWITCH: INSPECTION; 2025 MY 4Runner 4Runner HV
[12/2024 - ]
INSPECTION
PROCEDURE
1. INSPECT AUTO HIGH BEAM SWITCH
(a) Inspect the auto high beam switch.
(1) Measure the resistance according to the value(s) in the table below.
Standard Resistance:
Click Location & Routing(K80)
Click Connector(K80)
TESTER
CONNECTION
SWITCH CONDITION SPECIFIED
CONDITION
RESULT
K80-5 (+B) - K80-2
(E)
Auto high beam switch
OFF
10 kΩ or higher kΩ
K80-5 (+B) - K80-2
(E)
Auto high beam switch
ON
Below 1 Ω Ω
If the result is not as specified, replace the auto high beam switch.
(b) Check the illumination.
(1) Apply auxiliary battery voltage to the auto high beam switch and check
that the switch illuminates.
OK:
Click Location & Routing(K80)
Click Connector(K80)
TESTER CONNECTION SPECIFIED CONDITION
K80-6 (ILL+) - Auxiliary battery positive (+)
K80-1 (ILL-) - Auxiliary battery positive (-)
Auto high beam switch illuminates
If the result is not as specified, replace the auto high beam switch.
(c) Check the indicator illumination.
(1) Apply auxiliary battery voltage to the auto high beam switch and check
that the indicator lights illuminate.
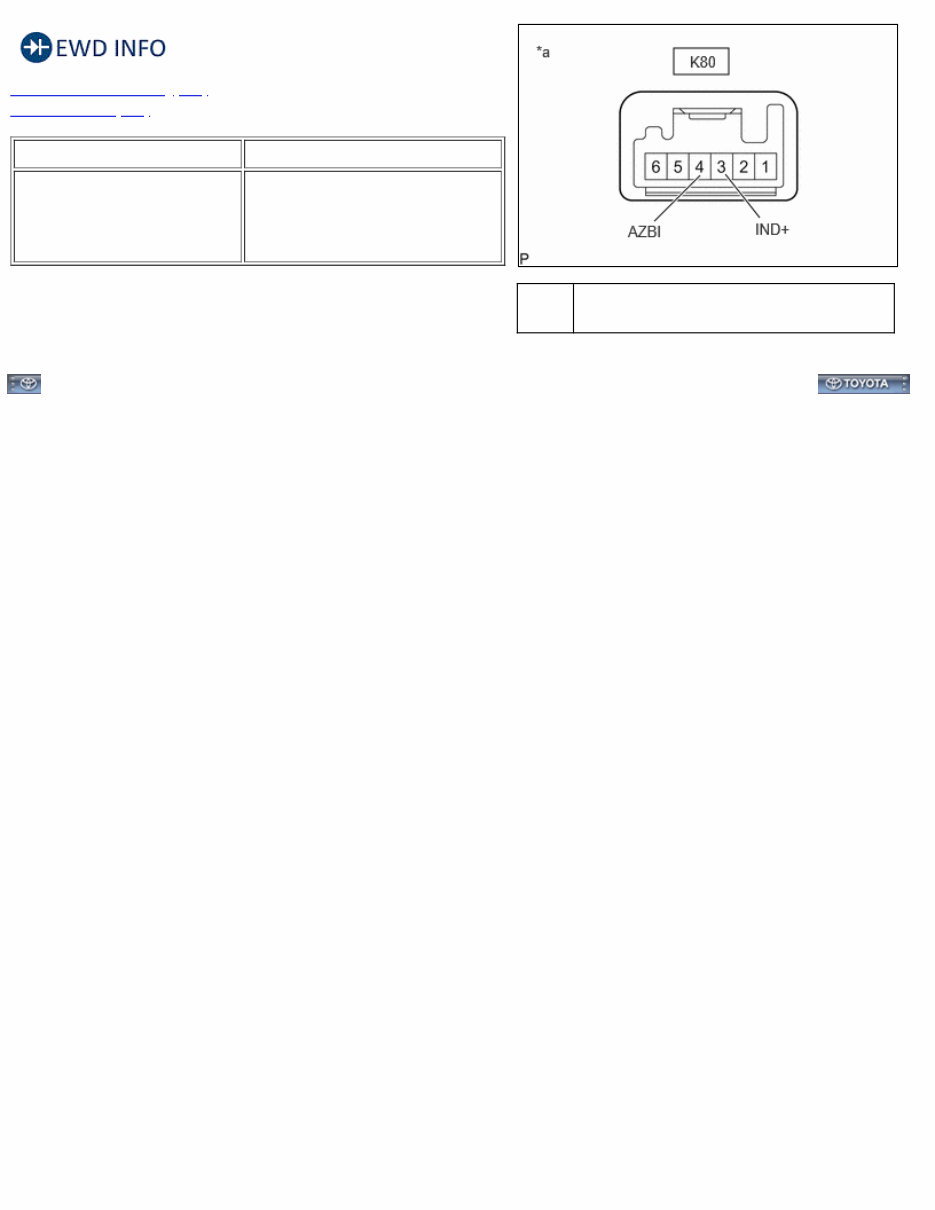
*a
Component without harness connected
(Auto High Beam Switch)
OK:
Click Location & Routing(K80)
Click Connector(K80)
TESTER CONNECTION SPECIFIED CONDITION
K80-3 (IND+) Auxiliary battery
positive (+)
K80-4 (AZBI) - Auxiliary battery
positive (-)
Auto high beam switch indicator lights
illuminates
If the result is not as specified, replace the auto high beam switch.
Last Modified: 11-21-2024 6.11:8.1.0 Doc ID: RM100000002OXUR
Model Year Start: 2025 Model: 4Runner Prod Date Range: [12/2024 - ]
Title: ADVANCED DRIVER ASSISTANCE SYSTEM: AUTOMATIC HIGH BEAM MAIN SWITCH: INSTALLATION; 2025 MY 4Runner 4Runner HV
[12/2024 - ]
INSTALLATION
CAUTION / NOTICE / HINT
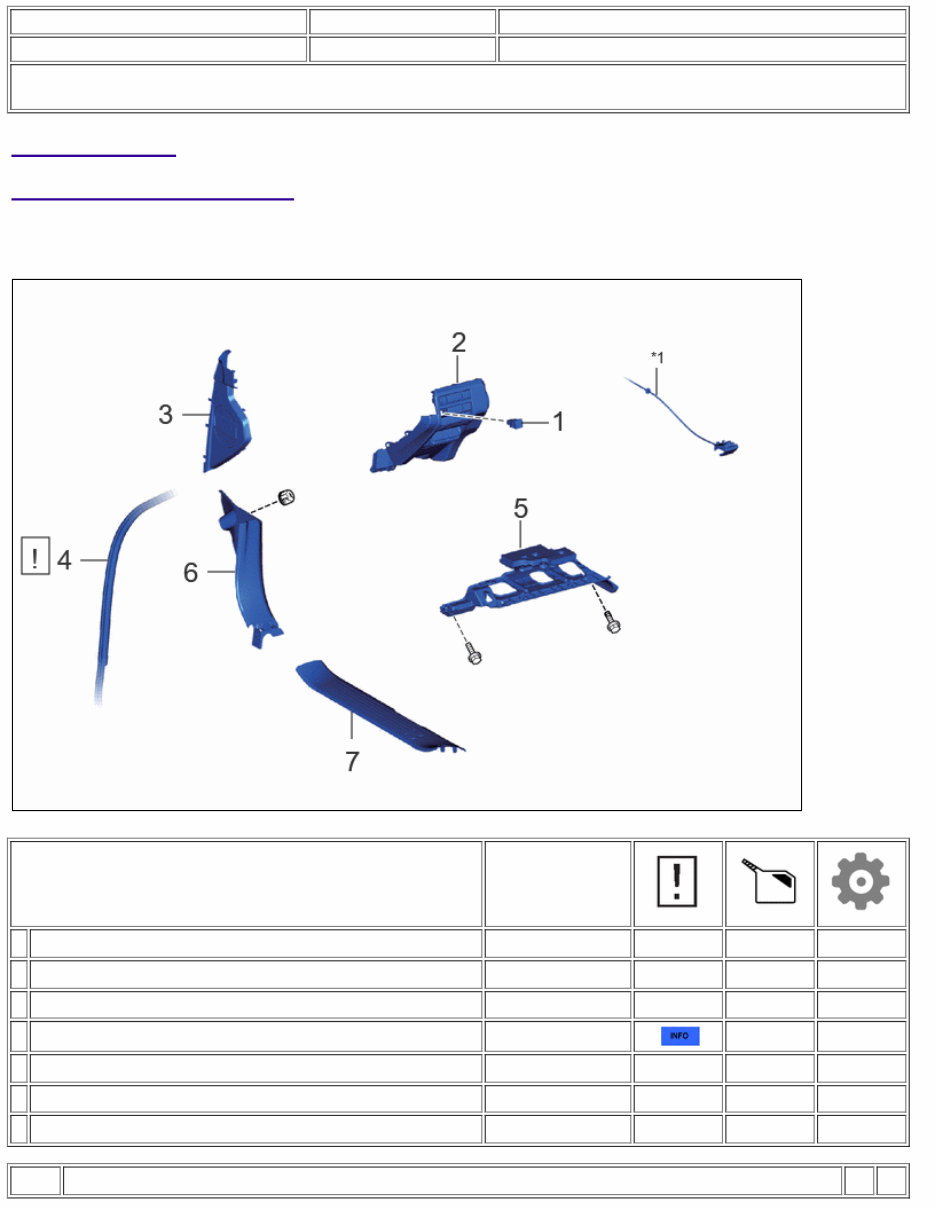
COMPONENTS (INSTALLATION)
PROCEDURE PART NAME CODE
1 AUTO HIGH BEAM SWITCH 84153 - - -
2 LOWER INSTRUMENT PANEL FINISH PANEL 55432B - - -
3 INSTRUMENT SIDE PANEL LH 55318C - - -
4 FRONT DOOR OPENING TRIM WEATHERSTRIP LH 62312B - -
5 NO. 1 INSTRUMENT PANEL UNDER COVER SUB-ASSEMBLY 55606 - - -
6 COWL SIDE TRIM SUB-ASSEMBLY LH 62112A - - -
7 FRONT DOOR SCUFF PLATE LH 67914B - - -
*1 HOOD LOCK CONTROL LEVER SUB-ASSEMBLY - -
PROCEDURE
1. INSTALL AUTO HIGH BEAM SWITCH
2. INSTALL LOWER INSTRUMENT PANEL FINISH PANEL
3. INSTALL INSTRUMENT SIDE PANEL LH
4. INSTALL FRONT DOOR OPENING TRIM WEATHERSTRIP LH
Click here
5. INSTALL NO. 1 INSTRUMENT PANEL UNDER COVER SUB-ASSEMBLY
6. INSTALL COWL SIDE TRIM SUB-ASSEMBLY LH
7. INSTALL FRONT DOOR SCUFF PLATE LH

Last Modified: 11-21-2024 6.11:8.1.0 Doc ID: RM100000002OXUQ
Model Year Start: 2025 Model: 4Runner Prod Date Range: [12/2024 - ]
Title: ADVANCED DRIVER ASSISTANCE SYSTEM: AUTOMATIC HIGH BEAM MAIN SWITCH: REMOVAL; 2025 MY 4Runner 4Runner HV
[12/2024 - ]
REMOVAL
CAUTION / NOTICE / HINT
COMPONENTS (REMOVAL)
PROCEDURE PART NAME CODE
1 FRONT DOOR SCUFF PLATE LH 67914B - - -
2 COWL SIDE TRIM SUB-ASSEMBLY LH 62112A - - -
3 NO. 1 INSTRUMENT PANEL UNDER COVER SUB-ASSEMBLY 55606 - -
4 FRONT DOOR OPENING TRIM WEATHERSTRIP LH 62312B - -
5 INSTRUMENT SIDE PANEL LH 55318C - - -
6 LOWER INSTRUMENT PANEL FINISH PANEL 55432B - -
7 AUTO HIGH BEAM SWITCH 84153 - - -
*1 HOOD LOCK CONTROL LEVER SUB-ASSEMBLY - -
PROCEDURE
1. REMOVE FRONT DOOR SCUFF PLATE LH
Click here
2. REMOVE COWL SIDE TRIM SUB-ASSEMBLY LH
Click here
3. REMOVE NO. 1 INSTRUMENT PANEL UNDER COVER SUB-ASSEMBLY
Click here
4. REMOVE FRONT DOOR OPENING TRIM WEATHERSTRIP LH
Pull back the front door opening trim weatherstrip LH so that the instrument side panel LH can be removed.
Click here
5. REMOVE INSTRUMENT SIDE PANEL LH
Click here
6. REMOVE LOWER INSTRUMENT PANEL FINISH PANEL
Click here
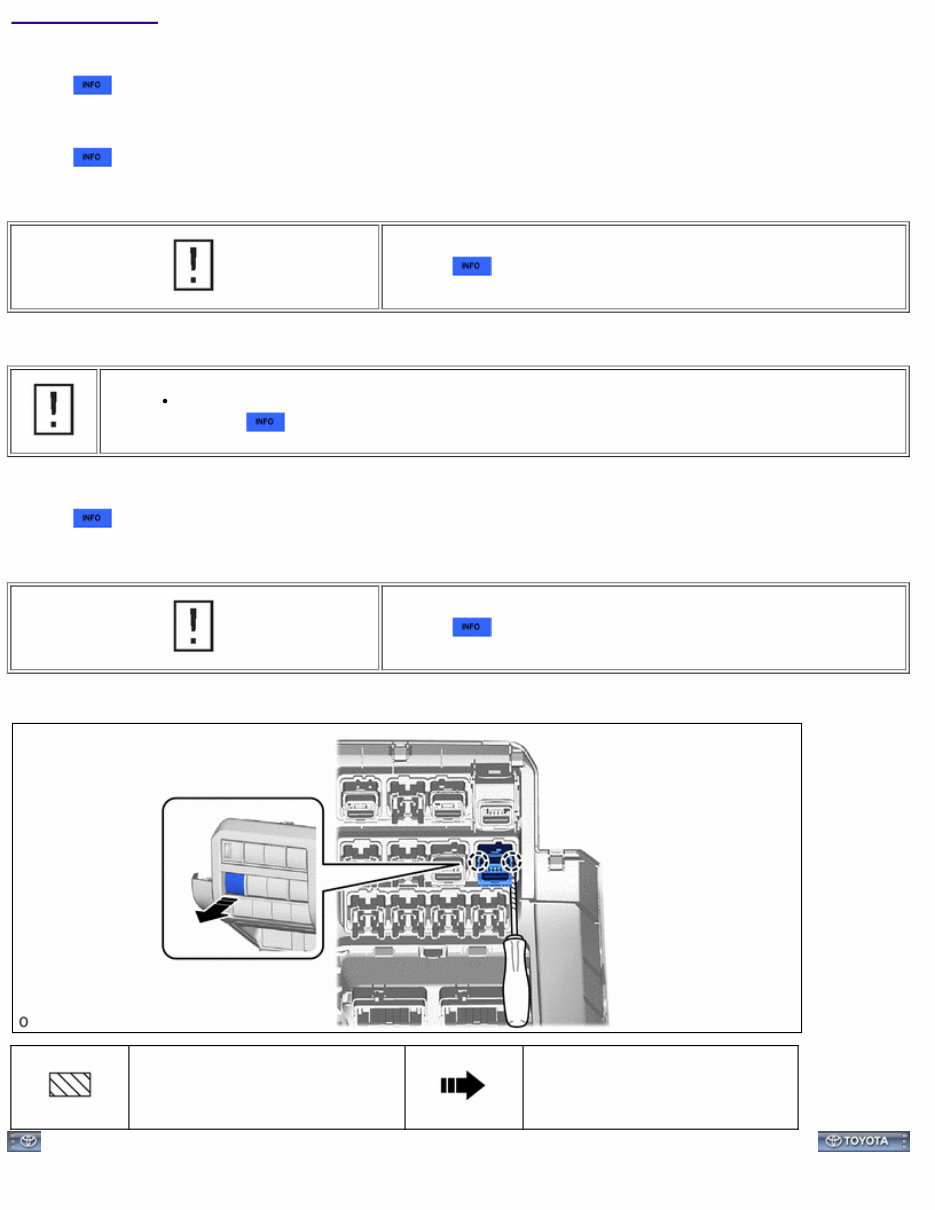
7. REMOVE AUTO HIGH BEAM SWITCH
Protective Tape Remove in this Direction
Last Modified: 11-21-2024 6.11:8.1.0 Doc ID: RM100000002OQUC
Model Year Start: 2025 Model: 4Runner Prod Date Range: [12/2024 - ]
Title: ADVANCED DRIVER ASSISTANCE SYSTEM: AUTOMATIC HIGH BEAM SYSTEM: Automatic High Beam Switch Circuit; 2025 MY 4Runner
4Runner HV [12/2024 - ]
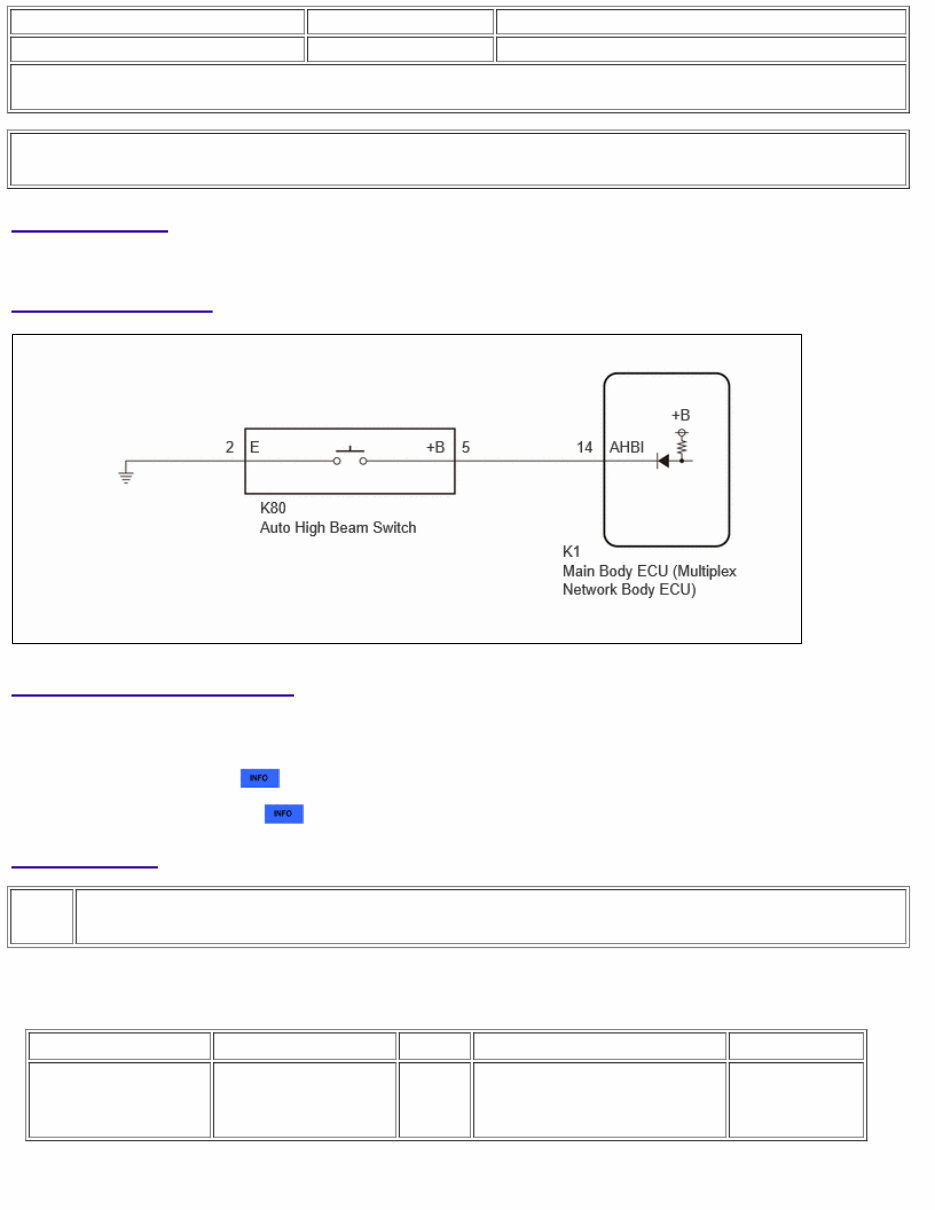
Automatic High Beam Switch Circuit
DESCRIPTION
The main body ECU (multiplex network body ECU) detects the ON/OFF signal of the auto high beam switch.
WIRING DIAGRAM
CAUTION / NOTICE / HINT
NOTICE:
Before replacing the main body ECU (multiplex network body ECU), refer to Registration.
for Gasoline Model: Click here
except Gasoline Model: Click here
PROCEDURE
1. READ VALUE USING GTS
(a) Read the Data List according to the display on the GTS.
Body Electrical > Main Body > Data List
TESTER DISPLAY MEASUREMENT ITEM RANGE NORMAL CONDITION DIAGNOSTIC NOTE
Auto High Beam Main Switch Auto high beam switch signal OFF or ON
OFF: Auto high beam switch not pressed
ON: Auto high beam switch pressed
-
Body Electrical > Main Body > Data List
NG
OK
TESTER DISPLAY
Auto High Beam Main Switch
OK:
Normal conditions listed above are displayed.
OK
PROCEED TO NEXT SUSPECTED AREA SHOWN IN PROBLEM SYMPTOMS
TABLE
2. INSPECT AUTO HIGH BEAM SWITCH
Click here
NG
REPLACE AUTO HIGH BEAM SWITCH
3.
CHECK HARNESS AND CONNECTOR (AUTO HIGH BEAM SWITCH - MAIN BODY ECU (MULTIPLEX NETWORK BODY
ECU) AND BODY GROUND)
(a) Disconnect the K1 main body ECU (multiplex network body ECU) connector.
(b) Measure the resistance according to the value(s) in the table below.
Standard Resistance:
Click Location & Routing(K80,K1)
Click Connector(K80)
Click Connector(K1)
TESTER CONNECTION CONDITION SPECIFIED CONDITION
K80-5 (+B) - K1-14 (AHBI) Always Below 1 Ω
K80-5 (+B) or K1-14 (AHBI) - Body ground Always 10 kΩ or higher
K80-2 (E) - Body ground Always Below 1 Ω
OK
REPLACE MAIN BODY ECU (MULTIPLEX NETWORK BODY ECU)
NG
REPAIR OR REPLACE HARNESS OR CONNECTOR
Last Modified: 11-21-2024 6.11:8.1.0 Doc ID: RM100000002OQUD
Model Year Start: 2025 Model: 4Runner Prod Date Range: [12/2024 - ]
Title: ADVANCED DRIVER ASSISTANCE SYSTEM: AUTOMATIC HIGH BEAM SYSTEM: Automatic High Beam Switch Indicator does not Come
ON; 2025 MY 4Runner 4Runner HV [12/2024 - ]
Automatic High Beam Switch Indicator does not Come ON
DESCRIPTION
When the automatic high beam system is on, the main body ECU (multiplex network body ECU) illuminates the auto high beam switch indicator.
WIRING DIAGRAM
CAUTION / NOTICE / HINT
NOTICE:
Inspect the fuses for circuits related to this system before performing the following procedure.
Before replacing the main body ECU (multiplex network body ECU), refer to Registration.
for Gasoline Model: Click here
except Gasoline Model: Click here
PROCEDURE
1. PERFORM ACTIVE TEST USING GTS
(a) Perform the Active Test according to the display on the GTS.
Body Electrical > Main Body > Active Test
TESTER DISPLAY MEASUREMENT ITEM CONTROL RANGE DIAGNOSTIC NOTE
Automatic High Beam Switch Light Auto high beam switch indicator light OFF or ON -
Body Electrical > Main Body > Active Test
NG
OK
OK
TESTER DISPLAY
Automatic High Beam Switch Light
OK:
Auto high beam switch indicator light illuminates.
OK
USE SIMULATION METHOD TO CHECK
2. INSPECT AUTO HIGH BEAM SWITCH
Click here
NG
REPLACE AUTO HIGH BEAM SWITCH
3. CHECK HARNESS AND CONNECTOR (AUTO HIGH BEAM SWITCH - AUXILIARY BATTERY)
(a) Measure the voltage according to the value(s) in the table below.
Standard Voltage:
Click Location & Routing(K80)
Click Connector(K80)
TESTER CONNECTION SWITCH CONDITION SPECIFIED CONDITION
K80-3 (IND+) - Body ground Ignition switch off 11 to 14 V
NG
REPAIR OR REPLACE HARNESS OR CONNECTOR
4.
CHECK HARNESS AND CONNECTOR (AUTO HIGH BEAM SWITCH - MAIN BODY ECU (MULTIPLEX NETWORK BODY
ECU))
(a) Disconnect the K1 main body ECU (multiplex network body ECU) connector.
You're Reading a Preview
What's Included?
Fast Download Speeds
Online & Offline Access
Access PDF Contents & Bookmarks
Full Search Facility
Print one or all pages of your manual
$57.99
2025 Toyota 4Runner 4Runner HV Service & Repair Manual
Viewed 17 Times Today

What's Included?
Fast Download Speeds
Online & Offline Access
Access PDF Contents & Bookmarks
Full Search Facility
Print one or all pages of your manual
$57.99

Secure transaction
What's Included?
Fast Download Speeds
Online & Offline Access
Access PDF Contents & Bookmarks
Full Search Facility
Print one or all pages of your manual
Description
The 2025 Toyota 4Runner Service & Repair Manual is a comprehensive technical guide designed for both professional mechanics and DIY enthusiasts. This manual provides detailed instructions on troubleshooting, repair, and maintenance of the 2025 Toyota 4Runner, covering all aspects of its inner workings.
- It includes detailed diagrams, specifications, and step-by-step procedures for conducting repairs, maintenance, and troubleshooting tasks.
- It is suitable for both professional mechanics and DIY enthusiasts who need in-depth knowledge to conduct more complex tasks.
- The manual provides technical guidance on how to diagnose and fix problems, as well as how to perform routine maintenance tasks.
- It is an essential resource for anyone who wants to understand and address the complexities of the 2025 Toyota 4Runner.
This manual is an invaluable resource for anyone who wants to fully utilize their 2025 Toyota 4Runner's capabilities and ensure its optimal performance and longevity.


