2006 Subaru Legacy Outback Service & Repair Manual
What's Included?
Lifetime Access
Fast Download Speeds
Offline Viewing
Access Contents & Bookmarks
Full Search Facility
Print one or all pages of your manual
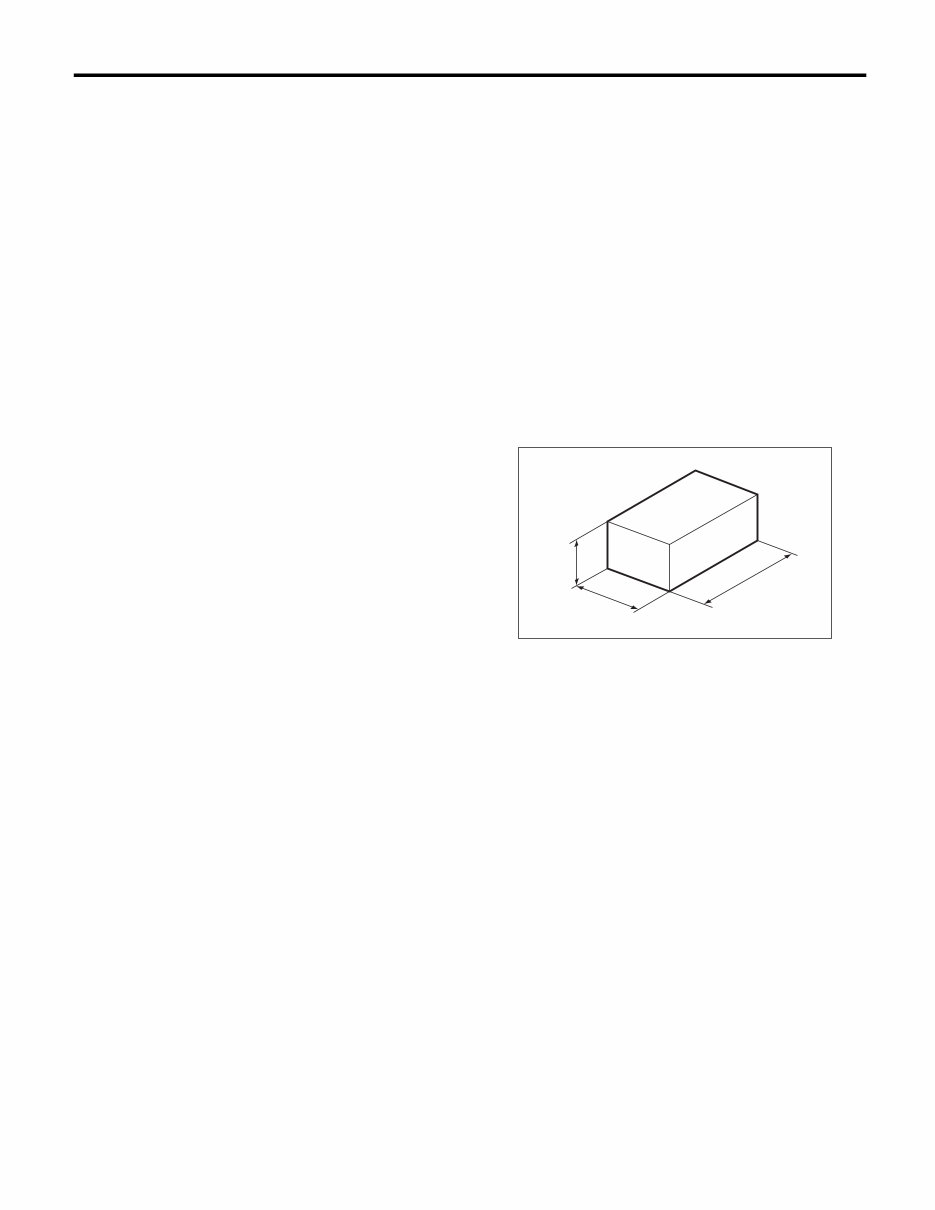
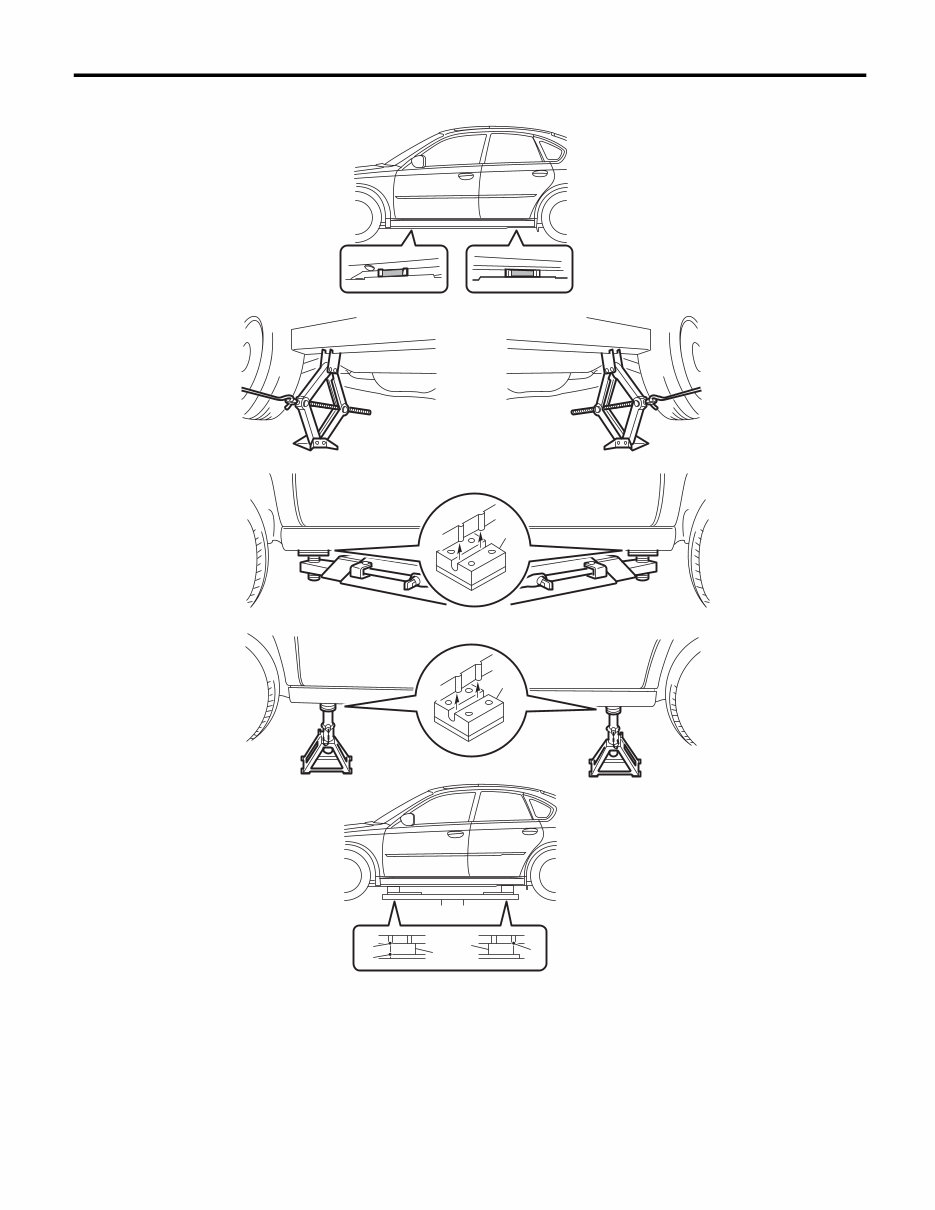
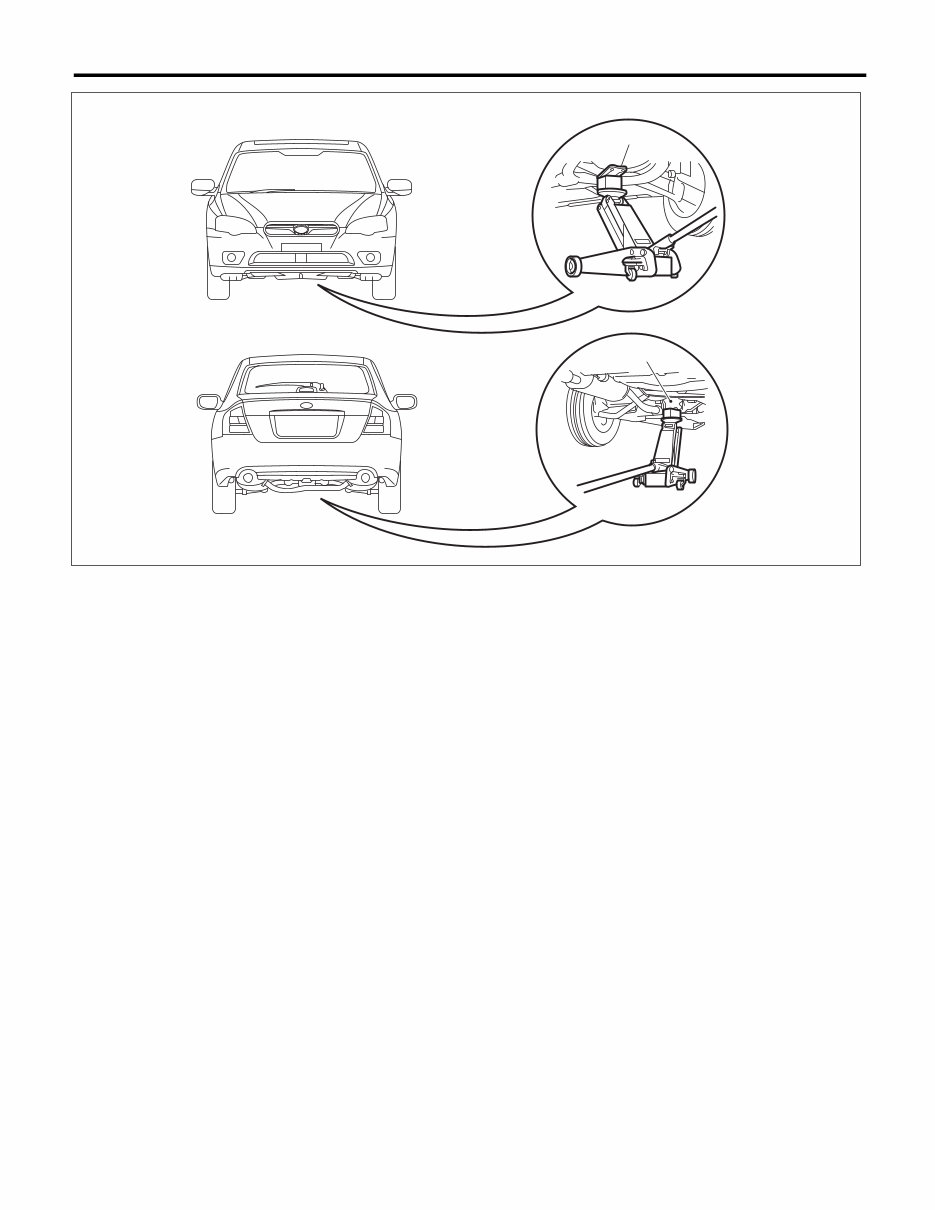
NT-2 Note NOTE 1. Note A: NOTE This is the information that can improve the effi- ciency of maintenance and assure the sound work. 1. FASTENERS NOTICE Fasteners are used to prevent the parts from dam- age, dislocation and play due to looseness. Fasten- ers must be tightened to the specified torque. Do not apply paint, lubricant, rust retardant or other substance to the surface around bolts, nuts, etc. Doing so will make it difficult to obtain the correct torque and result in looseness and other problem. 2. STATIC ELECTRICITY DAMAGE Do not touch the control modules, connectors, logic boards and other such parts when there is a possi- bility of static electricity. Always use a static elec- tricity prevention cord or touch grounded metal for the elimination of static electricity before conduct- ing work. 3. BATTERY When removing the battery terminal, always be sure to turn the ignition switch to OFF to prevent electrical damage of the control module from over- current. Be sure to remove the battery ground ca- ble first. 4. SERVICE PARTS Use genuine parts for maximum performance and maintenance when conducting repairs. Subaru/FHI will not be responsible for poor performance result- ing from the use of parts except for genuine parts. 5. PROTECTING VEHICLE UNDER MAIN- TENANCE Make sure to attach the fender cover, seat covers, etc. before work. 6. ENSURING SECURITY DURING WORK When working in a group of two or more, perform the work with calling each other to ensure mutual safety. 7. LIFT AND JACK When using a lift or shop jack raise a vehicle or us- ing rigid rack to support a vehicle, always follow in- structions concerning jack-up points and weight limits to prevent the vehicle from falling, which could result in injury. Be especially careful that the vehicle is balanced before raising it. Be sure to set the wheel stoppers when jacking-up only the front or rear side of the vehicle. NOTE: • When using a lift, follow its operation manual be- fore work. • Do not work or leave unattended while the vehi- cle is supported with jack, support it with rigid racks. • Be sure to use the rigid racks with rubber at- tached to cradle to support the vehicle. • When using a plate lift, use a rubber attachment. • Align the cushion rubber end of plate lift with the end of rubber attachment. (Portion b) Also, align the protrusion portion of the supporting locations with the end of attachment. (Portion a) (A) 80 mm (3.1 in) or more (B) 100 — 150 mm (3.94 — 5.91 in) (C) 120 — 190 mm (4.72 — 7.48 in) NT-00070 (A) (B) (C)
NT-3 Note NOTE • Do not use the plate lift whose attachment does not reach the supporting locations. (1) Supporting locations (3) Swing arm lift (5) Plate lift (2) Pantograph jack (4) Rigid rack (6) Attachment NT-00086 a a b (1) (2) (3) (4) (5) (6) (6) (6) (6)
NT-4 Note NOTE (A) Front (B) Rear (1) Front crossmember (2) Rear differential NT-00072 (1) (2) (A) (B)
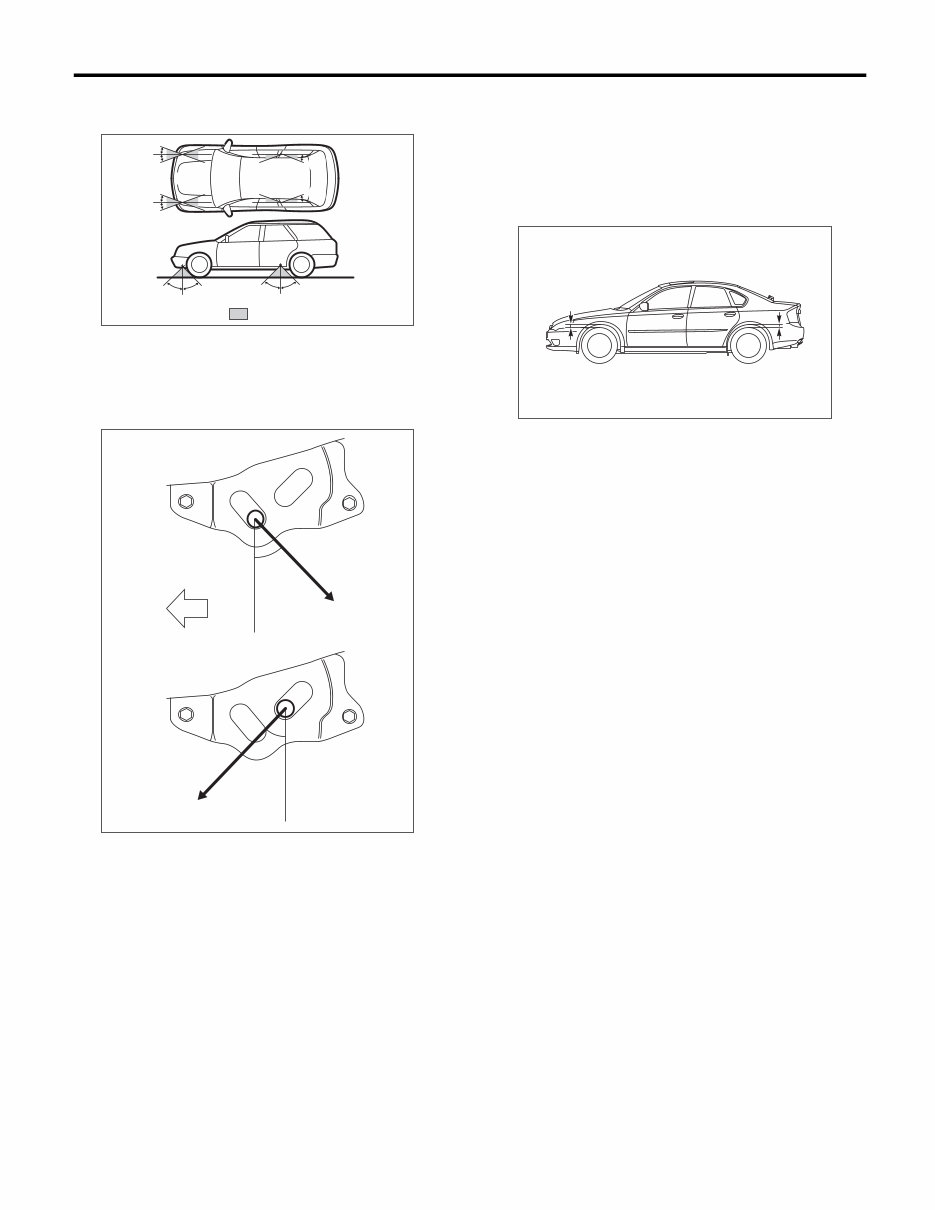
NT-5 Note NOTE 8. TIE-DOWNS Tie-downs are used when transporting vehicles and when using the chassis dynamo. Attach tie-down only to the specified locations on the vehicle. • Tie-down location CAUTION: Use the T-hook for rear tie-down. Do not use the hook other than T-hook, otherwise it can be removed when transporting vehicles • CHAIN DIRECTION AT TIE-DOWN CONDITION NOTE: Pull the chains LH and RH in the same direction, but front and rear side in the counter direction. Pull all the chains in a same moment. (1) (1) (1) NT-00149 (1) Hook for tie-down NT-00117
NT-6 Note NOTE • CHAIN PULLING RANGE AT TIE-DOWN CON- DITION • VEHICLE SINKING VOLUME AT TIE-DOWN CONDITION Measure the distance between the highest tire point and highest arch point before and after tie- down. Difference of measured values (sinking vol- ume) should be within 50 mm (1.97 in) and make sure to fix the vehicle securely. (1) Chain pulling range at tie-down condition (2) 20° (3) 45° (F) Front side (1) Tightening direction of chain (2) 45° NT-00122 (2) (2) (2) (2) (3) (3) (3) (3) : (1) (2) (2) NT-00151 (1) (1) (2) (2) F NT-00076 L L
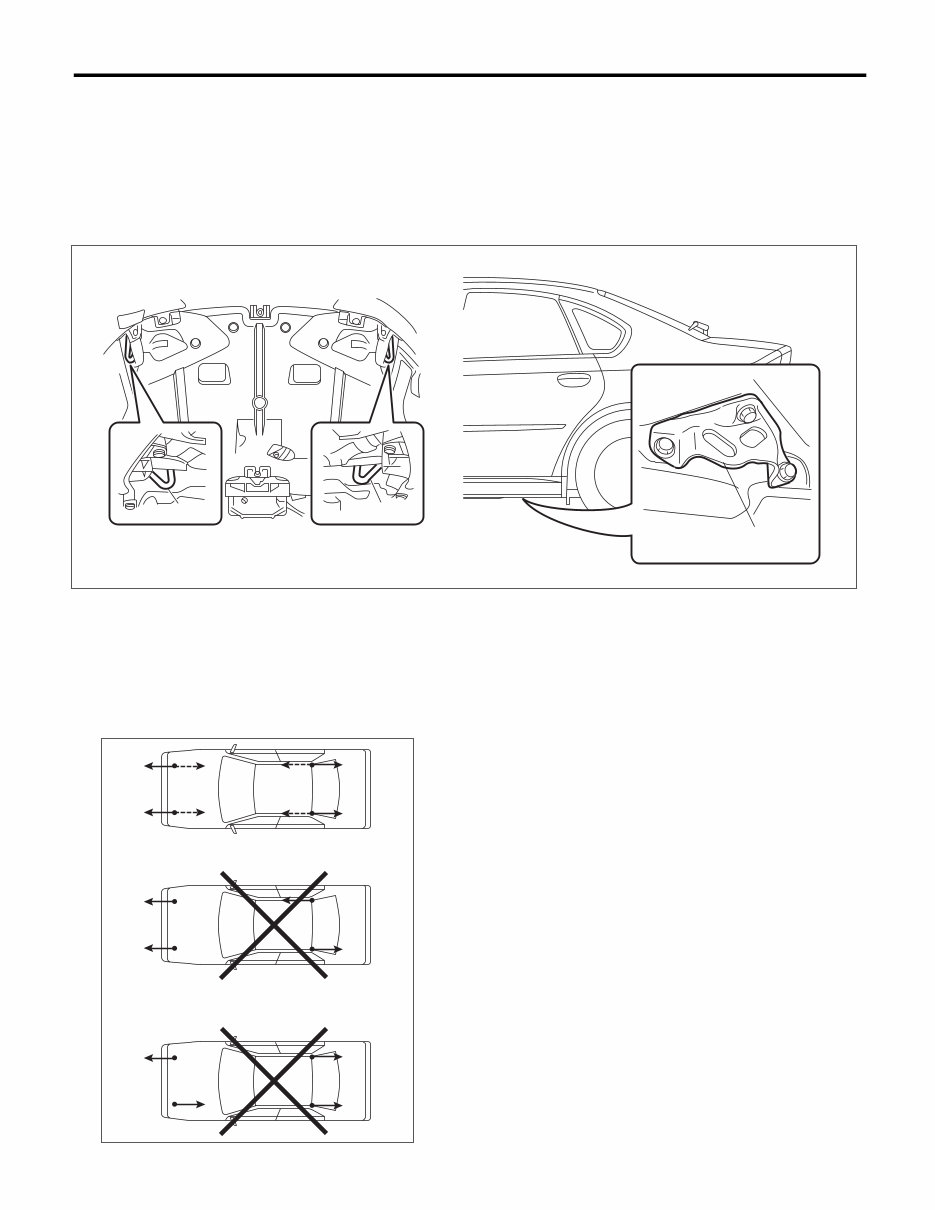
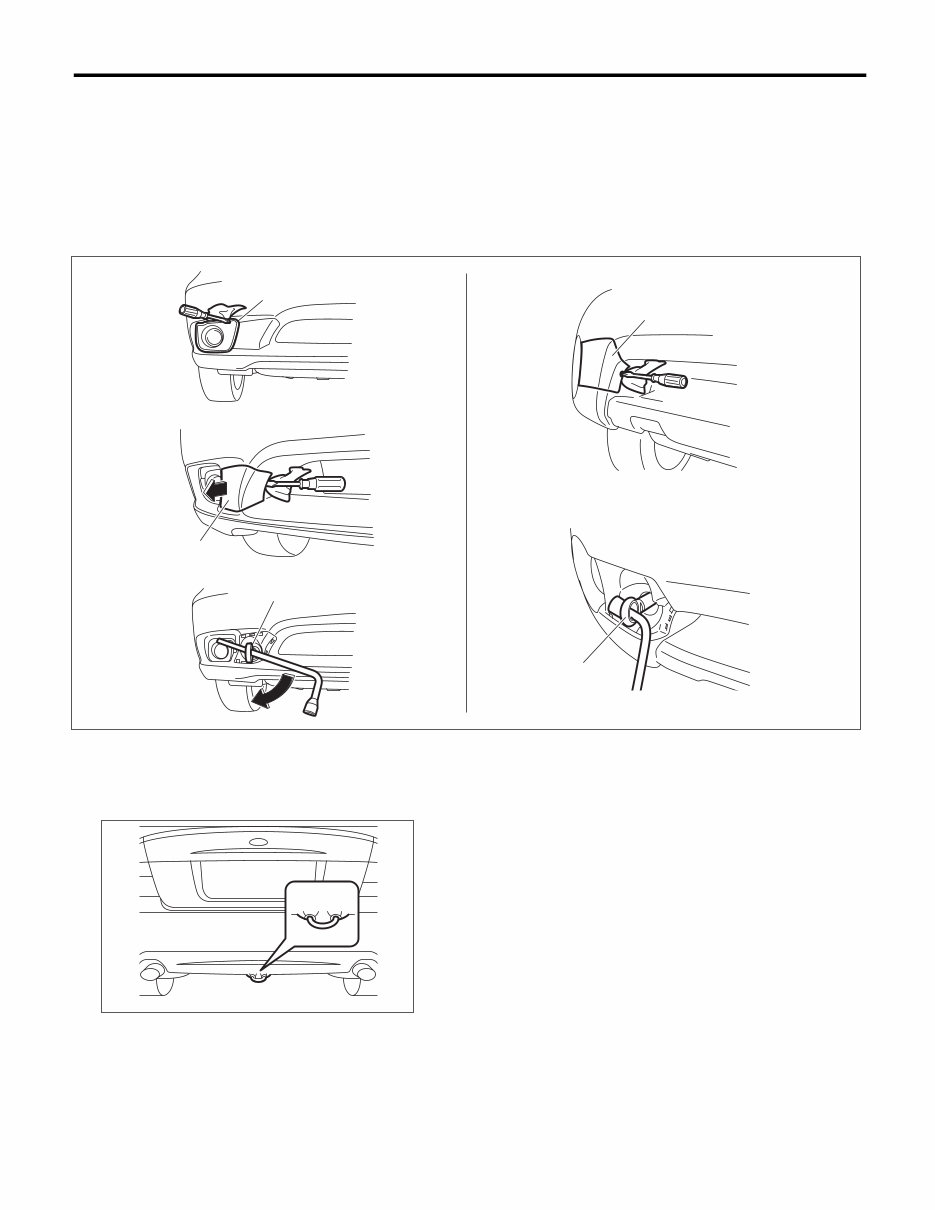
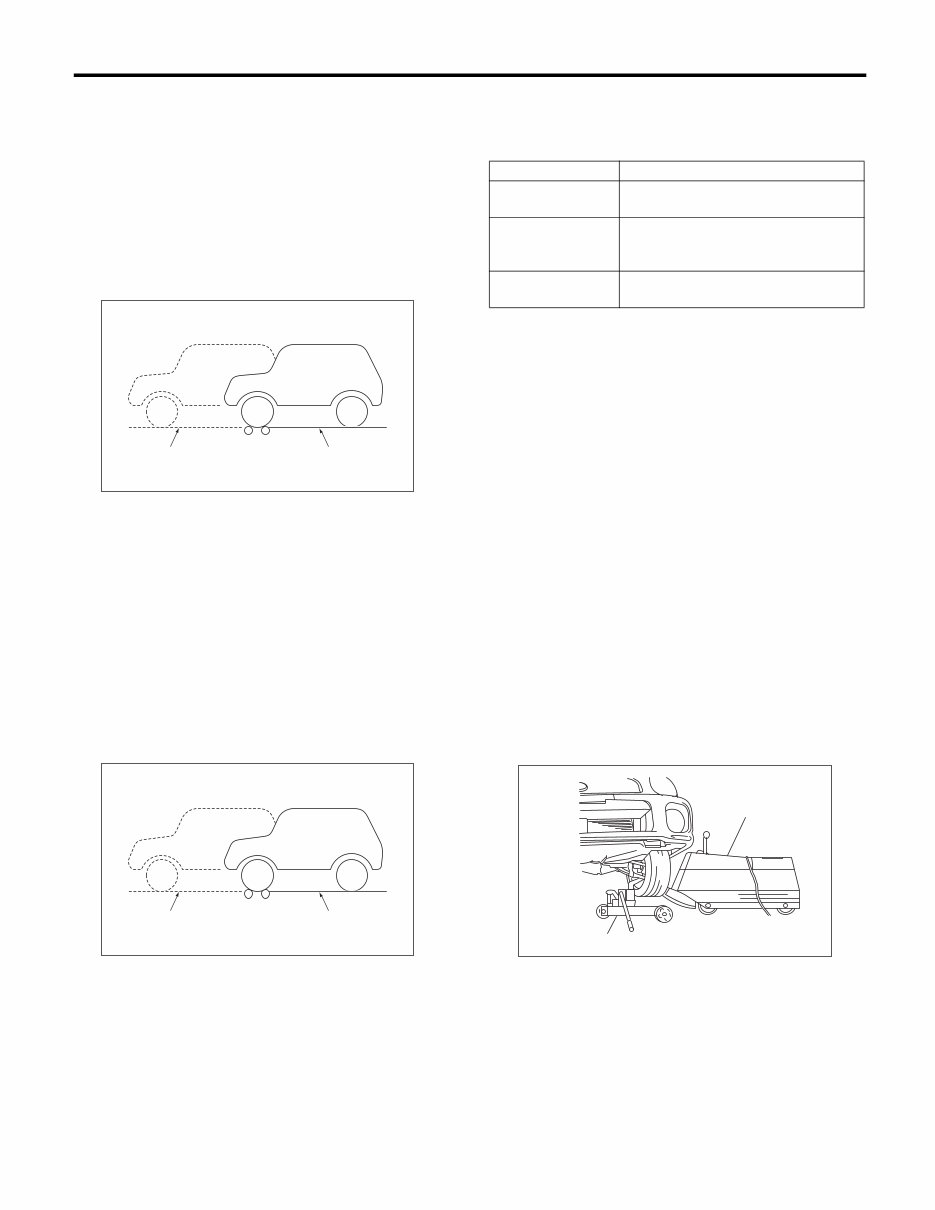
NT-7 Note NOTE 9. TOWING Avoid towing vehicles except when the vehicle cannot be driven. For models with AWD, AT or VTD, use a loader instead of towing. When towing other vehicles, pay attention to the following to prevent hook or vehicle damage resulting from excessive weight. • Do not tow other vehicles with a front tie-down hook. • Make sure the vehicle towing is heavier than the vehicle being towed. • FRONT Remove the fog light cover (except for OUTBACK model) and hook cover, and then install the hook. • REAR (A) Fog light cover (except for OUT- BACK model) (B) Hook cover (C) Hook NT-00118 (A) (C) (B) (B) (C) NT-00078
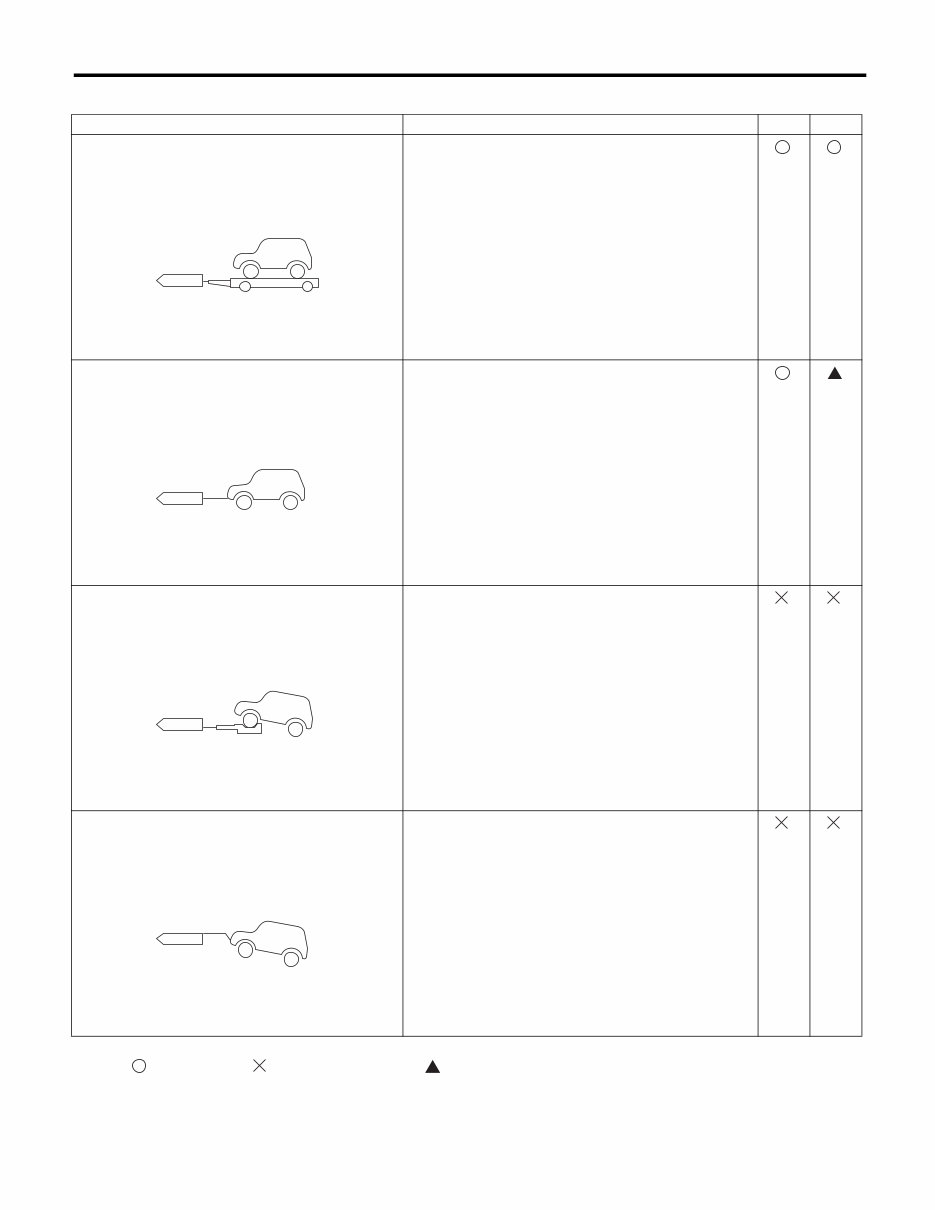
NT-8 Note NOTE • NOTES Marked : OK, Marked : Prohibited, Marked : Conditionally OK. Towing Precautions MT AT Lifting up four wheels (On a trailer) Towing the vehicle after lifting up all four wheels is a basic rule for AWD model. Rope • Check if both front and rear wheels are rotated nor- mally. • AT model driving conditions: Driving speed 30 km/h (19 MPH) or less Allow driving distance 30 km (19 miles) or less Raising the front wheels Prohibited for full-time AWD model. Lifting up the front wheels • Prohibited, due to damage on bumper, front grille, etc. • Do not raise the vehicle with bumper. NT-00023 NT-00024 NT-00025 NT-00026
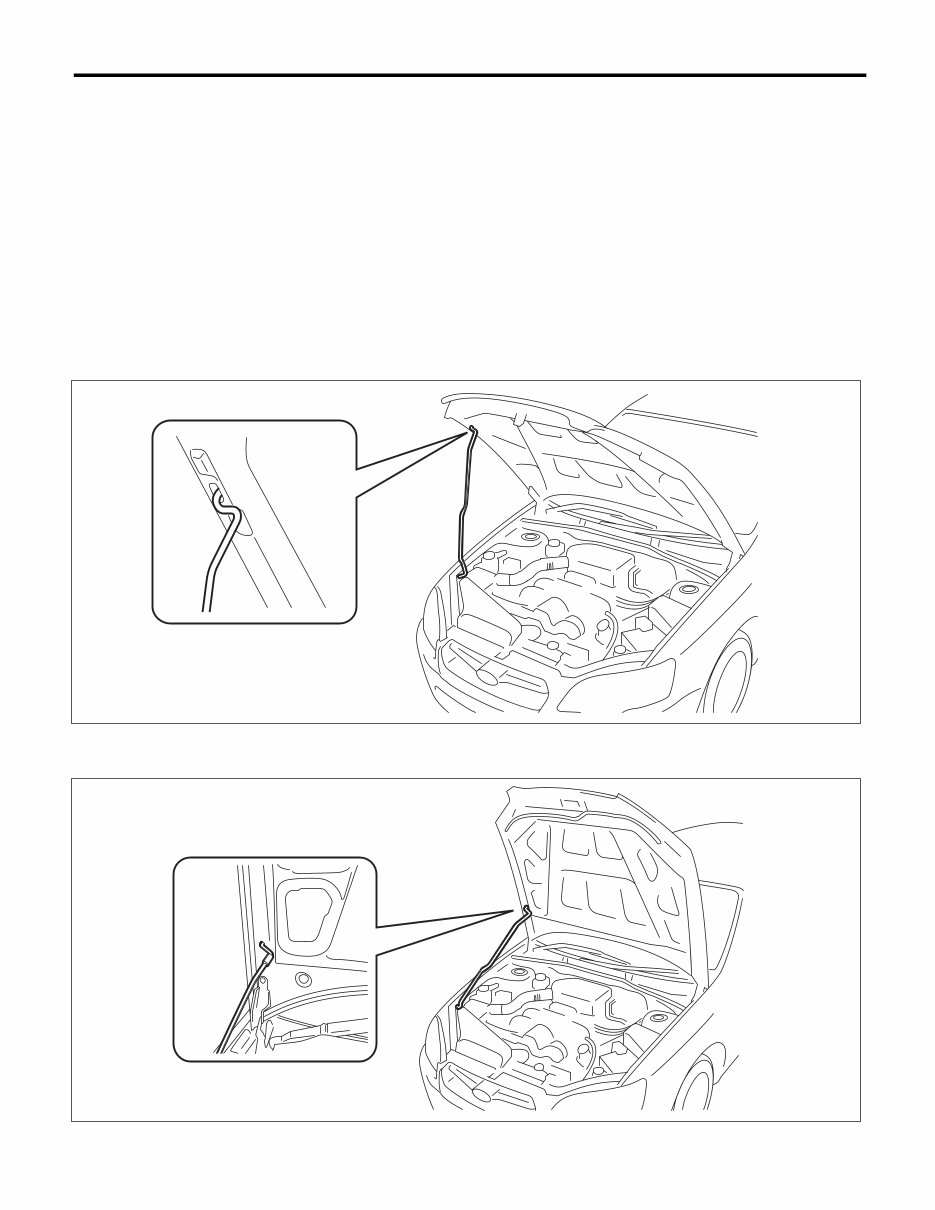
NT-9 Note NOTE CAUTION: • Check ATF, gear oil and rear differential oil before driving. • Place the shift lever in “N” position during towing. • Do not lift up the rear wheels to avoid unsteady rotation. • Turn the ignition key to “ACC”, then check the steering wheel moves freely. • Release the parking brake to avoid tire dragging. • Since the power steering does not work, be careful for the heavy steering effort (When engine is stopped) • Since the servo brake does not work, be careful that the brake is not applied effectively. (When engine is stopped) • In case of the malfunction of internal transmission or drive system, lift up four wheels (on a trail- er) for towing. 10.FRONT HOOD STAY INSTALLATION • AT THE CHECK AND GENERAL MAINTENANCE • WHEN WIDER HOOD OPENING IS NECESSARY Set the stay into the hole of lower hood as shown in the figure below. NT-00079 NT-00080
NT-10 Note NOTE 11.GENERAL SCAN TOOL Using general scan tools will greatly improve the ef- ficiency of repairing engine electronic controls. Subaru Select Monitor can be used to diagnose the engine, ABS, air conditioner and other parts. 12.AWD CIRCUIT MEASURES 1) Full-time AWD MT model Since viscous coupling (limited slip differential) is used in the center differential, cut-off of AWD circuit cannot be carried out. 2) Full-time AWD 5AT model Since VTD type is used in the center differential, cut-off of AWD circuit cannot be carried out. 3) Full-time AWD 4AT model Insert a spare fuse into FWD fuse holder in the fuse box located in the left side of engine room to select the FWD. Since electronically controlled MT-P hy- draulic multi-plate clutch is adapted for center dif- ferential, select FWD. When maintenance is performed with jack-up or on the free roller, check the illumination of AWD warning light in the combi- nation meter. 13.SPEEDOMETER TEST 1) Rear wheel free roller system (1) Set the free roller on the floor of rear wheel side securely according to the wheel base and rear tread of the vehicle. (2) Let the vehicle ride on the tester and free roller gently. CAUTION: Fix the vehicle using a pulling metal (chain or wire) to the front and rear towing hooks or tie- down hook to prevent the lateral runout of front wheels and springing out of vehicle. (3) Set the speedometer tester. (4) Conduct the speedometer test work. CAUTION: Do not operate the clutch quickly and do not ac- celerate or decelerate suddenly during work. 2) Rear wheel jack-up system (1) Set the vehicle on speedometer tester. CAUTION: Fix the vehicle using a pulling metal (chain or wire) to the front and rear towing hooks or tie- down hook to prevent the lateral runout of front wheels and springing out of vehicle. (2) Jack up the rear wheels and set the rigid racks to the specified locations of side sill. (3) Conduct the speedometer test work. CAUTION: Do not operate the clutch quickly and do not ac- celerate or decelerate suddenly during work. (A) FWD fuse holder (B) AWD warning light NT-00081 (B) (A) (A) Free roller (A) Rigid rack NT-00033 (A) NT-00034 (A)
NT-11 Note NOTE 14.BRAKE TEST 1) Full-time AWD MT model (1) Perform this test after driving the vehicle 2 to 3 km (1.24 to 1.86 miles) on road in order to sta- bilize the viscous torque of viscous coupling. (2) Keep the front or rear wheels on the ground for this test. NOTE: Effect of the viscous torque on braking force will be added approx. 25 kg compared with FWD model. (3) When the brake dragging force is large. • Check the dragging of brake pad or brake shoe. • Since it may be affected by the viscosity of vis- cous couping, jack up either of the front or rear two wheels to check the each wheel rotation condition with the viscous coupling affection removed. 2) Full-time AWD AT model (1) Keep the front or rear wheels on the ground during measurement. (2) When the brake dragging force is large. • Check the dragging of brake pad or brake shoe. Specifications: • When measurement is difficult to carry out be- cause both of front wheels are locked, bake force measurement in this condition conforms to stan- dard grand total. 15.ON THE CAR WHEEL BALANCING CAUTION: • Carry out this procedures after measuring the balance of each single tire. • Set the vehicle so that the front and rear wheels are the same height. • Release the parking brake during measure- ment. • Rotate each wheel by hands, and make sure it rotates without dragging. • Do not operate the clutch quickly and do not accelerate or decelerate suddenly during work. • When an error is indicated during engine drive, do not use the motor drive together. 1) Set the rigid rack to the specified locations of side sill, jack up the front or rear two wheels of non- measuring side and set the pickup stands to two wheels of measuring side. 2) For drive wheel, drive the tires with engine for measurement. 3) For non-drive wheel, drive the tires from the on the car wheel balancer for measurement. (A) Brake tester (B) Position for measuring front wheel (C) Position for measuring rear wheel (A) Brake tester (B) Position for measuring front wheel (C) Position for measuring rear wheel NT-00029 (C) (A) (B) NT-00029 (C) (A) (B) Braking force Rear wheel total More than 10% of load on front or rear wheels Difference between right and left wheels Less than 8% of load on front or rear wheels Grand total More than 50% of vehicle weight at the time of test (A) Balancer body (B) Pickup stand NT-00031 (A) (B)
This is a comprehensive service repair manual for the 2006 Subaru Legacy/Outback. The manual features easy-to-read text sections with high-quality diagrams and instructions, making it ideal for both do‐it‐yourself enthusiasts and experienced mechanics. It includes step-by-step instructions, detailed exploded views, and clear diagrams to assist in completing tasks accurately and efficiently.
The repair manual covers every single detail of the 2006 Subaru Legacy/Outback and provides step-by-step guidance based on a complete disassembly of the vehicle. It offers an affordable resource to ensure the proper functioning of your vehicle.
Models Covered:
2006 Subaru Legacy/Outback
This professional technical manual contains comprehensive service, maintenance, and troubleshooting information for all models, engines, trim levels, and transmission types of the 2006 Subaru Legacy/Outback. The workshop repair manual is complete and intact, ensuring every piece of information is accurate and reliable, just as the manuals used in local service and repair shops.
Immediate access is available with no waiting time or shipping fees. The manual is delivered in PDF format, is fully printable without any restrictions, and requires Adobe Reader for access. Payments can be made via PayPal or Credit Card. After payment, the download link will be provided immediately on the checkout page.
Product Details:
2006 Subaru Legacy/Outback
File Format: PDF
Language: English
Printable: Without any restriction
Delivery: Link will appear on the checkout page after payment is complete
Requirements: Adobe Reader
Ensure the proper functioning of your 2006 Subaru Legacy/Outback with this comprehensive service repair manual.
Recently Viewed
5,521,897Happy Clients
2,594,462eManuals
1,120,453Trusted Sellers
15Years in Business
Price:
Actual Price:
2006 Subaru Legacy Outback Service & Repair Manual