

2012-2014 Subaru Brz Service & Repair Manual
What's Included?
Fast Download Speeds
Online & Offline Access
Access PDF Contents & Bookmarks
Full Search Facility
Print one or all pages of your manual
SUBARU BRZ 2012-2015 REPAIR
MANUAL
2013 RESTRAINTS
Air Bag System (Service Information) - BRZ
DRIVER SIDE AIR BAG MODULE
EXPLODED VIEW
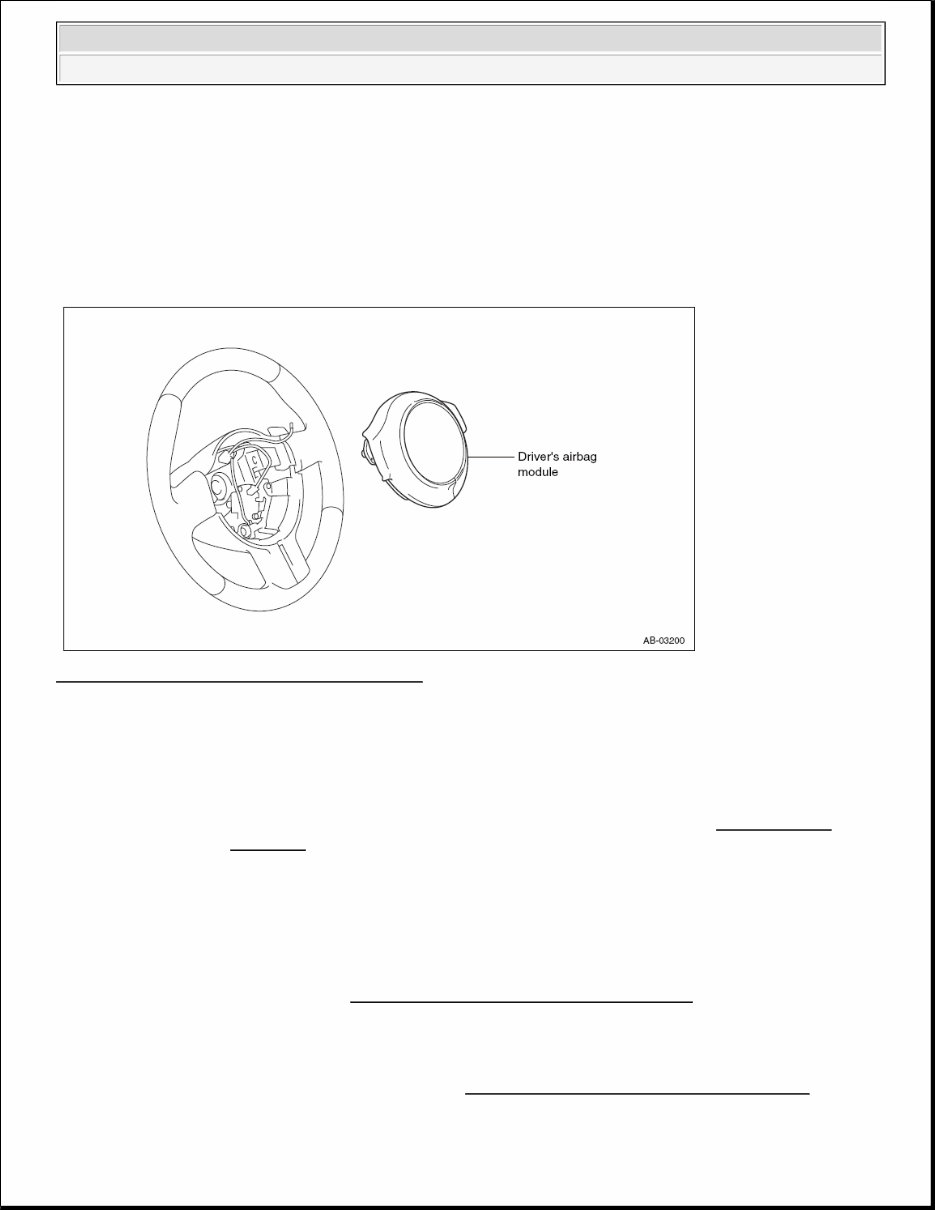
Fig. 1: Identifying Driver Side Air Bag Module
Courtesy of SUBARU OF AMERICA, INC.
REMOVAL
1. Precautions
2. Disconnection of the battery ground terminal
1. Turn the ignition switch to OFF, disconnect the battery ground terminal, and then wait for 60
seconds before starting the work. (Refer to WORKING PRECAUTIONS AND NOTES )
WARNING: The following service operations include the works which may affect the
SRS airbag system. Before starting work, always be sure to confirm the
precautions related to the SRS airbag system. (Refer to SRS AIRBAG
SYSTEM )
CAUTION: After turning the ignition switch to OFF, you may have to wait for a
while before disconnecting the battery terminals. Check appropriate
precautions for battery terminal disconnection before proceeding.
(Refer to WORKING PRECAUTIONS AND NOTES )
2013 Subaru BRZ Premium
2013 RESTRAINTS Air Bag System (Service Information) - BRZ
3. Removal of the driver's airbag module
1. Check that the ignition switch is turned to OFF.
2. Check that the battery ground terminal is disconnected.
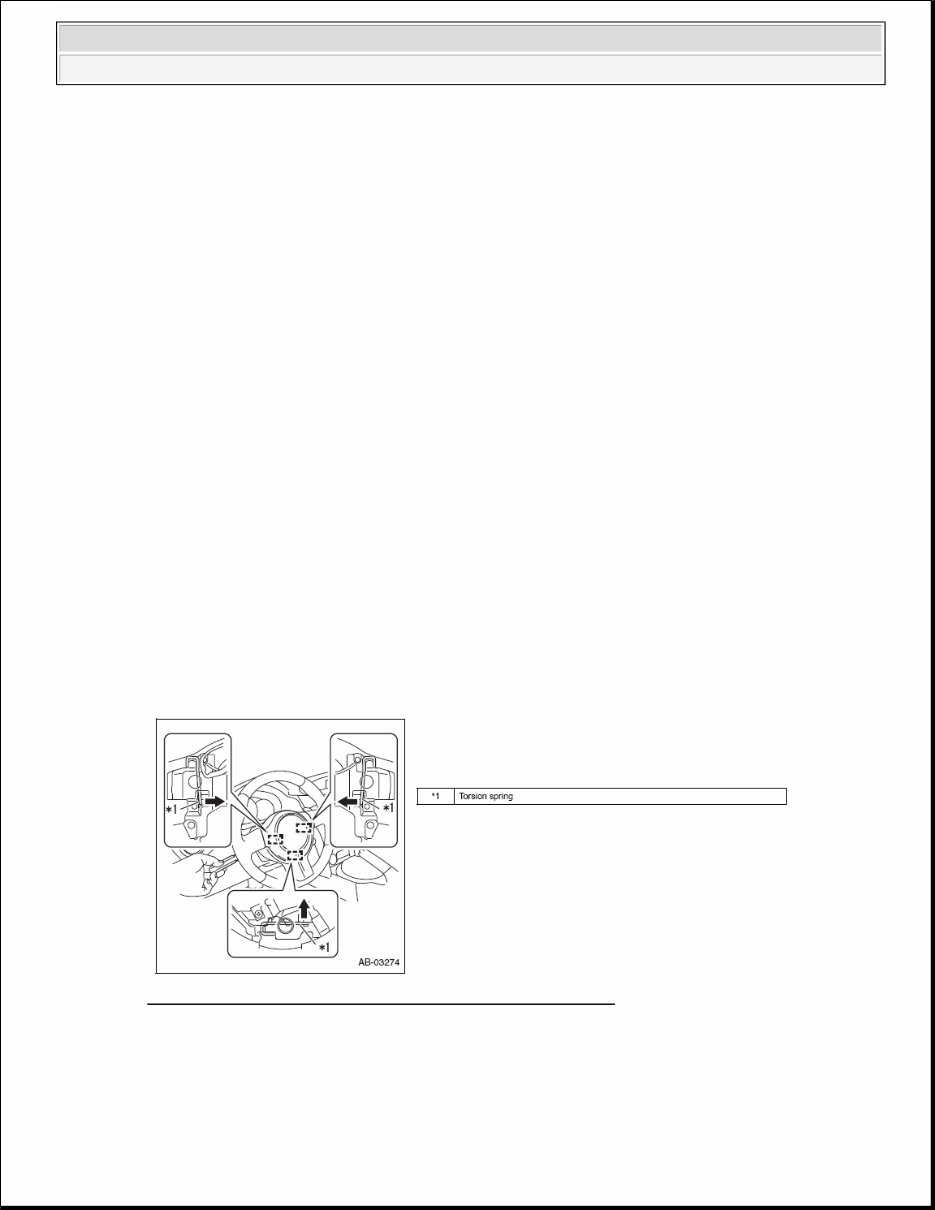
3. Using a flat tip screwdriver, push 3 torsion springs, then release 3 pins.
Fig. 2: Pushing Torsion Springs Using Flat Tip Screwdriver
Courtesy of SUBARU OF AMERICA, INC.
4. Pull out the driver's airbag module toward the rear side of the vehicle.
WARNING: The air bag and pretensioner system are fitted with a backup
power supply. If you start the work within 60 seconds after
disconnecting the battery ground terminal, the air bag may be
activated.
CAUTION: To avoid damage to the molding, be sure to fully open the door
glasses on both driver's and passenger's sides.
WARNING: When storing a removed driver's airbag module, even if it is a
temporary storage, be sure to place the airbag module with the
deploying side facing upward.
WARNING: After disconnecting the battery ground terminal, do not start
the work before waiting for 60 seconds.
CAUTION: Be careful not to drop the driver's airbag module.
2013 Subaru BRZ Premium
2013 RESTRAINTS Air Bag System (Service Information) - BRZ
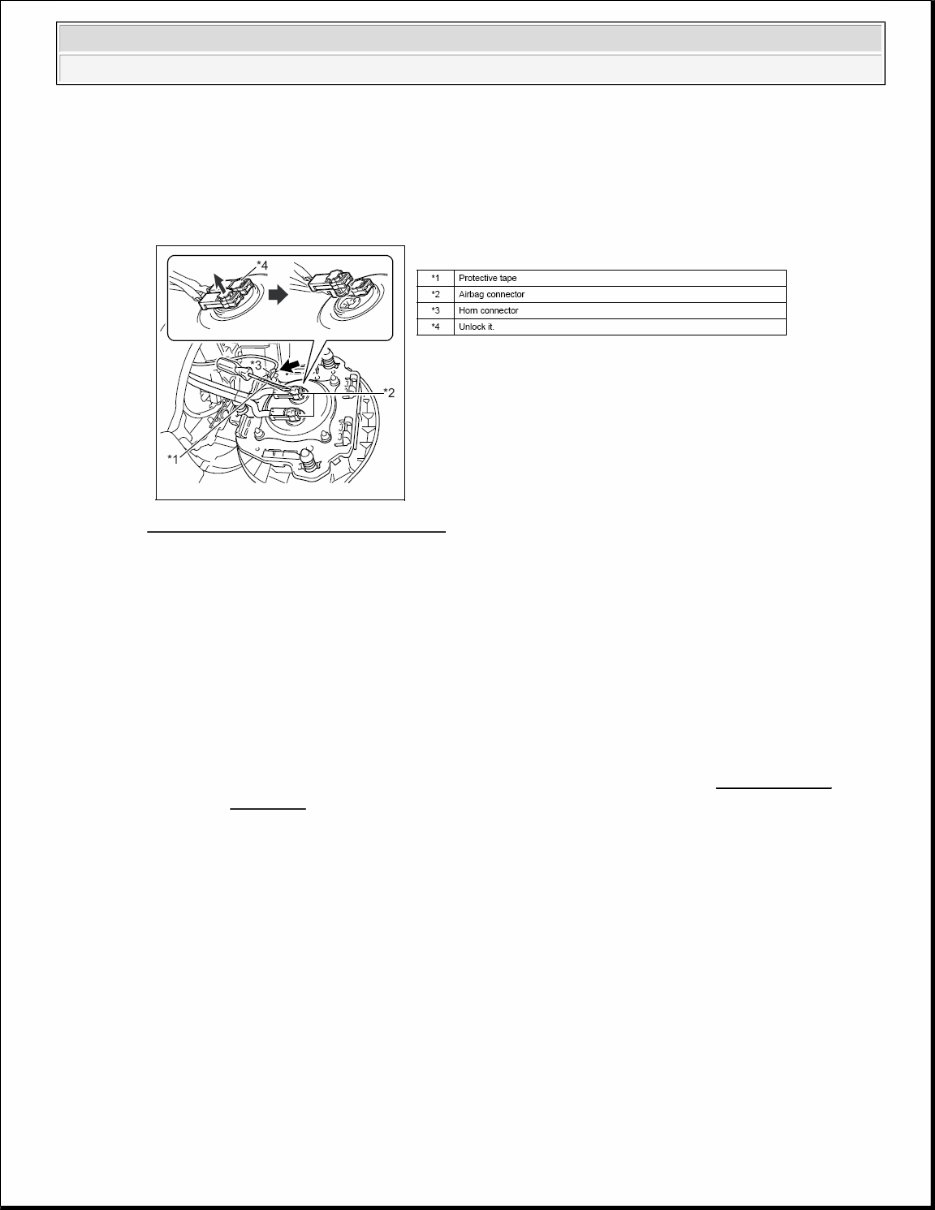
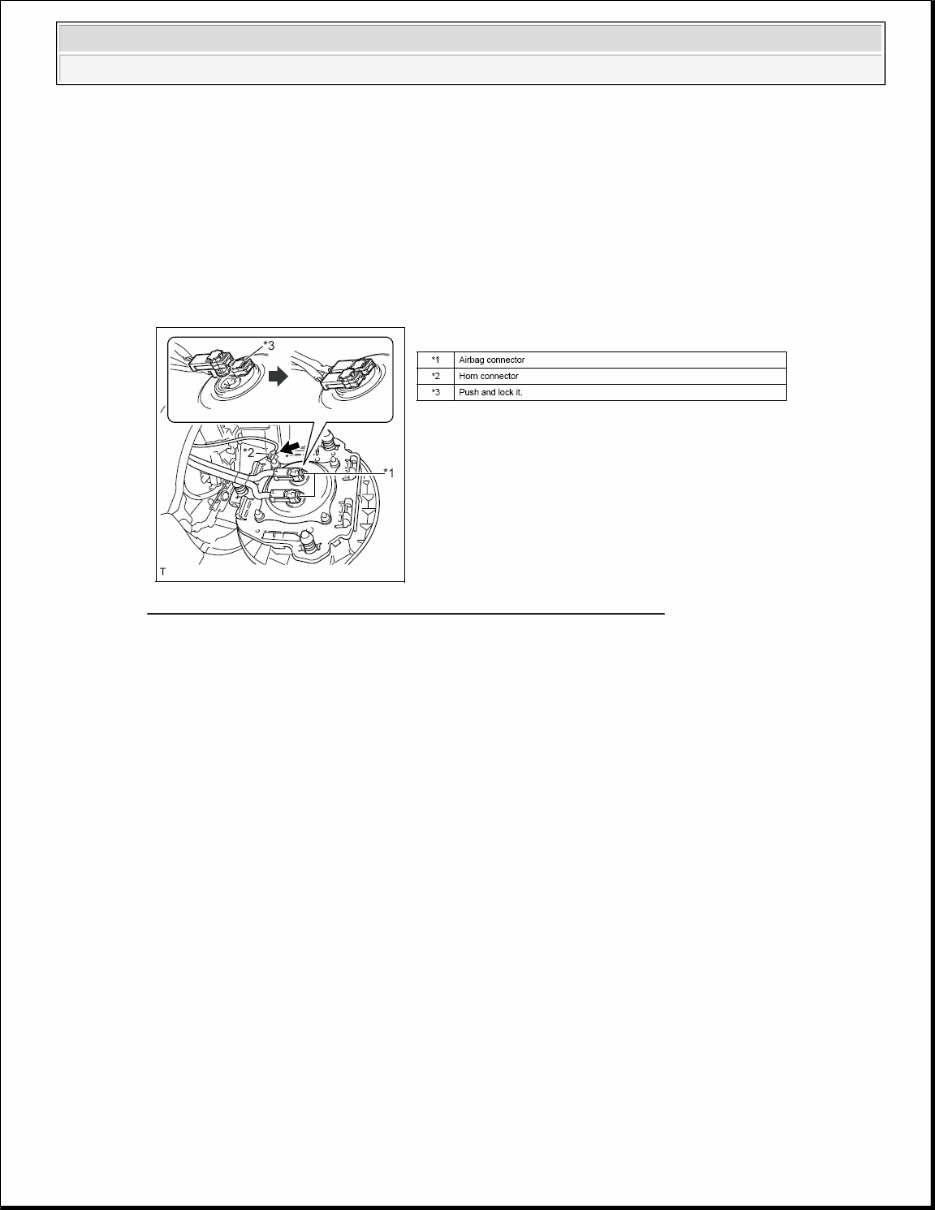
5. Disconnect the horn connector.
Fig. 3: Disconnecting Horn Connector
Courtesy of SUBARU OF AMERICA, INC.
6. Using the fine flat tip screwdriver wrapped with protective tape, pull up the lock of the airbag
connectors (2) to unlock it.
7. Using the fine flat tip screwdriver wrapped with protective tape, disconnect the airbag connector
and remove the driver's airbag module.
INSTALLATION
1. Installation of the driver's airbag module
1. Before installation, inspect the following items and replace any faulty part with a new one.
Airbag module is cracked or deformed.
Harness and/or connector is cracked, deformed or broken.
Harness wire is exposed.
The condition of the steering wheel makes the installation of the airbag module difficult.
The clearance between the driver's airbag module and the steering wheel is not constant.
CAUTION: When pulling out the driver's airbag module, be careful not to
pull the wiring.
WARNING: The following service operations include the works which may affect the
SRS airbag system. Before starting work, always be sure to confirm the
precautions related to the SRS airbag system. (Refer to SRS AIRBAG
SYSTEM )
CAUTION: Do not allow the harnesses and the connectors to interfere or get tangled
with other parts.
2013 Subaru BRZ Premium
2013 RESTRAINTS Air Bag System (Service Information) - BRZ
2. Check that the ignition switch is turned to OFF.
3. Check that the battery ground terminal is disconnected.
4. Connect the airbag connectors (2) to the driver's airbag module.
Fig. 4: Connecting Airbag Connectors To Driver's Airbag Module
Courtesy of SUBARU OF AMERICA, INC.
5. Push in the lock of the airbag connector.
6. Connect the horn connector to the driver's airbag module.
7. Push in the driver's airbag module and engage 3 pins to install the driver's airbag module to the
steering wheel ASSY.
WARNING: After disconnecting the battery ground terminal, do not start
the work before waiting for 60 seconds.
CAUTION: Lock it securely.
CAUTION:
Securely insert the pins to the attachment holes of the
steering wheel ASSY.
Check that the driver's airbag module is securely installed.
2013 Subaru BRZ Premium
2013 RESTRAINTS Air Bag System (Service Information) - BRZ
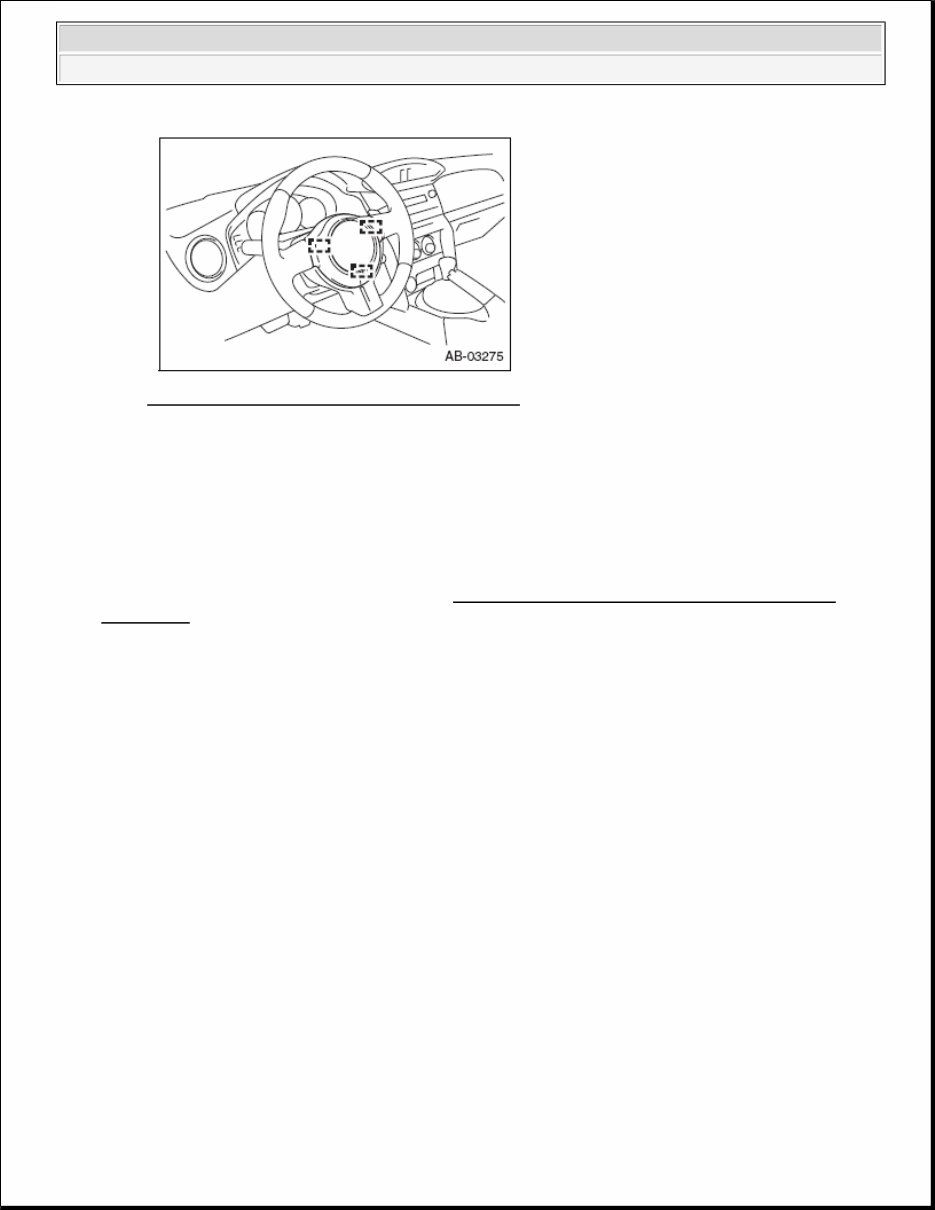
Fig. 5: Identifying Driver's Airbag Module Pins
Courtesy of SUBARU OF AMERICA, INC.
2. Connection of the battery ground terminal
Standard value: T=6.0N.m {61kgf.cm} {4.4ft.lbf}
3. Inspection of the driver's airbag module
1. Check that the horn sounds.
4. Inspection of the airbag warning light (Refer to AIRBAG WARNING LIGHT ILLUMINATION
PATTERN )
STEERING ROLL CONNECTOR
EXPLODED VIEW
2013 Subaru BRZ Premium
2013 RESTRAINTS Air Bag System (Service Information) - BRZ
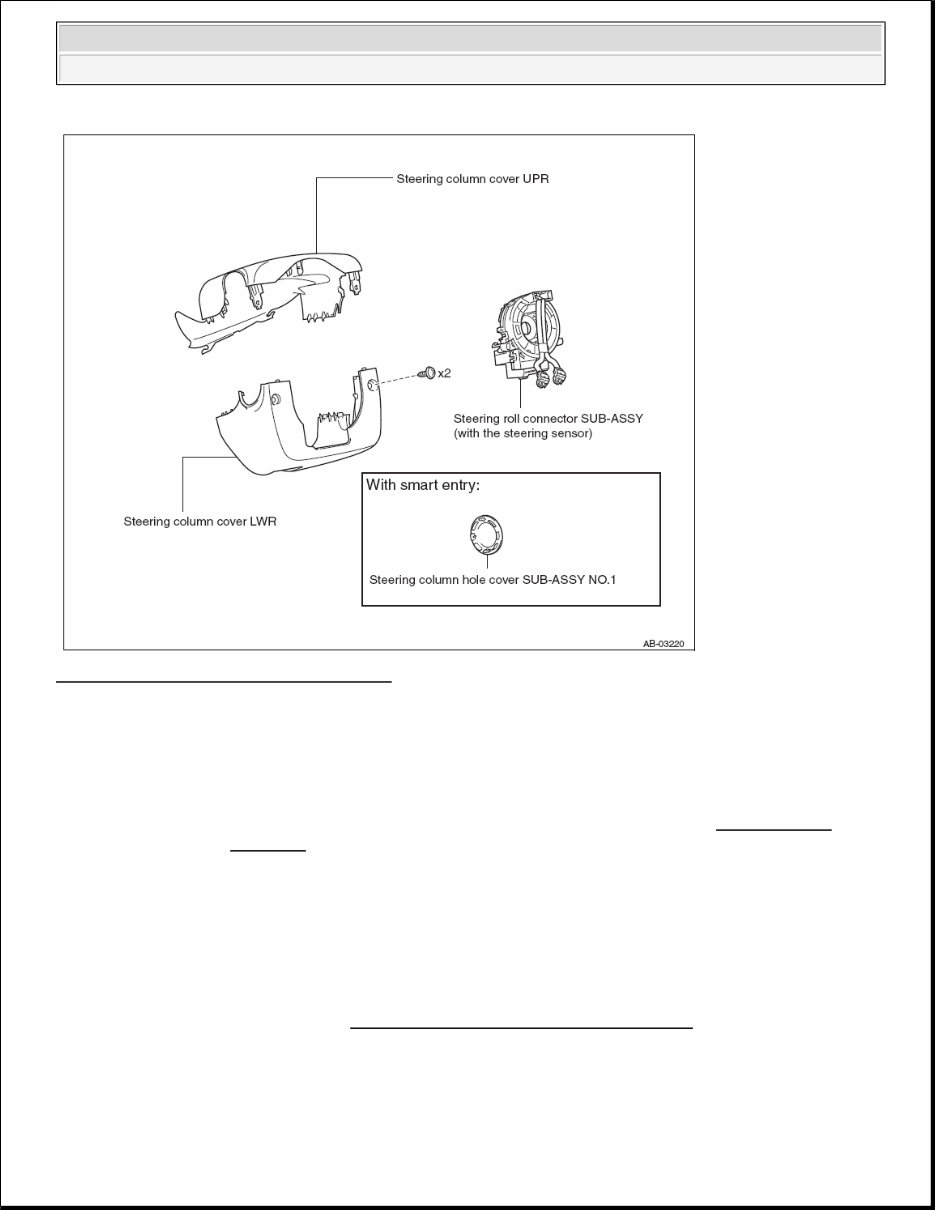
Fig. 6: Identifying Steering Roll Connector
Courtesy of SUBARU OF AMERICA, INC.
REMOVAL
1. Check of the straight-ahead position of the front tire
2. Precautions
3. Disconnection of the battery ground terminal
1. Turn the ignition switch to OFF, disconnect the battery ground terminal, and then wait for 60
WARNING: The following service operations include the works which may affect the
SRS airbag system. Before starting work, always be sure to confirm the
precautions related to the SRS airbag system. (Refer to SRS AIRBAG
SYSTEM )
CAUTION: After turning the ignition switch to OFF, you may have to wait for a
while before disconnecting the battery terminals. Check appropriate
precautions for battery terminal disconnection before proceeding.
(Refer to WORKING PRECAUTIONS AND NOTES )
2013 Subaru BRZ Premium
2013 RESTRAINTS Air Bag System (Service Information) - BRZ
seconds before starting the work. (Refer to WORKING PRECAUTIONS AND NOTES )
4. Removal of the steering wheel ASSY (Refer to REMOVAL )
5. Removal of the steering column cover support (with smart entry) (Refer to REMOVAL )
6. Removal of the steering column cover LWR (Refer to REMOVAL )
7. Removal of the steering column cover UPR (Refer to DISASSEMBLY )
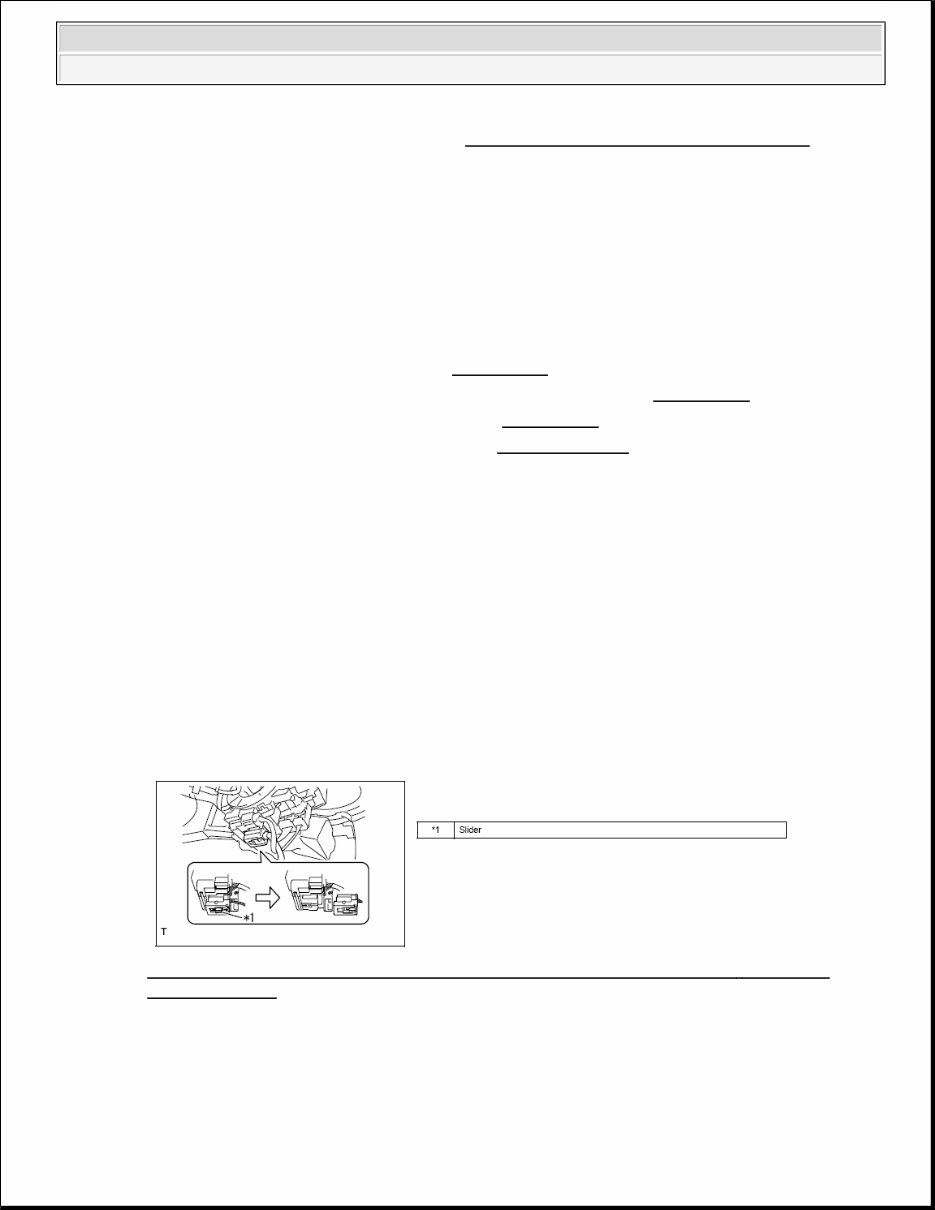
8. Removal of the steering roll connector SUB-ASSY (with the steering sensor)
1. Slide the slider to disconnect the airbag connector from the steering roll connector SUB-ASSY
(with the steering sensor).
Fig. 7: Disconnecting Airbag Connector From Steering Roll Connector Sub - Assy (With
Steering Sensor)
Courtesy of SUBARU OF AMERICA, INC.
2. Disconnect each connector from the steering roll connector SUB-ASSY (with the steering sensor).
3. Release 3 claws, and remove the steering roll connector SUB-ASSY (with the steering sensor).
WARNING: The air bag and pretensioner system are fitted with a backup
power supply. If you start the work within 60 seconds after
disconnecting the battery ground terminal, the air bag may be
activated.
CAUTION: To avoid damage to the molding, be sure to fully open the door
glasses on both driver's and passenger's sides.
CAUTION:
Do not replace the steering roll connector when the ignition
switch is turned to ON and the battery is connected.
Do not rotate the steering roll connector when the ignition
switch is turned to ON and the battery is connected.
When the steering sensor is rotated for its operation check
(noise check, diagnosis, etc.), make sure to confirm the vehicle
is in the straight-ahead position, then perform the check with
the steering wheel installed.
2013 Subaru BRZ Premium
2013 RESTRAINTS Air Bag System (Service Information) - BRZ

Fig. 8: Removing Claws And Steering Roll Connector Sub - Assy (With Steering Sensor)
Courtesy of SUBARU OF AMERICA, INC.
9. Removal of the steering roll connector
1. Release 6 claws and 2 pins, and remove the steering roll connector from the steering sensor.
Fig. 9: Identifying Claws And Pins Of Steering Roll Connector
Courtesy of SUBARU OF AMERICA, INC.
CAUTION:
Remove the steering roll connector only when replacing itself or
the steering sensor.
Do not rotate the center part of the steering sensor, because it
may displace the neutral position of the steering sensor.
CAUTION:
Do not damage the guide.
Do not damage the claws of the steering sensor.
2013 Subaru BRZ Premium
2013 RESTRAINTS Air Bag System (Service Information) - BRZ
INSPECTION
1. Inspection of the steering roll connector SUB-ASSY (with the steering sensor)
1. When the following conditions are found, replace the steering roll connector SUB-ASSY (with the
steering sensor) with a new one.
Criteria
There are scratches, cracks, or damages in the connector.
There are cracked, dented, or chipped parts.
When rotating the connector, it does not move smoothly and makes noise.
The connector can not be centered.
INSTALLATION
1. Installation of the steering roll connector
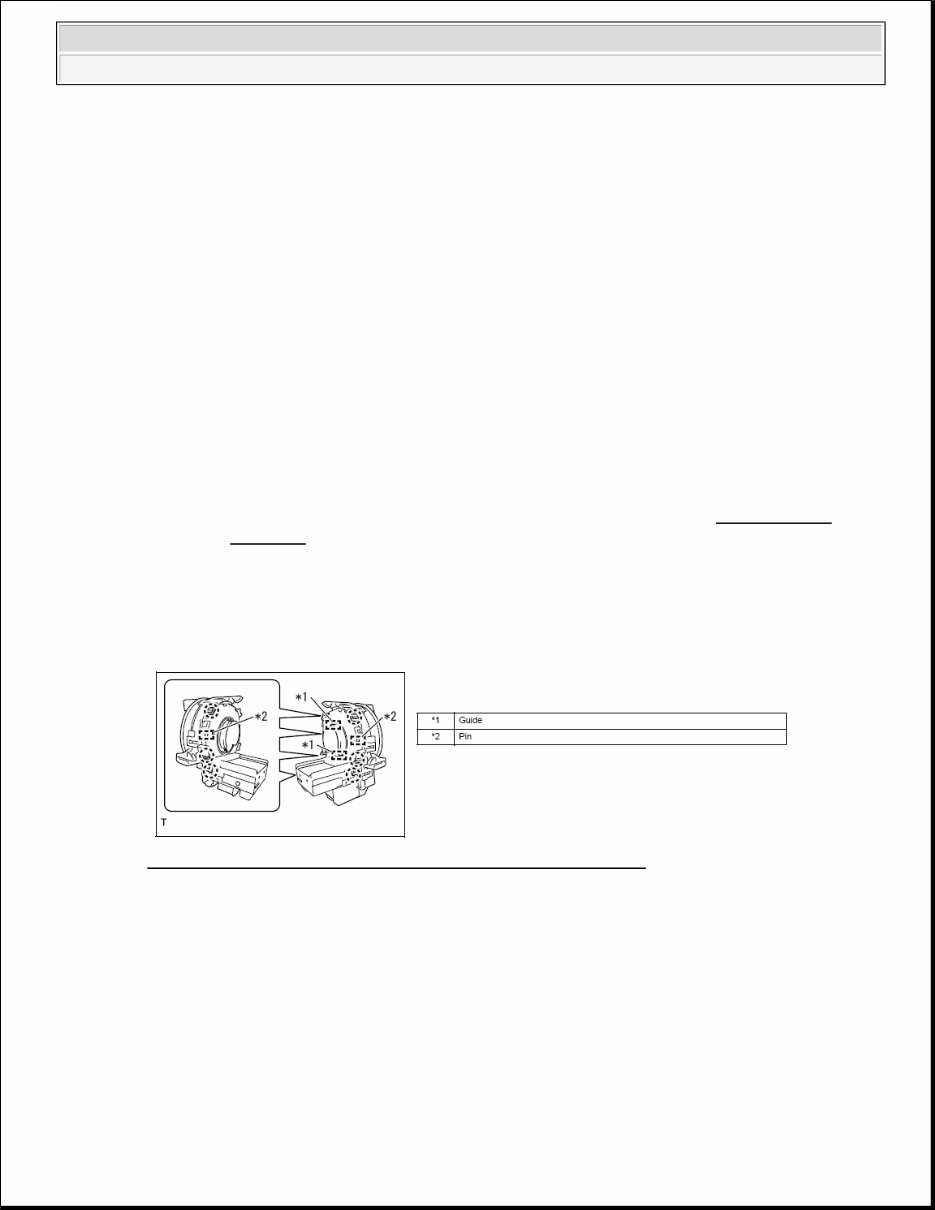
1. Align 2 pins and 2 guides.
2. Engage 6 claws to install the steering roll connector to the steering sensor.
Fig. 10: Identifying Claws And Pins Of Steering Roll Connector
Courtesy of SUBARU OF AMERICA, INC.
2. Installation of the steering roll connector SUB-ASSY (with the steering sensor)
WARNING: The following service operations include the works which may affect the
SRS airbag system. Before starting work, always be sure to confirm the
precautions related to the SRS airbag system. (Refer to SRS AIRBAG
SYSTEM )
CAUTION: Do not rotate the steering sensor until the steering roll
connector is installed to the steering sensor.
CAUTION:
Do not replace the steering roll connector when the ignition
switch is turned to ON and the battery ground terminal is
connected.
2013 Subaru BRZ Premium
2013 RESTRAINTS Air Bag System (Service Information) - BRZ
You're Reading a Preview
What's Included?
Fast Download Speeds
Online & Offline Access
Access PDF Contents & Bookmarks
Full Search Facility
Print one or all pages of your manual
$31.99
Viewed 64 Times Today


Secure transaction
What's Included?
Fast Download Speeds
Online & Offline Access
Access PDF Contents & Bookmarks
Full Search Facility
Print one or all pages of your manual
$31.99
Get instant access to the Complete Factory Service Repair Workshop Manual without any extra fees or expiry dates. This Professional Manual is suitable for both professional Mechanics and Technicians, as well as DIY enthusiasts. It covers all repairs, servicing, and troubleshooting procedures with detailed photos, diagrams, step-by-step instructions, and highly detailed exploded diagrams & pictures to ensure every job is completed correctly.
Print out a single page or the entire manual as per your choice. This Manual can be used on multiple computers without any limitations or trial periods, and it does not expire or require any renewal fees. It is fully compatible with all Windows & MAC Computers.


