

2008 Saturn SKY Service & Repair Manual
What's Included?
Fast Download Speeds
Offline Viewing
Access Contents & Bookmarks
Full Search Facility
Print one or all pages of your manual
2007 SUSPENSION
Front Suspension - Sky
SPECIFICATIONS
FASTENER TIGHTENING SPECIFICATIONS
Fastener Tightening Specifications
REPAIR INSTRUCTIONS
STABILIZER SHAFT REPLACEMENT
Application
Specification
Metric English
Lower Ball Joint Nut
First Pass
40 N.m 30 lb ft
Second Pass
Plus 135°
Lower Control Arm to Frame Nut 165 N.m 122 lb ft
Shock Absorber Lower Nut 28 N.m 21 lb ft
Shock Absorber Top Nut 42 N.m 31 lb ft
Shock Absorber Upper Nut 47 N.m 35 lb ft
Stabilizer Shaft Link Nuts 72 N.m 53 lb ft
Stabilizer Shaft Mounting Bracket Bolts 55 N.m 41 lb ft
Tie Rod End Nut
First Pass
30 N.m 22 lb ft
Second Pass
Plus 115°
Upper Ball Joint Nut
First Pass
30 N.m 22 lb ft
Second Pass
Plus 150°
Upper Control Arm to Frame Bolt 110 N.m 81 lb ft
Wheel Hub Bolt 115 N.m 85 lb ft
2007 Saturn Sky
2007 SUSPENSION Front Suspension - Sky
2007 Saturn Sky
2007 SUSPENSION Front Suspension - Sky
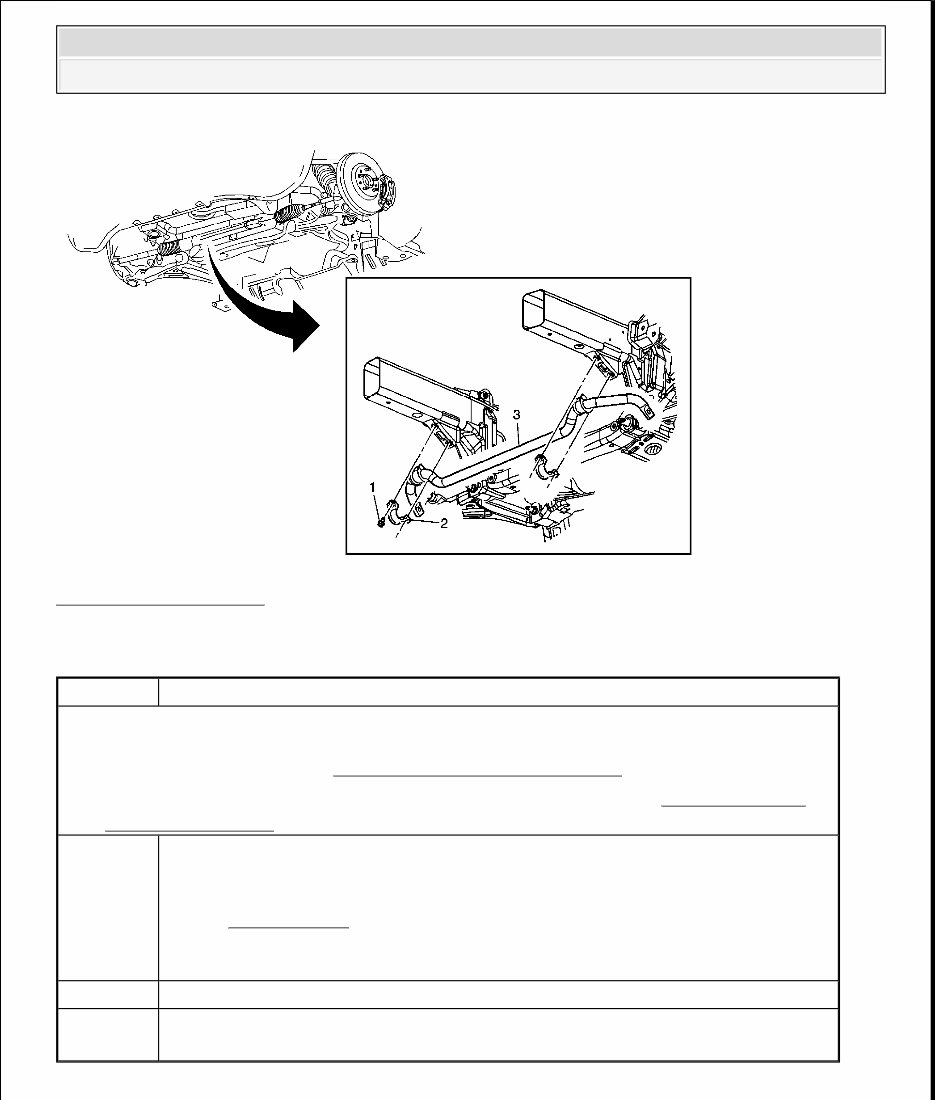
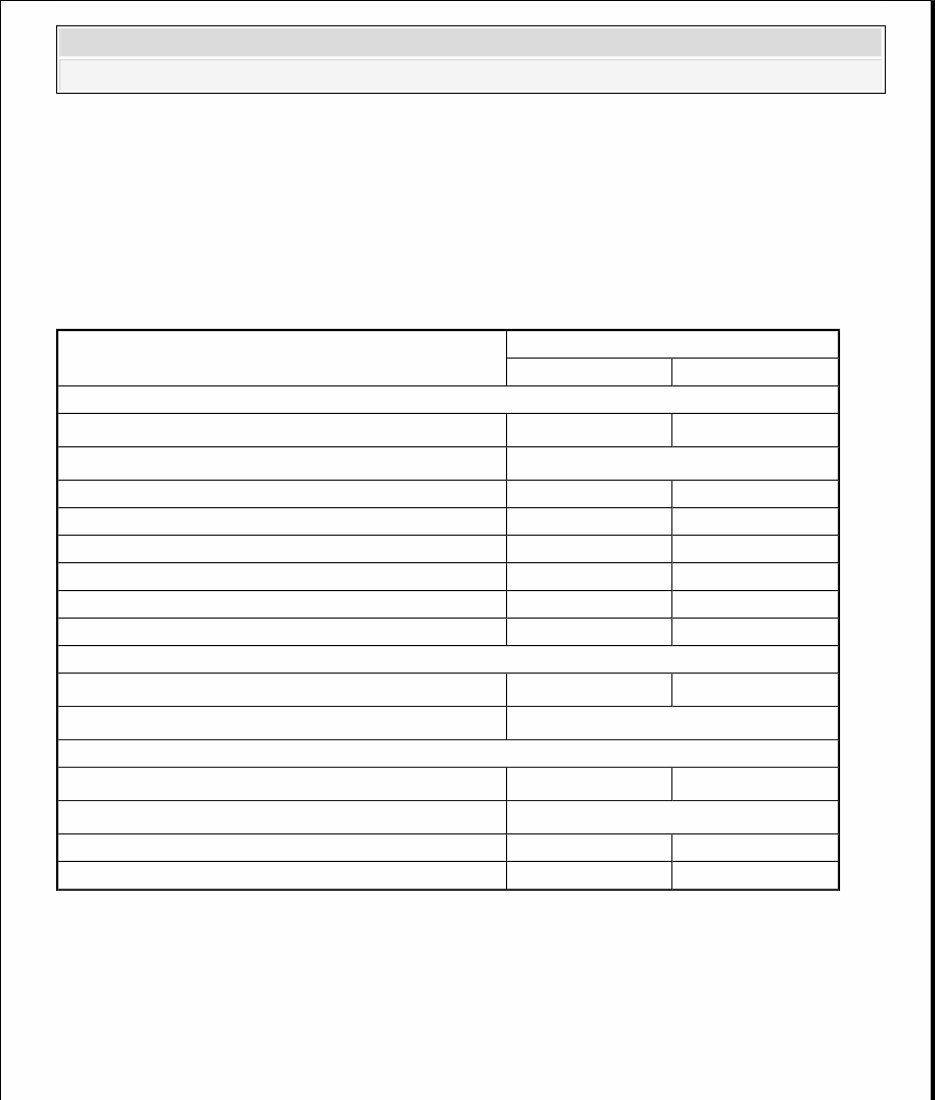
Fig. 1: Stabilizer Shaft
Courtesy of GENERAL MOTORS CORP.
Stabilizer Shaft Replacement
STABILIZER SHAFT LINK REPLACEMENT
Callout Component Name
Preliminary Procedure
1. Raise the vehicle. Refer to Lifting and Jacking the Vehicle .
2. Remove the stabilizer shaft from the stabilizer shaft link. Refer to Stabilizer Shaft
Link Replacement .
1
Stabilizer Shaft Mounting Bolts (Qty: 4)
Tighten: 55 N.m (41 lb ft)
NOTE:
Refer to Fastener Notice .
2 Stabilizer Shaft Mounting Bracket
3
Front Stabilizer Shaft
Tip: Remove the insulators from the stabilizer shaft.
2007 Saturn Sky
2007 SUSPENSION Front Suspension - Sky
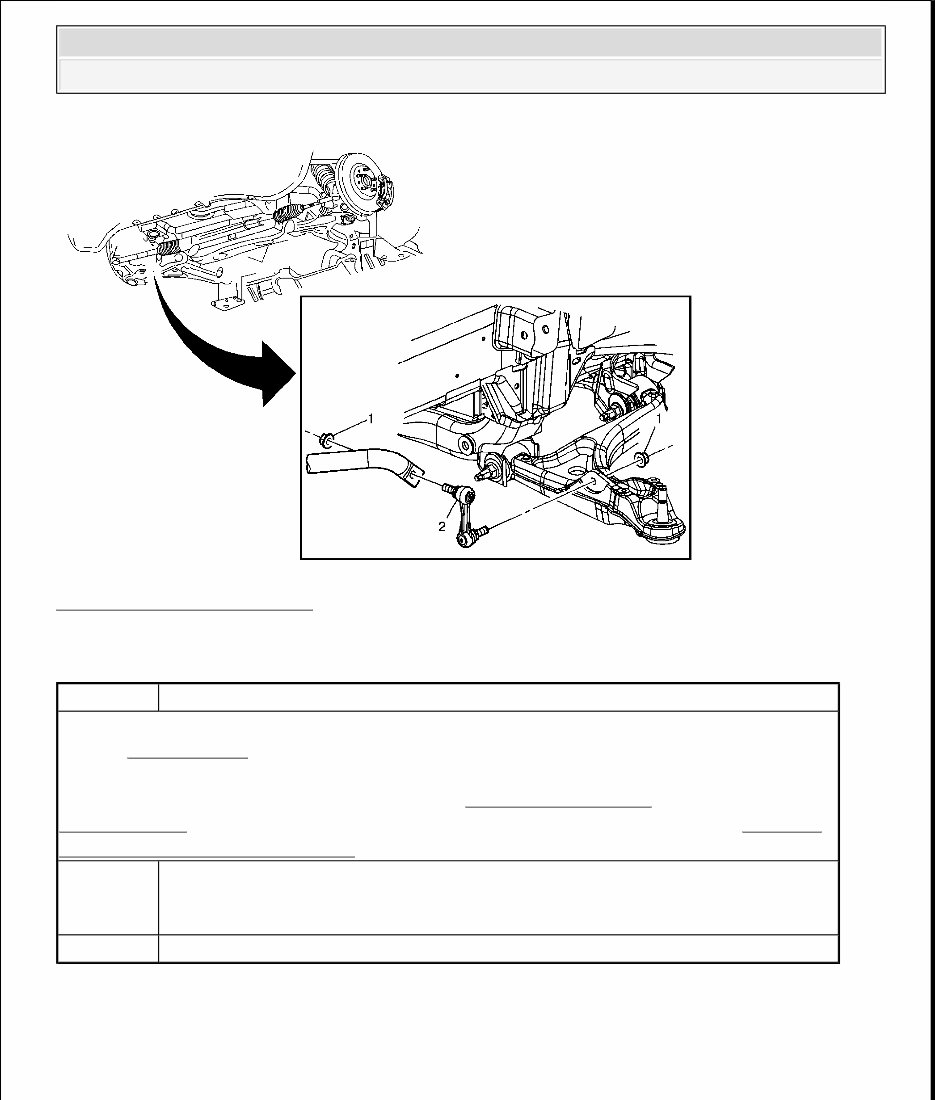
Fig. 2: Stabilizer Shaft Link
Courtesy of GENERAL MOTORS CORP.
Stabilizer Shaft Link Replacement
STABILIZER SHAFT INSULATOR REPLACEMENT
Callout Component Name
Fastener Tightening Specifications: Refer to Fastener Tightening
Specifications .Preliminary Procedure: Remove the tires and wheels. Refer to Tire and
Wheel Removal and Installation .
NOTE:
Refer to Fastener Notice .
1
Nut, Stabilizer Shaft Link Retaining (Qty: 2)
Tighten: 72 N.m (53 lb ft)
2 Link, Stabilizer Shaft
2007 Saturn Sky
2007 SUSPENSION Front Suspension - Sky
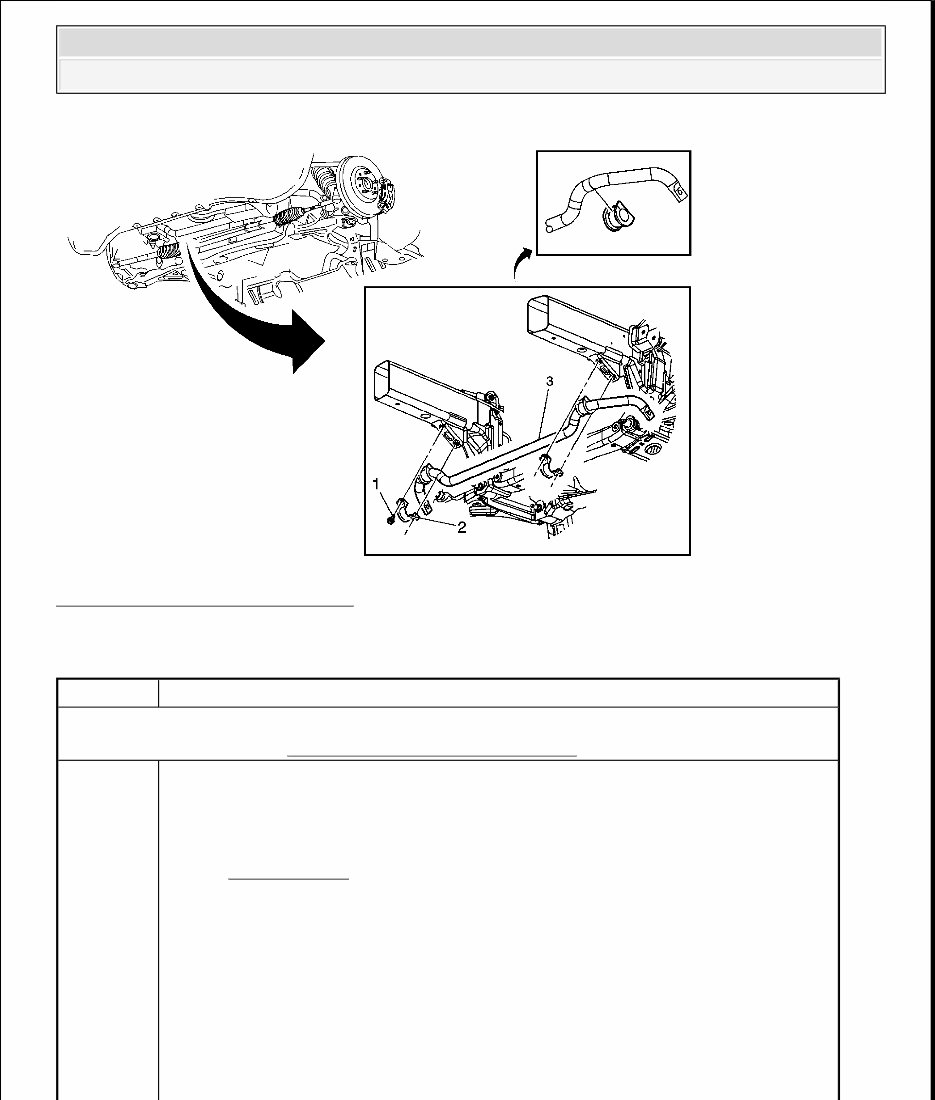
Fig. 3: Stabilizer Shaft Insulator
Courtesy of GENERAL MOTORS CORP.
Stabilizer Shaft Insulator Replacement
Callout Component Name
Preliminary Procedure:
Raise the vehicle. Refer to Lifting and Jacking the Vehicle .
1
Stabilizer Shaft Insulator Mounting Bolts (Qty: 4)
Tip:
The mounting bolts DO NOT have to be removed to perform this
procedure. Loosen the bolts until the bracket is loose enough to slide the
insulator along the stabilizer shaft.
Support the lower control arm with a jack stand in order to ease the
removal and installation of the link.
NOTE:
Refer to Fastener Notice .
2007 Saturn Sky
2007 SUSPENSION Front Suspension - Sky
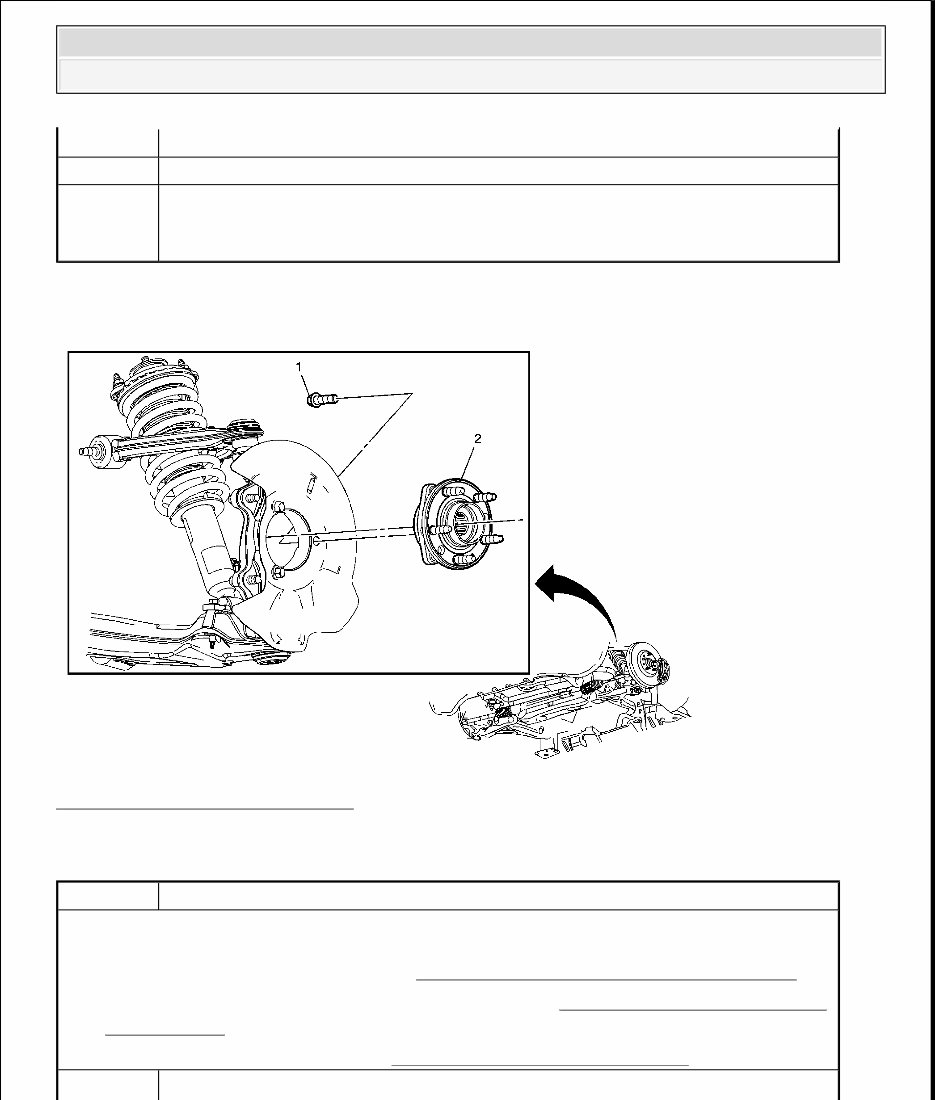
WHEEL HUB/SPEED SENSOR REPLACEMENT
Fig. 4: Wheel Hub/Speed Sensor
Courtesy of GENERAL MOTORS CORP.
Wheel Hub/Speed Sensor Replacement
Tighten: 55 N.m (41 lb ft)
2 Stabilizer Shaft Bracket
3
Stabilizer Shaft Insulator
Tip: Before removing the insulator, clean the area around the insulator and
apply a small amount of silicone spray.
Callout Component Name
Preliminary Procedure
1. Remove the tire and wheel. Refer to Tire and Wheel Removal and Installation .
2. Remove the brake caliper mounting bracket. Refer to Front Brake Caliper Bracket
Replacement .
3. Remove the brake rotor. Refer to Front Brake Rotor Replacement .
Wheel Hub/Speed Sensor Mounting Bolts (Qty: 3)
2007 Saturn Sky
2007 SUSPENSION Front Suspension - Sky
STEERING KNUCKLE REPLACEMENT
Fig. 5: Steering Knuckle
Courtesy of GENERAL MOTORS CORP.
Steering Knuckle Replacement
1
Tip: Disconnect the speed sensor electrical connector and the wiring harness
from the retainers on the steering knuckle.
Tighten: 115 N.m (85 lb ft)
NOTE:
Refer to Fastener Notice .
2 Wheel/Speed Sensor Hub
Callout Component Name
NOTE:
The ball stud must not rotate during disassembly or reassembly. Hand tools must be used to keep
the ball stud from rotating. If air tools are used and the stud is allowed to rotate, damage to the ball
stud and/or stud mounting hole may occur.
2007 Saturn Sky
2007 SUSPENSION Front Suspension - Sky

UPPER CONTROL ARM REPLACEMENT
Preliminary Procedure: Remove wheel hub and bearing assembly. Refer to Wheel
Hub/Speed Sensor Replacement .
1
Outer Tie Rod End Retaining Nut
Tip: Using the J-42188-B Ball Joint Separator, separate the outer tie rod end
from the steering knuckle. Do Not loosen the adjustment jamb nut. Refer to
Rack and Pinion Outer Tie Rod End Replacement .
Tighten: 30 N.m (22 lb ft) plus an additional 115°
NOTE:
Refer to Fastener Notice .
2
Upper Ball Joint Retaining Nut
Tip:
Loosen but DO NOT remove the nut until the ball stud has been separated
from the knuckle.
Using the J-42188-B , separate the ball stud from the knuckle.
Tighten: 30 N.m (22 lb ft) ± 150°
3
Lower Ball Joint Retaining Nut
Tip:
Rotate the forward edge of the knuckle outboard to provide access for the
J-42188-B .
Loosen but DO NOT remove the nut until the ball stud has been separated
from the knuckle.
Using the J-42188-B , separate the ball stud from the steering knuckle.
Tighten: 40 N.m (30 lb ft) ± 135°
4 Steering Knuckle
2007 Saturn Sky
2007 SUSPENSION Front Suspension - Sky
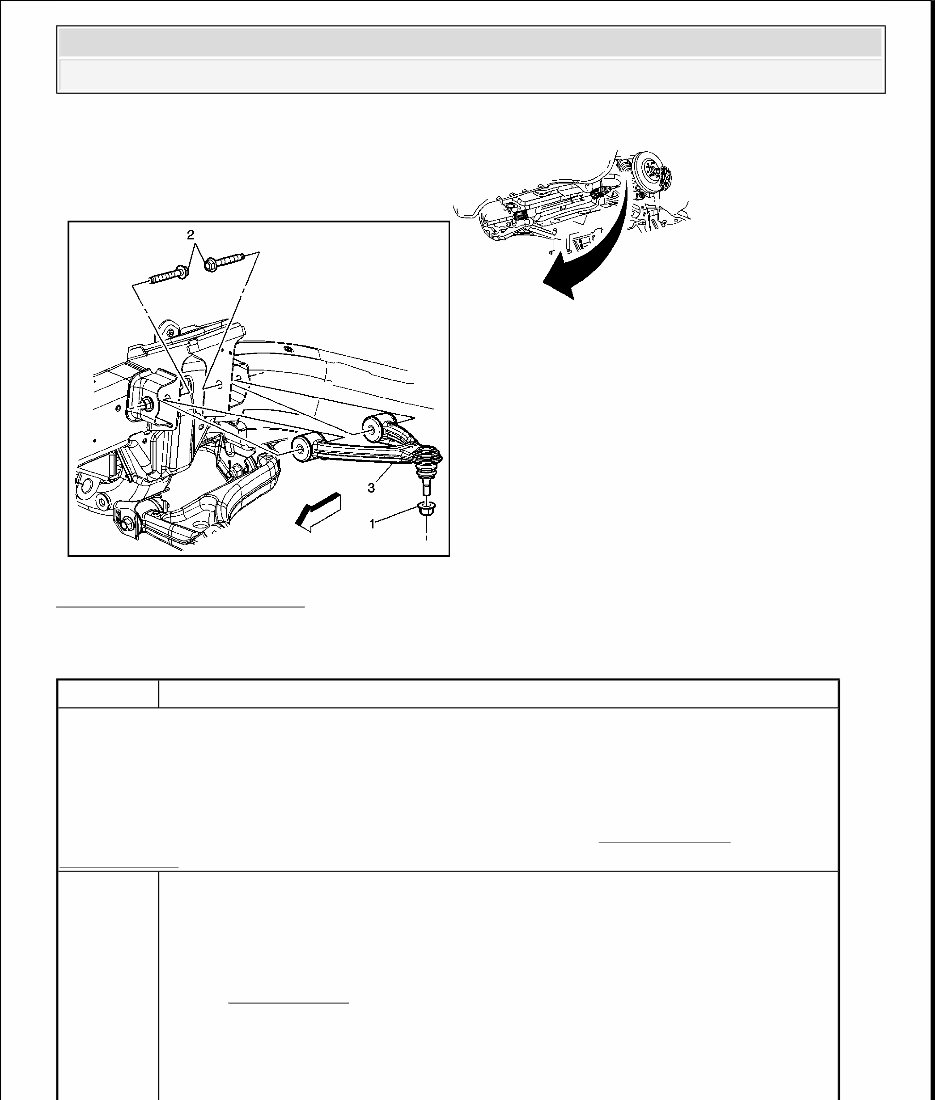
Fig. 6: Upper Control Arm
Courtesy of GENERAL MOTORS CORP.
Upper Control Arm Replacement
Callout Component Name
Preliminary Procedures: Remove the shock module. Refer to Shock Module
Replacement .
NOTE:
The ball stud must not rotate during disassembly or reassembly. Hand tools must be used to keep
the ball stud from rotating. If air tools are used and the stud is allowed to rotate, damage to the ball
stud and/or stud mounting hole may occur.
1
Upper Ball Joint Nut
Tip: Loosen but DO NOT remove the nut until the ball stud has been separated
from the knuckle.
NOTE:
Refer to Fastener Notice .
2007 Saturn Sky
2007 SUSPENSION Front Suspension - Sky
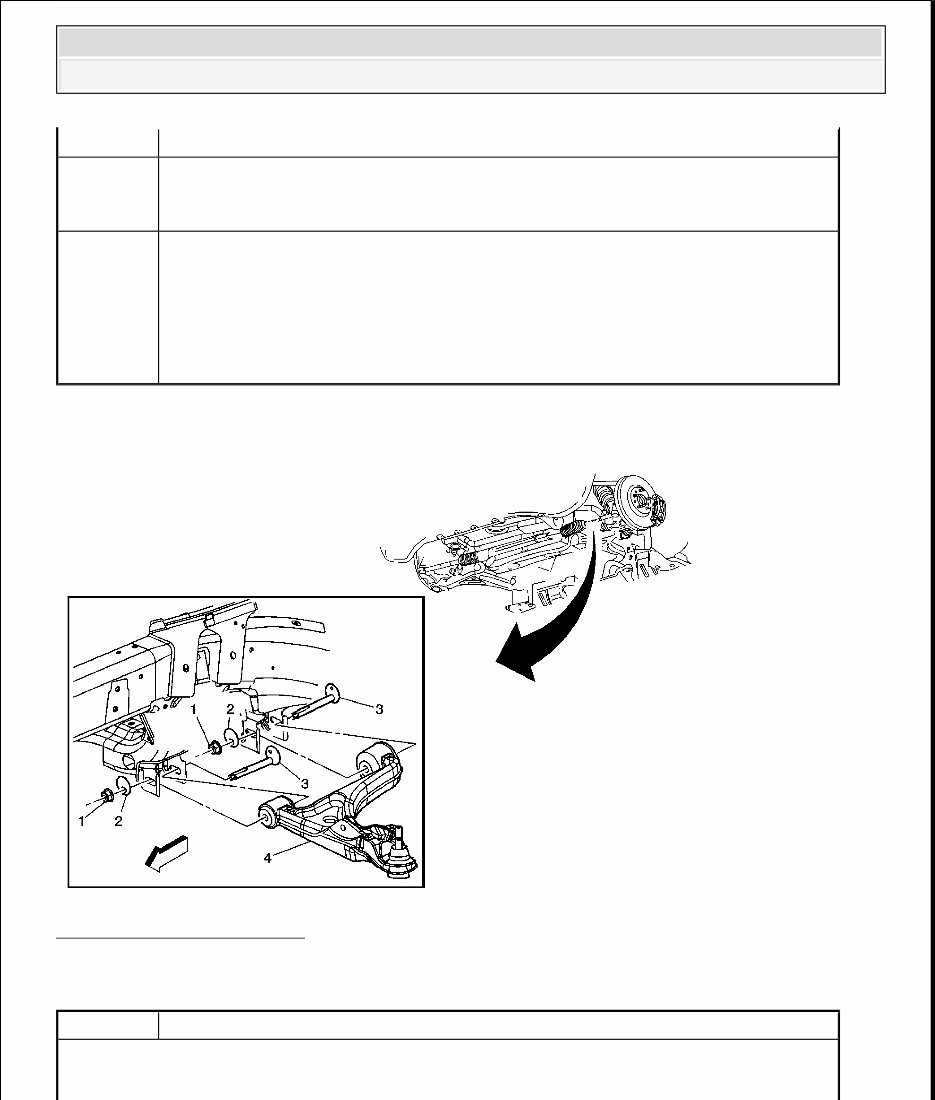
LOWER CONTROL ARM REPLACEMENT
Fig. 7: Lower Control Arm
Courtesy of GENERAL MOTORS CORP.
Lower Control Arm Replacement
Tighten: 30 N.m (22 lb ft) ± 150°
2
Upper Control Arm Mounting Bolts (Qty: 2)
Tighten: 110 N.m (81 lb ft)
3
Upper Control Arm
Tip:
Using the J-42188-B Ball Joint Separator, separate the ball stud from the
knuckle.
Disconnect the wiring harness from the upper control arm.
Callout Component Name
NOTE:
The ball stud must not rotate during disassembly or reassembly. Hand tools must be used to keep
2007 Saturn Sky
2007 SUSPENSION Front Suspension - Sky
WHEEL STUD REPLACEMENT
Tools Required
J 43631 Ball Joint Remover. See Special Tools .
Removal Procedure
Preliminary Procedures
1. Disconnect the stabilizer link from the lower control arm. Refer to Stabilizer Shaft
Link Replacement .
2. Disconnect the shock module from the lower control arm. Refer to Shock Module
Replacement .
3. Separate the outer tie rod end from the steering knuckle. DO NOT loosen the
adjustment jamb nut. Refer to Rack and Pinion Outer Tie Rod End Replacement
the ball stud from rotating. If air tools are used and the stud is allowed to rotate, damage to the ball
stud and/or stud mounting hole may occur.
1
Lower Control Arm to Frame Nuts (Qty: 2)
Tip: Finger start the nut before tightening.
Tighten: 165 N.m (122 lb ft)
NOTE:
Refer to Fastener Notice .
2 Lower Control Arm Alignment Cam
3 Lower Control Arm Alignment Bolt
4
Lower Control Arm Assembly
Tip:
Rotate the forward edge of the knuckle outboard to provide access for the
J-42188-B Ball Joint Separator.
Loosen but DO NOT remove the nut until the ball stud has been separated
from the knuckle.
Using the J-42188-B , separate the ball stud from the knuckle.
2007 Saturn Sky
2007 SUSPENSION Front Suspension - Sky
You're Reading a Preview
What's Included?
Fast Download Speeds
Offline Viewing
Access Contents & Bookmarks
Full Search Facility
Print one or all pages of your manual
$24.99
Viewed 20 Times Today


Secure transaction
What's Included?
Fast Download Speeds
Offline Viewing
Access Contents & Bookmarks
Full Search Facility
Print one or all pages of your manual
$24.99
- This repair manual provides comprehensive troubleshooting and replacement procedures, including step-by-step instructions, clear images, and exploded-view illustrations.
- It is useful for both professional mechanics and DIY enthusiasts, offering manufacturer-recommended charts and procedures for vehicle maintenance and repair.
- No need to search through numerous pages; this manual allows easy access, search, and bookmarking for quick reference.
- It is available in printable PDF format and compatible with various electronic devices, including PCs, Mac computers, smartphones, and tablets.
- Adobe Reader (free) is required for viewing and printing the manual.
The software version is available as a .OVA file, providing the same comprehensive information in a digital format.


