51A- 1 SIDE OPENING ELEMENT MECHANISMS Front side door check strap: Removal - Refitting 51A REMOVAL I - REMOVAL PREPARATION OPERATION a Remove: - the front side door trim (see Front side door trim: Removal - Refitting) (72A, Side opening element trim), - the front speaker (see Front speakers: Removal - Refitting) (86A, Radio). II - OPERATION FOR REMOVAL OF PART CONCERNED a Remove: - the front side door check strap seal (1) , - the bolt (2) . a Remove: - the bolts (3) , - the front side door check strap from inside the front side door box section. REFITTING I - REFITTING OPERATION FOR PART CONCERNED a Refit: - the front side door check strap through the inside of the front side door box section, - the bolts (3) , - the bolt (2) , - the front side door check strap seal (1) . II - FINAL OPERATION a Refit: - the front speaker (see Front speakers: Removal - Refitting) (86A, Radio), - the front side door trim (see Front side door trim: Removal - Refitting) (72A, Side opening element trim). 136159 136160
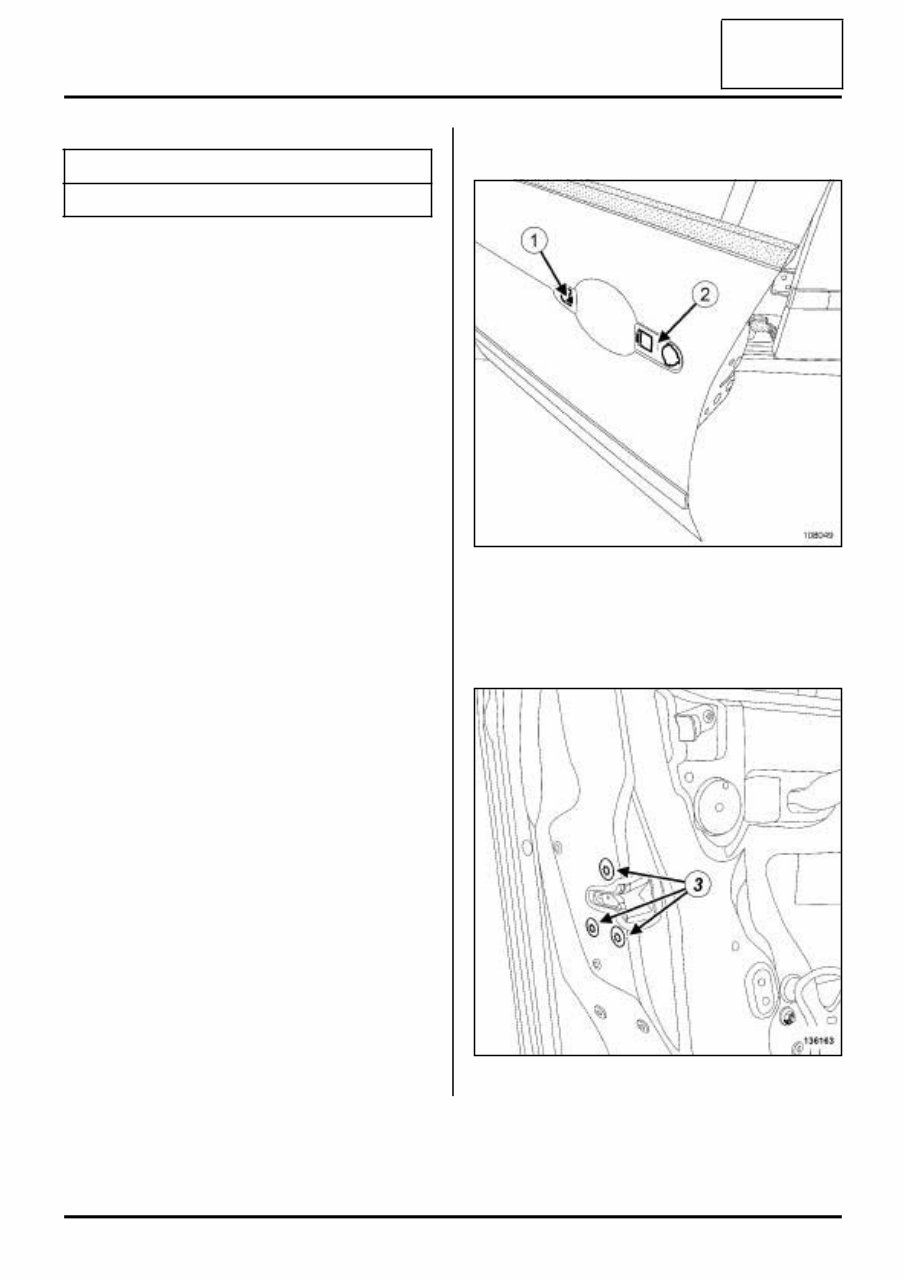
51A- 2 SIDE OPENING ELEMENT MECHANISMS Front side door lock: Removal - Refitting 51A REMOVAL I - REMOVAL PREPARATION OPERATION a Disconnect the battery (see Battery: Removal - Re- fitting) (80A, Battery). a Remove: - the front side door trim (see Front side door trim: Removal - Refitting) (72A, Side opening element trim), - the door sealing film (see Door sealing film: Re- moval - Refitting) (65A, Opening element sea- ling), - the front side door lock barrel (see 51A, Side ope- ning element mechanisms, Front side door lock barrel: Removal - Refitting, page 51A-4) , - the front side exterior door handle (see 51A, Side opening element mechanisms, Door exterior handle: Removal - Refitting, page 51A-6) . a Protect the side impact sensor to prevent any acci- dental damage (cardboard and adhesive tape). II - OPERATION FOR REMOVAL OF PART CONCERNED a Remove: - the bolt (1) , - the seal (2) . a Unclip the front side door exterior handle module. a Remove the bolts (3) . Tightening torques m front side door lock bolts 8 N.m 108049 136163
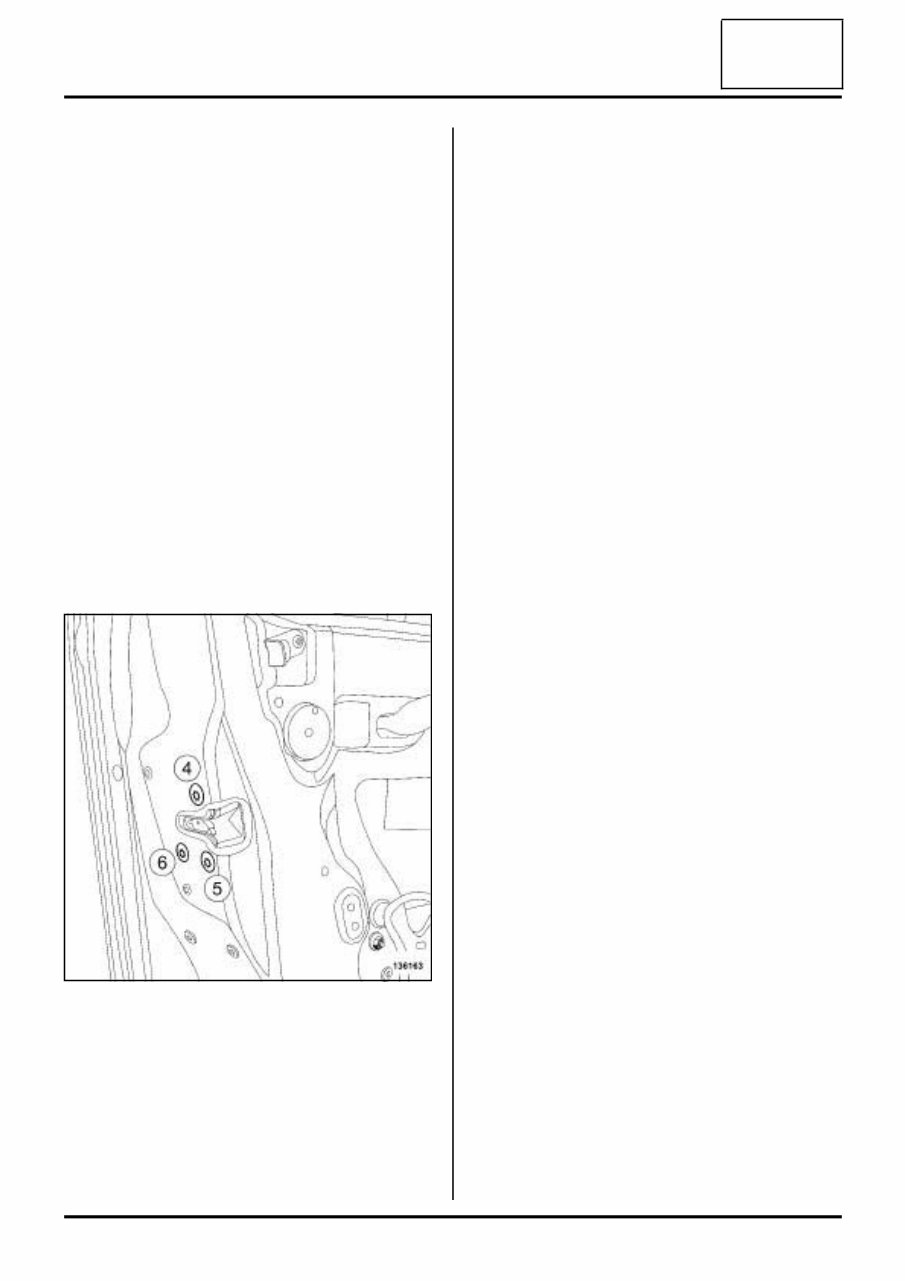
51A- 3 SIDE OPENING ELEMENT MECHANISMS Front side door lock: Removal - Refitting 51A a Gently lift the front side door lock to remove it from the retaining hook. a Remove the front side door « lock - exterior door handle module » assembly. a Disconnect the connectors. a Unclip the cable from the front side door exterior handle module lock. REFITTING I - REFITTING OPERATION FOR PART CONCERNED a Clip the lock cable onto the front side door exterior handle module. a Connect the connectors. a Refit the front side door « lock - exterior door handle module » assembly. a Position the lock on the front side door box section retaining hook. a Refit the front window guide bolts. a Refit the front side door lock bolts (3) in the order ( 4) , (5) and (6) . a Torque tighten the front side door lock bolts (8 N.m). a Clip on the front side door exterior handle module. a Refit: - the seal, - the bolt. II - FINAL OPERATION a Refit: - the front side exterior door handle (see 51A, Side opening element mechanisms, Door exterior handle: Removal - Refitting, page 51A-6) , - the front side door lock barrel (see 51A, Side ope- ning element mechanisms, Front side door lock barrel: Removal - Refitting, page 51A-4) . a Connect the battery (see Battery: Removal - Refit- ting ) (80A, Battery). a Carry out a function test. a Remove the side impact sensor protection, a Refit new door sealing film (see Door sealing film: Removal - Refitting) (65A, Opening element sea- ling). a Carry out a sealing test (see Technical Note 0653A). a Refit the front side door trim (see Front side door trim: Removal - Refitting) (72A, Side opening ele- ments trim). 136163
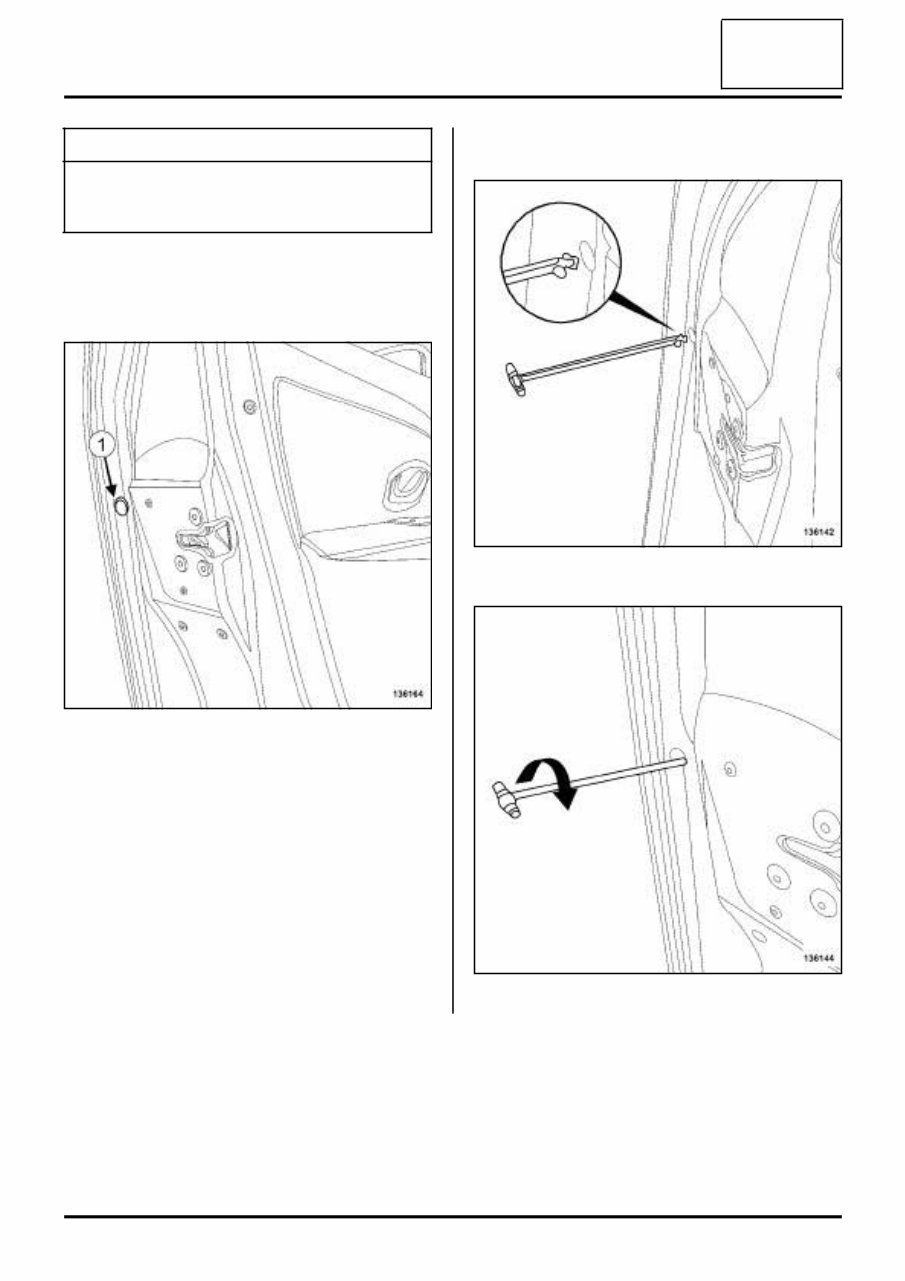
51A- 4 SIDE OPENING ELEMENT MECHANISMS Front side door lock barrel: Removal - Refitting 51A REMOVAL I - REMOVAL PREPARATION OPERATION a Remove the blanking cover (1) to access the front side door lock barrel release mechanism. II - OPERATION FOR REMOVAL OF PART CONCERNED a Insert the tool (Car. 1904) in the door box section. a Rotate the tool (Car. 1904) a quarter of a turn. Essential special tooling Car. 1904 Tool for removing and refit- ting door lock barrels and dummy lock barrels 136164 136142 136144
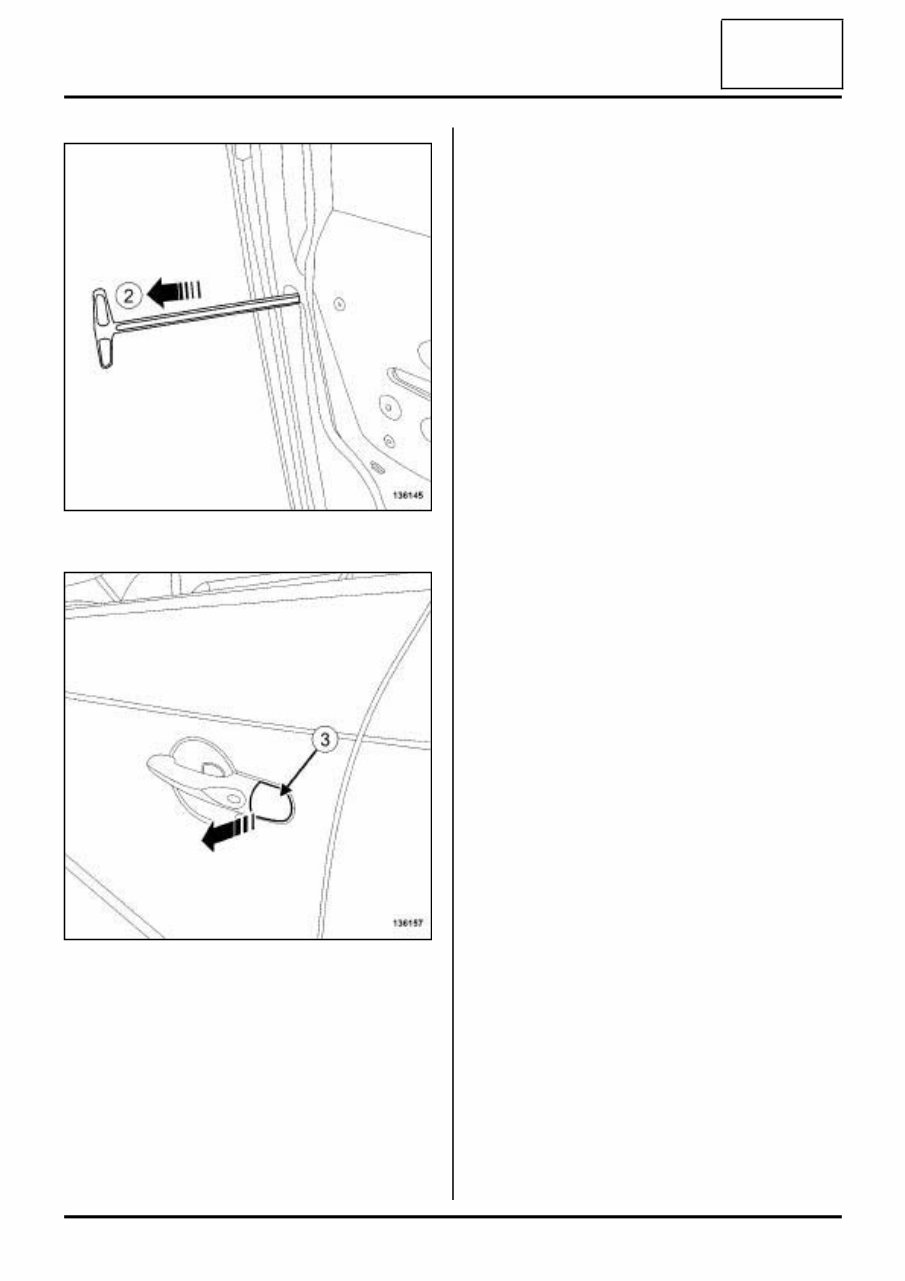
51A- 5 SIDE OPENING ELEMENT MECHANISMS Front side door lock barrel: Removal - Refitting 51A a Pull the tool (Car. 1904) at ( 2) . a Remove the front side door lock barrel (3) . REFITTING I - REFITTING OPERATION FOR PART CONCERNED a Refit the front side door lock barrel. a Lock the safety mechanism by pushing it with a screwdriver. a Carry out a function test. II - FINAL OPERATION a Refit the blanking cover on the front side door lock barrel release mechanism. 136145 136157
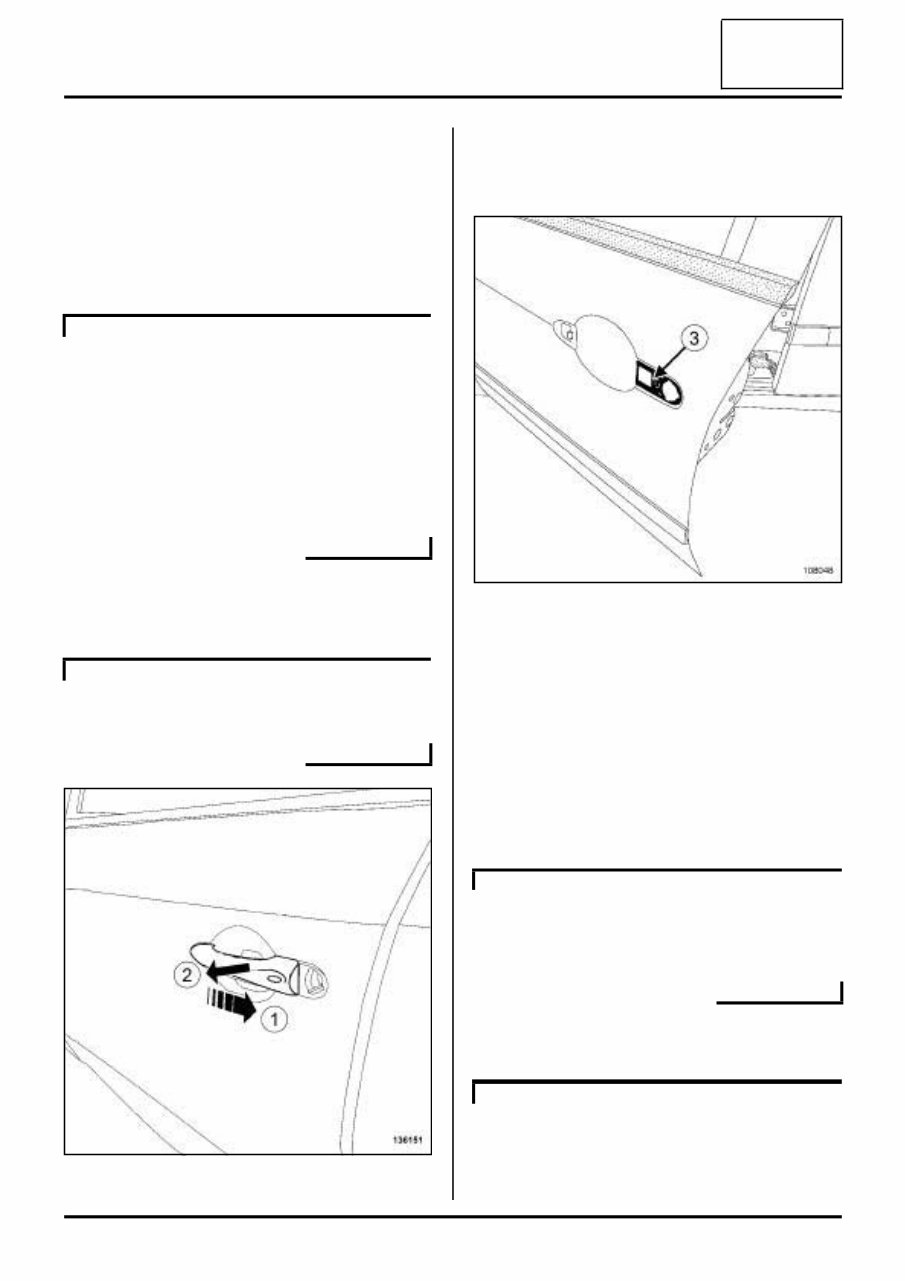
51A- 6 SIDE OPENING ELEMENT MECHANISMS Door exterior handle: Removal - Refitting 51A REMOVAL I - REMOVAL PREPARATION OPERATION a Remove the front side door lock barrel or the dummy lock (see 51A , Side opening element mecha- nisms, Front side door lock barrel: Removal - Refitting, page 51A-4) . a Remove: - the front side door trim (see Front side door trim: Removal - Refitting) (72A, Side opening elements trim), - the door sealing film (see Door sealing film: Re- moval - Refitting) (65A, Opening element sea- ling). II - OPERATION FOR REMOVAL OF PART CONCERNED a Disconnect the door handle connector. a Remove the exterior door handle at (1) and (2) . REFITTING I - REFITTING PREPARATION OPERATION a Check the presence and condition of seal ( 3) . II - REFITTING OPERATION FOR PART CONCERNED a Refit: - the door exterior handle, - the front side door lock barrel or the dummy lock (see 51A, Side opening element mechanisms, Front side door lock barrel: Removal - Refitting, page 51A-4) . a Connect the door handle connector. a Perform a function test of the "hands-free" function. III - FINAL OPERATION a Refit: - new door sealing film (see Door sealing film: Re- moval - Refitting) (65A, Opening element sea- ling), DOOR OPEN SYST. 433 NML DOOR OPEN SYST. 433 NML 136151 108048 DOOR OPEN SYST. 433 NML DOOR OPEN SYST. 433 NML
This Renault Megane 3 Body Repair Service & Workshop Manual is the perfect guide for car enthusiasts, mechanics, and owners looking to repair and maintain their Renault Megane 3 vehicles. With detailed step-by-step instructions, diagrams, and illustrations, this manual provides all the necessary information to carry out body repairs on the Megane 3 model.
Renault Megane 3 - Body Repair Service Manual
Renault Megane 3 - Workshop Manual
Whether you need to fix a dent, replace a panel, or repair any other body damage, this manual covers it all. From identifying the parts and tools required to comprehensive repair procedures, this manual ensures you have the knowledge and guidance to tackle any body repair task on your Renault Megane 3.
Save time and money by performing these repairs yourself with the help of this comprehensive manual. Don't let body damage hinder the appearance and performance of your Megane 3. Get this Body Repair Service & Workshop Manual today and start restoring your Renault Megane 3 to its former glory!
Recently Viewed
5,521,897Happy Clients
2,594,462eManuals
1,120,453Trusted Sellers
15Years in Business
Price:
Actual Price:
Renault Megane 3 - Body repair Service & Workshop Manual