1975-1989 Porsche 911 Turbo (930) Service & Repair Manual
What's Included?
Lifetime Access
Fast Download Speeds
Offline Viewing
Access Contents & Bookmarks
Full Search Facility
Print one or all pages of your manual
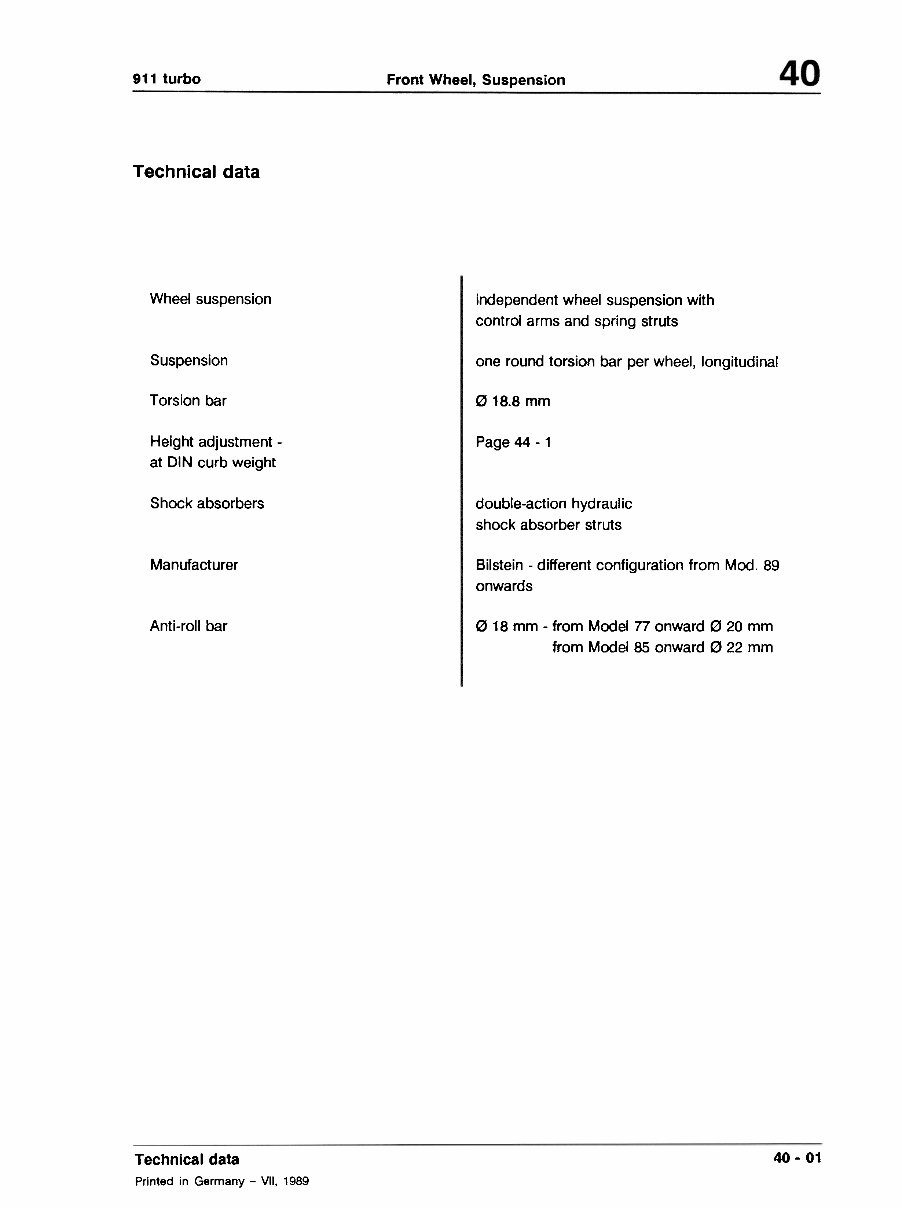
911 turbo Front Wheel, Suspension Technical data Wheel suspension independent wheel suspension with control arms and spring struts Suspension one round torsion bar per wheel, longitudinal Torsion bar " 18.8 mm Height adjustment - at DIN curb weight Page 44 -1 Shock absorbers double-action hydraulic shock absorber struts Manufacturer Bilstein -different configuration from Mod. 89 onwards Anti-roll bar 0 18 mm -from Model 77 onward 0 20 mm from Model 85 onward 0 22 mm 40 -01 Technical data Printed in Germany -VII, 1989
40 General TORQUE SPECIFICATIONS FOR FRONT AXLE Location Designation Threads Class Torque Nm ft Ib Support bearing to strut Nut M 14 x 1.5 8 80 58 Support bearing to body Capscrew M 10 8.8 47 34 Carrier to body Bolt M 12 x 1.5 8.8 90 65 Carrier strut guard to body Bolt M 10 8.8 47 34 Stabilizer and suspension Bolt M8 8.8 25 18 Guard Bolt M8 8.8 25 18 Stabilizer to carrier strut Bolt M8 8.8 25 18 Carrier strut,guard and stabilizer to body Capscrew M 10 8.8 47 34 Carrier strut and guard toI carrier Nut M 10 8 28 20 Control arm to body Bolt M 10 8.8 47 34 Ball joint to control arm M 45 x 8.8 Slotted nut 5 250 181 Nut on stub axle Capscrew M7 10.9 15 11 M8 8 Ball joint to strut Uni stop nut 22 16 Brake disc to wheel hub Nut M8 8.8 23 17 Cover for brake disc Bolt M8 8.8 10 7 Caliper to stub axle Bolt Capscrew M 12 x 1.5 8.8 70 51 Brake line Coupling M 10 x 1 12 9 Nut M 14 x 1.5 130 94 Wheel to wheel hub Printed in Germany 40-02 Technical Data
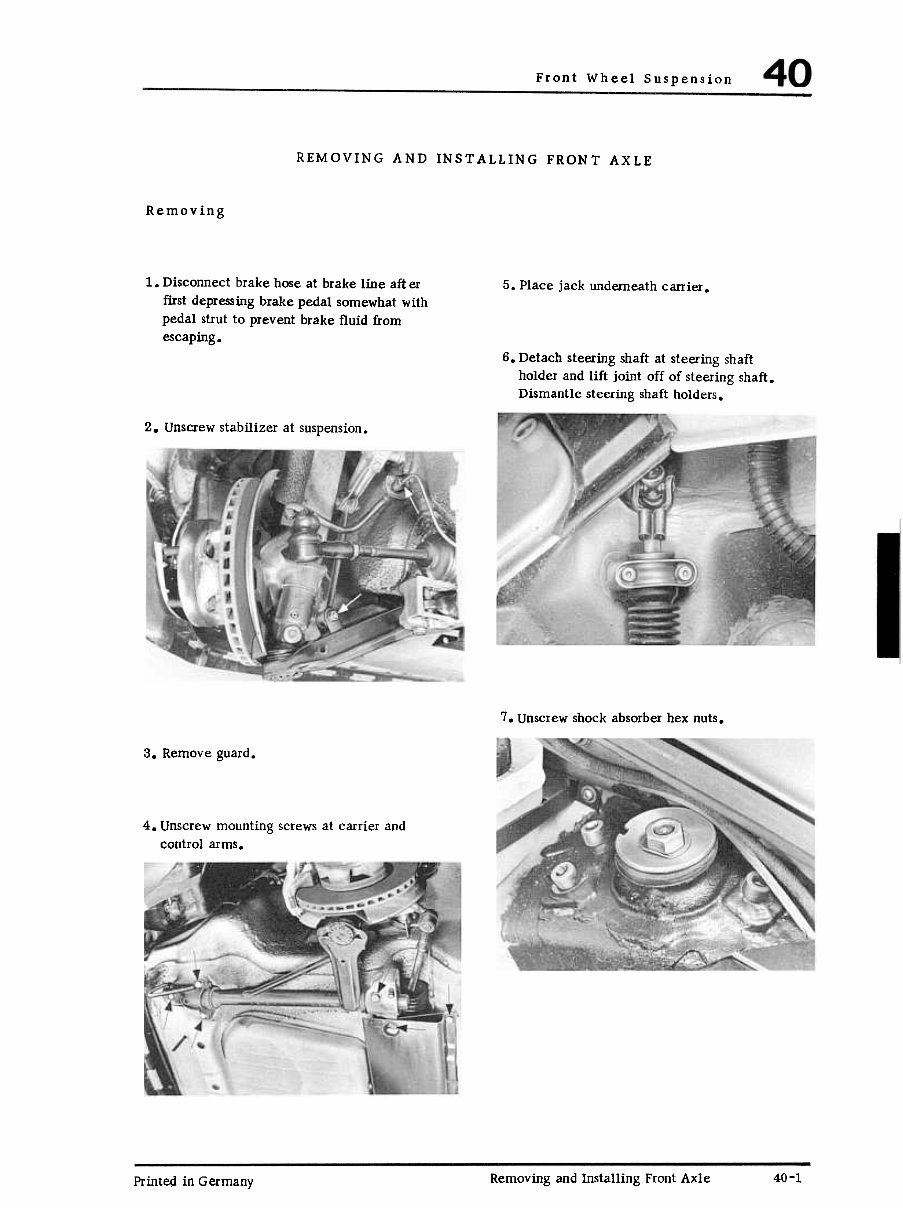
Front Wheel Suspension REMOVING AND INSTALLING FRONT AXLE Removing 1. Disconnect brake hose at brake line aft er first depressingbrake pedal somewhat with pedal strut to prevent brake fluid from escaping. 5. Place jack underneath carrier. 6. Detach steering shaft at steering shaft holder and lift joint off of steering shaft. Dismantle steering shaft holders. 2. Unscrew stabilizer at suspension. 7. Unscrew shock absorber hex nuts. 3. Remove guard. 4. Unscrewmounting screws at carrier and control arms. Removing and Installing Front Axle 40-1 Printed in Germany
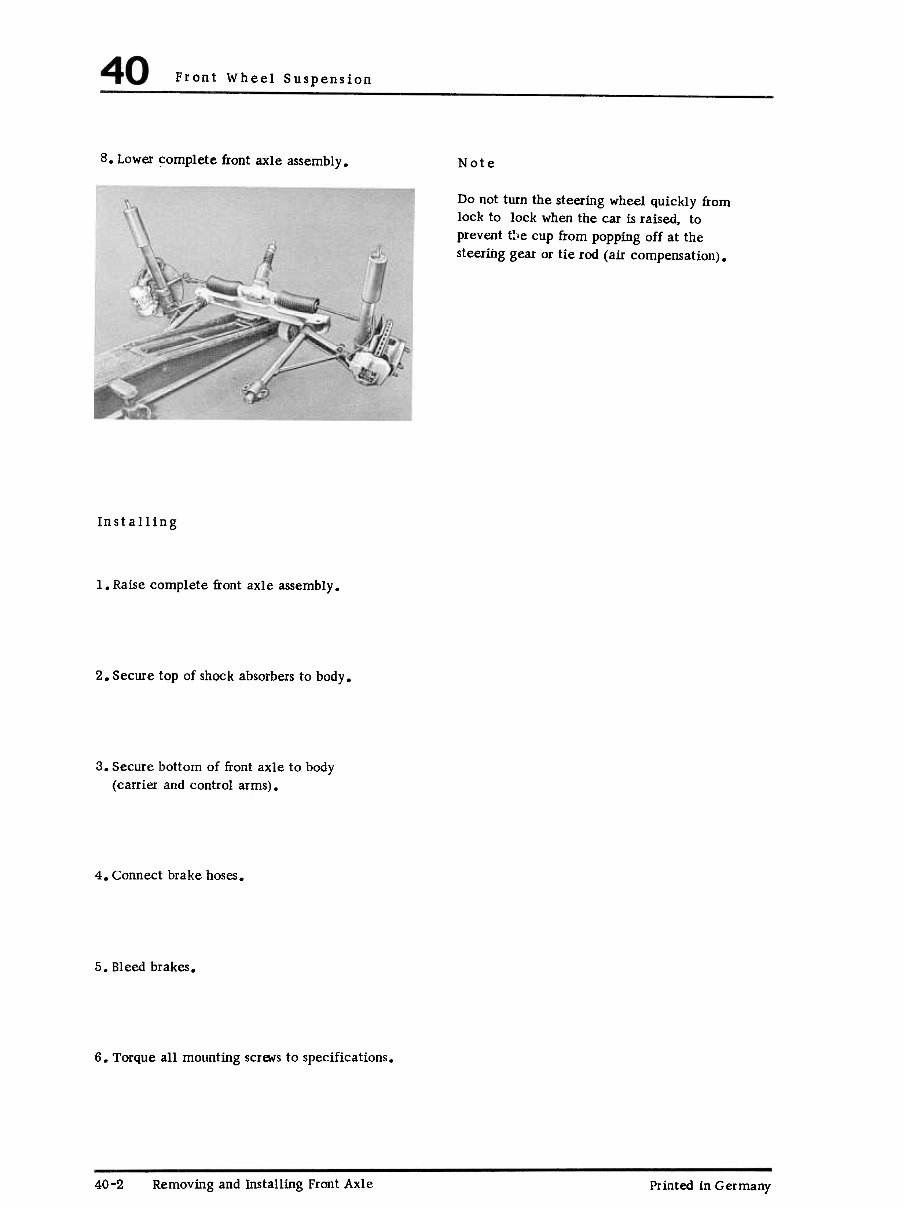
Front Wheel Suspension 8. Lowercomplete front axle assembly. Note Do not turn the steering wheel quickly from lock to lock when the car is raised, to prevent tIle cup from popping off at the steeritlg gear or tie rod (air compensation). Installing 1. Raise complete front axle assembly. 2. Secure top of shock absorbers to body. 3. Secure bottom of front axle to body (carrier and control arms). 4. Connect brakehoses. 5. Bleed brakes. 6. Torque all mountingscra-ls to specifications. 40-2 Removing and Installing Front Axle Printed in Germany
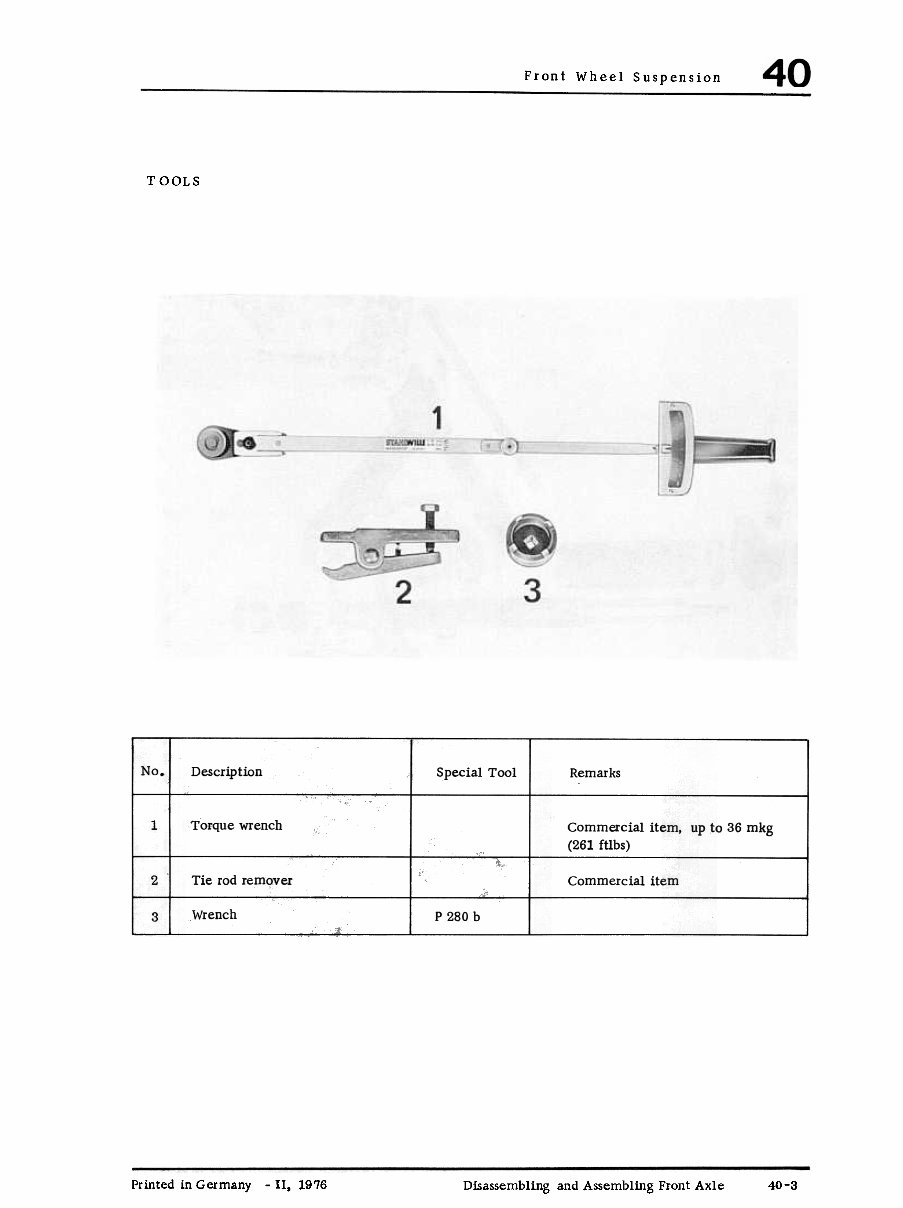
Front Wheel Suspension T GalS No. Description Special Tool Remarks Torque wrench 1 Commexcial item, up to 36 mkg (261 ftlbs) 2 Commercial item Tie rod remover Wrench P 280 b 3 Printed in Germany -II. 1976 Disassembling and Assembling Front Axle 40-3
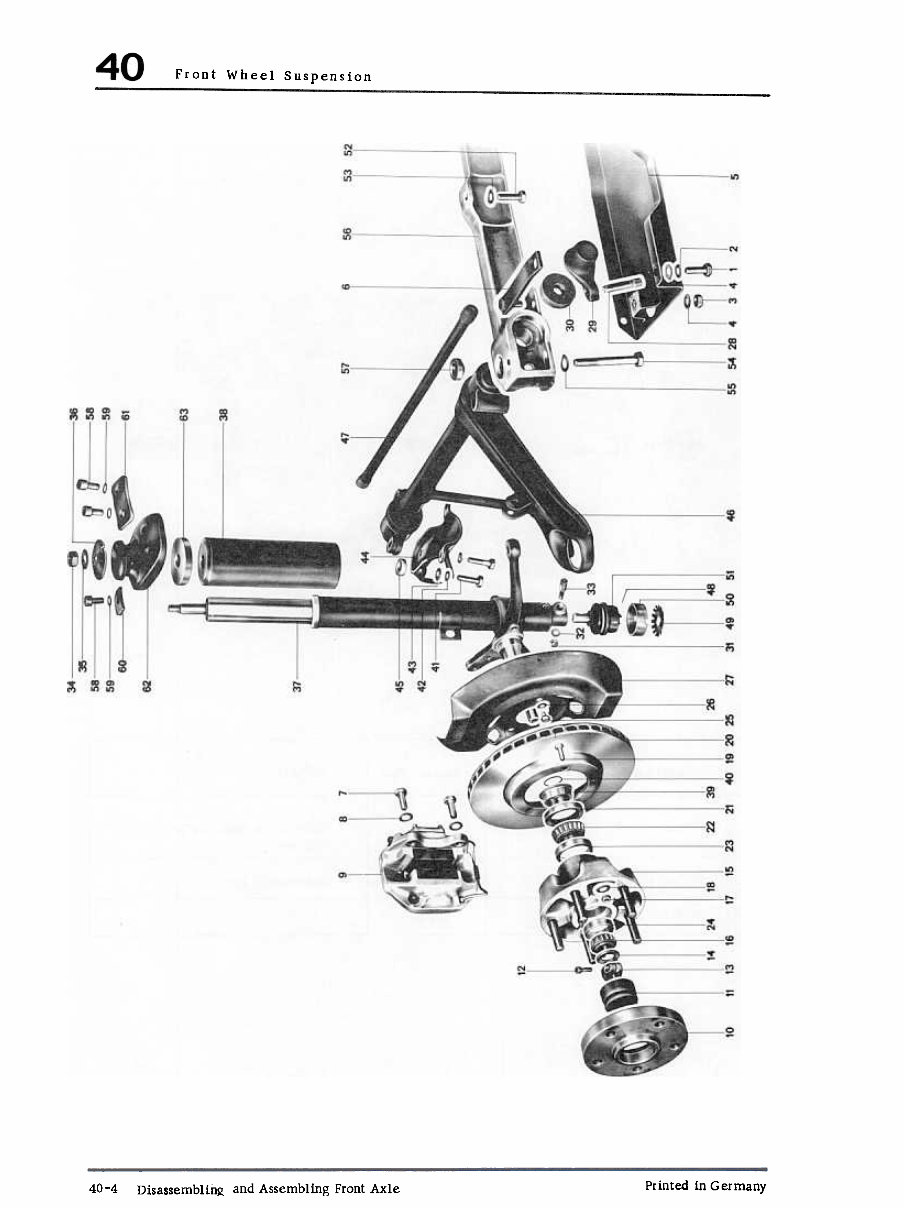
Front Wheel Suspension Printed in Germany 40-4 Disassembling and Assembling Front Axle
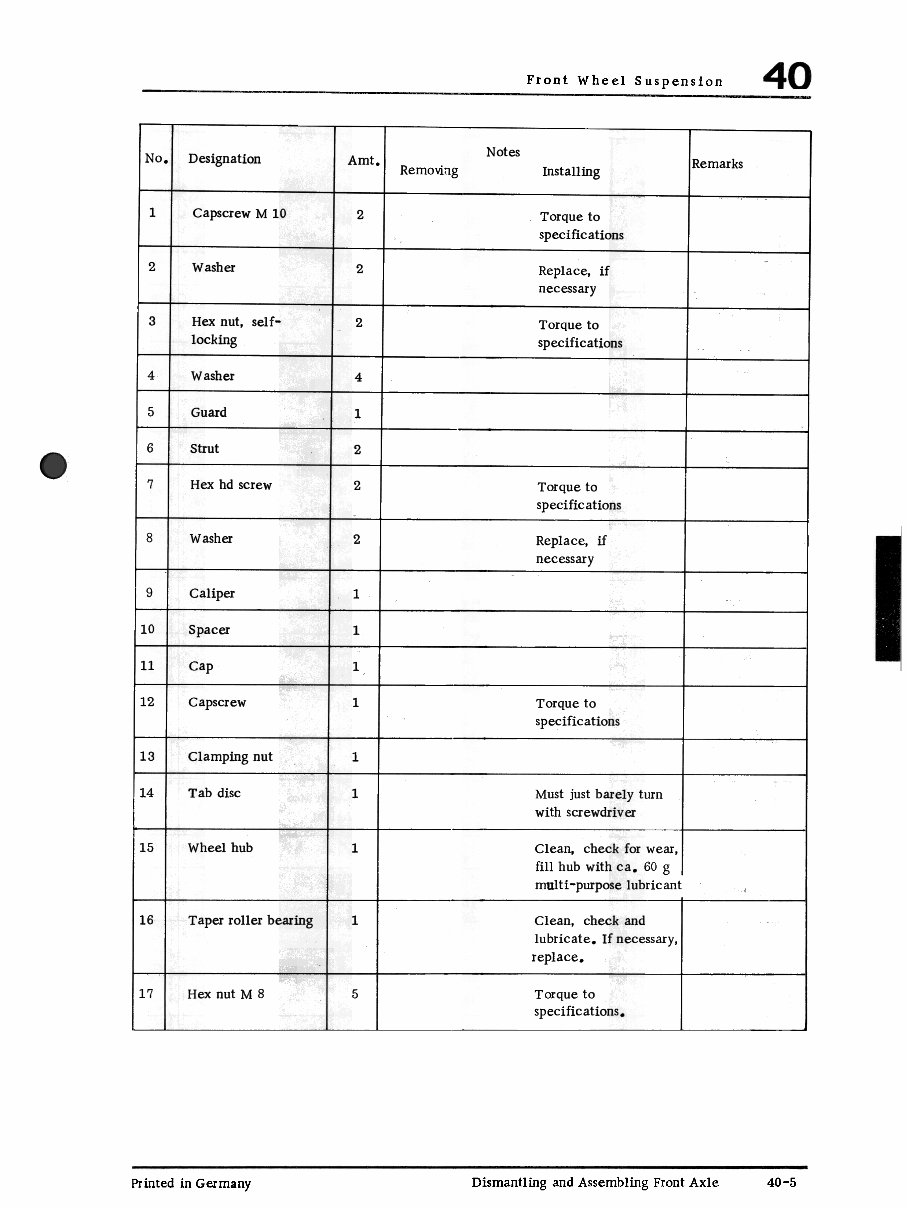
Front Wheel Suspension Notes No Designation Amt. Removing Installing 1 Capscrew M 10 2 Torque to specifications 2 Washer 2 Replace, if necessary 3 Hex nut, self- locking 2 Torque to specifications 4 Washer 4 5 Guard 1 6 Strut 2 Hex hd screw 2 Torque to specifications 8 Washer 2 Replace, if necessary 9 Caliper 1 10 Spacer 1 111 Cap 1 12 Capscrew 1 Torque to specifications 13 Clamping nut 1 Tab disc 14 1 Must just barely turn with screwdriver 15 Wheel hub 1 Clean, check for wear' l fill hub with ca. 60 g multi-purpose lubricant 16 Taperroller bearing 1 Clean, check and lubricate. If necessary. replace. 17 Hex nut M 8 5 Torque to specifications. Printed in Germany Dismantling and Assembling Front Axle 40-5
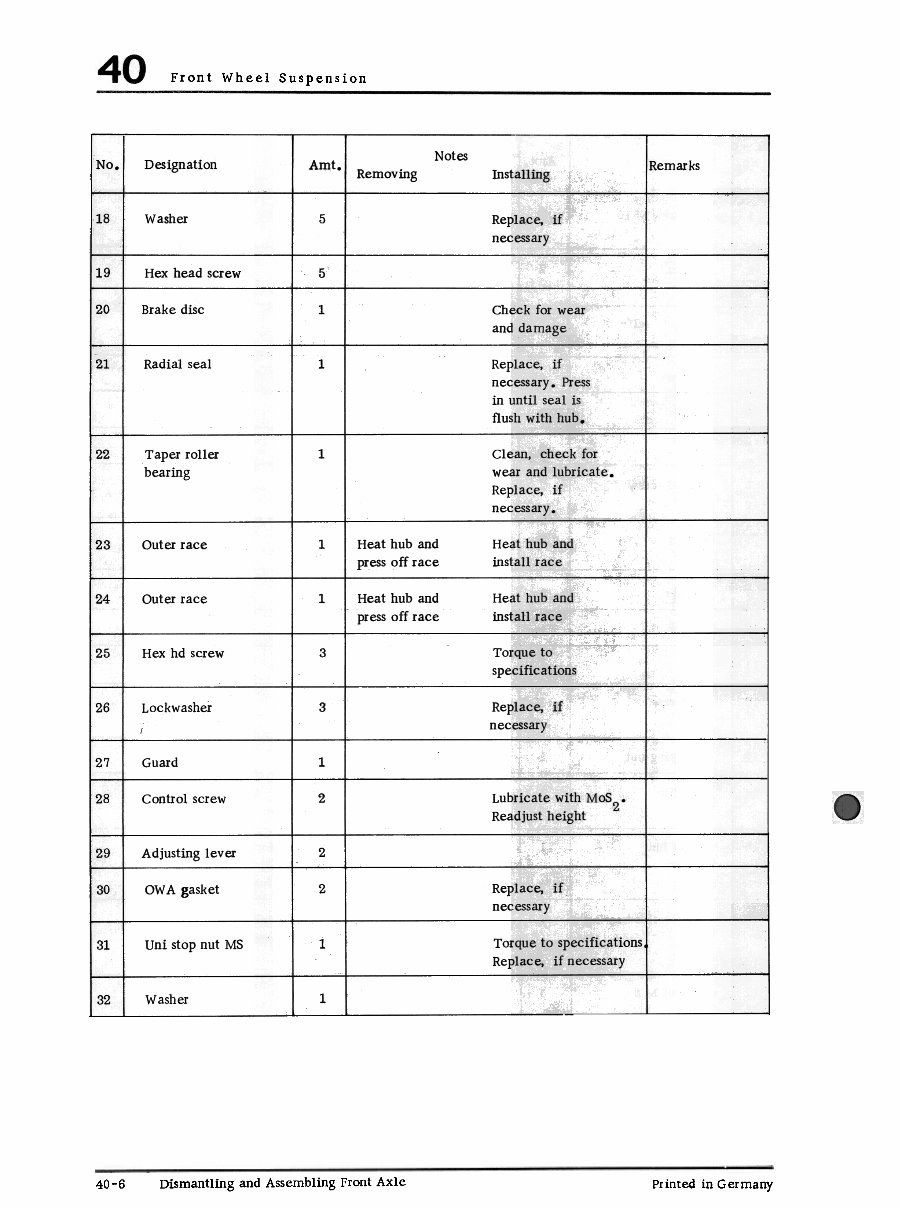
Front Wheel Suspension Notes No. Designation Amt IRemarks Removing Installing 18 Washer 5 Replace, if necessary 19 Hex head screw 5 120 Brake disc 1 Check for wear and damage 121 Radial seal 1 Replace, if necessary. Press in until seal is flush with hub. Clean. check for wear and lubricate. Replace. if necessary. 22 Taper roller bearing 1 1 Heat hub and press off race Heat hub and install race 123 Outer race 1 Heat hub and pressoff race Heat hub and install race 124 Outer race Hex hd screw 3 Torque to specifications 125 Replace. if necessary 26 Lockwasher 3 27 Guard 1 28 2 Lubricate with MoS2° Readjust height Control screw 2 129 I Adjusting lever Replace, if necessary OWA gasket 2 30 Torque to specifications, Replace, if necessary 131 Uni stop nut MS 1 Washer 1 32 Dismantling and Assembling Front Axle 40-6 Printed in Germany
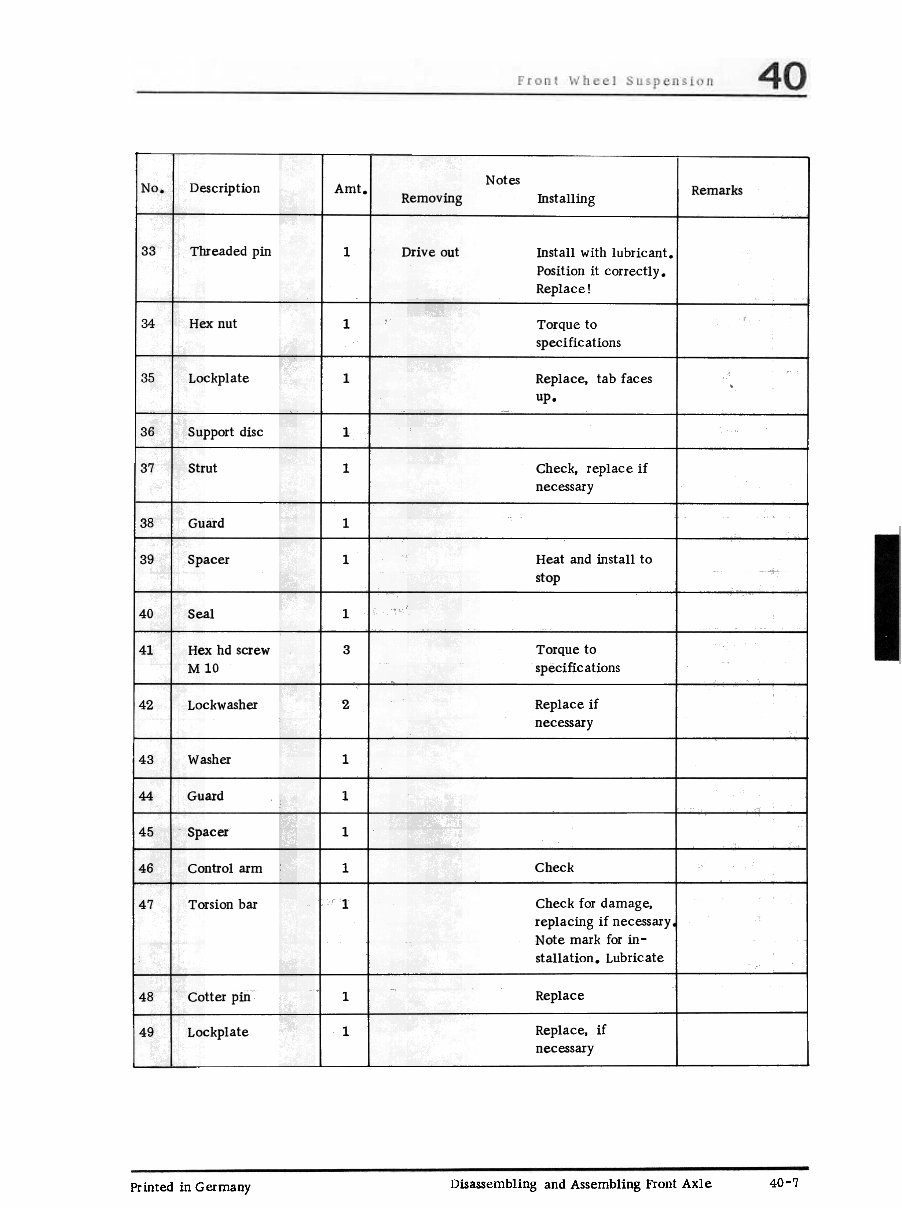
Notes No. Description Amt Remarks Removing Installing 33 Threaded pin 1 Drive out Install with lubricant Position it correctly. Replace! 34 Hex nut 1 Torque to specifications 35 Lockplate 1 Replace, tab faces up. 36 Support disc 1 37 Strut 1 Check, replace if necessary 38 Guard 1 39 Spacer Heat and install to stop 1 40 Seal 1 41 Hex hd screw M 10 3 Torqueto specifications Lockwasher 2 Replace if necessary 42 Washer 43 1 Guard 44 1 45 Spacer 1 Check 46 Control arm 1 Torsion bar 1 47 Check for damage, replacing if necessary Note mark for in- stallation. Lubricate 48 1 Replace Cotter pin Replace. if necessary Lockplate 1 49 40-7 Disassembling and Assembling Front Axle Printed in Germany
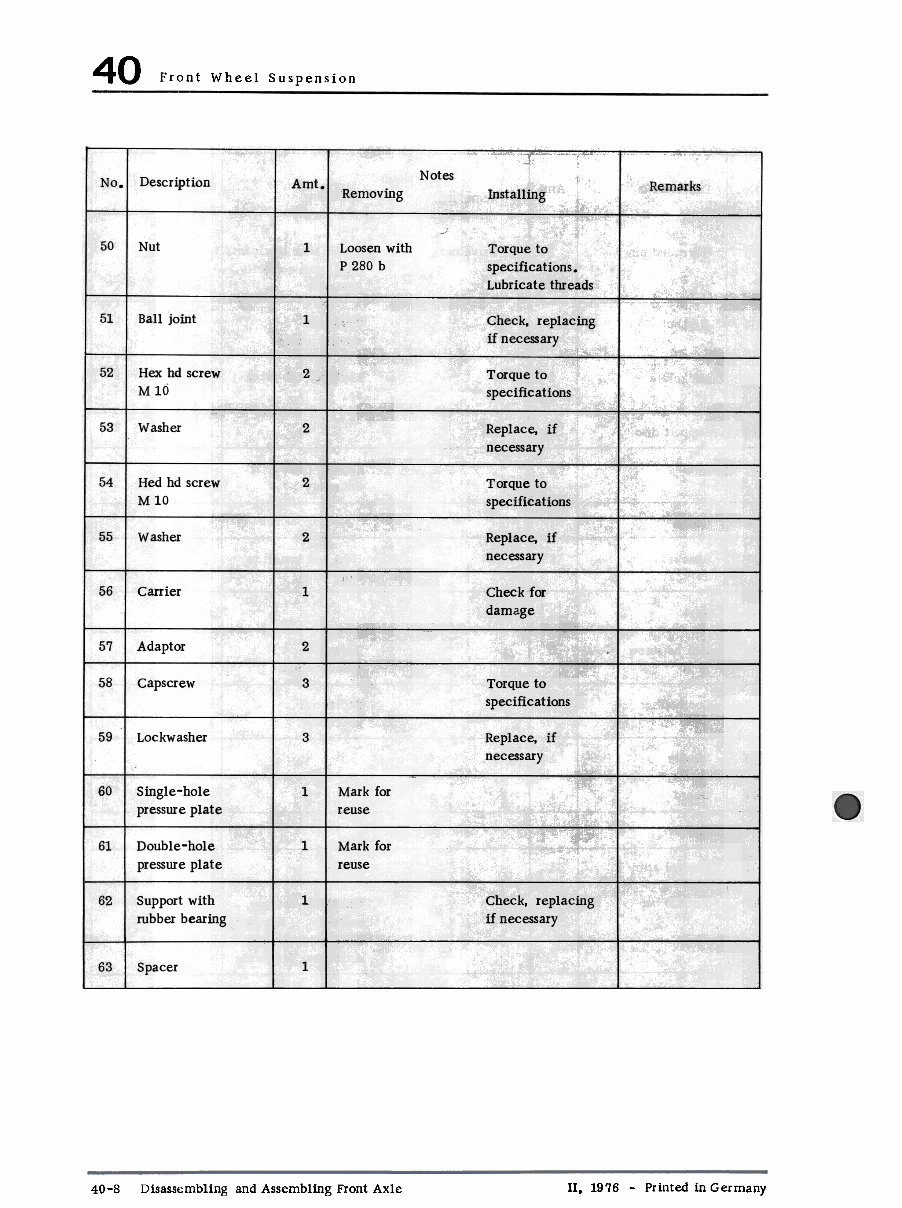
40 Front Wheel Suspension Notes No Description Amt, Remarks Installing Removing 50 Nut 1 Loosen with P 280 b Torque to specifications. Lubricate threads 51 Ball joint 1 Check, replacing if necessary 52 Hex hd screw M 10 2 Torque to specifications 53 Washer 2 Replace, if necessary 54 Hed hd screw M1O 2 Torqueto specifications 55 Washer 2 Replace, if necessary 56 Carrier 1 Check for damage 57 Adaptor 2 58 Capscrew 3 Torque to specifications 59 Lockwasher 3 Replace. if necessary 60 Single-hole pressure plate Mark for reuse 1 Double-hole pressure plate Mark for reuse 61 1 62 Support with rubber bearing 1 Check, replacing if necessary 63 1 Spacer II, 1976 -Printed in Germany 40-8 Disassembling and Assembling Front Axle
1975-1989 Porsche 911 Turbo (930) Service & Repair Manual
Engines Covered:
3.0L 930/50 air-cooled turbo H6
3.3L 930/60 air-cooled turbo H6
Transmissions Covered:
4-speed manual
5-speed manual (Getrag G50)
The 1975-1989 Porsche 911 Turbo (930) Service & Repair Manual delivers in-depth OEM procedures for servicing and maintaining Porsche’s legendary air-cooled turbocharged models. Covering both the original 3.0L and later 3.3L variants, this manual includes full documentation for engine overhaul, turbocharger service, transmission repair, and vehicle electrical systems.
Whether you're rebuilding a 930 engine or tracking down an electrical fault, the manual provides clear, Porsche-approved procedures along with torque specs, wiring diagrams, and subsystem flowcharts. From engine internals to climate control, everything is laid out for both professional workshops and serious restorers.
Content Overview:
Engine crankcase, crankshaft, cylinder head, and valve drive service
Lubrication and cooling system diagnostics and maintenance
Fuel supply system and CIS (Continuous Injection System) repair
Turbocharger inspection and service procedures
Exhaust system and ignition system troubleshooting
Starter and power supply component repairs
Clutch control and manual transmission servicing
Gear and shaft replacement procedures
Differential inspection and rebuild steps
Front and rear wheel suspension repair
Wheels, tires, and alignment specifications
Hydraulic brake system diagnostics and service
Steering system adjustments and servicing
Body repairs: front, center, rear sections, lids, and doors
Sliding roof and bumper replacement procedures
Glass, exterior fittings, and interior equipment servicing
Heating and air conditioning system diagnostics
Heater core and A/C component repair
Electrical systems: radio, instruments, lights, and wiring
Wiper and washer system repair and adjustments
Exterior and interior lighting troubleshooting
This manual is an essential resource for anyone performing serious work on a Porsche 930. With detailed factory content and step-by-step repair instructions, it ensures accuracy and confidence for every repair job—from oil changes to full restorations.
Printable: Yes Language: English Compatibility: Pretty much any electronic device Requirements: Adobe Reader (free)
Recently Viewed
5,521,897Happy Clients
2,594,462eManuals
1,120,453Trusted Sellers
15Years in Business
Price:
Actual Price:
1975-1989 Porsche 911 Turbo (930) Service & Repair Manual

 Workshop Repair Service Ma")