3. Secure the antenna wire to the "C" pillar sheet metal using three Argent wire wraps (1) leaving 138 mm (5 7/16 in) (a) of wire from the antenna base to the first Argent wire wrap. 4. Reassemble the passenger side "C" pillar trim. 5. Clean the antenna mounting location on the passenger side "C" pillar trim with an alcohol wipe. 6. Dry the "C" pillar trim thoroughly using a lint free cloth. 7. Apply Adhesion Promoter GM P/N 12378462 (Canadian P/N 10953554) to the area of the "C" pillar trim where the antenna will be mounted. Follow the adhesion promoter instructions on Page 2 of 5 Document ID: 2174278 2/19/2010 http://localhost:9001/si/showDoc.do?docSyskey=2174278&pubCellSyskey=176302&pub...
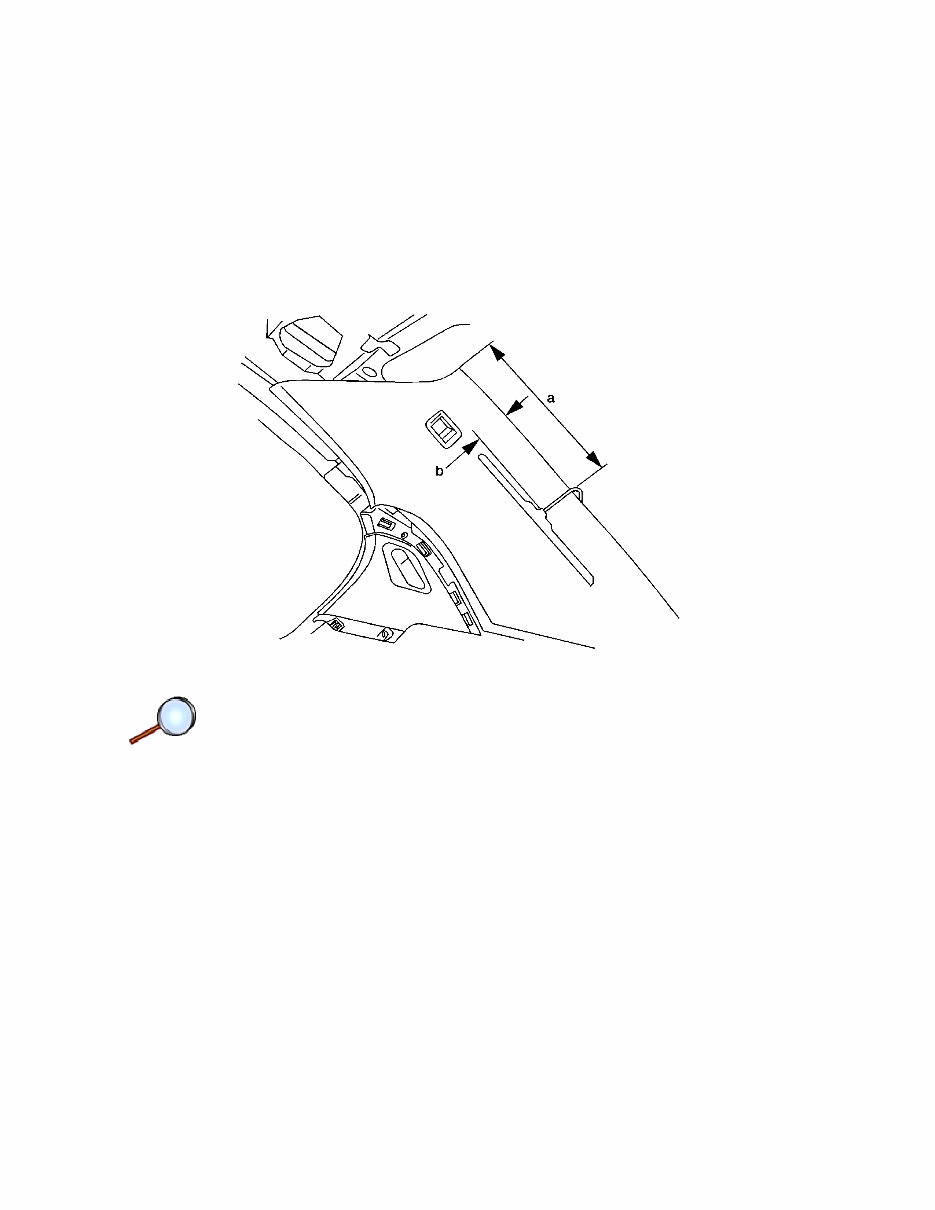
the product label. Note: 8. Remove the protective film from the adhesive pad on the antenna. 9. Using the measurements , a=340 mm (13 3/8 in) and b=55 mm (2 3/16 in), attach the antenna to the passenger side "C" pillar trim. 10. Press firmly on the antenna, including all four corners of the adhesive pad, in order to ensure proper adhesion to the trim panel. 11. Hold pressure on the antenna for 10-30 seconds. 12. Ensure that no gaps occur between the antenna adhesive pad and the "C" pillar trim. • The adhesion promoter must be used to assure adequate bonding of the antenna. • Mask off or protect areas before applying the adhesion promoter. • Position the antenna according to the figure provided. Page 3 of 5 Document ID: 2174278 2/19/2010 http://localhost:9001/si/showDoc.do?docSyskey=2174278&pubCellSyskey=176302&pub...
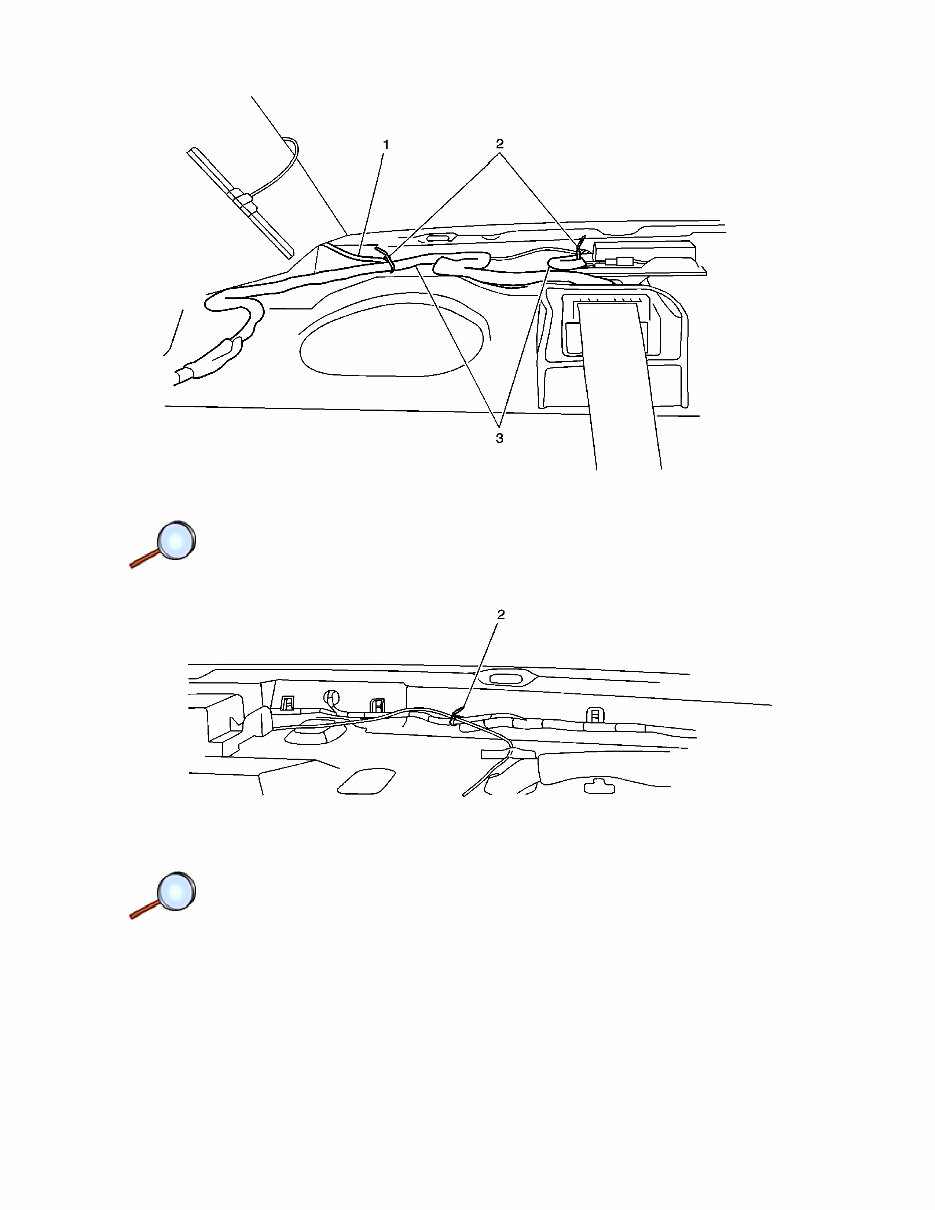
13. Secure antenna wire (1) with three wire wraps (2), to the existing factory harness (3). Page 4 of 5 Document ID: 2174278 2/19/2010 http://localhost:9001/si/showDoc.do?docSyskey=2174278&pubCellSyskey=176302&pub...
Note: If the harness is not present to secure the cable to, re-locate it from its tied back position to the body harness and clip in place. Secure the loose connectors to the foam wrapped harness with a wire wrap. 14. Continue to route the antenna wire (3) towards the RCDLR, secure with three Argent wire wraps (1). Loop the excess antenna wire in a "Figure 8" and secure to the existing wire harness with two wire wraps (2). Note: Excess wire must be looped in a "Figure 8" no less than 100 mm (4 in) in length, failure to do this will reduce the performance of the system. 15. Remove the factory keyless entry antenna. 16. Connect the antenna to the RCDLR. 17. Program the new RCDLR. See Remote Control Door Lock Receiver Programming and Setup . 18. Using the scan tool, retrieve any Diagnostic Trouble Codes (DTCs) from all of the modules. 19. Clear all DTCs. 20. Remove the scan tool. 21. Drive the vehicle above 25 mph for at least two minutes. This is to update the tire pressure displays. 22. Operate the 2-way and factory transmitters in order to verify correct system operation. See Keyless Entry System Description and Operation . Press a command button with the vehicle ignition ON in order to synchronize the 2-way transmitter clock to the vehicle clock. 23. Add the transmitters to the customer key rings. 24. Place the 2-Way Advanced Remote Start Owner Manual in the instrument panel compartment. 25. Keep the vehicle dry. Allow 6-8 hours, at 15°C (60°F), for the antenna adhesive to cure after installation. Page 5 of 5 Document ID: 2174278 2/19/2010 http://localhost:9001/si/showDoc.do?docSyskey=2174278&pubCellSyskey=176302&pub...
Upon purchasing this manual, you will receive a .PDF file containing an email address for further assistance. After contacting the provided email, you will receive a reply with a link to access the manual for your Pontiac G8 2008-2009.
This comprehensive manual covers every aspect of your vehicle, providing detailed instructions for maintenance and repair tasks, from simple oil changes to complex transmission swaps. With its extensive content spanning hundreds of pages, the manual includes numerous illustrations to assist you in your work, accompanied by clear and easy-to-follow text.
Utilize the search function to navigate the manual efficiently and print the necessary pages as needed. This Factory Service Repair Manual serves as a valuable guide, offering step-by-step instructions for maintaining and repairing your vehicle, imparting the expertise of factory-trained technicians.
By leveraging the knowledge presented in this service repair manual, both professional mechanics and DIY enthusiasts can confidently make informed decisions regarding the maintenance and repair of their vehicle.
Rest assured, in addition to providing a high-quality service manual, we are committed to delivering excellent customer service, ensuring your satisfaction with your purchase.