

1990 Pontiac Firebird Service & Repair Manual Software
What's Included?
Fast Download Speeds
Offline Viewing
Access Contents & Bookmarks
Full Search Facility
Print one or all pages of your manual

DEFOGGER - REAR WINDOW
1990 ACCESSORIES & SAFETY EQUIPMENT General Motors Defogger - Rear Window
DESCRIPTION & OPERATION
DESCRIPTION
The heated rear window defogger uses a heating grid baked to the inside of the rear window. Window heat is
controlled by a control switch and a timer/relay. The timer/relay is located in the accessory relay panel. When
defogger is operating, indicator light will glow to show system is on. Current feed to defogger is through a
circuit breaker and power to control switch is through a fuse in the fuse block.
OPERATION
Voltage is applied to the rear defogger through the defogger relay. With the ignition switch in RUN position,
voltage is applied to one side of defogger relay coil. When rear defogger ON/OFF switch is activated, a ground
signal is sent from heater-A/C control to the Central Control Module (CCM). Upon receiving this ground signal,
and only if the engine is running, the CCM then energizes the defogger relay by grounding the other side of the
defogger relay coil. When energized, the normally open contacts in the defogger relay close, applying voltage to
heat the rear defogger. The CCM will energize the defogger relay for 10 minutes during the first activation of
the rear defogger after ignition on, engine running, and for 5 minutes each additional activation. This timing
process will reset at each ignition cycle.
TROUBLE SHOOTING
Before performing system test, check the following:
Check the SEATS circuit breaker by operating seats and power door locks.
Check body fuse by operating courtesy lights.
Check ignition fuse by operating back-up lights.
Check fuse to gauges by observing fuel gauge operation. If components appear to be in good condition,
proceed to GRID TEST , SYSTEM TEST, and the appropriate component TESTS A:, B:, C:, D: or E:
(as applicable).
TESTING
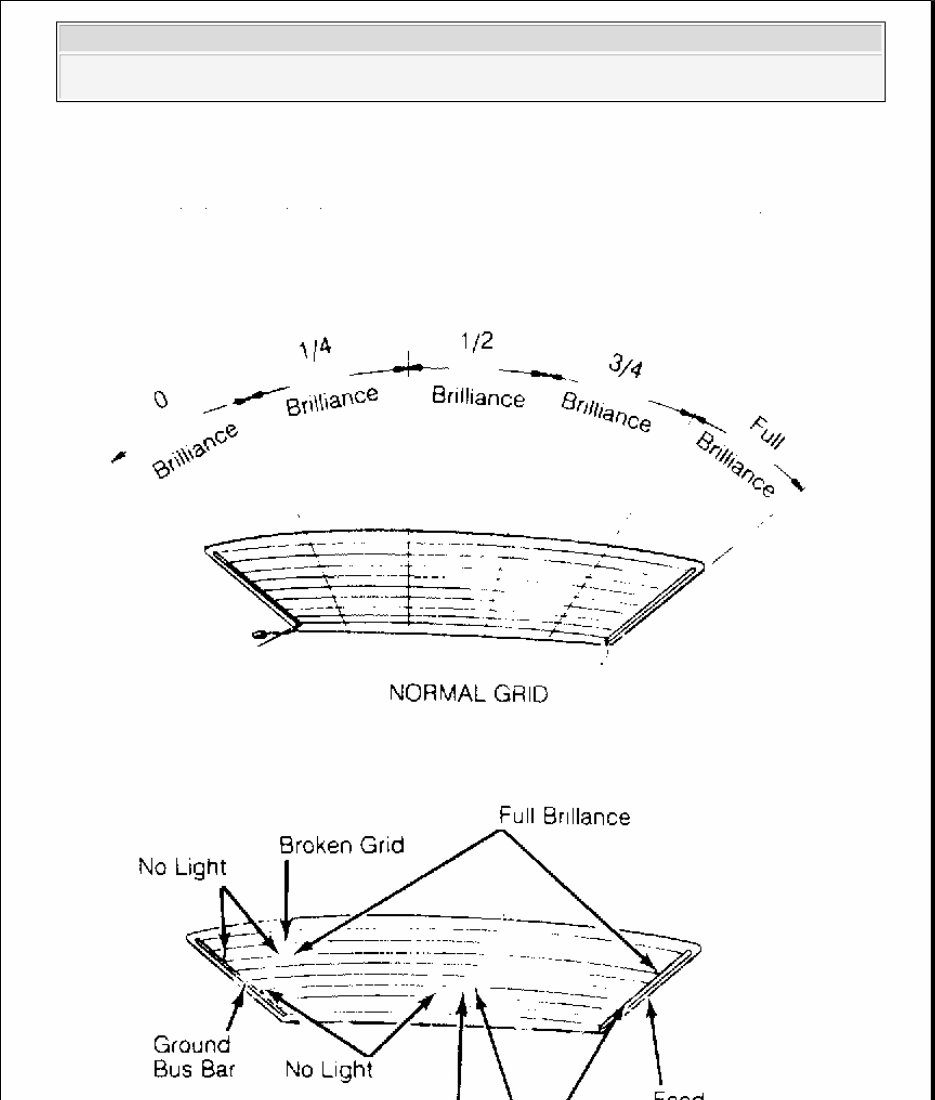
GRID TEST
1. Start engine and turn rear defogger control switch on. Using a test light connected to ground, lightly touch
each grid line. If test light shows full brilliance at both ends of all grid lines, check for loose ground wire.
Test light brilliance will gradually change as test light probe is moved from left bus bar to right bus bar.
2. Contact each grid line a few inches on either side of glass center line to eliminate the possibility of
missing a break in grid line. If a problem on a grid line is detected, place test light probe on that grid line
at left bus bar and move probe toward right bus bar until light goes out. This will indicate a break in
continuity of grid line. See Fig. 1 .
1990 Chevrolet Camaro RS
DEFOGGER - REAR WINDOW 1990 ACCESSORIES & SAFETY EQUIPMENT General Motors Defogger - Rear
Window
1990 Chevrolet Camaro RS
DEFOGGER - REAR WINDOW 1990 ACCESSORIES & SAFETY EQUIPMENT General Motors Defogger - Rear
Window
1990 Chevrolet Camaro RS
DEFOGGER - REAR WINDOW 1990 ACCESSORIES & SAFETY EQUIPMENT General Motors Defogger - Rear
Window
Fig. 1: Grid Brilliance Test Patterns
Courtesy of GENERAL MOTORS CORP.
SYSTEM TEST "F" BODY
SYSTEM TEST
TEST A: TIMER RELAY INPUT VOLTAGE TEST - "F" BODY
Measure: Voltage at defogger timer-relay connector (connected) with ignition switch in RUN position.
TEST A: TIMER RELAY INPUT VOLTAGE TEST
(1)
TEST B: REAR DEFOGGER RELAY TEST - "F" BODY
Measure: Voltage at rear defogger control connector (connected) with ignition switch in RUN position, rear
defogger switch ON (HOLD).
TEST B: REAR DEFOGGER RELAY TEST
(1)
Action Normal Result Go To Test:
W/ ignition on, turn rear defogger
switch ON
Button returns to "rest" & ON
indicator in center of rear defogger
control lights
Do TEST A .
" The rear window becomes warm Do TEST D . & TEST E .
" The ON indicator & rear defogger
turn off after approximately 10
minutes
Replace rear defogger control
Depress rear defogger switch
again
The ON indicator & rear rear
defogger operate for
approximately 5 minutes
Replace rear defogger control
Measure Between Correct Voltage For Diagnosis
ORG/BLK & GND Battery
(2)
PNK/BLK & GND Battery
(3)
(1)
If all results are correct, go to TEST B: REAR DEFOGGER RELAY TEST .
(2)
Check ORG/BLK wire for an open. If okay, check power accessory circuit breaker.
(3)
Check PNK/BLK wire for an open. If okay, check the gauges fuse.
Connect Between Correct Voltage For Diagnosis
LT BLU & GND Battery
(2)
DK BLU & LT BLU Battery
(3)
PPL/WHT & GND Battery
(4)
PPL/WHT & GND
(2)
No Voltage
(5)
1990 Chevrolet Camaro RS
DEFOGGER - REAR WINDOW 1990 ACCESSORIES & SAFETY EQUIPMENT General Motors Defogger - Rear
Window

TEST C: DEFOGGER CONTROL VOLTAGE TEST - "F" BODY
Measure: Voltage at defogger control connector (connected) with ignition switch in RUN position and rear
defogger switch ON (HOLD) and headlight switch in PARK (maximum brightness) position.
TEST C: DEFOGGER CONTROL VOLTAGE TEST
(1)
TEST D: GRID TEST - "F" BODY
See GRID TEST under TESTING at the beginning of this article.
TEST E: DEFOGGER LIGHT TEST - "F" BODY
Measure: Voltage at left and right hatch support arm (connected) with ignition switch in RUN position,
defogger switch ON.
TEST E: REAR DEFOGGER TEST
(1)
(1)
If voltage is correct, perform TEST D .
(2)
Switch OFF (HOLD).
(3)
Check LT BLU wire for an open. If wire is okay, perform TEST C .
(4)
Check BLK for an open. Ensure ground is clean and tight.
(5)
Replace defogger timer relay.
Connect Between Correct Voltage For Diagnosis
PNK/BLK & GND Battery
(2)
LT BLU & GND Battery
(3)
PPL/WHT & GND Battery
(4)
GRY & GND Battery
(5)
GRY & BLK Battery
(6)
(1)
If all voltages are correct, and defogger still does not operate properly, perform TEST D .
(2)
Check PNK/BLK wire for an open. If wire is okay, check gauges fuse.
(3)
Replace defogger control.
(4)
Check the PPL/WHT wire for an open. If wire is okay, perform TEST B .
(5)
Check INST LP fuse. Check the GRY wire for an open.
(6)
Check BLK wire for an open. Check that ground is clean and tight. Replace panel light if wire and
ground are okay.
Measure Between Correct Voltage For Diagnosis
LH Arm & GND Battery
(2)
1990 Chevrolet Camaro RS
DEFOGGER - REAR WINDOW 1990 ACCESSORIES & SAFETY EQUIPMENT General Motors Defogger - Rear
Window
LH Arm & RH Arm Battery
(3)
(1)
If all voltages are correct, repair grid.
(2)
Perform Test B.
(3)
Check the BLK wire for an open. Make sure the ground is clean and tight.
1990 Chevrolet Camaro RS
DEFOGGER - REAR WINDOW 1990 ACCESSORIES & SAFETY EQUIPMENT General Motors Defogger - Rear
Window
You're Reading a Preview
What's Included?
Fast Download Speeds
Offline Viewing
Access Contents & Bookmarks
Full Search Facility
Print one or all pages of your manual
$36.99
Viewed 45 Times Today


Secure transaction
What's Included?
Fast Download Speeds
Offline Viewing
Access Contents & Bookmarks
Full Search Facility
Print one or all pages of your manual
$36.99
Discover the 1990 Pontiac Firebird Service & Repair Manual in PDF format. This comprehensive manual is a valuable resource for maintaining, repairing, and servicing your Pontiac Firebird with ease and efficiency.
Equipped with user-friendly instructions and detailed diagrams, this manual is indispensable for both professional mechanics and DIY enthusiasts.
Key features of the 1990 Pontiac Firebird Service & Repair Manual:
- Step-by-step procedures for all repair and maintenance tasks
- Detailed diagrams and illustrations for enhanced understanding
- Comprehensive troubleshooting guide for diagnosing issues
- Easy-to-follow instructions for routine maintenance
- Covers engine, transmission, suspension, electrical system, and more
Models covered:
- 1990 Pontiac Firebird Base Coupe 2-Door
- 1990 Pontiac Firebird Formula Coupe 2-Door
- 1990 Pontiac Firebird Trans Am Coupe 2-Door
- 1990 Pontiac Firebird Trans Am GTA Coupe 2-Door
Empower yourself with the 1990 Pontiac Firebird Service & Repair Manual to tackle any maintenance or repair task confidently, ensuring your Firebird runs smoothly and efficiently.


