ACCESSORIES AND EQUIPMENT Airbag, Audio, Navigation and Anti-Theft - Repair Instructions - Clubman PROGRAMMING / ENCODING 61 00... PROGRAM / ENCODE THE CONTROL UNIT(S) programming routine via ISTA/P: Connect the battery charger to the vehicle. Connect the programming system with the vehicle. Determine the action plan. Accept action plan with the control units to be programmed/encoded and enabled, if necessary or work through. Observe the reworking list! If applicable, connect the workshop system to the vehicle depending on the rework list, run the brief test and delete the fault memory. Compliance with the information about programming in workshop systems and the corresponding notes in the user documentation is required. RADIO, CD/DVD CHANGER 65 11 072 REMOVING AND INSTALLING/REPLACING CD CHANGER NOTE: In order to avoid incorrect programming procedures and fault messages, it is essential to always use the most current version when working with the ISTA/P programming system. Battery voltage must not drop below 13.0 V during programming. Connect battery charger prior to programming IMPORTANT: Prior to programming / encoding hybrid and electric vehicles disconnect the high-voltage system! NOTE: A switch to the workshop system may not necessarily be required with the integration of the service functions and the "Delete fault memory" function in ISTA/P. Check the rework list accordingly! NOTE: Follow instructions for handling optical fibres. See 61 00... NOTES ON HANDLING OPTICAL FIBERS . 2008 MINI Cooper S ACCESSORIES AND EQUIPMENT Airbag, Audio, Navigation and Anti-Theft - Repair Instructions - Clubman
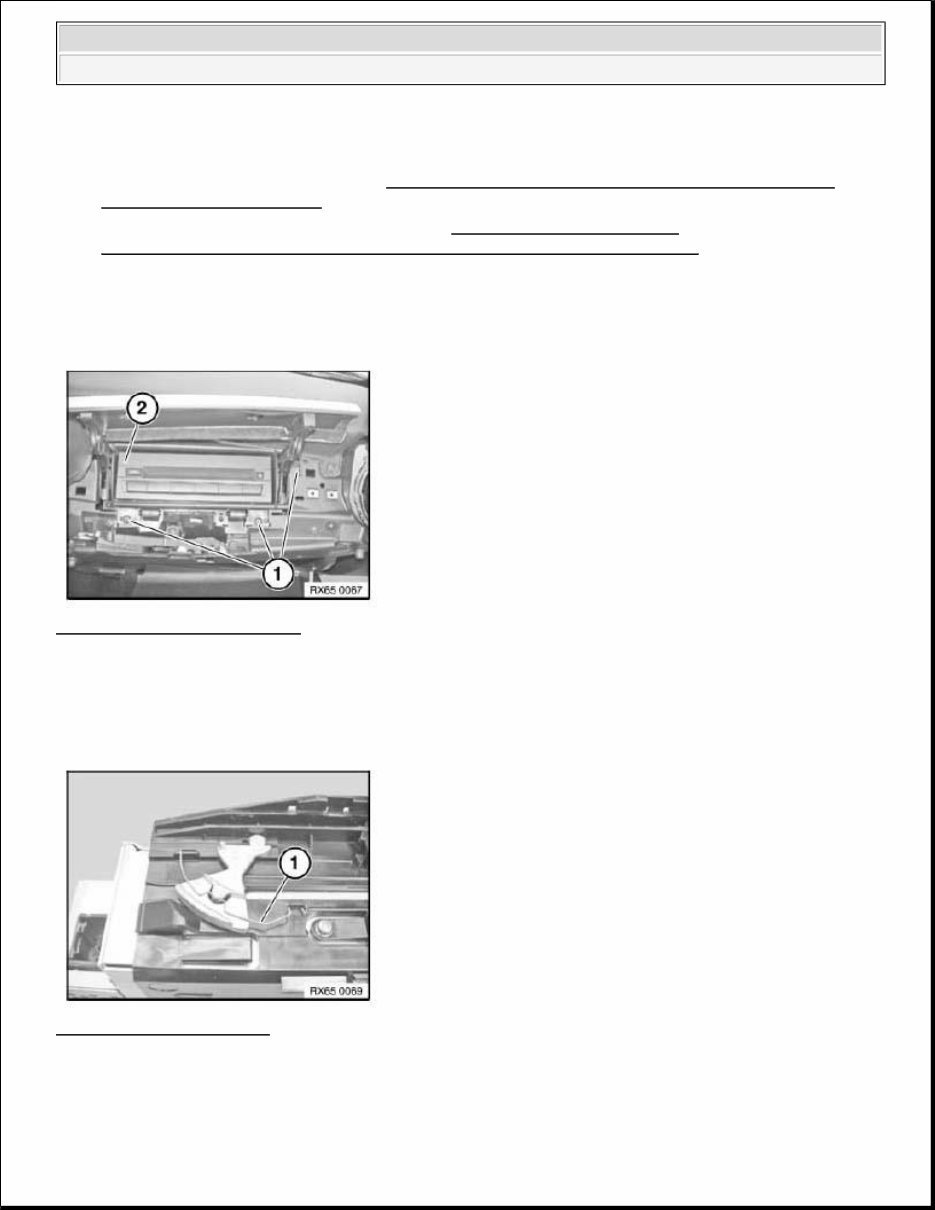
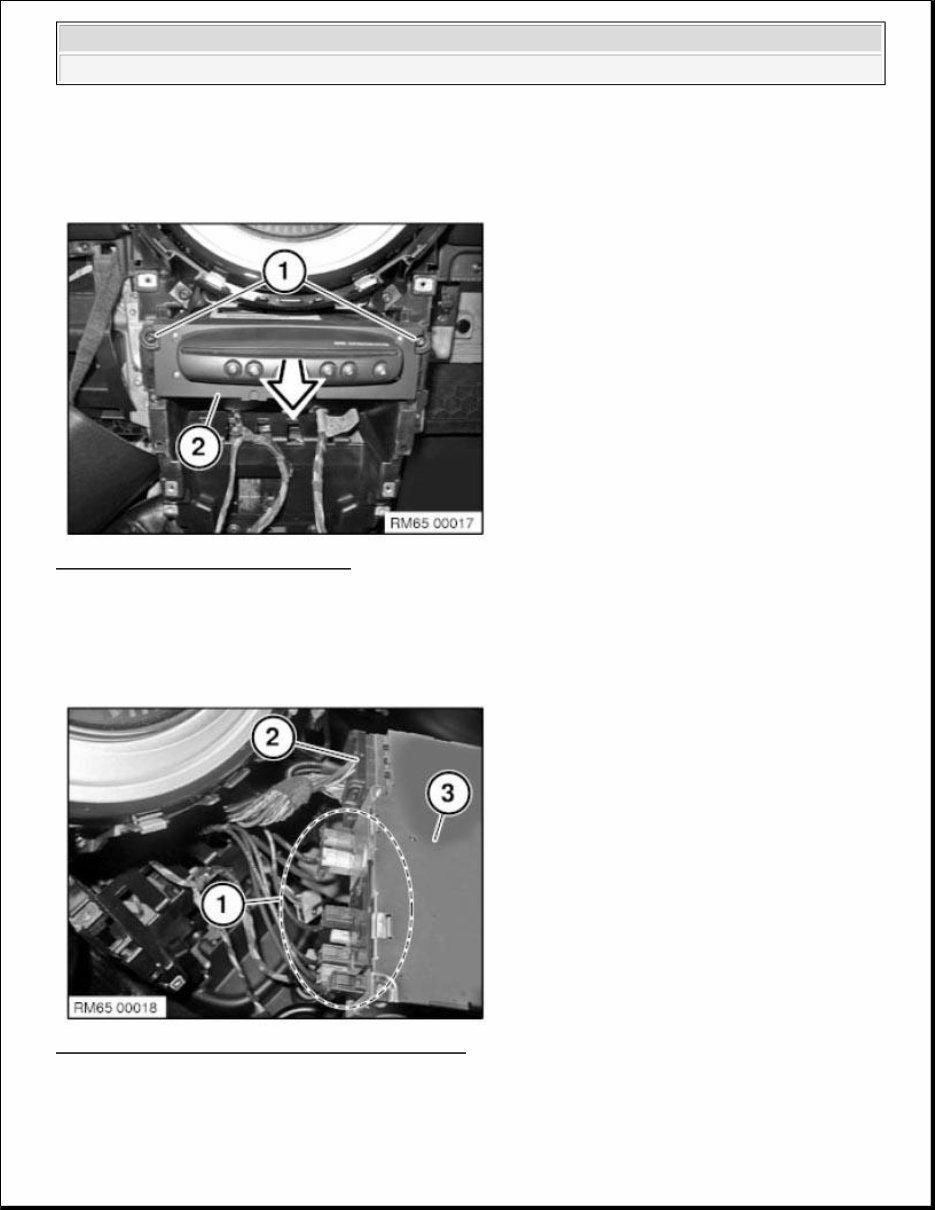
Necessary preliminary tasks: Disconnect battery negative lead . See 12 00... INSTRUCTIONS FOR DISCONNECTING AND CONNECTING BATTERY . Remove knee protection, passenger's side . See 51 45 254 REMOVING AND INSTALLING/REPLACING KNEE PROTECTION, PASSENGER'S SIDE . Release screws (1). Remove CD changer (2) with carrier and disconnect associated plug connection. Fig. 1: Identifying CD Changer Courtesy of BMW OF NORTH AMERICA, INC. Installation: Make sure retainer (1) is correctly seated. Fig. 2: Identifying Retainer Courtesy of BMW OF NORTH AMERICA, INC. Replacement: 2008 MINI Cooper S ACCESSORIES AND EQUIPMENT Airbag, Audio, Navigation and Anti-Theft - Repair Instructions - Clubman
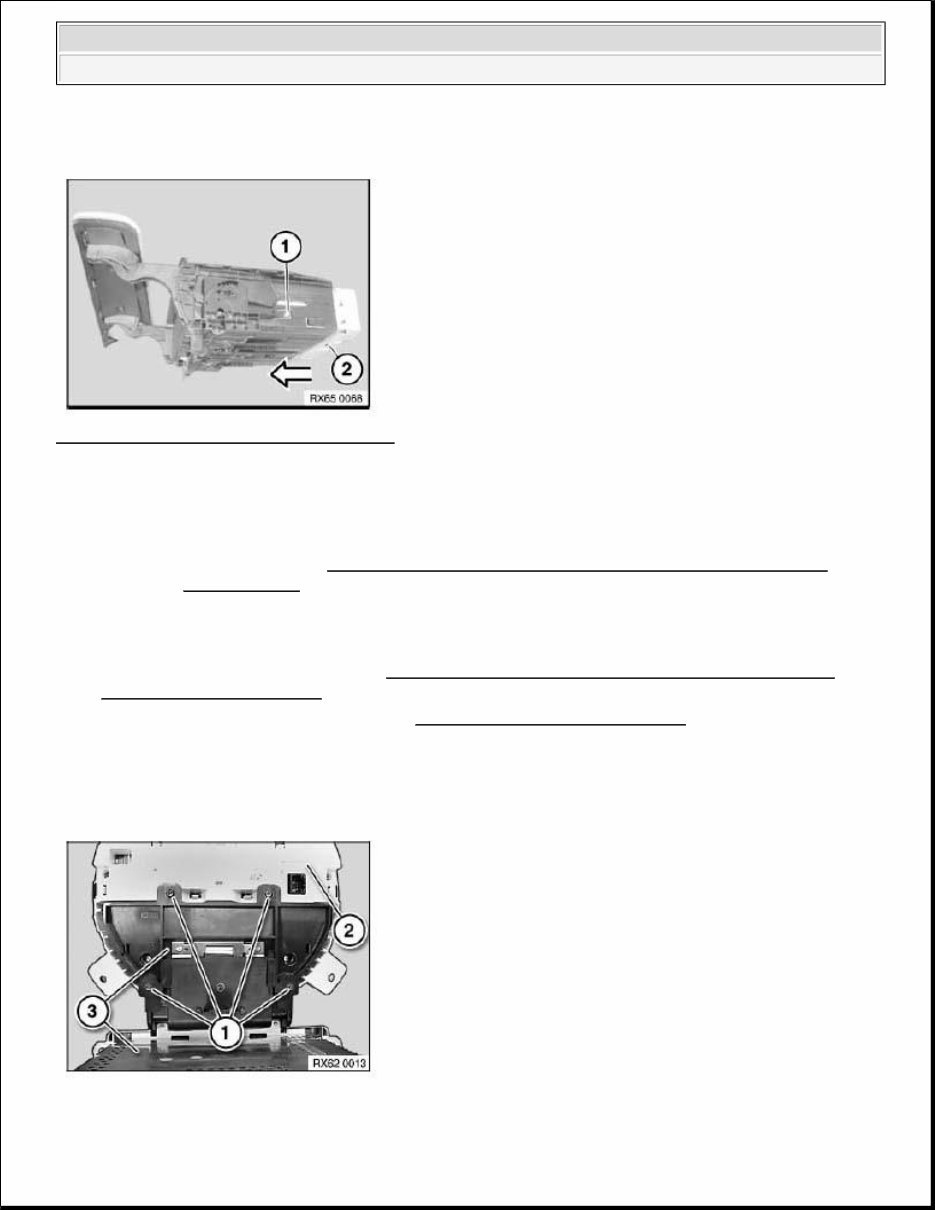
Release screw (1) on both sides and slide CD changer (2) out of carrier. Fig. 3: Sliding CD Changer Out Of Carrier Courtesy of BMW OF NORTH AMERICA, INC. 65 11 080 REMOVING AND INSTALLING/REPLACING RADIO RECEIVER Necessary preliminary tasks: Disconnect battery negative lead . See 12 00... INSTRUCTIONS FOR DISCONNECTING AND CONNECTING BATTERY . Remove complete instrument cluster . See INSTRUMENT CLUSTER TRIM . Release screws (1). Remove speedometer (2) from radio (3). IMPORTANT: Read and comply with notes on protection against electrostatic damage (ESD protection). See 61 35... NOTES ON ESD PROTECTION (ELECTRO STATIC DISCHARGE) . 2008 MINI Cooper S ACCESSORIES AND EQUIPMENT Airbag, Audio, Navigation and Anti-Theft - Repair Instructions - Clubman
Fig. 4: Identifying Speedometer And Radio Courtesy of BMW OF NORTH AMERICA, INC. 65 12 230 REMOVING AND INSTALLING DAB TUNER Necessary preliminary tasks: Disconnect negative battery cable . See 12 00... INSTRUCTIONS FOR DISCONNECTING AND CONNECTING BATTERY . Remove luggage compartment wheel arch trim on side panel on left. See 51 47 161 REMOVING AND INSTALLING/REPLACING RIGHT LUGGAGE COMPARTMENT WHEEL ARCH TRIM . Release screws (1) and remove DAB tuner with bracket. Disconnect associated plug connections (2). Fig. 5: Identifying DAB Tuner Screws And Associated Plug Connections Courtesy of BMW OF NORTH AMERICA, INC. Replacement: Release screws (1) and remove DAB tuner (2) from bracket. IMPORTANT: Read and comply with notes on protection against electrostatic damage (ESD protection). See 61 35... NOTES ON ESD PROTECTION (ELECTRO STATIC DISCHARGE) . NOTE: Follow instructions for handling optical fibres. See 61 00... NOTES ON HANDLING OPTICAL FIBERS . 2008 MINI Cooper S ACCESSORIES AND EQUIPMENT Airbag, Audio, Navigation and Anti-Theft - Repair Instructions - Clubman
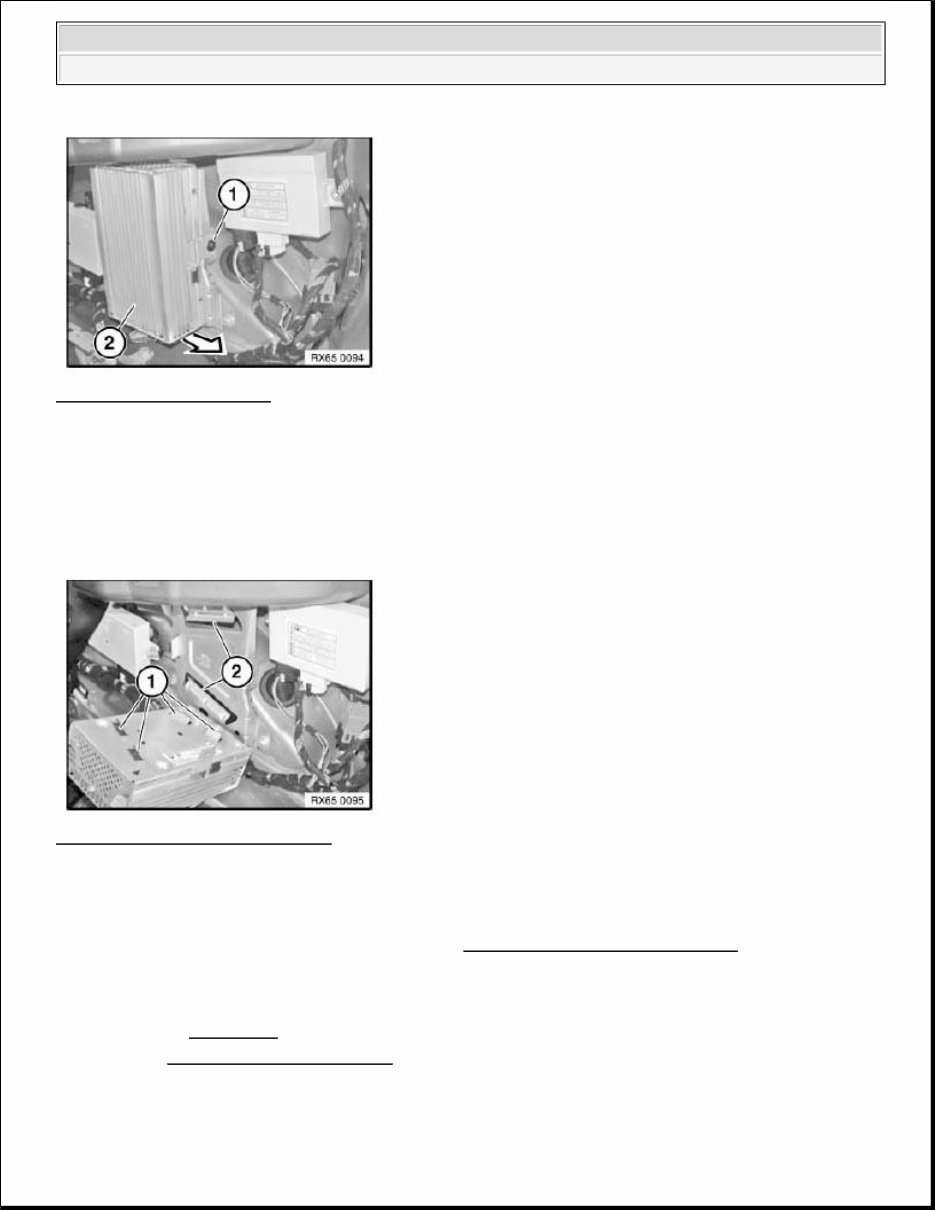
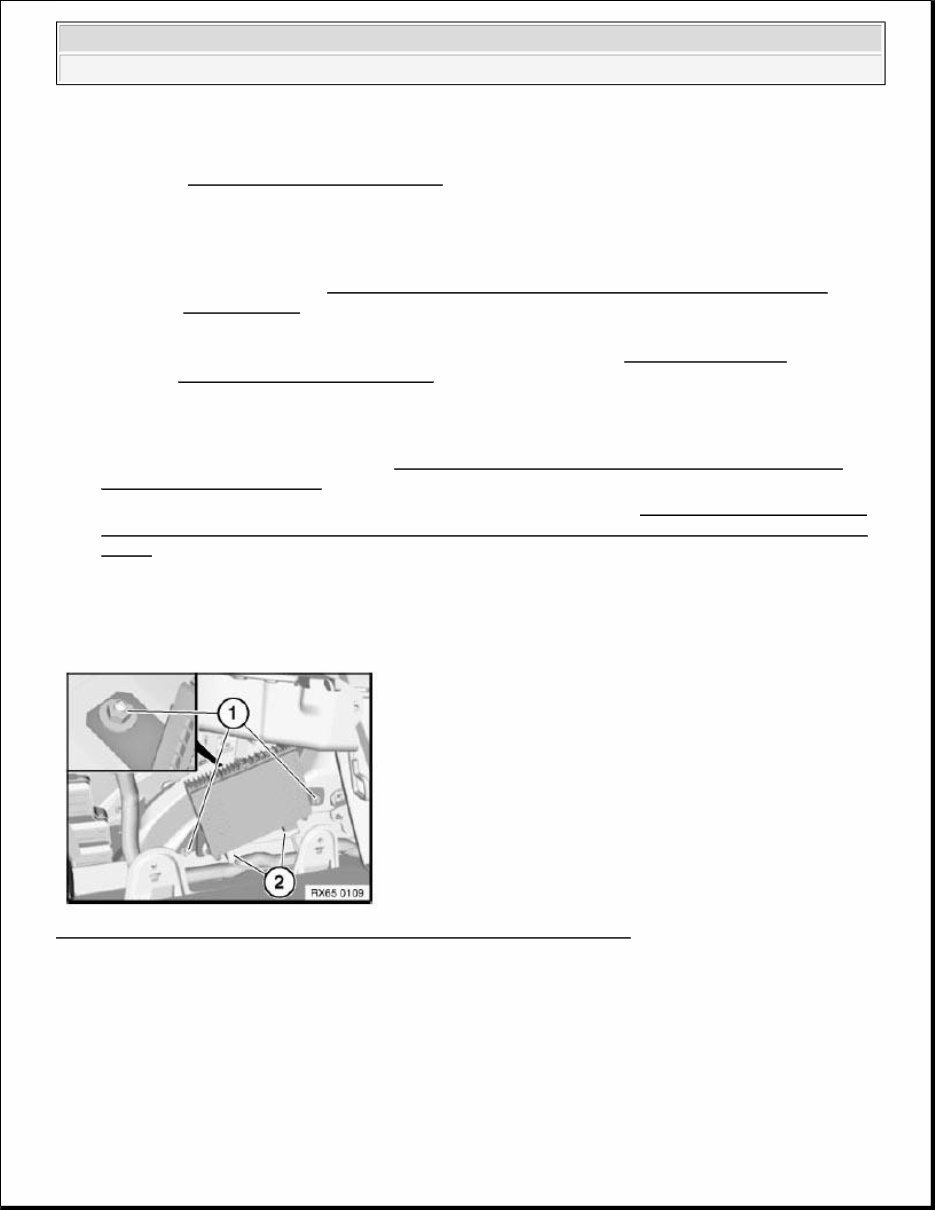
Fig. 6: Identifying DAB Tuner Screws Courtesy of BMW OF NORTH AMERICA, INC. Replacement: Carry out vehicle programming/coding. STEREO RADIO, AMPLIFIER 65 12 072 REMOVING AND INSTALLING OR REPLACING AMPLIFIER Necessary preliminary tasks: Disconnect battery negative lead . See 12 00... INSTRUCTIONS FOR DISCONNECTING AND CONNECTING BATTERY . Remove right luggage compartment wheel arch trim . See 51 47 151 REMOVING AND INSTALLING/REPLACING LEFT OR RIGHT LUGGAGE COMPARTMENT WHEEL ARCH TRIM . Release screw (1) and slide amplifier (2) in direction of arrow towards rear. Disconnect associated plug connection and remove amplifier (2). 2008 MINI Cooper S ACCESSORIES AND EQUIPMENT Airbag, Audio, Navigation and Anti-Theft - Repair Instructions - Clubman
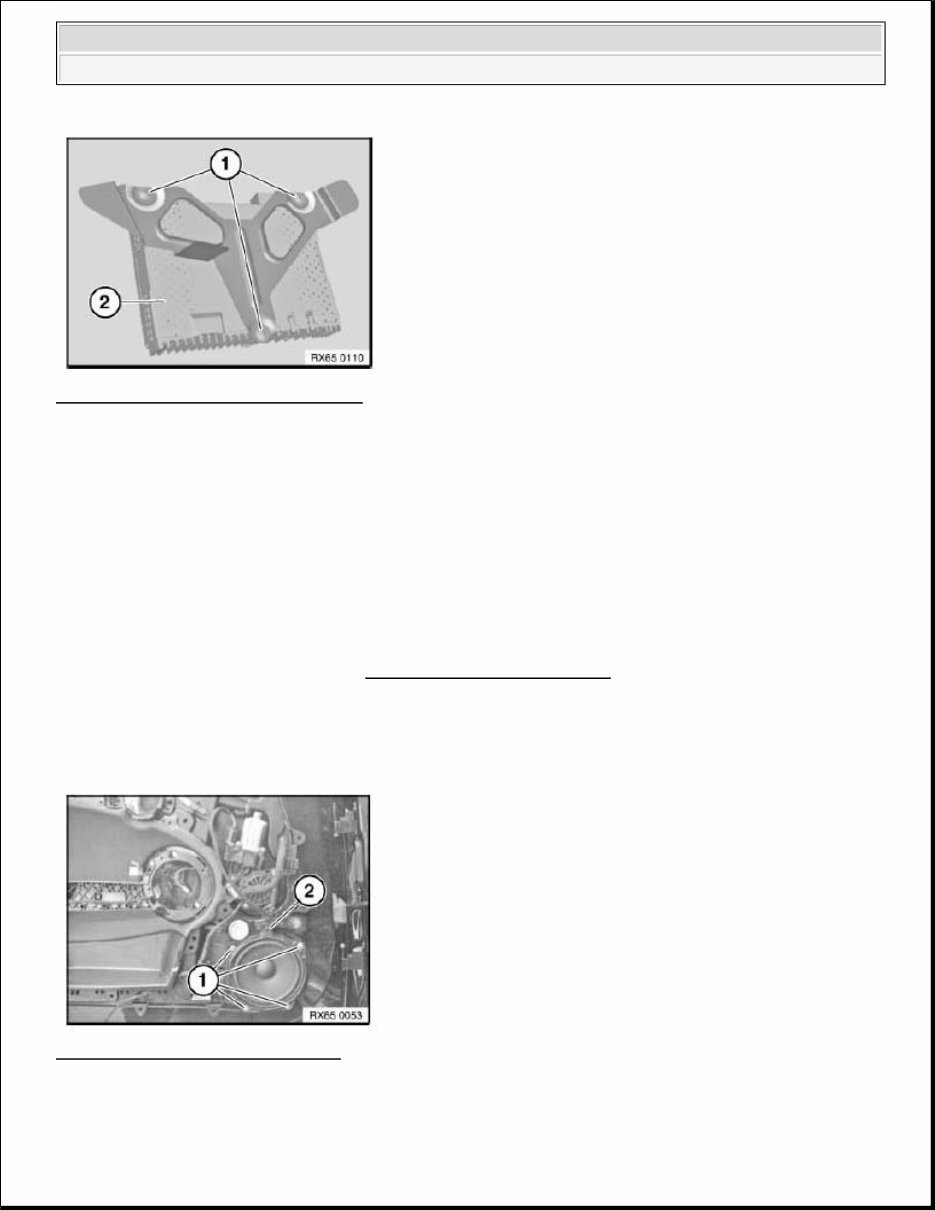
Fig. 7: Removing Amplifier Courtesy of BMW OF NORTH AMERICA, INC. Installation: Lugs (1) must be correctly slid into guide (2). Check that amplifier is firmly seated. Fig. 8: Identifying Lugs And Guide Courtesy of BMW OF NORTH AMERICA, INC. 65 12 210 REMOVING AND INSTALLING/REPLACING RADIO RECEIVER - CHAMP Necessary preliminary tasks: Disconnect BATTERY . Remove CENTER CONSOLE TRIM . IMPORTANT: Read and comply with notes on ELECTRO STATIC DISCHARGE . 2008 MINI Cooper S ACCESSORIES AND EQUIPMENT Airbag, Audio, Navigation and Anti-Theft - Repair Instructions - Clubman
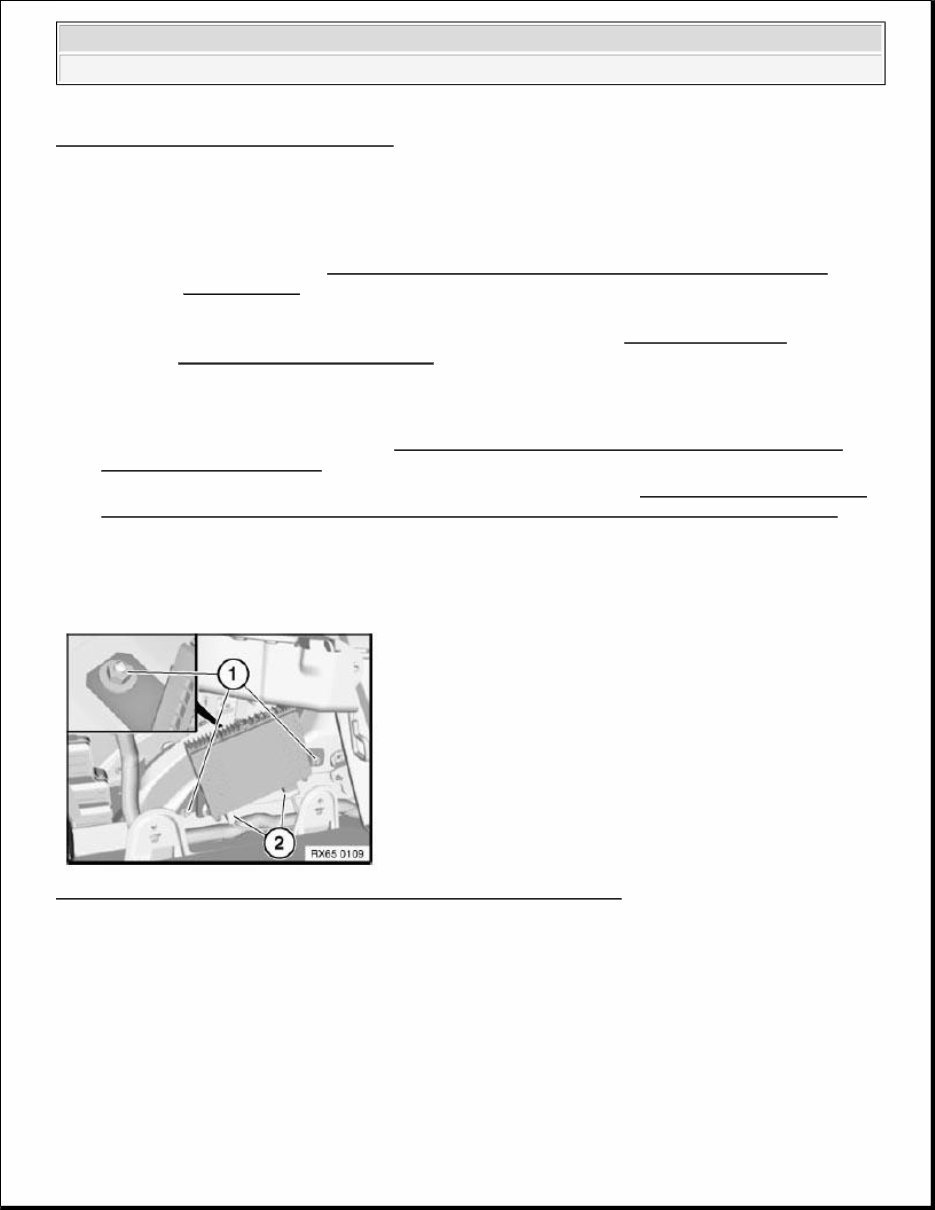
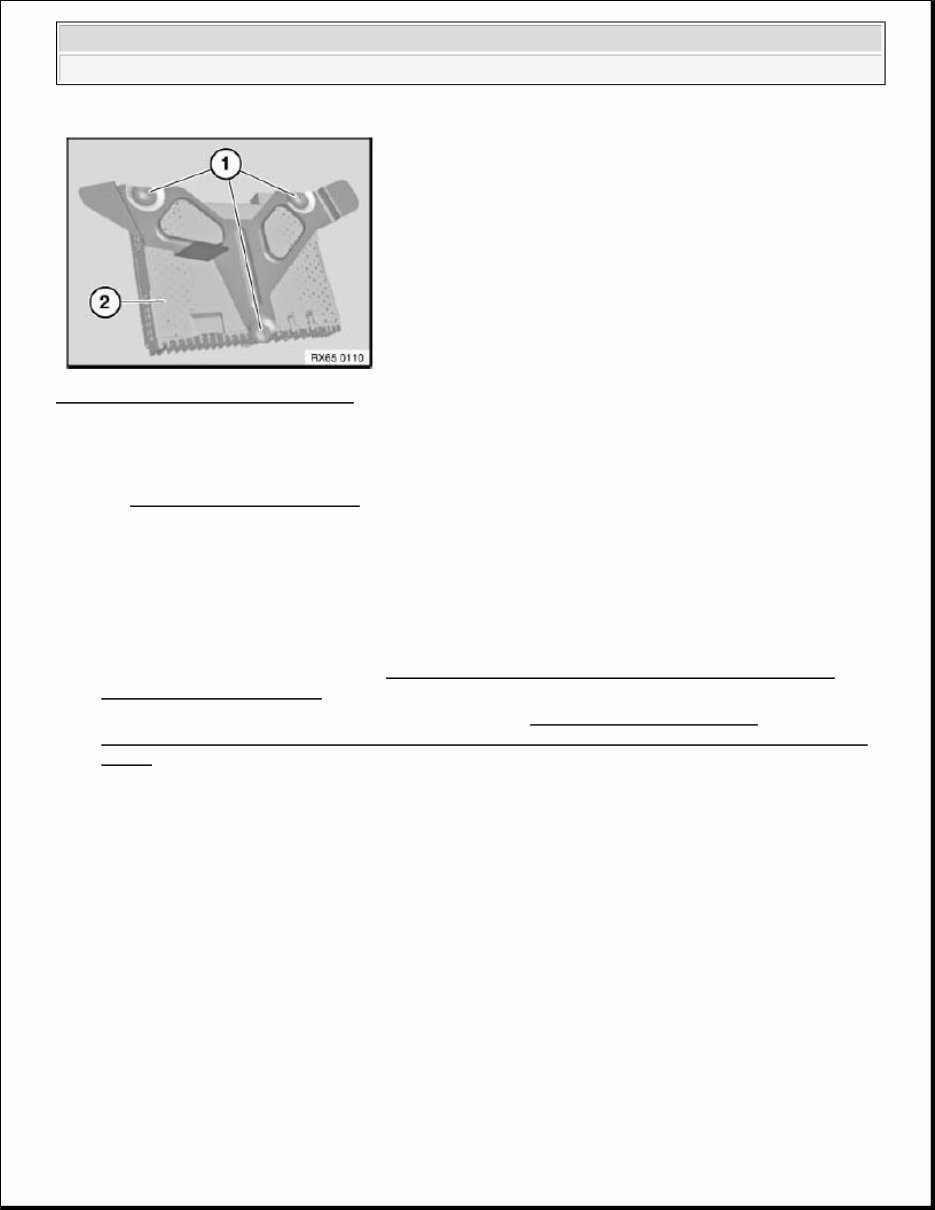
Release screws (1). Pull out the CHAMP (2) to the front. Fig. 9: Pulling Out CHAMP To Front Courtesy of BMW OF NORTH AMERICA, INC. Unlock plug connections (1) and (2) and disconnect. Remove CHAMP (3). Fig. 10: Identifying Plug Connections With CHAMP Courtesy of BMW OF NORTH AMERICA, INC. 2008 MINI Cooper S ACCESSORIES AND EQUIPMENT Airbag, Audio, Navigation and Anti-Theft - Repair Instructions - Clubman
Replacement Carry out vehicle PROGRAMMING/ENCODING 65 12 230 REMOVING AND INSTALLING DAB TUNER Necessary preliminary tasks: Disconnect negative battery cable . See 12 00... INSTRUCTIONS FOR DISCONNECTING AND CONNECTING BATTERY . Remove luggage compartment wheel arch trim on side panel on left. See 51 47 151 REMOVING AND INSTALLING/REPLACING LEFT OR RIGHT LUGGAGE COMPARTMENT WHEEL ARCH TRIM . Release screws (1) and remove DAB tuner with bracket. Disconnect associated plug connections (2). Fig. 11: Identifying DAB Tuner Screws And Associated Plug Connections Courtesy of BMW OF NORTH AMERICA, INC. Replacement: Release screws (1) and remove DAB tuner (2) from bracket. IMPORTANT: Read and comply with notes on protection against electrostatic damage (ESD protection). See 61 35... NOTES ON ESD PROTECTION (ELECTRO STATIC DISCHARGE) . NOTE: Follow instructions for handling optical fibres. See 61 00... NOTES ON HANDLING OPTICAL FIBERS . 2008 MINI Cooper S ACCESSORIES AND EQUIPMENT Airbag, Audio, Navigation and Anti-Theft - Repair Instructions - Clubman
Fig. 12: Identifying DAB Tuner Screws Courtesy of BMW OF NORTH AMERICA, INC. Replacement: Carry out vehicle programming/coding. SPEAKER AND COVER 65 13 040 REMOVING AND INSTALLING/REPLACING SPEAKER (WOOFER IN FRONT DOOR) Necessary preliminary tasks: Remove front door trim panel . See FRONT DOOR TRIM PANEL . Release screws (1). Disconnect plug connection (2) and remove speaker. Fig. 13: Identifying Plug Connection Courtesy of BMW OF NORTH AMERICA, INC. 2008 MINI Cooper S ACCESSORIES AND EQUIPMENT Airbag, Audio, Navigation and Anti-Theft - Repair Instructions - Clubman
Get the ultimate guide for your 2011 Mini Cooper with this Service & Repair Manual. Whether you own a Hardtop, Convertible, Clubman, or Countryman model, this manual has got you covered.
2011 Mini Cooper Hardtop
2011 Mini Cooper Convertible
2011 Mini Cooper Clubman
2011 Mini Cooper Countryman
This comprehensive manual provides detailed step-by-step instructions and illustrations to help you maintain, service, and repair your Mini Cooper. It covers everything from routine maintenance tasks like oil changes and tire rotations to more complex repairs such as engine and transmission overhauls.
Whether you're a professional mechanic or a DIY enthusiast, this manual equips you with all the necessary information to confidently tackle any repair or maintenance project on your Mini Cooper. Say goodbye to expensive trips to the dealership or mechanic and save both time and money by doing it yourself.
Invest in this 2011 Mini Cooper Service & Repair Manual and keep your Mini Cooper running smoothly for years to come.