4.2L V8 & 5.6L V8 Article Text (p. 2) 1987 Merced cooling fan. Remove all vacuum, fuel and electrical lines leading to engine. Remove right drag link end from ball stud. 4) Drain power steering reservoir and disconnect hoses. Remove TDC test socket, and remove cable from TDC transmitter. Disconnect regulating shaft. Remove left and right engine shock absorbers. 5) Attach engine sling and hoist to engine and support engine. Remove engine mount bolts. Remove rear engine carrier with engine mount. Remove drive shaft. 6) Remove transmission linkage at transmission. Lift engine/transmission assembly to a 45 degree angle and carefully remove assembly from vehicle. Separate transmission from engine. Installation 1) Ensure oil cooler and all hoses have been flushed and are free from contamination. Replace engine mounts and components as necessary. 2) Reverse removal procedure to complete installation. Recharge air conditioning system and check for leaks. Adjust engine idle speed as necessary. INTAKE MANIFOLD Removal & Installation 1) Disconnect negative battery cable. Partially drain coolant at cylinder block drain plug. Disconnect injection lines and fuel lines. Remove all vacuum hoses. Remove shift cable from automatic transmission. 2) Remove bearing bracket from throttle linkage and bearing bracket from throttle shaft. Disconnect cables and spark plug wiring. Disconnect vacuum lines from automatic transmission and power brake unit. 3) Remove cooling system hoses. Remove intake manifold. Clean intake manifold and check flange surfaces for warpage with straightedge. To install, reverse removal procedure. EXHAUST MANIFOLD Removal & Installation Disconnect negative battery cable. Disconnect exhaust pipe from manifold and EGR line at 90 degree fitting. Remove exhaust manifold retaining bolts and remove exhaust manifold. To install, reverse removal procedure. CYLINDER HEAD NOTE: Allow engine to cool before removing cylinder head. Several specially shaped Allen wrenches are required for cylinder head bolt removal and replacement. Removal 1) Remove left and right cylinder block drain plugs and drain
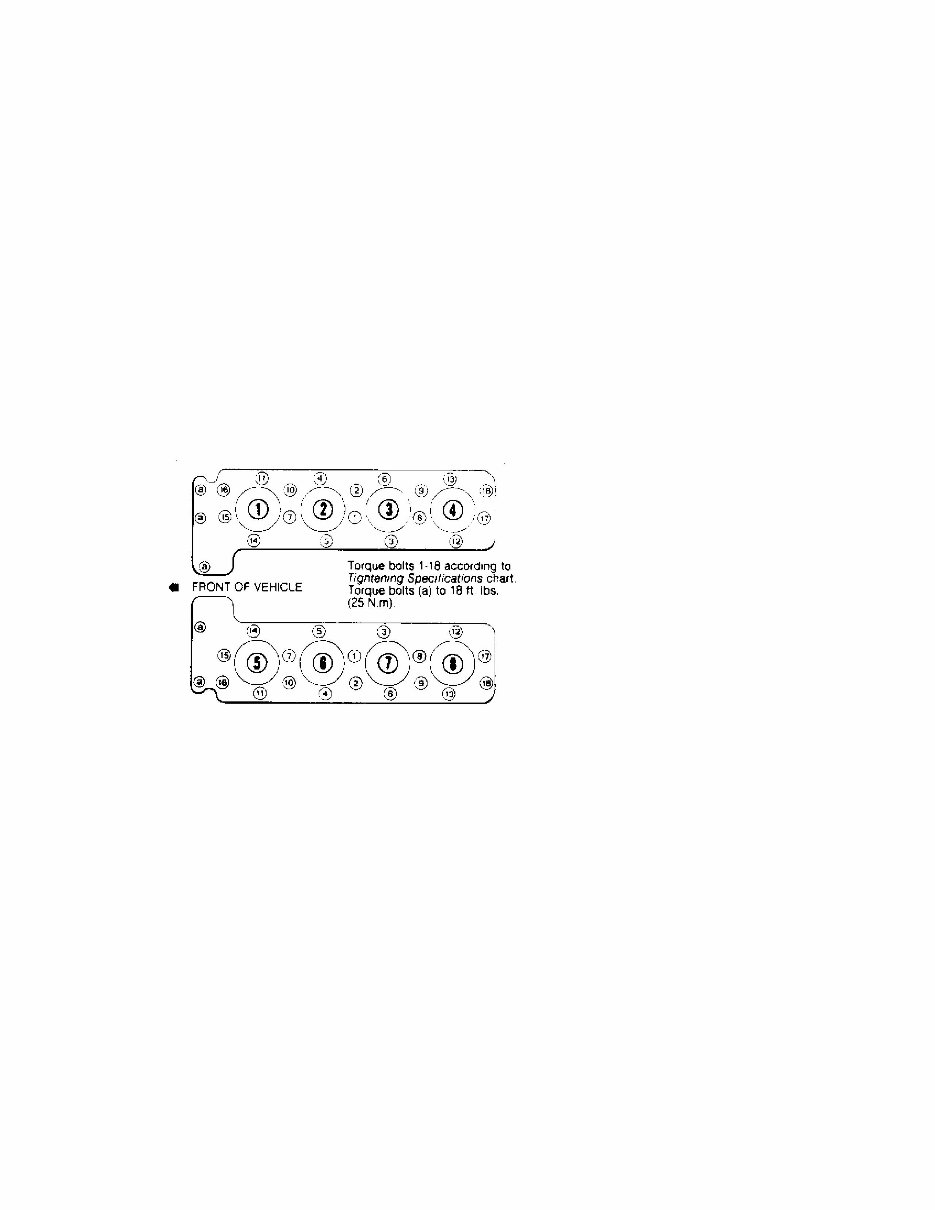
4.2L V8 & 5.6L V8 Article Text (p. 3) 1987 Merc cooling system. Remove air cleaner and battery. Remove fuel line and injectors. Disconnect fuel injection linkage. 2) Disconnect all fuel and electrical lines leading to intake manifold and remove intake manifold. Remove A/T fluid filler pipe from attachment to cylinder head. Remove alternator and mounting bracket. Remove distributor and power steering pump with mounting bracket. 3) On right cylinder head, disconnect power steering pump hoses and set aside. Remove ignition distributor. Remove slide rail after removing camshaft sprocket. 4) On left cylinder head, disconnect exhaust pipe from manifold and EGR line at 90 degree fitting. Remove chain tensioner and slide rails. Mark camshaft sprocket and timing chain position for reassembly reference. Remove sprocket from camshaft. Using specially shaped Allen wrenches, remove head bolts and lift off cylinder head. Fig. 1: Cylinder Head Tightening Sequence Courtesy of Mercedes-Benz of North America. Installation 1) Ensure all mating surfaces are clean. Install new cylinder head gaskets. Ensure mating surfaces are not damaged. Install cylinder head bolt in rear camshaft bearing bracket before installing head. Tighten cylinder head bolts. See Fig. 1. 2) To complete installation, reverse removal procedure. Run engine at normal operating temperature. Slightly loosen head bolts individually, and retighten to specification. CAMSHAFTS TIMING CHAIN Removal & Installation 1) A split link timing chain is available for repairs without dismantling engine. Set No. 1 piston at TDC. DO NOT use camshaft sprocket bolts to rotate engine. Remove spark plugs and camshaft covers. Remove air cleaner adapter. Cover chain guard and grind open both pins of a link in the timing chain. 2) Remove old link and install new spit link with new chain
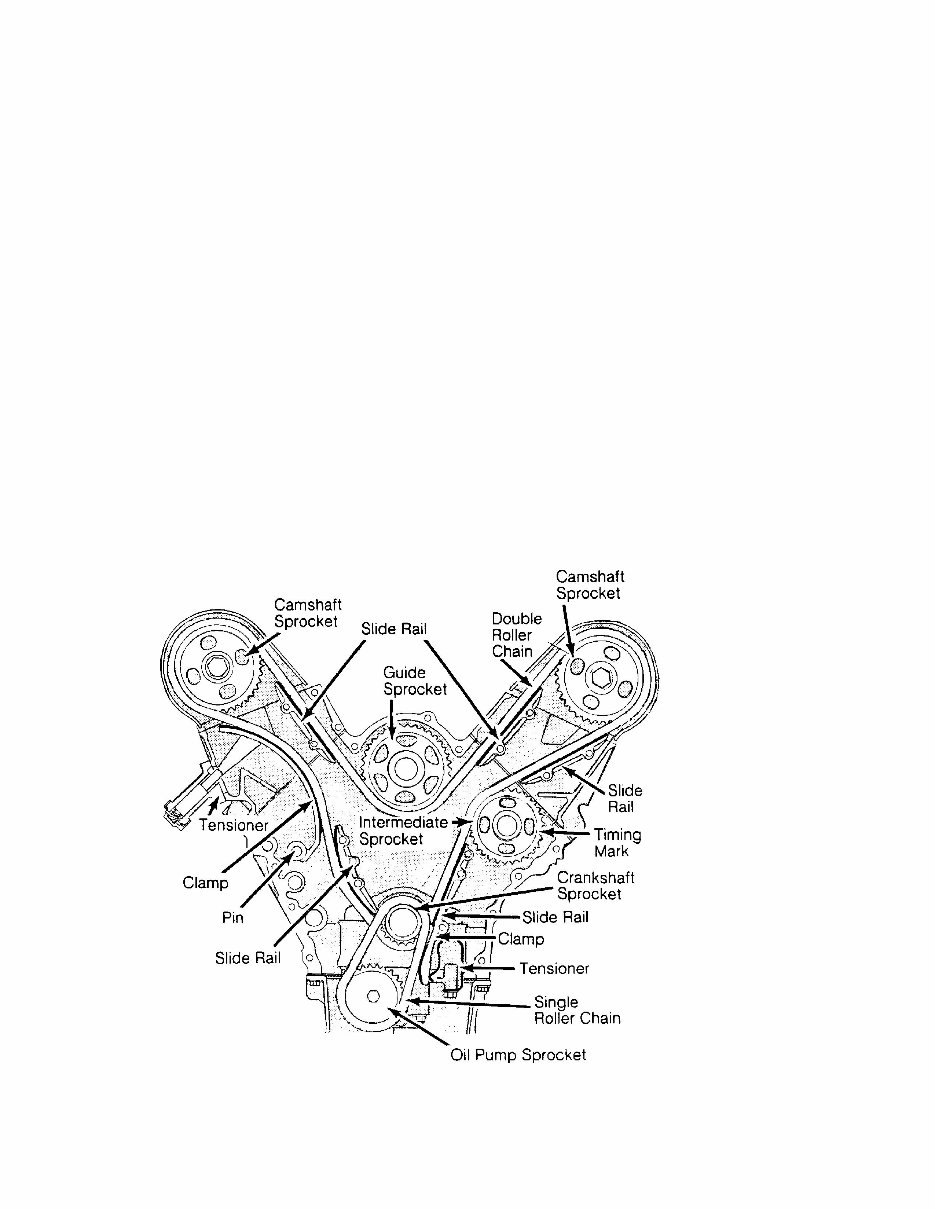
4.2L V8 & 5.6L V8 Article Text (p. 4) 1987 Merced attached. Turn crankshaft slowly in normal direction while feeding in new chain and removing old chain. Ensure that chain does not slip on sprockets. Install master link from rear of chain so retaining clip faces front of engine. 3) Install retaining clip with closed end facing direction of rotation. Rotate crankshaft one complete revolution and check for proper alignment of timing marks. To complete installation, reverse removal procedure. Check cam timing. Set distributor rotor alignment. CHAIN TENSIONER 1) Remove air injector pipe and 3 bolts fastening chain tensioner. Remove chain tensioner. See Fig. 2. 2) To check tensioner, place vertically in container of oil with oil covering flange. Actuate plunger to fill tensioner with oil. After filling with oil and venting air, plunger should allow slow and even compression. 3) To install, reverse removal procedure. Use new gasket and tighten bolts evenly. Pressure pin of tensioner must press against lug of tensioning rail. Fig. 2: Timing Chain & Sprockets Courtesy of Mercedes-Benz of North America. VALVE TIMING
This service and repair manual for the 1987 Mercedes 560SL includes a comprehensive collection of over a thousand pages. It encompasses various repair and maintenance procedures, part layouts, wiring schematics, and specific part numbers tailored to your model. With this manual, there's no need to invest in costly paper manuals as you can access everything digitally and print required pages as many times as necessary.
Whether you're a professional mechanic, a DIY enthusiast, or a regular car owner, this manual is designed to meet your needs. Even if you have minimal experience in car repairs, this manual can help you save a significant amount of money by enabling you to undertake minor repairs on your own. Additionally, it provides the opportunity to reference extensive repair procedures before visiting a repair shop, ensuring that you are well-informed about the necessary repairs and replacements, thus preventing any potential overcharging.
For experienced mechanics and individuals well-versed in car maintenance, this manual offers in-depth details essential for performing extensive repairs on various components.
The manual comprises over 70 separate sections, providing a comprehensive guide for all your repair and maintenance needs.
It is compatible with all computers using Adobe Acrobat reader, allowing you to conveniently view and print the required pages. The manual is accessible on both Mac and Windows operating systems.