Page 1 of 27 Compiled by krazzdav Initial write up by Racin_fool Pics from liveniceguy and Wilsophia http://mbworld.org/ Air Conditioner / HVAC W203 Stepper Motor Repair PART 1 OF 3 http://mbworld.org/forums/c-class-w203/177068-noisy-air-conditioner-stepper-motor- replacement-clicking-hissing.html http://mbworld.org/forums/c32-amg-c55-amg-w203/449471-famous-ac-clicking-noise- ac-footwell-damper-linkage-replacement-diy-details-steps.html Great BIG thanks to Racin_fool , liveniceguy and Wilsophia for the write up and pictures!!! DIY Starts on page 5 Upper Dash Removal page 25 W203 & 463 HVAC MB Technical Training Aid http://www.buellwinkle.com/HVAC-W203.pdf
Page 2 of 27 Compiled by krazzdav Initial write up by Racin_fool Pics from liveniceguy and Wilsophia http://mbworld.org/
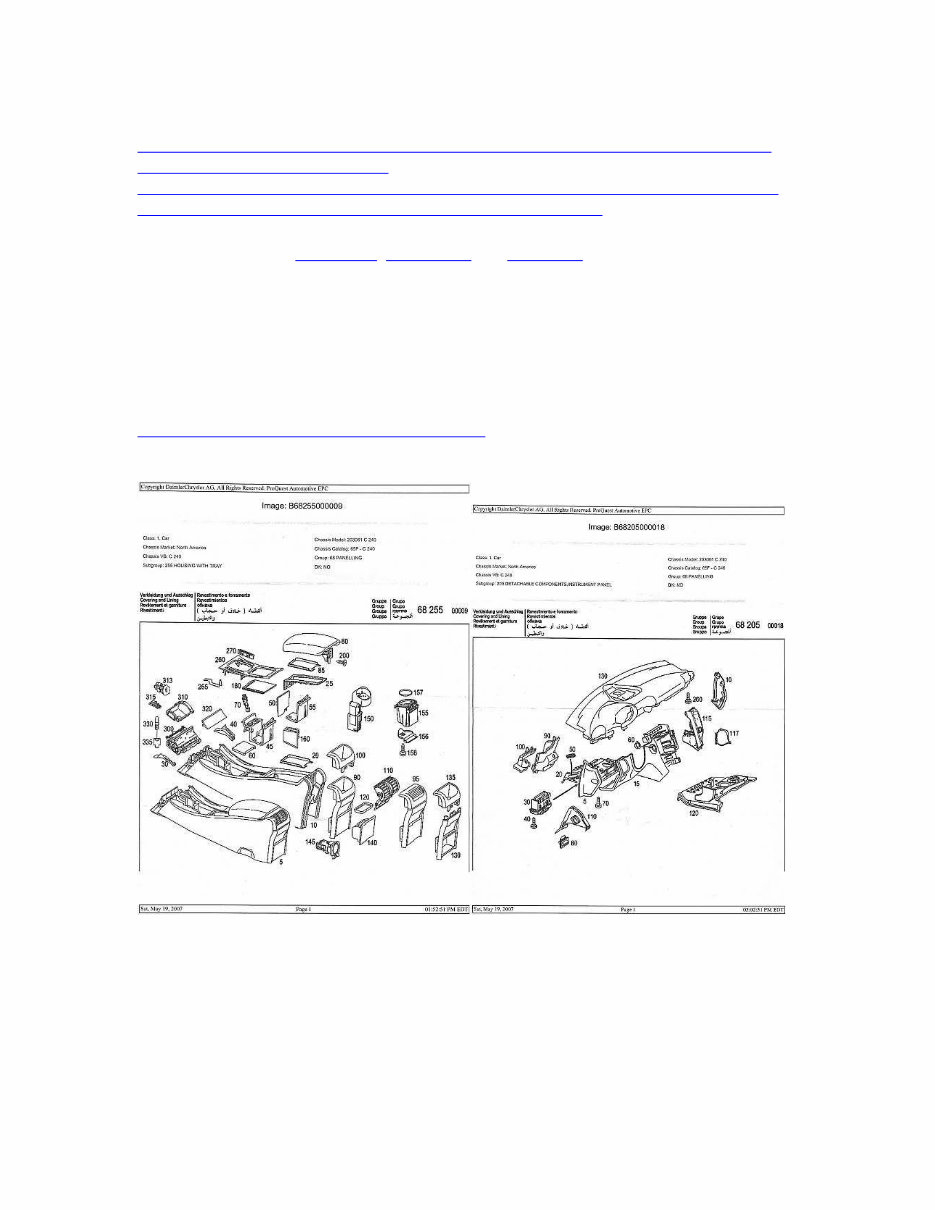
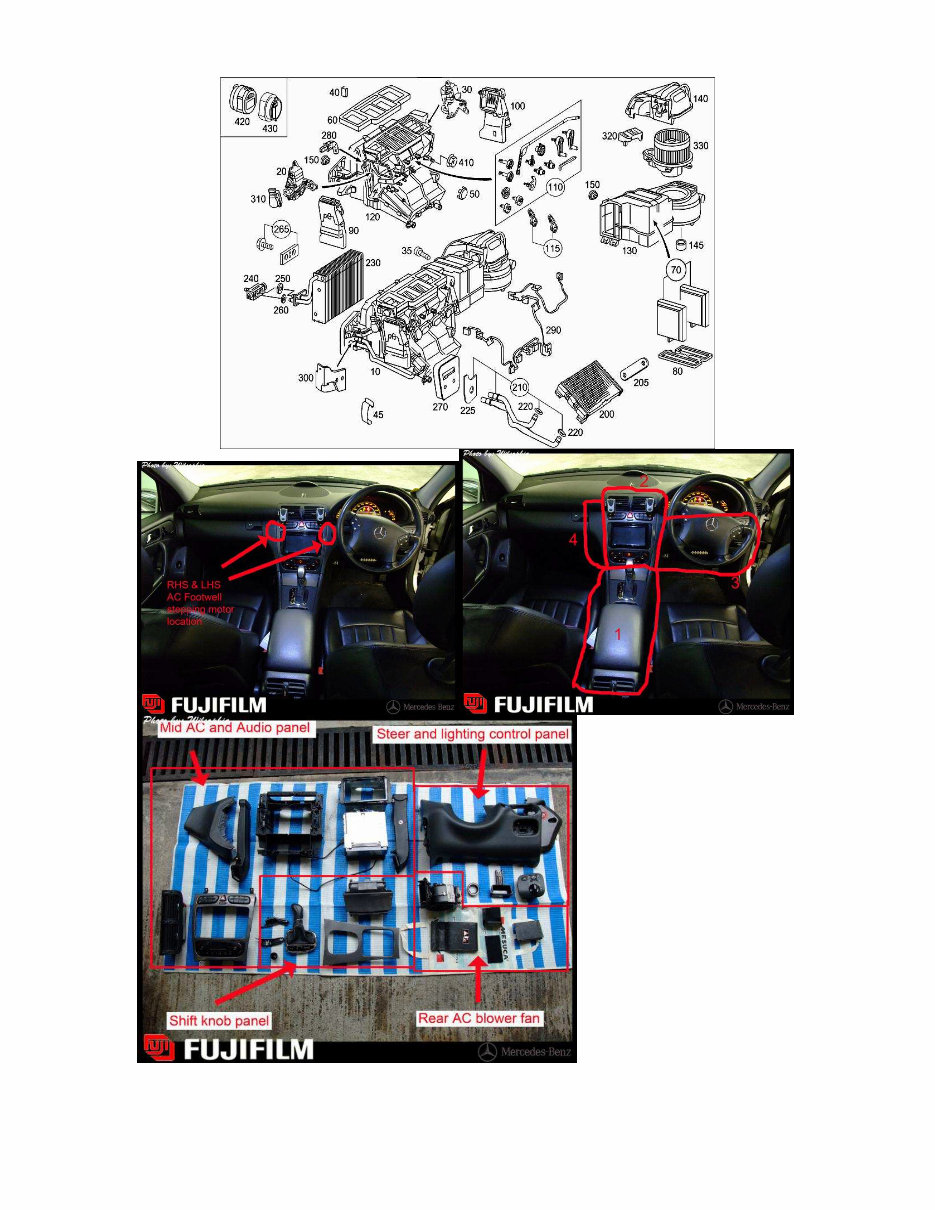
Page 3 of 27 Compiled by krazzdav Initial write up by Racin_fool Pics from liveniceguy and Wilsophia http://mbworld.org/ Write up courtesy of Racin_fool http://mbworld.org/forums/members/48522-racin_fool.html Images courtesy of liveniceguy http://mbworld.org/forums/members/54770-liveniceguy.html Wilsophia http://mbworld.org/forums/members/215496-wilsophia.html M2/19 information courtesy WaveyKat http://mbworld.org/forums/members/19476-waveykat.html Upper Dash Removal courtesy of noreaga0221 http://mbworld.org/forums/members/40139-noreaga0221.html Other additions courtesy of vert http://mbworld.org/forums/members/175496-vert.html strder007 http://mbworld.org/forums/members/149731-strder007.html y2k2c200 http://mbworld.org/forums/members/239153-y2k2c200.html ferdiyan http://mbworld.org/forums/members/231971-ferdiyan.html Part numbers courtesy of me krazzdav http://mbworld.org/forums/members/206007-krazzdav.html Item 30 A2038300233 Operating Lever Right Item 20 A2038300133 Operating Lever Left Item 115 A2038300033 Operating Parts Kit Item 110 A2038300032 Linkage – Parts Kit, Footwell flaps without operating lever Item 310 A2038201642 Stepper Motor / flap positioning motor (all same) Item 320 A2308216351 Blower Regulator Item 330 A2038202514 Electric Motor
Page 4 of 27 Compiled by krazzdav Initial write up by Racin_fool Pics from liveniceguy and Wilsophia http://mbworld.org/
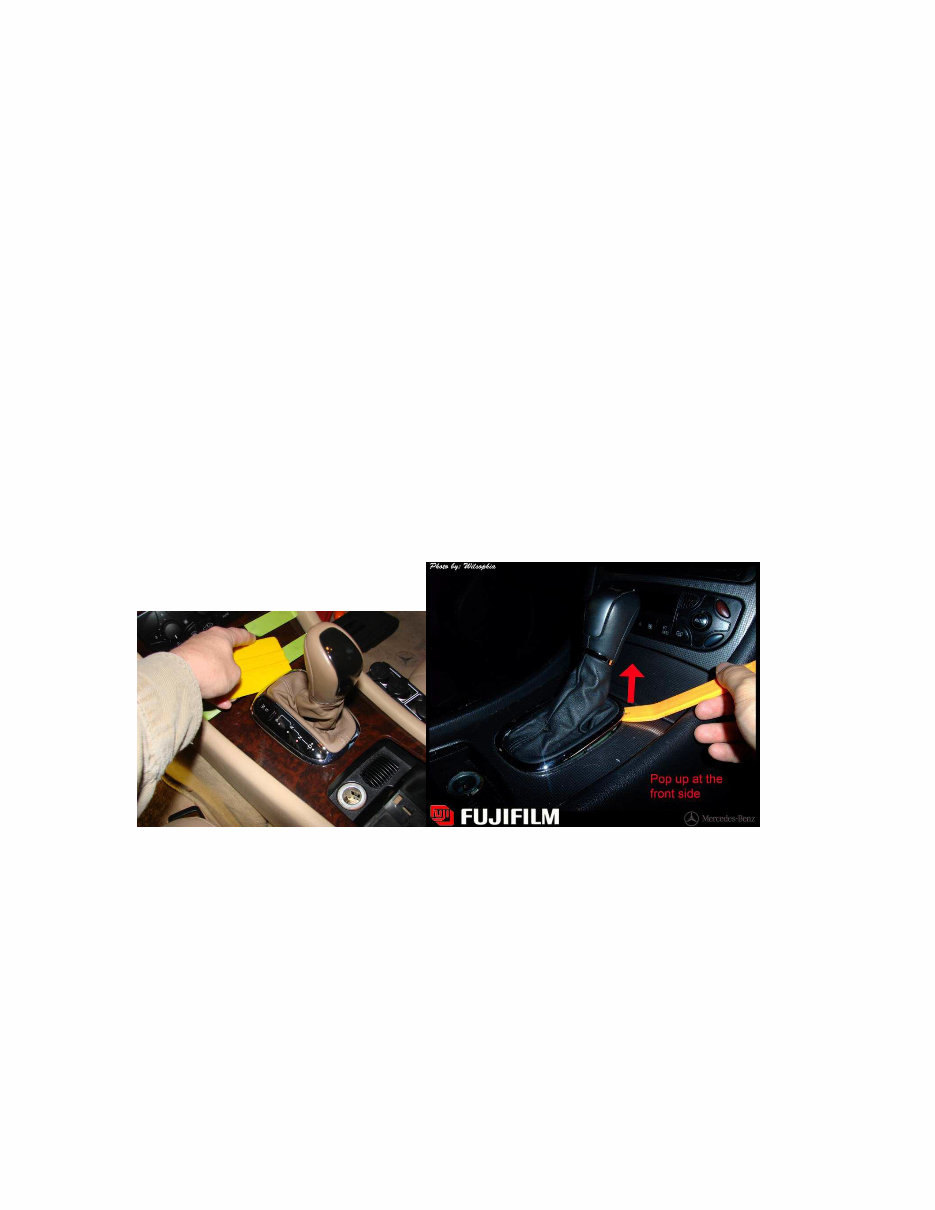
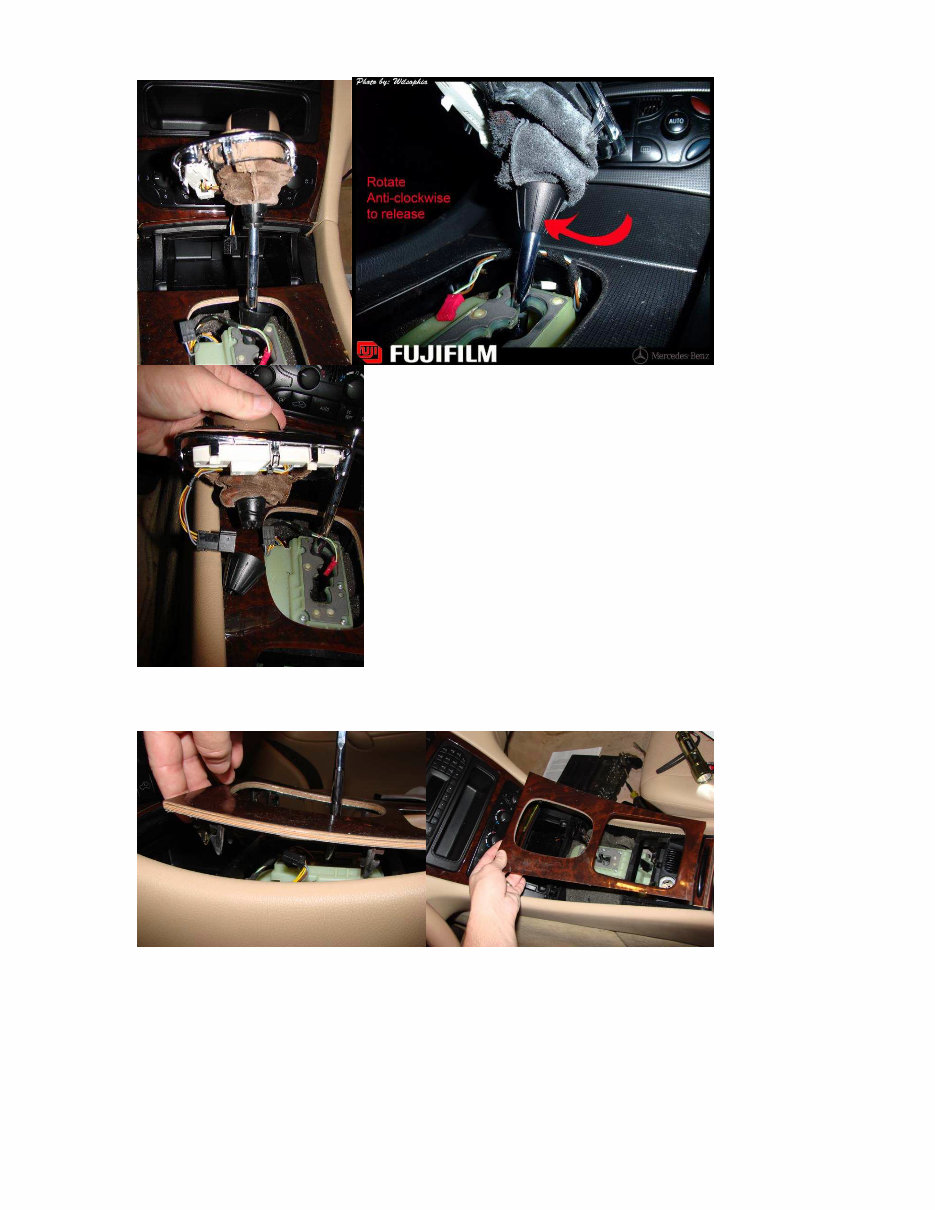
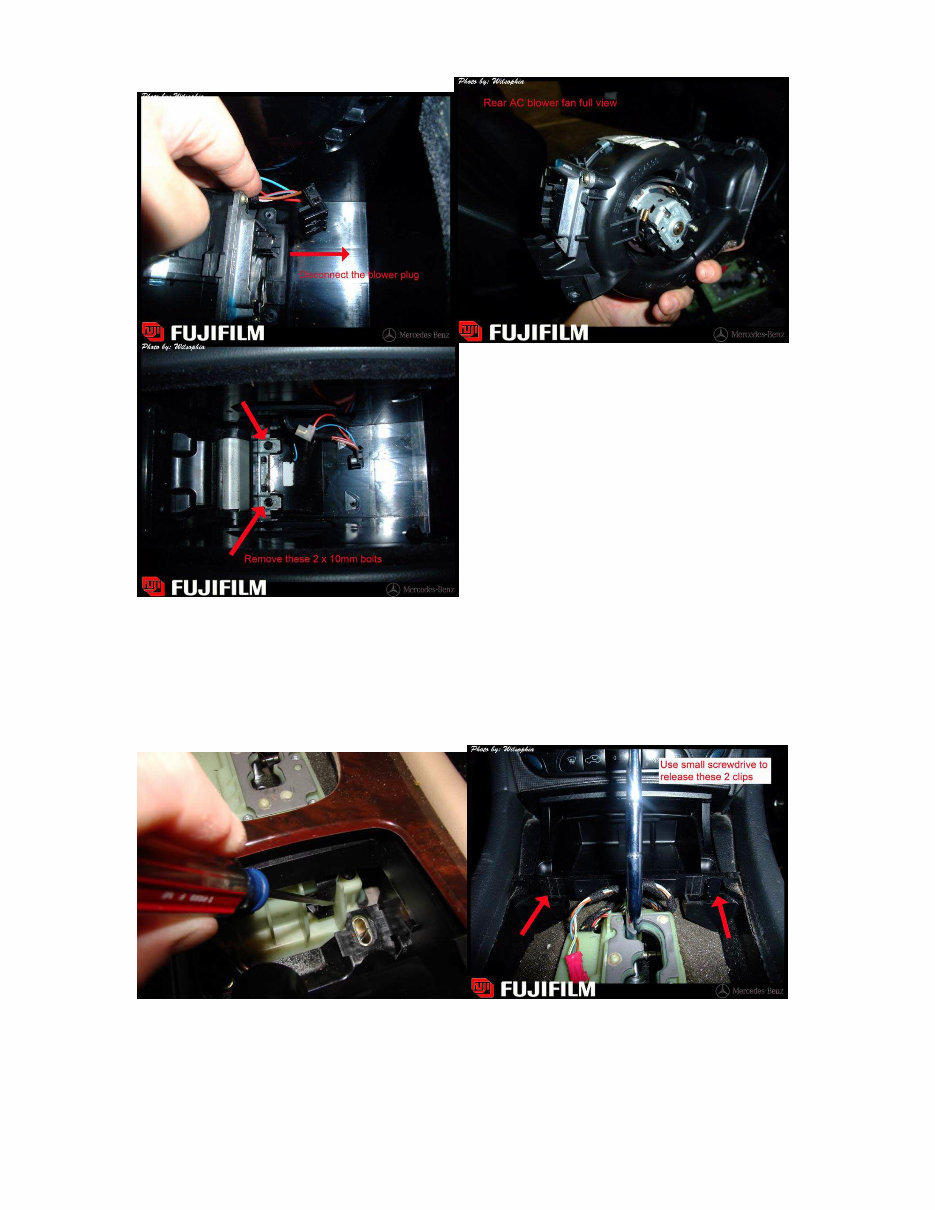
Page 5 of 27 Compiled by krazzdav Initial write up by Racin_fool Pics from liveniceguy and Wilsophia http://mbworld.org/ Item needed: (1) Footwell flap linkage kit with 2 linkage arms (will edit with the part# tomorrow) *Note - 99% of the time you do NOT need the A/c stepper motor* Tools you will need: (1) flashlight of some kind (1) 10mm socket (6 or 12pt) (1) 3/8" ratchet (1) 6-12" 3/8" extension (1) T35 Torx socket (3/8") (1) T20 torx screwdriver (1) plastic wedge (1) flat tip small pocket screwdriver (my most used tool) 1. Get in the driver's seat and turn off the car and the radio. I usually listen to the radio for a few minutes before removing it during the process. 2. Pop open the ashtray lid and empty the ashtray. 3. Use either the plastic wedge or your fingers to grab ahold of the front of the shifter surround trim and gently pull it up. Unplug the connectors from it and remove the shifter knob with it. (set all of this in the passenger seat so you won't misplace anything).
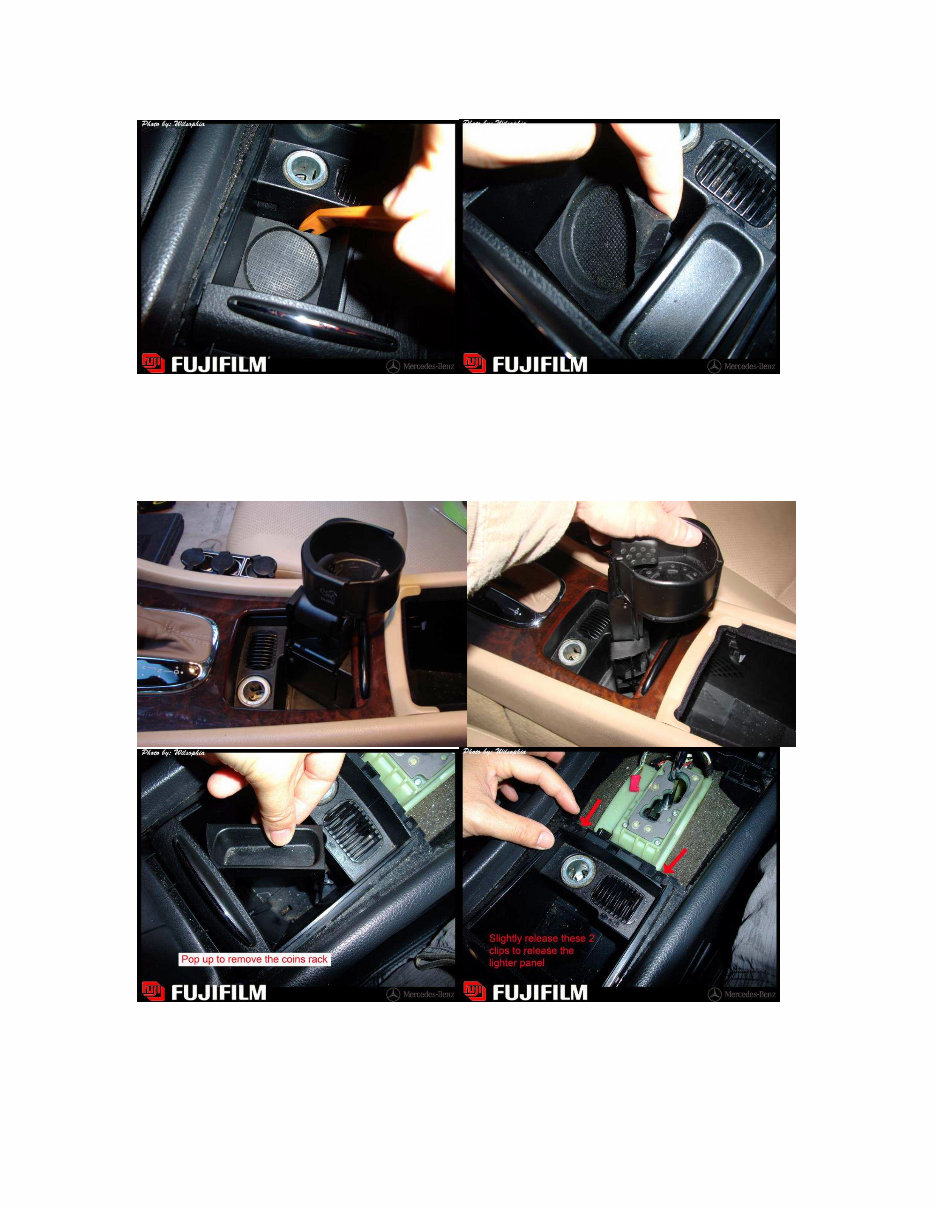
Page 6 of 27 Compiled by krazzdav Initial write up by Racin_fool Pics from liveniceguy and Wilsophia http://mbworld.org/ 4. With the ashtray open, grab ahold of the front of the other trim piece around the shifter that goes from the ashtray to the cupholder. Pop this trim piece off and set it aside. 5. Next open the cupholder area and reach down inside it with either the small screwdriver or some small but long hook and remove the rubber insert where you would set a second cup/drink. (Most people seem to use this as a trashcan or coin holder). The
Page 7 of 27 Compiled by krazzdav Initial write up by Racin_fool Pics from liveniceguy and Wilsophia http://mbworld.org/ easiest way is to pry it loose at the rear and reach down inside with your fingers and just pull the insert out. 6. There is a small tab on the cupholder that you need to pull slightly up on to pop it loose and then it just twists out and can be removed and set aside. After this, you will notice 2 small tabs at the front of this section that can be pried loose and you can fold the front half of the cupholder section back exposing (2) of the (4) 10mm screws/bolts you must remove.
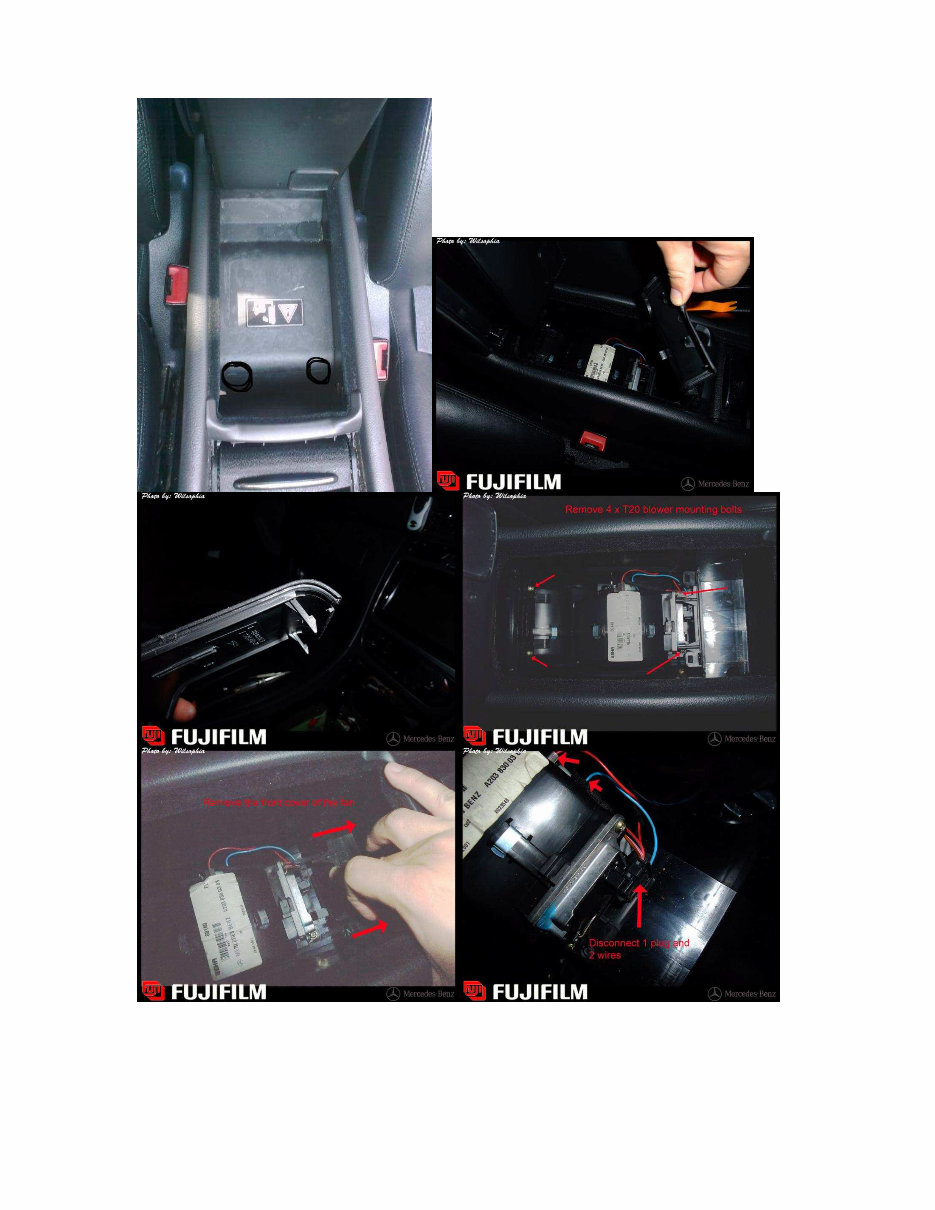
Page 8 of 27 Compiled by krazzdav Initial write up by Racin_fool Pics from liveniceguy and Wilsophia http://mbworld.org/ 7. Open the center console lower area and empty it. Next, remove the lower cloth section mat at the bottom of this area and it will expose the remaining (2) 10mm bolts you must remove. *****Notice: if you have the rear A/C option, you will need to remove the covers for it and then unscrew the rear a/c blower using the T20 torx screwdriver. Next unplug it and set it aside and then remove the (2) exposed black 10mm bolts. (it is inside the center console; there are two small slots on the left and right front side of the top cover where a small flat screw driver was stuck in to release the latch)
Page 9 of 27 Compiled by krazzdav Initial write up by Racin_fool Pics from liveniceguy and Wilsophia http://mbworld.org/
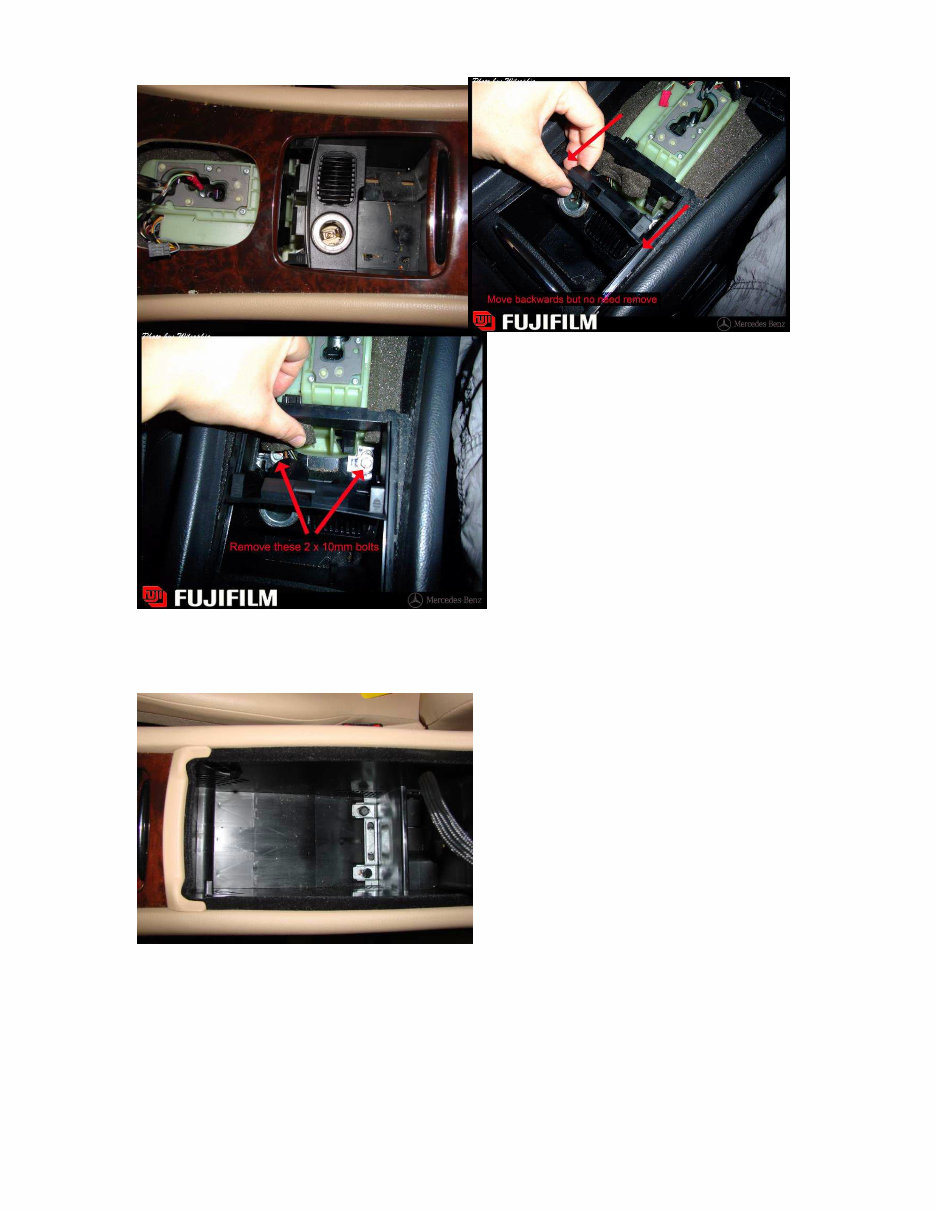
Page 10 of 27 Compiled by krazzdav Initial write up by Racin_fool Pics from liveniceguy and Wilsophia http://mbworld.org/ 8. ****Notice - engage the parking brake for you and your vehicles safety. Now you should see the black tab at the right rear of the shifter base. Press it forward and pull the gear selector back into neutral or drive. If you have not engaged the parking brake, do so NOW. Grab the small flat tip screwdriver and gently pry the two exposed tabs on the ashtray and pull the assembly up and out of the way. Also, don't forget to unplug it and then set it aside.
These repair instructions are designed to address the common clicking or ticking noise originating from the dashboard or footwell area of various Mercedes W203 and 463 chassis cars, such as C200, C220, C240, C320, G500, C32amg, and C55amg.
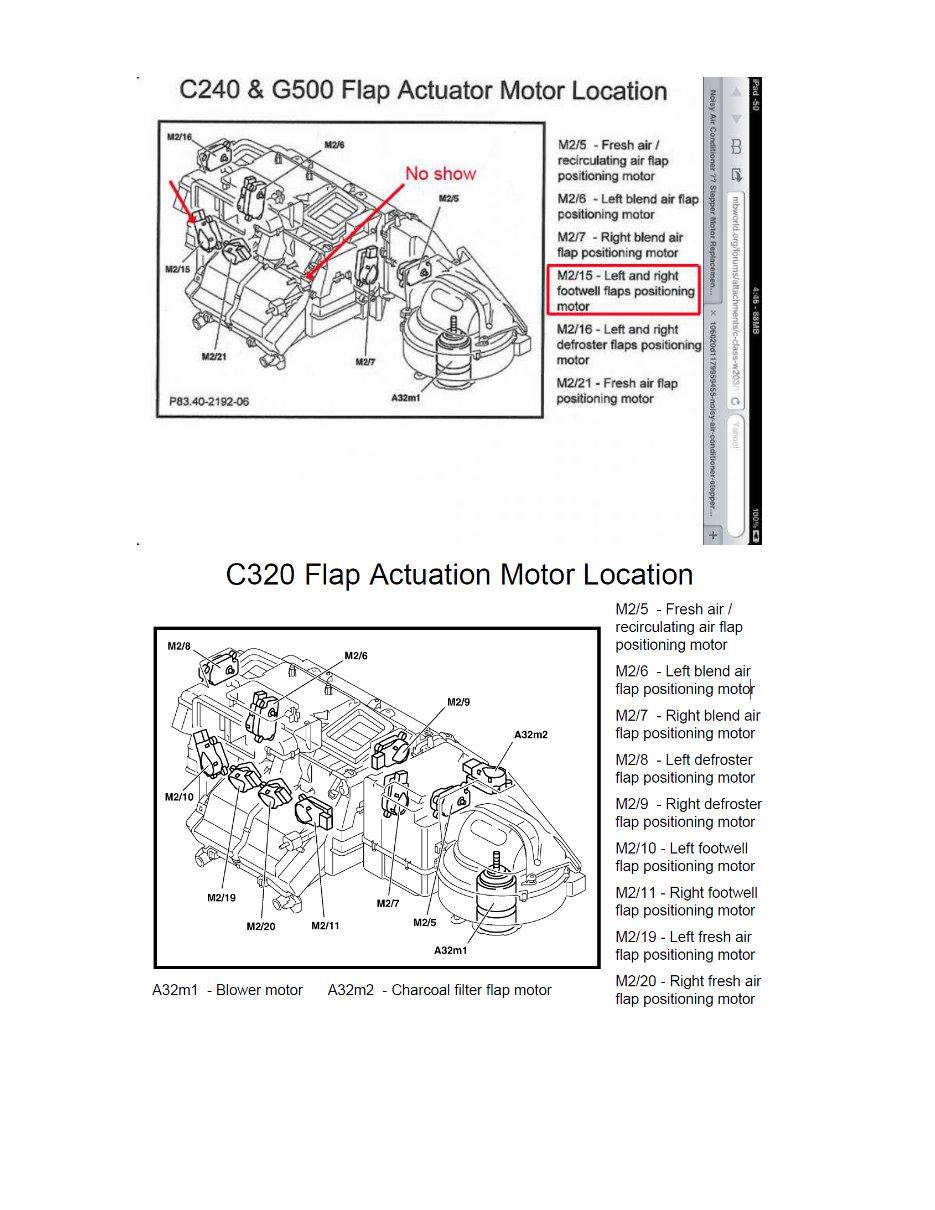
The clicking or ticking sound is typically caused by a broken AC footwell damper linkage to the Flap Actuators (Stepper Motors) located underneath the dashboard or footwell/glove box. In some instances, the stepper motor itself may be faulty. This e-book provides detailed do-it-yourself (DIY) instructions along with color pictures to guide you through the repair process.
Common symptoms of this issue include:
A clicking or ticking sound within the dashboard, usually under the glove box or driver's wheel
The clicking or ticking sound may be constant, lasting for about 20 seconds, and can occur without starting the car, with just the ignition key in position 1 or 2
Inadequate air circulation to the feet, with the most common issue being no air circulation to the windscreen or weak air circulation to the windscreen or front air vents. In some cases, there may be no air circulation at all
Condensation on the windscreen, driver's window, and passenger window
The stepper motors are responsible for controlling the flaps under the dashboard that direct air circulation, heater air, and air conditioning. The linkage arms connecting to the stepper motors and air flaps can eventually break due to constant stress and temperature changes.
This DIY repair manual provides detailed repair instructions in clear, easy-to-follow plain English, accompanied by clear color pictures. Additionally, it includes a list of required tools and part numbers for any replacement parts.
The repair manual is available in PDF format and is divided into three parts. Adobe Reader is required to view this manual and can be downloaded for free from the following link: Adobe Reader Download
This comprehensive document serves as a valuable resource for addressing this common and annoying issue in Mercedes vehicles.