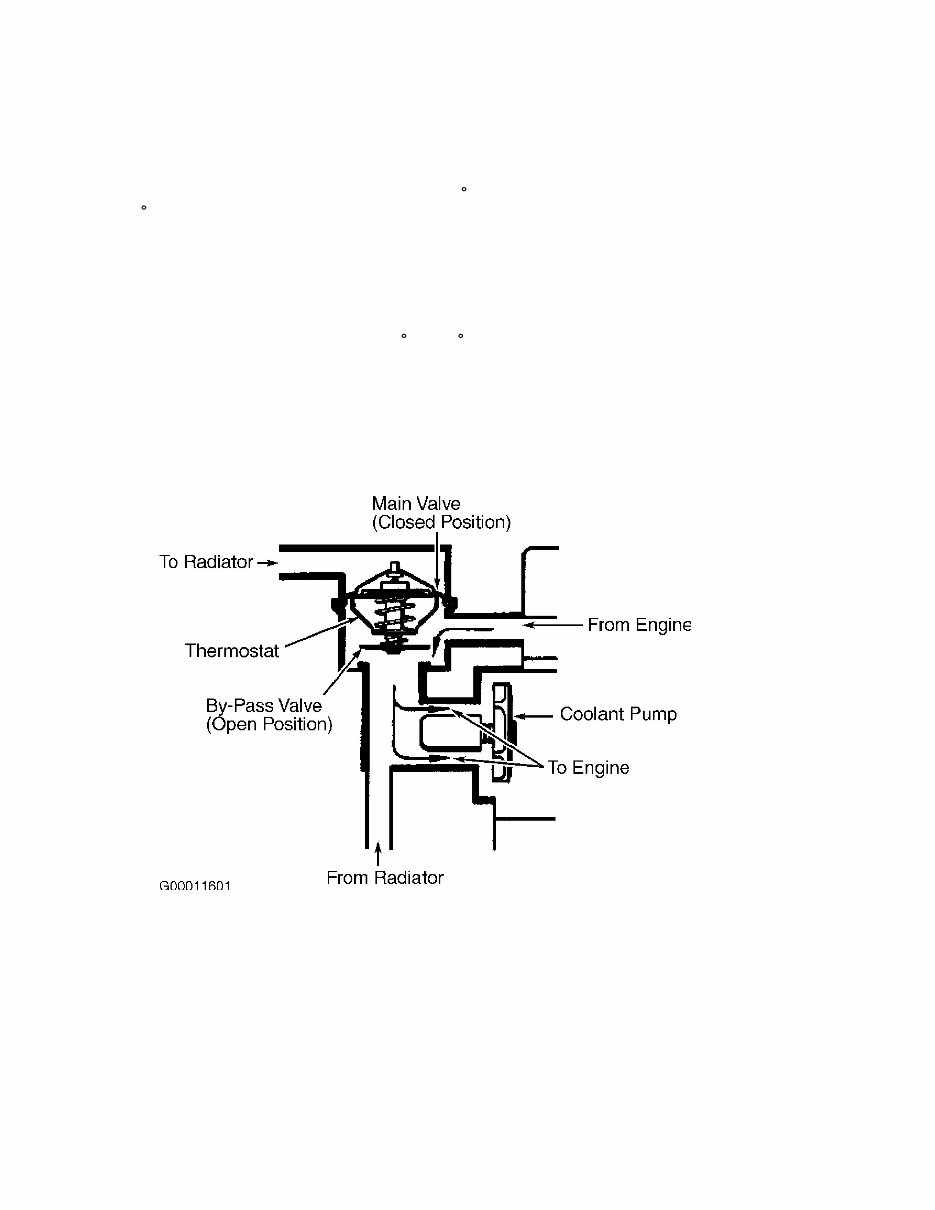
COOLING SYSTEM SPECIFICATIONS - 2.3L Article Text (p. 3) 199 * When coolant temperature is approximately 189-216 F (87-102 C), thermostat main valve opens and bypass valve is open. This allows coolant to circulate in engine block, cylinder head and through radiator. In this valve position thermostat allows some coolant to recirculate (bypass) back into engine block and cylinder head, while also allowing some coolant to flow to radiator for cooling. * When coolant temperature is more than 216 F (102 C), thermostat main valve opens and bypass valve is closed. This allows coolant to circulate through engine block, cylinder head and radiator. This type of coolant flow is for optimum engine cooling. In this valve position all coolant is routed through radiator. No coolant is recirculated (bypassed) back into engine block and cylinder head. Fig. 2: Identifying Thermostat Valves Courtesy of Mercedes-Benz of North America. TESTING COOLANT LEVEL SWITCH Coolant Level Indicator On Constantly 1) Disconnect coolant level indicator electrical connector. Coolant level indictor is located at coolant expansion tank. Using a DVOM, check resistance between coolant level indicator terminals. DVOM should indicate infinite resistance. If infinite resistance is present, go to next step. If infinite resistance is not present,
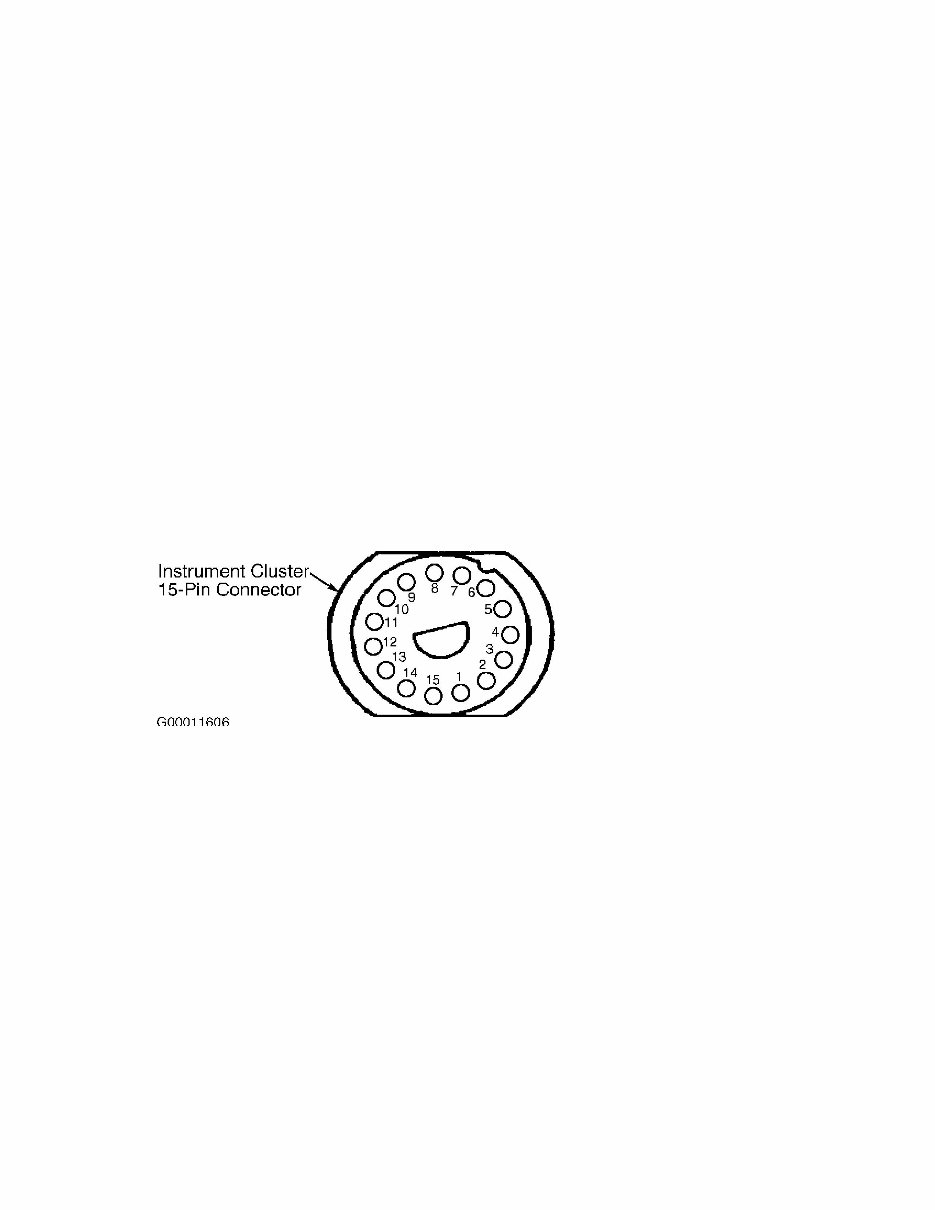
COOLING SYSTEM SPECIFICATIONS - 2.3L Articl replace coolant level switch. 2) Remove instrument cluster. Disconnect 15-pin connector on back of instrument cluster. See Fig. 3. Using a DVOM, check resistance between 15-pin connector terminal No. 12 (Brown/Green wire) and ground. DVOM should indicate infinite resistance. If infinite resistance is present, replace coolant level switch. If infinite resistance is not present, repair short to ground on 15-pin connector terminal No. 12 (Brown/Green wire). Coolant Level Indicator Does Not Light As Bulb Test 1) Remove instrument cluster. Check coolant level indicator bulb. If bulb is okay, go to next step. If bulb is not okay, replace coolant level indicator bulb. 2) With instrument cluster removed, disconnect 15-pin connector on back of instrument cluster. See Fig. 3. Using a DVOM, check voltage between 15-pin connector terminals No. 6 and 9. DVOM should indicate approximately 12 volts. If approximately 12 volts is present, replace coolant level switch. If approximately 12 volts is not present, repair wiring harness as necessary. Fig. 3: Identifying Instrument Cluster Connector Term Courtesy of Mercedes-Benz of North America. Coolant Level Indicator Does Not Light When Coolant Level Is Below Minimum NOTE: For this test procedure to be valid, coolant level must be below minimum. 1) Disconnect coolant level indicator electrical connector. Coolant level indictor is located at coolant expansion tank. Using a DVOM, check resistance between coolant level indicator terminals. DVOM should indicate approximately 5 ohms. If approximately 5 ohms is present, go to next step. If approximately 5 ohms is not present, replace coolant level switch. 2) Connect a DVOM between coolant level switch harness connector Brown wire and battery positive terminal. DVOM should indicate approximately 12 volts. If approximately 12 volts is present, go to next step. If approximately 12 volts is not present, repair wiring harness as necessary. 3) Using a jumper wire, jumper coolant level switch harness connector wires. Turn ignition on. Coolant level indicator should light. If coolant level indicator lights, circuit is okay. If coolant
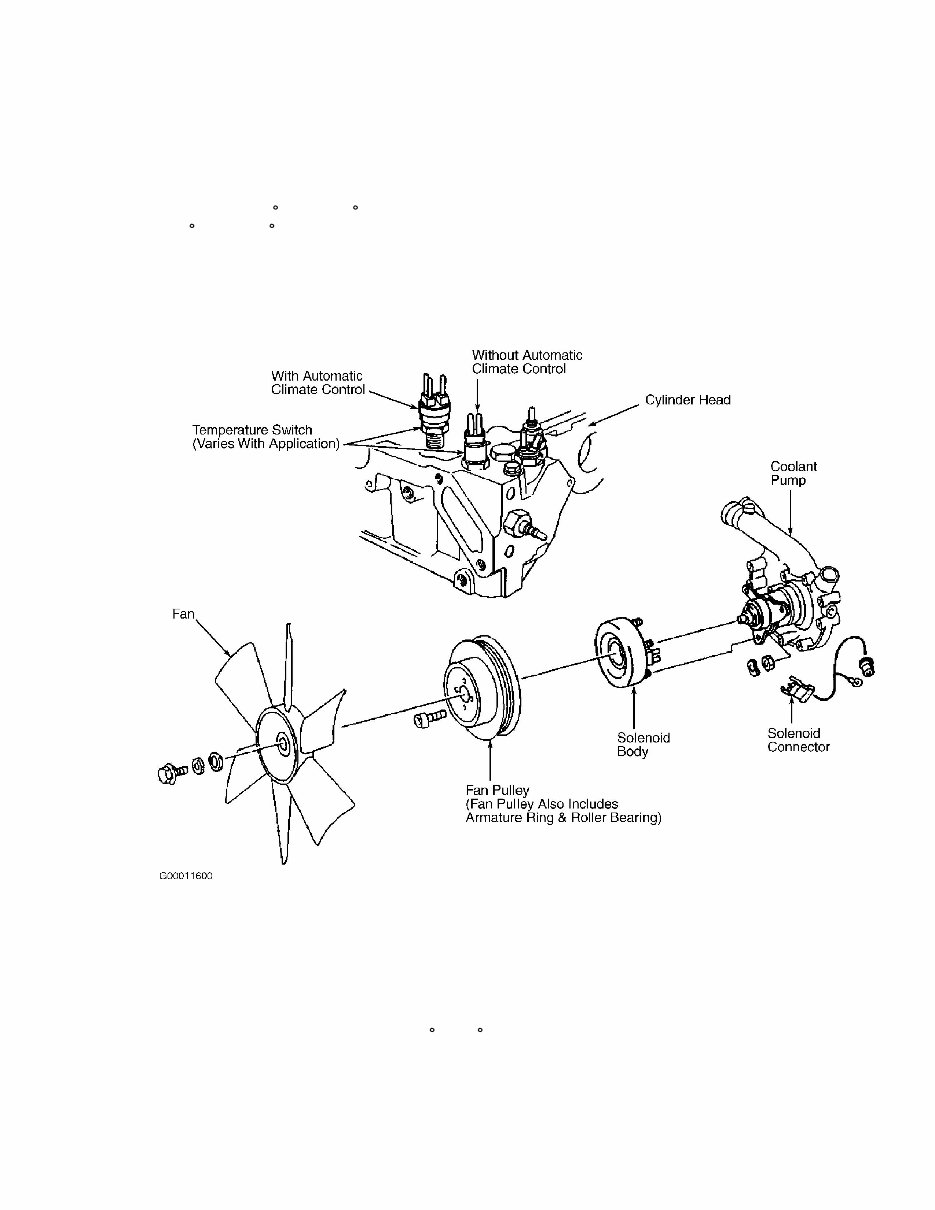
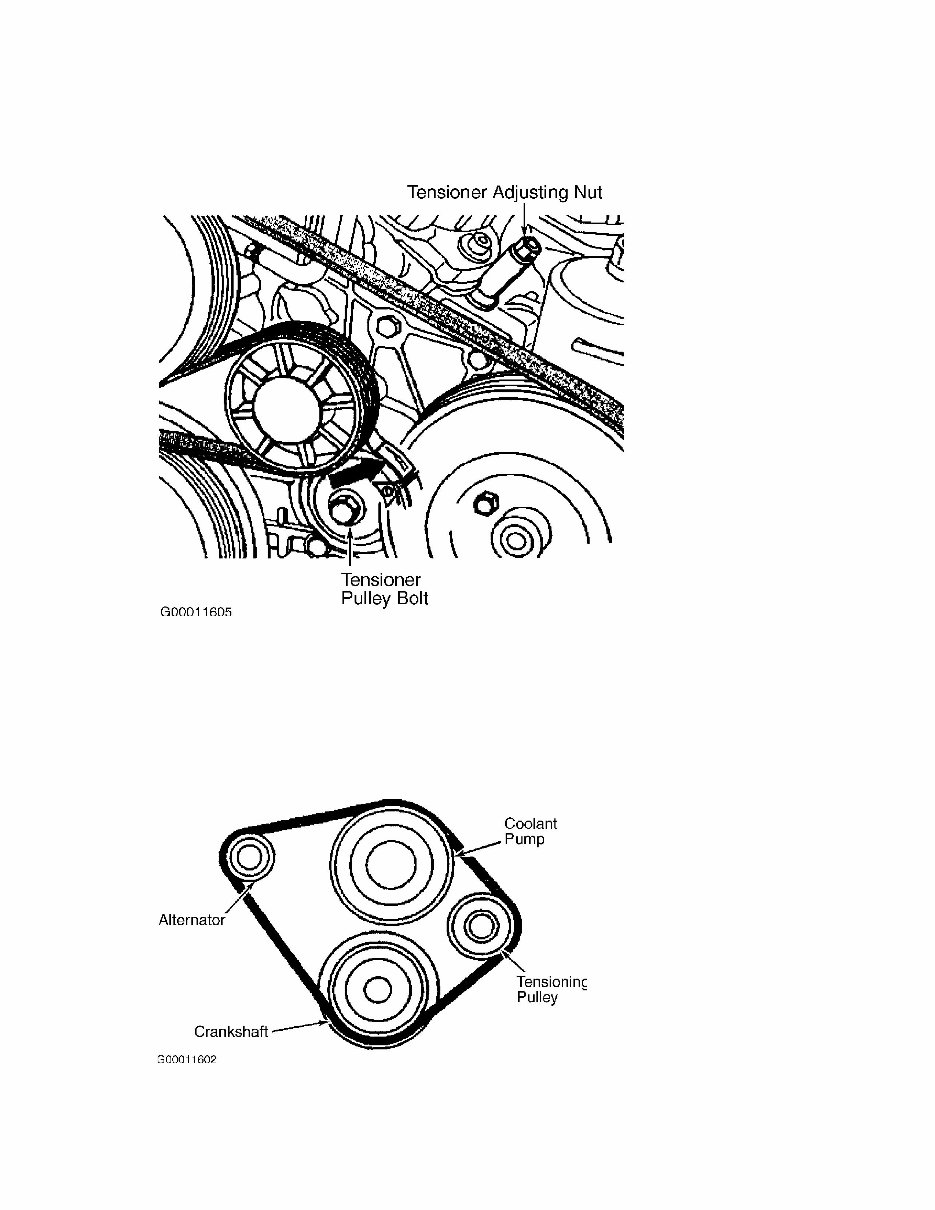
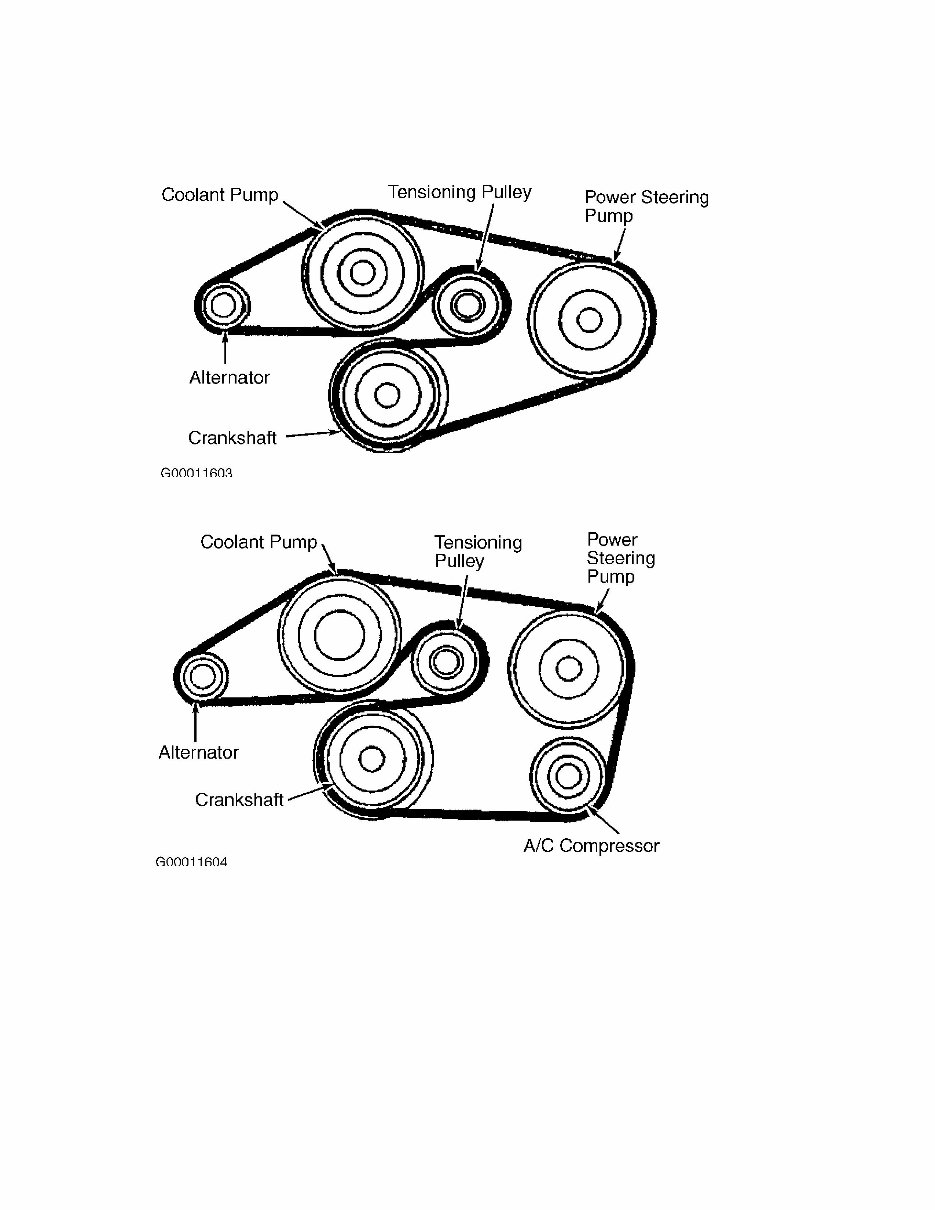
COOLING SYSTEM SPECIFICATIONS - 2.3L Artic level indicator does not light, repair wiring harness as necessary. COOLANT TEMPERATURE SWITCH With Automatic Climate Control Vehicles equipped with automatic climate control have a 3-pin coolant temperature switch located in cylinder head. See Fig. 1. When coolant temperature reaches 230 F (110 C), coolant temperature switch closes energizing cooling fan solenoid clutch. Verify coolant temperature switch closes when coolant temperature reaches 230 F (110 C). If coolant temperature switch does not complete circuit for cooling fan solenoid clutch, replace coolant temperature switch. When cooling fan solenoid clutch is energized, a 2-stage auxiliary cooling fan is also energized. Without Automatic Climate Control Vehicles not equipped with automatic climate control have a 2-pin coolant temperature switch located in cylinder head. See Fig. 1. When coolant temperature reaches 212 F (100 C), coolant temperature switch closes energizing cooling fan solenoid clutch. Verify coolant temperature switch closes when coolant temperature reaches 212 F (100 C). If coolant temperature switch does not complete circuit for cooling fan solenoid clutch, replace coolant temperature switch. FAN SOLENOID COUPLING NOTE: When cooling fan is disengaged, it may continue to rotate due to airflow or inertia. If cooling fan solenoid is suspected of failing, turn engine off. Disconnect fan solenoid 2-pin connector located behind cooling fan pulley. See Fig. 1. Connect a jumper wire to each terminal of fan solenoid coupling connector (component side). Connect one end of a jumper wire to battery positive terminal. Start engine and idle. Connect other jumper wire to ground. Cooling fan solenoid coupling should energize. If cooling fan solenoid coupling does not energize, replace components as necessary. If cooling fan solenoid engages, verify coolant temperature switch operation. See COOLANT TEMPERATURE SWITCH. Verify wiring harness integrity. Repair as necessary. REMOVAL & INSTALLATION BELT TENSIONER Releasing Belt Tensioner Loosen tensioner pulley bolt 1/4 to 1/2 turn. Turn tensioner adjusting nut until accessory drive belt can be removed. See Fig. 4.
1991 Mercedes-Benz 190E (W201) Service & Repair Manual
Engines covered:
2.3L M102.985 I4
2.6L M103.940 I6
The 1991 Mercedes-Benz 190E (W201) Service & Repair Manual contains comprehensive technical information for maintaining these enduring German classics. Whether you're working on the nimble 2.3L four-cylinder (M102.985) or the smooth 2.6L straight-six (M103.940), this factory documentation provides precise specifications and procedures for every major system on these meticulously engineered sports sedans.
This manual breaks down complex systems with detailed exploded views, component specifications, and logical troubleshooting sequences. You'll find exact valve clearances, critical torque values, precise adjustment procedures, and maintenance intervals for the entire drivetrain, braking system, and chassis components.
Whether you're rebuilding the head, servicing the rear subframe bushings, or tackling that temperamental climate control system, this manual provides the exact procedures these precision vehicles demand. Skip the forum theories and maintain your 190E the way the Stuttgart engineers intended.
Printable: Yes Language: English Compatibility: Pretty much any electronic device, incl. PC & Mac computers, Android and Apple smartphones & tablet, etc. Requirements: Adobe Reader (free)
Recently Viewed
5,521,897Happy Clients
2,594,462eManuals
1,120,453Trusted Sellers
15Years in Business
Price:
Actual Price:
1991 Mercedes-Benz 190E (W201) Service & Repair Manual