VIEW MAIN INDEX TO MODEL INDEX RANG.DRFT.OVERHAUL MANUAL Ranger/Drifter Overhaul Manual BACK TO MODEL INDEX FOREWORD This Manual has been prepared to provide information covering normal service repairs and maintenance for the RANGER / DRIFTER SERIES. As all information in this manual was the best available at the time of printing, vehicle specification and other information will be updated in Service Information. Ford/Mazda Motor Company WARNING Servicing a vehicle can be dangerous. If you have not received service-related training, the risks of injury, property damage, and failure of servicing increase. The recommended servicing procedures for the vehicle in this workshop manual were developed with Ford/Mazda-trained technicians in mind. This manual may be useful to non-Ford/Mazda trained technicians, but a technician with our service-related training and experience will be at less risk when performing service operations. However, all users of this manual are excepted at least to know general safety procedures. This manual contains "Warnings" and "Cautions" applicable to risks not normally encountered in a general technician's experience. They should be followed to reduce the risk of injury and the risk that improper service or repair may damage the vehicle or render it unsafe. It is also important to understand that the "Warnings" and "Cautions" are not exhaustive. It is impossible to warn of all the hazardous consequences that might result from failure to follow the procedures. The procedures recommended and described in this manual are effective methods of performing service and repair. Some require tools specifically designed for a specific purpose. Persons using procedures and tools, which are not recommended by Ford/Mazda Motor Corporation, must satisfy themselves thoroughly that neither personal safety nor safety of the vehicle will be jeopardized. The contents of this manual, including drawings and specifications, are the latest available at the time of printing, and Ford/Mazda Motor Corporation reserves the right to change the vehicle designs and alter the contents of this manual without notice and without incurring obligation. Parts should be replaced with genuine Ford/Mazda replacement parts or with parts, which match the quality of genuine Ford/Mazda replacement parts. Persons using replacement parts of lesser quality than that of genuine Ford/Mazda replacement parts must satisfy themselves thoroughly that neither personal safety nor safety of the vehicle will be jeopardized. Ford/Mazda Motor Corporation is not responsible for any problems, which may arise from the use of this manual. The cause of such problems includes but is not limited to insufficient service related training, use of improper tools, use of replacement parts of lesser quality than that of genuine Mazda replacement parts, or not being aware of any revision of this manual.
1999 Ford/Mazda Motor Company All rights reserved. Reproduction by any means, electronic or mechanical including photocopying, recording or by any information storage and retrieval system or translation in whole or part is not permitted without written authorization from Ford/Mazda Motor Company. PRINTED IN JAPAN, JAN.1999 F161–20–99A CONTENTS Title Section General Information GI G6 B1 Ranger / Drifter Overhaul Manual D ENGINE D MANUAL TRANSMISSION APPLICATION: This manual is applicable to vehicles beginning with the Vehicle Identification Numbers (VIN) shown on the following page. B2 Engine Engine WL, WL Turbo R15M–D R15MX–D J2 J3 Manual transmission Transfer TD Technical Data ST Special Tools F2 B3 J1 Engine Manual transmission M15M–D M15MX–D TO. MODEL .INDEX BACK TO FOREWORD & ENGINE INDEX RANG.DRFT.OVERHAUL MANUAL PAGES FROM SUPPLEMENT
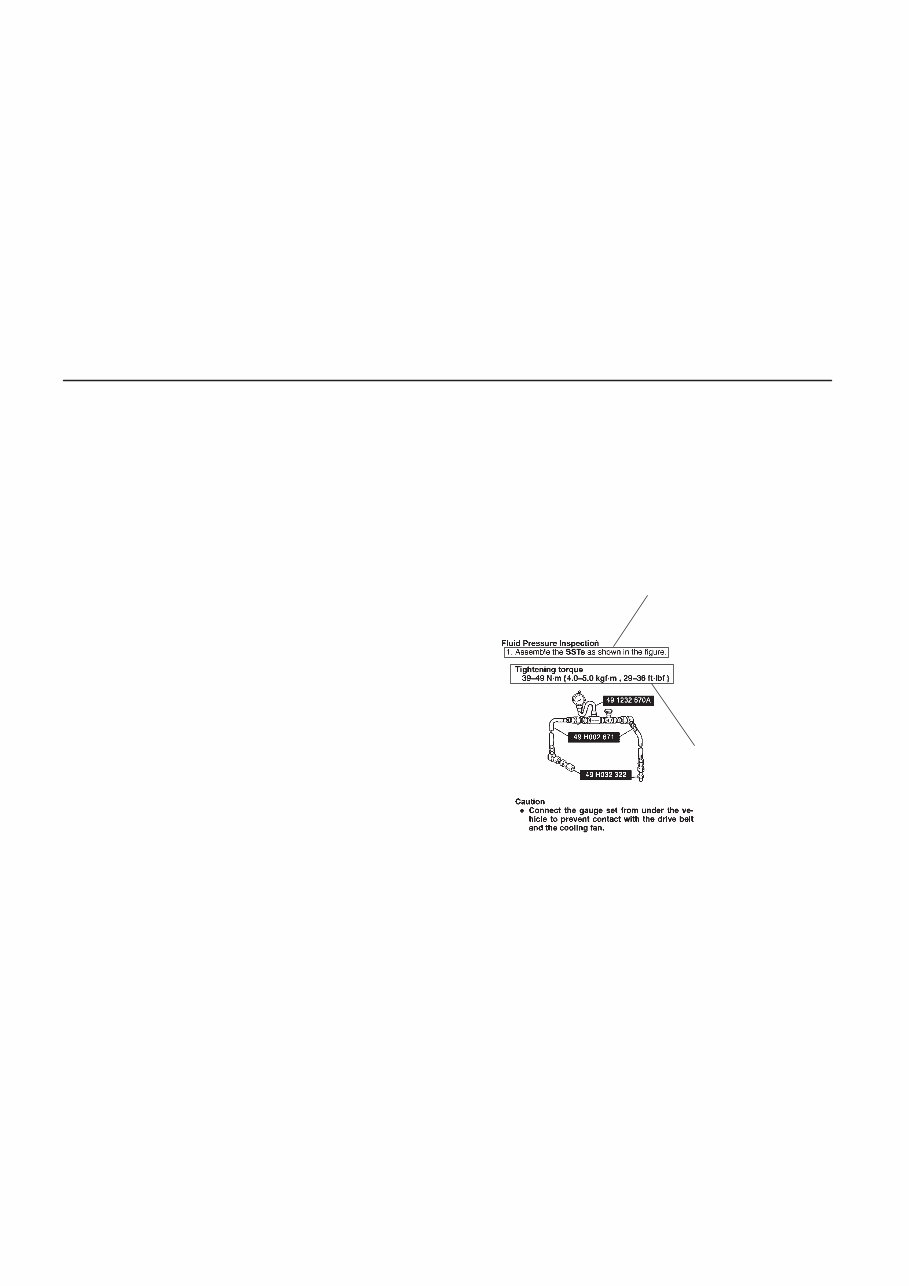
GI–1 GENERAL INFORMATION HOW TO USE THIS MANUAL GI–1 . . . . . . . . . . . . . . . RANGE OF TOPICS GI–1 . . . . . . . . . . . . . . . . . . . . . SERVICING PROCEDURE GI–1/2 . . . . . . . . . . . . . . . SYMBOLS GI–1 3 . . . . . . . . . . . . . . . . . . . . . . . . . . . . . . ADVISORY MESSAGES GI–1 3 . . . . . . . . . . . . . . . . . . TEXT SEQUENCE GI–1 3 . . . . . . . . . . . . . . . . . . . . . . . UNITS GI–1 4 . . . . . . . . . . . . . . . . . . . . . . . . . . . . . . . . . . . . FUNDAMENTAL PROCEDURES GI–1 5 . . . . . . . . . . . . PREPARATION OF TOOLS AND MEASURING EQUIPMENT GI–1 5 . . . . . . . . . . . . . . SPECIAL SERVICE TOOLS GI–1 5 . . . . . . . . . . . . . . . DISASSEMBLY GI–1 5 . . . . . . . . . . . . . . . . . . . . . . . . . . INSPECTION DURING REMOVAL, DISASSEMBLY GI–1 5 . . . . . . . . . . . . . . . . . . . . . . . . . ARRANGEMENT OF PARTS GI–1 5 . . . . . . . . . . . . . . CLEANING OF PARTS GI–1 5 . . . . . . . . . . . . . . . . . . . REASSEMBLY GI–1 5/6 . . . . . . . . . . . . . . . . . . . . . . . . . . ADJUSTMENT GI–1 6 . . . . . . . . . . . . . . . . . . . . . . . . . . RUBBER PARTS AND TUBING GI–1 6 . . . . . . . . . . . HOSE CLAMPS GI–1 6 . . . . . . . . . . . . . . . . . . . . . . . . . TORQUE FORMULAS GI–1 6 . . . . . . . . . . . . . . . . . . . . VISE GI–1 6 . . . . . . . . . . . . . . . . . . . . . . . . . . . . . . . . . . . ELECTRICAL SYSTEM GI–1 7 . . . . . . . . . . . . . . . . . . . . . CONNECTORS GI–1 7 . . . . . . . . . . . . . . . . . . . . . . . . . . NEW STANDARDS GI–1 8/10 . . . . . . . . . . . . . . . . . . . . . . . . ABBREVIATIONS GI–10 . . . . . . . . . . . . . . . . . . . . . . . . . . HOW TO USE THIS MANUAL RANGE OF TOPICS D This manual contains the procedures for performing all of the required service operations. The procedures are divided into the following five basic operations. (1) Removal/Installation (2) Disassembly/Assembly (3) Replacement (4) Inspection (5) Adjustment D Simple operations which can be performed easily just by looking at the vehicle, such as removal/installation of parts, jacking, vehicle lift, cleaning of parts, and visual inspection, have been omitted. SERVICING PROCEDURE Inspection, Adjustment D The procedures for inspections and adjustments are divided into steps. Important points in regard to the location and contents of the procedures are explained in detail and are shown in the illustrations. SHOWS PROCEDURE ORDER FOR SERVICE SHOWS TIGHTENING TORQUE SPECIFICATIONS BACK.TO.MAIN.INDEX CONTINUED TO. MODEL .INDEX PAGES FROM SUPPLEMENT RANG.DRFT.OVERHAUL MANUAL
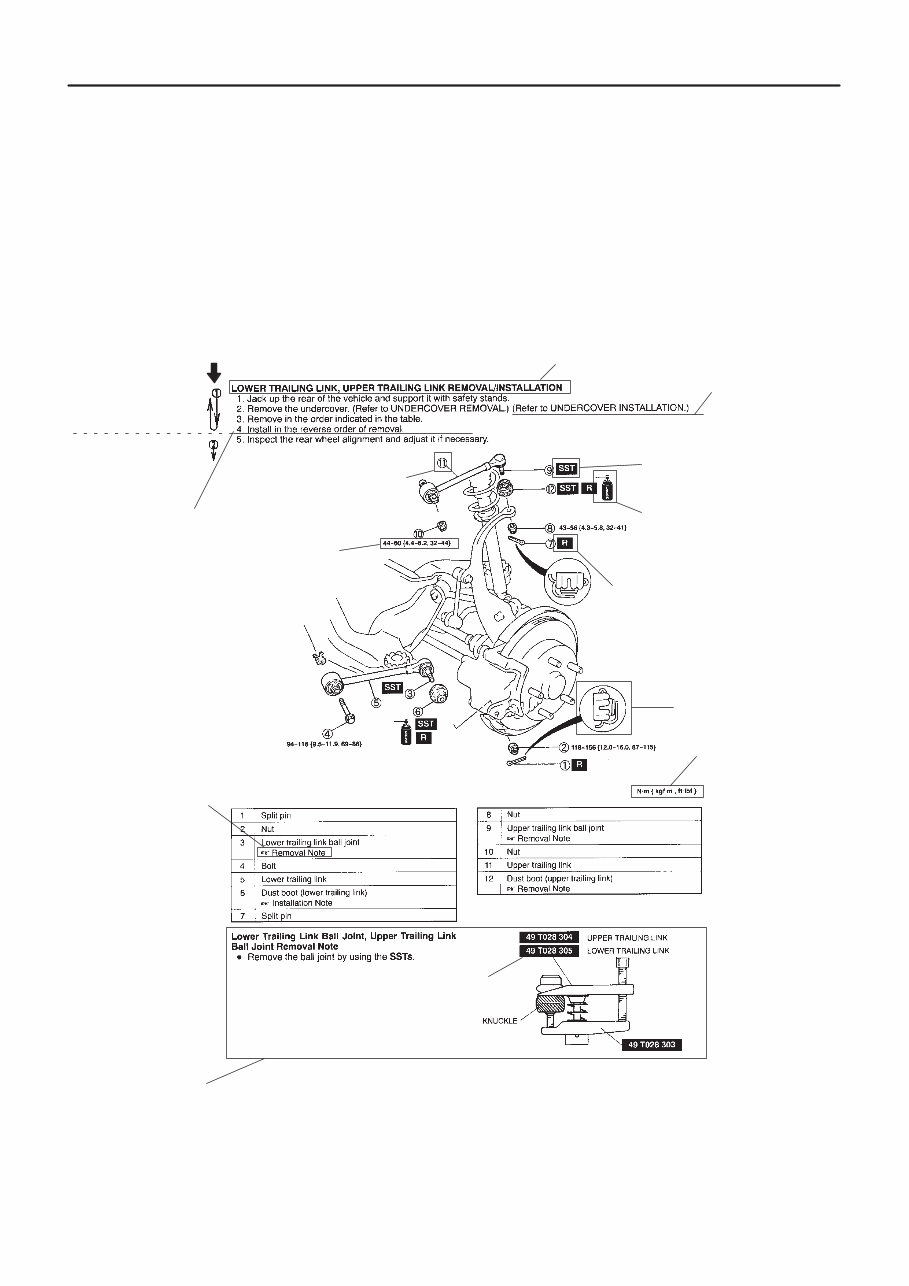
HOW TO USE THIS MANUAL GI–2 Repair procedure 1. Most repair operations begin with an overview illustration. It identifies the components, shows how the parts fit together, and describes visual part inspection. However, only the removal/installation procedures which need to be performed methodically have written instructions. 2. Expendable parts, tightening torques, and symbols for oil, grease, and sealant are shown in the overview illustration. In addition, symbols indicating parts which require the use of special service tools for removal/installation are also shown. 3. The procedures are numbered and the part that is the main point of that procedure is shown in the illustration with the corresponding number. Occasionally, there are important points or information concerning a procedure. Refer to this information when servicing the related part. SHOWS SERVICE ITEM (S) SHOWS TIGHTENING TORQUE SPECIFICATIONS SHOWS PROCEDURE ORDER FOR SERVICE SHOWS SPECIAL SERVICE TOOL (SST) FOR SERVICE OPERATION SHOWS APPLICATION POINTS OF GREASE, ETC. SHOWS EXPENDABLE PARTS SHOWS DETAILS SHOWS TIGHTENING TORQUE UNITS SHOWS THERE ARE REFERRAL NOTES FOR SERVICE SHOWS REFERRAL NOTES FOR SERVICE Procedure “Removal/Installation” Portion Indicates any relevant references which need to be followed during installation. “Inspection After Installation” Portion Install the parts by performing steps 1—3 in reverse order SHOWS SPECIAL SERVICE TOOL (SST) NO. BACK.TO.CHAPTER.INDEX CONTINUED TO. MODEL .INDEX PAGES FROM SUPPLEMENT RANG.DRFT.OVERHAUL MANUAL
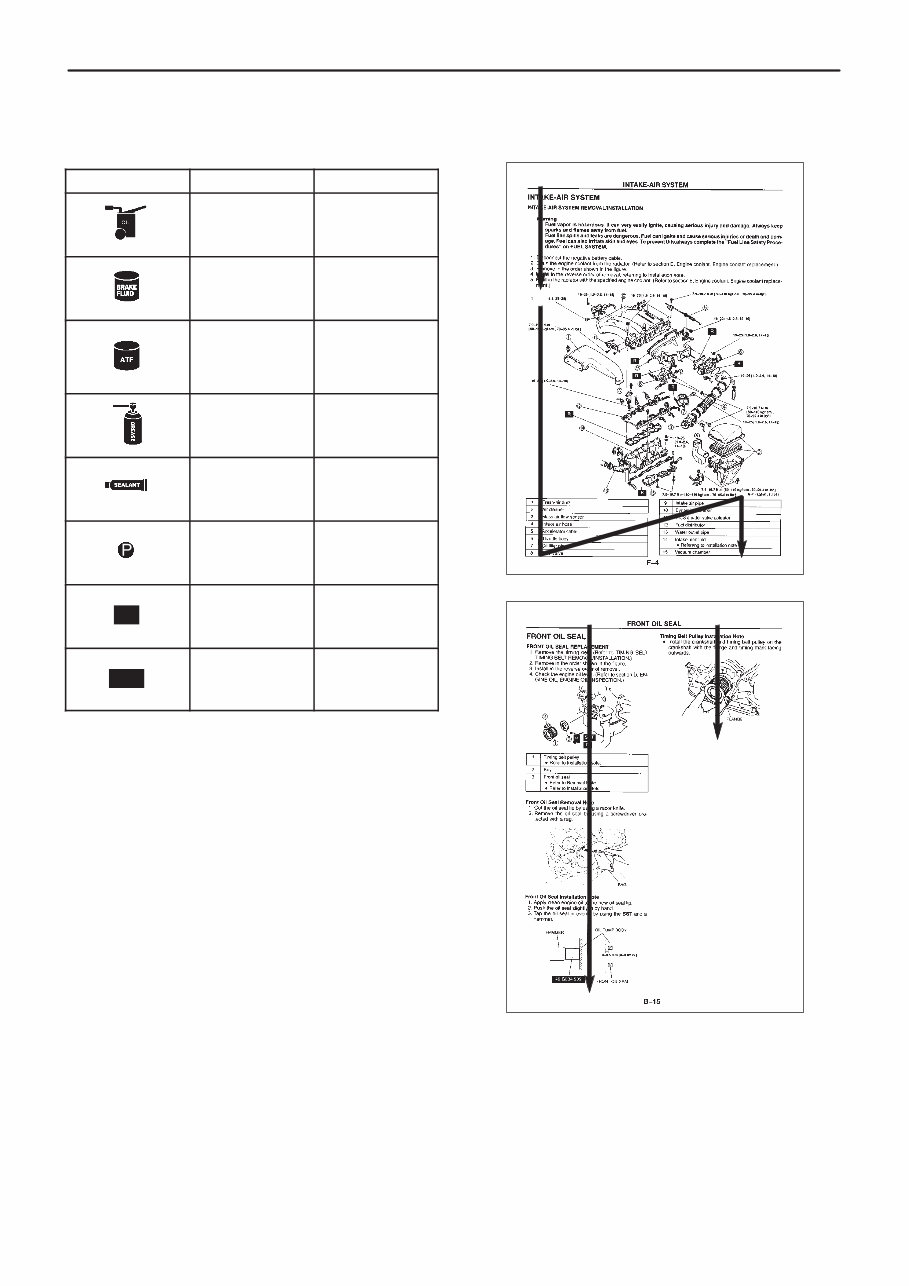
HOW TO USE THIS MANUAL GI–3 SYMBOLS D There are eight symbols indicating oil, grease, sealant, and the use of SSTs. These symbols show the points of applying or using such materials during service. Symbol Meaning Kind Apply oil New appropriate engine oil or gear oil Apply brake fluid New appropriate brake fluid Apply automatic transaxle/ transmission fluid New appropriate automatic transaxle/ transmission fluid Apply grease Appropriate grease Apply sealant Appropriate sealant Apply petroleum jelly Appropriate petroleum jelly R Replace part O-ring, gasket, etc. SST Use SST Appropriate SST ADVISORY MESSAGES You’ll find several Warnings, Cautions, Notes, Specifications and Upper and lower limits in this manual. Warning D A Warning indicates a situation in which serious injury or death could result if the warning is ignored. Caution D A Caution indicates a situation in which damage to the vehicle could result if the caution is ignored. Note D A Note provides added information that will help you to complete a particular procedure. Specification D The values indicate the allowable range when performing inspections or adjustments. Upper and lower limits D The values indicate the upper and lower limits that must not be exceeded when performing inspections or adjustments. D The text sequence is as indicated by the arrows shown below. Example: Á À À Á BACK.TO.CHAPTER.INDEX CONTINUED TEXT SEQUENCE TO. MODEL .INDEX PAGES FROM SUPPLEMENT RANG.DRFT.OVERHAUL MANUAL
UNITS GI–4 UNITS Electric current A (ampere) Electric power W (watt) Electric resistance W (ohm) Electric voltage V (volt) Length mm (millimeter) Length in (inch) kPa (kilo pascal) Negative pressure mmHg (millimeters of mercury) inHg (inches of mercury) kPa (kilo pascal) Positive pressure kgf/cm 2 (kilogram force per square centimeter) psi (pounds per square inch) Number of revolutions rpm (revolutions per minute) N·m (Newton meter) kgf·m (kilogram force meter) Torque kgf·cm (kilogram force centimeter) ft·lbf (foot pound force) in·lbf (inch pound force) L (liter) US qt (U.S. quart) Imp qt (Imperial quart) Volume ml (milliliter) cc (cubic centimeter) cu in (cubic inch) fl oz (fluid ounce) Weight g (gram) Weight oz (ounce) Conversion to SI Units (Système International d’Unités) D All numerical values in this manual are based on SI units. Numbers shown in conventional units are converted from these values. Rounding off D Converted values are rounded off to the same number of places as the SI unit value. For example, if the SI unit value is 17.2 and the value after conversion is 37.84, the converted value will be rounded off to 37.8. Upper and lower limits D When the data indicates upper and lower limits, the converted values are rounded down if the SI unit value is an upper limit and rounded up if the SI unit value is a lower limit. Therefore, converted values for the same SI unit value may differ after conversion. For example, consider 2.7 kgf/cm 2 in the following specifications: 210—260 kPa {2.1—2.7 kgf/cm 2 , 30—38 psi} 270—310 kPa {2.7—3.2 kgf/cm 2 , 39—45 psi} D The actual converted values for 2.7 kgf/cm 2 are 264 kPa and 38.4 psi. In the top specification, 2.7 is used as an upper limit, so its converted values are rounded down to 260 and 38. In the bottom specification, 2.7 is used as a lower limit, so its converted values are rounded up to 270 and 39. BACK.TO.CHAPTER.INDEX CONTINUED TO. MODEL .INDEX PAGES FROM SUPPLEMENT RANG.DRFT.OVERHAUL MANUAL
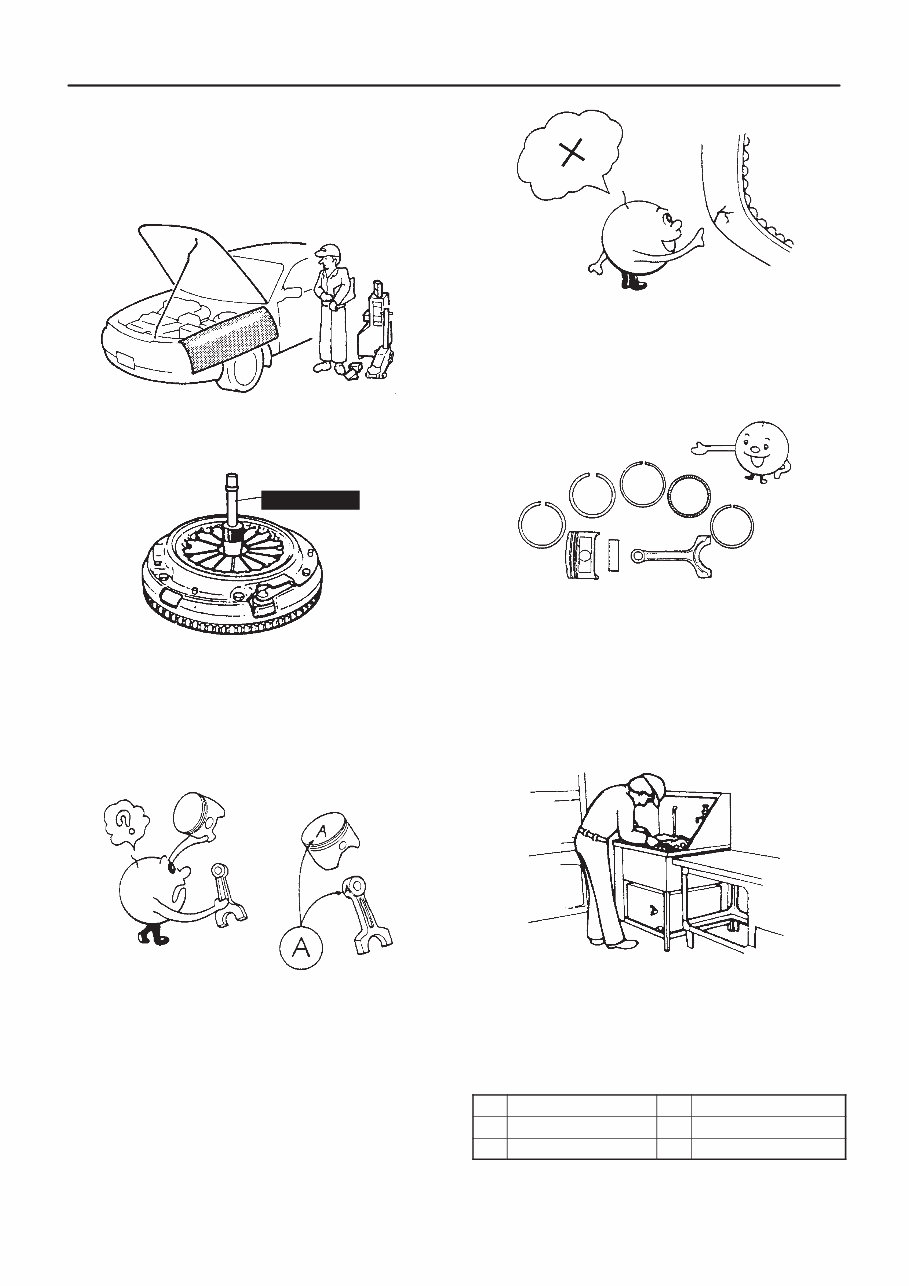
FUNDAMENTAL PROCEDURES GI–5 FUNDAMENTAL PROCEDURES PREPARATION OF TOOLS AND MESURING EQUIPMENT D Be sure that all necessary tools and measuring equipment are available before starting any work. SXU00004 SPECIAL SERVICE TOOLS D Use special tools when they are required. 49 SE01 310 DISASSEMBLY D If the disassembly procedure is complex, requiring many parts to be disassembled, all parts should be marked in a place that will not affect their performance or external appearance and identified so that reassembly can be performed easily and efficiently. SXU00007 INSPECTION DURING REMOVAL, DISASSEMBLY D When removed, each part should be carefully inspected for malfunctioning, deformation, damage, and other problems. SXU00008 ARRANGEMENT OF PARTS D All disassembled parts should be carefully arranged for reassembly. D Be sure to separate or otherwise identify the parts to be replaced from those that will be reused. SXU00009 CLEANING OF PARTS D All parts to be reused should be carefully and thoroughly cleaned in the appropriate method. Warning D Using compressed air can cause dirt and other particles to fly out, causing injury to the eyes. Wear protective eye wear whenever using compressed air. SXU00010 REASSEMBLY D Standard values, such as torques and certain adjustments, must be strictly observed in the reassembly of all parts. If removed, these parts should be replaced with new ones: 1 Oil seals 2 Gaskets 3 O-rings 4 Lockwashers 5 Cotter pins 6 Nylon nuts BACK.TO.CHAPTER.INDEX CONTINUED TO. MODEL .INDEX PAGES FROM SUPPLEMENT RANG.DRFT.OVERHAUL MANUAL
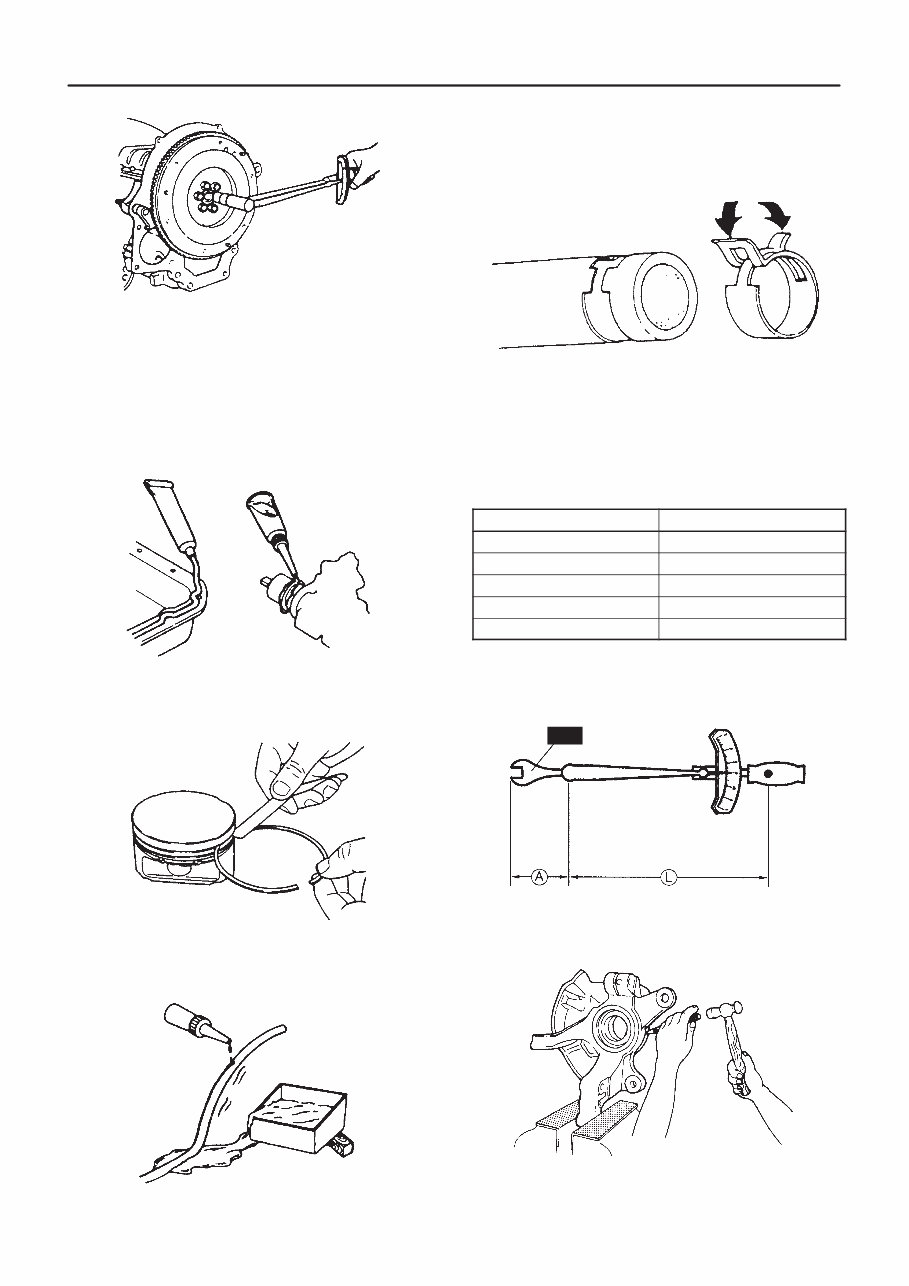
FUNDAMENTAL PROCEDURES GI–6 SXU00011 D Sealant, a gasket, or both should be applied to the specified locations. When sealant is applied, parts should be installed before sealant hardens. Hardened sealant causes leakage. D Oil should be applied to the moving components of parts. D Specified oil or grease should be applied at the prescribed locations (such as oil seals) before reassembly. SXU00012 ADJUSTMENT D Use suitable gauges and/or testers when making adjustments. SXU00013 RUBBER PARTS AND TUBING D Prevent gasoline or oil from getting on rubber parts or tubing. SXU00014 HOSE CLAMPS D When reinstalling, position the hose clamp in the original location on the hose, and squeeze the clamp lightly with large pliers to ensure a good fit. SXU00015 TORQUE FORMULAS D When using a torque wrench–SST combination, the written torque must be recalculated due to the extra length that the SST adds to the torque wrench. Recalculate the torque using the following formulas. Choose the formula that applies to you. Torque Unit Formula N·m N·m [L/(L+A) ] kgf·m kgf·m [L/(L+A) ] kgf·cm kgf·cm [L/(L+A) ] ft·lbf ft·lbf [L/(L+A) ] in·lbf in·lbf [L/(L+A) ] A: The length of the SST past the torque wrench drive. L: The length of the torque wrench. SXU00016 SST VISE D When using a vise, put protective plates in the jaws of the vise to prevent damage to parts. SXU00017 BACK.TO.CHAPTER.INDEX CONTINUED TO. MODEL .INDEX PAGES FROM SUPPLEMENT RANG.DRFT.OVERHAUL MANUAL
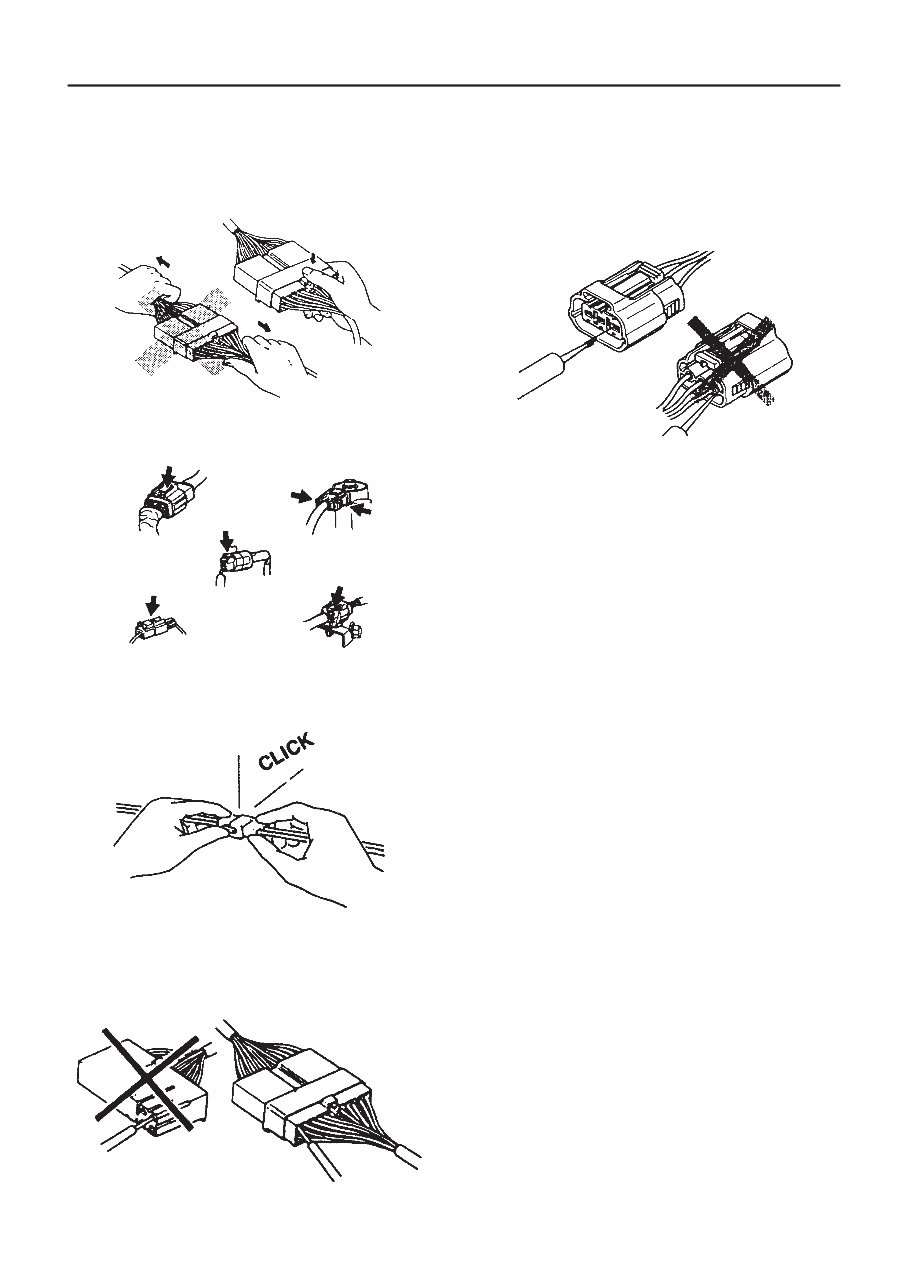
ELECTRICAL SYSTEM GI–7 ELECTRICAL SYSTEM CONNECTORS Disconnecting Connectors D When disconnecting two connectors, grasp the connectors, not the wires. SXU00020 D Connectors can be disconnected by pressing or pulling the lock lever as shown. SXU00021 Locking Connector D When locking connectors, listen for a click that will indicate they are securely locked. SXU00022 Inspection 1. When a tester is used to inspect for continuity or to measure voltage, insert the tester probe from the wiring harness side. SXU00023 2. Inspect the terminals of waterproof connectors from the connector side, as they cannot be accessed from the wiring harness side. Caution D To prevent damage to the terminal, wrap a thin wire around the lead before inserting it into the terminal. SXU00024 BACK.TO.CHAPTER.INDEX CONTINUED TO. MODEL .INDEX PAGES FROM SUPPLEMENT RANG.DRFT.OVERHAUL MANUAL
2005 Mazda B-Series, Drifter Service & Repair Manual
Engines covered:
2.6L G6 I4
2.2L F8 I4
2.0L FE I4
2.5L WL I4 (diesel)
2.5L WL-T turbo I4 (diesel)
2.2L F2 I4 (diesel)
The 2005 Mazda B-Series, Drifter Service & Repair Manual covers factory procedures for models equipped with the 2.0L FE, 2.2L F8/F2, 2.6L G6, and both versions of the 2.5L WL diesel engines. Whether you're working on a daily runabout or a hard-used work truck, this manual has what you need to get the job done right.
It includes step-by-step instructions for engine servicing, transmission work, cooling system maintenance, clutch and differential service, brake components, and suspension checks. You'll also find torque specs, service intervals, and mechanical tolerances that match factory standards—nothing added, nothing skipped.
Whether you're doing routine upkeep or tackling something more involved, this manual gives you the technical info without the guesswork. Built for shop floors, but just as useful in a home garage with a floor jack and some patience. Clean, clear, and written for those who prefer to fix things DIY style.
Printable: Yes Language: English Compatibility: Pretty much any electronic device, incl. PC & Mac computers, Android and Apple smartphones & tablet, etc. Requirements: Adobe Reader (free)