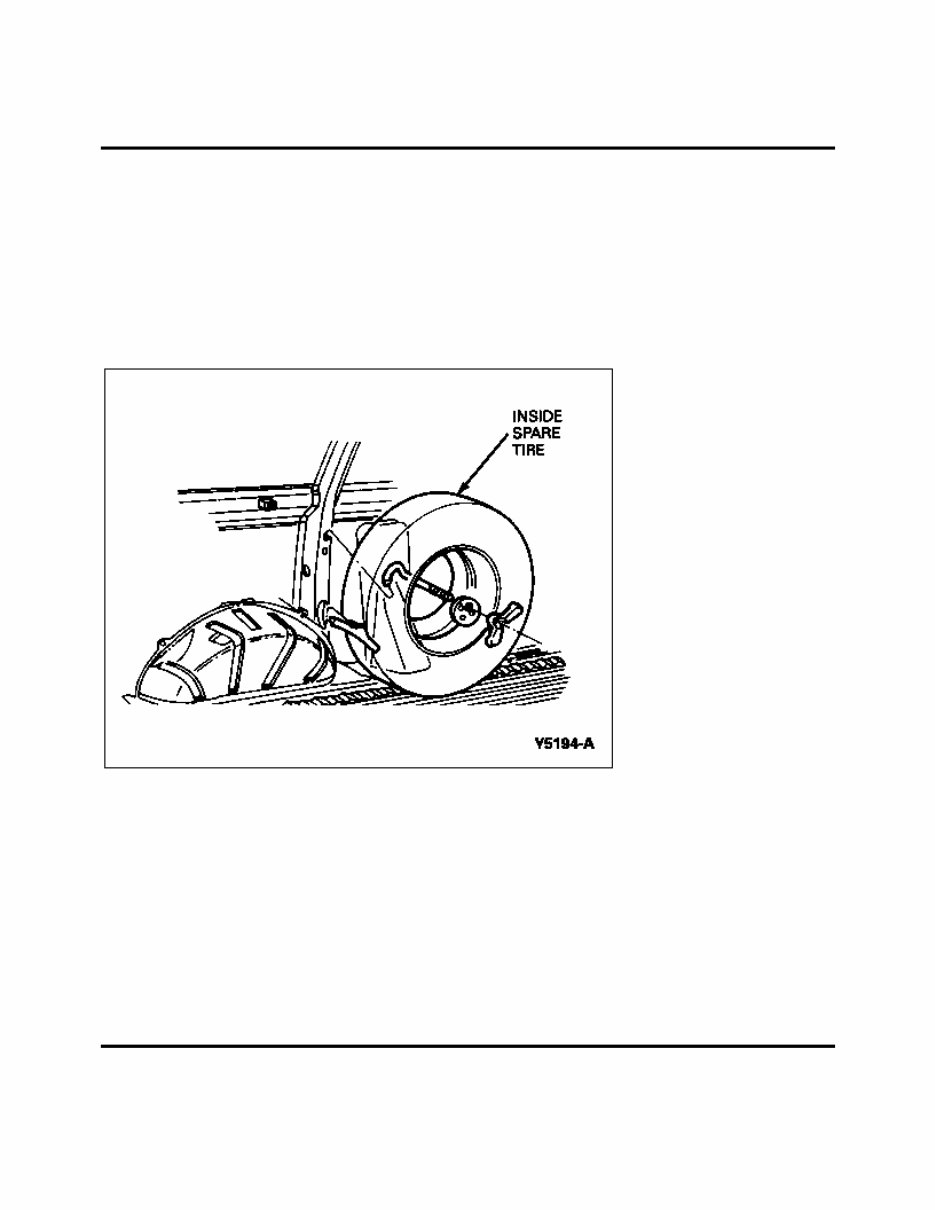
REMOVAL AND INSTALLATION Tire, Spare, Inside, Aerostar Removal If the Aerostar is a standard length vehicle the spare tire is mounted inside to a carrier at the left rear quarter panel. To remove the spare tire, remove the wing nut and plate. A flat tire can be temporarily stowed in the same location. If the Aerostar is the bus with a standard length body or extended length (all models), the temporary spare tire is stowed at the rear of the vehicle under the body. The Aerostar standard length E-4WD bus spare tire is mounted on the floor. 1. Insert lug nut wrench into the actuator hole and turn counterclockwise until the cable extends to allow the spare tire to be pulled rearward from under the vehicle. 2. Slide spare tire to the rear and remove the retainer from the wheel. 3. To stow cable/retainer with spare tire removed, insert cable fitting into carrier rear wall slot, place wheel retainer against the carrier, and turn lug nut wrench clockwise until slack is removed. Section 00-02: Lifting, Jacking and Spare Tire Stowage 1997 Aerostar, Ranger Workshop Manual Page 1 of 2 1997 Aerostar/Ranger 2011-04-27 file://C:\TSO\tsocache\VDTOM_3244\SVK~us~en~file=SVK02001.HTM~gen~ref.HTM
Page 2 of 2 1997 Aerostar/Ranger 2011-04-27 file://C:\TSO\tsocache\VDTOM_3244\SVK~us~en~file=SVK02001.HTM~gen~ref.HTM
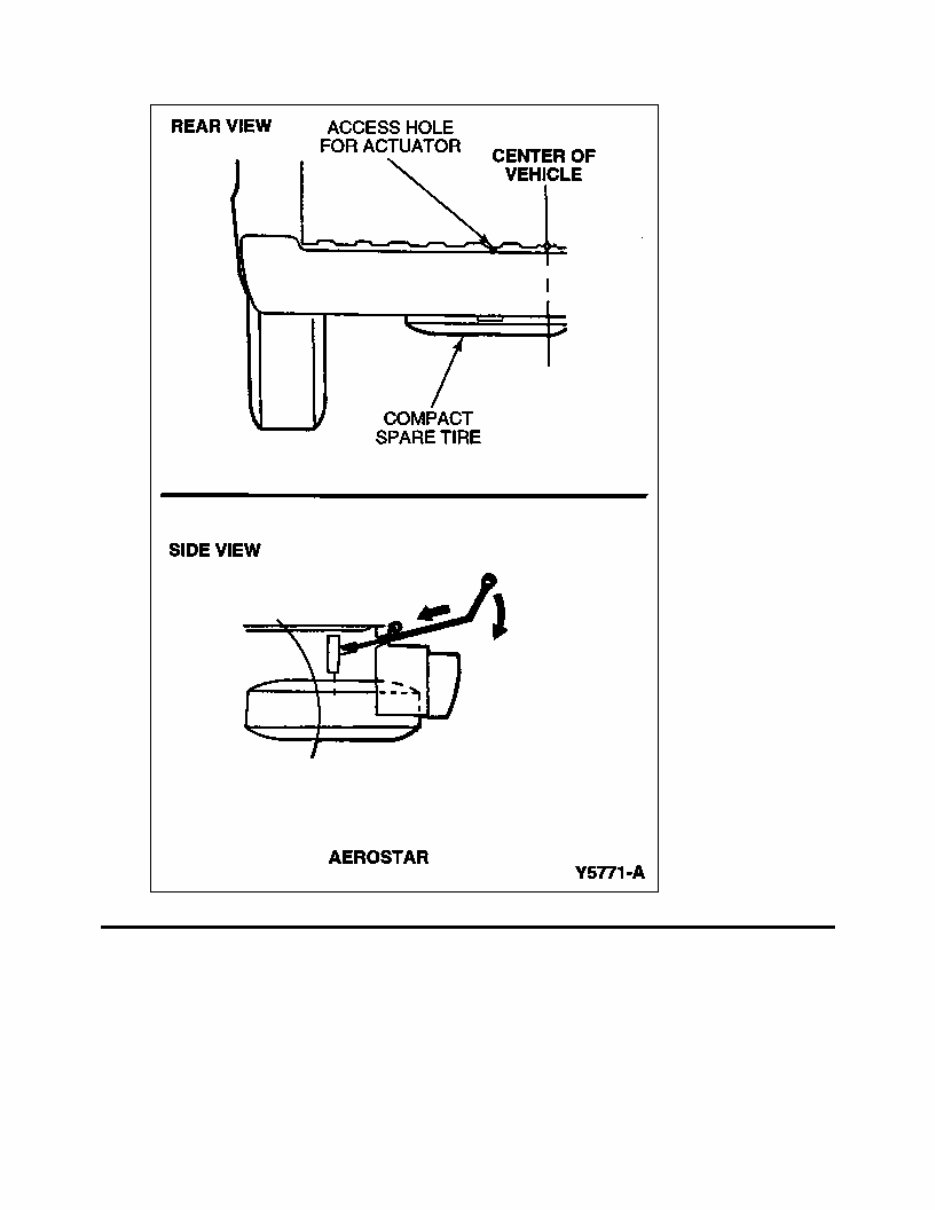
REMOVAL AND INSTALLATION Tire, Spare, Under Vehicle, Aerostar Removal 1. Open the liftgate and insert drive section of the jack handle through hole above rear bumper. 2. Turn handle counterclockwise until tire can be slid rearward and cable is slack. 3. Slide retainer through center of wheel. Section 00-02: Lifting, Jacking and Spare Tire Stowage 1997 Aerostar, Ranger Workshop Manual Page 1 of 3 1997 Aerostar/Ranger 2011-04-27 file://C:\TSO\tsocache\VDTOM_3244\SVK~us~en~file=SVK02002.HTM~gen~ref.HTM
Page 2 of 3 1997 Aerostar/Ranger 2011-04-27 file://C:\TSO\tsocache\VDTOM_3244\SVK~us~en~file=SVK02002.HTM~gen~ref.HTM
Page 3 of 3 1997 Aerostar/Ranger 2011-04-27 file://C:\TSO\tsocache\VDTOM_3244\SVK~us~en~file=SVK02002.HTM~gen~ref.HTM
REMOVAL AND INSTALLATION Tire, Spare, Temporary WARNING: IF YOU USE THE TEMPORARY SPARE TIRE CONTINUOUSLY OR DO NOT FOLLOW THESE PRECAUTIONS, THE TIRE COULD FAIL, CAUSING YOU TO LOSE CONTROL OF THE VEHICLE AND POSSIBLY INJURE YOURSELF OR OTHERS. CAUTION: Continuously using a spare tire other than a conventional spare tire on vehicles equipped with Traction-Lok® rear axles could cause damage to the Traction-Lok® differential. NOTE: Extended use of other than matching size spare tires on a Traction-Lok® rear axle could result in a permanent reduction in effectiveness. This loss of effectiveness does not affect normal driving and should not be noticeable to the driver. The temporary spare tire is smaller than a regular tire and is designed for emergency use only. This spare tire is marked with the words TEMPORARY USE ONLY. Section 00-02: Lifting, Jacking and Spare Tire Stowage 1997 Aerostar, Ranger Workshop Manual Page 1 of 1 1997 Aerostar/Ranger 2011-04-27 file://C:\TSO\tsocache\VDTOM_3244\SVK~us~en~file=SVK02004.HTM~gen~ref.HTM
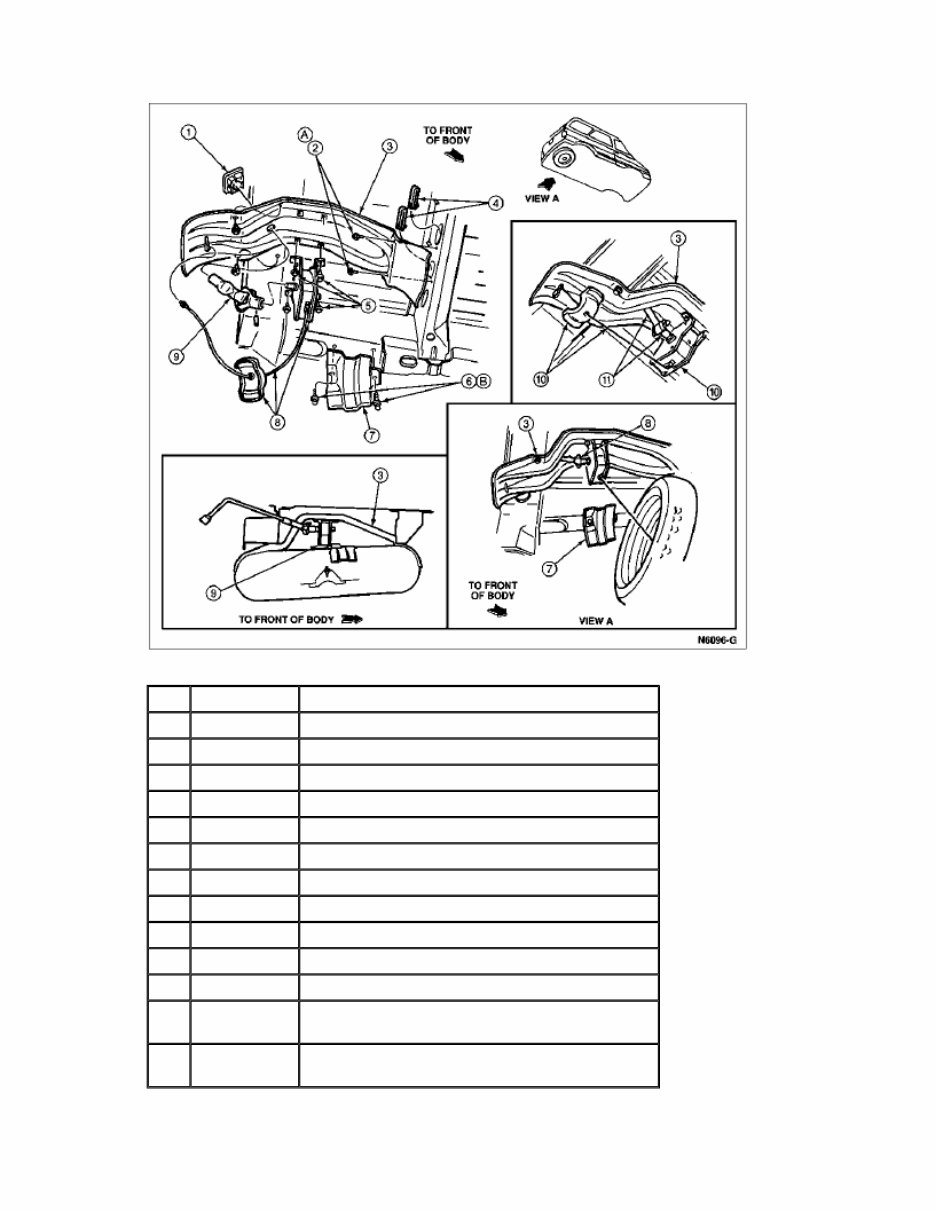
REMOVAL AND INSTALLATION Tire, Spare, Carrier, Aerostar (Base Vehicle) Removal 1. Remove the two screws and remove the spare wheel bracket support from the underbody. 2. Remove the four screws and remove the spare wheel carrier lift assembly and the spare wheel carrier lift gear assembly from the underbody. 3. Remove the four screws and remove the spare wheel carrier mounting bracket from the underbody. Installation 1. Position the spare wheel carrier mounting bracket on the underbody and install the four retaining screws. Tighten to 9-14 Nm (7-10 lb-ft). 2. Position the spare wheel carrier lift assembly and the spare wheel carrier lift gear assembly on the underbody. Install the four retaining screws and tighten to 9-14 Nm (7-10 lb-ft). 3. Position the spare wheel bracket support on the underbody. Install the retaining screws and tighten to 3.2-4.0 Nm (28.3-35 lb-in). Spare Tire Carrier, Aerostar Section 00-02: Lifting, Jacking and Spare Tire Stowage 1997 Aerostar, Ranger Workshop Manual Page 1 of 3 1997 Aerostar/Ranger 2011-04-27 file://C:\TSO\tsocache\VDTOM_3244\SVK~us~en~file=SVK02005.HTM~gen~ref.HTM
Page 3 of 3 1997 Aerostar/Ranger 2011-04-27 file://C:\TSO\tsocache\VDTOM_3244\SVK~us~en~file=SVK02005.HTM~gen~ref.HTM
REMOVAL AND INSTALLATION Tire, Spare, Carrier, Aerostar (Extended Vehicle) Removal 1. Remove the four screws and remove the spare wheel carrier mounting bracket assembly from the underbody. 2. Remove the two screws and remove the lift and gear assembly from the spare wheel carrier mounting bracket assembly. Installation 1. Position the lift and gear assembly on the spare wheel carrier mounting bracket assembly. Install the two retaining screws and tighten to 9-14 Nm (7-10 lb-ft). 2. Position the spare wheel carrier mounting bracket assembly on the underbody. Install the four retaining screws and tighten to 23-34 Nm (17-25 lb-ft). Spare Tire Carrier, Aerostar Extended Vehicle Section 00-02: Lifting, Jacking and Spare Tire Stowage 1997 Aerostar, Ranger Workshop Manual Page 1 of 2 1997 Aerostar/Ranger 2011-04-27 file://C:\TSO\tsocache\VDTOM_3244\SVK~us~en~file=SVK02006.HTM~gen~ref.HTM
This is the complete official full factory OEM service and repair manual for the 1997 Mazda B Series. It provides detailed information for general maintenance, troubleshooting, engine and transmission service/repair, brake system, wiring diagrams, electrical system, suspension, periodic lubrication, steering, cooling system, fuel injection, fuel system, emission system, heater/air conditioning, engine control system, chassis/body, restraint system, interior, differential/drive, and axle. This manual is an indispensable resource for both professional mechanics and DIY enthusiasts.
The manual is provided in .PDF format and is optimized for printing or viewing on PC-based Windows operating systems and Mac. It includes step-by-step instructions, detailed illustrations, and photos to guide you through each service and repair procedure. Additionally, it offers comprehensive information for diagnosing and repairing electrical system issues, supported by detailed wiring diagrams for ease of use.
Product Details:
File Format: .PDF
Language: English
Printable: Yes
Delivery: Instant download link after payment
Requirements: Adobe Reader
This comprehensive OEM service and repair manual for the 1997 Mazda B Series covers a wide range of topics including vehicle specifications, engine removal, wiring diagrams, oil types, periodic maintenance, tune-up procedures, disassembly, reassembly, and much more. It is expertly created to support all your maintenance and repair needs.