WARNING Servicing a vehicle can be dangerous. If you have not received service-related training, the risks of injury, property damage, and failure of servicing increase. The recommended servicing procedures for the vehicle in this workshop manual were developed with Mazda-trained technicians in mind. This manual may be useful to non-Mazda trained technicians, but a technician with our service-related training and experience will be at less risk when performing service operations. However, all users of this manual are expected to at least know general safety procedures. This manual contains "Warnings" and "Cautions" applicable to risks not normally encountered in a general technician's experience. They should be followed to reduce the risk of injury and the risk that improper service or repair may damage the vehicle or render it unsafe. It is also important to understand that the "Warnings" and "Cautions" are not exhaustive. It is impossible to warn of all the hazardous consequences that might result from failure to follow the procedures. The procedures recommended and described in this manual are effective methods of performing service and repair. Some require tools specifically designed for a specific purpose. Persons using procedures and tools which are not recommended by Mazda Motor Corporation must satisfy themselves thoroughly that neither personal safety nor safety of the vehicle will be jeopardized. The contents of this manual, including drawings and specifications, are the latest available at the time of printing, and Mazda Motor Corporation reserves the right to change the vehicle designs and alter the contents of this manual without notice and without incurring obligation. Parts should be replaced with genuine Mazda replacement parts or with parts which match the quality of genuine Mazda replacement parts. Persons using replacement parts of lesser quality than that of genuine Mazda replacement parts must satisfy themselves thoroughly that neither personal safety nor safety of the vehicle will be jeopardized. Mazda Motor Corporation is not responsible for any problems which may arise from the use of this manual. The cause of such problems includes but is not limited to insufficient service-related training, use of improper tools, use of replacement parts of lesser quality than that of genuine Mazda replacement parts, or not being aware of any revision of this manual.
GI–1 GI GIGENERAL INFORMATION HOW TO USE THIS MANUAL ............................. GI-2 RANGE OF TOPICS .......................................... GI-2 SERVICE PROCEDURE ................................... GI-2 SYMBOLS .......................................................... GI-3 ADVISORY MESSAGES ................................... GI-4 UNITS ................................................................... GI-5 UNITS ................................................................ GI-5 FUNDAMENTAL PROCEDURES ........................ GI-6 PREPARATION OF TOOLS AND MEASURING EQUIPMENT ................................................... GI-6 SPECIAL SERVICE TOOLS .............................. GI-6 DISASSEMBLY .................................................. GI-6 INSPECTION DURING REMOVAL, DISASSEMBLY ............................................... GI-7 ARRANGEMENT OF PARTS ............................ GI-7 CLEANING OF PARTS ...................................... GI-7 REASSEMBLY ................................................... GI-7 ADJUSTMENT ................................................... GI-8 RUBBER PARTS AND TUBING ........................ GI-8 HOSE CLAMPS ................................................. GI-8 TORQUE FORMULAS ....................................... GI-9 VISE ................................................................... GI-9 ELECTRICAL SYSTEM...................................... GI-10 ELECTRICAL PARTS ...................................... GI-10 CONNECTORS................................................ GI-10 NEW STANDARDS ............................................ GI-13 NEW STANDARDS.......................................... GI-13 ABBREVIATIONS .............................................. GI-15 ABBREVIATIONS ............................................ GI-15
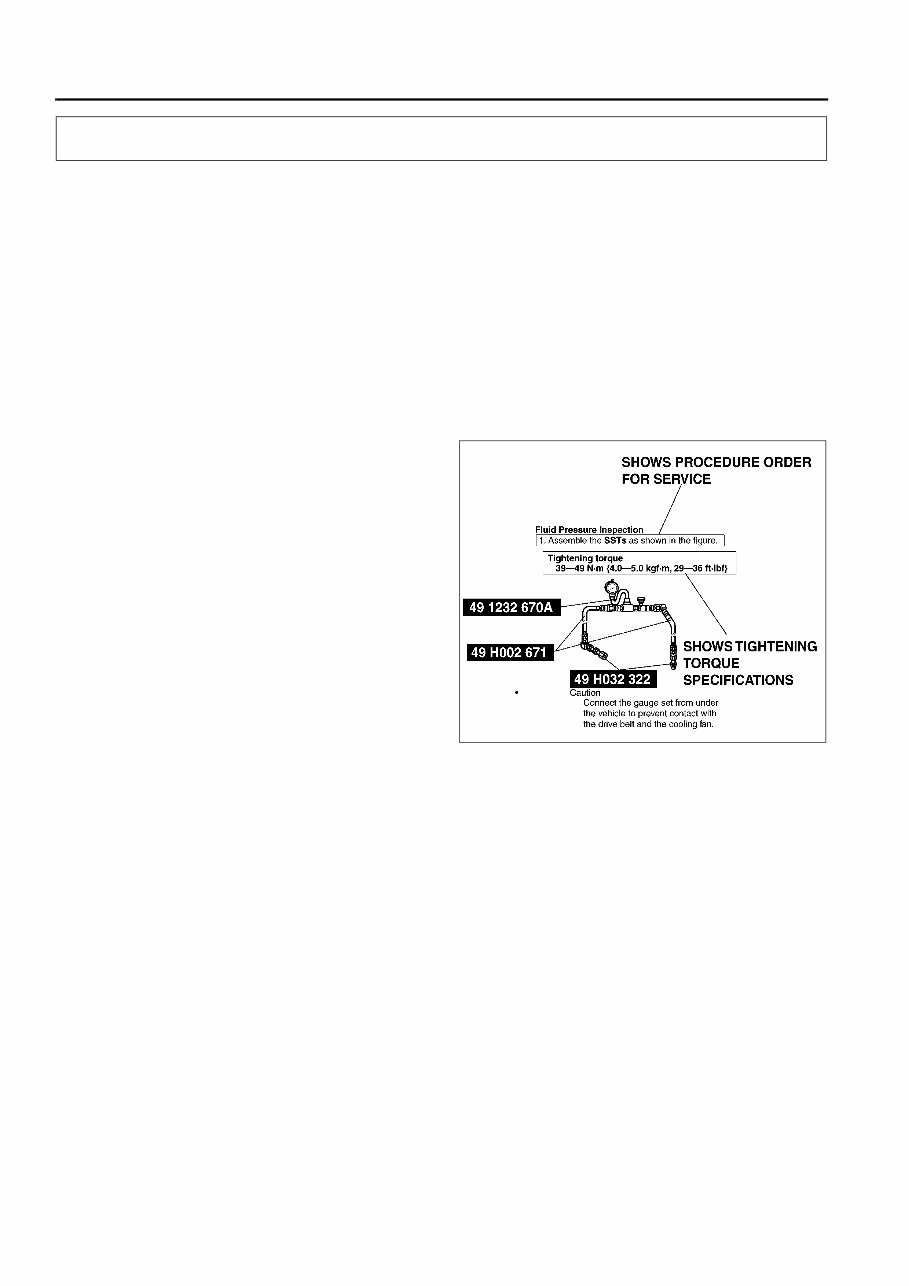
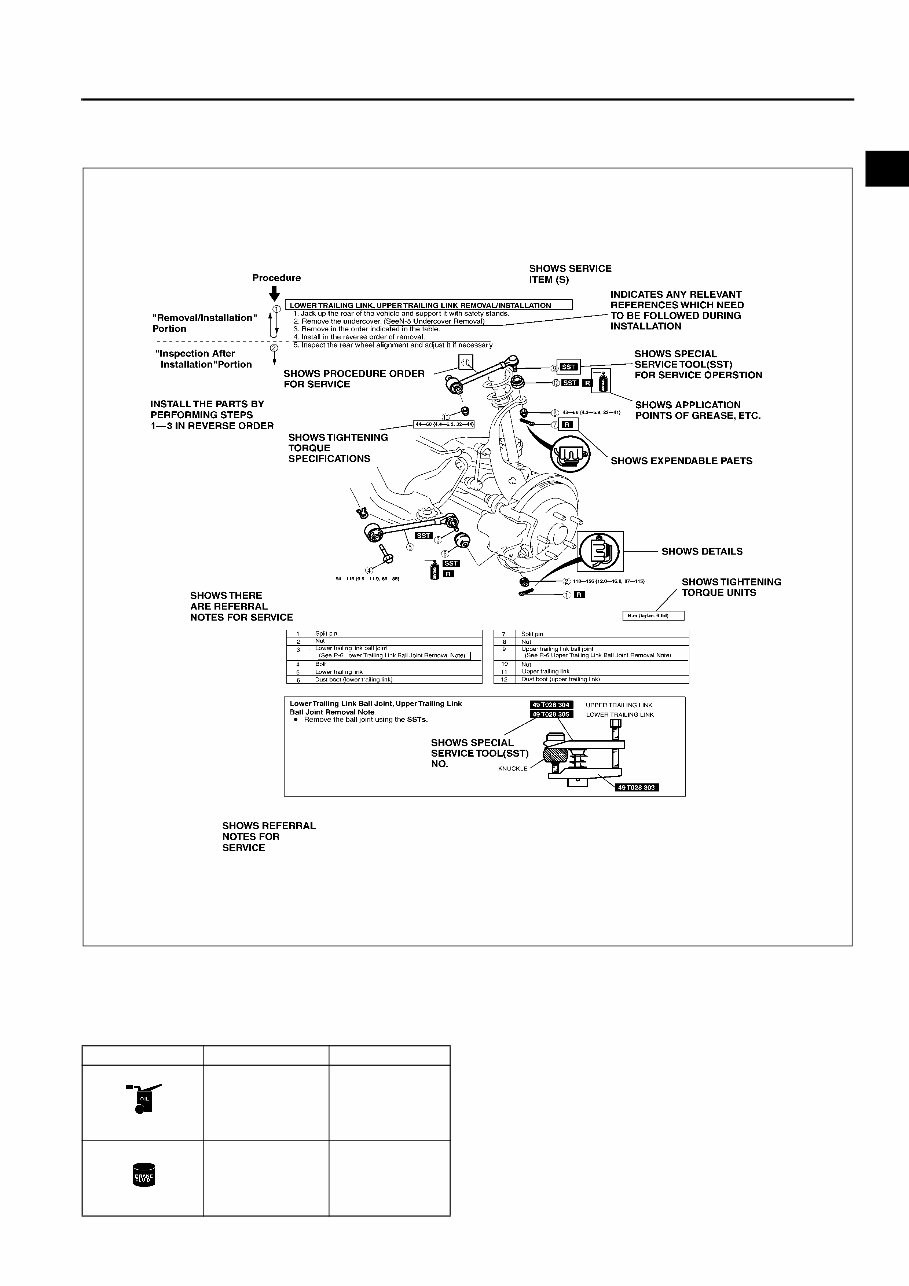
GI–2 HOW TO USE THIS MANUAL RANGE OF TOPICS AME201000001101 • This manual contains procedures for performing all required service operations. The procedures are divided into the following five basic operations: — Removal/Installation — Disassembly/Assembly — Replacement — Inspection — Adjustment • Simple operations which can be performed easily just by looking at the vehicle (i.e., removal/installation of parts, jacking, vehicle lifting, cleaning of parts and visual inspection) have been omitted. End Of Sie SERVICE PROCEDURE AME201000001102 Inspection, adjustment • Inspection and adjustment procedures are divided into steps. Important points regarding the location and contents of the procedures are explained in detail and shown in the illustrations. Repair procedure 1. Most repair operations begin with an overview illustration. It identifies the components, shows how the parts fit together and describes visual part inspection. However, only removal/installation procedures that need to be performed methodically have written instructions. 2. Expendable parts, tightening torques and symbols for oil, grease, and sealant are shown in the overview illustration. In addition, symbols indicating parts requiring the use of special service tools or equivalent are also shown. HOW TO USE THIS MANUAL XME2010001
HOW TO USE THIS MANUAL GI–3 GI 3. Procedure steps are numbered and the part that is the main point of that procedure is shown in the illustration with the corresponding number. Occasionally, there are important points or additional information concerning a procedure. Refer to this information when servicing the related part. End Of Sie SYMBOLS AME201000001103 • There are eight symbols indicating oil, grease, fluids, sealant, and SST or equivalent use. These symbols show application points or use of these materials during service. XME2010010 Symbol Meaning Kind Apply oil New appropriate engine oil or gear oil Apply brake fluid New appropriate brake fluid
The Mazda 6 2009-2011 Service Repair Manual covers USA/Canada models and includes all models and repairs from A-Z. This vehicle-specific manual is the same one used by technicians at dealerships for vehicle maintenance, service, diagnosis, and repair.
It provides complete step-by-step instructions, diagrams, illustrations, wiring schematics, and specifications to easily repair your vehicle. You will have all the necessary information in one easy-to-use manual, eliminating the need to flip through multiple books. You can print only the pages and diagrams you need, ensuring no more greasy or torn paper manuals.
All pages are printable, allowing you to take the required information with you to your vehicle or workshop. Additionally, you can enlarge and print images as needed. The manual is compatible with Windows Vista 32 and 64, XP, ME, 98, NT, 2000, and Mac.
This highly detailed repair manual includes complete instructions, illustrations, wiring schematics, and diagrams to fully service and repair your vehicle. It is a great resource for both professional mechanics and DIY enthusiasts, providing the necessary information to fix your vehicle yourself and save money.
Instant access is available for purchase with PayPal or credit card. This manual is a valuable resource for all your car and truck repair needs.