

2011-2016 Mahindra Genio Service & Repair Manual
What's Included?
Fast Download Speeds
Offline Viewing
Access Contents & Bookmarks
Full Search Facility
Print one or all pages of your manual
© 2011 Mahindra & Mahindra Ltd. All rights reserved. This book may not be reproduced or copied, in whole or in part, without
the written permission of Mahindra & Mahindra Ltd.
MAINTENANCE MANUAL
(BS-III/BS-IV)
www.teknetmahindra.com
ALL INFORMATION CONTAINED IN THIS MANUAL IS MOST UP-TO-DATE AT THE TIME OF PUBLICATION.
HOWEVER, SPECIFICATIONS AND PROCEDURES ARE SUBJECT TO CHANGE WITHOUT NOTICE. THIS
MANUAL IS STRICTLY MEANT FOR RESTRICTED INTERNAL CIRCULATION WITHIN M&M AUTHORIZED
DEALER SERVICE CENTERS.
RELEASED BY –
TECHNICAL PUBLICATION CELL
MAHINDRA & MAHINDRA LTD.
Rev1 – JULY 2011
MAN-00135
© 2011 Mahindra & Mahindra Ltd. All rights reserved. This book may not be reproduced or copied, in whole or in part, without
the written permission of Mahindra & Mahindra Ltd.
About the Maintenance Manual
The maintenance manual outlines the correct standard operating procedures (SOPs) for carrying out
maintenance operations in a Mahindra GENIO DC vehicle. Carrying out the periodic maintenance
operations, as specified, is crucial for safe and trouble-free operation of the vehicle.
The recommended maintenance schedule /operations are published in the owner’s handbook.
This manual covers the correct method of carrying out the maintenance operations, using the correct
process/procedures, tools, parts and lubricants. The manual consists of –
Maintenance Schedule – The maintenance schedules outlines the operations to be carried out a
specified interval. These operations are Adjust (A), Inspect & Correct (I), Replace (.R), Clean (C). The
maintenance periods are specified in Kilometers (Kms).
Standard Operating Procedures (SOP) – Each maintenance operation is coded by a operation code
– 705-MAT-xxxx. Here 705 stands for the model family code, MAT indicating it is a maintenance
operation and xxxx the operation number.
Each maintenance operation is explained step-by-step, in the SOP section of the manual. The man-hours
required to complete the operation is also mentioned along with the operation code. The correct grade of
lubricants /coolants to be used, torque values, special tools are also mentioned wherever applicable.
Check Sheets – Check sheets for each service list outs the operation which need to be carried out by
the technician, when the vehicles report for scheduled maintenance service. These check sheets need to be
attached to the Repair order.
Repair Code
Repair Time {Manhours} Job Description
Lubricant Quantity
Lubricant Recommended
Tool Specified
Torque Specified
This chart is only a sample.
Crown
705

© 2011 Mahindra & Mahindra Ltd. All rights reserved. This book may not be reproduced or copied, in whole or in part, without
the written permission of Mahindra & Mahindra Ltd.
Good Workshop Practices
Attire/Dress
Always wear clean uniform
Wear safety shoes
Wear gloves, when required
Wear belt cover
Vehicle Protection
Put seat cover, fender cover, steering wheel cover, before starting the operations.
Safety
When working with 2 or more persons, be sure to check safety for one another
When working with engine running, make sure to provide ventilation for exhaust fumes in the
workshop
If working on high temperature, high pressure, rotating, moving, or vibrating parts, wear
appropriate safety gear and take extra care not to injure yourself or others.
When jacking up the vehicle, be sure to support the specified location with a safety stand.
When lifting up the vehicle, use appropriate safety equipment.
Parts and tools
Before starting operation, prepare tool stand, MST, Gauges, oils and parts for replacement.
Removed Parts
Place removed parts in a separate box to avoid mixing them up with new parts or contaminating
new parts.
For non-reusable parts such as gaskets, O-rings, and self-locking nuts, replace them with new
ones as instructed in the manual
Retain the removed parts for customer inspection, if requested.
IMPORTANT
Mahindra Xylo mEagle is fitted with LSPV (Load Sensing Pressure Regulating Valve) in the
brake circuit. Hence it is imperative that the LSPV spring is disconnected before lifting
the vehicle on a 2‐post lift. Failure to do so can lead to elongation of the spring,
disturbing the LSPV settings, leading to different braking characteristics.
Ensure to re‐connect the LSPV spring and measure the fitted length after lowering the
vehicle from the 2‐post lift.
Maintenance Manual MAN-00135
GENIO DC (BS-III & BS-IV) JULY 2011/Rev1
The repair methods given by the manufacturer in this document are based on the technical specifications, current at the time of release. The methods may be modified as a result of changes
introduced by the manufacturer in the production of the various component units and accessories from which the vehicles are manufactured. The reproduction, translation, transmission, in part of or
whole of the present document, are prohibited without the prior written consent of Mahindra & Mahindra Ltd. The use of this document by any person other than the trained personnel, at the
Authorized Service Centre of Mahindra & Mahindra Ltd., will amount to unauthorized use and shall be liable for penalty/prosecution © 2011 Mahindra & Mahindra Ltd.
1
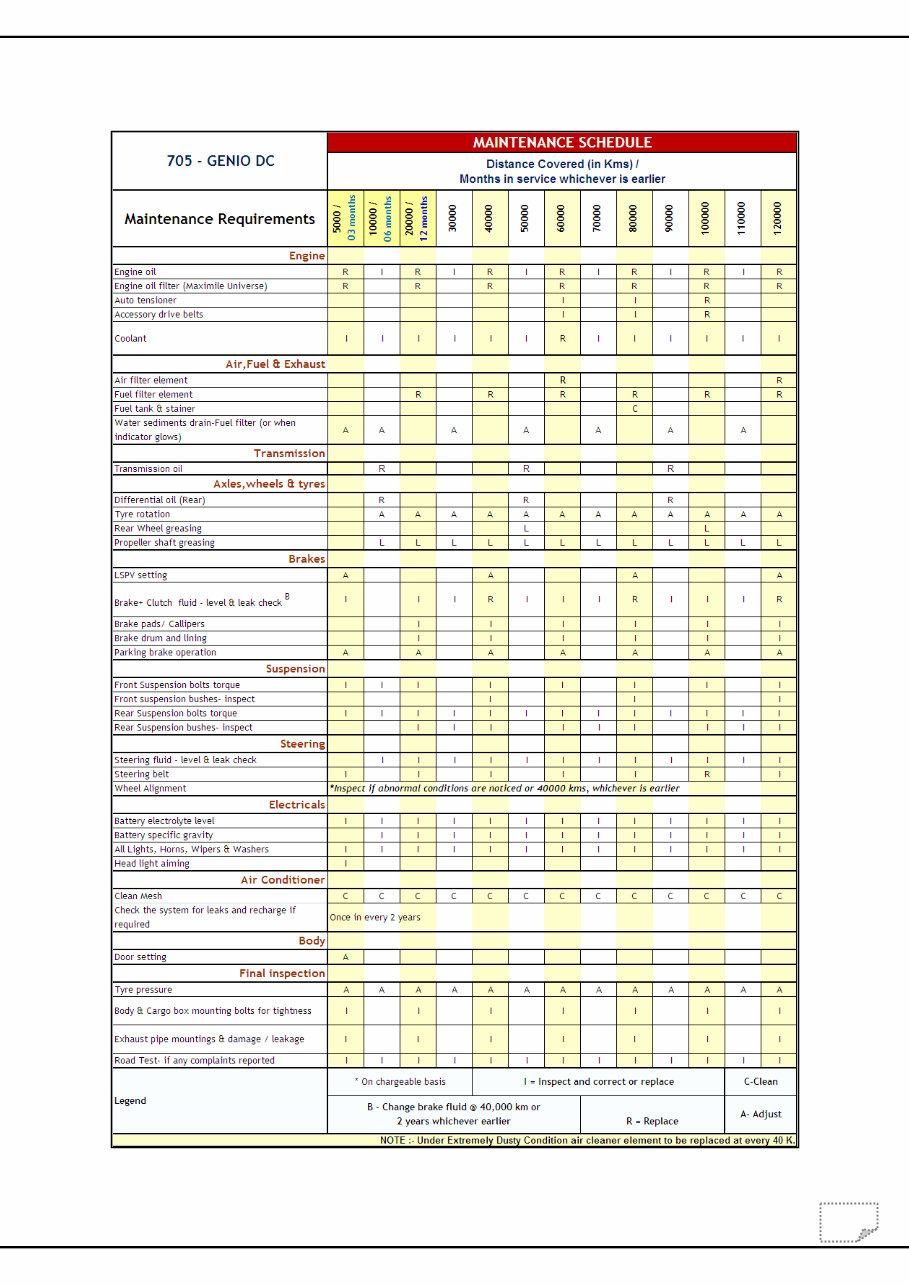
Refer below Maintenance Schedule chart for GENIO DC (BS-III & BS-IV) models :-
Maintenance Manual MAN-00135
GENIO DC (BS-III & BS-IV) JULY 2011/Rev1
The repair methods given by the manufacturer in this document are based on the technical specifications, current at the time of release. The methods may be modified as a result of changes
introduced by the manufacturer in the production of the various component units and accessories from which the vehicles are manufactured. The reproduction, translation, transmission, in part of or
whole of the present document, are prohibited without the prior written consent of Mahindra & Mahindra Ltd. The use of this document by any person other than the trained personnel, at the
Authorized Service Centre of Mahindra & Mahindra Ltd., will amount to unauthorized use and shall be liable for penalty/prosecution © 2011 Mahindra & Mahindra Ltd.
2
* on chargeable basis.
705 - MAT-xxxx
Maintenance item Operation Code Page No
Engine oil - Replace 705 - MAT - 0001 03
Engine oil - Level Check 705 - MAT - 0002 04
Engine oil filter - Replace 705 - MAT - 0003 05
Auto tensioner - Inspect 705 - MAT - 0004 06
Auto tensioner - Replace 705 - MAT - 0005 07
Accessory drive belts - Inspect 705 - MAT - 0006 08
Accessory drive belts - Replace 705 - MAT - 0007 10
Coolant - Check 705 - MAT - 0008 11
Coolant - Replace 705 - MAT - 0009 12
Air filter element - Replace 705 - MAT - 0010 13
Fuel filter element - Replace 705 - MAT - 0011 14
Fuel tank - Clean 705 - MAT - 0012 15
Water sediments drain – Fuel filter 705- MAT - 0013 16
Transmission oil - Replace 705 - MAT - 0014 17
Differential oil (Rear) - Replace 705 - MAT - 0015 18
Tyre rotation 705 - MAT - 0016 19
Rear Wheel Greasing 705 - MAT - 0260 20
Propeller Shaft Greasing 705 - MAT - 0221 24
LSPV setting 705 - MAT - 0017 25
Brake + Clutch fluid - level & leak Check 705 - MAT - 0018 26
Brake + Clutch fluid - Replace 705 - MAT - 0019 27
Brake pads/ Calipers - Check 705 - MAT - 0020 29
Brake drum and lining - Check 705 - MAT - 0021 30
Parking brake operation - Check & Adjust 705 - MAT - 0022 31
Front Suspension bolts torque - Check 705 - MAT - 0023 32
Front suspension bushes- Inspect 705 - MAT - 0025 33
Rear Suspension bolts torque - Check 705 - MAT - 0024 32
Rear Suspension bushes - Check 705 - MAT - 0026 35
Power steering fluid - level & leak 705 - MAT - 0027 36
Power steering belt - Check 705 - MAT - 0028 37
Power steering belt - Replace 705 - MAT - 0029 39
Wheel alignment * 705 - MAT - 0030 40
Battery electrolyte level - Check 705 - MAT - 0031 43
Battery specific gravity - Check 705 - MAT - 0032 44
All Lights, Horns, Wipers & Washers - Check 705 - MAT - 0033 45
Head light aiming - Check & Adjust 705 - MAT - 0034 47
HVAC – Clean mesh 705 – MAT - 0035 49
Door setting 705 - MAT - 0036 50
Tyre pressure - Check & Adjust 705 - MAT - 0037 51
Body & Cargo mounting bolts for tightness-Check & Adjust 705 - MAT - 0038 52
Exhaust pipe mtgs. & damage/leakage - Check 705 - MAT - 0039 53
Road Test- if any complaints reported 705 - MAT - 0040
Maintenance Manual MAN-00135
GENIO DC (BS-III & BS-IV) JULY 2011/Rev1
The repair methods given by the manufacturer in this document are based on the technical specifications, current at the time of release. The methods may be modified as a result of changes
introduced by the manufacturer in the production of the various component units and accessories from which the vehicles are manufactured. The reproduction, translation, transmission, in part of or
whole of the present document, are prohibited without the prior written consent of Mahindra & Mahindra Ltd. The use of this document by any person other than the trained personnel, at the
Authorized Service Centre of Mahindra & Mahindra Ltd., will amount to unauthorized use and shall be liable for penalty/prosecution © 2011 Mahindra & Mahindra Ltd.
3
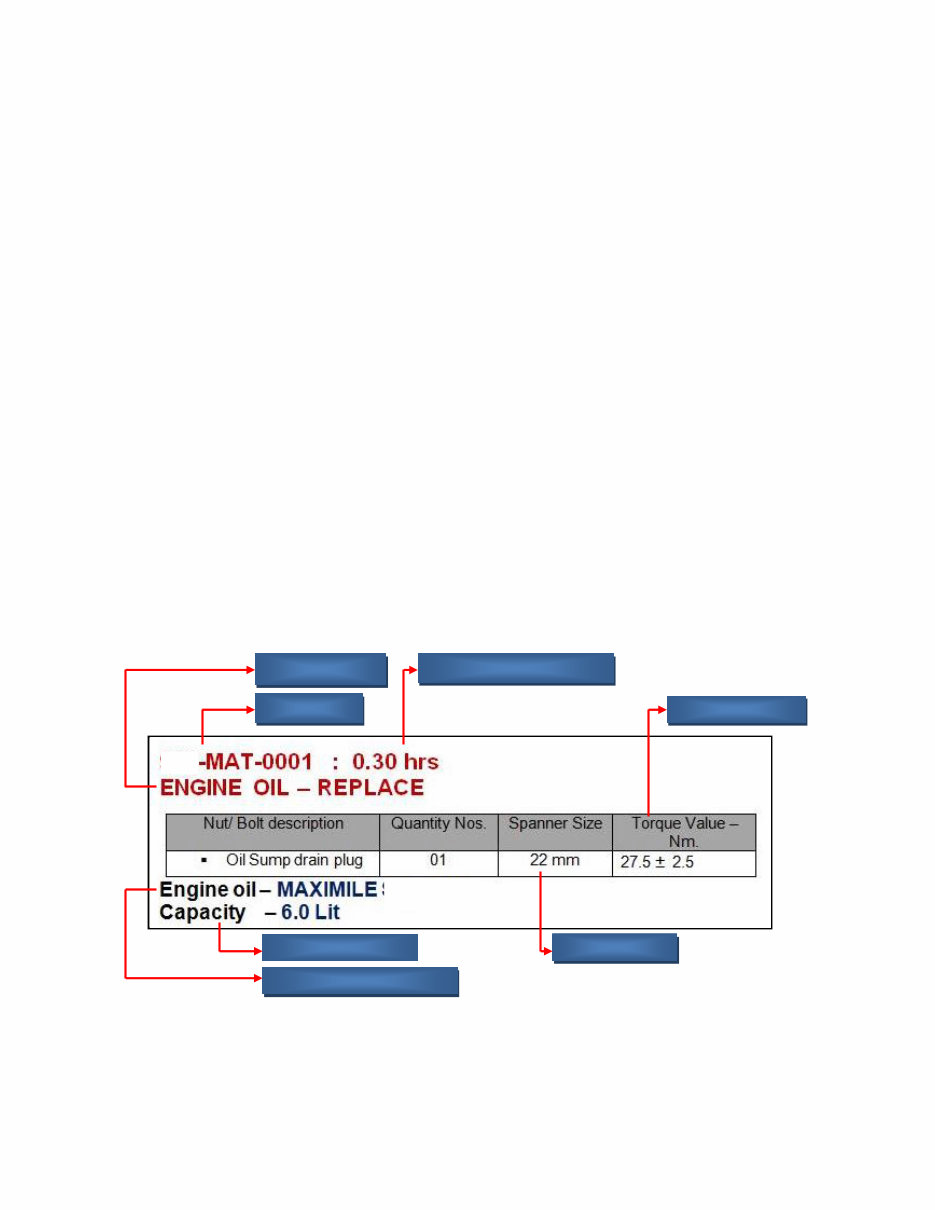
705-MAT-0001 : 0.30 hrs.
ENGINE OIL – REPLACE
Engine oil – MAXIMILE CROWN (SAE 15W-40) API CH4
Capacity – 6.0 Lit.
Park the vehicle on level ground/2 post lift* /4 post lift
If the activity is done on a 2 post lift, ensure that the LSPV spring is disconnected
before lifting the vehicle. After lowering, re-connect the LSPV spring and ensure
that the setting height is correct.
Engine should be hot while draining the oil.
For other than Maximile brand, the oil change interval has to be reduced to
10000kms if the oil meets minimum of API CH-4 SAE 15W-40 specification.
Recommended intervals for Maximile CROWN engine Oil change are at 5000,
20000kms & then at every 20000kms.
Nut/ Bolt description Quantity Nos. Spanner Size Torque Value – Nm.
Oil Sump drain plug 01 22 mm 27.5 ± 2.5
Oil Drain & Refill –
1. Open the oil filler cap.
2. Put the oil collecting tray below the sump, loosen & remove the oil sump drain plug.
Allow the oil to drain for 15 min.
3. Fit the drain plug with a new gasket/ washer. Torque tightens the Drain Plug –Torque -
27.5 ± 2.5 Nm.
4. Fill fresh oil as per the recommended quantity and specification.
5. Refit the oil filer cap & check the oil level as per procedure 910-MAT-0002.
Oil Filler Cap
Maintenance Manual MAN-00135
GENIO DC (BS-III & BS-IV) JULY 2011/Rev1
The repair methods given by the manufacturer in this document are based on the technical specifications, current at the time of release. The methods may be modified as a result of changes
introduced by the manufacturer in the production of the various component units and accessories from which the vehicles are manufactured. The reproduction, translation, transmission, in part of or
whole of the present document, are prohibited without the prior written consent of Mahindra & Mahindra Ltd. The use of this document by any person other than the trained personnel, at the
Authorized Service Centre of Mahindra & Mahindra Ltd., will amount to unauthorized use and shall be liable for penalty/prosecution © 2011 Mahindra & Mahindra Ltd.
4
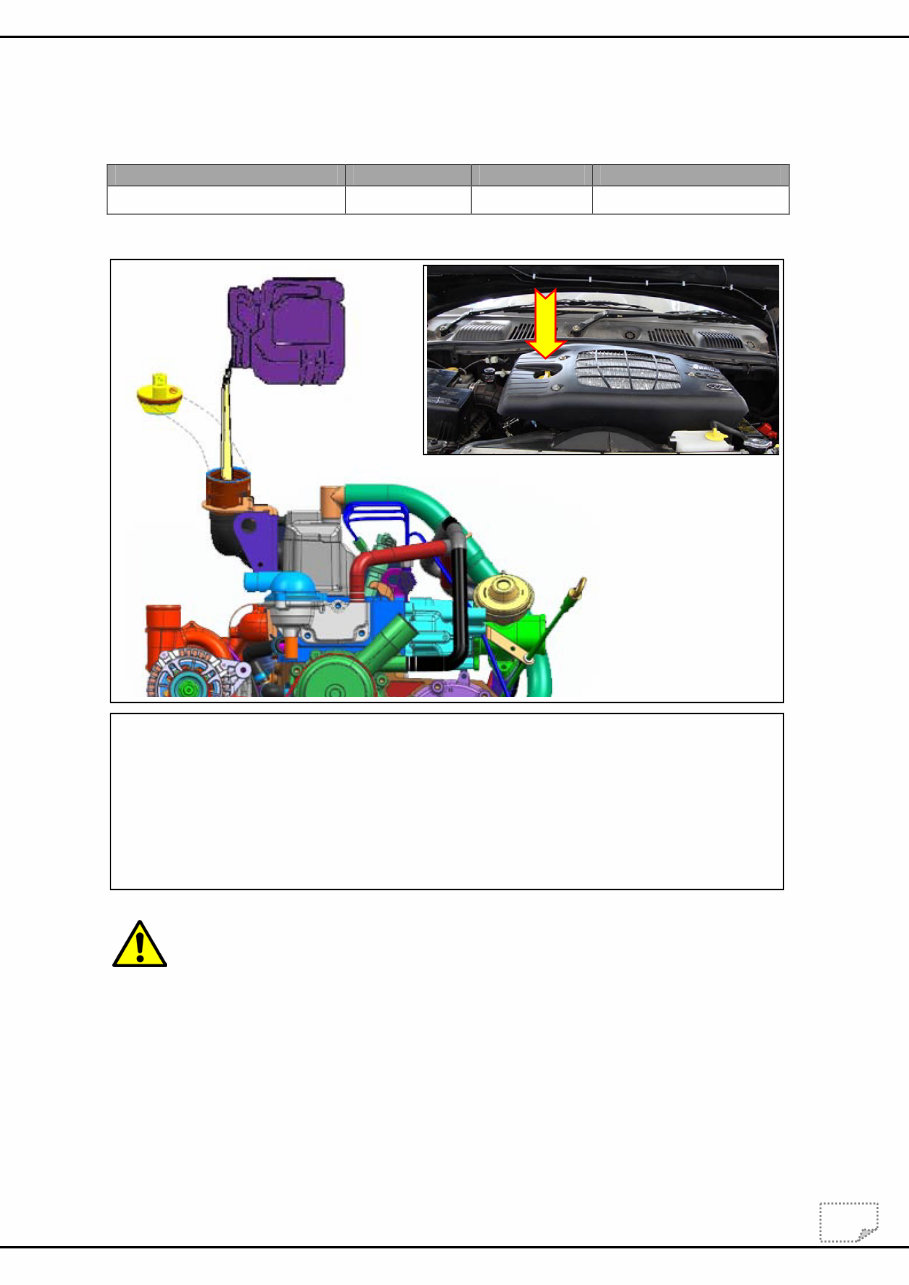
705-MAT-0002: 0.05 hrs.
ENGINE OIL – LEVEL & LEAK – CHECK
Ensure that the vehicle is parked on level ground/2 post lift/4 post lift.
If the activity is done on a 2 post lift, ensure that the LSPV spring is disconnected
before lifting the vehicle. After lowering, re-connect the LSPV spring and ensure
that the setting height is correct.
Ensure that the engine is not running when oil level check is being done.
If the engine was running before, wait for 10-12 minutes to accumulate oil in the
sump and then do oil level check.
Oil Level Check – Refer illustrations shown.
1. Pull out the dip stick gauge and wipe it clean with a cloth/paper.
2. Insert the dip stick gauge into the dip stick guide fully till the end.
3. Pull out the dip stick slowly and check for the oil level between Maximum and
Minimum level - if found below, top up with recommended oil.
4. Start the engine and check for oil leakage/ seepage at –
Refer illustration [C] checkpoints are shown with arrows.
Oil sump & crankcase joint.
Oil sump drain plug.
Oil filter joint.
DIPSTICK
DIPSTICK
DIPSTICK
GUIDE
MAX
MIN
A B
C
Maintenance Manual MAN-00135
GENIO DC (BS-III & BS-IV) JULY 2011/Rev1
The repair methods given by the manufacturer in this document are based on the technical specifications, current at the time of release. The methods may be modified as a result of changes
introduced by the manufacturer in the production of the various component units and accessories from which the vehicles are manufactured. The reproduction, translation, transmission, in part of or
whole of the present document, are prohibited without the prior written consent of Mahindra & Mahindra Ltd. The use of this document by any person other than the trained personnel, at the
Authorized Service Centre of Mahindra & Mahindra Ltd., will amount to unauthorized use and shall be liable for penalty/prosecution © 2011 Mahindra & Mahindra Ltd.
5
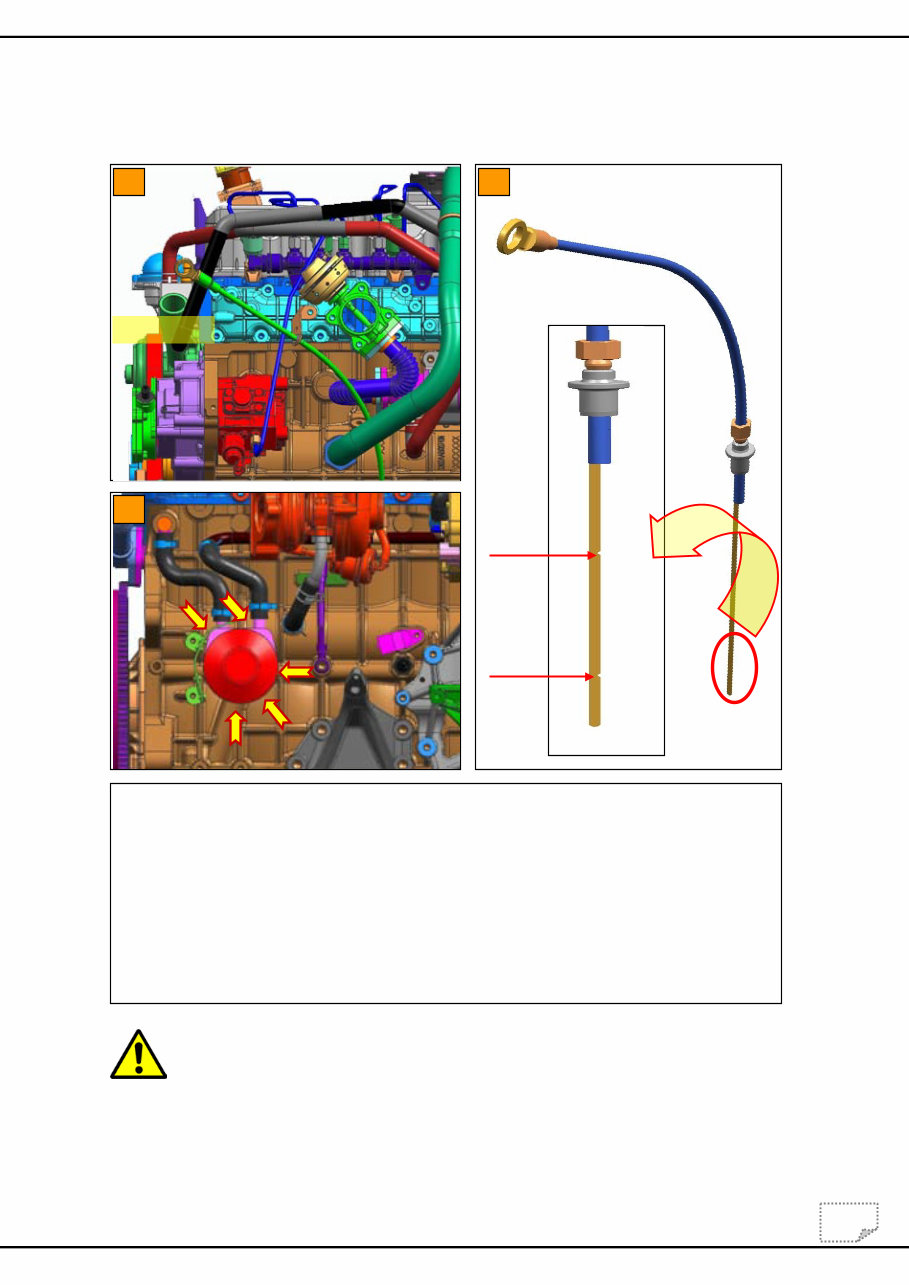
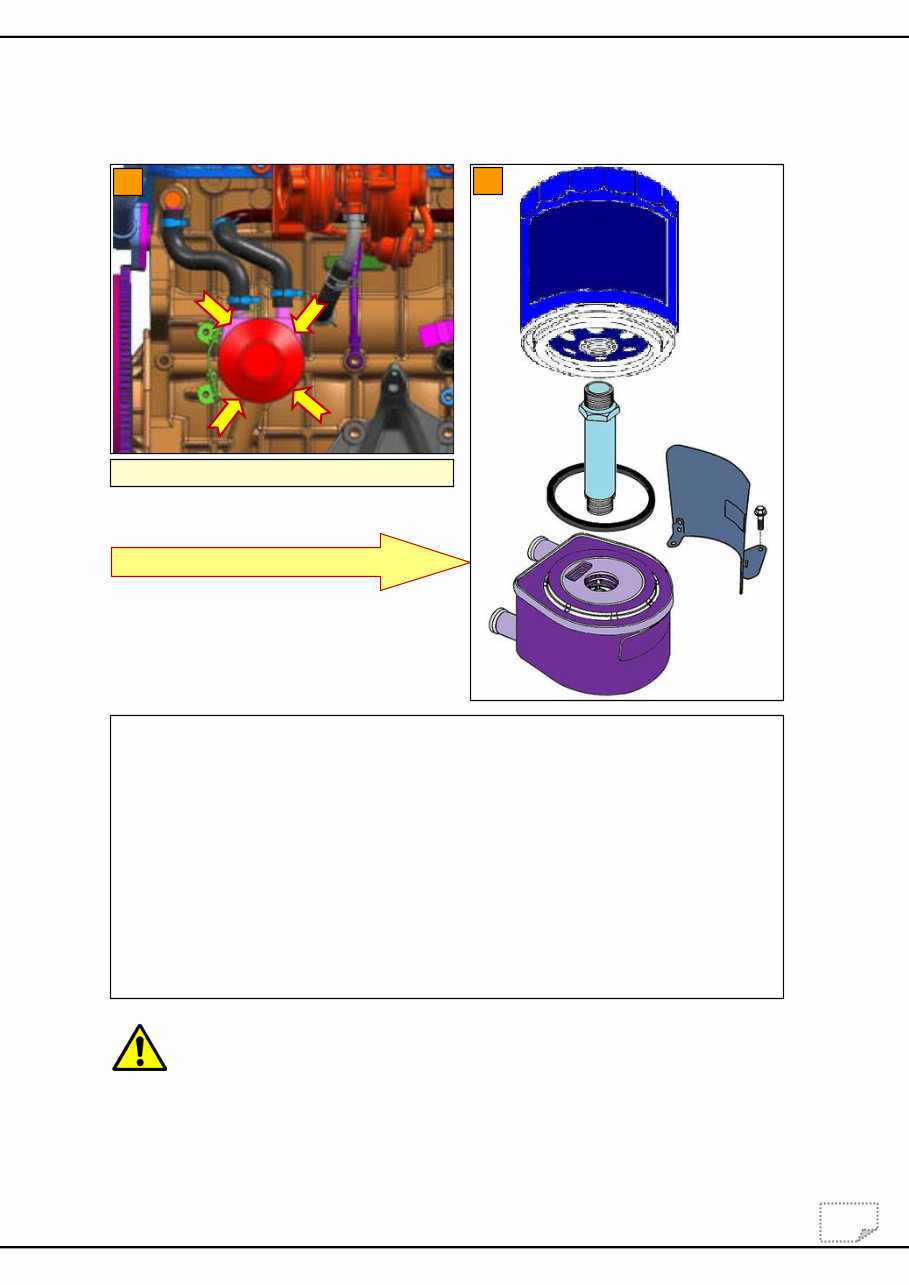
705-MAT-0003 : 0.20 hrs.
ENGINE OIL FILTER– REPLACE
Never use a wrench/spanner to tighten the oil filter.
Oil filters need to be replaced during engine Oil change. Recommended intervals
are at 5000, 20000kms & then at every 20000kms. Use Maximile UNIVERSE oil
filter.
Oil filter Removal – Refer illustrations.
1. Remove the oil filter by unscrewing it in anti-clockwise direction, using an oil filter
wrench.
2. Check the oil cooler stud for tightness – Torque 27.5 ± 2.5 Nm.
3. Smear a layer of fresh engine oil on the oil filter “O” ring
4. Fit the oil filter and turn it clockwise till the “O” ring touches the oil cooler face.
5. Turn the filter another 3/4th turn by hand.
6. Check for Oil leakage/ seepage at –
Refer illustration [A] checkpoints are shown with arrows.
Oil pan & crankcase joint
Oil pan Drain Plug.
Oil filter joint.
Oil cooler joint
Oil Filter & Cooler disassembly
B
Oil Leak - Check Points near Oil Filter
A
Maintenance Manual MAN-00135
GENIO DC (BS-III & BS-IV) JULY 2011/Rev1
The repair methods given by the manufacturer in this document are based on the technical specifications, current at the time of release. The methods may be modified as a result of changes
introduced by the manufacturer in the production of the various component units and accessories from which the vehicles are manufactured. The reproduction, translation, transmission, in part of or
whole of the present document, are prohibited without the prior written consent of Mahindra & Mahindra Ltd. The use of this document by any person other than the trained personnel, at the
Authorized Service Centre of Mahindra & Mahindra Ltd., will amount to unauthorized use and shall be liable for penalty/prosecution © 2011 Mahindra & Mahindra Ltd.
6
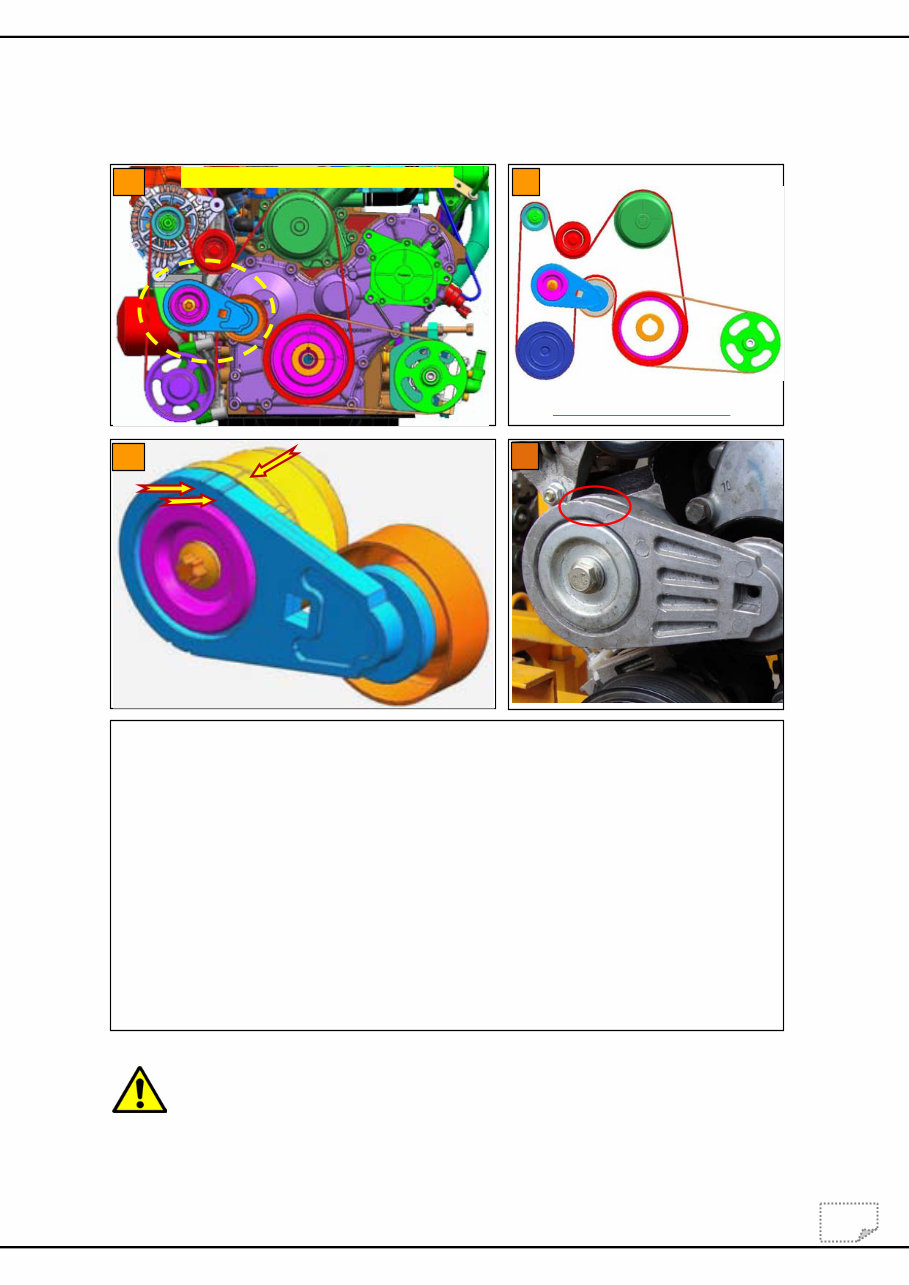
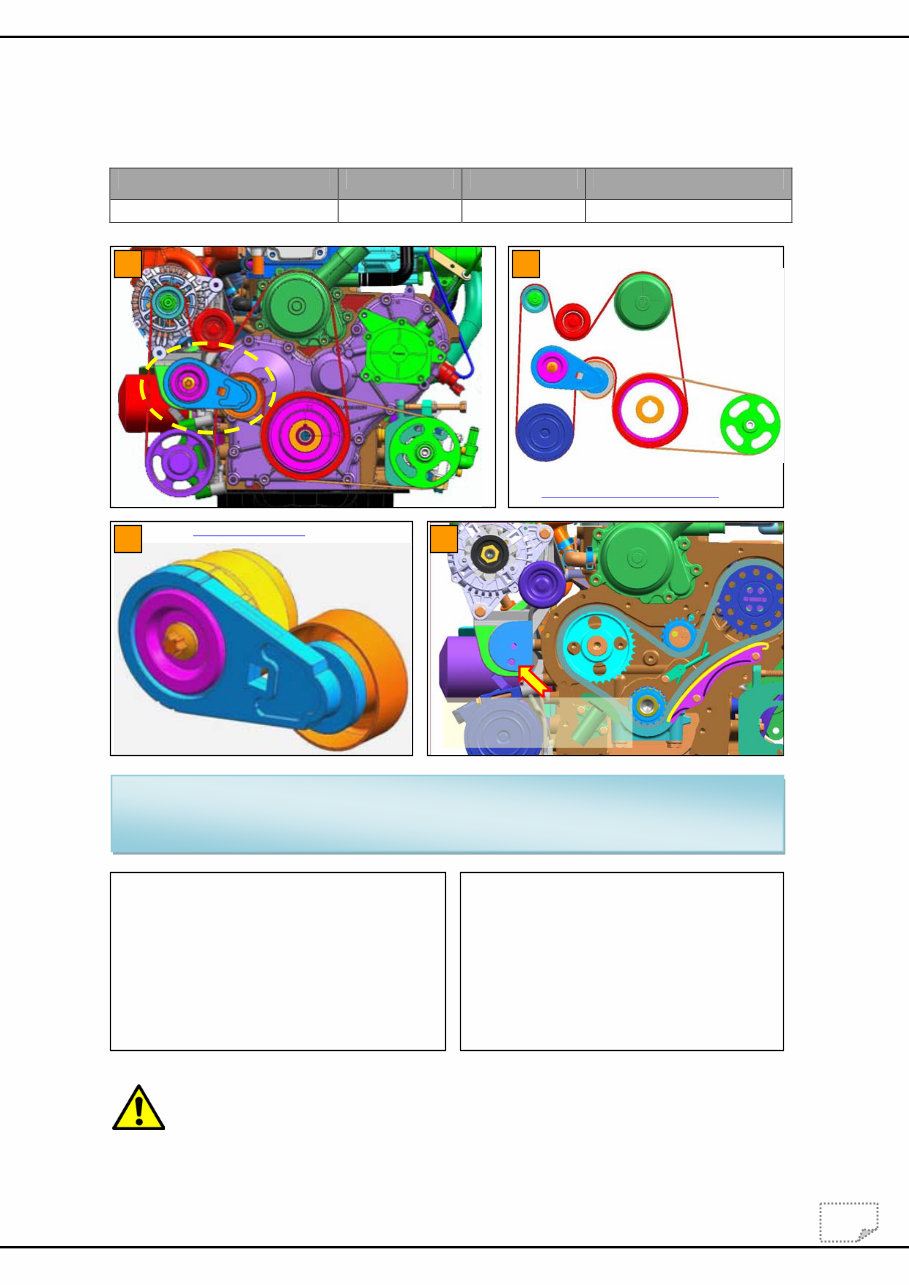
705-MAT-0004 : 0.05 hrs.
AUTO TENSIONER - CHECK
Auto tensioner to be check at 60000, 80000kms and it is recommended to
replace it at every 100000kms.
Auto Tensioner Inspection:
Refer illustrations shown.
Inspect automatic tensioner carefully for symptoms such as cracked arms, excessive vibration
during idle speeds, looseness, noise (clatter or rattling) and sticking or seized operation. These
can all be signs that a tensioner needs replacing.
Refer slots shown by arrow marks on Auto tensioner in sketch [C] & [D]. Two slots marked on
Auto tensioner arm, and one slot marked on its coil hub. The slot marked on coil hub should
always match in between two slots marked on Tensioner Arm when the belt is in its position. If
there is mismatch, either the belt needs to be check and replaced or Auto tensioner needs to
be replaced.
D
Marking on Auto Tensioner
Marking on Auto Tensioner
C
DRIVE BELTS - LAYOUT
B
Auto Tensioner mounting on Engine
A
Maintenance Manual MAN-00135
GENIO DC (BS-III & BS-IV) JULY 2011/Rev1
The repair methods given by the manufacturer in this document are based on the technical specifications, current at the time of release. The methods may be modified as a result of changes
introduced by the manufacturer in the production of the various component units and accessories from which the vehicles are manufactured. The reproduction, translation, transmission, in part of or
whole of the present document, are prohibited without the prior written consent of Mahindra & Mahindra Ltd. The use of this document by any person other than the trained personnel, at the
Authorized Service Centre of Mahindra & Mahindra Ltd., will amount to unauthorized use and shall be liable for penalty/prosecution © 2011 Mahindra & Mahindra Ltd.
7
705-MAT-0005 : 0.60 hrs.
AUTO TENSIONER - REPLACE
Auto tensioner to be check at 60000, 80000kms and it is recommended to
replace it at every 100000kms.
Nut/ Bolt description Quantity Nos. Spanner Size Torque Value – Nm.
Auto tensioner mtg. bolt 01 12 mm. 35 ± 05
Removal Steps –
1. Remove NVH cover.
2. Remove fan & shroud
3. Remove power steering belt (705-
MAT-0029) & Accessory drive belt
(705-MAT-0007)
4. Remove Auto tensioner assy.
Assembly Procedure –
1. Refit Auto tensioner assy.
2. Refit Accessory drive belt (705-
MAT-0007) & power steering belt
(705-MAT-0029)
3. Refit fan & shroud.
4. Refit NVH cover.
NOTE: Auto tensioner is provided with dowel-pin on its mounting face for correct fitment;
while assembling the dowel should match & fixed carefully.
Refer sketch [D] Dowel Pin location shown by arrow mark.
DRIVE BELTS - LAYOUT
B A
C
Auto Tensioner
D
Auto Tensioner dowel
Pin mounting hole
You're Reading a Preview
What's Included?
Fast Download Speeds
Offline Viewing
Access Contents & Bookmarks
Full Search Facility
Print one or all pages of your manual
$31.99
Viewed 32 Times Today


Secure transaction
What's Included?
Fast Download Speeds
Offline Viewing
Access Contents & Bookmarks
Full Search Facility
Print one or all pages of your manual
$31.99
This is a comprehensive service and repair manual for the 2011-2016 Mahindra Genio, containing essential information for maintenance, troubleshooting, and repair.
- It is a valuable resource for both professional mechanics and DIY enthusiasts, providing easy-to-read text sections, high-quality diagrams, and step-by-step instructions.
- The manual covers every single detail of the 2011-2016 Mahindra Genio, including comprehensive diagrams, in-depth illustrations, and all the manufacturer's specifications and technical information.
- It is available in English and can be zoomed in/out for better clarity. The file format is PDF, compatible with all versions of Windows and Mac, and requires Adobe Reader and WinZip for access.
- With this manual, you can easily find the relevant information, print it off, and start working on your machine without worrying about damaging an expensive paper manual with grease and dirt.
- Instant access to the material allows for quick repairs without waiting for postal delivery, making it convenient for on-the-spot troubleshooting and repairs.
- The manual includes a wide range of topics such as MOT test checks, roadside repairs, routine maintenance, engine and associated systems, cooling, heating and air conditioning systems, fuel and exhaust systems, electrical systems, transmission, braking system, suspension, steering systems, body equipment, wiring diagrams, tools, general repair procedures, spare parts, fault finding, and a glossary of technical terms.
Get your 2011-2016 Mahindra Genio fully equipped with this comprehensive service and repair manual for efficient maintenance and repairs.


