

2000-2006 Lincoln LS Service & Repair Manual
What's Included?
Fast Download Speeds
Offline Viewing
Access Contents & Bookmarks
Full Search Facility
Print one or all pages of your manual
2000-01 ENGINES
3.9L V8 - VIN A
ENGINE IDENTIFICATION
Engine may be identified by eighth character of Vehicle Identification Number (VIN). VIN is located on top of
instrument panel, near lower left corner of windshield.
An emission calibration number is located on driver's door or door-post pillar. This label identifies engine
calibration number, engine code and revision label.
Engine code label is located on valve cover. Label contains engine calibration number, engine build date, plant
code and engine code. Information from labels are required when ordering replacement parts.
ENGINE IDENTIFICATION CODES
ADJUSTMENTS
VALVE CLEARANCE ADJUSTMENT
1. Disconnect negative battery cable. Remove valve covers. See VALVE COVERS under REMOVAL &
INSTALLATION. Remove spark plugs. Rotate engine by rotating crankshaft as necessary to bring each
valve to base circle. Using a feeler gauge, measure intake and exhaust valve clearance, between camshaft
base circle and valve tappet. See VALVE ADJUSTMENT SPECIFICATIONS table.
2. If clearance is not within specification, remove timing chains. See TIMING CHAIN under REMOVAL
& INSTALLATION. Remove camshaft. See CAMSHAFT under REMOVAL & INSTALLATION.
Remove shim. Select shims as follows: Measured Clearance + Base Shim Thickness - Desired Clearance
= Required Shim Thickness. Install appropriate replacement shim to obtain specified clearance. Repeat
procedure for each valve. Install camshaft. See CAMSHAFT under REMOVAL & INSTALLATION.
Measure new valve clearances and ensure they are within specification. Install timing chains. See
TIMING CHAIN under REMOVAL & INSTALLATION. Install valve covers. See VALVE COVERS
under REMOVAL & INSTALLATION.
VALVE ADJUSTMENT SPECIFICATIONS
Engine Code
3.9L DOHC SFI A
NOTE: Valve shims are not repairable with camshafts in place. Failure to measure all
clearances with camshafts in place will cause unnecessary repetition of this
procedure.
Application
(1)
In. (mm)
Intake
Clearance Range .0070-.0086 (.18-.22)
2000 Lincoln LS
2000-01 ENGINES 3.9L V8 - VIN A
2000 Lincoln LS
2000-01 ENGINES 3.9L V8 - VIN A
TROUBLE SHOOTING
REMOVAL & INSTALLATION
FUEL PRESSURE RELEASE & FUEL LINE CONNECTIONS
1. Disconnect battery ground cable. Remove fuel cap to release fuel tank pressure. Using EFI Pressure
Gauge (T80L-9974-B), release fuel pressure from fuel-pressure relief valve on fuel rail.
2. To disconnect fuel lines, remove retaining clip from outside of fuel line coupling. Use Spring Lock
Coupling Remover (D87L-9280-A) for 3/8" line or (D87L-9280-B) for 1/2" line. Install spring lock
coupling remover on fuel line coupling so it enters cage opening.
3. Push spring lock coupling remover into cage opening to release female fitting from garter spring. Pull
couplings apart. Remove spring lock coupling remover.
4. When installing fuel lines, install NEW "O" rings on fuel lines. Use only specified fuel resistant "O" rings
(Black). Before installing, lightly coat "O" rings with clean engine oil. Clean fittings, and replace garter
spring (if necessary). Fit female fitting to male fitting and push until garter spring snaps over flared end of
female fitting.
5. Ensure lines are locked together and garter spring is over female fitting flared end. Install retaining clip.
Ensure horseshoe portion of clip is over coupling. DO NOT install retaining clip over rubber fuel line.
Desired .0078 (.20)
Exhaust
Clearance Range .0090-.0106 (.23-.27)
Desired .01 (.25)
(1)
Perform valve adjustment with engine cold.
NOTE: To trouble shoot mechanical engine components, see appropriate table in
TROUBLE SHOOTING article in GENERAL INFORMATION.
NOTE: For reassembly reference, label all electrical connectors, vacuum hoses and
fuel lines before removal. Place mating marks on engine hood and other major
assemblies before removal.
CAUTION: When battery is disconnected, vehicle computer and memory systems
may lose memory data. Driveability problems may exist until computer
systems have completed a relearn cycle. See COMPUTER RELEARN
PROCEDURES article in GENERAL INFORMATION before disconnecting
battery.
WARNING: Fuel system is under pressure. Pressure must be released before
servicing fuel system components.
2000 Lincoln LS
2000-01 ENGINES 3.9L V8 - VIN A

ENGINE
Removal
1. Disconnect battery negative terminal. Remove air cleaner inlet. Drain engine coolant. Remove upper
radiator sight shield. Remove 2 upper radiator support brackets. Discharge A/C system, using approved
refrigerant recovery/recycling equipment. Disconnect A/C pressure switch electrical connector. Release
power steering return line from pressure clip line.
2. Remove power steering pump reservoir retaining bolts, and secure reservoir to engine. Relieve fuel
pressure and disconnect supply and return lines. See FUEL PRESSURE RELEASE & FUEL LINE
CONNECTIONS . Remove Vapor Management Valve (VMV) cover. Disconnect VMV canister purge
hose, and vacuum hose. Disconnect main vacuum supply hose.
3. Remove cowl vent screens. Remove engine compartment brace. Disconnect degas (coolant recovery)
bottle. Disconnect accelerator cable and cruise control cable. Disconnect ground strap. Remove fresh air
filter. Remove fresh air filter housing. Disconnect powertrain bulkhead electrical connectors. Remove
fresh air filter panel.
4. Disconnect heater hoses. Remove hydraulic cooling fan reservoir and secure onto engine. Disconnect
water valve electrical connector, and unclip connector form radiator support and position aside. Raise and
support vehicle.
5. Remove front wheels and tires. Remove inner splash shield pin-type retainers, and position left and right
side inner splash panels aside. Disconnect left and right side anti-lock brake sensor electrical connectors.
Unclip left and right side anti-lock brake harnesses from brake hoses. Remove left and right side brake
calipers, and wire aside. DO NOT allow calipers to hang by brake hose.
6. Remove left and right side sway bar lower nuts. Remove left and right side ball joint nuts, and separate
ball joints from spindles. Remove left and right side lower strut mount bolts. Remove left and right side
splash shields. Remove center splash shield. Remove A/C high pressure line retaining nut and disconnect
line. Disconnect low pressure A/C line.
7. Remove drive shaft. Disconnect shift cable from shifter. Unclip shift cable from bracket. Remove shift
cable bracket. Release power steering lines from left side frame rail. Disconnect rack and pinion steering
unit electrical connectors. Remove steering column pinch bolt, and separate steering shaft from steering
gear.
8. Remove starter motor ground cable. Remove starter motor cover, and disconnect starter motor electrical
connectors. Disconnect generator electrical connector.
CAUTION: When draining engine coolant, care must be taken to avoid spilling
coolant onto and contaminating accessory drive belt.
NOTE: Mark position of hoses for installation reference.
NOTE: Hold external hex when removing ball joint nuts to prevent damage to ball
joint.
2000 Lincoln LS
2000-01 ENGINES 3.9L V8 - VIN A

9. Remove 6 lower transmission-to-engine bolts. Remove torque converter inspection cover. Remove 8
torque converter nuts. Remove inner air deflector. Remove engine block heater plug (if equipped).
Support rear of vehicle with suitable safety stands. Support engine, transmission, front and center
crossmembers, and cooling system with a powertrain lift and transmission support bracket.
10. Remove transmission crossmember bolts. Remove 4 front and 4 center crossmember bolts. Carefully
lower entire assembly from vehicle. Disconnect block heater (if equipped).
11. Disconnect A/C manifold and tube. Disconnect power steering pump and hydraulic cooling fan pump
return hoses. Remove lower radiator hose. Disconnect remaining radiator hoses. Disconnect knock sensor
electrical connector. Disconnect heater hose. Remove transmission cooler line bracket. Disconnect
transmission cooler lines. Disconnect power steering pressure line. Remove power steering line bracket.
12. Install Engine Lifting Brackets (303-050). Remove hydraulic fan pump bracket. Disconnect hydraulic fan
pump line. Using engine lifting brackets and an engine hoist, support engine and transmission on front
subframe. Remove left and right side engine mount nuts. remove engine and transmission from subframe
and rest on floor or bench. Remove wiring harness retaining nuts and position wiring harness aside.
Remove bolts and separate engine from transmission. Mount engine into suitable engine stand.
Installation
1. To install, reverse removal procedure. Tighten bolts and nuts to specification. See TORQUE
SPECIFICATIONS .
2. When installing fuel lines, install NEW "O" rings on fuel lines. Use only specified fuel resistant "O" rings
(Black). Lightly coat "O" rings with clean engine oil before installing. Clean fittings, and replace garter
spring (if necessary).
3. Adjust control cables and fluid levels. Refill cooling system. Evacuate and recharge A/C system. Check
wheel alignment. See appropriate SPECIFICATIONS & PROCEDURES article in WHEEL
ALIGNMENT.
FRONT COVER
Removal
1. Drain engine cooling system. Remove left and right side valve covers. See VALVE COVER . Remove
cooling fan assembly. Loosen water pump pulley bolts. Remove generator. Remove and discard water
pump pulley bolts. Remove water pump pulley. Remove bracket in front of lower radiator hose. Remove
lower radiator hose stud bolts. Disconnect lower radiator hose from thermostat hosing.
NOTE: Make an identifying mark on nut, stud, and adapter plate to allow for
correct installation.
CAUTION: When draining engine coolant, care must be taken to avoid spilling
coolant onto and contaminating accessory drive belt.
NOTE: Use a clean container to reuse coolant. If coolant is contaminated, coolant must
be recycled, or disposed of correctly.
2000 Lincoln LS
2000-01 ENGINES 3.9L V8 - VIN A

2. Disconnect heater hose. Remove accessory drive belt idler pulleys. Remove and discard crankshaft pulley
bolt. Using Crankshaft Damper Remover (303-009), remove crankshaft pulley. Remove A/C compressor.
Disconnect power steering reservoir hose, and drain reservoir into a suitable container.
3. Remove power steering pump retaining bolts and position pump aside. Remove power steering pump
bracket.
4. Disconnect hydraulic cooling fan pump reservoir hose, and drain reservoir into a suitable container.
Disconnect hydraulic cooling fan pump electrical connector. Remove hydraulic cooling fan pump
reservoir line bracket. Remove hydraulic cooling fan pump. Remove hydraulic cooling fan pump bracket.
Disconnect 5 wiring harness clips. Remove front engine cover bolts in sequence. See Fig. 1 . Remove
front cover.
NOTE: One power steering pump retaining bolts is blocked by a power steering
pressure line, and has to be removed in stages.
2000 Lincoln LS
2000-01 ENGINES 3.9L V8 - VIN A
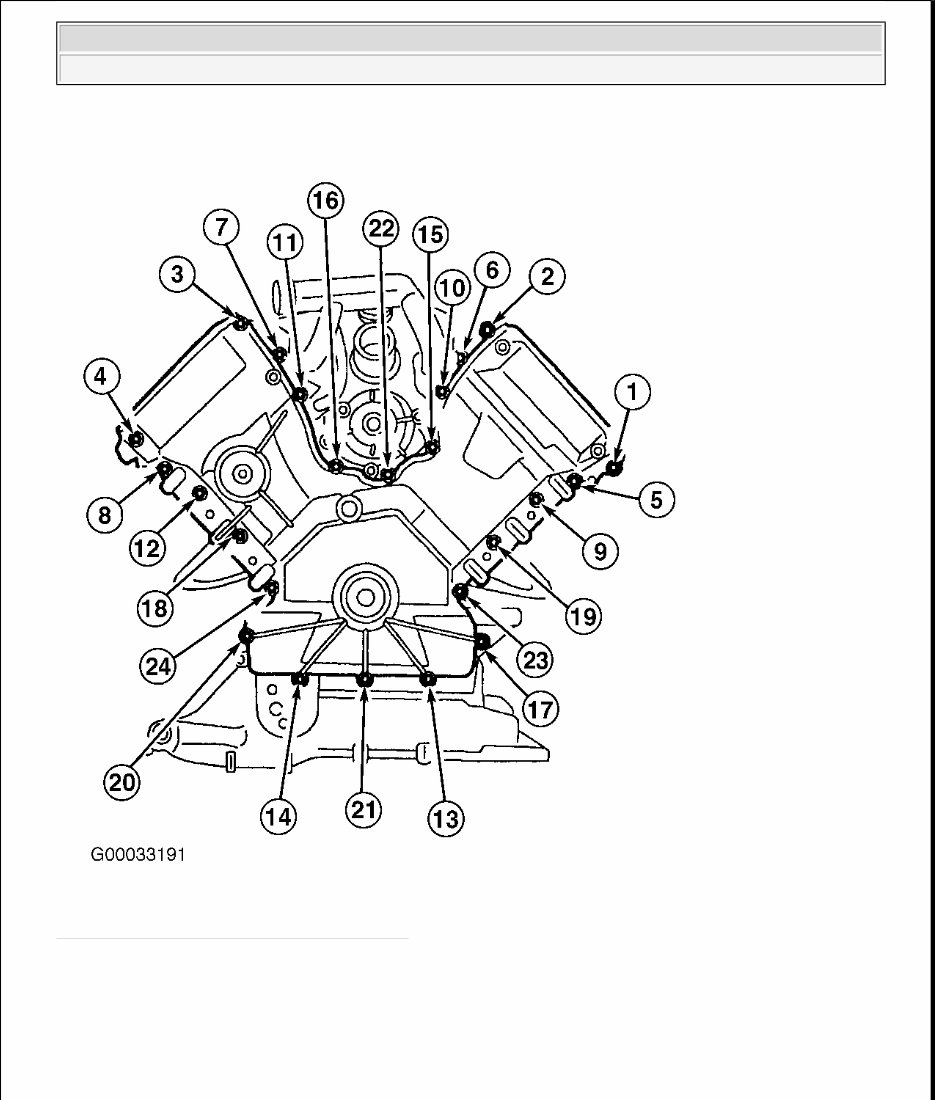
Fig. 1: Front Cover Bolt Loosening Sequence
Courtesy of FORD MOTOR CO.
Installation
CAUTION: Do not use metal scrapers, wire brushes, power abrasive discs or other
abrasive means to clean sealing surfaces. These tools may scratch or
gouge mating surfaces, which make leak paths. Use a plastic scraping tool
2000 Lincoln LS
2000-01 ENGINES 3.9L V8 - VIN A

1. Clean sealing surfaces. Install NEW gaskets. Apply a .12" (3 mm) bead of Silicone Gasket and Sealant
(F7AZ-19554-EA) or equivalent onto 8 sealing surfaces. See Fig. 2 . Install front cover, and loosely
install front cover retaining bolts. Tighten bolts in sequence in 2 stages. See Fig. 3 . See TORQUE
SPECIFICATIONS .
2. To complete installation, reverse removal procedure. Tighten all bolts and nuts to specification. See
TORQUE SPECIFICATIONS .
to clean surfaces.
2000 Lincoln LS
2000-01 ENGINES 3.9L V8 - VIN A
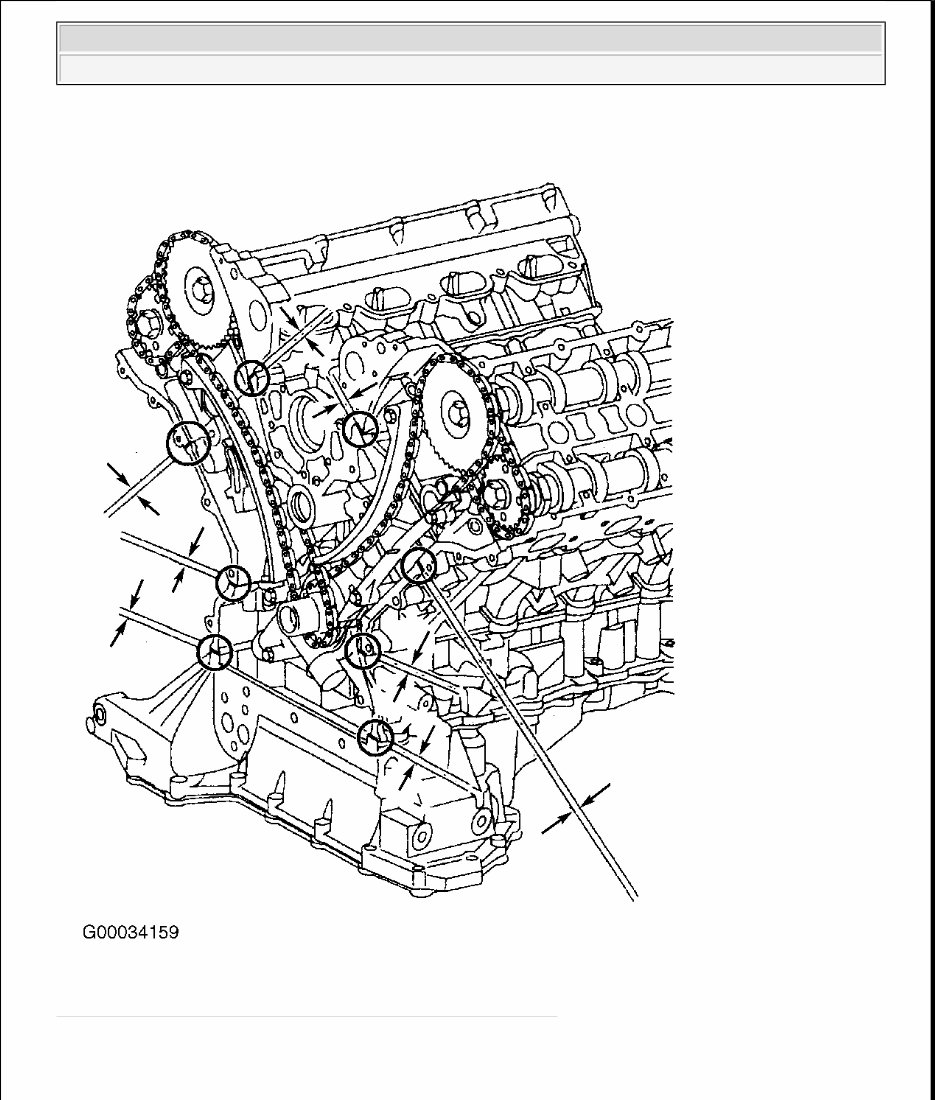
Fig. 2: Applying Gasket Sealer Onto Front Cover Mating Points
Courtesy of FORD MOTOR CO.
2000 Lincoln LS
2000-01 ENGINES 3.9L V8 - VIN A
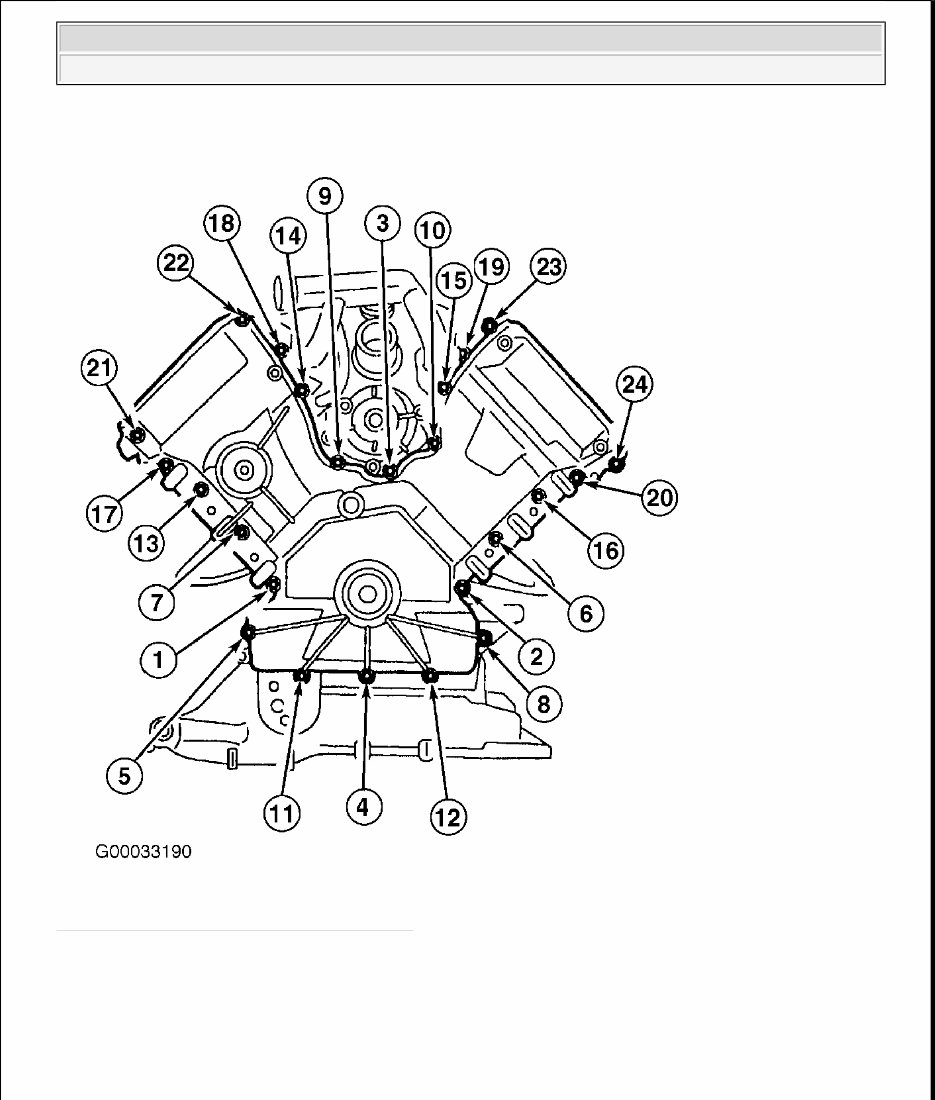
Fig. 3: Front Cover Bolt Tightening Sequence
Courtesy of FORD MOTOR CO.
INTAKE MANIFOLD
Removal
CAUTION: When draining engine coolant care must be taken to avoid spilling coolant
onto and contaminating accessory drive belt.
2000 Lincoln LS
2000-01 ENGINES 3.9L V8 - VIN A

1. Disconnect negative battery cable. Remove air cleaner outlet tube. Drain engine coolant. Remove cowl
vent screen. Remove engine compartment brace. Disconnect accelerator and cruise control cables.
Disconnect necessary vacuum hoses and lines. Disconnect EGR valve to exhaust manifold tube. Remove
EGR valve and discard gasket. Disconnect camshaft position sensor electrical connector, and separate
connector from fuel injection supply manifold.
2. Disconnect evaporative emission canister purge valve line. Disconnect fuel pressure sensor electrical
connector. Disconnect fuel pressure sensor vacuum connector. Relieve fuel pressure and disconnect
supply and return lines. See FUEL PRESSURE RELEASE & FUEL LINE CONNECTIONS .
Remove left side knock sensor and cylinder head temperature sensor electrical connectors from bracket.
Remove retaining nut and electrical connector bracket.
3. Disconnect left side fuel injector connectors. Disconnect Idle Air Control (IAC) valve, and Throttle
Position (TP) sensor electrical connectors. Disconnect crankcase ventilation tube from right side valve
cover. Disconnect hoses from throttle body. Disconnect right side fuel injectors. Remove delta PFE
sensor. Remove intake manifold bolts and stud in sequence. See Fig. 4 . Remove intake manifold. Clean
all sealing surfaces.
NOTE: Use a clean container to reuse coolant. If coolant is contaminated, coolant must
be recycled, or disposed of correctly.
CAUTION: To remove normal fittings, squeeze tabs and pull straight out or
damage to fitting may occur.
CAUTION: Do not use metal scrapers, wire brushes, power abrasive discs or
other abrasive means to clean sealing surfaces. These tools may
scratch or gouge mating surfaces, which make leak paths. Use a
plastic scraping tool to clean surfaces.
NOTE: Throttle body and adapter do not need to be removed to remove intake
manifold.
2000 Lincoln LS
2000-01 ENGINES 3.9L V8 - VIN A
You're Reading a Preview
What's Included?
Fast Download Speeds
Offline Viewing
Access Contents & Bookmarks
Full Search Facility
Print one or all pages of your manual
$39.99
Viewed 88 Times Today


Secure transaction
What's Included?
Fast Download Speeds
Offline Viewing
Access Contents & Bookmarks
Full Search Facility
Print one or all pages of your manual
$39.99
- This Full Service & Repair Manual is a comprehensive factory workshop manual covering the Lincoln LS model years 2000-2006.
- It is a professional manual designed for both professional mechanics and DIY enthusiasts, providing detailed repair, servicing, and troubleshooting procedures.
- The manual includes hundreds of pages with detailed photos, diagrams, step-by-step instructions, and highly detailed exploded diagrams and pictures.
- Users have the flexibility to print out a single page or the entire manual as per their requirement.
- It can be accessed and used on multiple computers without any limitations or trial periods.
- There are no expiry dates or renewal fees associated with this manual, and it can be used for life.
- It is fully compatible with Windows and MAC computers.
For instant access to this comprehensive manual, please click on the provided button.


