AC2810 AC0W6–01 AC2811 N11084 Wrong Okay HI LO HI LO – AIR CONDITIONING AIR CONDITIONING SYSTEM AC–1 2686 AuthorĂ: DateĂ: 2000 LEXUS GS300/GS400 (RM718U) AIR CONDITIONING SYSTEM PRECAUTION 1. DO NOT HANDLE REFRIGERANT IN AN ENCLOSED AREA OR NEAR AN OPEN FLAME 2. ALWAYS WEAR EYE PROTECTION 3. BE CAREFUL NOT TO GET LIQUID REFRIGERANT IN YOUR EYES OR ON YOUR SKIN If liquid refrigerant gets in your eyes or on your skin. (a) Wash the area with lots of cool water. CAUTION: Do not rub your eyes or skin. (b) Apply clean petroleum jelly to the skin. (c) Go immediately to a physician or hospital for professional treatment. 4. NEVER HEAT CONTAINER OR EXPOSE IT TO NAKED FLAME 5. BE CAREFUL NOT TO DROP CONTAINER AND NOT TO APPLY PHYSICAL SHOCKS TO IT 6. DO NOT OPERATE COMPRESSOR WITHOUT ENOUGH REFRIGERANT IN REFRIGERANT SYSTEM If there is not enough refrigerant in the refrigerant system oil lu- brication will be insufficient and compressor burnout may occur, so take care to avoid this, necessary care should be taken. 7. DO NOT OPEN HIGH PRESSURE MANIFOLD VALVE WHILE COMPRESSOR IS OPERATING If the high pressure valves opened, refrigerant flows in the re- verse direction and could cause the charging cylinder to rup- ture, so open and close the only low pressure valve. 8. BE CAREFUL NOT TO OVERCHARGE SYSTEM WITH REFRIGERANT If refrigerant is overcharged, it causes problems such as insuffi- cient cooling, poor fuel economy, engine overheating etc.
AC–2 – AIR CONDITIONING AIR CONDITIONING SYSTEM 2687 AuthorĂ: DateĂ: 2000 LEXUS GS300/GS400 (RM718U) 9. SUPPLEMENTAL RESTRAINT SYSTEM (SRS) The Lexus GS 300/ 400 is equipped with an SRS (Supplemen- tal Restraint System) such as the driver and passenger airbag. Failure to carry out service operations in the correct sequence could cause the SRS to unexpectedly deployed during servic- ing, possibly leading to a serious accident. Further, if a mistake is made in servicing the SRS, it is possible the SRS may fail to operate when required. Before servicing ( including removal or installation of parts, inspection or replacement), be sure to read the following item carefully, then follow the correct procedure described in repair manual.
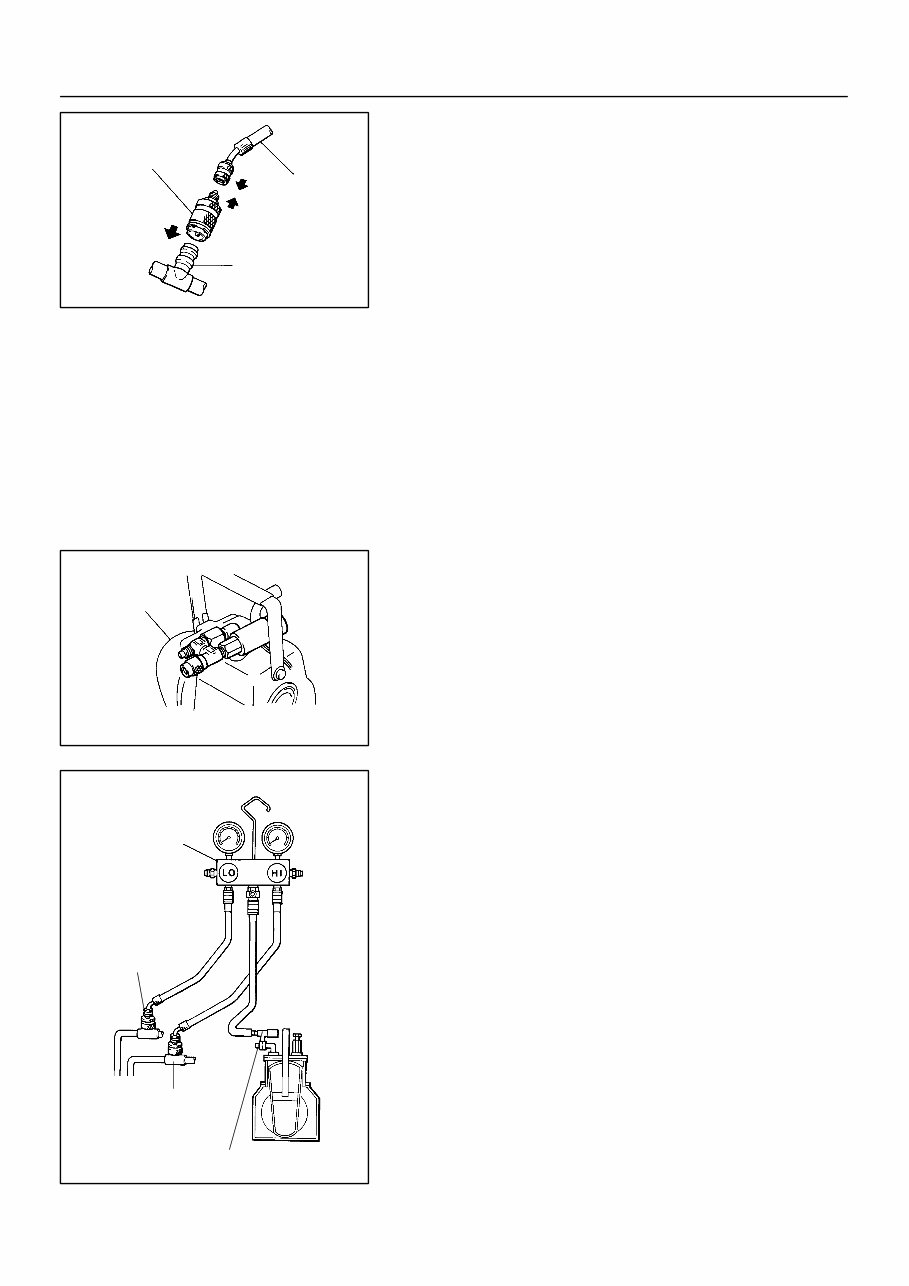
AC0W8–01 N13795 Quick Disconnect Adapter Charging Service Valve Hose N13794 Vacuum Pump Vacuum Pump Adapter N13791 Low Pressure Service Valve Vacuum Pump Adapter High Pressure Service Valve Manifold Gauge Set AC–10 – AIR CONDITIONING AIR CONDITIONING SYSTEM 2695 AuthorĂ: DateĂ: 2000 LEXUS GS300/GS400 (RM718U) EVACUATING 1. CONNECT QUICK DISCONNECT ADAPTER TO CHARGING HOSES 2. REMOVE CAPS FROM SERVICE VALVES ON RE- FRIGERANT LINES 3. SET ON MANIFOLD GAUGE SET (a) Close both hand valves of manifold gauge set. (b) Connect the quick disconnect adapters to the service valves. 4. EVACUATE AIR FROM REFRIGERATION SYSTEM (a) Connect the vacuum pump adapter to the vacuum pump. (b) Connect the center hose of the manifold gauge set to the vacuum pump adapter. (c) Open both the high and low hand valves and run the vacu- um pump. (d) After 10 minutes or more, check that the low pressure gauge indicates 750 mmHg (30 in. Hg) or more. HINT: If the reading is 750 mmHg (30 in. Hg) or more, close both hand valves of manifold gauge set and stop the vacuum pump. Check the system for leaks and repair if necessary. (e) Close both the high and low hand valves and stop the vac- uum pump. (f) Leave the system in this condition for 5 minutes or more and check that there is no gauge indicator.
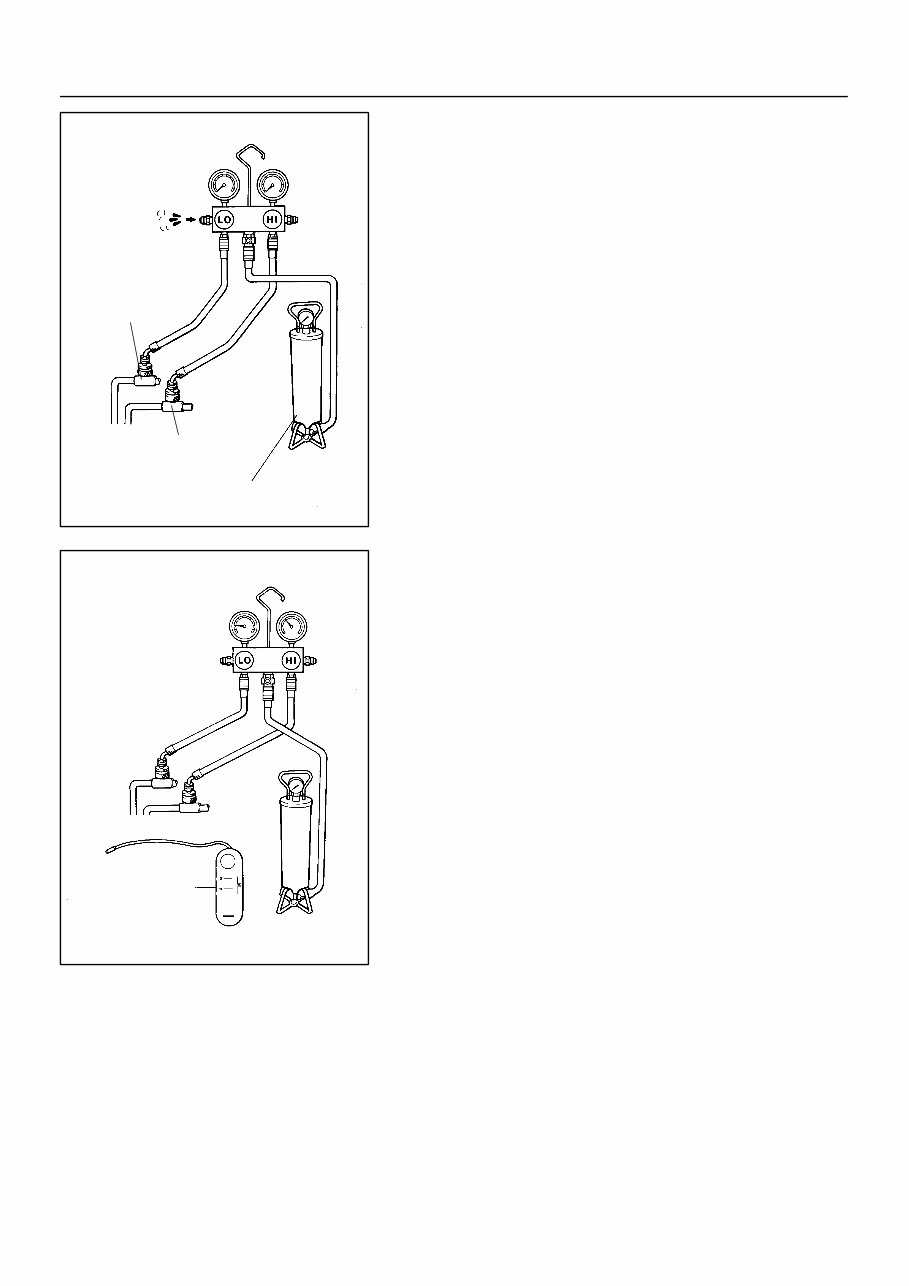
AC0W9–01 N13793 Charging Cylinder High Pressure Service Valve Low Pressure Service Valve Push Air N13792 Gas Leak Detector – AIR CONDITIONING AIR CONDITIONING SYSTEM AC–11 2696 AuthorĂ: DateĂ: 2000 LEXUS GS300/GS400 (RM718U) CHARGING 1. INSTALL CHARGING CYLINDER HINT: When handling the charging cylinder, always follow the direc- tions given in the instruction manual. (a) Charge the proper amount of refrigerant into the charging cylinder. (b) Connect the center hose to the charging cylinder. CAUTION: Do not open both high and low hand valves of manifold gauge set. (c) Open the valve of charging cylinder. (d) Press the valve core on the side of manifold gauge and expel the air inside of the center hose. 2. INSPECT REFRIGERATION SYSTEM FOR LEAKS (a) Open the high pressure hand valve and charge refriger- ant. (b) When the low pressure gauge indicates 98 kPa (1 kgf/cm 2 , 14 psi) close the high pressure hand valve. (c) Using a gas leak detector, check the system for leakage. If leak is found, repair the faulty component or connection. CAUTION: Use the refrigerant recovery/ recycling machine to recover the refrigerant whenever replacing parts.
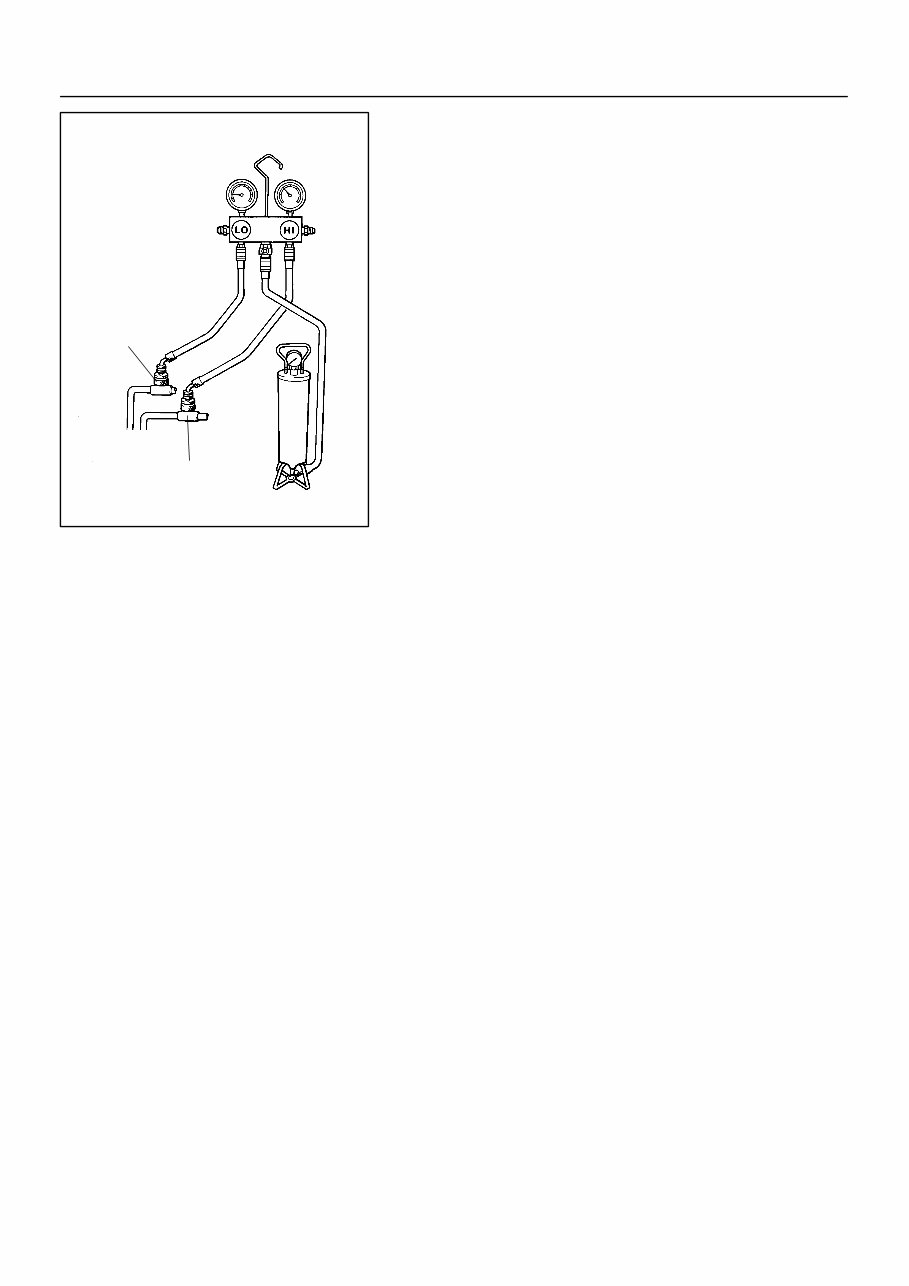
N13790 Low Pressure Service Valve High Pressure Service Valve AC–12 – AIR CONDITIONING AIR CONDITIONING SYSTEM 2697 AuthorĂ: DateĂ: 2000 LEXUS GS300/GS400 (RM718U) 3. INSTALL CHARGING CYLINDER HINT: When handling the charging cylinder, always follow the direc- tions given in the instruction manual. (a) Charge the proper amount of refrigerant into the charging cylinder. (b) Connect the center hose to the charging cylinder. CAUTION: Do not open both high and low hand valves of manifold gauge set. (c) Open the valve of charging cylinder. (d) Press the valve core on the side of manifold gauge and expel the air inside of the center hose. A fully charged system is indicated by the sight glass being free of any bubbles. 4. SET OFF MANIFOLD GAUGE SET (a) Close both hand valves of manifold gauge set. (b) Disconnect the quick disconnect adapters from the ser- vice valves. 5. INSTALL CAPS TO SERVICE VALVES ON REFRIGER- ANT LINES
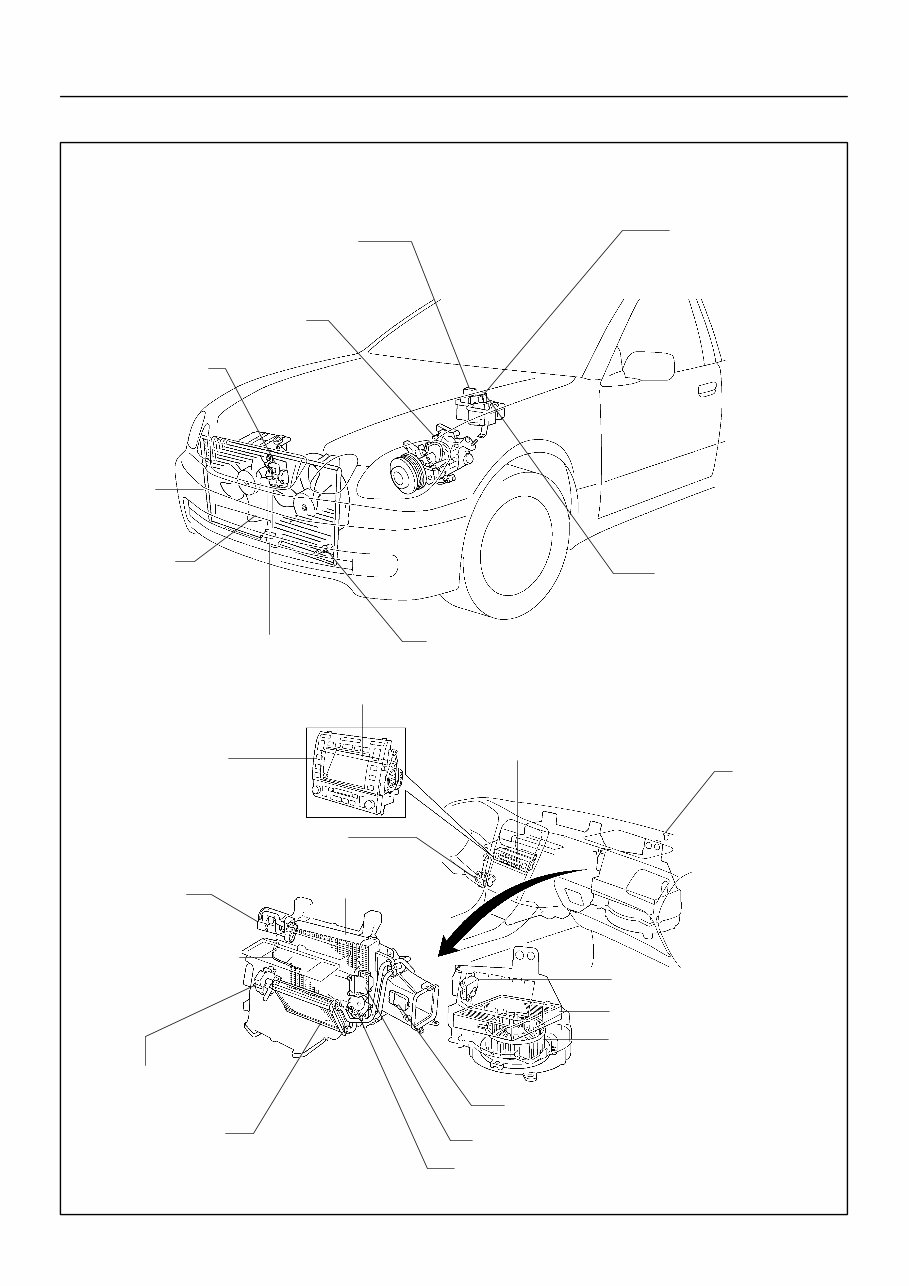
AC0WA–01 I03811 Smog Ventilation Sensor No. 2 Cooling Fan Relay (Marking: FAN NO.2) No. 3 Cooling Fan Relay (Marking: FAN NO.3) Compressor Magnetic Clutch Relay (Marking A/C COMP) Condenser Ambient Temperature Sensor Condenser Fan Engine Coolant Temperature (ECT) Switch Air Inlet Servomotor Blower Motor Air Outlet Servomotor A/C Amplifier Evaporator Solar Sensor A/C Control Assembly Electrical Multi Vision (Built in A/C Control Assembly) Expansion Valve Air Refiner Filter Blower Motor Control Relay Evaporator Temperature Sensor Heater Radiator Air Mix Servomotor (Driver Side) Air Mix Servomotor (Passenger Side) Room Temperature Sensor – AIR CONDITIONING AIR CONDITIONING SYSTEM AC–13 2698 AuthorĂ: DateĂ: 2000 LEXUS GS300/GS400 (RM718U) LOCATION
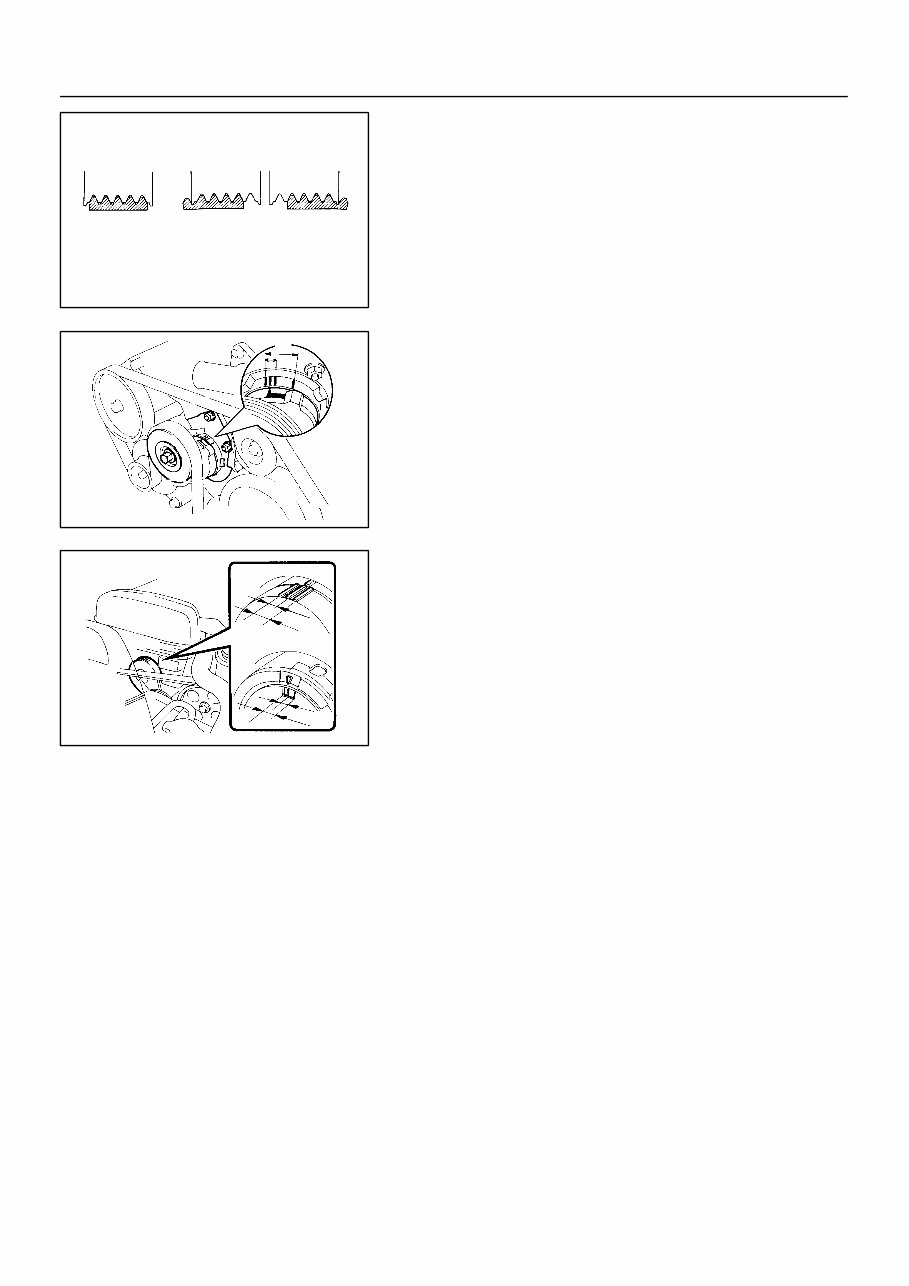
CH0086 Correct Wrong AC0WB–01 I03853 GS 400: A B P10652 GS 300: Type A Type B A B A B AC–14 – AIR CONDITIONING DRIVE BELT 2699 AuthorĂ: DateĂ: 2000 LEXUS GS300/GS400 (RM718U) DRIVE BELT ON–VEHICLE INSPECTION 1. INSPECT DRIVE BELT’S INSTALLATION CONDITION Check that the drive belt fits properly in the ribbed grooves. 2. INSPECT DRIVE BELT TENSION Check that the arrow mark on the belt tensioner falls within area ”A” of the scale. If it is out side area ”A”, replace the drive belt. HINT: When a new belt is installed, it should be lie within area B.
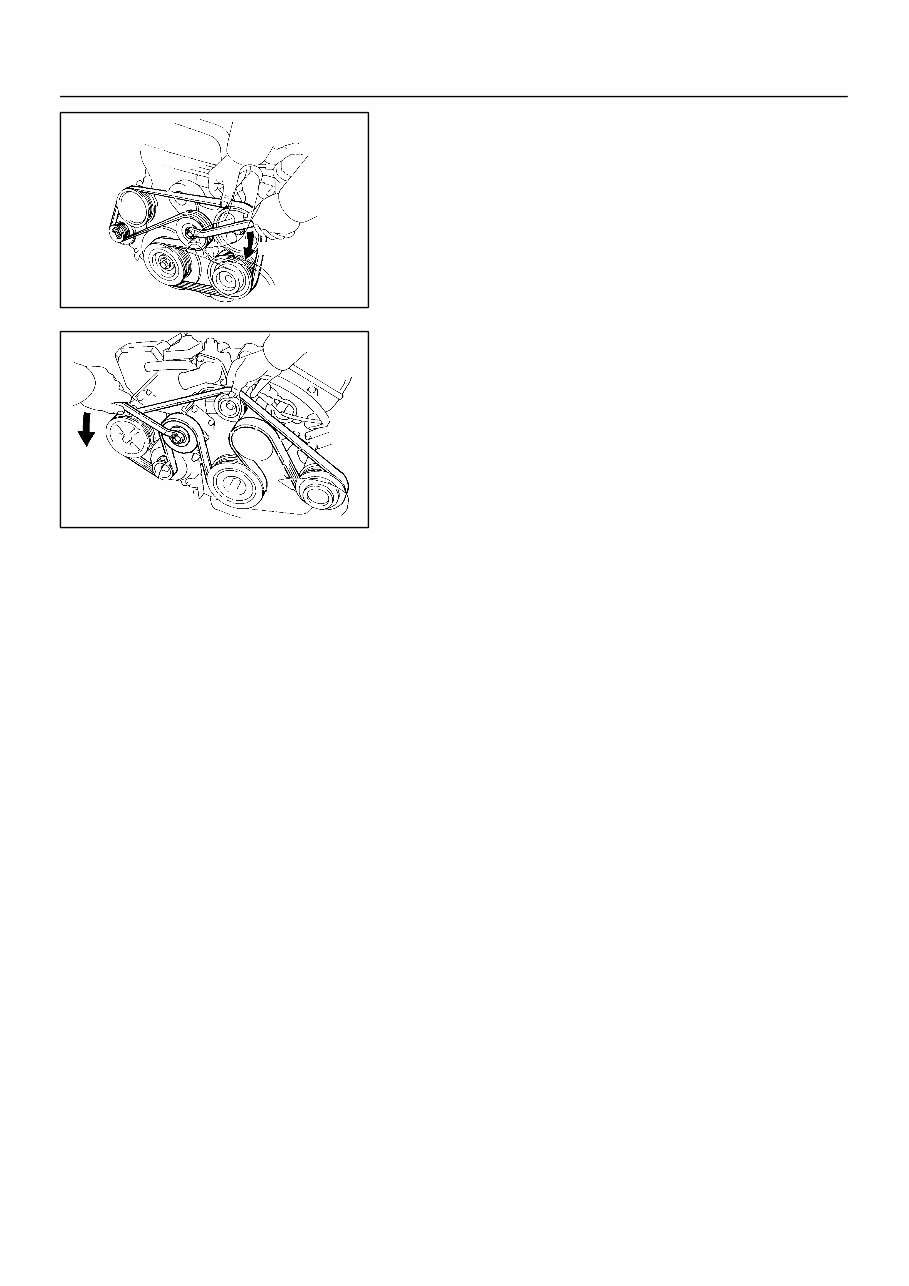
AC0WC–01 I03854 GS300: Turn I03855 GS400: – AIR CONDITIONING DRIVE BELT AC–15 2700 AuthorĂ: DateĂ: 2000 LEXUS GS300/GS400 (RM718U) REMOVAL 1. GS 300: REMOVE DRIVE BELT Loosen the drive belt tension by turning the drive belt tensioner clockwise and remove the drive belt. 2. GS 400: REMOVE DRIVE BELT Loosen the drive belt tension by turning the drive belt tensioner counterclockwise and remove the drive belt.
AC0WD–01 AC–16 – AIR CONDITIONING DRIVE BELT 2701 AuthorĂ: DateĂ: 2000 LEXUS GS300/GS400 (RM718U) INSTALLATION Installation is in the reverse order of removal (See page AC–15). AFTER INSTALLATION, CHECK DRIVE BELT’S INSTALLATION CONDITION
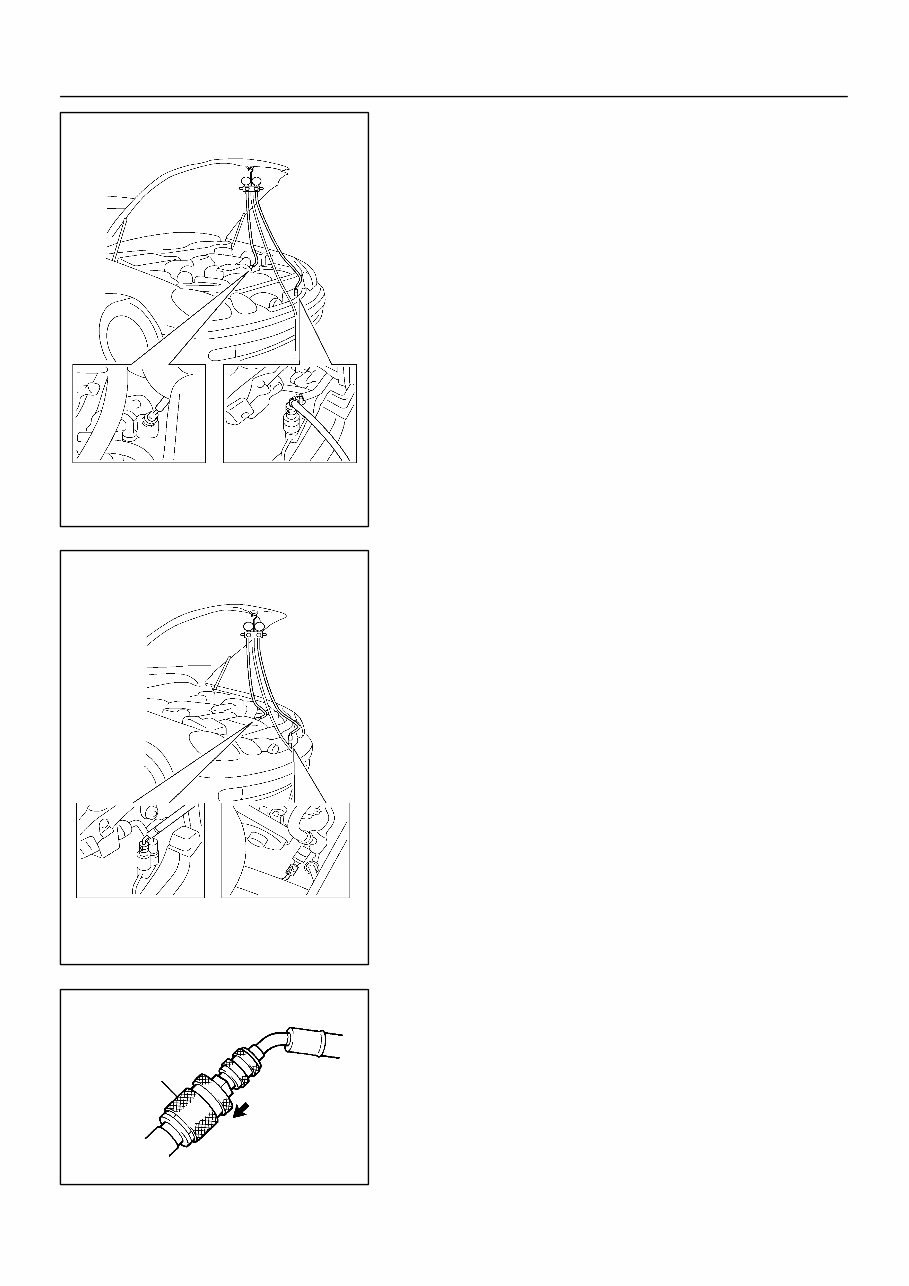
I02353 GS400: Low Pressure Charging Hose High Pressure Charging Hose I02354 GS300: Low Pressure Charging Hose High Pressure Charging Hose AC0WE–01 N04392 Sleeve – AIR CONDITIONING MANIFOLD GAUGE SET AC–17 2702 AuthorĂ: DateĂ: 2000 LEXUS GS300/GS400 (RM718U) MANIFOLD GAUGE SET SET ON 1. CONNECT CHARGING HOSES TO MANIFOLD GAUGE SET Tighten the nuts by hand. CAUTION: Do not connect the wrong hoses. 2. CONNECT QUICK DISCONNECT ADAPTERS TO CHARGING HOSES Tighten the nuts by hand. 3. CLOSE BOTH HAND VALVES OF MANIFOLD GAUGE SET 4. REMOVE CAPS FROM SERVICE VALVE ON REFRIG- ERANT LINES 5. CONNECT QUICK DISCONNECT ADAPTERS TO SER- VICE VALVES HINT: Push the quick disconnect adapter onto the service valve, then slide the sleeve of the quick disconnect adapter downward to lock it.
If you are in need of a repair manual for your 1998 Lexus GS400, look no further. This comprehensive manual is suitable for both professional mechanics and DIY enthusiasts. In the past, traditional paper manuals were the norm, but this accessible digital format offers a more cost-effective and convenient alternative.
Whether you are tackling brake repairs, suspension component replacements, engine troubleshooting, or standard maintenance tasks, this manual provides all the necessary information. It covers a wide range of services including brakes, engine, suspension, steering, drivetrain, electrical systems, heating, and air conditioning.
By utilizing this manual, you can save a significant amount of money on vehicle maintenance. Professional mechanics often charge high fees for their services, making a DIY approach a cost-effective option. The manual is compatible with Windows, Mac computers, smartphones, and tablets, ensuring ease of use across various devices.