LEXUS ES300 2002- FRONT END MASK Section I Installation Preparation Page 1 of 6 pages DIO Rev: A 12/05/01 Part Number: PT218-33021 Section I Installation Preparation Kit Contents Item # Quantity Reqd. Description 1 1 Fender Bumper Piece 2 1 Hood Piece 3 1 Installation Instructions 4 1 Hardware Bag Hardware Bag Contents Item # Quantity Reqd. Description 1 2 Snap/screw 2 2 Washer 3 2 Spring Clip Additional Items Required For Installation Item # Quantity Reqd. Description Conflicts Note: Recommended Tools Safety Tools None Special Tools None Installation Tools Phillips Head Screwdriver Flat Head Screwdriver Scissors Special Chemicals None General Applicability This mask can be installed on ES300 model years 2002 and up. Recommended Sequence of Application Item # Accessory 1 2 3 *Mandatory Legend STOP STOP: Damage to the vehicle may occur. Do not proceed until process has been complied with. OPERATOR SAFETY: Use caution to avoid risk of injury CRITICAL PROCESS: Proceed with caution to ensure a quality installation. GENERAL PROCESS: This highlights specific processes to ensure a quality installation. TOOLS & EQUIPMENT: This calls out the specific tools and equipment required for this process For technical assistance regarding this Toyota product, please call: 1-800-347-1200. Engineered by Toyota to meet cooling requirements. Please follow these installation instructions in the order they are written. It will make installing your custom made mask much easier. Your mask was designed to have a tight fit, and when fully i nstalled it will be snug. Don t be afraid to tug.
LEXUS ES300 2002 - FRONT END MASK Section II Installation Procedure Page 2 of 6 pages DIO Rev: A 12/05/01 Section II Installation Procedure A. Protect the Vehicle 1. Customer Care Information: NOTE: Important, please observe the following precautions, the manufacturer cannot be responsible for damage to paint. i. Area to be covered by mask must be free of dirt. The mask, especially the flannel surface, must be clean. ii. Both car and mask must be completely dry. If moisture is present under mask, and is allowed to dry on the vehicle, it may cause the paint to cloud. If mask gets wet, remove and allow to dry completely before reinstalling. iii. To clean vinyl and flannel backing use a mild soap and water solution. (Approx. one tablespoon of soap per half gallon of water.) Using a cloth or sponge, gently rub soiled area until clean. Take care to rinse with clear water when finished. Repeat if necessary. Hang out to dry, but not in direct sunlight. iv. It is recommended that the mask be removed before washing the vehicle. v. If mask should flap due to high speed or wind conditions, stop car and adjust or remove the mask. 2. Pre-installation Tip: i. Remove mask from package and familiarize yourself with its shape in relation to the contours of the vehicle. NOTE: Mask will be easier to install if it is warmed before installation. STOP
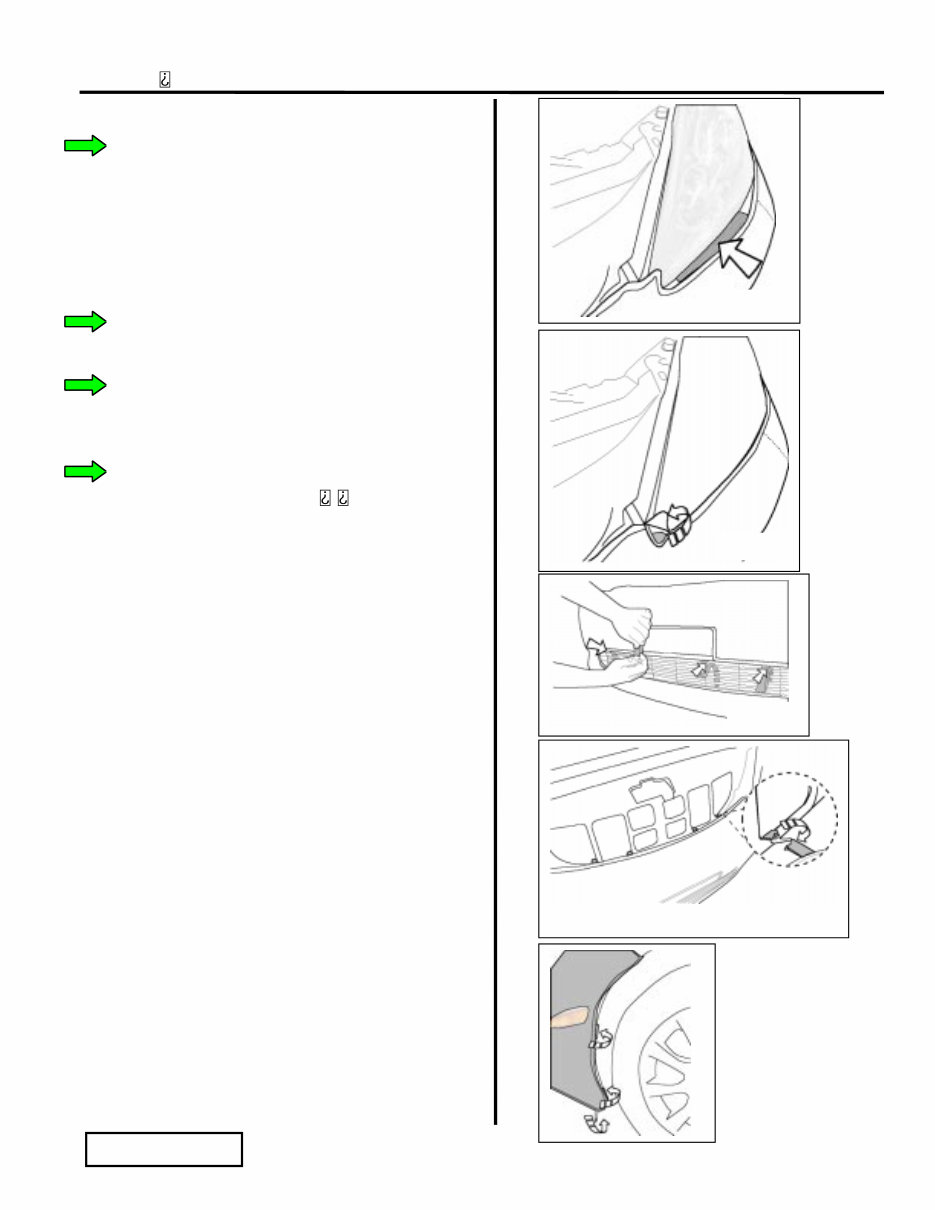
LEXUS ES300 2002 - FRONT END MASK Section II Installation Procedure Page 3 of 6 pages DIO Rev: A 12/05/01 B. Hardware Installation NOTE: Turning the wheels eases the next operation. 1. Remove the plastic fastener installed in vehicle wheel well area with flat head screwdriver. Take care not to scratch body panel (protect panel/screwdriver.) (Fig. B-1.) 2. Pull back the plastic fender liner and install the spring clip over the fender tab by aligning the hole in the clip with the hole in the tab. Reinstall the plastic fender liner over the spring clip. Install the snap/screw and washer into the spring clip (Fig. B-2.) Repeat on opposite side of vehicle. C. Hood Piece Installation 1. Open hood to install hood piece. 2. Tuck the flaps all the way around the side of the grill (Fig. C-1.) 3. At the top of the hood attach (2) elastics with S hooks to openings on each side of the grill (Fig. C2.) At the bottom of the hood, attach (2) elastic straps with S hooks to holes at sides of hood (Fig. C-3.) IMPORTANT : Pull the elastic strap toward you; NEVER away from you. D. Bumper Piece Installation NOTE BEFORE INSTALLATION: If your state requires a license plate on the front of your vehicle, use scissors to cut just the stitching that attaches the license plate flap to the mask (Fig. D1.) 1. With hood open, place plastic flap into the opening in the fender next to the headlight (Fig. D-2.) Tuck flap underneath the fender flange. 2. Attach snap at top of wheel well to previously installed snap/screw hardware. (Fig. D-3.) Fig. C-1 Fig. C-2 Fig. C-3 Fig. D-2 Fig. D-3 Fig. D-1 Scissors Fig. B-2 Phillips Head Screwdriver Fig. B-1 Flat Head Screwdriver STOP
LEXUS ES300 2002 - FRONT END MASK Section II Installation Procedure Page 4 of 6 pages DIO Rev: A 12/05/01 3. Repeat steps 1 and 2 on other side of vehicle. 4. Place (1) plastic flap between the bumper fascia and the headlight (Fig. D4.) Repeat on other side of vehicle. 5. At each corner of the bumper top, near the inside edge of the headlight, place the pocket over the corner. (Fig. D-5.) 6. At the top of the intake place (4) elastics with hooks through the intake (Fig. D-6.) 7. Pull the (4) top intake elastics up to the top of the bumper and attach the hooks to the (4) loops at the top of the mask. (Fig. D-7.) 8. Attach (2) plastic clips to the side of the wheel well and (1) elastic with S hook to the bottom of the wheel well. (Fig. D-8.) Fig. D-4 Fig. D-5 Fig. D-6 Fig. D-7 Fig. D-8
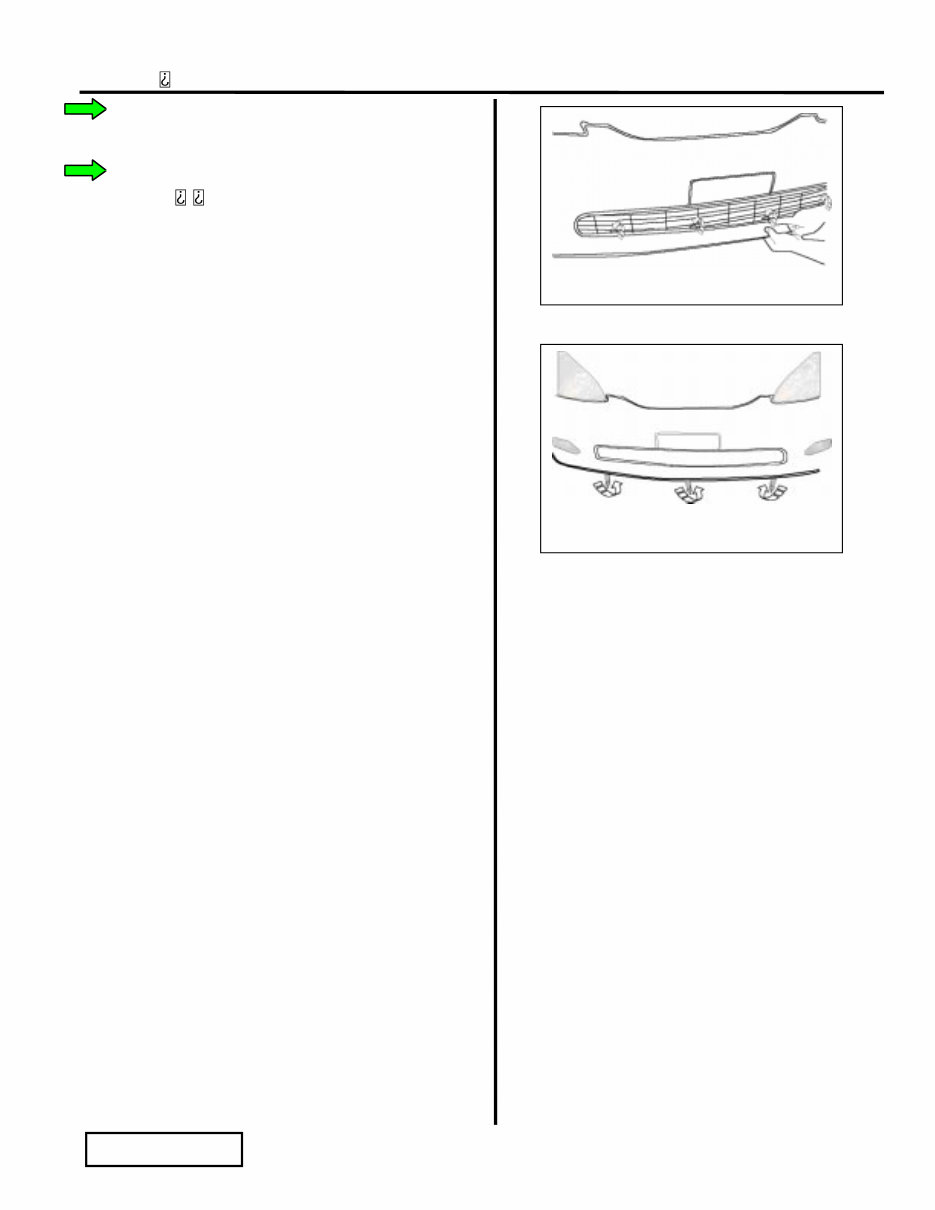
LEXUS ES300 2002 - FRONT END MASK Section II Installation Procedure Page 5 of 6 pages DIO Rev: A 12/05/01 9. At the bottom of the intake attach (4) plastic clips to the edge of the intake. (Fig. D-9.) 10. Underneath the vehicle, attach the elastics with S hooks to the edge of the bumper. (Fig. D-10.) E. Installation Instructions 1. Place installation instructions in glove box for future reference. Fig. D-9 Fig. D-10
LEXUS ES300 2002 - FRONT END MASK Section III Functional Verifications Section III Functional Verifications Check: Look For: Page 6 of 6 pages DIO Rev: A 12/05/01 Correct part number has been installed. Vehicle and mask are free of dirt Vehicle and mask are dry Mask is properly adjusted Mask has proper fit Verify part number on package. Verify that there are no smudges or dirt particles Verify that any area that may have been wet is completely dry. Verify that headlights, markers, turn signals, cooling intakes and ducts are unobstructed. Verify that there is no flapping and the mask fits tightly.
If you are in need of a repair manual for your 2006 Lexus ES330, look no further. Our convenient repair manual software provides all the necessary service information for both professional mechanics and DIY enthusiasts. In the past, traditional paper manuals were costly and inconvenient. Our accessible software format offers a more affordable and user-friendly alternative.
Whether you are looking to address brake issues, replace suspension components, troubleshoot engine problems, or perform standard maintenance, this repair manual software has you covered. It includes comprehensive information on brakes, engine, suspension, steering, drivetrain, electrical systems, heating, air conditioning, and more.
By utilizing this software, you can save a significant amount of money on vehicle repairs. Mechanics often charge high fees for their services, making a DIY approach a cost-effective solution. The 2006 Lexus ES330 repair manual software is designed for easy use and is compatible with Windows, Mac computers, smartphones, and tablets.