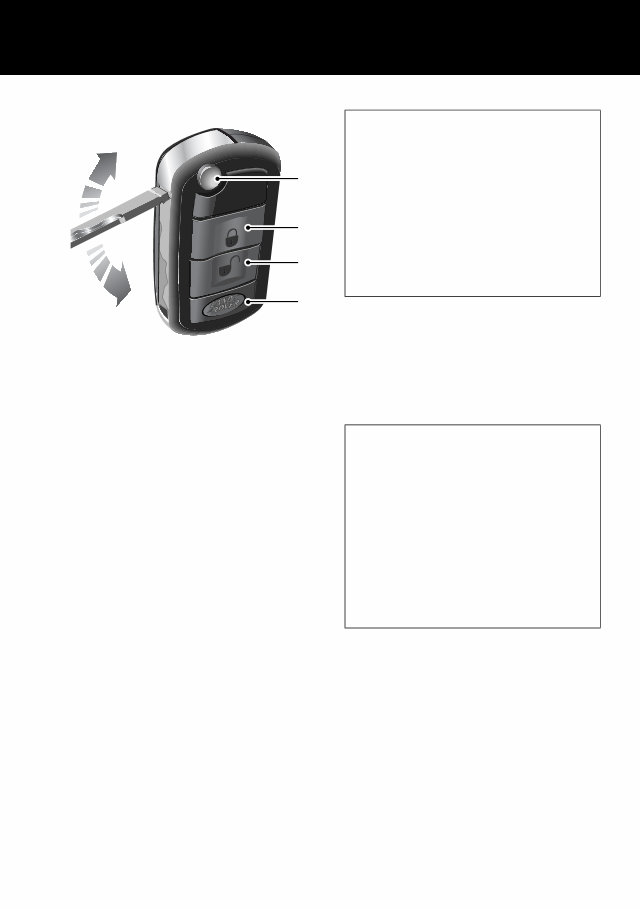
7 Quick Start Quick Start THE REMOTE CONTROL 1. Key release button. Press to release the folded key. 2. Lock button. Superlocks all doors and activates perimetric alarm. If interior space protection and tilt sensor options are fitted, they can be over-ridden by pressing the button twice within 3 seconds. See Superlocking, 44, Perimetric alarm, 44, Interior space protection, 46, and Tilt sensor, 46. 3. Unlock button. Press once to disarm all alarm features and unlock driver’s door only. Press twice to open all doors. Note: The above applies unless configured for multi-point entry. See Single-point entry, 42. 4. Land Rover button. The remote control can be programmed to initiate one of 5 features; Panic alarm, Headlamp courtesy delay, Tailgate release, Tailglass release or Air suspension control. See LAND ROVER BUTTON, 40. Automatic relock If the vehicle is unlocked with the remote control, it will automatically relock and arm the alarm if a door or the tailgate is not opened within one minute. LAN0114G 1 2 3 4 Single point entry This is a security feature that unlocks only the driver’s door. It can be disabled on individual remote controls by simultaneously pressing and holding buttons 2 and 3 for three seconds. The vehicle will lock and then unlock in the currently selected mode to confirm the change. You can now unlock all doors with a single press. Repeating the procedure will re-enable Single point entry. Partial arming If an aperture (door, bonnet or tailgate) is not fully closed when the remote control lock button is pressed, the horn will sound briefly to signal that an aperture is still open. The alarm will remain disarmed and all of the closed apertures will lock. As soon as the open aperture is closed, the system will automatically arm, signalled by three flashes of the hazard warning lamps, with interior space protection activating 30 seconds later.
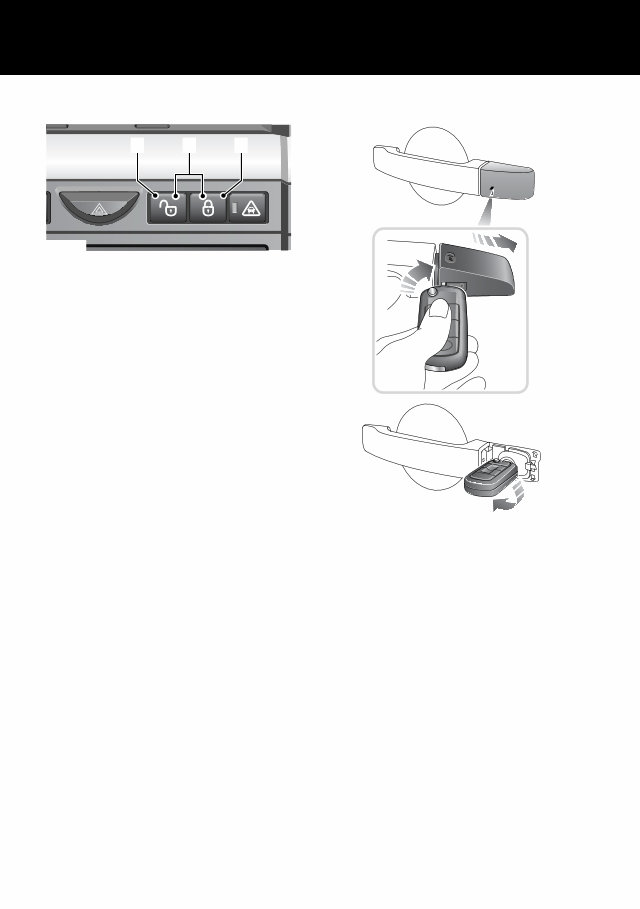
8 Quick Start CENTRAL LOCKING Master lock and unlock switches 1. Press to unlock all doors and tailgate. 2. Press to lock all doors and tailgate. 3. Press both buttons simultaneously for three seconds to release the tailgate. Speed related locking If enabled, the doors and tailgate will automatically lock when the vehicle’s speed exceeds 8 km/h (5 mph). This feature can be disabled or enabled in the SETTINGS menu of the trip computer. See SELECTING SETTINGS OPTION, 88. EMERGENCY UNLOCKING If the remote control should fail, there is an emergency access feature on the left-hand front door lock. With the key inserted into the slot beneath the handle cap, the cap can be pulled outwards slightly and then moved backwards to unhook it. The key can now be used to unlock the vehicle. See Emergency locking/unlocking, 49. LAN0121N 1 2 3 LAN0116G
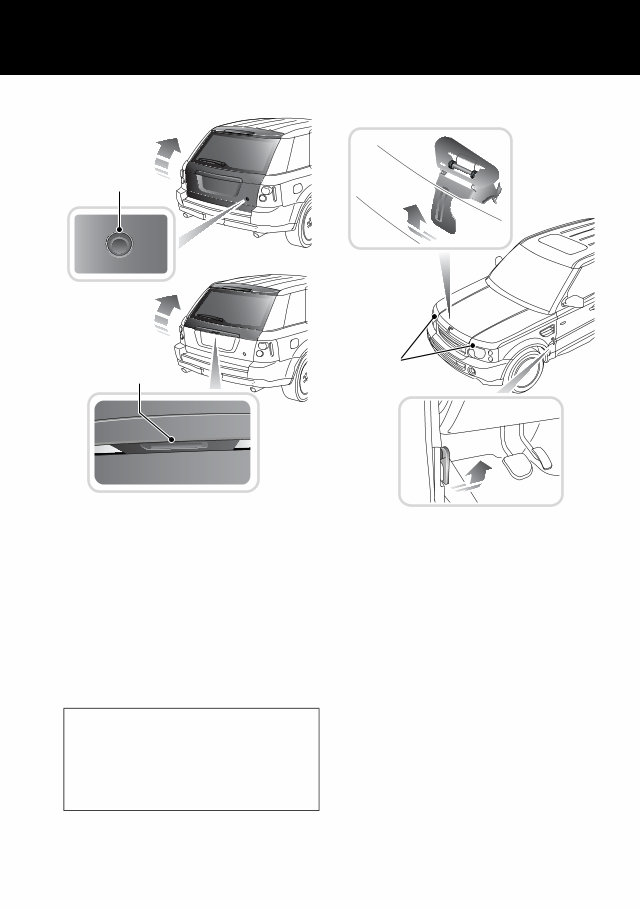
9 Quick Start TAILGATE Opening the tailgate With all the doors unlocked, press the release button 1 on the tailgate to release. The tailgate incorporates a ‘Power closure’ feature, which removes the need to ‘slam’ the tailgate when closing. Opening the tailglass With all the doors unlocked, press the touch pad 2 on the exterior handle and pull to open. BONNET Opening Pull the bonnet release lever 1 located on the left-hand side of the vehicle. Lift the bonnet safety catch lever 2, located on the front edge of the bonnet beneath the centre point of the words LAND ROVER and raise the bonnet. Closing Lower the bonnet until it is 300 mm (12 inches) from its closed position. Using the palms of both hands positioned on the front edge of the bonnet on either side of the radiator grille, push down until the catches ‘click’. Check that both catches 3 are engaged by trying to lift the front edge of the bonnet. Operating note If the vehicle is locked/unlocked 10 times within a short period, the door and tailgate latches will be disabled for approximately one minute, to protect the battery and lock mechanism. LAN0394G 1 2 LAN0395G 3 1 2
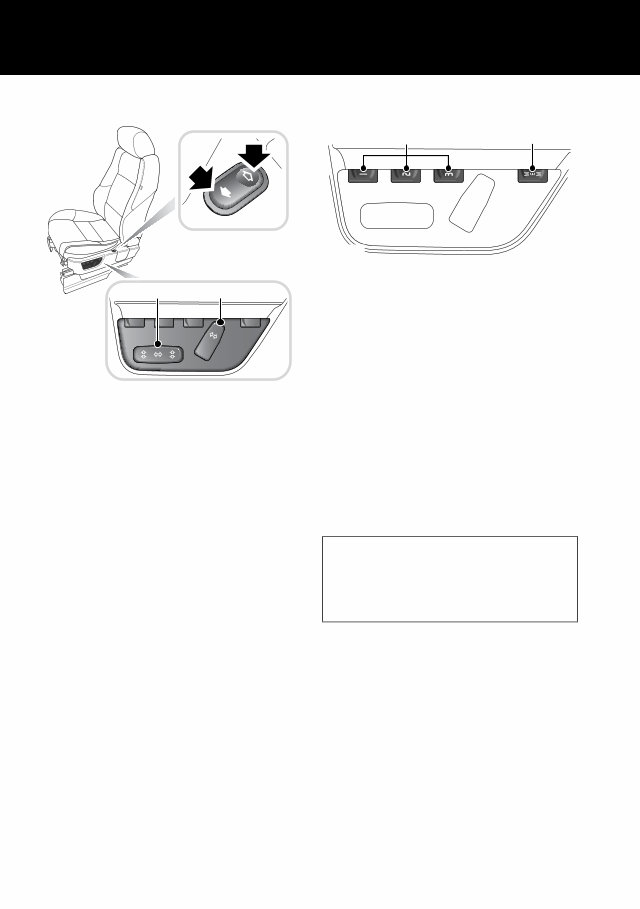
10 Quick Start SEAT ADJUSTMENT - POWER SEATS To adjust the seats, the starter switch must be in position I or II. 1. Seat recline. 2. Seat fore/aft, cushion height and front tilt control. 3. Lower backrest lumbar support. Power operated memory driver’s seat also has a 10 minute active period (Non-memory power operated seats up to 15 minutes) initiated when: • The driver’s door is opened/closed. • The starter key is turned to the off position. See FRONT SEAT ADJUSTMENT, 54. DRIVING POSITION MEMORY Once you have adjusted the driver’s seat and exterior mirrors, the vehicle can memorise these settings for future use. 1. Press the memory store button 1 to activate the memory function for five seconds. 2. Press one of the preset buttons 2 within five seconds to memorise the current settings. MEMORY STORED will be displayed in the message centre accompanied by an audible chime to confirm the settings have been memorised. To recall a stored driving position, press the appropriate preset button 2. Lazy entry When this feature is enabled, the vehicle stores the seating and mirror positions for each remote control. Next time the vehicle is unlocked using a remote control, the position of the seat and mirrors will adjust to the last used position. This feature can be disabled or enabled in the Settings option accessed via the trip computer. 3 LAN0396G 2 1 Operating note A seat position will only be memorised during the five second active period. Any existing settings will be over-written when programming a memory position. LAN0397G 2 1
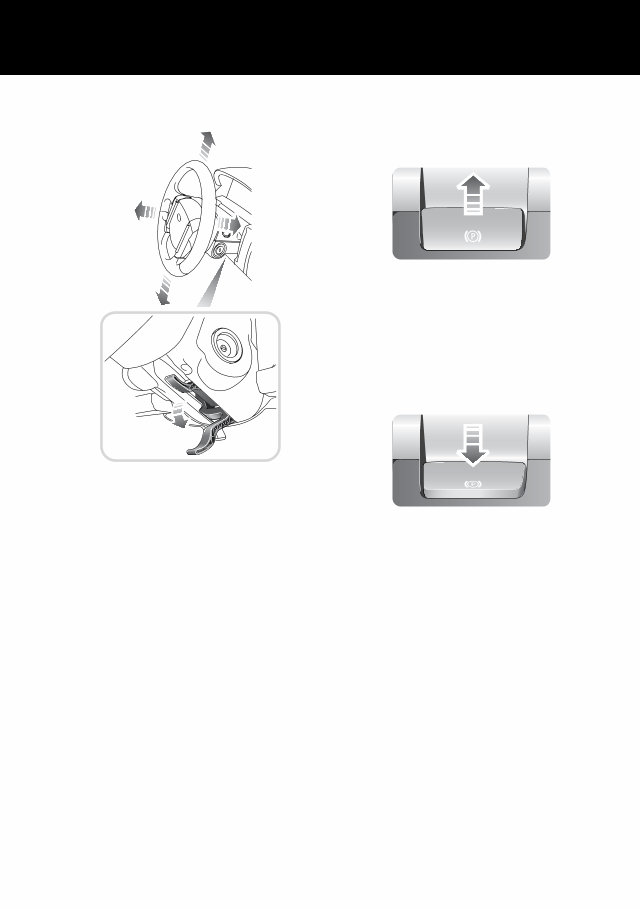
11 Quick Start STEERING COLUMN ADJUSTMENT 1. Move the lever located under the steering wheel fully downward. 2. Adjust the height and reach of the steering wheel to the desired position. 3. Move the lever fully up to lock the position of the wheel. See STEERING COLUMN ADJUSTMENT, 81. PARKBRAKE (EPB) Applying With the vehicle stationary, pull up the parkbrake leverand then release it. The lever will return to a neutral position and the red warning indicator in the instrument pack will illuminate. Releasing The starter switch must be in position I or II. Apply the footbrake and press down on the parkbrake lever. If the vehicle is stationary with the parkbrake applied and either D (Drive) or R (Reverse) selected, pressing the accelerator will automatically release the parkbrake. For more detailed information on the parkbrake, see PARKBRAKE (EPB), 177. LAN0398G LAN0406G LAN0407G
Get your hands on the 2005-2012 Land Rover Range Rover Sport Service & Repair Manual for comprehensive guidance on fixing vehicle issues. Whether you're a professional mechanic or a DIY enthusiast, this manual equips you with the manufacturer's recommended troubleshooting charts and replacement procedures, complete with step-by-step instructions, clear images, and exploded-view illustrations.
Regular maintenance is essential for the durability of your vehicle. Over time, certain parts will wear out and require replacement. This manual provides you with everything you need to address these issues, ultimately saving on repairs, enhancing your vehicle's reliability, and reducing trips to the repair shop.
Conveniently formatted in .pdf, this manual is easily accessible and printable, making it suitable for use on various electronic devices, including PC, Mac, Android, and Apple smartphones and tablets. Simply ensure you have Adobe Reader (free) installed for seamless access to this valuable resource.
Don't waste time searching through countless pages or dealing with greasy, torn, or lost pages. Embrace the convenience of digital access, allowing you to carry, search, screenshot, and bookmark the manual with ease. If you prefer a physical copy, you can also print it out for reference.
Recently Viewed
5,521,897Happy Clients
2,594,462eManuals
1,120,453Trusted Sellers
15Years in Business
Price:
Actual Price:
2005-2012 Land Rover Range Rover Sport Service & Repair Manual