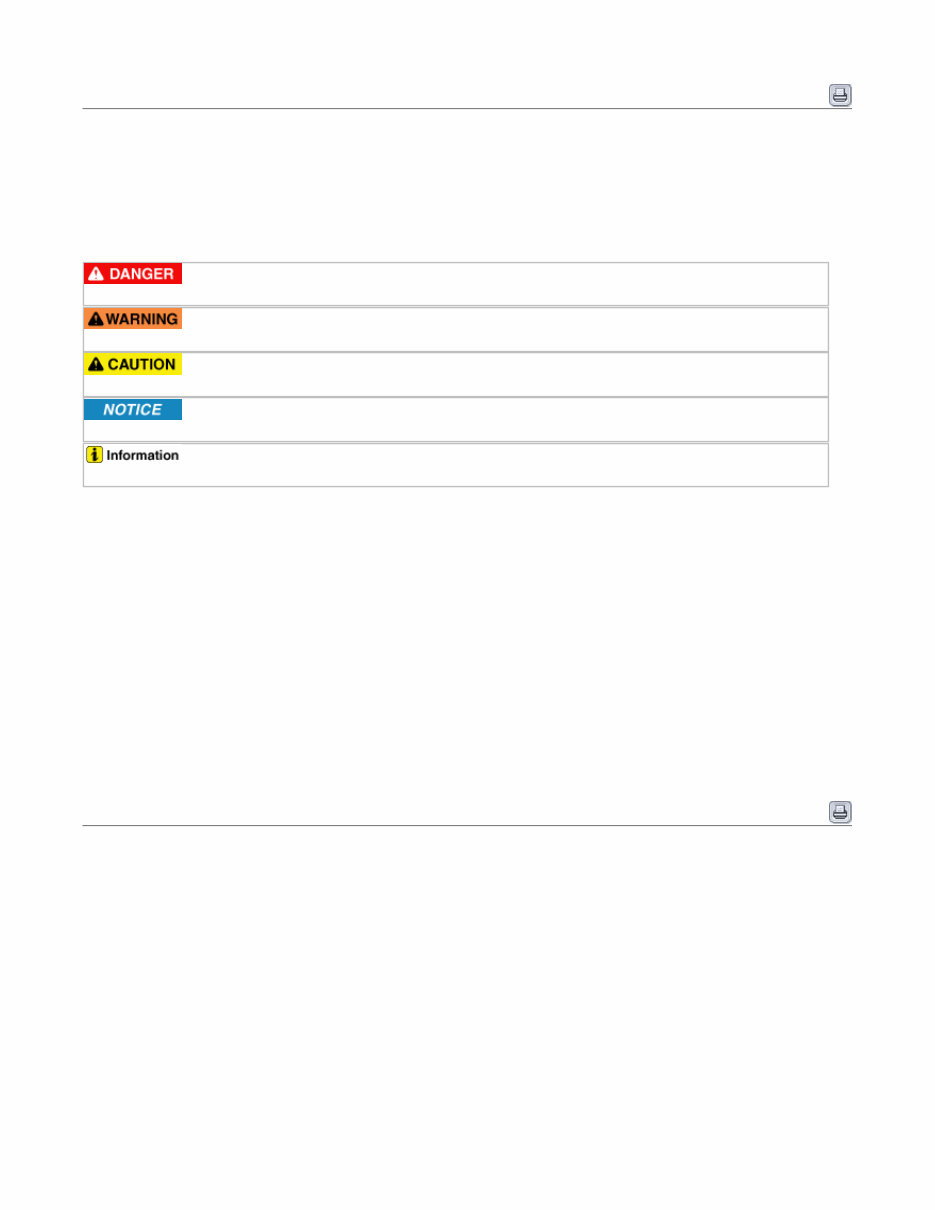
General Information General Information Important Safety Notice Proper service methods and repair procedures are essential for safe, reliable operation of all motor vehicles as well as personal safety of the operator. The service procedures and descriptions in this shop manual provide general directions for a service and repair. Procedure, techniques, tools, and parts for service including the skill of the technician vary. It is impossible to provide advice or caution as to each case in this manual. Accordingly, anyone who intends to use a replacement part, service procedure, or tool, which is not recommended by the vehicle manufacturer, must first assure thoroughly that neither their personal safety nor the safe operation of the vehicle will be first jeopardized by the replacement part, service procedure, or tool they select. Reminds you to be especially careful in those areas where carelessness will cause death or serious injury. Reminds you to be especially careful in those areas where carelessness may cause death or serious injury. Reminds you to be especially careful in those areas where carelessness may cause personal injury. Gives you information that will prevent you from making errors that could damage the vehicle. Gives you added information that will help you complete a particular procedure. The following list contains some general WARNINGS that you should follow while working on a vehicle. • Always wear safety glasses for eye protection. • Use safety stands whenever a procedure requires you to be under the vehicle. • Make sure that the ignition switch is always in the OFF position, unless otherwise required by the procedure. • Set the parking brake when working on the vehicle. If you have an automatic transaxle, set in park unless instructed otherwise for a specific operation. • Place supporters against the front and rear surfaces of the tires to help prevent the vehicle from moving. • Operate the engine only in a well-ventilated area to avoid the danger of carbon monoxide poisoning. • Keep yourself and your clothing away from moving parts when the engine is running, especially the drive belts. • To prevent serious burns, avoid contact with hot metal parts such as the radiator, exhaust manifold, tail pipe, catalytic converter and muffler. • Do not smoke while working on a vehicle. • To avoid injury, always remove rings, watches, loose hanging jewelry, and loose clothing before beginning to work on a vehicle. • When it is necessary to work under the hood, keep hands and other objects clear of the radiator fan blades! Your vehicle may be equipped with a cooling fan that may turn on, even though the ignition switch is in the OFF position. For this reason care should be taken to ensure that the radiator fan electric motor is completely disconnected when working under the hood and the engine is not running. Identification Number Page 1 sur 22
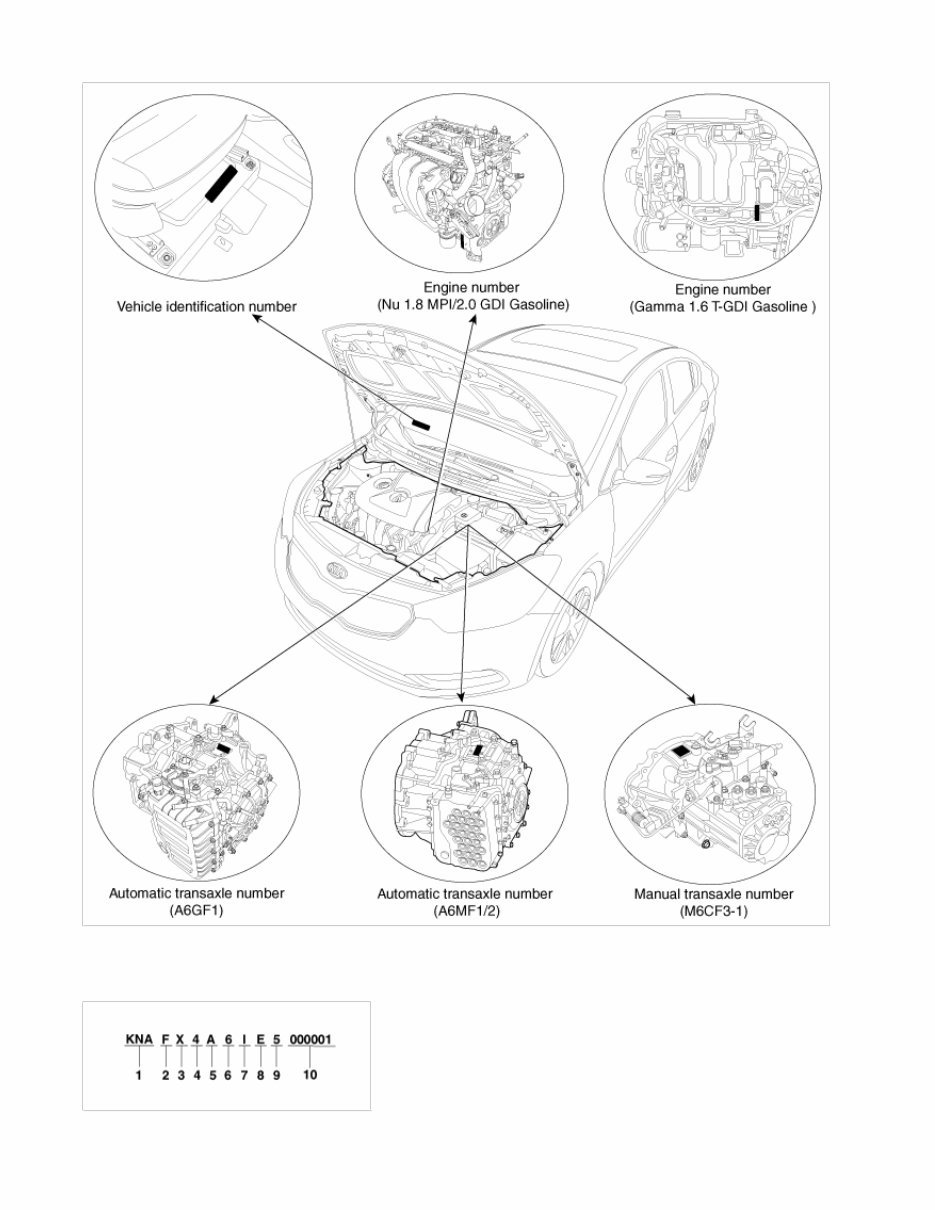
Identification Number Description Vehicle Identification Number Page 2 sur 22
1. World Manufacturer Identifier (WMI) - KNA : Passenger vehicle, MPV(Multipurpose Passenger Vehicle)/SUV(Sports Utility Vehicle)/RV(Recreational Vehicle) - KNC : Commercial vehicle (Van) - KND : MPV/SUV/RV (For U.S.A, Canada, Mexico) - KNH : Van 2. Vehicle line - F : FORTE 3. Model & Series - J : Low grade (L) - K : Middle-Low grade (GL) - X : Middle grade (GLS, JSL, TAX) - Y : Middle-High grade (HGS) - Z : High grade (TOP) 4. Body/Cabin type, Gross Vehicle Weight Rating KNA - 1 : Limousine - 2 : Sedan - 2 door - 3 : Sedan - 3 door - 4 : Sedan - 4 door - 5 : Sedan - 5 door - 6 : Coupe - 7 : Convertible - 8 : Wagon - 9 : Commercial Van - 0 : Pick-Up KNC (Commercial vehicle / Van) Except U.S.A, Canada, Mexico, Gulf Cooperation Council, China - X : Standard Cabin / Semi-Bonnet - Y : Double Cabin / Bonnet - Z : Super Cabin / Box For U.S.A, Canada, Mexico, Gulf Cooperation Council, China - 2 : Standard Cabin Class-H 4×2 - 3 : Standard Cabin Class-E 4×2 / Semi-Bonnet Class-E 4×2 - 4 : Standard Cabin Class-E 4×4 / Semi-Bonnet Class-E 4×4 - 5 : Standard Cabin Class-F 4×2 / Semi-Bonnet Class-F 4×2 - 6 : Standard Cabin Class-F 4×4 / Semi-Bonnet Class-F 4×4 - 7 : Double Cabin Class-E 4×2 / Bonnet Class-E 4×2 - 8 : Double Cabin Class-E 4×4 / Bonnet Class-E 4×4 - 9 : Double Cabin Class-F 4×2 / Bonnet Class-F 4×2 - 0 : Double Cabin Class-F 4×4 / Bonnet Class-F 4×4 - A : Super Cabin Class-E 4×2 / Box Class-E 4×2 - B : Super Cabin Class-E 4×4 / Box Class-E 4×4 - C : Super Cabin Class-F 4×2 / Box Class-F 4×2 - D : Super Cabin Class-F 4×4 / Box Class-F 4×4 KND - 1 : Wagon 4×2 Class-A - 2 : Wagon 4×2 Class-B - 3 : Wagon 4×2 Class-C - 4 : Wagon 4×2 Class-D - 5 : Wagon 4×2 Class-E - 6 : Wagon 4×2 Class-F - 7 : Wagon 4×2 Class-G - A : Wagon 4×4 Class-A - B : Wagon 4×4 Class-B - C : Wagon 4×4 Class-C - D : Wagon 4×4 Class-D - E : Wagon 4×4 Class-E - F : Wagon 4×4 Class-F Page 3 sur 22
- G : Wagon 4×4 Class-G KNH - 1 : Box - 2 : Bonnet - 3 : Semi-Bonnet 5. Restraint system, Brake system KNA, KND Except U.S.A, Canada, Mexico - 0 : Both side - None - 1 : Both side - Active belt - 2 : Both side - Passive belt For U.S.A, Canada, Mexico Code Seat belt Front air bag Knee air bag Side air bag Curtain air bag Driver's Passenger's Driver's Passenger's 1st row 2nd row 3rd row 1st row 2nd row 3rd row A ○ ○ ○ × × ○ × × ○ ○ × B ○ ○ ○ × × × × × × × × C ○ ○ ○ × × ○ × × ○ ○ ○ D ○ ○ ○ × × ○ ○ × ○ ○ × E ○ ○ × × × × × × × × × F ○ ○ ○ × × ○ × × × × × J ○ ○ ○ ○ × ○ ○ × ○ ○ × L ○ ○ ○ ○ × ○ × × ○ ○ × N ○ × × × × × × × × × × H ○ ○ ○ ○ × ○ × × ○ ○ ○ KNC, KNH Except U.S.A, Canada, Mexico - 7 : Hydraulic brake system - 8 : Pneumatic brake system - 9 : Mixed brake system For U.S.A, Canada, Mexico - X : Hydraulic brake system - Y : Pneumatic brake system - Z : Mixed brake system 6. Engine type - 3 : Gasoline engine 1.6 T-GDI (Gamma) - 6 : Gasoline engine 1.8 MPI (Nu) - 8 : Gasoline engine 2.0 GDI (Nu) 7. Check digit or Driver’s side & Transmission Except U.S.A, Canada, Mexico, Gulf Cooperation Council, China, Yemen - A : LHD & MT - B : LHD & AT - C : LHD & MT+Transfer - D : LHD & AT+Transfer - E : LHD & CVT - F : LHD & Decelerator - G : LHD & DCT - L : RHD & MT - M : RHD & AT - N : RHD & MT+Transfer - S : RHD & AT+Transfer - T : RHD & CVT - U : RHD & Decelerator - V : RHD & DCT For U.S.A, Canada, Mexico, Gulf Cooperation Council, China, Yemen - Check digit : 0 ~ 9, × 8. Model year Page 4 sur 22
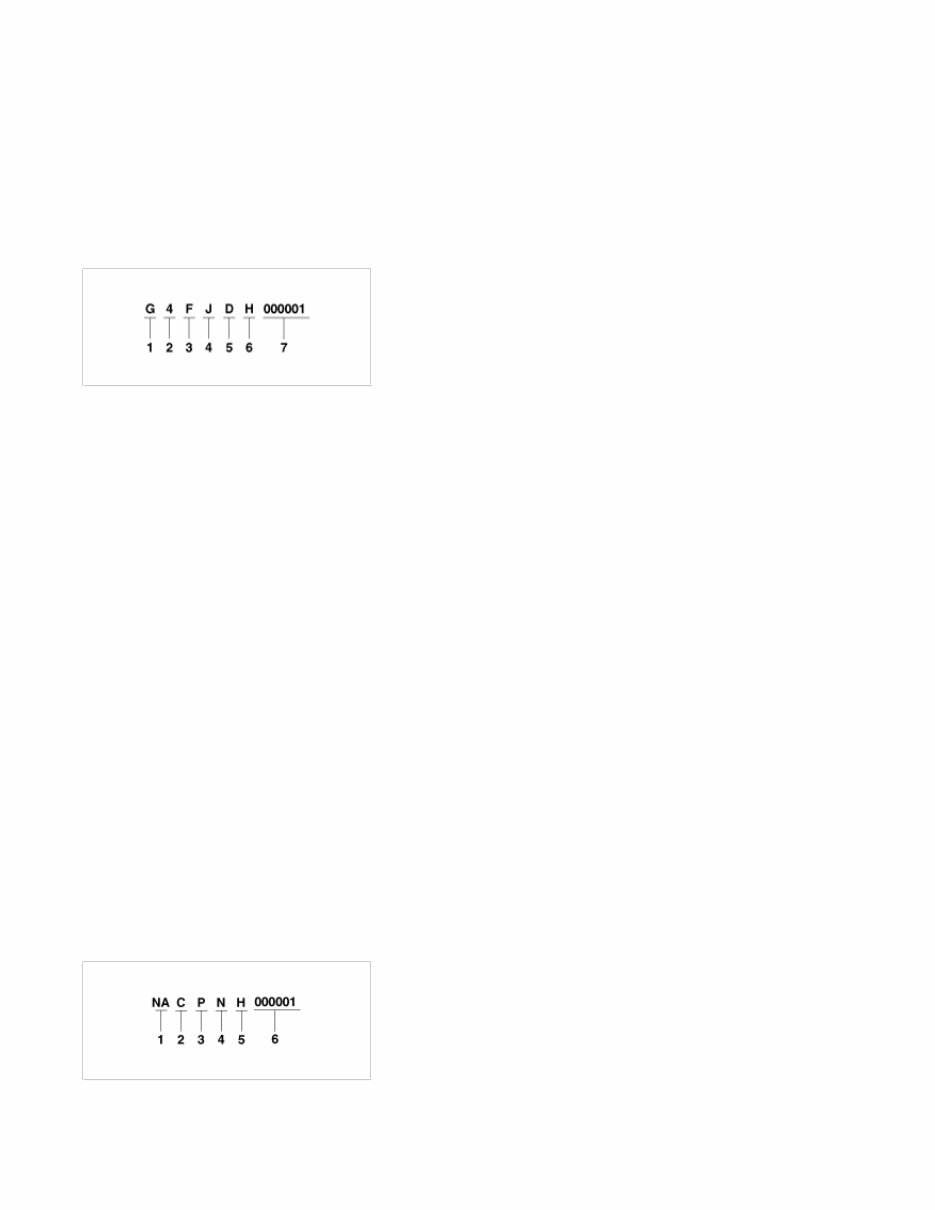
- D : 2013, E : 2014, F : 2015, G : 2016 … 9. Plant of production - 5 : Hwasung (Korea) - 6 : Sohari (Korea) - 7 : Kwangju (Korea) - T : Seosan (Korea) 10. Vehicle production sequence number - 000001 ~ 999999 Engine Number 1. Engine fuel - G : Gasoline 2. Engine range - 4 : 4 cycle 4 cylinder 3. Engine development order and capacity - F : Gamma engine (Gasoline) - N : Nu engine (Gasoline) 4. Engine Capacity - J : 1591cc (Gamma T-GDI) - B : 1797cc (Nu MPI) - C : 1999cc (Nu GDI) 5. Production year - D : 2013, E : 2014, F : 2015, G : 2016 … 6. Plant of production - A : Asan (Korea) - B : Beijing (China) - H : Hwasung (Korea) - K : Montgomery (U.S.A) - M : Chennai (India) - P : Poseung (Korea) - S : Sohari (Korea) - T : Izmit (Turkey) - U : Ulsan (Korea) - W : Shandong (China) - Z : Zilina (Slovakia) - 1 : Yancheng (China) 7. Engine production sequence number - 000001 ~ 999999 Transaxle Number Automatic (A6GF1, A6MF1, A6MF2) 1. Model - NA : A6GF1 Page 5 sur 22
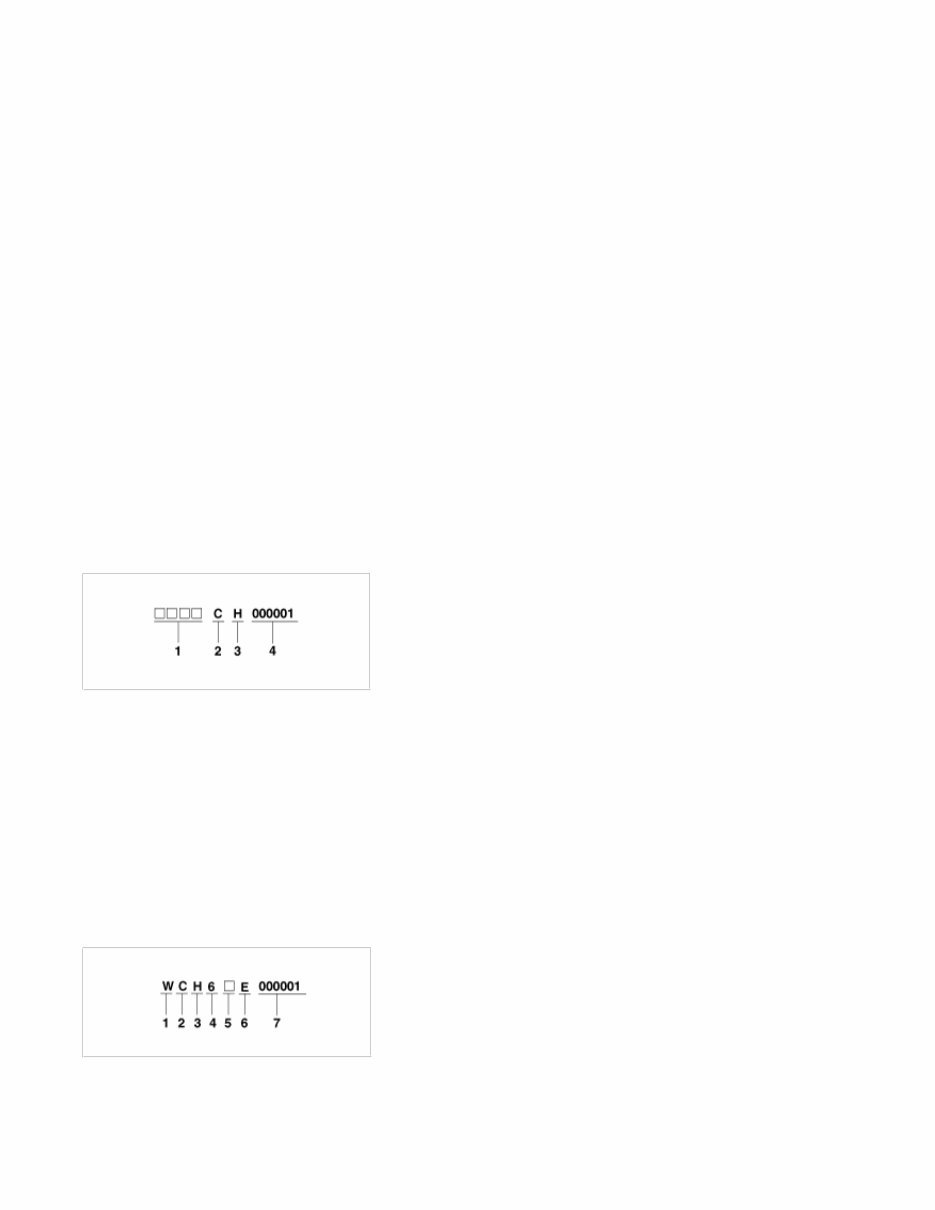
- EA : A6MF1 - EJ : A6MF1 - FA : A6MF2 - FJ : A6MF2 2. Production year - C : 2012, D : 2013 , E : 2014, F : 2015... 3. Final gear ratio - R : 3.612 (A6GF1), 3.195 (A6MF1) - P : 3.064 (A6MF1) - H : 3.648 (A6MF2) 4. Detailed classification - A : Gamma 1.6 T-GDI, Nu 2.0 GDI TC - C : Nu 1.8 MPI - D : Nu 1.8 MPI (ISG) - F : Nu 2.0 GDI TC - G : Nu 2.0 GDI - L : Nu 2.0 GDI - N : Nu 1.8 MPI TC - P : Nu 1.8 MPI TC (ISG) 5. Plant of production - 2 : HPT Plant 2 - 4 : HPT Plant 4 - U : Ulsan Plant 1 - S : Ulsan Plant 2 - H : Hwasung Manual (M6CF1) 1. Assembly code of plant 2. Production year - C : 2012, D : 2013 , E : 2014, F : 2015... 3. Plant of production - B : Beijing (China) - H : Hwasung (Korea) - J : Ostrava (Chech) - M : Chennai (India) - U : Ulsan (Korea) - W : Wia 4. Transaxle production sequence number - 000001 ~ 999999 Manual (M6CF3-1) 1. Model - W : M6CF3-1 2. Production year Page 6 sur 22
General Information - C : 2012, D : 2013 , E : 2014, F : 2015... 3. Plant of production - B : Beijing (China) - J : Ostrava (Chech) - M : Chennai (India) - U : Ulsan (Korea) - W : Hwasung 4. Speed 5. Spare 6. Final gear ratio - E : 4.188 - K : 4.333 - L : 4.467 7. Transaxle production sequence number - 000001 ~ 999999 Paint Code Code Color UD Clear White SWP Snow White Pearl 3D Bright Silver ABP Aurora Black K3G Glittering Metal K3N Golden Beat D7U Planet Blue K3U Abyss Blue K3R Temptation Red M9Y Milky Beige Warning And Caution Labels Page 7 sur 22
1. Fan caution 2. Radiator cap caution 3. Battery caution Battery Caution Label Page 8 sur 22
Warning / Caution Label (Cont'd) A. Keep lighted cigarettes and all other flames or sparks away from the battery. B. Wear eye protection when charging or working near a battery. Always provide ventilation when working in an enclosed space. • When lifting a plastic-cased battery, excessive pressure on acid to leak resulting in personal injury. Lift with a battery carrier or with your hands on opposite corners. • Never attempt to change the battery when the battery cables are connected. • The electrical ignition system works with high voltage. Never touch these components with the engine running or the ignition switched on. C. Keep batteries out of the reach of children because batteries contain highly corrosive SULFURIC ACID. Do not allow battery acid to contact your skin, eyes, clothing or paint finish. D. If any electrolyte gets into your eyes, flush your eyes with clean water for at least 15 minutes and get immediate medical attention. If possible, continue to apply water with a sponge or cloth until medical attention is received. If electrolyte gets on your skin, throughly wash the contacted area. If you feel a pain or a burning sensation, get medical attention immediately. E. Always read the following instructions carefully when handing a battery. F. Hydrogen, which is a highly combustible gas, is always presents in battery cells and may explode if ignited. G. An improperly disposed battery can be harmful to the environment and human health. Always confirm local regulations for battery disposal. Handling And Storage The Battery Battery Itself • Page 9 sur 22
General Information Batteries should be stored in cool, dry (27 degrees Celsius) places and out of direct sunlight. • MF batteries are tightly sealed to prevent acid leakage. However, tilting the battery to an angle of 45 degrees can cause acid to leak through the vents on the sides. Therefore, batteries should always be stored in their upright positions. Prevent placing any aqueous or solid (i.e. conductors) bodies on top of the battery. • It is extremely dangerous to use tools, such as hammers, on the battery terminals when connecting cables to the mounted battery. Battery on Vehicle • When storing the vehicle for long periods of time, make sure to remove the memory fuse at junction box to prevent natural discharging. • Also, run the engine for battery charging within 1 month if the memory fuse wasn't removed from the start of vehicle storing. If the memory fuse was removed, run the engine for battery charging within 3 months from the start of vehicle storing. After reconnecting or recharging a discharged battery, the ESC OFF indicator may illuminate. In this case, turn the handle half way to the left and right whilst the ignition switch is in the ON position. Then, restart the engine after the ignition is OFF. The ESC OFF indicator may turn OFF. If the ESC OFF indicator does not turn OFF, have the system checked refering to DTC. Lift And Support Points When heavy rear components such as suspension, fuel tank, spare tire, tailgate and trunk lid are to be removed, place additional weight in the luggage area before hoisting. When substantial weight is removed from the rear of the vehicle, the center of gravity may change and can cause the vehicle to tip forward on the hoist. • Since each tire/wheel assembly weights approximately 14kg (30lbs), placing the front wheels in the luggage area can assist with the weight distribution. • Use the same support points to support the vehicle on safety stands. 1. Place the lift blocks under the support points as shown in the illustration. 2. Raise the hoist a few inches (centimeters) and rock the vehicle to be sure it is firmly supported. 3. Raise the hoist to full height to inspect the lift points for secure support. Page 10 sur 22
You're Reading a Preview
What's Included?
Lifetime Access
Fast Download Speeds
Online & Offline Access
Access PDF Contents & Bookmarks
Full Search Facility
Print one or all pages of your manual
$31.99
2015 Kia Forte Koup 1.8L MPI Service & Repair Manual
The Kia Forte Koup 2015 1.8L MPI Workshop Service Manual for Repair is an essential resource for both professional mechanics and DIY enthusiasts. It provides comprehensive data, characteristics, instructions, and methodology for performing repair interventions on the vehicle and its components.
Key features of this manual include:
Special notes, important points, service data, precautions, etc. needed for maintenance, adjustments, service, removal, and installation of vehicle components for Kia Forte Koup 2015 1.8L MPI.
The most detailed, comprehensive step-by-step procedures, explanations, and pictorial diagrams from bumper to bumper.
Detailed illustrations, exploded diagrams, drawings, and photos to guide through every service repair procedure.
Reference to service tool numbers and associated illustrations depicting the tools for Kia Forte Koup 2015 1.8L MPI.
This service manual is designed for viewing on any computer, allowing zooming and printing. It has been specially prepared to ensure that even relatively new personnel can give satisfactory after-services to customers, as well as disassemble and maintain the vehicle.
It includes general descriptions for accomplishing service and repair work with tested, effective techniques, and information on construction, function, troubleshooting, servicing specifications, tightening torque, checking and adjusting, disassembling and assembling, and servicing procedures.
The manual also provides valuable information on adjusting work and reference data for adjustment values. It is important to strictly observe all accident prevention guidelines and use the correct tools and fixtures for all maintenance and repair work on Kia Forte Koup 2015 1.8L MPI.
To maximize the life of the vehicle, it is crucial to follow the maintenance requirements, investigate and rectify problems promptly, use genuine parts, follow procedures carefully, keep complete records of all maintenance and repairs, and use approved lubricants as specified in the manual.
This Kia Forte Koup 2015 1.8L MPI Workshop Service Manual for Repair is known by various names, including service manual, repair manual, workshop manual, and shop manual. It is designed to be used by trained technicians in a properly equipped workshop, but contains enough detail and basic information to be useful to owners who desire to perform their own basic maintenance and repair work.
For all maintenance and repair work, it is essential to strictly observe all accident prevention guidelines and use the necessary hand and special service tools to complete the job. A basic knowledge of mechanics, including the proper use of tools and workshop procedures, is necessary to carry out maintenance and repair work satisfactorily.
This manual is a 100% complete and intact quality resource, providing technical information regarding the design, function, disassembly, adjusting work, and troubleshooting on the components and model of the Kia Forte Koup 2015 1.8L MPI.
It is important to follow the procedures outlined in this manual carefully and completely, without taking shortcuts, to ensure the safety and reliability of the vehicle.
For a complete list of topics covered, please refer to the manual itself.
Reviews
Q&A
Recently Viewed
5,521,897Happy Clients
2,594,462eManuals
1,120,453Trusted Sellers
15Years in Business
Price:
Actual Price:
2015 Kia Forte Koup 1.8L MPI Service & Repair Manual