2006-2009 Kia Carnival / Sedona Service & Repair Manual
What's Included?
Lifetime Access
Fast Download Speeds
Offline Viewing
Access Contents & Bookmarks
Full Search Facility
Print one or all pages of your manual
CHAPTER 2: Engine Mechanical System
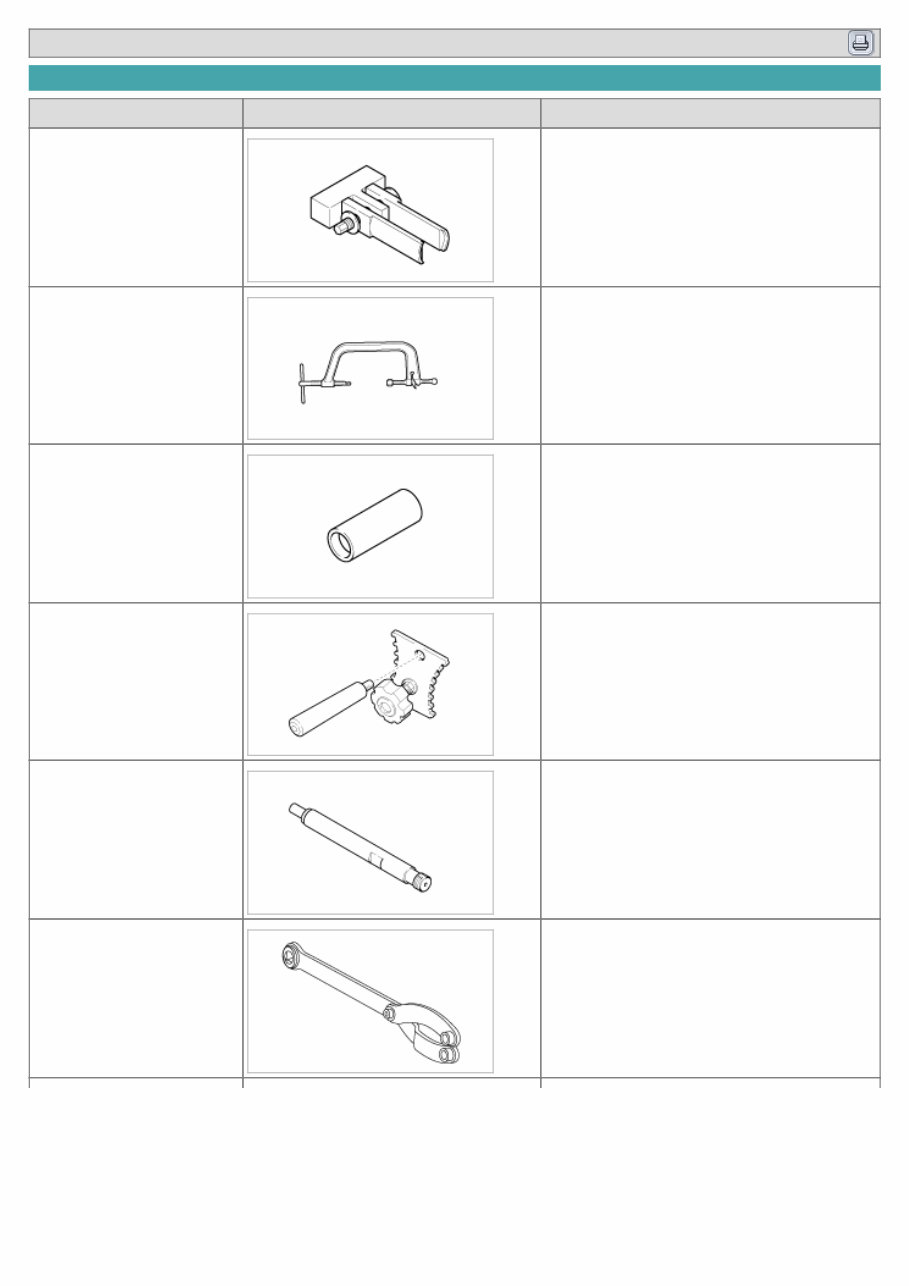
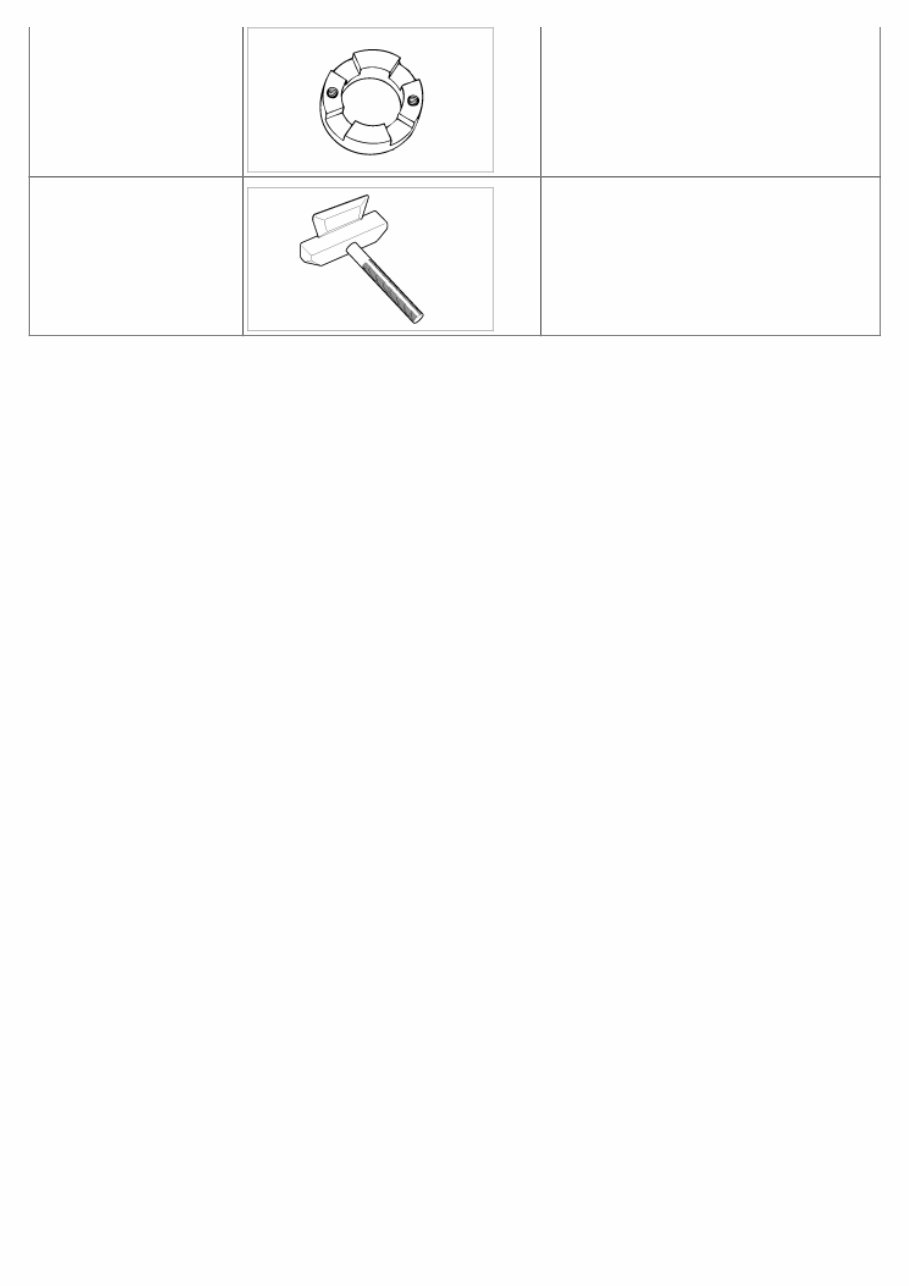
2007 > J2.9L DIESEL CRDI(VGT) > SPECIAL SERVICE TOOLS Tool (Number and name) Illustration Use Valve spring lifter pivot. (0K993 120 004) Removal or installation of the valve spring Valve spring lifter arm. (0K993 120 001) Removal or installation of the valve spring Valve seal installer. (09222-22001) Installation of the valve seal Camshaft pulley holder. (09231 - 4X100) Installation of the camshaft Pressure gauge adapter. (0K552 131 002) Measurement of compression pressure End york holder. (09517-21700) Removal or installation of the crankshaft pulley bolt (used with 09231-H1000) Crankshaft pulley adapter. Removal or installation of the crankshaft
Crankshaft pulley adapter. (09231-H1000) Removal or installation of the crankshaft pulley bolt (used with 09517-21700) Oil pan remover. (09215-3C000) Removal of the oil pan
2007 > J2.9L DIESEL CRDI(VGT) > TROUBLESHOOTING Symptom Suspect area Remedy Engine misfire with abnormal internal lower engine noises. Loose or improperly installed engine flywheel. Repair or replace the flywheel as required. Worn piston rings. (Oil consumption may or may not cause the engine to misfire.) Inspect the cylinder for a loss of compression . Repair or replace as required. Worn crankshaft thrust bearings. Replace the crankshaft and bearings as required. Engine misfire with abnormal valve train noise. Stuck valves. (Carbon buildup on the valve stem can cause the valve not to close properly.) Repair or replace as required. Excessive worn or mis-aligned timing chain. Replace the timing chain and sprocket as required. Worn camshaft lobes. Replace the camshaft and valve lifers. Engine misfire with coolant consumption a. Faulty cylinder head gasket and/or cracking or other damage to the cylinder head and engine block cooling system . b. Coolant consumption may or may not cause the engine to overheat. a. Inspect the cylinder head and engine block for damage to the coolant passages and/or a faulty head gasket. b. Repair or replace as required. Engine misfire with excessive oil consumption Worn valves, valve guides and/or valve stem oil seals. Repair or replace as required. Worn piston rings. (Oil consumption may or may not cause the engine to misfire) Inspection the cylinder for a loss of compression Repair or replace as required. Engine noise on start-up, but only lasting a few seconds. Incorrect oil viscosity. Drain the oil. Install the correct viscosity oil. Worn crankshaft thrust bearing. Inspect the thrust bearing and crankshaft. Repair or replace as required. Upper engine noise, regardless of engine speed. Low oil pressure. Repair or replace as required. Broken valve spring. Replace the valve spring. Worn or dirty valve lifters. Replace the valve lifters. Stretched or broken timing chain and/or damaged sprocket teeth. Replace the timing chain and sprockets. Worn timing chain tensioner, if applicable. Replace the timing chain tensioner as required. Worn camshaft lobes. Inspect the camshaft lobes. Replace the camshaft and valve lifters as required. Worn valve guides or valve stems. Inspect the valves and valve guides, then repair as required. Stuck valves. (Carbon on the valve stem or valve seat may cause the valve to stay open.) Inspect the valves and valve guides, then repair as required.
Lower engine noise, regardless of engine speed. Low oil pressure. Repair or replace damaged components as required. Loose or damaged flywheel. Repair or replace the flywheel. Damaged oil pan, contacting the oil pump screen. Inspect the oil pan. Inspect the oil pump screen. Repair or replace as required. Oil pump screen loose, damaged or restricted. Inspect the oil pump screen . Repair or replace as required. Excessive piston-to-cylinder bore clearance. Inspect the piston and cylinder bore. Repair as required. Excessive piston pin-to-bore clearance. Inspect the piston, piston pin and the connecting rod. Repair or replace as required. Excessive connecting rod bearing clearance. Inspect the following components and repair as required. a. The connecting rod bearings. b. The connecting rods. c. The crankshaft. d. The crankshaft journal. Excessive crankshaft bearing clearance. Inspect the following components and repair as required. a. The crankshaft bearings. b. The crankshaft journals. Incorrect piston, piston pin and connecting rod installation. Verify the piston pins and connecting rods are installed correctly. Repair as required. Engine noise under load. Low oil pressure. Repair or replace as required. Excessive connecting rod bearing clearance. Inspect the following components and repair as required. a. The connecting rod bearings. b. The connecting rods. c. The crankshaft. Excessive crankshaft bearing clearance. Inspect the following components and repair as required. a. The crankshaft bearings. b. The crankshaft journals. c. The cylinder block crankshaft bearing bore. Engine will not crank. (crankshaft will not rotate) Hydraulically locked cylinder. a. Coolant/antifreeze in cylinder. b. Oil in cylinder. c. Fuel in cylinder. Remove spark plugs and check for fluid. Inspect for broken head gasket. Inspect for cracked engine block or cylinder head. Inspect for a sticking fuel injector and/or leaking fuel regulator. Broken timing chain and/or timing chain gears. Inspect timing chain and gears. Repair as required. Foreign material in cylinder. a. Broken valve. b. Piston material. c. Foreign material. Inspect cylinder for damaged components and/or foreign materials. Repair or replace as required.
Seized crankshaft or connecting rod bearings. Inspect crankshaft and connecting rod bearing. Repair or replace as required. Bent or broken connecting rod. Inspect connecting rods. Repair or replace as required. Broken crankshaft. Inspect crankshaft.Repair or replace as required.
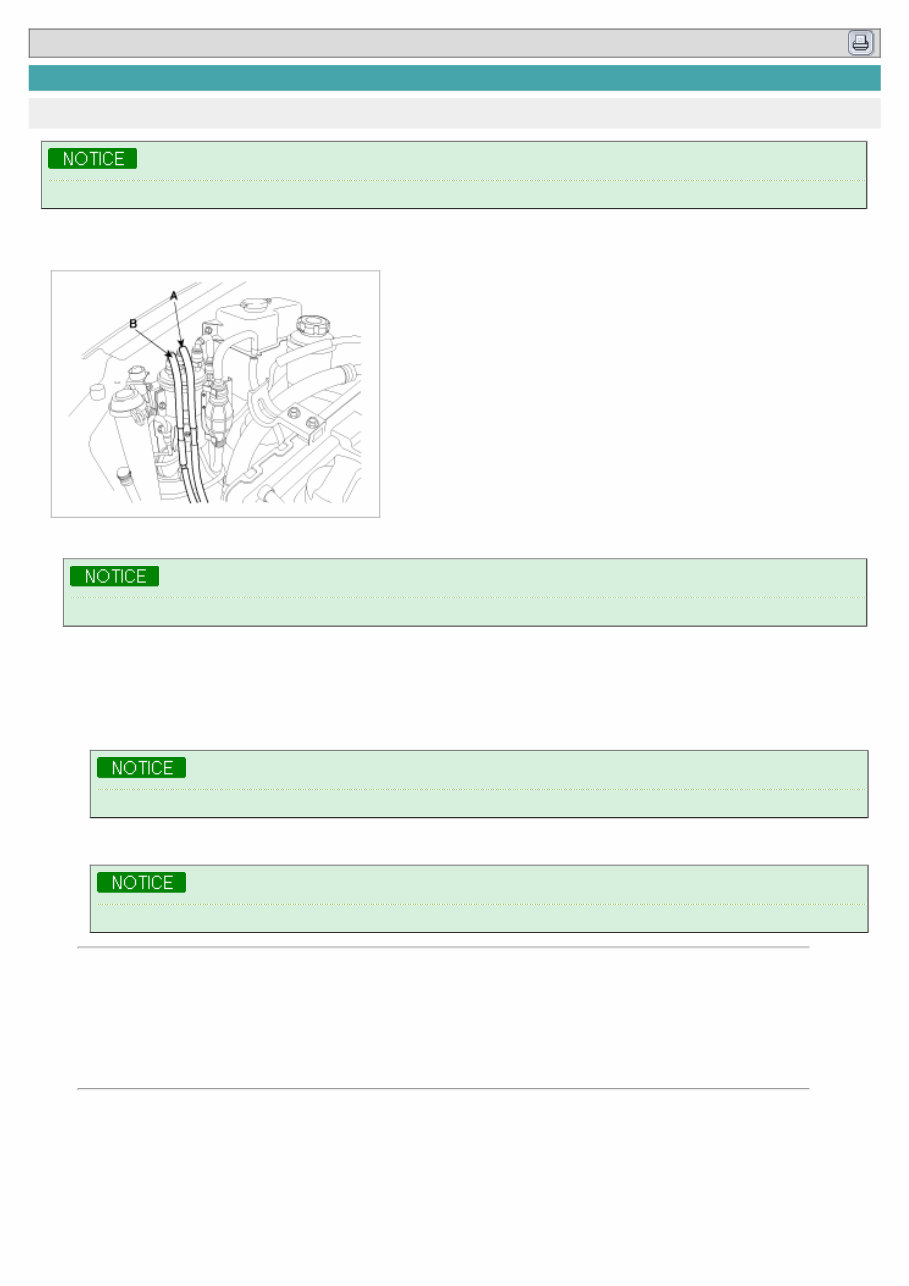
2007 > J2.9L DIESEL CRDI(VGT) > INSPECTION COMPESSION PRESSURE If there is lack of power, excessive oil consumption or poor fuel economy, measure the compression pressure. 1. Warm up the engine until the coolant temperature becomes 80~95°C(176~203°F). 2. Remove the fuel inlet(A) and the return hose(B) from the fuel filter. 3. Crank the engine in order to exhaust fuel in the high pressure pump. Gather residual fuel by putting the return hose into a proper vessel. 4. Remove the injection pipe, injector and washer.(Refer to FL group). 5. Measure the cylinder compression pressure. (1) Insert the SST(0K552 131 002) into the injector hole. (2) Cranking the engine, measure the pressure. Use the complete charging battery for the engine to crank at the speed of 350rpm or more. (3) Do the above step 1)~2) again for each cylinder. This work must be done in as short time as possible. Compression pressure : 3040.05kPa (31kg/cm², 440.92psi) (325 rpm) Minimum pressure : 2745.85kPa (28kg/cm², 398.25psi) Difference between each cylinder : 294.20kPa (3.0kg/cm², 42.67psi) (4) If, in one or more cylinders, the measured value is below the limit, fill a little engine oil into the injector holes of the cylinders, repeat the step 1)~2) and measure the compression pressure again. a. If the re-measured pressure becomes higher, wear or damage of the piston ring or cylinder surface can be the cause. b. If the re-measured pressure does not become higher, adherence or poor contact of the valves or inferior
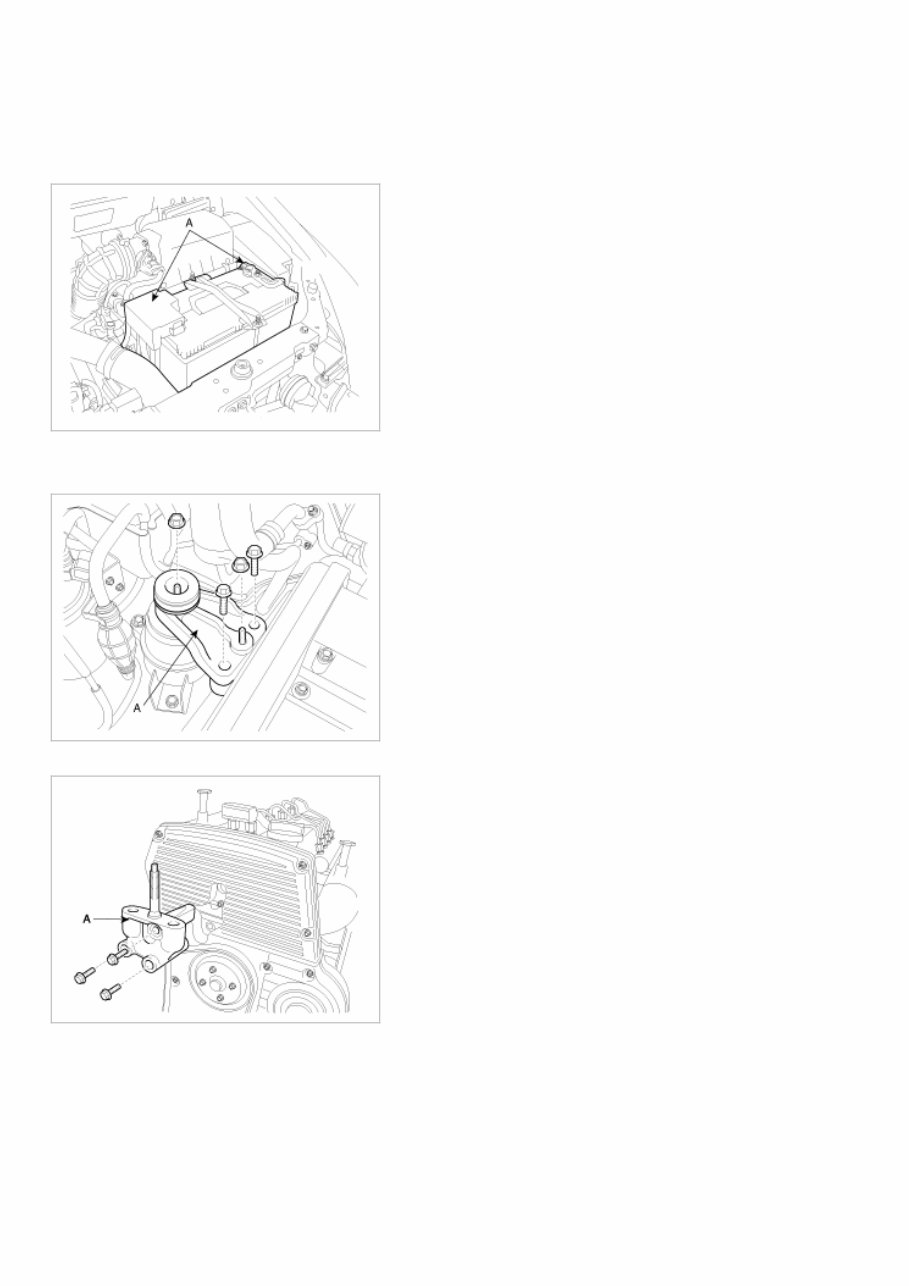
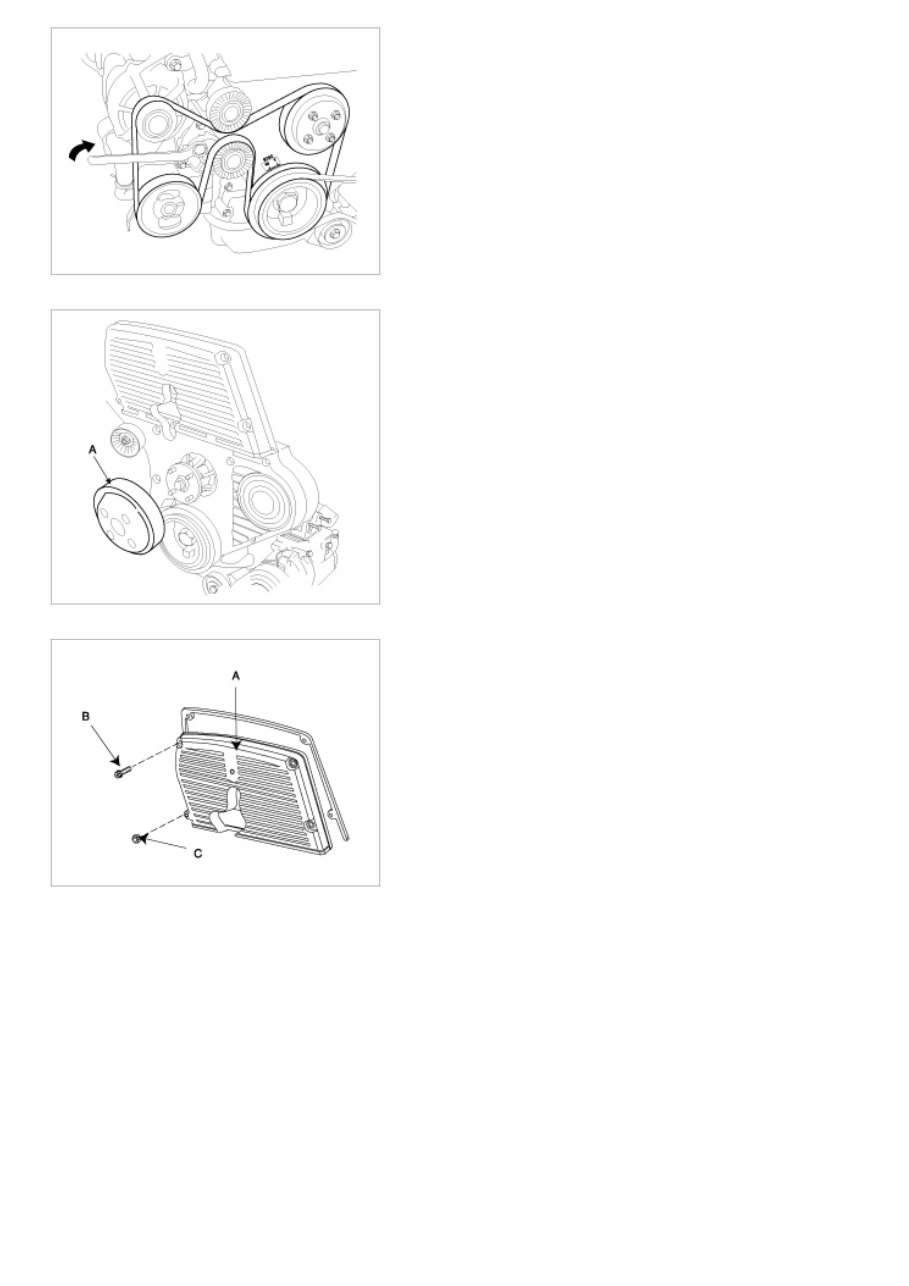
gasket can be the cause. 6. Install the injectors, washers and the injector pipes.(Refer to FL group). 7. Install the inlet and the return hoses to the fuel filter. TIMING BELT TENSION ADJUSTMENT 1. Remove the battery terminals (A). 2. Install the jack for oil pan. 3. Remove the engine mounting (A). 4. Remove the engine support bracket(A). 5. Remove the drive belt.
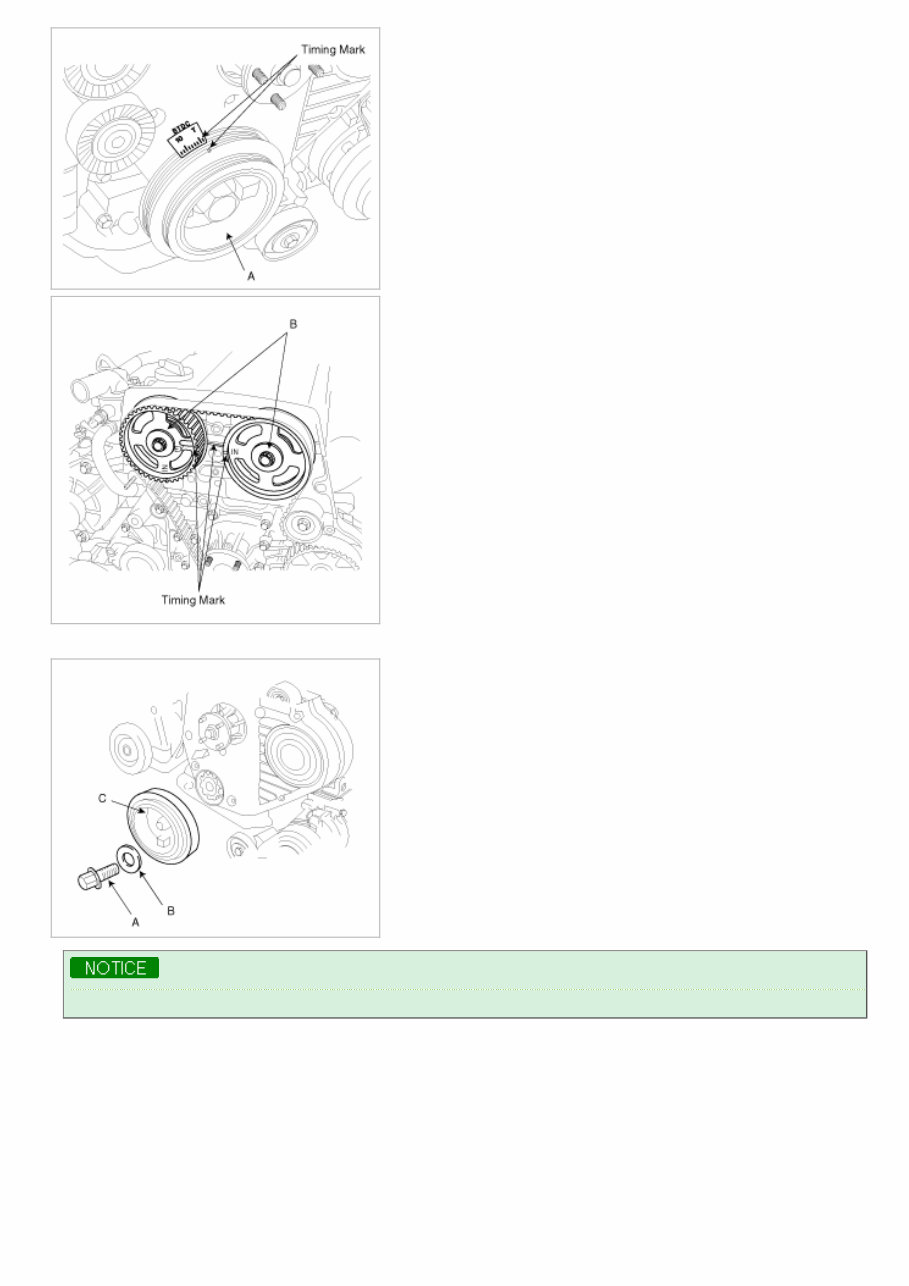
6. Remove the water pump pulley. 7. Remove the bolts(B), nut(C) and timing belt upper cover (A). 8. Turn the crankshaft pulley(A) and align its groove with the timing mark “T” of the timing belt cover. Check that the timing mark of camshaft sprocket(B) is aligned with that of the cylinder head cover. (No.1 cylinder positioned at the TDC position)
9. Remove the crankshaft pulley bolt(A), washer(B) and crankshaft pulley(C). Using the special tool(09517-21700, 09231-H1000), fix the crankshaft pulley and loosen the bolt(A). 10. Remove the drive belt idler(A).
This is the official service and repair manual for the 2006-2009 Kia Carnival/Sedona. It contains comprehensive details for all models and engines, including diagnostic and repair procedures, detailed illustrations, wiring schematics, and step-by-step instructions. The manual is fully printable, making it highly convenient for use in the garage or workshop. It is an invaluable resource for both DIY enthusiasts and experienced mechanics, ensuring cost-effective vehicle maintenance.
The manual covers a wide range of service and repair procedures, including but not limited to:
Engine overhaul and rebuilding
Brakes
Sunroof
Timing belt replacement
Trouble codes
Wiring diagrams
Troubleshooting and diagnostics
Computer diagnostic trouble tree charts
Engine performance
Front end and alignment procedures and specifications
Suspension
Transmission removal and installation
Air conditioning service and capacities
Transmission in-car servicing
Computer diagnostic codes
Firing orders
Detailed specifications on every model covered
Factory maintenance schedules and charts
Serpentine belt routings with diagrams
Brake servicing procedures
Driving concerns
Complete torque specifications
U-joint and CV-joint service procedures
Repair procedures
Complete wiring diagrams
Hundreds of illustrations
Vacuum diagrams
The manual is provided in English, with a .PDF file format containing over 5000 pages. It is fully printable and bookmarked, ensuring compatibility with all versions of Windows and Mac. The file is searchable and bookmarked for easy navigation. Detailed illustrations, exploded diagrams, drawings, and photos are provided to guide users through each service repair procedure.
Upon payment, this comprehensive manual is instantly accessible, eliminating shipping costs and waiting time. It can be viewed, zoomed, and printed on any computer, and can be saved to a hard drive for convenient off-line access. By utilizing this manual, individuals can perform repairs themselves and effectively save on costs.
Recently Viewed
5,521,897Happy Clients
2,594,462eManuals
1,120,453Trusted Sellers
15Years in Business
Price:
Actual Price:
2006-2009 Kia Carnival / Sedona Service & Repair Manual

 - !")