


2007 Jeep COMPASS
Submodel: LIMITED | Engine Type: L4 | Liters: 2.4
Fuel Delivery: FI | Fuel: GAS
DESCRIPTION
The Accelerator Pedal Position Sensor (APPS) is a variable resistor that provides the PCM with an input signal (voltage). The signal represents pedal angle position. As the position of the
accelerator pedal changes, the resistance of the APPS changes.

2007 Jeep COMPASS
Submodel: LIMITED | Engine Type: L4 | Liters: 2.4
Fuel Delivery: FI | Fuel: GAS
DESCRIPTION
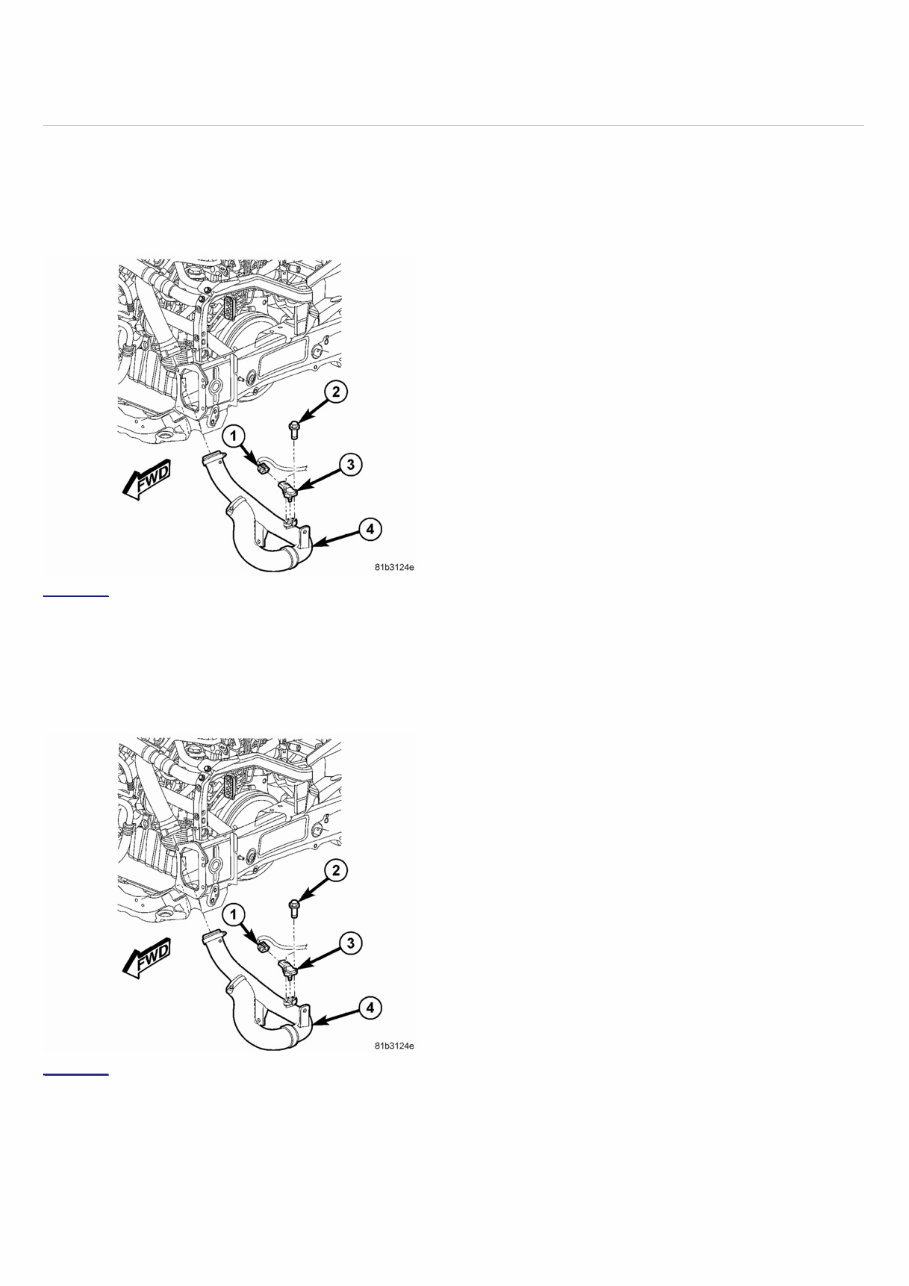
The boost pressure sensor (1) is integrated with the intake air temperature sensor, and mounted in the charge air hose below the intake manifold. The sensor allows the ECM to monitor air
pressure within the intake manifold.
OPERATION
When the intake manifold pressure is low (high vacuum) sensor voltage output is 0.25-1.8 volts at the ECM. When the intake manifold pressure is high due to turbo boost, sensor voltage
output is 2.0-4.7 volts. The sensor receives a 5-volts reference from the ECM. Sensor ground is also provides by the ECM. The ECM uses boost pressure combined with intake air temp
erature to determine the volume of air entering the engine.
2007 Jeep COMPASS
Submodel: LIMITED | Engine Type: L4 | Liters: 2.4
Fuel Delivery: FI | Fuel: GAS
REMOVAL
1. Disconnect negative battery cable.
2. Remove the belly pan.
Click to enlarge
1. Disconnect the electrical connector (1) from the boost pressure sensor (3).
2. Remove the 2 mounting bolts (2).
3. Remove the boost pressure sensor (3) from the charge air tube (4).
INSTALLATION
Click to enlarge
1. Install the boost pressure sensor (3) in the charge air tube (4).
2. Install the 2 mounting bolts (2). Tighten to 8 Nm/6 lb-ft.
3. Reconnect the electrical connector (1).
4. Install the belly pan.
5. Reconnect negative battery cable.
2007 Jeep COMPASS
Submodel: LIMITED | Engine Type: L4 | Liters: 2.4
Fuel Delivery: FI | Fuel: GAS
REMOVAL
The Crankshaft Position Sensor is part of the Rear Main Oil Seal assembly.
1. Refer to (Refer to 9 - ENGINE/ENGINE BLOCK/CRANKSHAFT OIL SEAL - REAR - REMOVAL) and (Refer to 9 - ENGINE/ENGINE BLOCK/CRANKSHAFT OIL SEAL -
REAR - INSTALLATION) for Crankshaft Position Sensor Removal and Installation procedures.
REMOVAL
1. Disconnect negative battery cable.
2. Remove engine cover (Refer to 9 - ENGINE COVER - REMOVAL).
3. Remove the throttle body.
4. Disconnect camshaft position sensor electrical connector.
5. Remove the upper and lower timing belt covers. Refer to (Refer to 9 - ENGINE/VALVE TIMING/TIMING BELT / CHAIN COVER(S) - REMOVAL).
6. Remove cylinder head cover.
When rotating engine to TDC, verify that the cylinder #1 in on the compression stroke. The camshaft lobes for cylinder #1 should be pointing upward.
Click to enlarge
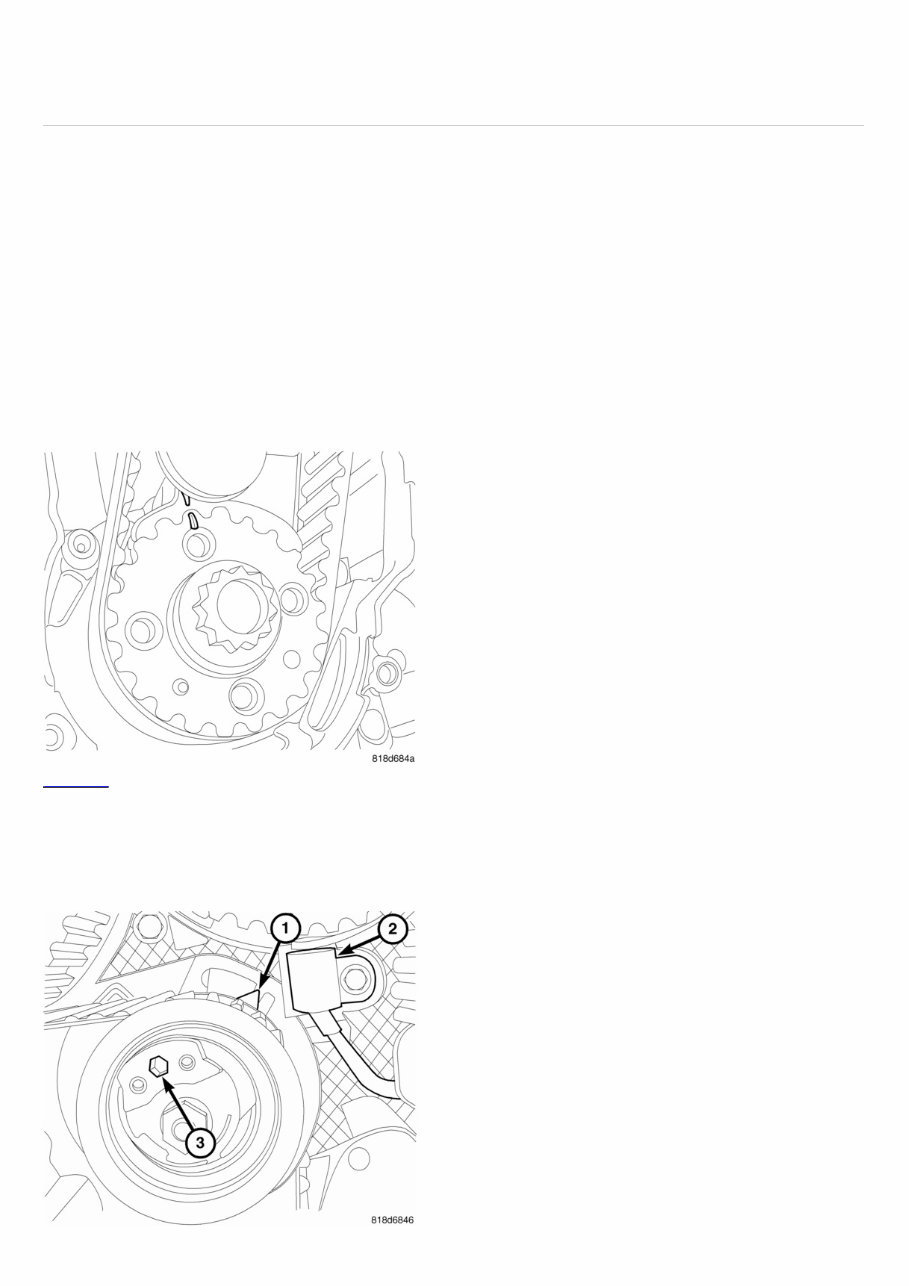
1. Rotate engine to TDC and insert crankshaft lock 9883.
2. Insert camshaft locking pins 9882.
3. Loosen timing belt tensioner retaining nut.
4. Rotate timing belt tensioner counter clockwise to release tension from the timing belt.
Click to enlarge
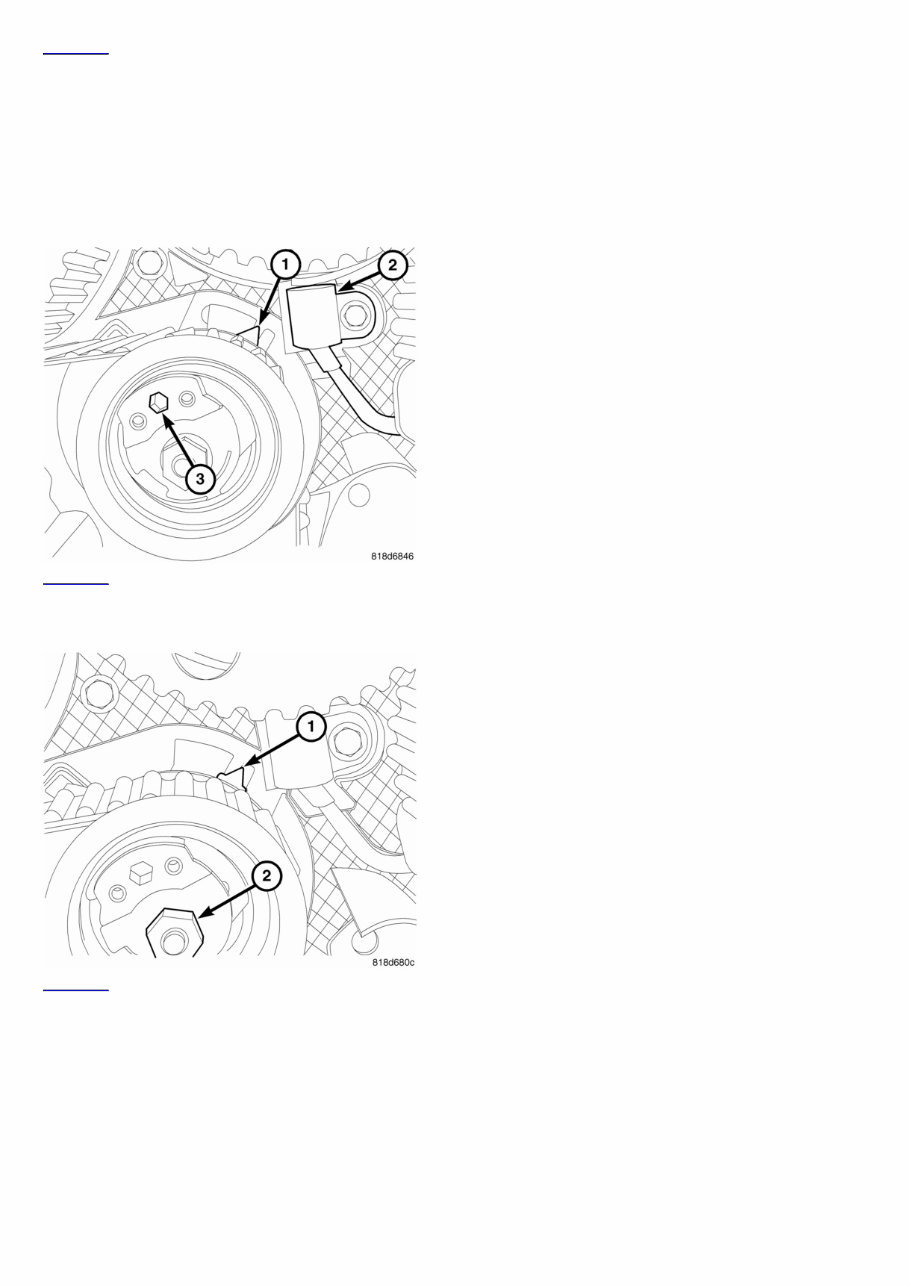
1. Remove the access plug from the cam position sensor harness opening in the back (engine block side) of the timing belt cover.
2. Remove retaining bolt and remove the cam position sensor.
INSTALLATION
1. Route the cam position sensor harness connector through the opening in the back of the timing belt cover (engine block side) and install the access hole plug.
2. Reconnect the cam position sensor harness connector .
3. Install the cam p osition sensor (2) and the retaining bolt. Tighten the bolt to 10 Nm/ 7 lb-ft.
Click to enlarge
1. Insert allen wrench into timing belt tensioner (3) and rotate timing belt tensioner until indicator (1) is in the middle of the slot.
Click to enlarge
1. Torque nut (2) to 20 N·m + 45° (177 in. lbs. +45°).
Tensioner indicator (1) will move out of the slot when nut (2) is torqued. This is normal, do not reposition the tensioner.
You're Reading a Preview
What's Included?
 Lifetime Access
Fast Download Speeds
Offline Viewing
Access Contents & Bookmarks
Full Search Facility
Print one or all pages of your manual
$32.99
2007-2009 Jeep Compass Service & Repair Manual
Viewed 18 Times Today

What's Included?
Lifetime Access
Fast Download Speeds
Offline Viewing
Access Contents & Bookmarks
Full Search Facility
Print one or all pages of your manual
$32.99

Secure transaction
What's Included?
Lifetime Access
Fast Download Speeds
Offline Viewing
Access Contents & Bookmarks
Full Search Facility
Print one or all pages of your manual
Description
You are purchasing a comprehensive 2007-2009 Jeep Compass Factory Service Workshop Manual. This manual is utilized by professional mechanics at Jeep dealerships to service and repair vehicles. It encompasses a wide range of services and repairs, including but not limited to oil changes and transmission rebuilding, making it suitable for both professional mechanics and DIY enthusiasts.
The manual is available in HTML format and is compatible with Win95/98/ME/XP (on IE 10-11, please contact us via email for the necessary tweak to ensure compatibility).


