

JAGUAR 3.6 Litre and 5.3 Litre XJS Vehicle Maintenance Sheet
What's Included?
Fast Download Speeds
Online & Offline Access
Access PDF Contents & Bookmarks
Full Search Facility
Print one or all pages of your manual
A/C COMPRESSOR APPLICATION & SPECIFICATIONS
1989 A/C Compressor Applications & Specifications
COMPRESSOR APPLICATION TABLE
COMPRESSOR APPLICATION
OIL & R-12 CAPACITY TABLE
REFRIGERANT OIL & R-12 CAPACITY
Application Compressor
Jaguar Harrison A-6 6-Cyl
Application
(1)
Oil Ounces
R-12 Ounces
Jaguar 7.0 40
(1)
Total system capacity unless otherwise stated.
1989 Jaguar XJ-S
A/C COMPRESSOR APPLICATION & SPECIFICATIONS 1989 A/C Compressor Applications & Specifications

A/C COMPRESSOR OIL CHECKING
1989 GENERAL SERVICING Compressor Refrigerant Oil Checking
ISOLATING COMPRESSOR
1. Connect service gauge set to the compressor service valves and open compressor valves slightly (turn in
clockwise). Start engine and operate air conditioning. Slowly turn compressor suction valve clockwise
toward closed (front-seated) position.
2. When suction pressure is reduced to zero or less, turn off engine and compressor and quickly turn suction
valve stem in to full front-seated position. Suction pressure should be slightly above zero. Turn discharge
valve into front-seated position.
3. To check oil level, slowly open compressor crankcase plug to relieve any remaining pressure. After oil
level is corrected, cap service gauge ports on both valves. Back-seat suction service valve to allow
refrigerant to enter compressor. Open discharge valve halfway.
4. Loosen discharge service valve cap, allowing refrigerant pressure to force air out of compressor. Back-
seat service valve and tighten cap. Compressor is now ready for operation.
REFRIGERANT OIL
Only new, pure, moisture-free refrigerant oil should be used in the air conditioning system. This oil is highly
refined and dehydrated to a point where moisture content is less than 10 parts per million. The oil container
must be tightly closed at all times when not in use, or moisture will be absorbed into the refrigerant oil from the
air.
DISCHARGING SYSTEM PRECAUTIONS
If compressor has stem-type service valves, it can be isolated and removed without discharging entire system.
Otherwise, discharge system completely using approved refrigerant recovery/recycling equipment before
loosening any fittings.
DISCONNECTING LINES & FITTINGS TEST
After system is discharged, carefully clean area around all fittings to be opened. Always use 2 wrenches when
tightening or loosening fittings to avoid twisting or distorting lines. Cap or plug all openings as soon as lines are
CAUTION: When discharging air conditioning system, use only approved refrigerant
recovery/recycling equipment. Make every attempt to avoid discharging
refrigerant into the atmosphere.
NOTE: Only compressors with stem-type service valves can be isolated.
CAUTION: When discharging air conditioning system, use only approved refrigerant
recovery/recycling equipment. Make every attempt to avoid discharging
refrigerant into the atmosphere.
1989 Jaguar XJ-S
A/C COMPRESSOR OIL CHECKING 1989 GENERAL SERVICING Compressor Refrigerant Oil Checking

removed. Do not remove caps until immediately before connections are made. This will keep entry of air and
moisture to a minimum.
CONNECTING LINES AND FITTINGS
A new gasket or "O" ring should be used in all instances when connecting lines or fittings. Dip "O" ring in new
refrigerant oil and ensure it is not twisted during installation. Always use 2 wrenches to prevent damage to lines
and fittings.
PLACING SYSTEM IN OPERATION
After component service or replacement has been completed and all connections have been made, evacuate
system thoroughly with a vacuum pump. Charge system with proper amount of refrigerant and perform a leak
test. See REFRIGERANT OIL & R-12 SPECIFICATIONS chart in this section for system capacities. Be sure
to check all fittings that have been opened. After system has been leak tested, make a system performance
check.
ATSUGI ROTARY VANE DRAIN & REFILL
1. Before checking and adjusting oil level, operate compressor at engine idling speed, with controls set for
maximum cooling and high blower speed, for 20 to 30 minutes to return oil to compressor.
2. Stop engine, discharge refrigerant using approved refrigerant recovery/recycling equipment and remove
compressor from vehicle. Drain compressor oil from compressor discharge port and measure the amount.
Oil is sometimes hard to drain when compressor is cool. Remove oil while compressor is warm.
3. If the amount drained is less than 3 ounces, conduct leak tests at system connections, and if necessary,
repair or replace faulty parts. Check purity of oil and adjust oil level as follows.
4. If amount drained was above 3 ounces, oil level is right. Pour in same amount as was drained. If amount
drained was below 3 ounces, pour in 3 ounces of new refrigerant oil.
BOSCH 6-CYL DRAIN & REFILL
1. Before checking and adjusting oil level, operate compressor at engine idling speed, with controls set for
maximum cooling and high blower speed, for 20 to 30 minutes to return oil to compressor.
2. Stop engine and discharge refrigerant using approved refrigerant recovery/recycling equipment. Remove
refrigerant oil level inspection plug on side of compressor. Oil should be at lower lip of threaded hole.
Add necessary new refrigerant oil (if low). Replace inspection plug and tighten to 10-12 ft. lbs. (14-16
N.m).
DIESEL KIKI ROTARY VANE DRAIN & REFILL
1. Before checking and adjusting oil level, operate compressor at engine idling speed, with controls set for
NOTE: Air conditioning systems will not normally need addition of refrigerant oil
unless definite oil loss has occurred due to ruptured lines, leaking compressor
seals, compressor overhaul or component replacement.
1989 Jaguar XJ-S
A/C COMPRESSOR OIL CHECKING 1989 GENERAL SERVICING Compressor Refrigerant Oil Checking

maximum cooling and high blower speed, for 20 to 30 minutes to return oil to compressor.
2. Stop engine, discharge refrigerant using approved refrigerant recovery/recycling equipment and remove
compressor from vehicle. Drain compressor oil from compressor discharge port and measure the amount.
Oil is sometimes hard to drain when compressor is cool. Remove oil while compressor is warm.
3. If the amount is less than 2.4 ounces, conduct leak tests at system connections, and if necessary, repair or
replace faulty parts. Check purity of oil and adjust oil level as follows.
4. If amount drained was above 2.4 ounces, oil level is right. Pour in same amount as was drained. If amount
drained was below 2.4 ounces, pour in 2.4 ounces of new refrigerant oil.
DIESEL KIKI 6-CYL DRAIN & REFILL
1. Before checking and adjusting oil level, operate compressor at engine idling speed, with controls set for
maximum cooling and high blower speed, for 20 to 30 minutes to return oil to compressor.
2. Stop engine, discharge refrigerant using approved refrigerant recovery/recycling equipment and remove
compressor from vehicle. Remove oil drain plug and drain oil. Measure amount of oil drained. Install
drain plug with new "O" ring.
3. If amount drained was more than 2 ounces, refill with same amount of new oil. If amount drained was
less than 2 ounces, refill with 2 ounces. Install filler plug and recharge system.
HARRISON 4-CYL DRAIN & REFILL
The Harrison 4-cyl compressor is charged (new) with 6 ounces of refrigerant oil. Because compressor does not
have an oil sump, it should not have to be removed for oil measurement (it retains very little oil). Note the
following situations for checking and adding oil to this compressor.
NO OIL LEAK; REPLACING COMPONENTS
If only the compressor is to be replaced, remove, drain oil, measure and reinstall an equal amount of new oil. If
evaporator is being replaced, add 3 ounces of new oil. If condenser is being replaced, add one ounce.
LOSS OF REFRIGERANT OVER EXTENDED PERIOD
When a loss of refrigerant has occurred over an extended period of time and a component is being replaced to
correct the leak, add an appropriate amount of refrigerant oil to the component.
SIGNS OF EXCESSIVE OIL LEAKAGE
If system has lost excessive oil, remove accumulator. Drain and measure oil. If more than 3 ounces is measured,
replace the same amount of new oil as was drained. If less than 3 ounces is measured, add 3 ounces of new oil.
Add and additional 2 ounces of new oil to compensate for that lost by replacing the accumulator (held in
desiccant).
NOTE: The Harrison compressor does NOT have an oil sump. It's crucial that the
compressor remains well oiled. It takes very little time to destroy this
compressor if it runs dry.
1989 Jaguar XJ-S
A/C COMPRESSOR OIL CHECKING 1989 GENERAL SERVICING Compressor Refrigerant Oil Checking

HARRISON 6-CYL DRAIN & REFILL
1. If system is operable, run for several minutes to stabilize system before performing repairs. Turn off
engine, discharge system using approved refrigerant recovery/recycling equipment and remove
compressor. Remove drain plug. Drain and measure oil.
2. If amount drained was 7 ounces or more, add the same amount of new refrigerant oil. If less than 7
ounces was drained, add 7 ounces of new refrigerant oil to compressor.
3. If air conditioner components are replaced, refrigerant oil will need to be added to system. Add 3 ounces
if condenser or evaporator is replaced. Add one ounce if drier is replaced.
HITACHI 6-CYL DRAIN & REFILL
1. Before checking and adjusting oil level, operate compressor at engine idling speed, with controls set for
maximum cooling and high blower speed, for 10 minutes to return oil to compressor.
2. Stop engine, discharge refrigerant using approved refrigerant recovery/recycling equipment and remove
compressor from vehicle. Drain oil from compressor suction port. Measure amount of oil drained. If
amount drained was more than 2.4 ounces, refill with same amount of new oil. If amount drained was less
than 2.4 ounces, refill with 2.4 ounces. Install compressor and recharge.
MATSUSHITA ROTARY VANE DRAIN & REFILL
Discharge system using approved refrigerant recovery/recycling equipment. Remove compressor from vehicle.
Drain oil from compressor through inlet and outlet holes. Refill compressor with 3.4-4.7 ounces of oil through
suction port. When replacing evaporator, add 2 ounces. When replacing other A/C components, add 1.4 ounces
per component replaced.
NIPPONDENSO 6 & 10-CYL DRAIN & REFILL
When inspecting system for oil loss, look for signs of leaking (shiny, wet spots on components or underside of
hood). If oil leak is noted or component replacement is required, use the following procedure as indicated:
NO OIL LEAK
Discharge system using approved refrigerant recovery/recycling equipment and change components as
necessary. Add refrigerant oil to components as necessary.
OIL LEAK
1. Slowly discharge system using approved refrigerant recovery/recycling equipment. Repair or replace
faulty components. If equipped with a drain plug, remove plug, drain and discard oil. If not equipped with
a drain plug, remove compressor from vehicle and pour oil out suction and discharge ports.
2. Replace drain plug (if equipped). Add 1.5 ounces of new refrigerant oil through suction port. Use new
NOTE: If oil drained contains metal chips or other debris, replace receiver-drier. Flush
out system before evacuating and recharging.
1989 Jaguar XJ-S
A/C COMPRESSOR OIL CHECKING 1989 GENERAL SERVICING Compressor Refrigerant Oil Checking
gaskets or "O" rings when replacing suction and discharge lines.
COMPRESSOR FAILURE OR SYSTEM CONTAMINATED
If either situation exists, discharge system using approved refrigerant recovery/recycling equipment and remove
compressor, receiver-drier and expansion valve. Clean expansion valve screen. Flush entire system. Install new
compressor and receiver-drier. New compressors contain correct amount of oil. If installing overhauled
compressor, add 1.5 ounces of new refrigerant oil through suction port.
SANDEN SCROLL DRAIN & REFILL
Discharge system using approved refrigerant recovery/recycling equipment. Remove compressor from vehicle.
Drain oil from compressor through inlet and outlet holes. Refill compressor with 2.8 ounces of oil through
suction port. When replacing condenser, add .5 ounce. When replacing evaporator, add 1.7 ounces. When
replacing other A/C components, add .5 ounce per component replaced.
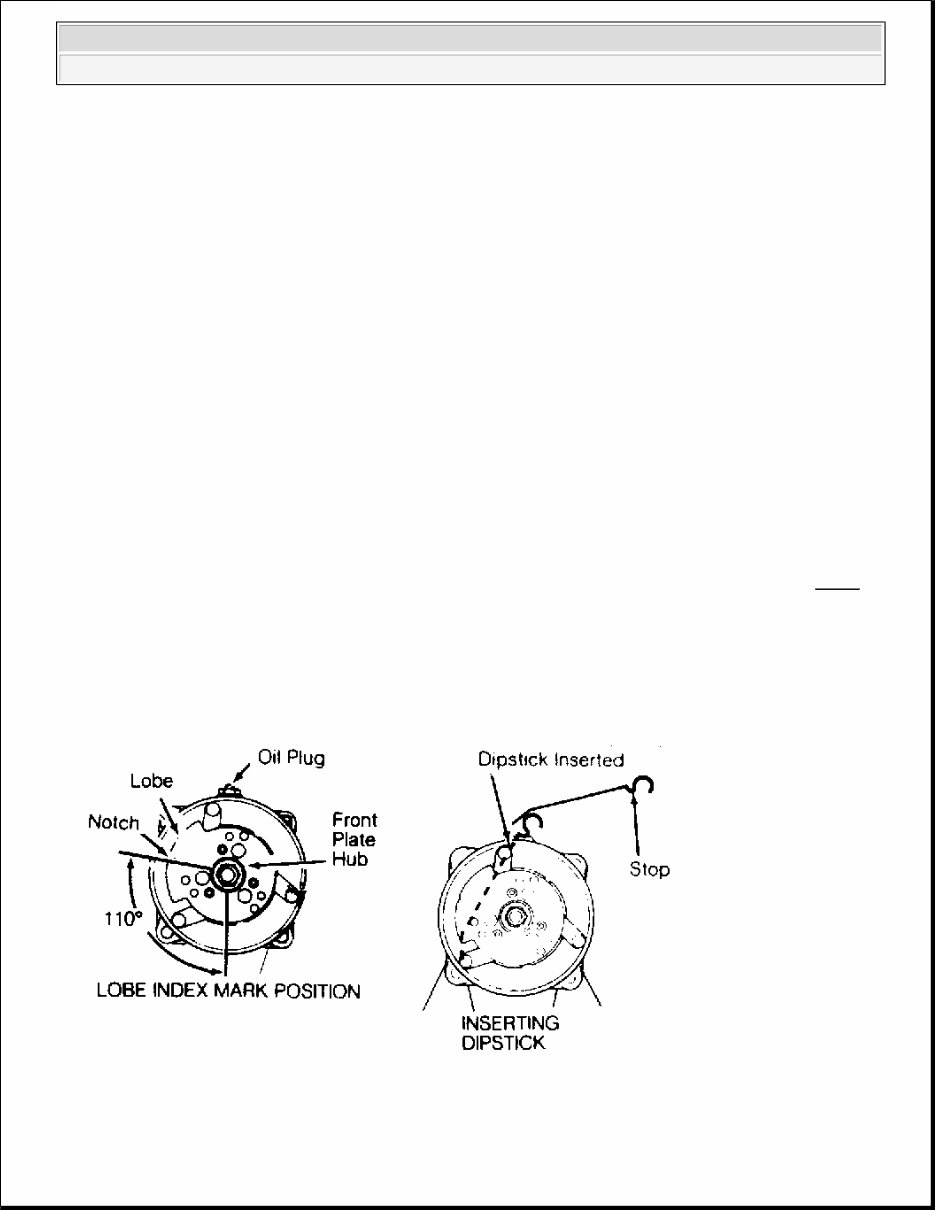
SANDEN 5-CYL DRAIN & REFILL
1. Discharge system using approved refrigerant recovery/recycling equipment. Remove compressor belt and
loosen mounting bolts. Rotate compressor in brackets until filler plug is at top. Clean area around filler
plug and remove plug slowly. Rotate front hub plate so notch in lobe is 110 degrees from the bottom.
This rotates ball end of top piston to align with oil fill port and allows clearance for dipstick. See Fig. 1 .
2. Insert compressor dipstick diagonally from right to left until stop on dipstick contacts filler plug surface.
Remove dipstick and note oil fill level. Each increment on dipstick represents one ounce of oil. Add oil if
necessary to reach 3-4 ounce level.
1989 Jaguar XJ-S
A/C COMPRESSOR OIL CHECKING 1989 GENERAL SERVICING Compressor Refrigerant Oil Checking

Fig. 1: Sanden 5 - Cylinder Oil Level Checking
Courtesy of SANDEN INTERNATIONAL U.S.A, INC.
1989 Jaguar XJ-S
A/C COMPRESSOR OIL CHECKING 1989 GENERAL SERVICING Compressor Refrigerant Oil Checking

A/C COMPRESSOR SERVICING
1989 GENERAL SERVICING Compressor Service
ATSUGI ROTARY VANE CLUTCH R & I
Removal
When replacing compressor clutch, be careful not to scratch shaft or bend pulley. When removing center bolt,
hold clutch disc with Clutch Holder (KV99231010). Using Hub Puller (KV998VR001 & KV99231010),
remove clutch disc. When removing pulley, remove lock nut with Hub Socket (KV99235160).
Installation
Wipe oil off clutch surface. Adjust disc pulley clearance to .012-.024" (.3-.6 mm). Tighten center bolt to 80-104
INCH lbs. (9.1-11.8 N.m). Tighten clutch lock nut to 22-29 ft. lbs. (29-39 N.m). See Fig. 1 .
CAUTION: When discharging air conditioning system, use only approved refrigerant
recovery/recycling equipment. Make every attempt to avoid discharging
refrigerant into the atmosphere.
1989 Jaguar XJ-S
A/C COMPRESSOR SERVICING 1989 GENERAL SERVICING Compressor Service
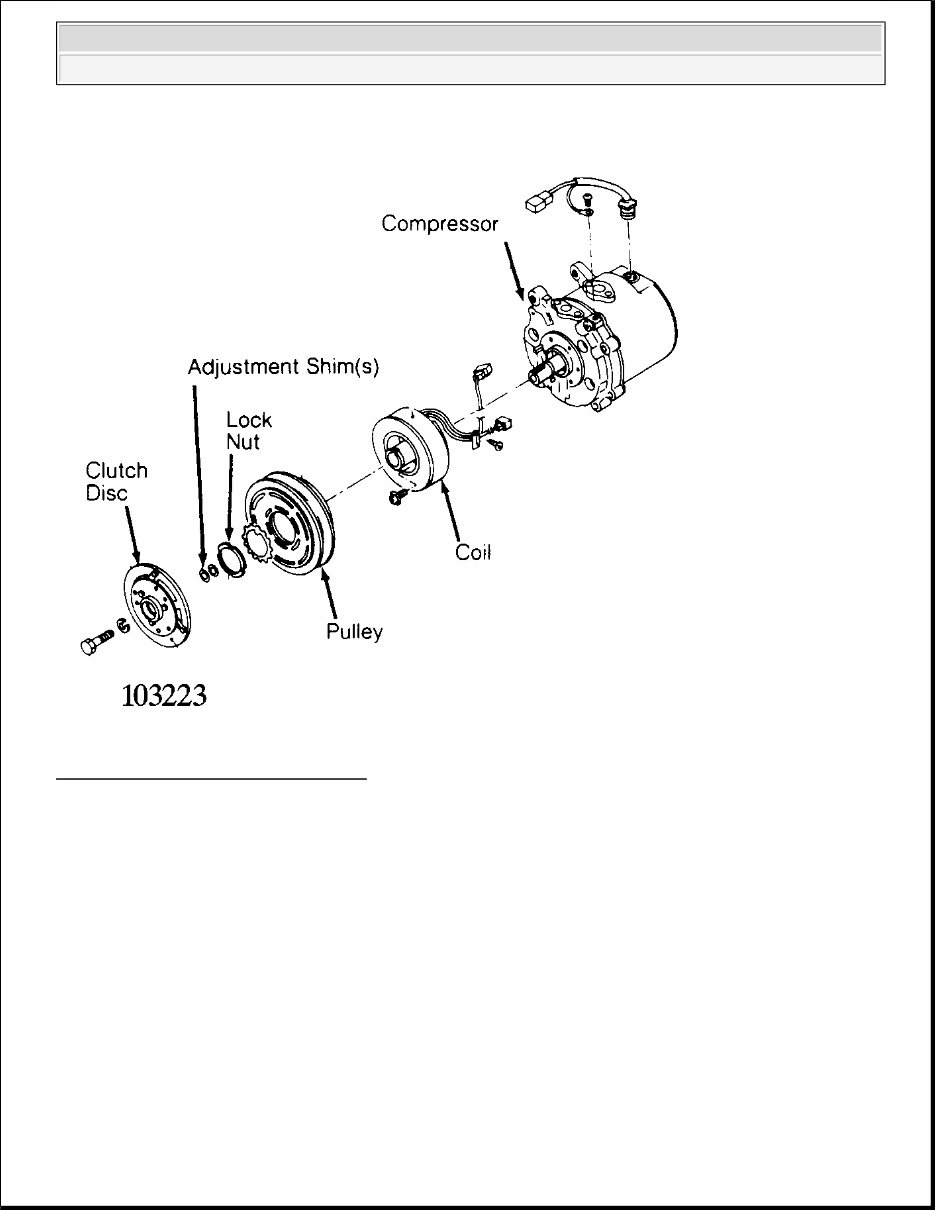
Fig. 1: Atsugi Rotary Vane Compressor
Courtesy of NISSAN MOTOR CO., U.S.A.
BOSCH 6-CYL CLUTCH R & I
Removal
1. Hold clutch plate and remove shaft nut. Using Clutch Plate Remover (64 5 00), remove clutch plate.
Using snap ring pliers, remove circlip and remove pulley assembly.
2. If pulley bearing is being replaced, remove circlip at rear of pulley. Press bearing and spacer from pulley.
Press in new bearing with spacer and replace circlip.
Installation
1. Clean all surfaces. Install pulley assembly on compressor and install circlip. Ensure clutch plate shim is in
place on shaft. Install clutch plate and nut. Tighten nut to 13-14 ft. lbs. (18-20 N.m).
1989 Jaguar XJ-S
A/C COMPRESSOR SERVICING 1989 GENERAL SERVICING Compressor Service
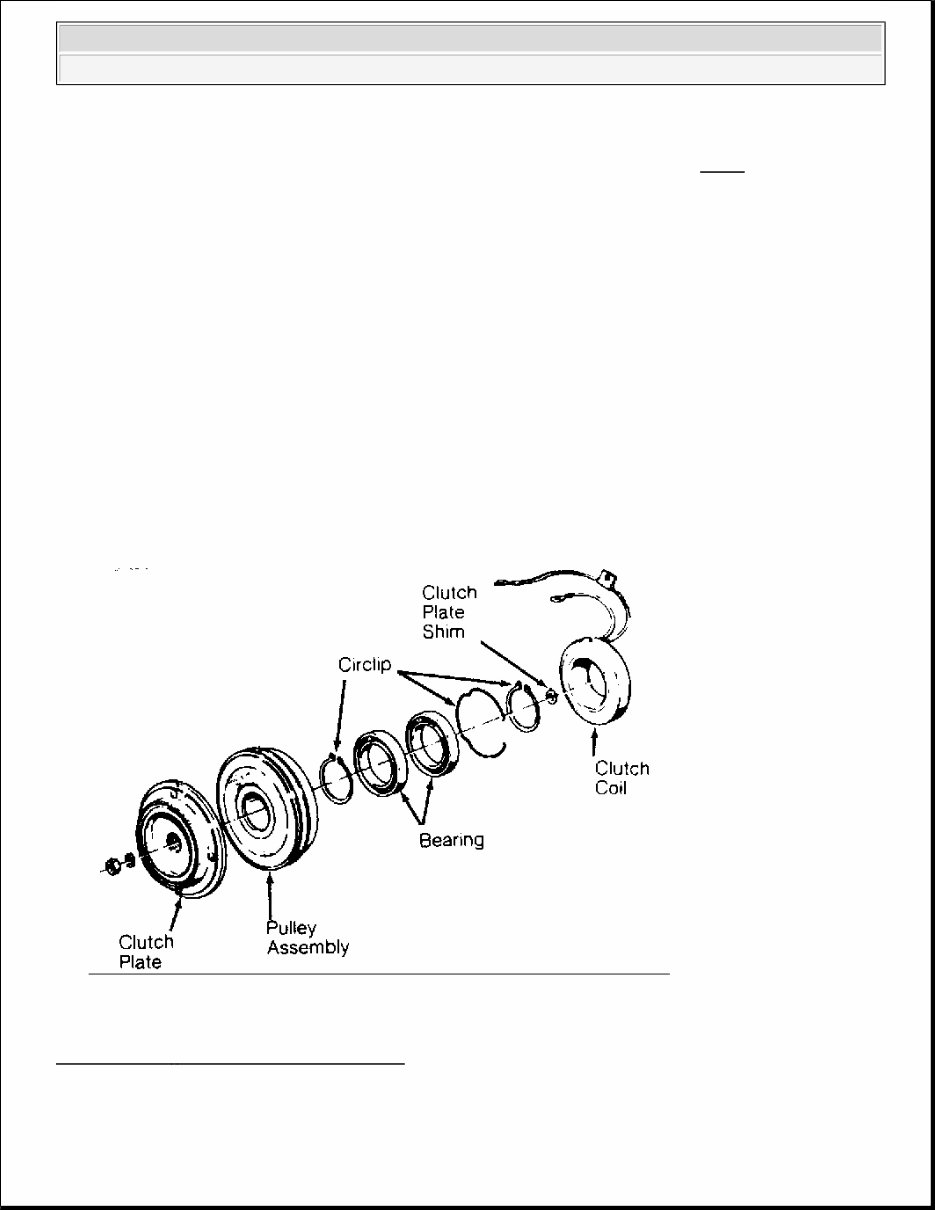
2. Using a feeler gauge, check clutch plate-to-pulley clearance. Clearance should be .028-.051" (.7-1.3 mm).
If clearance is not correct, remove clutch plate and replace clutch plate shim. See Fig. 2 .
BOSCH 6-CYL SHAFT SEAL R & I
Removal & Installation
1. Remove clutch plate. Remove shaft key and circlip. Using Seal Seat Remover/Installer (64 5 030),
remove seal seat.
2. Using Seal Remover/Installer (64 5 040), remove shaft seal by turning seal slightly clockwise to
disengage tangs and pull out shaft seal. Remove "O" ring seal.
3. Coat new "O" ring seal with refrigerant oil and install. Coat new shaft seal with refrigerant oil and install
shaft seal on Seal Remover/Installer (64 5 040). Ensure alignment of shaft seal and shaft machine
surfaces. Insert shaft seal and turn slightly counterclockwise to secure on shaft.
4. Using sleeve from Seal Seat Remover/Installer (64 5 030), push seal seat into compressor and install
circlip. Install shaft key and clutch plate. Check compressor oil level before charging system.
Fig. 2: Bosch 6 - Cylinder Compressor Clutch
Courtesy of BMW OF NORTH AMERICA, INC.
1989 Jaguar XJ-S
A/C COMPRESSOR SERVICING 1989 GENERAL SERVICING Compressor Service
You're Reading a Preview
What's Included?
Fast Download Speeds
Online & Offline Access
Access PDF Contents & Bookmarks
Full Search Facility
Print one or all pages of your manual
$28.99
Viewed 45 Times Today


Secure transaction
What's Included?
Fast Download Speeds
Online & Offline Access
Access PDF Contents & Bookmarks
Full Search Facility
Print one or all pages of your manual
$28.99
This vehicle maintenance sheet for the JAGUAR 3.6 Litre and 5.3 Litre XJS is designed to provide essential information for servicing. It is a valuable resource for professional mechanics as well as DIY enthusiasts. The sheet includes details for VINs ranging from 134286 to 179736.


