


I
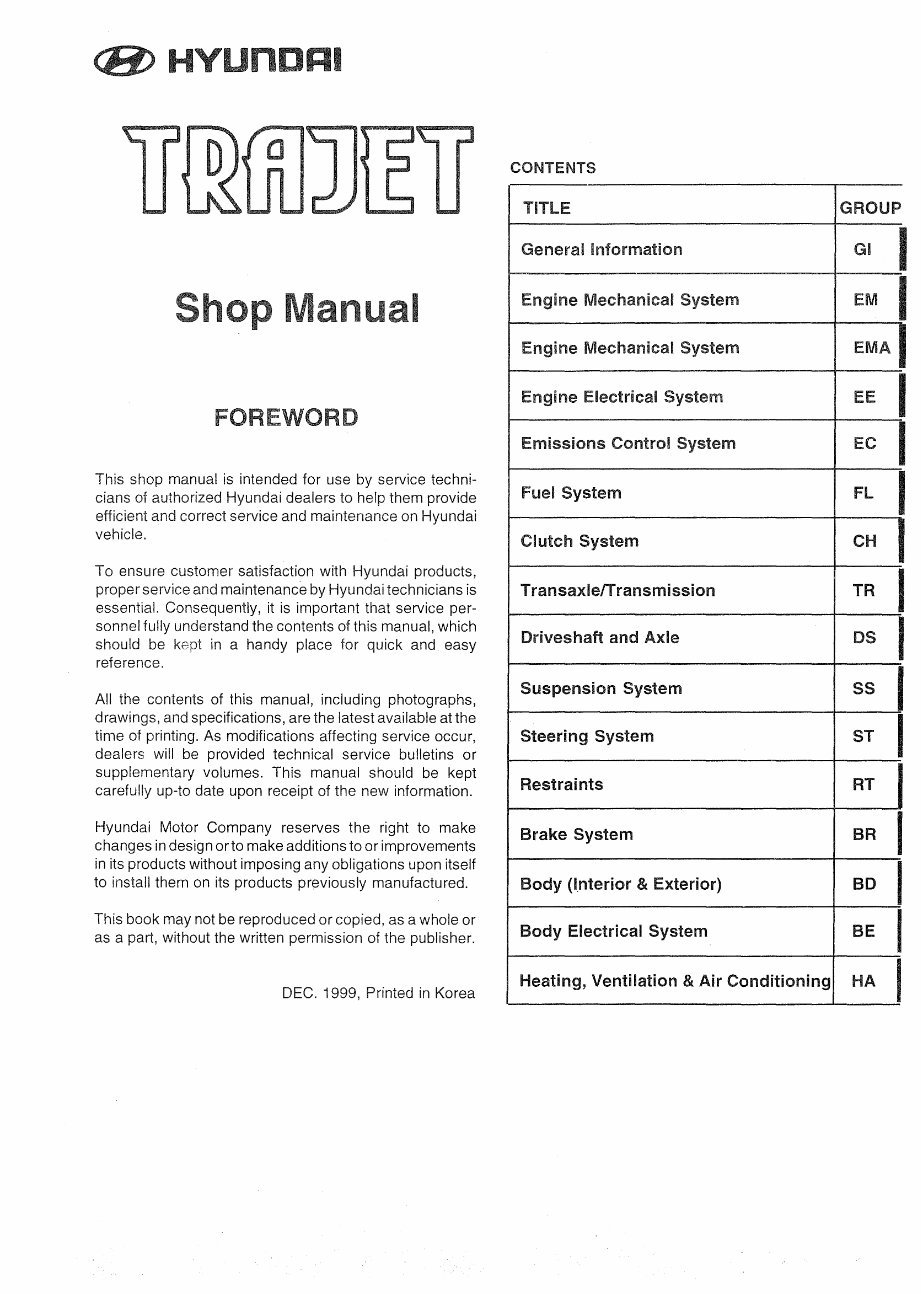
DEC. 1999, Printed in Korea
FOREWORD
CONTENTS
TITLE GROUP
General Information GI
I
Engine Mechanical System EM
I
Engine Mechanical System
EMA I
Engine Electrical System EE
I
Emissions Control System EC
I
Fuel System FL
I
CI utch System CH
I
TransaxlelTransmission TR
I
Driveshaft and Axle DS
I
Suspension System 5S
I
Steering System ST
I
Restraints RT
Brake System SR
I
Body (I.nterior & Exterior) BD
I
Body Electrical System BE
I
Heating, Ventilation & Air Conditioning HA
I
I
This shop manual is intended for use by service techni-
cians of authorized Hyundai dealers to help them provide
efficient and correct service and maintenance on Hyundai
vehicle.
All the contents of this manual, including photographs,
drawings, and specifications, are the latest available at the
time of printing. As modifications affecting service occur,
dealers will be provided technical service bulletins or
supplementary volumes. This manual should be kept
carefully up-to date upon receipt of the new information.
To ensure customer satisfaction with Hyundai products,
proper service and maintenance by Hyundai technicians is
essential. Consequently, it is important that service per-
sonnel fully understand the contents of this manual, which
should be kept in a handy place for quick and easy
reference.
Hyundai Motor Company reserves the right to make
changes in design orto makeadditions to or improvements
in its products without imposing any obligations upon itself
to install them on its products previously manufactured.
This book may not be reproduced or copied, as a whole or
as a part, without the written permission of the publisher.
..
I
III
I I
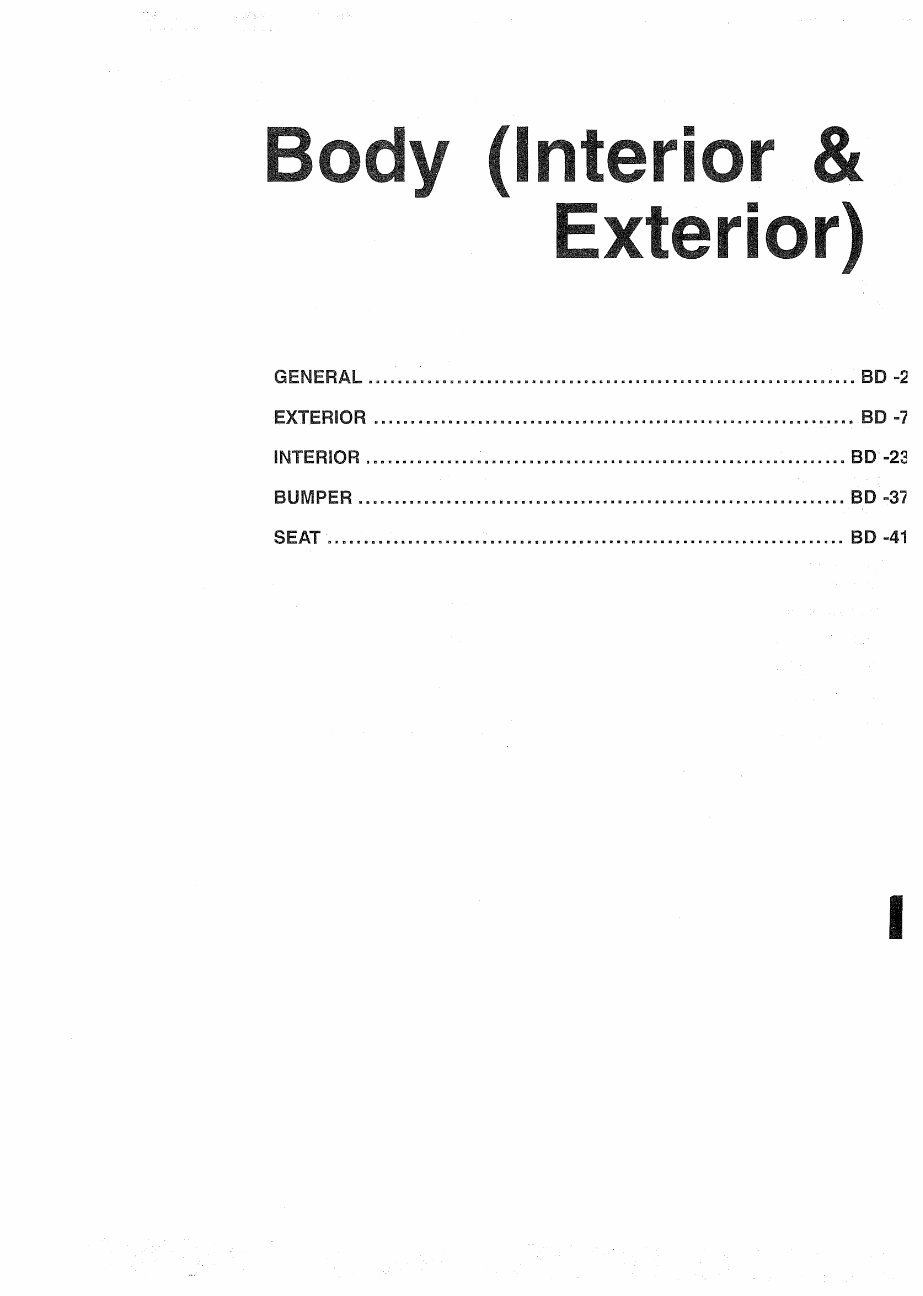
GENERAL BD -2
EXTERIOR BD -7
INTERIOR BD' ..23
BUM PER BD ..3'7
SEAT BD .. 41
I
SD -2
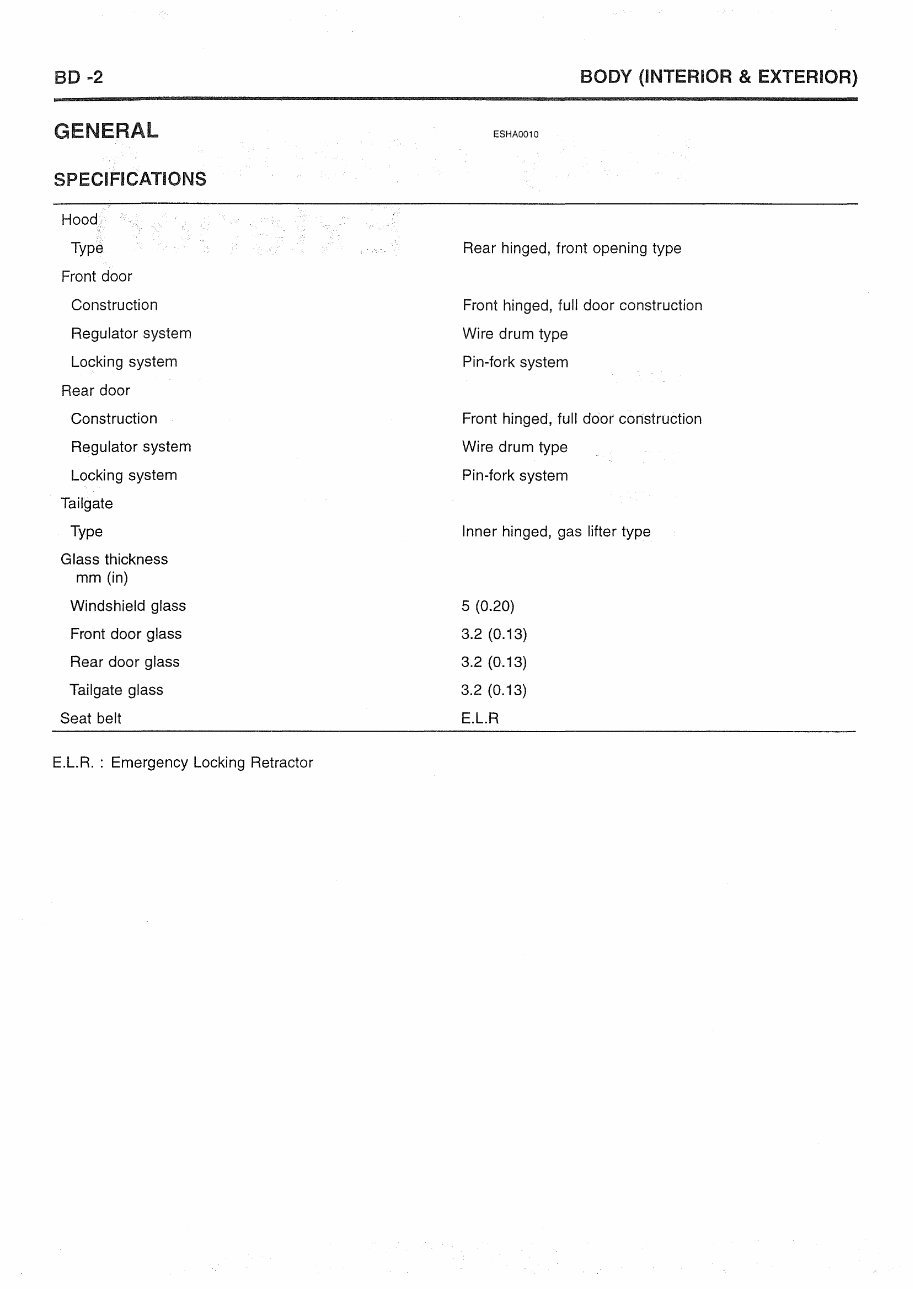
GENERAL
SPECIFICATIONS
Hood
Type
Front door
Construction
Regulator system
Locking system
Rear door
Construction
Regulator system
Locking system
Tailgate
Type
Glass thickness
mm (in)
Windshield glass
Front door glass
Rear door glass
Tailgate glass
Seat belt
E.L.R. : Emergency Locking Retractor
BODY (INTERIOR & EXTERIOR)
ESHA0010
Rear hinged, front opening type
Front hinged, full door construction
Wire drum type
Pin-fork system
Front hinged, full door construction
Wire drum type
Pin-fork system
Inner hinged, gas lifter type
5 (0.20)
3.2 (0.13)
3.2 (0.13)
3.2 (0.13)
E.L.R
GENERAL SD -3
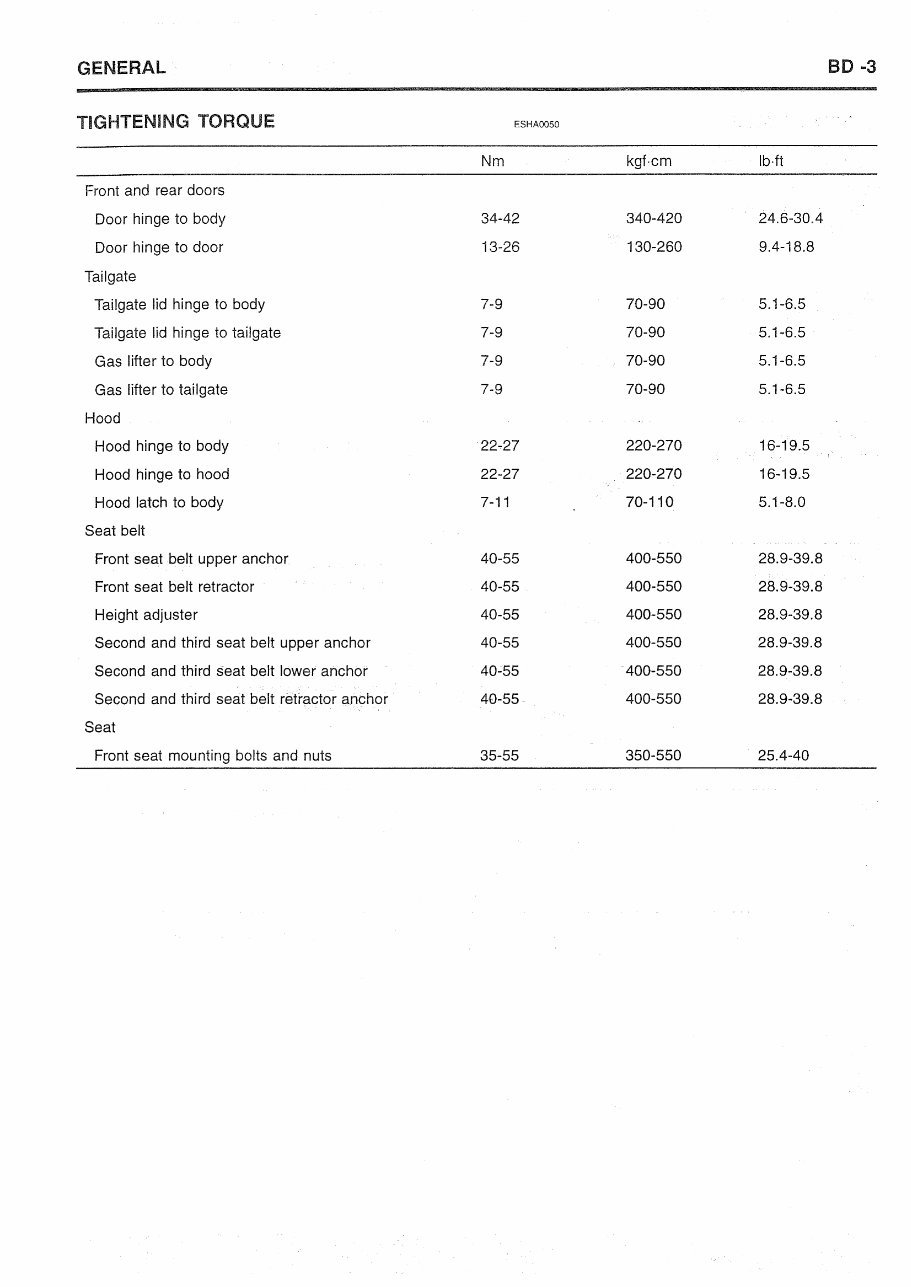
TIGHTENING TORQUE ESHAOO50
Nm kgf·cm Ib·ft
Front and rear doors
Door hinge to body 34-42 340-420 24.6-30.4
Door hinge to door 13-26 130-260 9.4-18.8
Tailgate
Tailgate lid hinge to body 7-9 70-90 5.1-6.5
Tailgate lid hinge to tailgate 7-9 70-90 5.1-6.5
Gas lifter to body 7-9 70-90 5.1-6.5
Gas lifter to tailgate 7-9 70-90 5.1-6.5
Hood
Hood hinge to body 22 .. 27 220-270 16-19.5
Hood hinge to hood 22-27 220-270 16-19.5
Hood latch to body 7-11 70-110 5.1-8.0
Seat belt
Front seat belt upper anchor 40-55 400-550 28.9-39.8
Front seat belt retractor 40-55 400-550 28.9-39.8
Height adjuster 40-55 400-550 28.9-39.8
Second and third seat belt upper anchor 40-55 400-550 28.9-39.8
Second and third seat belt lower anchor 40':55 400-550 28.9-39.8
Second and third seat belt retractor anchor 40-55 400-550 28.9-39.8
Seat
Front seat mounting bolts and nuts 35-55 350-550 25.4-40
SO -4
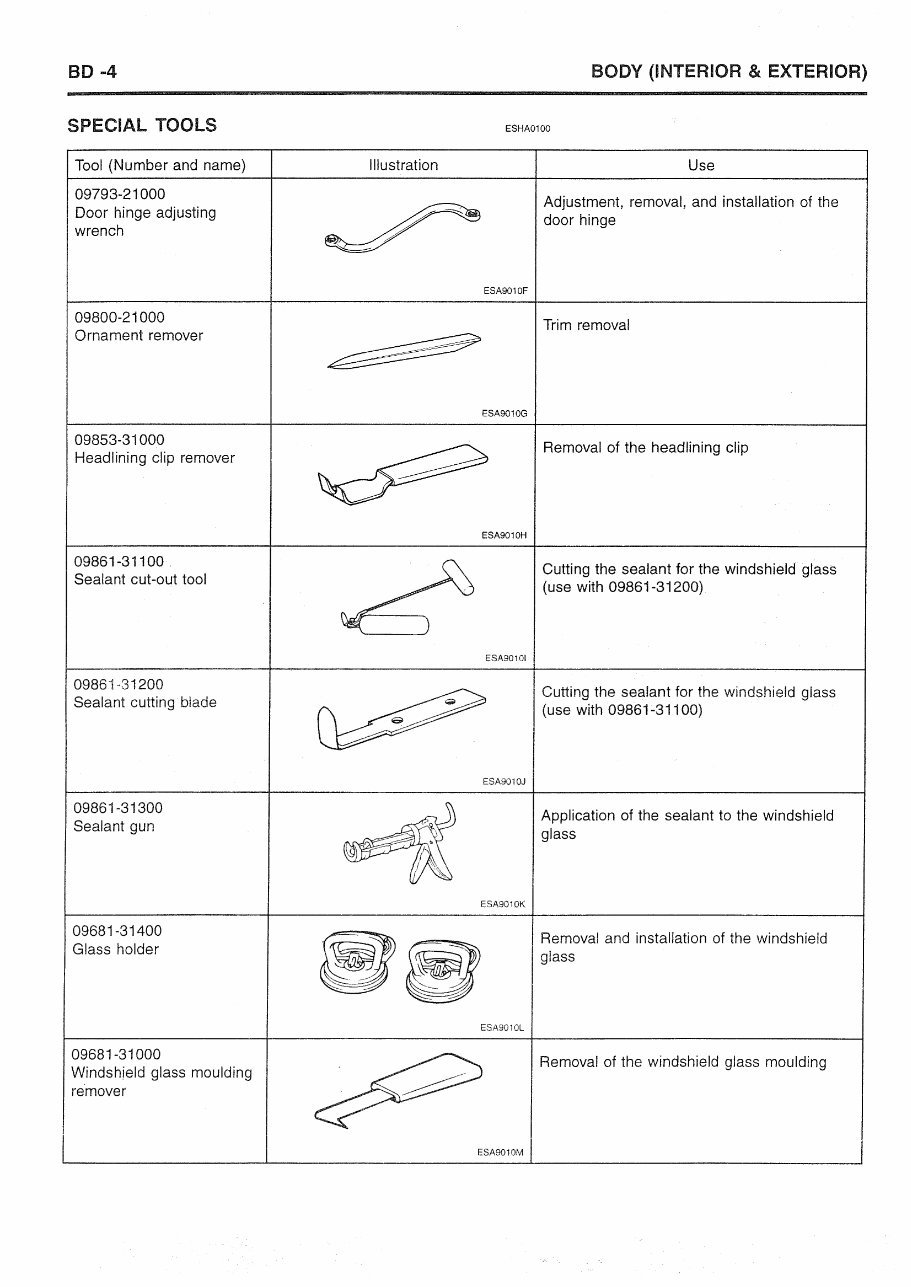
SPECIAL TOOLS
Tool (Number and name)
09793-21000
Door hinge adjusting
wrench
09800-21000
Ornament remover
Illustration
BODY (INTERIOR & EXTERIOR)
ESHA0100
Use
Adjustment, removal, and installation of the
door hinge
ESA901OF
Trim removal
ESA9010G
09853-31 000
Headlining clip remover
Removal of the headlining clip
09861-31100
Sealant cut-out tool
ESA9010H
Cutting the sealant for the windshield glass
(use with 09861-31200)
ESA90101
09861-31200
Sealant cutting· blade
Cutting the sealant for the windshield glass
(use with 09861-31100)
09861-31300
Sealant gun
ESA9010J
Application of the sealant to the windshield
glass
ES.A9010K
09681-31400
Glass holder
Removal and installation of the windshield
glass
ES,u.9010L
09681-31000
Windshield glass moulding
remover
Removal of the windshield glass moulding
ESA9010M I
GENERAL
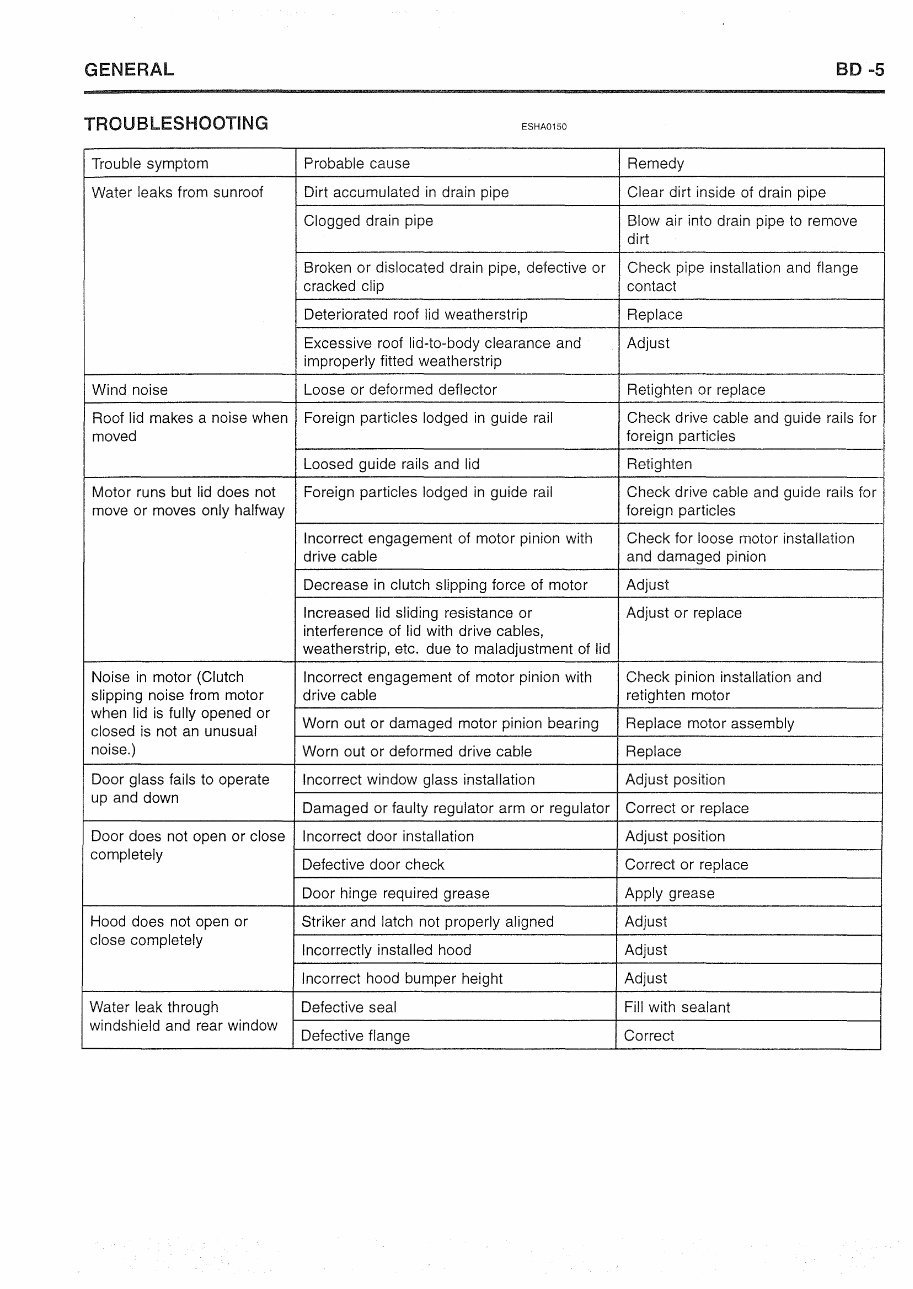
TROUBLESHOOTING ESHA0150
SD -5
Trouble symptom Probable cause Remedy
Water leaks from sunroof Dirt accumulated in drain pipe Clear dirt inside of drain pipe
Clogged drain pipe Blow air into drain pipe to remove
dirt
Broken or dislocated drain pipe, defective or Check pipe installation and flange
cracked clip contact
Deteriorated roof lid weatherstrip Replace
Excessive roof lid-to-body clearance and Adjust
improperly fitted weatherstrip
Wind noise Loose or deformed deflector Retighten or replace
Roof lid makes a noise when Foreign particles lodged in guide rail Check drive cable and guide rails for
moved foreign particles
Loosed guide rails and lid Retighten
Motor runs but lid does not Foreign particles lodged in guide rail Check drive cable and guide rails for
move or moves only halfway foreign particles
Incorrect engagement of motor pinion with Check for loose motor installation
drive cable and damaged pinion
Decrease in clutch slipping force of motor Adjust
Increased lid sliding resistance or Adjust or replace
interference of lid with drive cables,
weatherstrip, etc. due to maladjustment of lid
Noise in motor (Clutch Incorrect engagement of motor pinion with Check pinion installation and
slipping noise from motor drive cable retighten motor
when lid is fully opened or
I
closed is not an unusual
Worn out or damaged motor pinion bearing Replace motor assembly I
noise.)
Worn out or deformed drive cable Replace
Door glass fails to operate Incorrect window glass installation Adjust position
up and down
Damaged or faulty regulator arm or regulator Correct or replace
Door does not open or close Incorrect door installation Adjust position
completely
Defective door check Correct or replace
Door hinge required grease Apply grease
Hood does not open or Striker and latch not properly aligned Adjust
close completely
Incorrectly installed hood Adjust
Incorrect hood bumper height Adjust
Water leak through Defective seal Fill with sealant
windshield and rear window
Defective flange Correct
SD -6
BODY (INTERIOR & EXTERIOR)
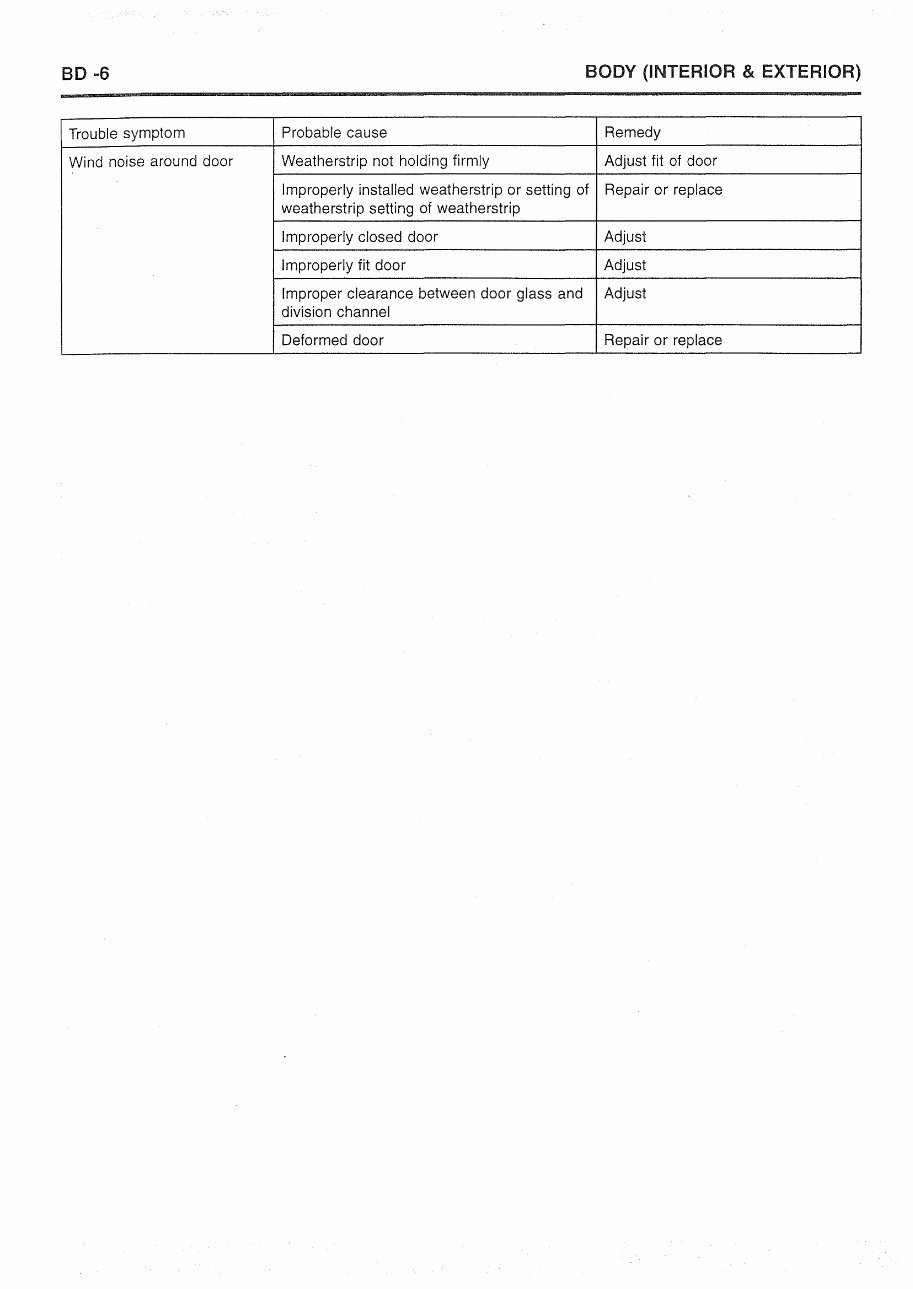
Trouble symptom Probable cause Remedy
Wind noise around door Weatherstrip not holding firmly Adjust fit of door
Improperly installed weatherstrip or setting of Repair or replace
weatherstrip setting of weatherstrip
Improperly closed door Adjust
Improperly fit door Adjust
Improper clearance between door glass and Adjust
division channel
Deformed door Repair or replace
EXTERIOR
EXTERIOR
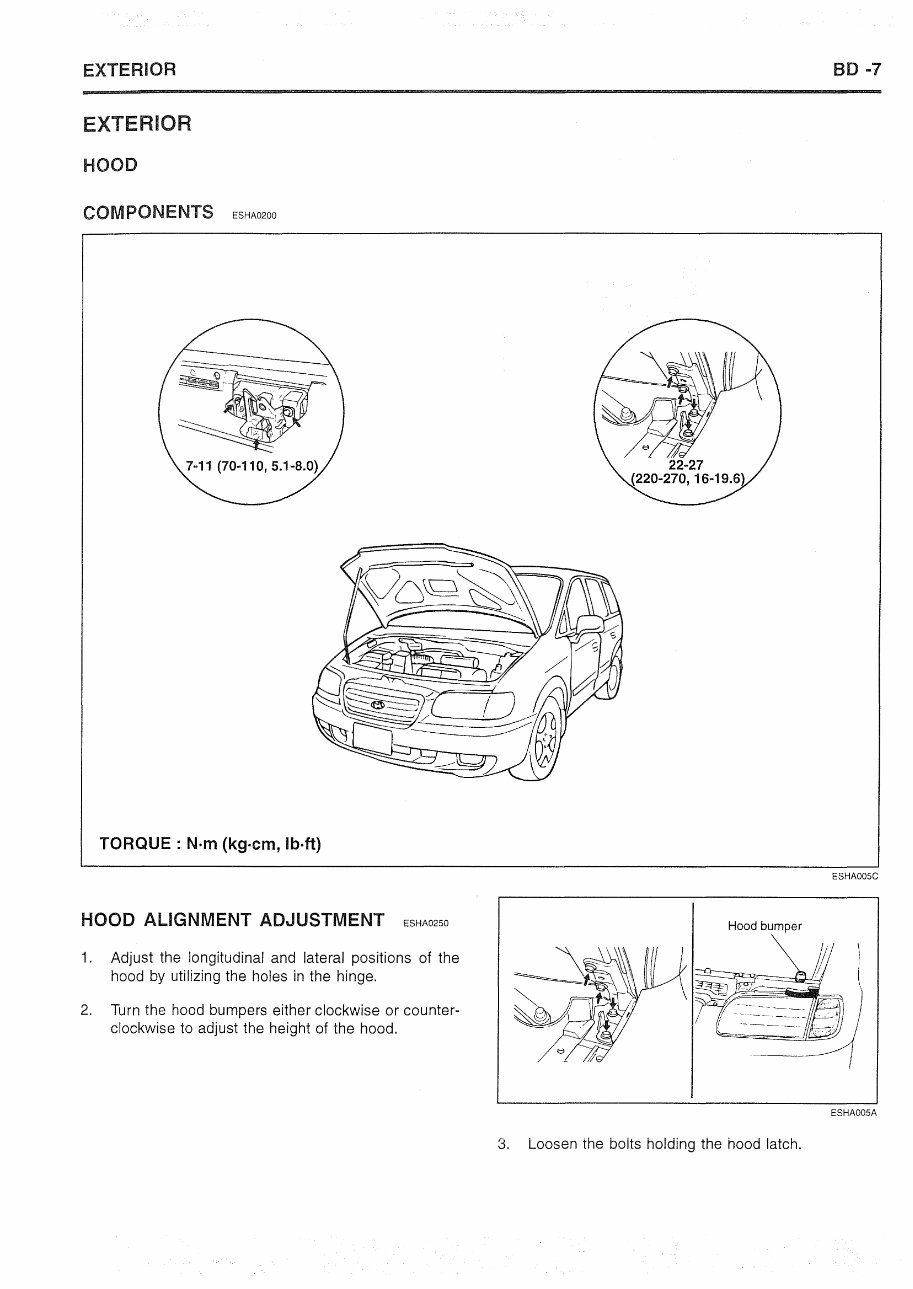
HOOD
COMPONENTS ESHA0200
SO -7
TORQUE: N·m (kg·em, Ib·ft)
HOOD ALIGNMENT ADJUSTMENT ESHA0250
Hood bumper
ESHA005C
1. Adjust the longitudinal and lateral positions of the
hood by utilizing the holes in the hinge.
2. Turn the hood bumpers either clockwise or counter-
clockwise to adjust the height of the hood.
ESHA005A
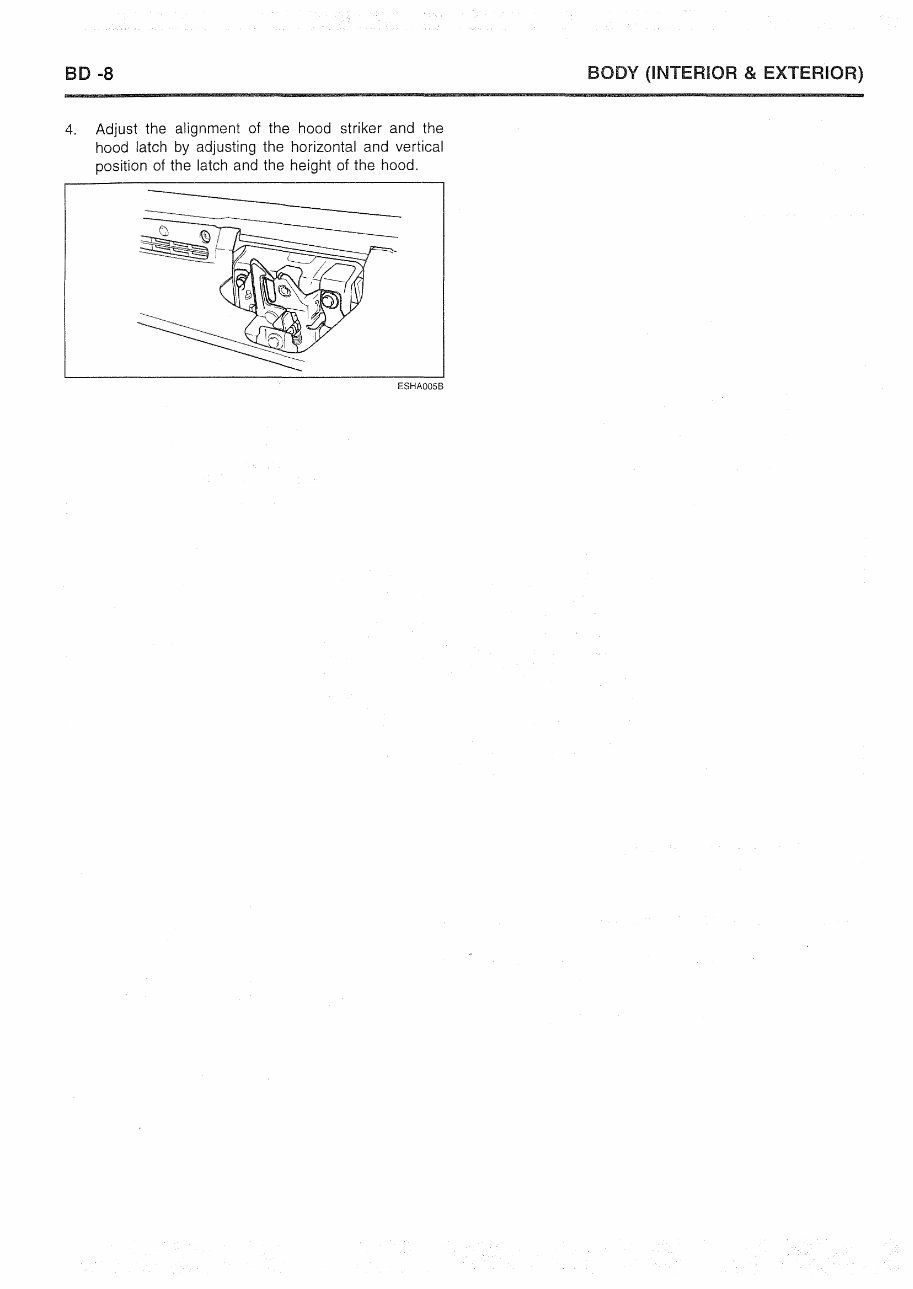
3. Loosen the bolts holding the hood latch.
SO -8
4. Adjust the alignment of the hood striker and the
hood latch by adjusting the horizontal and vertical
position of the latch and the height of the hood.
ESHAO05B
BODY (INTERIOR & EXTERIOR)
EXTERIOR
TAILGATE
REMOVAL AND INSTALLATION ESHA0300
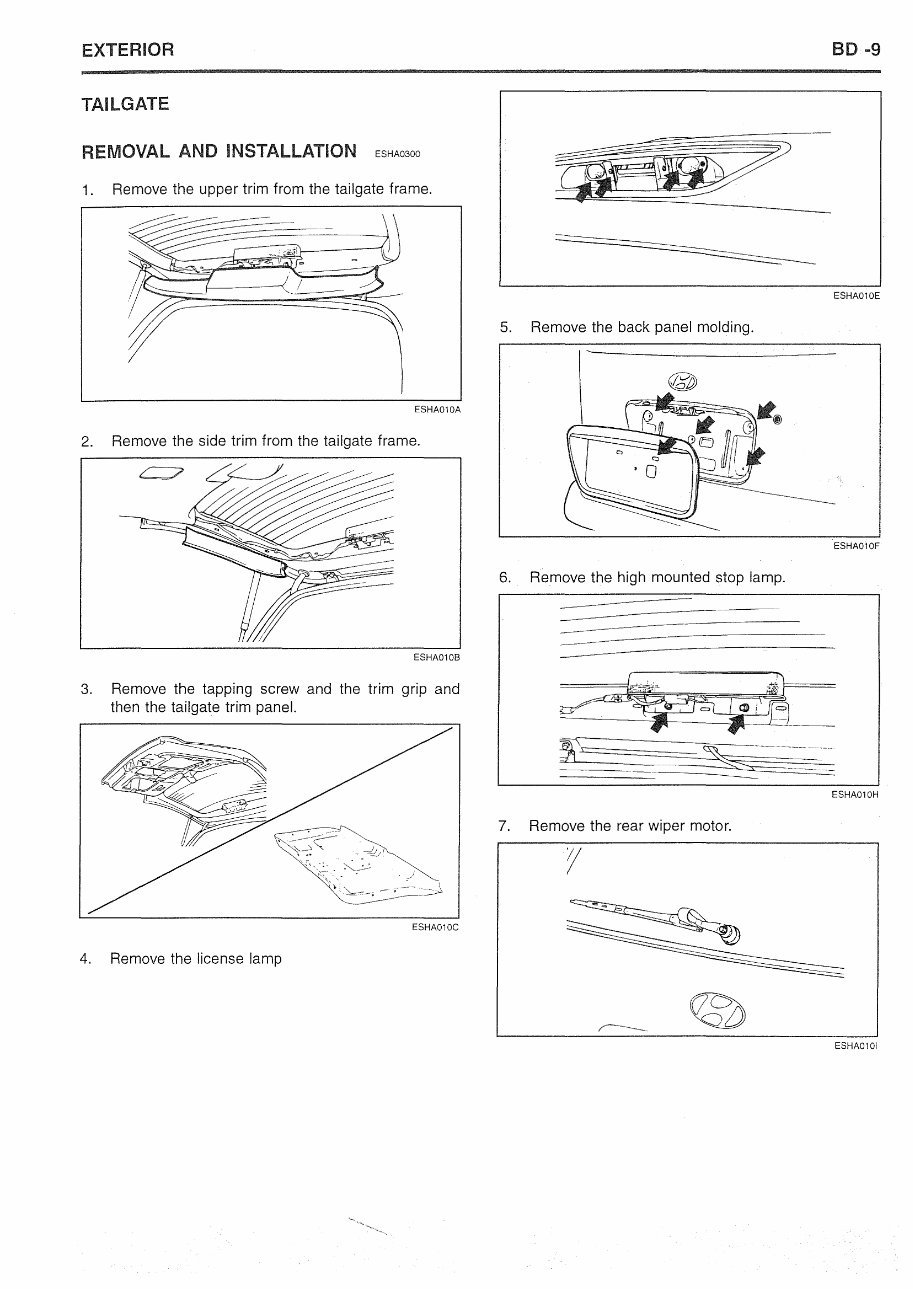
1. Remove the upper trim from the tailgate frame.
ESHA010A
2. Remove the side trim from the tailgate frame.
ESHA010B
3. Remove the tapping screw and the trim grip and
then the tailgate trim panel.
ESHA010C
4. Remove the license lamp
8D·-9
===--- -======-
ESHA010E
5. Remove the back panel molding.
ESHA010F
6. Remove the high mounted stop lamp.
ESHA010H
7. Remove the rear wiper motor.
ESHA0101
You're Reading a Preview
What's Included?
 Lifetime Access
Fast Download Speeds
Online & Offline Access
Access PDF Contents & Bookmarks
Full Search Facility
Print one or all pages of your manual
$46.99
1999-2008 Hyundai Trajet Service & Repair Manual
Viewed 93 Times Today

What's Included?
Lifetime Access
Fast Download Speeds
Online & Offline Access
Access PDF Contents & Bookmarks
Full Search Facility
Print one or all pages of your manual
$46.99

Secure transaction
What's Included?
Lifetime Access
Fast Download Speeds
Online & Offline Access
Access PDF Contents & Bookmarks
Full Search Facility
Print one or all pages of your manual
Description
Fix your 1999-2008 Hyundai Trajet yourself. This service and repair manual gives you the exact steps to handle engine work, transmission rebuilds, suspension fixes, electrical diagnostics, and everything in between. No guesswork, no expensive shop bills.
You get detailed diagrams, torque specs, fluid capacities, and troubleshooting charts for every major system. Maintenance schedules, parts identification, wiring schematics—it's all here. Download it now and start your repair today.


