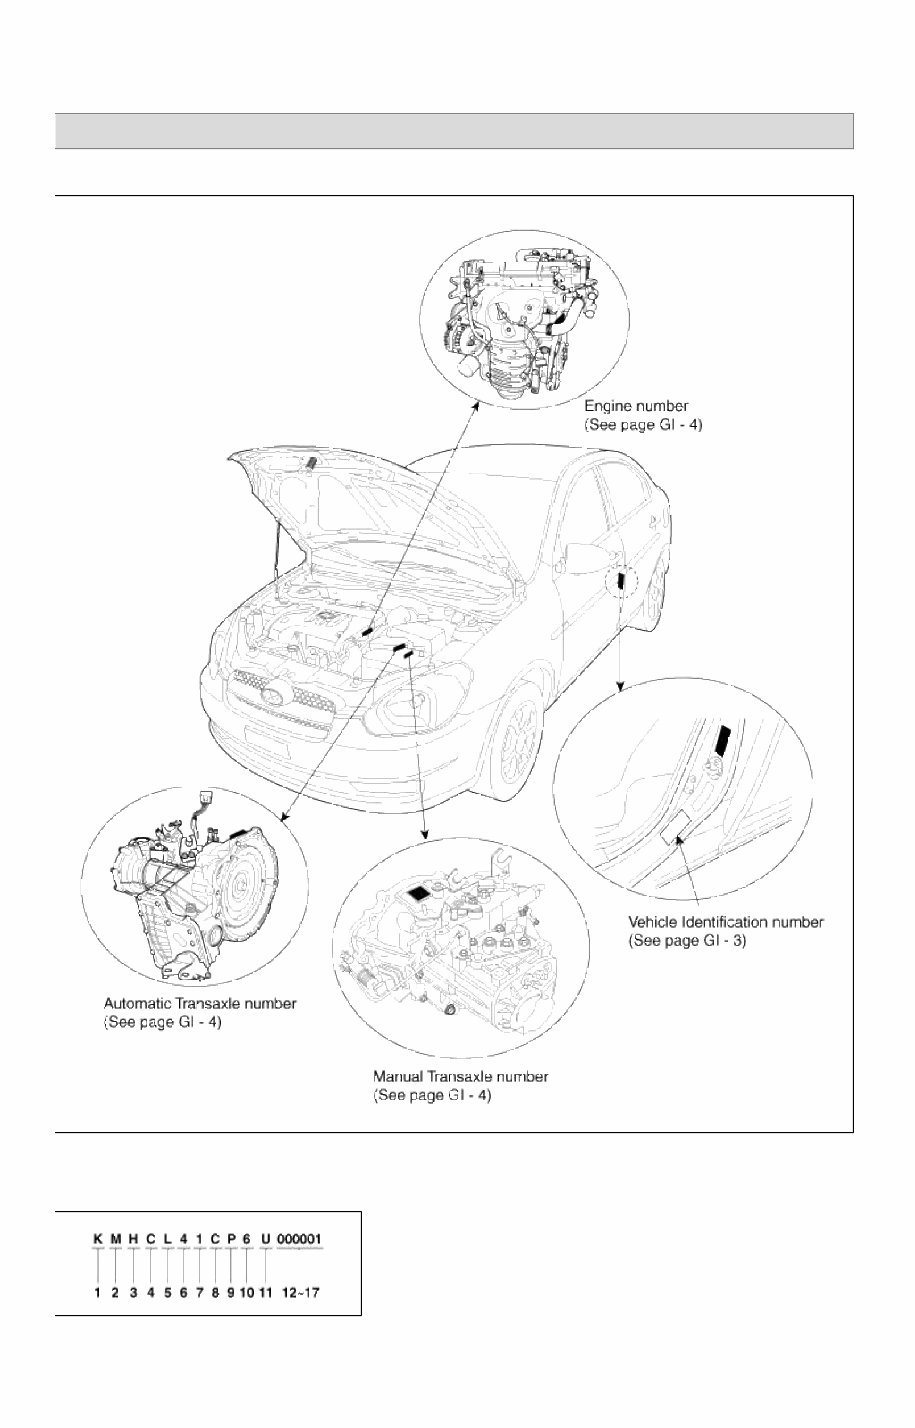
ACCENT(MC) > 2008 > G 1.6 DOHC > General Information General Information > General Information > General Information IDENTIFICATION NUMBER LOCATIONS IDENTIFICATION NUMBER DESCRIPTION VEHICLE IDENTIFICATION NUMBER 1 : Geographic zone Page 1 of 23 tomsn048@gmail.com
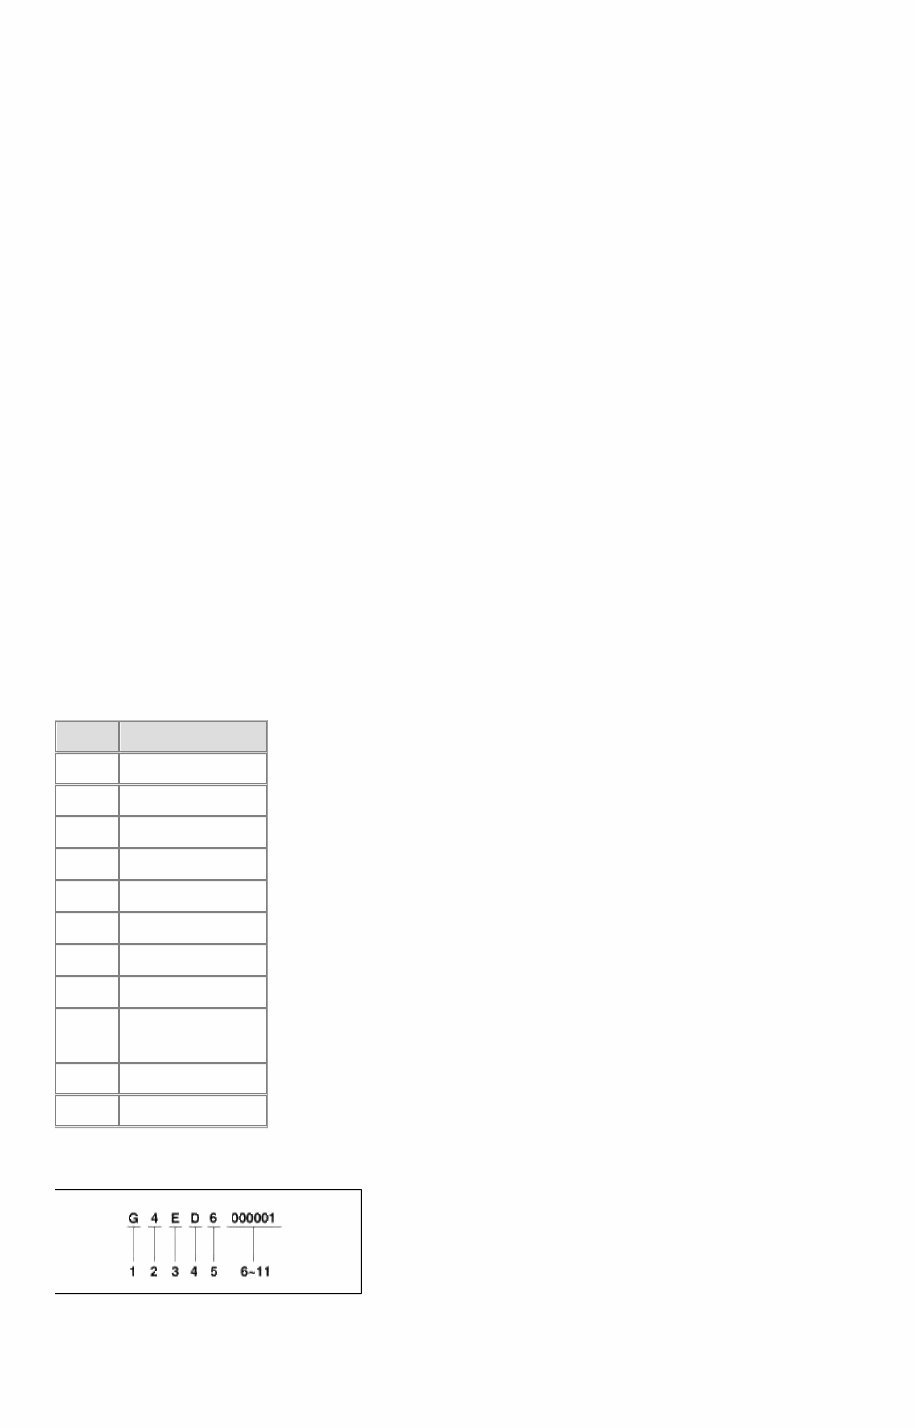
- K = Korea 2 : Manafacturer - M = Hyundai motor company 3 : Vehicle type - H = Passenger 4 : Vehicle Line - C = ACCENT 5 : Model & Series - L = STANDARD (L) - M = DELUXE (GL) - N = SUPER DELUXE (GLS) 6 : Body type - 3 = Sedan 3 door - 4 = Sedan 4 door 7 : Safety device - 0 = None - 1 = Active belt (Driver + Passenger) - 2 = Passive belt (Driver + Passenger) 8 : Engine type - C = 1.6 GASOLINE 9 : Driving type - P = LHD, R = RHD 10 : Model year - 5 = 2005, 6 = 2006 11 : Plant location - U = Ulsan plant 12 : Sequential number - 000001 ~ 999999 PAINT CODE CODE COLOR NW NOBLE WHITE EB EBONY BLACK HL HIPHOP RED 5S SPACE SILVER 2B SKY BLUE 9G GOLD BEIGE 3E BLUE ONYX 3W SHEER YELLOW 2M MIDNIGHT GRAY 8N LEAF GREEN 5R RUBY RED ENGINE IDENTIFICATION NUMBER 1. Engine fuel - G = Gasoline Page 2 of 23 tomsn048@gmail.com
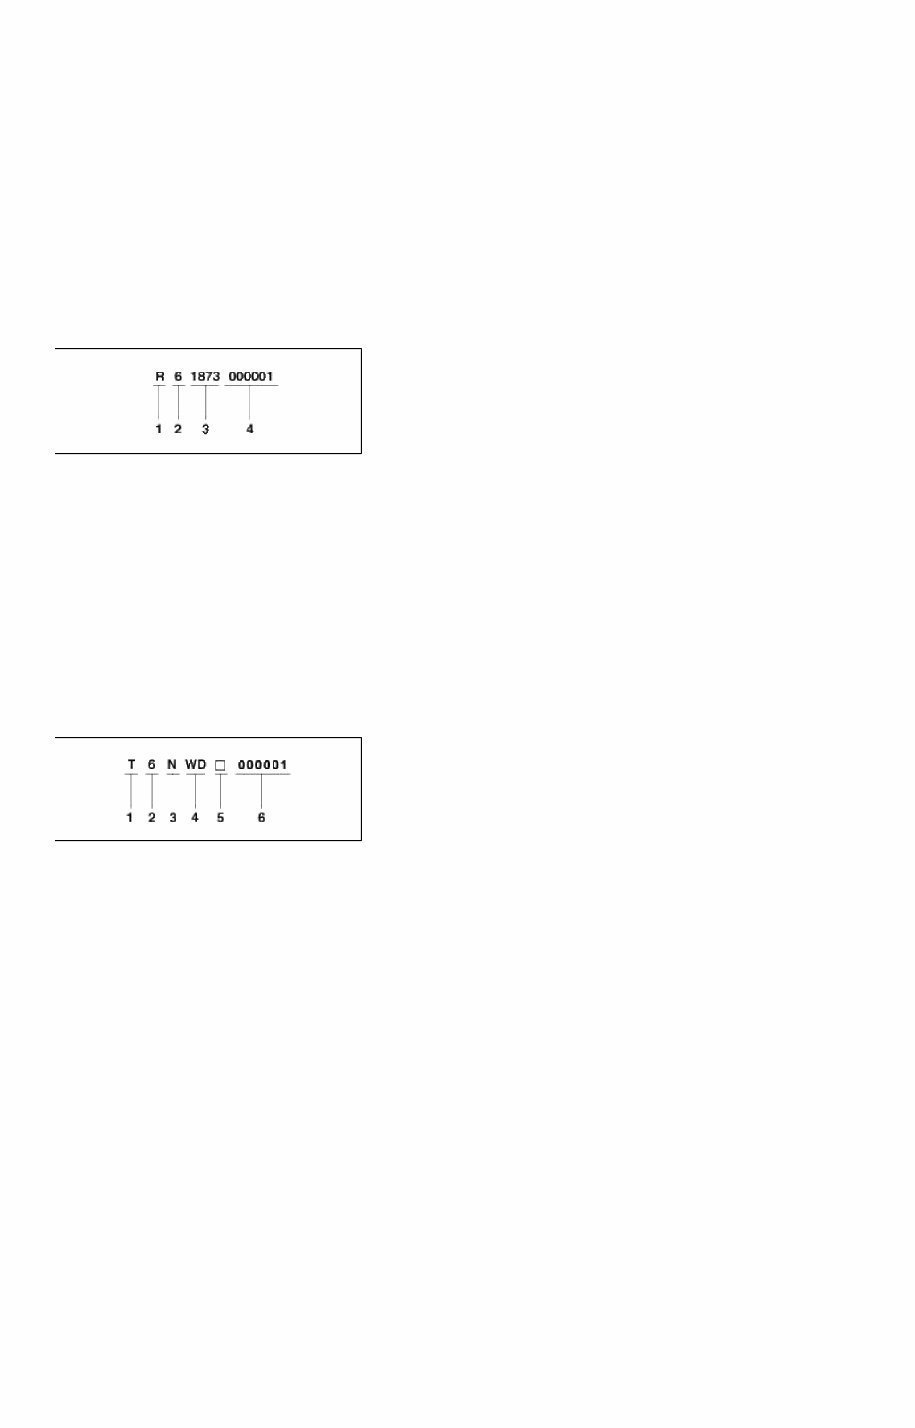
2. Engine range - 4 = 4 cycle 4 cylinder 3. Engine development order - E = ALPHA Engine 4. Engine capacity - D = 1,599cc 5. Production year - 5 : 2005, 6 : 2006 6. Engine production sequence number - 000001 ~ 999999 TRANSMISSION IDENTIFICATION NUMBER MANUAL MANUAL 1. Model - R = M5CF1 - P = M5CF2 2. Production year - 5 : 2005, 6 : 2006 3. Gear ratio(Tooth number) <Differential drive gear tooth number / Output shaft gear tooth number> - 1873 = 73/18 = 4.056 4. Transaxle production sequence number - 000001 ~ 999999 AUTOMATIC 1. Modle - T = A4AF3 2. Production year - 5 : 2005, 6 : 2006 3. Gear ratio - N = 4.041 4. Detailed chassification - WD = 1.6 CVVT 5. Spare 6. Transaxle production sequence number - 000001 ~ 999999 WARNING / CAUTION LABEL LOCATIONS Page 3 of 23 tomsn048@gmail.com
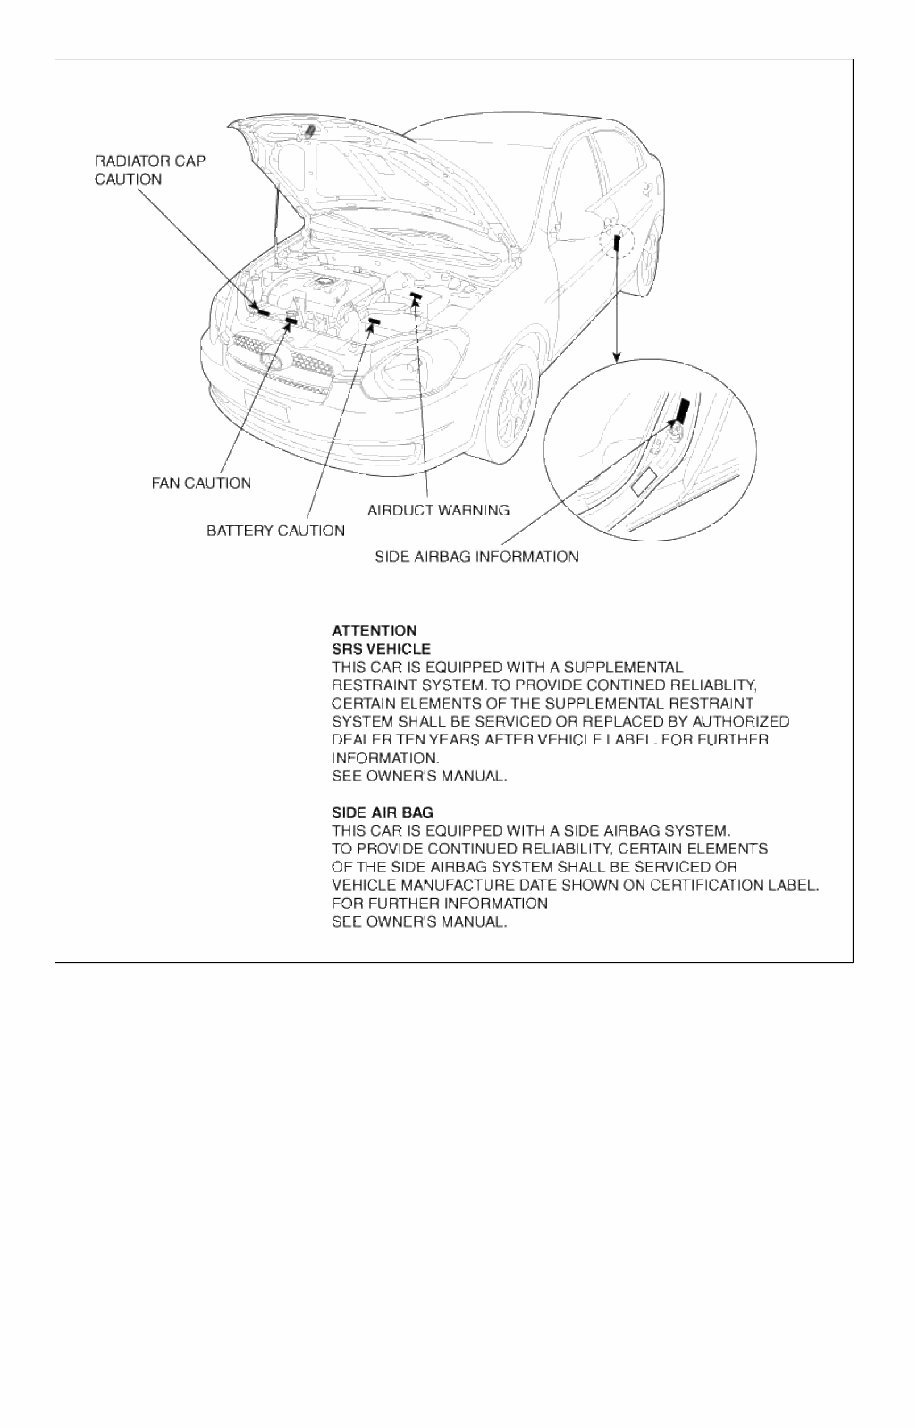
AIR BAG WARNING / CAUTION LABEL Page 4 of 23 tomsn048@gmail.com
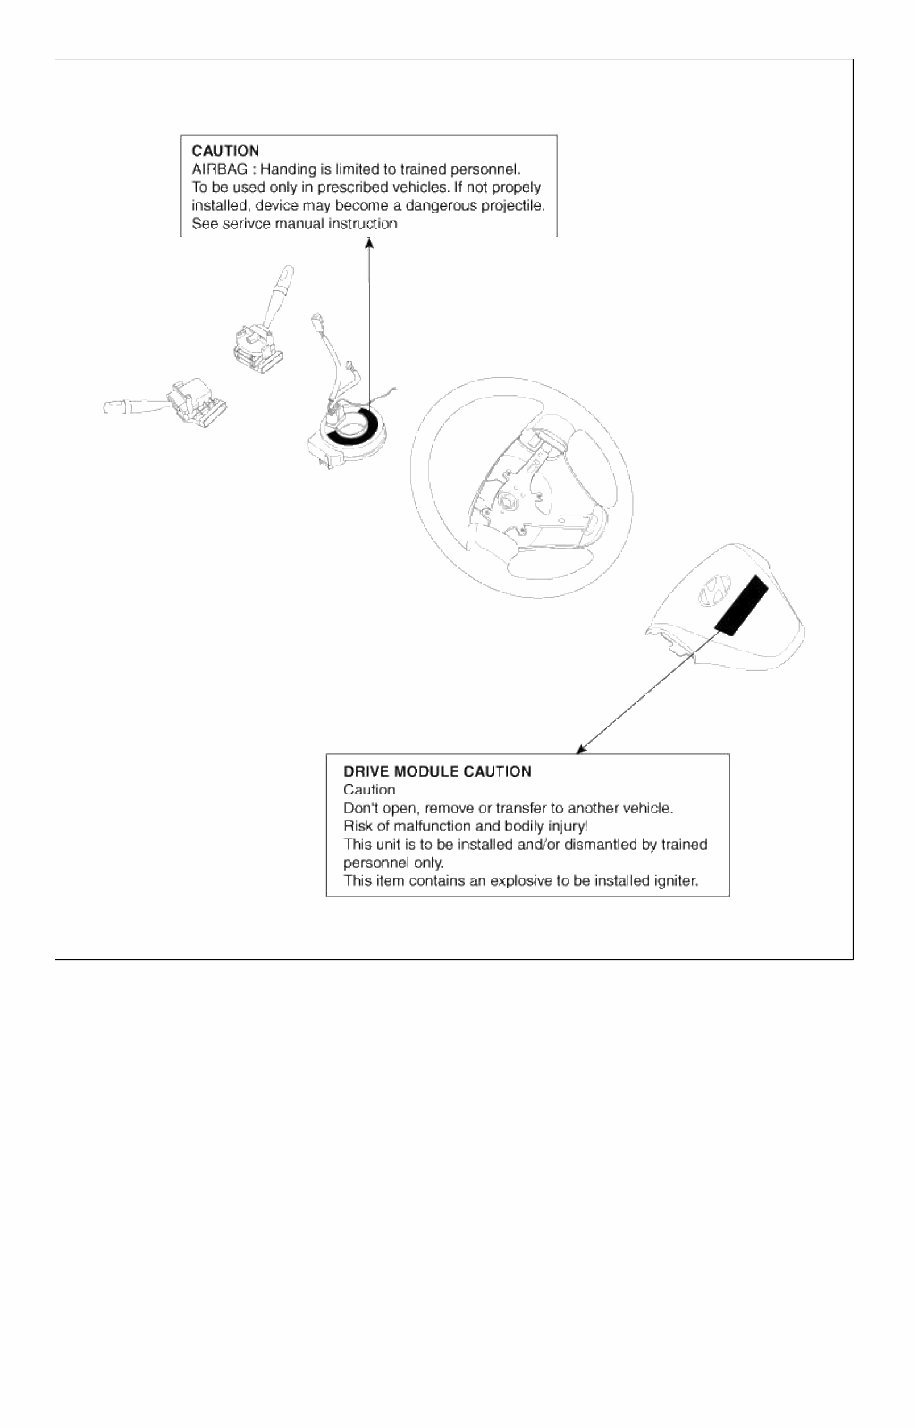
AIR BAG WARNING / CAUTION LABEL (CONT’D) Page 5 of 23 tomsn048@gmail.com
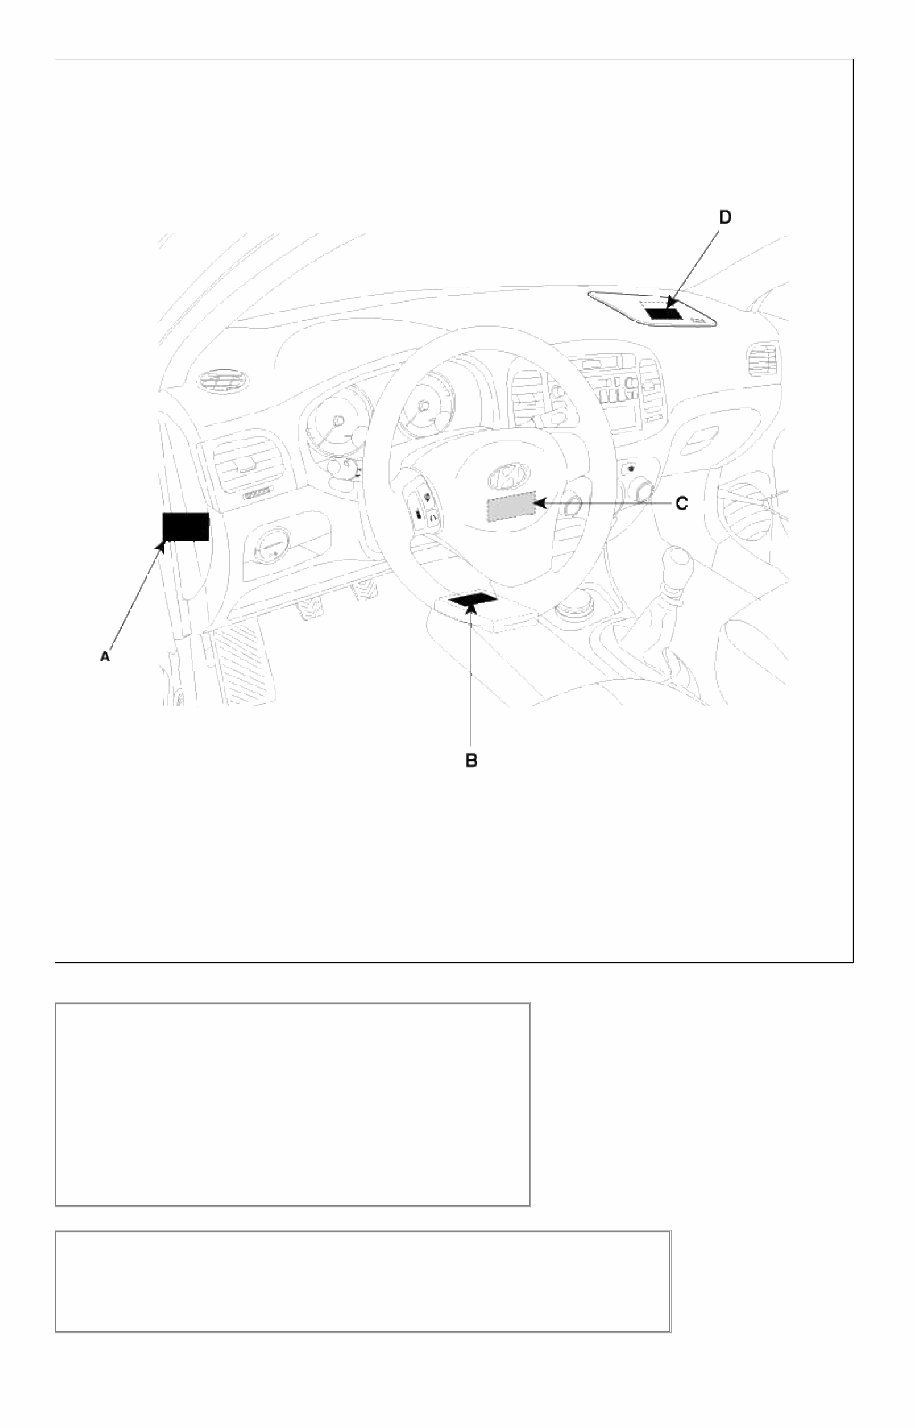
AIR BAG WARNING / CAUTION LABEL (CONT’D) A : WARNING SEE OWNER'S MANUAL. This car is equipped a side airbag for each front seat. • Do not use any accessory seat covers. • Use of other seat covers could reduce the effect of the system. • Do not install any accessories on the side or near the side airbag. • Do not use excessive force on the side of the seal. • For further information, see the owner's manual. B : CAUTION AIRBAG ESPE UNIT Detach connector before unmounting. Assemble strictly according to manual instructions. Page 6 of 23 tomsn048@gmail.com
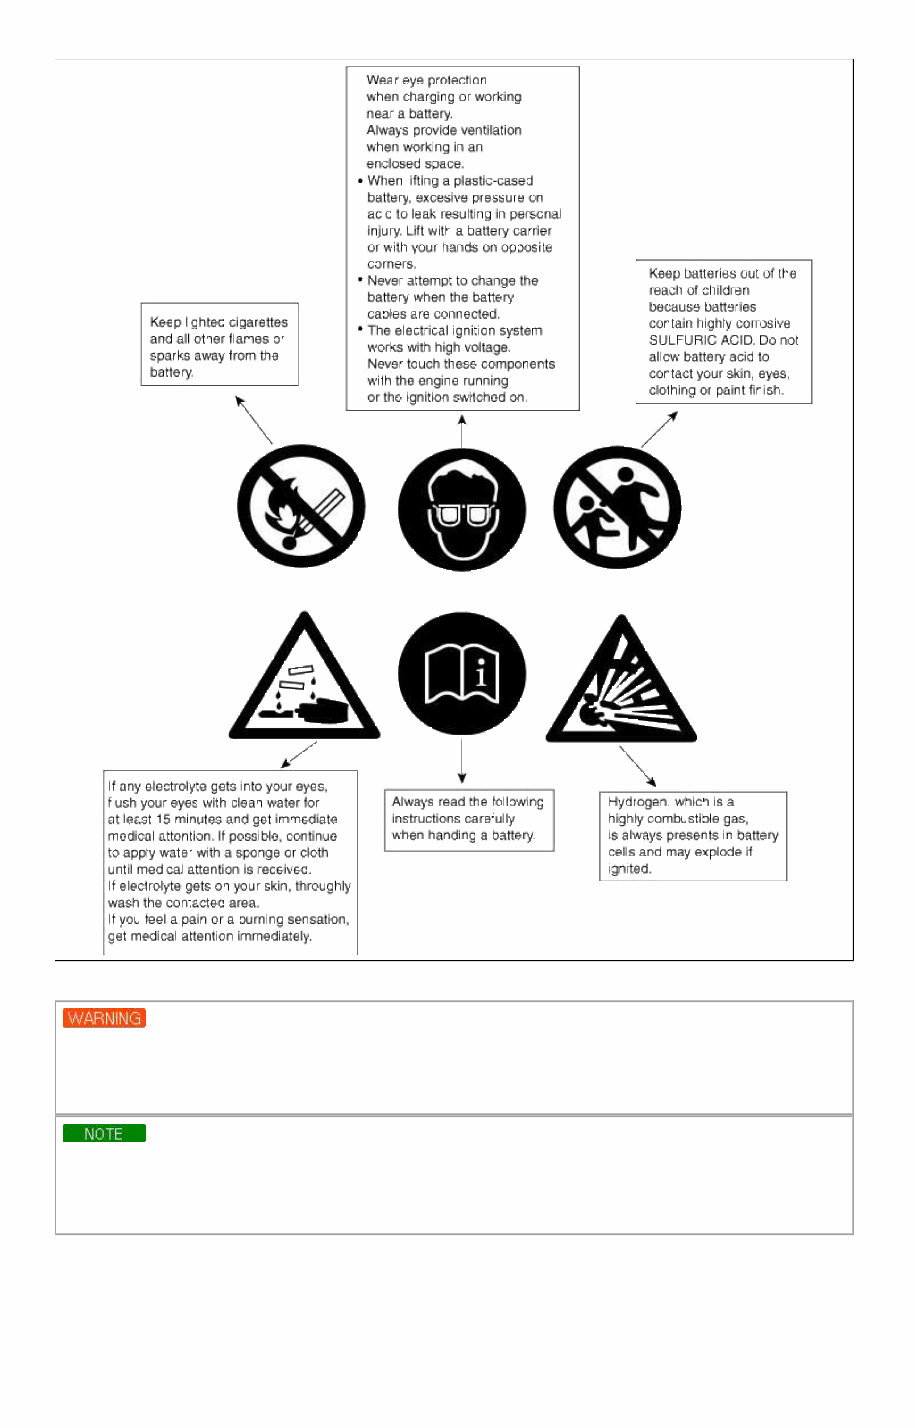
C : PASSENGER MODULE CAUTION CAUTION Don't open, remove or transfer to another vehicle. Risk of malfunction and bodily injury! This unit is to be installed and/or dismantled by trained personnel only. This item contains an explosive to be installed igniter. D : SUPPLEMENTAL RESTRAINT SYSTEM (AIRBAG) INFORMATION • The airbag is a Supplement Restraint System (SRS). You must always wear the seat belts. • The airbag system condition is normal when the "SRS" lamp in the cluster flashes approximately 6 times after the ignition key is turned on and then goes off. • If any of the following condition occur, the system must be serviced. • "SRS" lamp does not light up when the key is turned on. • "SRS" lamp stays lit or flashes continuously. • The airbag has inflated. • The airbag system must be inspected by an authorized dealer ten years after the vehicle manufacture date shown on the certification label, located on left front door opening area. WARNING Failure to the above instructions may result in injury to you or other occupants in the vehicle • See the "SRS" section in Owner's Manual for more information about airbags. BATTERY CAUTION LABEL DESCRIBTION Page 7 of 23 tomsn048@gmail.com
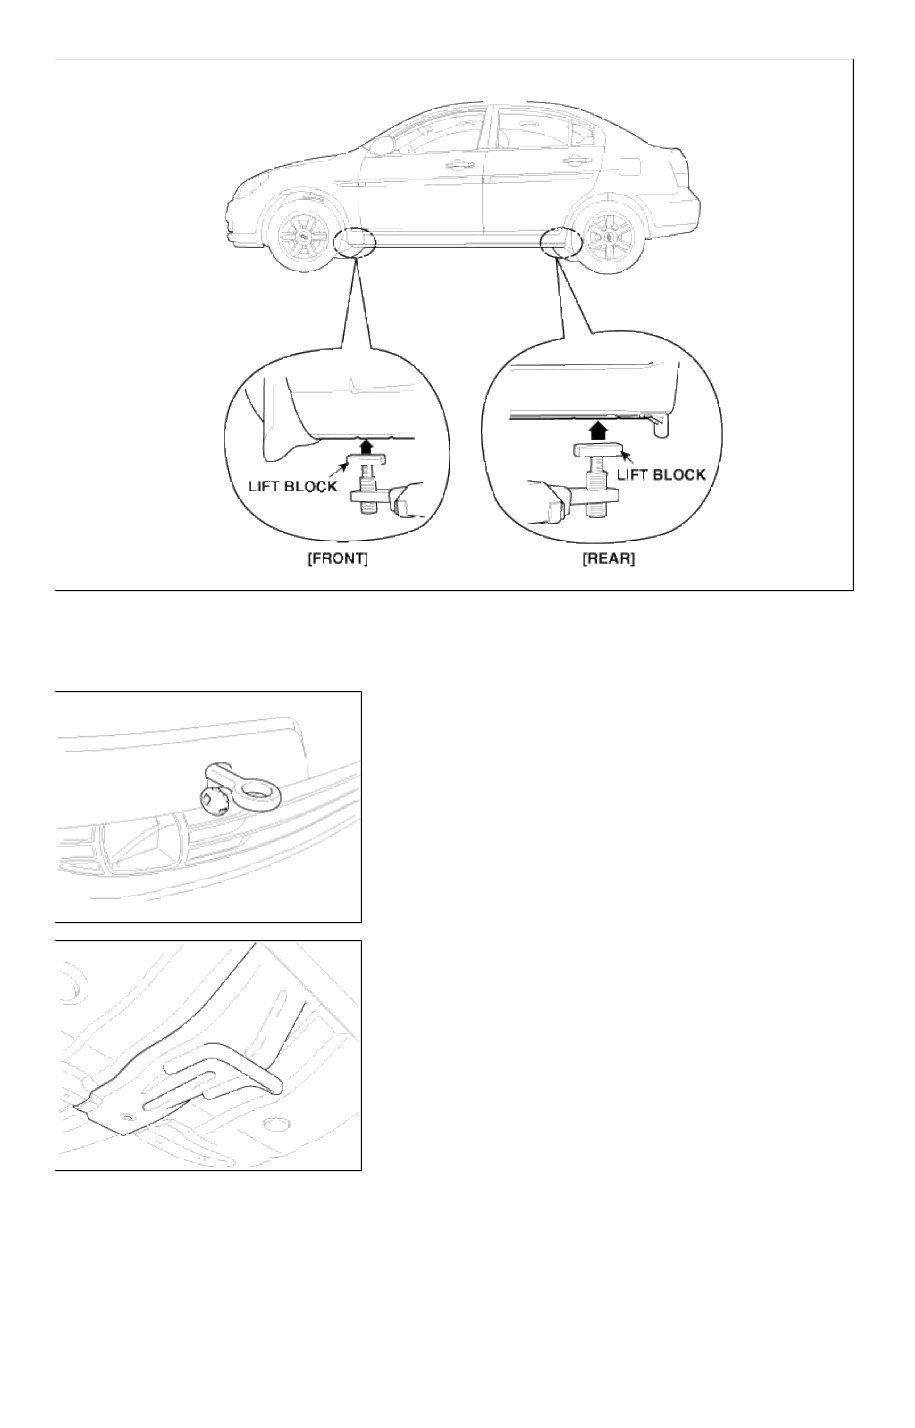
LIFT AND SUPPORT POINTS When heavy rear components such as suspension, fuel tank, spare tire, tailgate and trunk lid are to be removed, place additional weight in the luggage area before hoisting. When substantial weight is removed from the rear of the vehicle, the center of gravity may change and cam cause the vehicle to tip forward on the hoist. • Since each tire/wheel assembly weights approximately 30lbs (14kg), placing the front wheels in the luggage area can assist with the weight distribution. • Use the same support points to support the vehicle on safety stands. 1. Place the lift blocks under the support points as shown in the illustration. 2. Raise the hoist a few inches (centimeters) and rock the vehicle to be sure it is firmly supported. 3. Raise the hoist to full height to inspect the lift points for secure support. Page 8 of 23 tomsn048@gmail.com
TOWING If the vehicle needs to be towed, call a professional towing service. Never tow vehicle with just a rope or chain. It is very dangerous. EMERGENCY TOWING There are three propular methods of towing a vehicle : If the vehicle cannot be transported by flat-bed, if should be towed with the front wheels off the ground. If due to damage, the vehicle must be toward with the front wheels on the ground, do not following : Manual Transmission • Release the parking brake. • Shift the transmission to neutral. Page 9 of 23 tomsn048@gmail.com
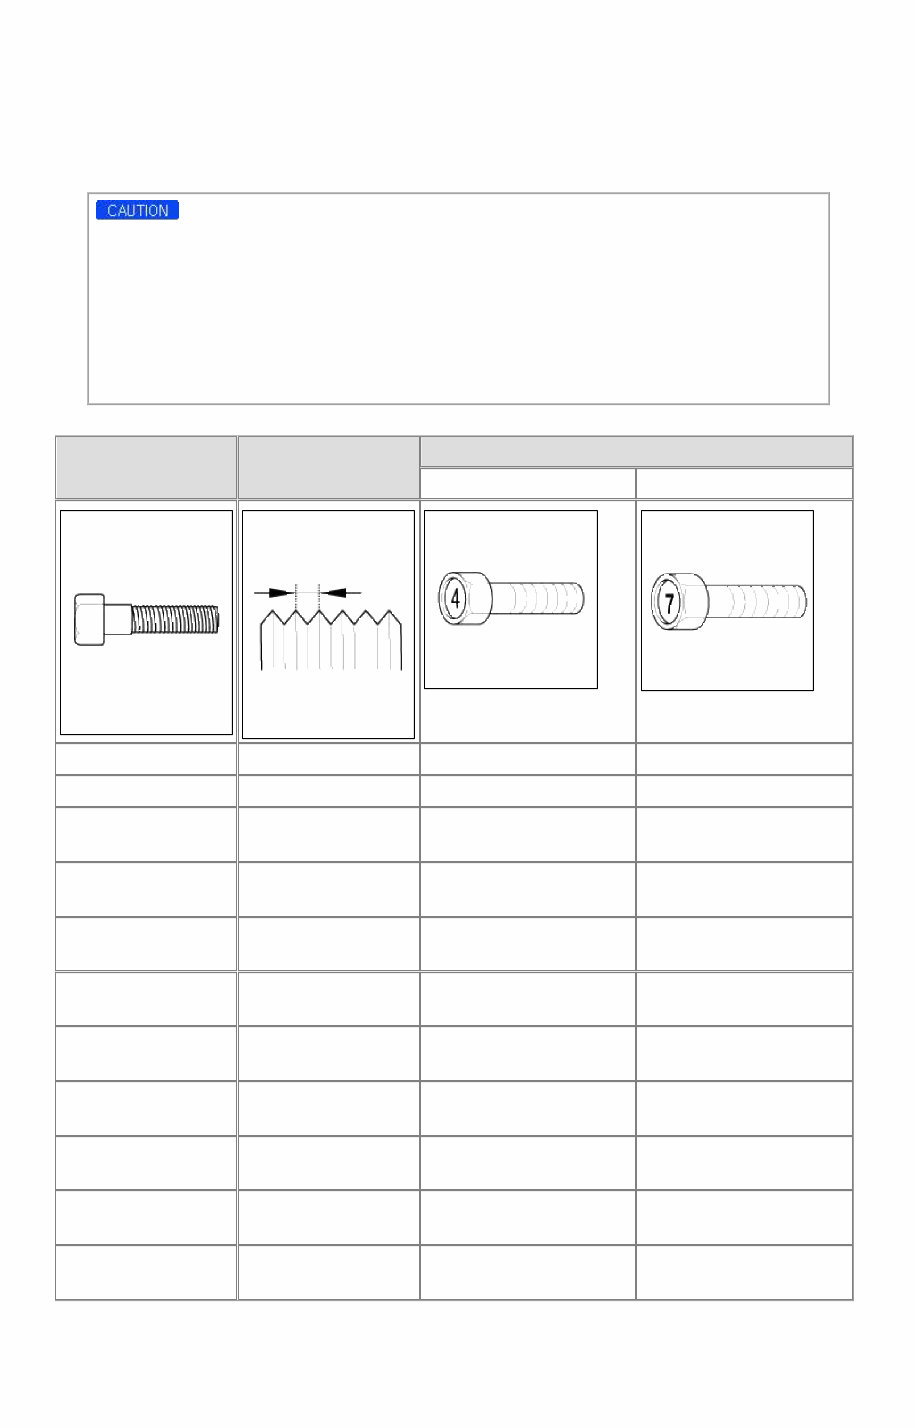
Automatic Transmission • Release the parking brake. • Start the engine. • Shift to [D] position, then [N] position. • Turn off the engine. • Improper towing preparation will damage the transmission. Follow the above procedure exactly. If you cannot shift the transmission or start the engine (automatic transmission), your vehicle must be transported on a flatbed. • It is the best to tow vehicle no farther than 19miles (30km), and keep the speed below 30mph (50km/h). • Trying to lift or tow your vehicle by the bumpers will cause serious damage. The bumpers are not designed to support the vehicle's weight. TIGHTENING TORQUE TABLE OF STANDARD PARTS Bolt nominal diameter (mm) Pitch (mm) Torque Nm (kg.cm, lb.ft) Head Mark 4 Head Mark 7 M5 0.8 3 ~ 4 (30 ~ 40, 2.2 ~ 2.9) 5 ~ 6 (50 ~ 60, 3.6 ~ 4.3) M6 1.0 5 ~ 6 (50 ~ 60, 3.6 ~ 4.3) 9 ~ 11 (90 ~ 110, 6.5 ~ 8.0) M8 1.25 12 ~ 15 (120 ~ 150, 9 ~ 11) 20 ~ 25 (200 ~ 250, 14.5 ~ 18.0 ) M10 1.25 25 ~ 30 (250 ~ 300, 18 ~ 22) 30 ~ 50 (300 ~ 500, 22 ~ 36) M12 1.25 35 ~ 45 (350 ~ 450, 25 ~ 33) 60 ~ 80 (600 ~ 800, 43 ~ 58) M14 1.5 75 ~ 85 (750 ~ 850, 54 ~ 61) 120 ~ 140 (1,200 ~ 1,400, 85 ~ 100) M16 1.5 110 ~ 130 (1,100 ~ 1,300, 80 ~ 94) 180 ~ 210 (1,800 ~ 2,100, 130 ~ 150) M18 1.5 160 ~ 180 (1,600 ~ 1,800, 116 ~ 130) 260 ~ 300 (2,600 ~ 3,000, 190 ~ 215) M20 1.5 220 ~ 250 (2,200 ~ 2,500, 160 ~ 180) 360 ~ 420 (3,600 ~ 4,200, 260 ~ 300) M22 1.5 290 ~ 330 (2,900 ~ 3,300, 210 ~ 240) 480 ~ 550 (4,800 ~ 5,500, 350 ~ 400) M24 1.5 360 ~ 420 (3,600 ~ 4,200, 260 ~ 300) 610 ~ 700 (6,100 ~ 7,000, 440 ~ 505) Page 10 of 23 tomsn048@gmail.com
This 2008 Hyundai Accent Service & Repair Manual is the ultimate guide for all your repair and maintenance needs. Whether you are a professional mechanic or a DIY enthusiast, this manual provides comprehensive instructions and diagrams to help you diagnose, repair, and maintain your Hyundai Accent with ease.
The manual covers various models of the 2008 Hyundai Accent, including:
2008 Hyundai Accent GL Hatchback
2008 Hyundai Accent GS Hatchback
2008 Hyundai Accent SE Hatchback
2008 Hyundai Accent GLS Sedan
Regardless of the specific model you own, this manual will guide you through every step of the process using clear and concise instructions. From routine maintenance tasks such as oil changes and brake pad replacements to more complex repairs like engine overhauls and electrical troubleshooting, this manual has got you covered.
With this manual, you can save hundreds or even thousands of dollars on dealership or repair shop costs. You have the power to take control of your vehicle's maintenance and repairs, ensuring that it stays in top condition for years to come.
Don't let mechanical issues hold you back. Get the 2008 Hyundai Accent Service & Repair Manual today and unleash your inner mechanic!



 Lifetime Access




