Service Information The service and repair information contained in this manual is intended for use by qualified, professional technicians. Attempting service or repairs without the proper training, tools, and equipment could cause injury to you or others. It could also damage the vehicle or create an unsafe condition. This manual describes the proper methods and procedures for doing service, maintenance, and repairs. Some procedures require the use of specially designed tools and dedicated equipment. Any person who intends to use a replacement part, a service procedure, or a tool that is not recommended by Honda, must determine the risks to their personal safety and the safe operation of the vehicle. If you need to replace any parts, always use the correct parts supplied by a Honda dealer. Never use inferior quality parts. FOR YOUR CUSTOMER'S SAFETY Proper service and maintenance are essential to the customer's safety and the reliability of the vehicle. Any error or oversight while servicing a vehicle can result in faulty operation, damage to the vehicle, or injury to others. Improper service or repairs can create an unsafe condition that can cause your customers or others to be seriously hurt or killed. Follow the procedures and precautions in this manual and other service materials carefully. FOR YOUR SAFETY Because this manual is intended for the professional service technician, we do not provide warnings about many basic shop safety practices (for example, hot parts-wear gloves). If you have not received shop safety training or do not feel confident about your knowledge of safe servicing practices, we recommend that you do not attempt to do the procedures described in this manual. Failure to properly follow instructions and precautions can cause you to be seriously hurt or killed. Follow the procedures and precautions in this manual carefully. Some of the most important general service safety precautions follow this text. However, we cannot warn you of every conceivable hazard that can arise in doing service and repair procedures. Only you can decide whether or not you should do a given task. IMPORTANT SAFETY PRECAUTIONS Make sure you have a clear understanding of all basic shop safety practices, and that you are wearing appropriate clothing and using safety equipment. When doing any service task, be especially careful of the following: - Read all of the instructions before you begin, and make sure you have the tools, the replacement or repair parts, and the skills required to do the tasks safely and completely. - Protect your eyes by using proper safety glasses, goggles, or face shields anytime you hammer, drill, grind, or work around pressurized air or liquids and springs, or other stored-energy components. If there is any doubt, put on eye protection. - Use other protective wear when necessary, such as gloves or safety shoes. Handling hot or sharp parts can cause severe burns or cuts. Before you grab something that looks like it can hurt you, stop and put on gloves. - Protect yourself and others whenever you have the vehicle up in the air. Anytime you raise the vehicle, either with a lift or a jack, make sure that it is always securely supported. Use safety stands if needed. - Protect yourself by wearing an approved welding helmet, gloves, and safety shoes anytime you are welding. You can receive burns from hot parts; allow the parts to cool before working in that area. - Protect yourself from paints and harmful chemicals by wearing an approved respirator, eye protection, and gloves whenever you are painting. Spray paint only in an approved paint booth that is well ventilated. Make sure the engine is off before you begin any servicing procedures, unless the instruction tells you to do otherwise. This will help eliminate several potential hazards: - Carbon monoxide poisoning from engine exhaust. Be sure there is adequate ventilation whenever you run the engine. - Burns from hot parts or coolant. Let the engine and exhaust system cool before working in those areas. - Injury from moving parts. If the instruction tells you to run the engine, be sure your hands, fingers, and clothing are out of the way. Gasoline vapors and hydrogen gases from batteries are explosive. To reduce the possibility of a fire or explosion, be careful when working around gasoline or batteries: - Use only a nonflammable solvent, not gasoline, to clean parts. - Never drain or store gasoline in an open container. - Keep all cigarettes, sparks, and flames away from the battery and all fuel-related parts.
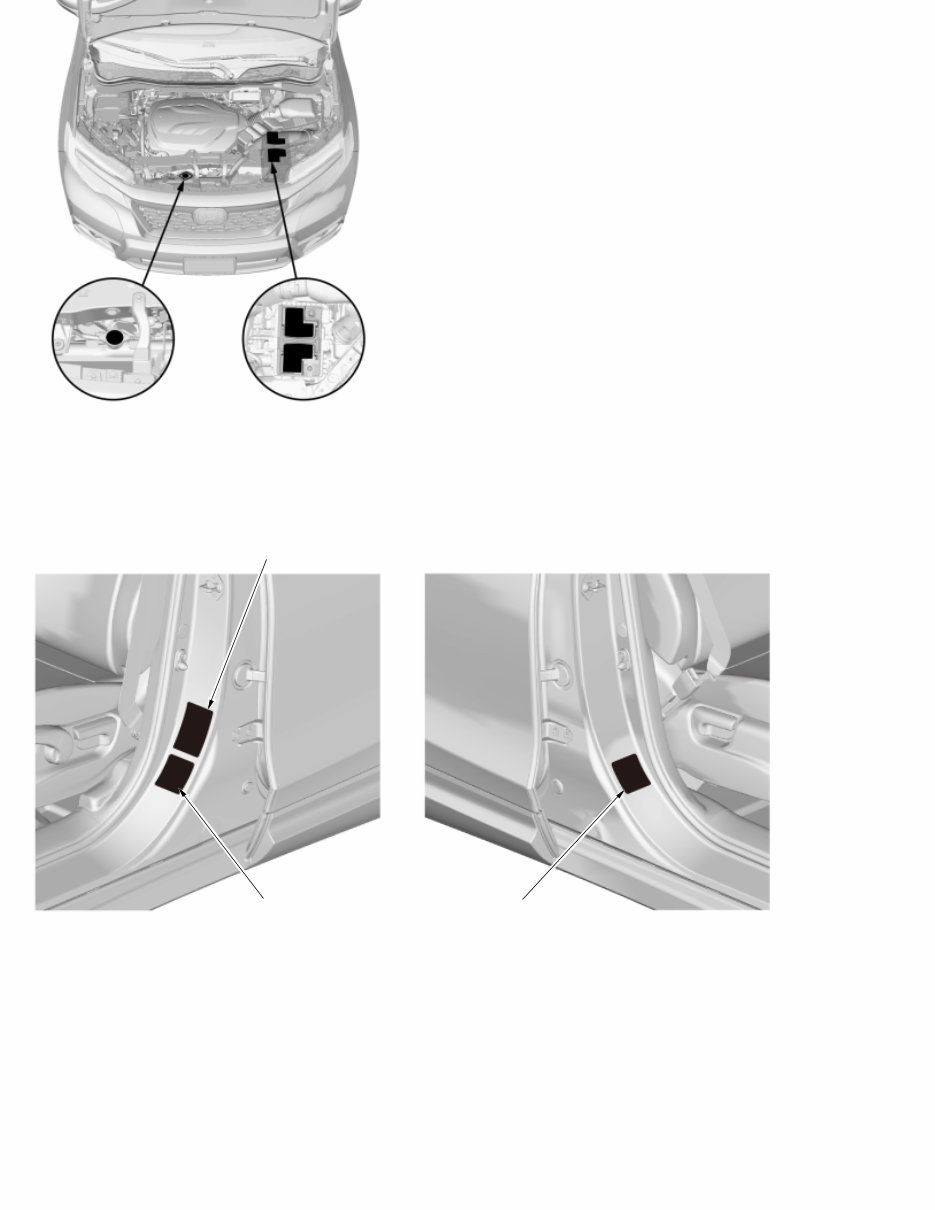
Front Passenger's Compartment: Steering Wheel: Rear Passenger's Compartment: Engine Compartment: SRS WARNING INFORMATION SRS UNIT SEAT BELT TENSIONER WARNING SIDE AIRBAG MODULE DANGER PASSENGER AIRBAG MODULE DANGER PASSENGER AIRBAG WARNING TAG (CHILD SEAT) USA models SRS WARNING INFORMATION HIGHER ROLLOVER RISK WARNING USA models SEAT BELT OUTER LAP TENSIONER WARNING DRIVER AIRBAG MODULE DANGER ROOF-SIDE AIRBAG MODULE DANGER AIR CONDITIONING INFORMATION EMISSION CONTROL INFORMATION and ENGINE COOLANT INFORMATION
Driver's Doorjamb: Passenger's Doorjamb: RADIATOR CAP DANGER 12 VOLT BATTERY CAUTION TIRE INFORMATION SIDE AIRBAG CAUTION SIDE AIRBAG CAUTION
Item Measurement Qualification Specification AUTOMATIC TRANSMISSION Type Electronically-controlled automatic, nine-speed forward, one reverse Primary reduction Direct 1:1 Gear ratio 1st 4.713 2nd 2.842 3rd 1.909 4th 1.382 5th 1.000 6th 0.808 7th 0.699 8th 0.580 9th 0.480 Reverse 3.830 Final reduction Type Single helical gear Gear ratio 4.334 STEERING Type Rack and pinion with electrical power-assisted Overall ratio 15.72 Turns, lock-to-lock 3.04 Steering wheel diameter 386 mm (15.20 in) SUSPENSION Type Front Independent strut with stabilizer, coil spring Rear Independent multilink with stabilizer, coil spring Shock absorber Front and rear Telescopic, hydraulic, nitrogen gas-filled TIRES Size See tire information label attached to driver's doorjamb BRAKES Type of service brake Front Power-assisted self-adjusting ventilated disc Rear Power-assisted self-adjusting solid disc Type of parking brake Mechanical actuating, rear wheels AIR CONDITIONING Compressor Type Swash plate Capacity 182 mL (11.10 cu in)/rev Maximum speed 7,600 rpm Lubricant capacity 127-153 mL (4 1/4-5 fl oz) Lubricant type RL85HM Condenser Type Corrugated fin Evaporator Type Corrugated fin Front Blower Type Ferrite Motor type 284 W/12 V Speed control Infinitely variable Maximum capacity 485 m 3 (17,128 cu ft)/h Rear Blower Type Ferrite Motor type 110 W/12 V Speed control Infinitely variable Maximum capacity 295 m 3 (10,418 cu ft)/h Temperature control Air-mix type Compressor clutch Type Dry, single plate, poly V-belt drive Electrical power consumption at 68 °F (20 °C) 43 W maximum at 12 V Refrigerant Type HFO-1234yf (R-1234yf) Capacity 605-655 g (21.34-23.10 oz) ELECTRICAL RATINGS Battery 12 V - 70 Ah/20 HR Fuses Under-hood fuse/relay box 150 A, 40 A, 30 A, 20 A, 15 A, 10 A, 7.5 A Auxiliary under- hood fuse/relay box 60 A, 40 A, 30 A, 20 A, 15 A, 10 A, 7.5 A Under-dash fuse/relay box 20 A, 15 A, 10 A, 7.5 A Auxiliary under- dash fuse/relay box 15 A, 10 A, 7.5 A Light bulbs Headlight high beam (With LED headlight(high beam)) LED Headlight high beam(Without LED 12 V - 60 W (HB3)
Item Measurement Qualification Specification headlight(high beam)) Headlight low beam LED Front side marker lights LED Front turn signal lights 12 V - 28 W Front parking lights LED Daytime running lights LED Front fog lights LED Side turn signal lights LED Rear turn signal lights 12 V-21 W Brake lights/taillights LED Rear side maker lights LED High mount brake light LED Back-up lights 12 V-21 W License plate lights LED Front individual map lights 12 V - 5 W Ambient light LED Rear individual map lights 12 V - 5 W Door courtesy lights 12 V - 2CP Glove box light 12 V - 1.4 W Console box light 12 V - 1.4 W Vanity mirror lights 12 V - 1CP Footwell lights LED Door pocket lights LED Door inner handle lights LED Beverage holder lights LED Cargo area light 12 V - 8 W
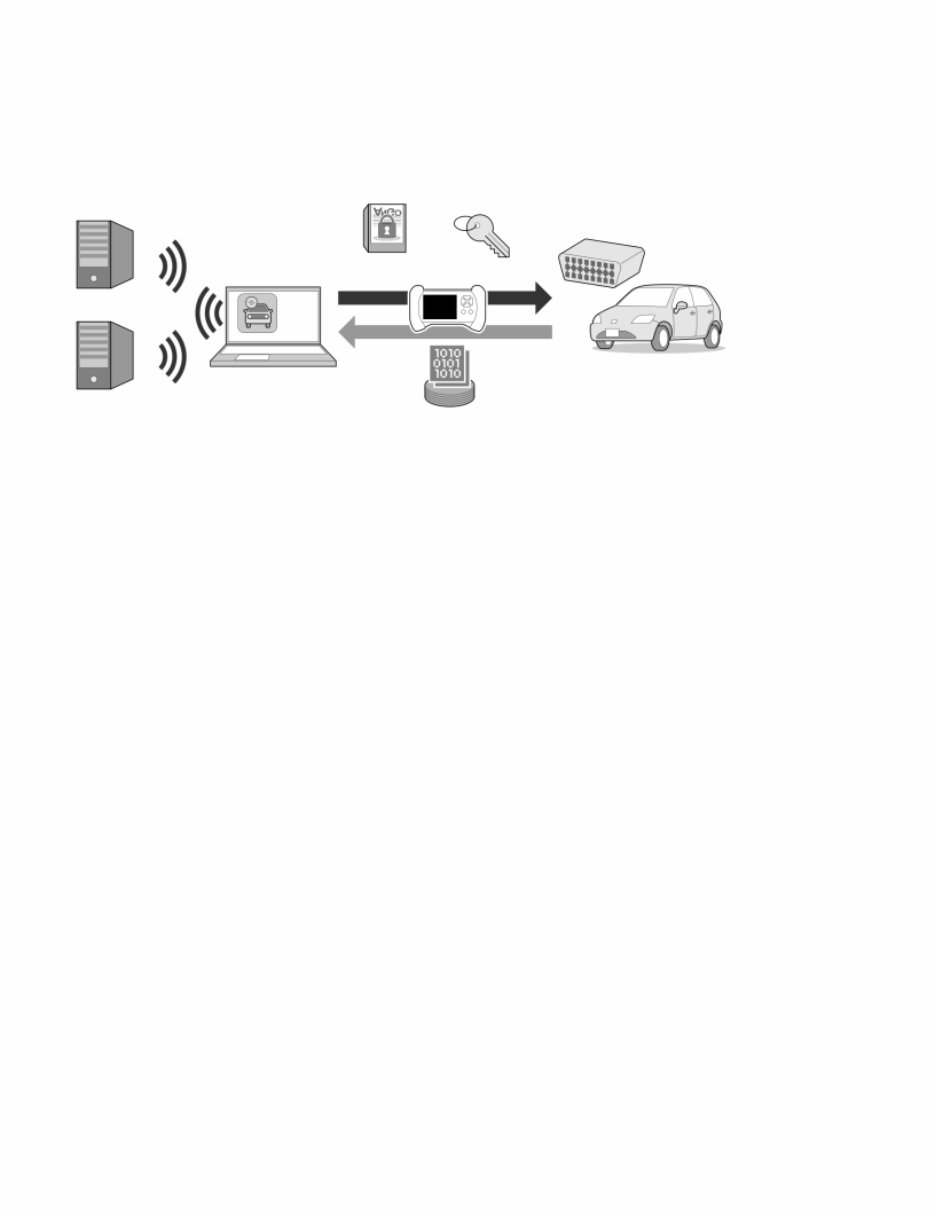
ECU Reprogramming In order to use a vehicle safely against the threat of cyberattacks to the control unit, the software update work of control units requires a rewriting system for control unit with high security. In this ECU Reprogramming, software of control units is updated without being stored in information appliance, and software is prevented from being tampered with or flowing out by private key between the server and the vehicle. Also, an update history is collected by the server, and the version of the software for one vehicle is managed. The ECU Reprogramming (dedicated application) is used to communicate with the server after the vehicle information is read through an interface. The server automatically searches for updatable software for the vehicle and displays it on the dedicated application. and *1: Data link connector Software distribution server control server Update history Information appliance Decided application Encryption software Private key DLC*1 Vehicle information Software update target vehicle
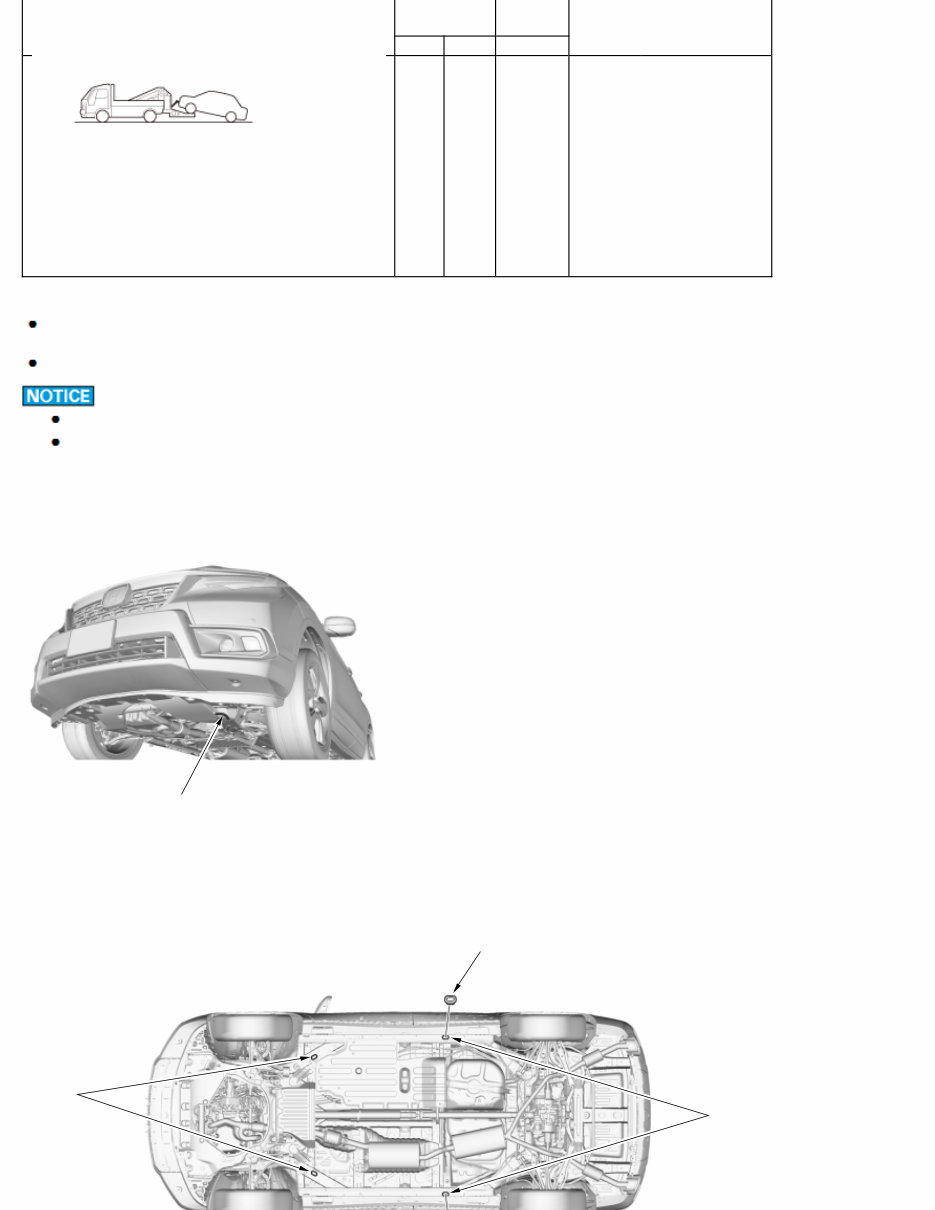
If the vehicle needs to be towed, call a professional towing service. Improper towing preparation will damage the transmission. Follow the below procedure exactly. If you cannot shift the transmission or start the engine, the vehicle must be transported on a flat-bed tow truck. Trying to lift or tow the vehicle by the bumpers will cause serious damage. The bumpers are not designed to support the vehicle's weight. It is best to tow the vehicle no farther than 50 miles (80 km), and keep the vehicle speed below 35 mph (55 km/h) except when loading on a flat-bed tow truck. For the vehicle equipped with the engine start/stop button If the 12 volt battery is discharged, the ACCESSORY mode cannot be selected by pushing the engine start/stop button. Charge or replace the 12 volt battery to unlock the steering wheel before towing. If the ACCESSORY mode cannot be selected because of in an electrical problem other than a discharged 12 volt battery, the flat-bed tow truck is the only way to transport the vehicle. For the vehicle equipped with the electric parking brake If the 12 volt battery is discharged, the electric parking brake cannot be canceled by pushing the electric parking brake/automatic brake hold switch. Charge or replace the 12 volt battery to release the parking brake before towing. If the electric parking brake is disabled in an electrical problem or severe vehicle damage, the vehicle must be transported on a flat-bed tow truck. For the vehicle equipped with the neutral position holding mode Neutral Position Holding Mode is automatically canceled after several minutes. For the vehicle equipped with the park lock If the transmission cannot shift from the P position/mode to the N position/mode because of an electrical problem or severe vehicle damage, shift to the N position/mode manually, and transport the vehicle by a flat-bed tow truck. See more information on " How to Release Park Lock." Emergency Towing There are three popular methods of towing a vehicle. Towing Method Driving type Shift Position Notes 2WD AWD AT Cable-type Equipment × × ― Never tow this vehicle with cable-type equipment. Flat-bed Tow Truck Equipment ○ ○ P Secure the vehicle securely on a flat-bed tow truck. Apply the parking brake. Front Wheel Lift Equipment ○ × N Turn the vehicle to the ACCESSORY or ON
Towing Method Driving type Shift Position Notes 2WD AWD AT mode, and then release the parking brake. For AWD model: Never tow this vehicle with front wheel lift equipment. Towing Hook/Tie Down Hook Slot Locations The towing hook can be used with a winch to pull the vehicle onto the flat-bed tow truck, and the tie down hook slots can be used to secure the vehicle to the flat-bed tow truck. The tie down hook slots are covered with rubber plugs. Be sure to reinstall them after use. To avoid damage to the vehicle, use the towing hook for straight flat ground towing only. Do not tow on an angle. This vehicle is not equipped with a rear towing hook. Do not use the rear bumper or the rear tie down hook slots as a towing hook. It will cause a severe damage to the rear of the vehicle. Front Towing Hook: A: Front towing hook Tie Down Hook Slots: A B C D
B: Front tie down hook slots C: Rear tie down hook slots D: Rubber plugs: Be sure to reinstall the plugs after use. D
Links: Neutral Position Holding Mode How to Release Park Lock
The Honda Passport 2022 Repair Manual is an essential resource for owners and technicians who need detailed information about the maintenance, repair, and troubleshooting of this vehicle. This comprehensive manual covers all aspects of the Honda Passport 2022, ensuring that every component is thoroughly explained and documented.
Contents of the Repair manual include:
General Information
Maintenance Procedures
Engine Mechanical Systems
Fuel and Emissions Systems
Cooling System
Transmissions
Steering System
Suspension
Braking System
Body and Exterior
Interior Equipment
Electrical Systems and Wiring Diagrams
Technical Specifications
Each section provides step-by-step instructions, detailed diagrams, and illustrations to help users perform various tasks efficiently. The manual is designed to be user-friendly, making it accessible for both professional mechanics and do-it-yourself enthusiasts.
With the Honda Passport 2022 Repair Manual, you can:
Understand your vehicle’s components and systems
Perform routine maintenance and inspections
Diagnose and troubleshoot potential issues
Follow detailed repair procedures
Access wiring diagrams for electrical system repairs
Ensure your vehicle operates at peak performance
Whether you are conducting simple maintenance tasks or complex repairs, the Honda Passport 2022 Repair Manual is your go-to guide for ensuring your vehicle remains in optimal condition.