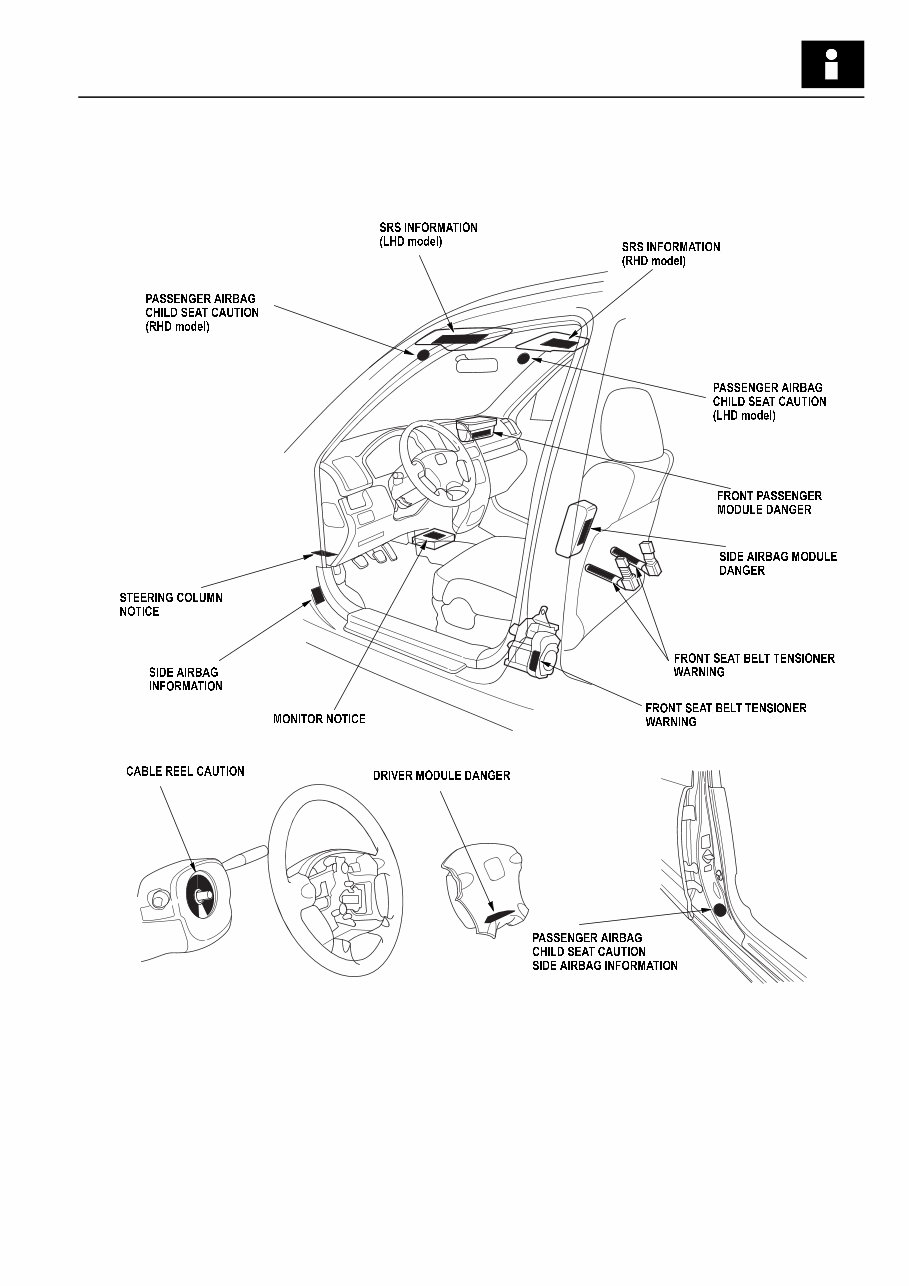
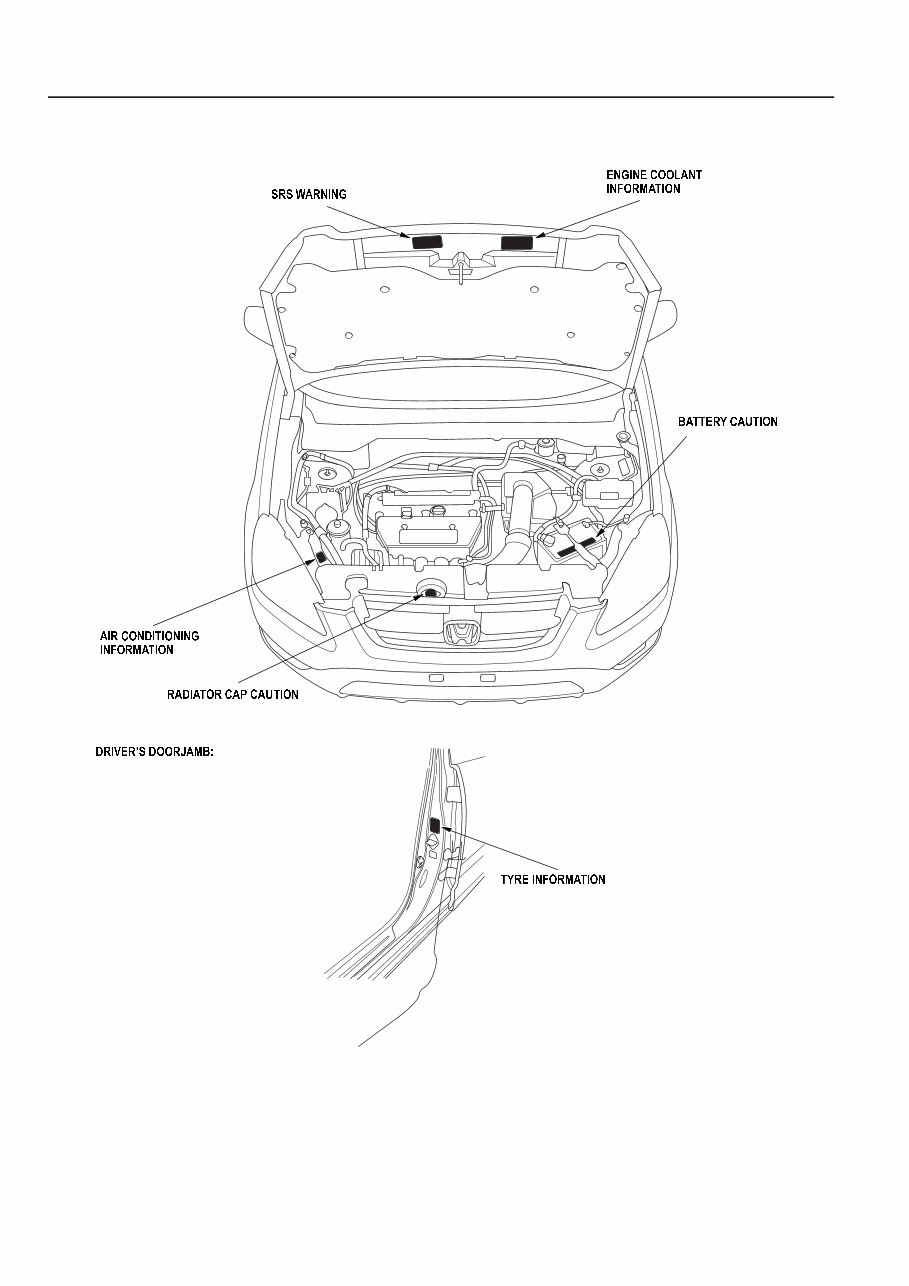
:DUQLQJ&DXWLRQ/DEHO/RFDWLRQV :DUQLQJ&DXWLRQ/DEHO/RFDWLRQV NOTE: The illustration shows the LHD model; RHD is symmetrical. SIDE AIRBAG INFORMATION labels are located on the driver’s and passenger’s doorjamb. (cont’d) Located on driver’s and passenger’s door jamb ProCarManuals.com
*HQHUDO,QIRUPDWLRQ :DUQLQJ&DXWLRQ/DEHO/RFDWLRQV :DUQLQJ&DXWLRQ/DEHO/RFDWLRQVFRQW¶G NOTE: The illustration shows the LHD model; RHD is symmetrical. ProCarManuals.com
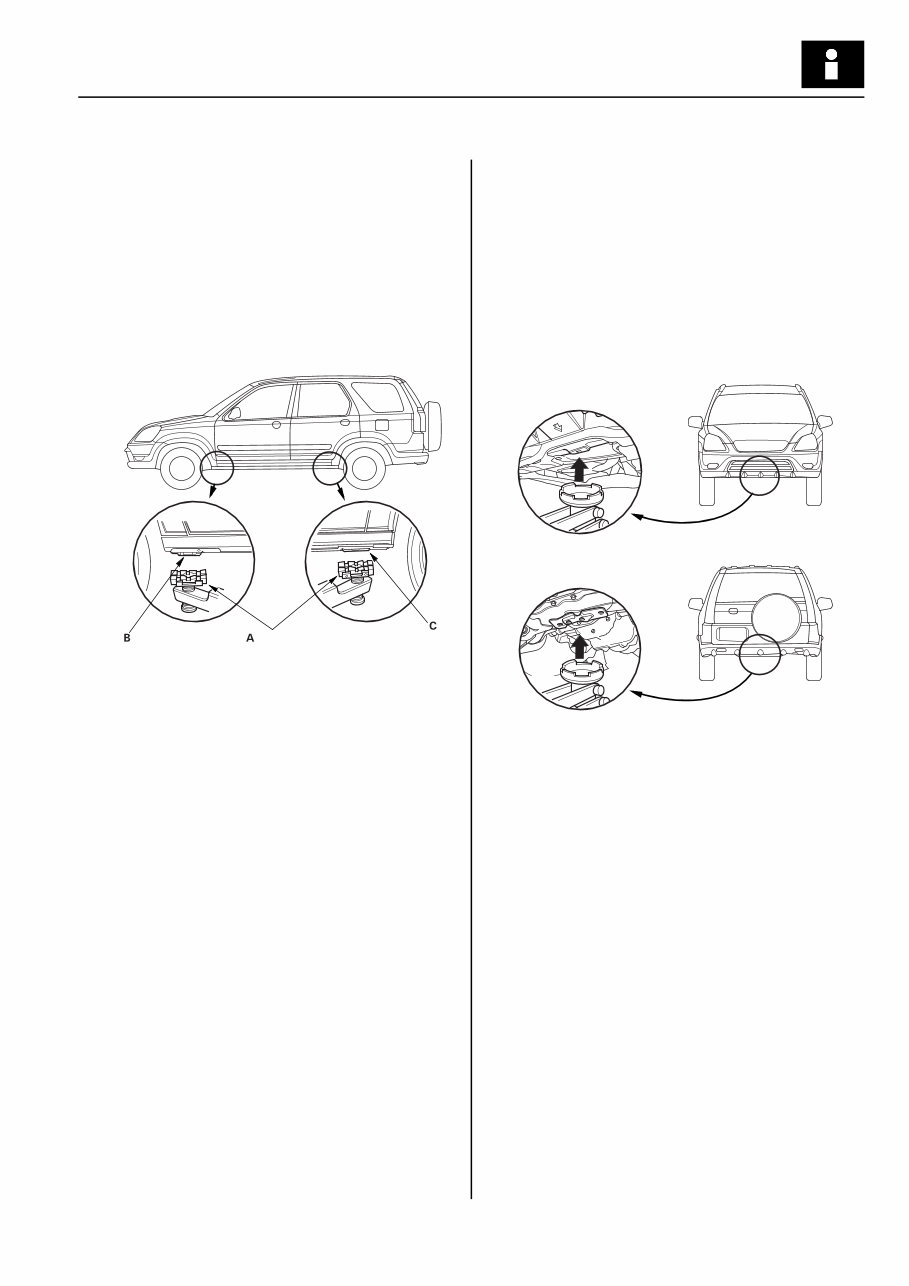
/LIWDQG6XSSRUW3RLQWV /LIWDQG6XSSRUW3RLQWV NOTE: If you are going to remove heavy components such as suspension or the fuel tank from the rear of the vehicle, first support the front of the vehicle with tall safety stands. When substantial weight is removed from the rear of the vehicle, the center of gravity can change and cause the vehicle to tip forward on the hoist. )UDPH+RLVW Position the hoist lift blocks (A), or safety stands, under the vehicle’s front support points (B) and rear support points (C). Raise the hoist a few inches, and rock the vehicle gently to be sure it is firmly supported. Raise the hoist to full height, and inspect the lift points for solid contact with the lift blocks. 6DIHW\6WDQGV To support the vehicle on safety stands, use the same support points (B and C) as for a frame hoist. Always use safety stands when working on or under any vehicle that is supported only by a jack. )ORRU-DFN Block the rear wheels when raising the front of the vehicle; block the front wheels when raising the rear of the vehicle. Place the blocks behind and ahead of the wheels. Raise the vehicle high enough to insert the safety stands. Adjust and place the safety stands so the vehicle will be approximately level, then lower the vehicle onto them. ProCarManuals.com
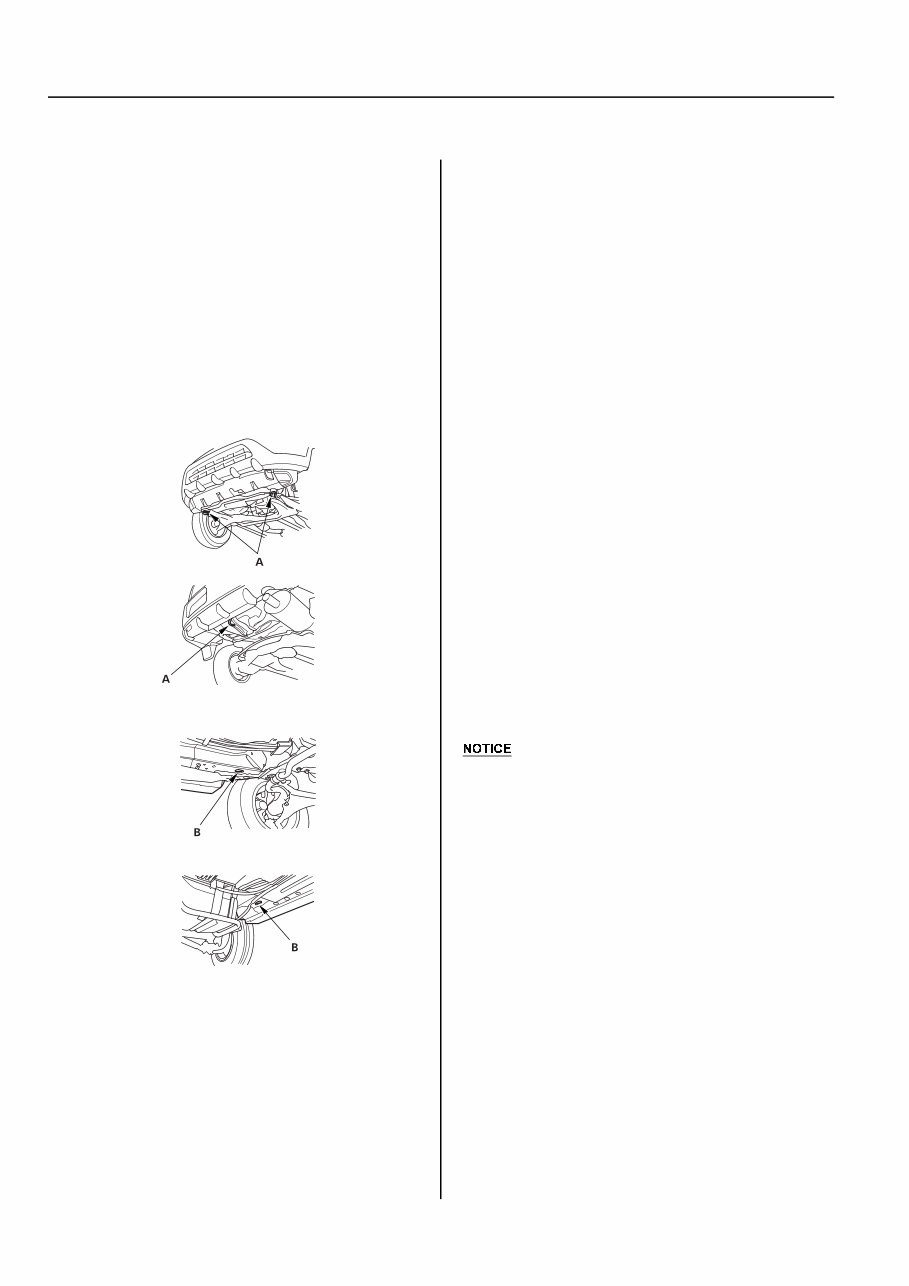
*HQHUDO,QIRUPDWLRQ 7RZLQJ 7RZLQJ If the vehicle needs to be towed, call a professional towing service. Never tow the vehicle behind another vehicle with just a rope or chain. It is very dangerous. (PHUJHQF\7RZLQJ There are three popular methods of towing a vehicle. )ODWEHG(TXLSPHQWThe operator loads the vehicle on the back of a truck. This is the best way of transporting the vehicle. To accommodate flat-bed equipment, the vehicle is equipped with towing hooks (A) and tie down hook slots (B). The towing hooks can be used with a winch to pull the vehicle onto the truck, and the tie down hook slots can be used to secure the vehicle to the truck. :KHHO/LIW(TXLSPHQW The tow truck uses two pivoting arms that go under the tires (front or rear) and lift them off the ground. The other two wheels remain on the ground. 6OLQJW\SH(TXLSPHQW- The tow truck uses metal cables with hooks on the ends. These hooks go around parts of the frame or suspension and the cables lift that end of the vehicle off the ground. The vehicle’s suspension and body can be seriously damaged if this method of towing is attempted. This method of towing the CR-V is unacceptable. The only recommended way of towing the CR-V is on a flat-bed truck. Towing the 4WD CR-V with only two wheels on the ground will damage parts of the 4WD system. The 2WD CR-V may also be towed with the front wheels off the ground, or with all four wheels on the ground. If the 2WD CR-V cannot be transported by flat-bed, it should be towed with the front wheels off the ground. If due to damage, the vehicle must be towed with the front wheels on the ground, or if the vehicle is towed with all four wheels on the ground, do the following: 0DQXDO7UDQVPLVVLRQ Release the parking brake. Shift the transmission in Neutral. $XWRPDWLF7UDQVPLVVLRQ Release the parking brake. Start the engine. Shift to [D] position, then [N] position. Turn off the engine. It is best to tow the vehicle no farther than 50 miles (80 km), and keep the speed below 35 mph (55 km/h). Improper towing preparation will damage the transmission. Follow the above procedure exactly. If you cannot shift the transmission or start the engine (automatic transmission), the vehicle must be transported on a flat-bed. Trying to lift or tow the vehicle by the bumpers will cause serious damage. The bumpers are not designed to support the vehicle’s weight. ProCarManuals.com
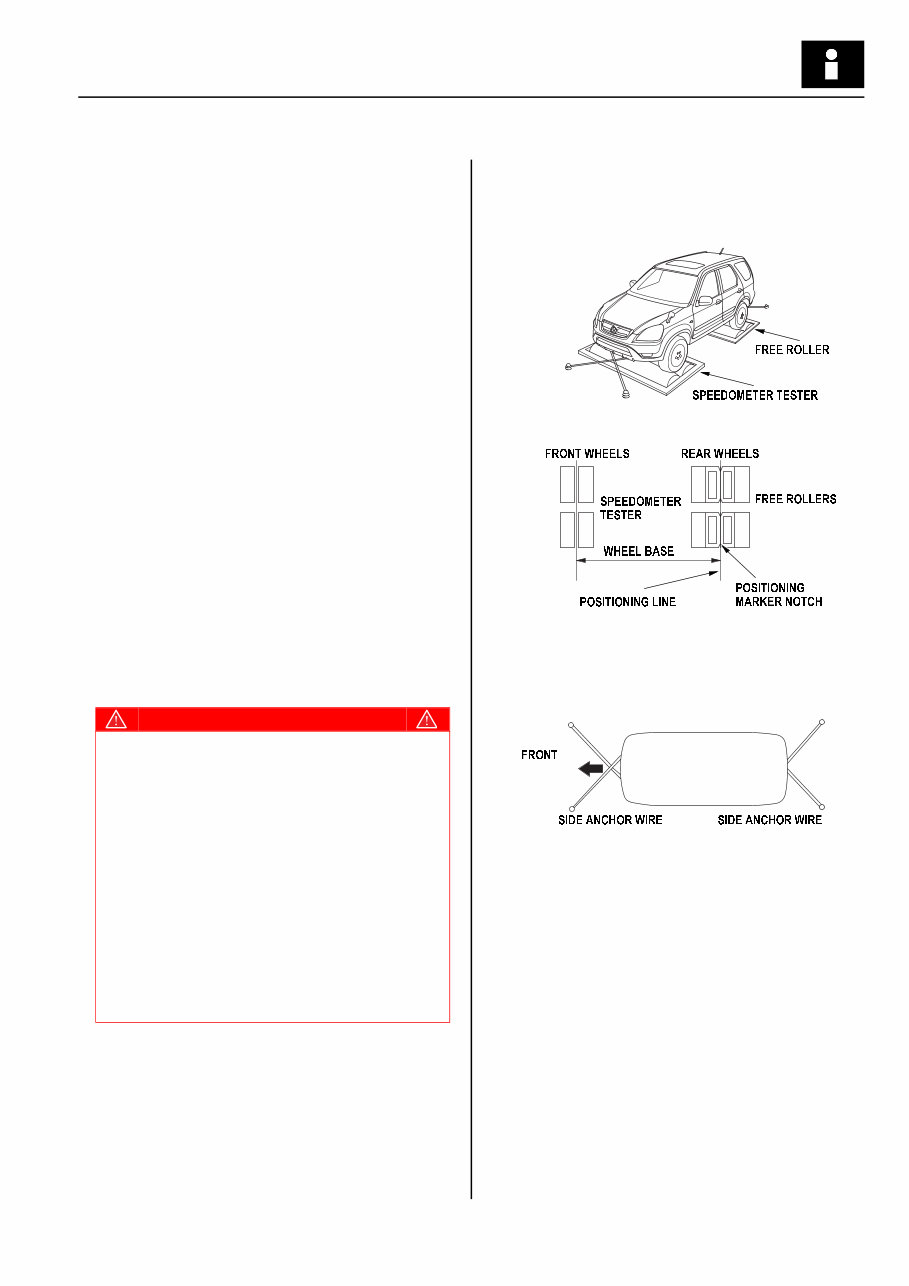
6HUYLFH3UHFDXWLRQV 6HUYLFH3UHFDXWLRQV :’PRGHO,QIRUPDWLRQ The 4WD CR-V does not have the feature that mechanically switches between 4WD (four-wheel drive) and 2WD (front-wheel drive). Do not drive the vehicle with rear wheels on the ground even though the front wheels are off the ground. The front wheel power is conveyed to the rear wheels, and the vehicle will start off. Always lift the vehicle up so all four wheels are off the ground when troubleshooting, testing and inspecting the vehicle to rotate the wheels. Use the free rollers under the rear wheels when performing test the vehicle with the speedometer tester. 3UHFDXWLRQVRQXVLQJIUHHUROOHUV Inspecting and testing using a chassis dynamometer is not feasible. Do not operate the accelerator pedal, brake pedal or steering wheel abruptly. It may cause the vehicle to roll and create a hazardous condition. The maximum testing speed should be 50 km/h (31 mph). The maximum continuous operating time should be 3 minutes. Make sure to tie down the vehicle securely with the side anchor wires. The free rollers are to be set under the rear wheels. 6SHHGRPHWHU7HVWLQJ3URFHGXUHV Set the free rollers according to the wheel base and tread of the vehicle. Move the vehicle to position the front wheels on the speedometer testers and the rear wheels on the free rollers. Make sure to align the center of the wheels to the center of the speedometer testers and the free rollers. Tie down the vehicle securely using the towing hooks to prevent the vehicle from rolling off or over the free rollers. Start the engine, shift the transmission to 3rd gear (manual transmission) or to [D] position (automatic transmission), accelerate the vehicle gradually, and measure the vehicle speed. After measurement, use the brake pedal to gradually decelerate and stop the vehicle. (cont’d) &$87,21 Make sure to place the free rollers parallel to the roller of each speedometer tester. Putting the front and rear wheels on the speedometer testers and free rollers inappropriately may cause the vehicle to roll off or over the free rollers and create a hazardous condition. The side anchor wires must be appropriately tensioned. If the wires have too much slack, the expected tie-down efficiency cannot be obtained. When attaching the side anchor wires, make sure they are not interfering with the bumper and other parts of the vehicle body. Do not attach the wires to any place other than the designed areas. Do not a operate the speedometer testers at a speed more than 50 km/h (31 mph) or for more than 3 minutes. NOTE: Align the position marker notch to the postioning line. ProCarManuals.com
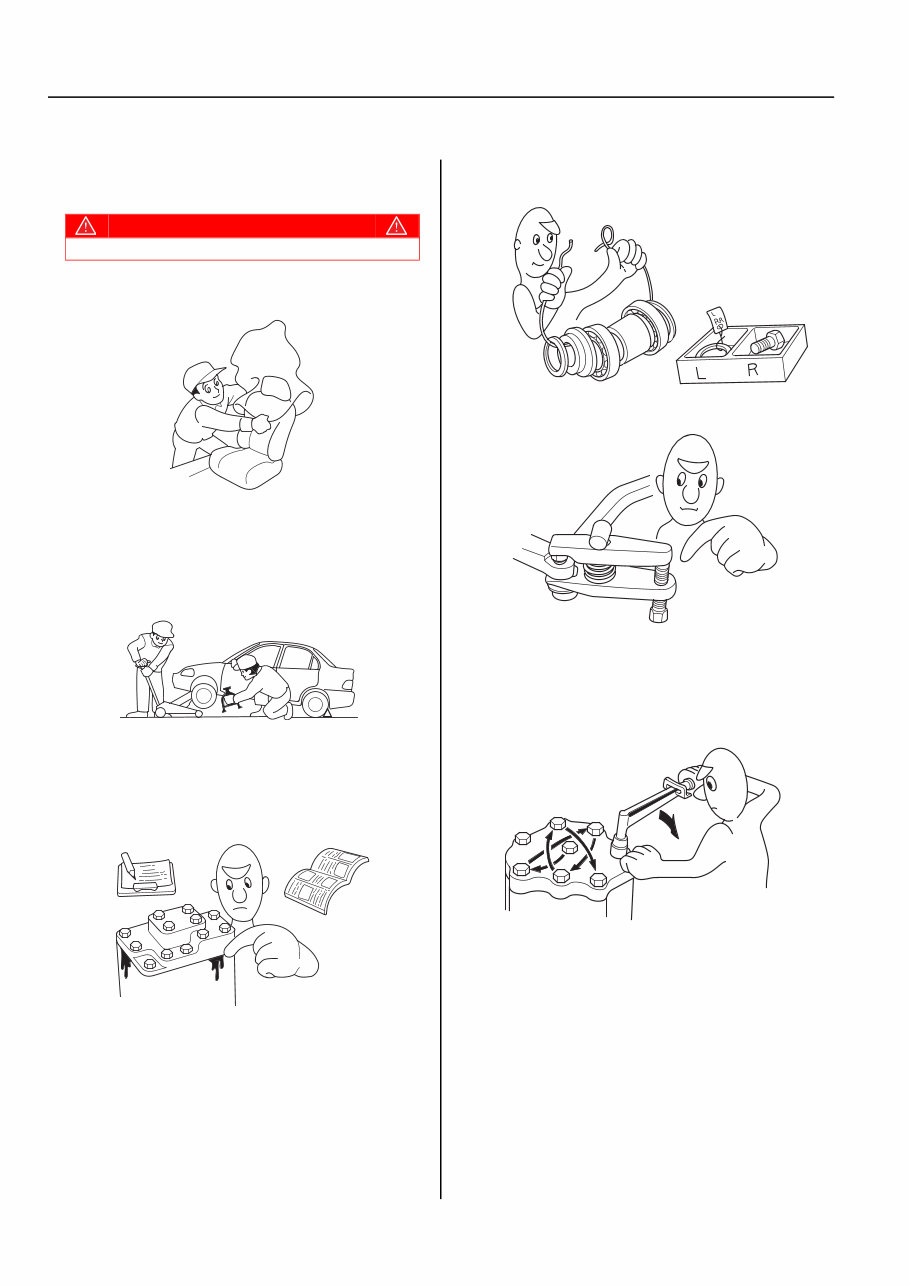
*HQHUDO,QIRUPDWLRQ 6HUYLFH3UHFDXWLRQV 6HUYLFH3UHFDXWLRQVFRQW¶G *HQHUDO Protect all painted surfaces and seats against dirt and scratches with a clean cloth or vinyl cover. Work safety and give your work your undivided attention. When either the front or rear wheels are to be raised, block the remaining wheels securely. Communicate at frequently as possible when work involves two or more workers. Do not run the engine unless the shop or working area is well ventilated. Before removing or disassembling parts, they must be inspected carefully to isolate the cause for which service is necessary. Observe all safety notes and precautions and follow the proper procedures as described in this manual. Mark or place all removed parts in order in a parts rack so they can be reassembled in their original places. Use the special tool when use of such a tool is specified. Parts must be assembled with the proper torque according to the maintenance standards established. When tightening a series of bolts or nuts, begin with the center or large diameter bolts and tighten them in crisscross pattern in two or more steps. &$87,21 Observe all safety precautions and notes while working. ProCarManuals.com
If you are in need of a repair manual for your 2005 Honda CR-V, look no further. Our accessible repair manual provides comprehensive coverage for the Honda CR-V, making it ideal for both professional mechanics and DIY enthusiasts.
Gone are the days of purchasing traditional service manuals in book format at a higher cost. Our repair manual offers the same valuable information in a more affordable and convenient digital format.
Whether you require guidance for brake repairs, suspension component replacements, engine troubleshooting, or standard maintenance procedures, this repair manual for the Honda CR-V has you covered.
With this , you will have access to a wealth of service information, including details on brakes, engine, suspension, steering, drivetrain, electrical systems, heating, air conditioning, and more. It provides comprehensive assistance for any repair or maintenance task.
By utilizing this 2005 Honda CR-V repair manual , you can save a significant amount of money on vehicle maintenance. Take advantage of the cost-effective solution and empower yourself to work on your own vehicle, whether you are using a Windows PC, Mac computer, smartphone, or tablet.