LIVING WITH YOUR FORD SIERRA Introduction to the Ford Sierra Page 0•4 Acknowledgements Page 0•4 Safety first! Page 0•5 ROADSIDE REPAIRS Jacking, vehicle support and wheel changing Page 0•6 Towing Page 0•7 Identifying leaks Page 0•8 Jump starting Page 0•9 Weekly Checks Introduction Page 0•10 Underbonnet check points Page 0•10 Engine Oil level Page 0•12 Coolant level Page 0•12 Screen washer fluid level Page 0•13 Brake fluid level Page 0•13 Power steering fluid level Page 0•14 Electrical systems Page 0•14 Battery Page 0•15 Wiper blades Page 0•15 Tyre condition and pressure Page 0•16 Lubricants and fluids Page 0•17 Tyre pressures Page 0•18 MAINTENANCE Routine Maintenance and Servicing Page 1•1 Maintenance schedule Page 1•4 Maintenance procedures Page 1•9 Contents
REPAIRS AND OVERHAUL Engine and Associated Systems SOHC engines Page 2A•1 DOHC engines Page 2B•1 CVH engines Page 2C•1 Cooling, heating and air conditioning systems Page 3•1 Fuel/exhaust systems - carburettor models Page 4A•1 Fuel/exhaust systems - fuel injection models Page 4B•1 Engine electrical systems Page 5•1 TRANSMISSION Clutch Page 6•1 Manual gearbox Page 7A•1 Automatic transmission Page 7B•1 Propellor shaft Page 8•1 Final drive and driveshafts Page 9•1 BRAKES AND SUSPENSION Braking system Page 10•1 Suspension and steering Page 11•1 BODY EQUIPMENT Bodywork, trim and fittings Page 12•1 Body electrical systems Page 13•1 Wiring Diagrams Page 13•22 Reference General dimensions and weights Page REF•1 Buying spare parts and vehicle identification Page REF•3 General repair procedures Page REF•4 Tools and working facilities Page REF•5 MOT test checks Page REF•7 Fault finding Page REF•11 Glossary of technical terms Page REF•18 Index Page REF•23 Contents
0•4 The Ford Sierra was first introduced in late 1982 with the option of seven different engines and four different trim levels. This manual covers the four cylinder in-line petrol engines, but other models in the range are fitted with V6 or diesel engines. The Sierra was introduced by Ford as the successor to the Cortina and initially received a mixed reception as it was one of the first vehicles to make use of the “aeroback” body style designed to reduce the air drag coefficient to a minimum in the interests of fuel economy. Mechanically the Sierra is similar to the Cortina with the exception of all-round independent suspension. Initially, 1.3, 1.6 and 2.0 litre SOHC carburettor engines were available, with Hatchback and Estate body styles. In late 1984, a 1.8 litre SOHC engine became available and in 1985, a performance orientated 2.0 litre SOHC fuel injection engine was introduced. Towards the end of 1986, the 1.3 litre engine was phased out. In order to fill a gap in the range, a Saloon body style, designated the Sapphire, was introduced in early 1987 and shortly afterwards, a 1.8 litre CVH engine replaced the previously used 1.8 litre SOHC engine throughout the model range. A 1.6 litre CVH engine was introduced in September 1991 to replace the 1.6 litre SOHC engine used previously, this engine being broadly similar to the original 1.8 litre CVH engine which was in turn uprated in March, 1992. A 2.0 litre DOHC (Double OverHead Camshaft) engine was in- troduced in August 1989 to replace the 2.0 litre SOHC engine. In early 1988, a Sierra-based P100 pick-up model became available to replace the previous Cortina-based design. The P100 consists of a Sierra-type “cab” and front suspension, and a Ford Transit-type rear suspension and 2.0 litre engine. A wide range of standard and optional equipment is available within the Sierra range to suit most tastes, including an anti-lock braking system. For the home mechanic, the Sierra is a straightforward vehicle to maintain and repair since design features have been incorporated to reduce the actual cost of ownership to a minimum, and most of the items requiring frequent attention are easily accessible. Ford Sierra L Ford Sierra Ghia Estate Introduction We take great pride in the accuracy of information given in this manual, but vehicle manufacturers make alterations and design changes during the production run of a particular vehicle of which they do not inform us. No liability can be accepted by the authors or publishers for loss, damage or injury caused by errors in, or omissions from, the information given. Thanks are due to Champion Spark Plug who supplied the illustrations showing spark plug conditions. Certain other illustrations are the copyright of the Ford Motor Company and are used with their permission. Thanks are also due to Sykes-Pickavant Limited, who provided some of the workshop tools, and to all those people at Sparkford who helped in the production of this manual. Introduction to the Ford Sierra Acknowledgements
0•5 Safety First! Working on your car can be dangerous. This page shows just some of the potential risks and hazards, with the aim of creating a safety-conscious attitude. General hazards Scalding • Don’t remove the radiator or expansion tank cap while the engine is hot. • Engine oil, automatic transmission fluid or power steering fluid may also be dangerously hot if the engine has recently been running. Burning • Beware of burns from the exhaust system and from any part of the engine. Brake discs and drums can also be extremely hot immediately after use. Crushing • When working under or near a raised vehicle, always supplement the jack with axle stands, or use drive-on ramps. Never venture under a car which is only supported by a jack. • Take care if loosening or tightening high- torque nuts when the vehicle is on stands. Initial loosening and final tightening should be done with the wheels on the ground. Fire • Fuel is highly flammable; fuel vapour is explosive. • Don’t let fuel spill onto a hot engine. • Do not smoke or allow naked lights (including pilot lights) anywhere near a vehicle being worked on. Also beware of creating sparks (electrically or by use of tools). • Fuel vapour is heavier than air, so don’t work on the fuel system with the vehicle over an inspection pit. • Another cause of fire is an electrical overload or short-circuit. Take care when repairing or modifying the vehicle wiring. • Keep a fire extinguisher handy, of a type suitable for use on fuel and electrical fires. Electric shock • Ignition HT voltage can be dangerous, especially to people with heart problems or a pacemaker. Don’t work on or near the ignition system with the engine running or the ignition switched on. • Mains voltage is also dangerous. Make sure that any mains-operated equipment is correctly earthed. Mains power points should be protected by a residual current device (RCD) circuit breaker. Fume or gas intoxication • Exhaust fumes are poisonous; they often contain carbon monoxide, which is rapidly fatal if inhaled. Never run the engine in a confined space such as a garage with the doors shut. • Fuel vapour is also poisonous, as are the vapours from some cleaning solvents and paint thinners. Poisonous or irritant substances • Avoid skin contact with battery acid and with any fuel, fluid or lubricant, especially antifreeze, brake hydraulic fluid and Diesel fuel. Don’t syphon them by mouth. If such a substance is swallowed or gets into the eyes, seek medical advice. • Prolonged contact with used engine oil can cause skin cancer. Wear gloves or use a barrier cream if necessary. Change out of oil- soaked clothes and do not keep oily rags in your pocket. • Air conditioning refrigerant forms a poisonous gas if exposed to a naked flame (including a cigarette). It can also cause skin burns on contact. Asbestos • Asbestos dust can cause cancer if inhaled or swallowed. Asbestos may be found in gaskets and in brake and clutch linings. When dealing with such components it is safest to assume that they contain asbestos. Specia hazards Hydrofluoric acid • This extremely corrosive acid is formed when certain types of synthetic rubber, found in some O-rings, oil seals, fuel hoses etc, are exposed to temperatures above 400 0 C. The rubber changes into a charred or sticky substance containing the acid. Once formed, the acid remains dangerous for years. If it gets onto the skin, it may be necessary to amputate the limb concerned. • When dealing with a vehicle which has suffered a fire, or with components salvaged from such a vehicle, wear protective gloves and discard them after use. The battery • Batteries contain sulphuric acid, which attacks clothing, eyes and skin. Take care when topping-up or carrying the battery. • The hydrogen gas given off by the battery is highly explosive. Never cause a spark or allow a naked light nearby. Be careful when connecting and disconnecting battery chargers or jump leads. Air bags • Air bags can cause injury if they go off accidentally. Take care when removing the steering wheel and/or facia. Special storage instructions may apply. Diesel injection equipment • Diesel injection pumps supply fuel at very high pressure. Take care when working on the fuel injectors and fuel pipes. Warning: Never expose the hands, face or any other part of the body to injector spray; the fuel can penetrate the skin with potentially fatal results. Remember... DO • Do use eye protection when using power tools, and when working under the vehicle. • Do wear gloves or use barrier cream to protect your hands when necessary. • Do get someone to check periodically that all is well when working alone on the vehicle. • Do keep loose clothing and long hair well out of the way of moving mechanical parts. • Do remove rings, wristwatch etc, before working on the vehicle – especially the electrical system. • Do ensure that any lifting or jacking equipment has a safe working load rating adequate for the job. A few tips DON’T • Don’t attempt to lift a heavy component which may be beyond your capability – get assistance. • Don’t rush to finish a job, or take unverified short cuts. • Don’t use ill-fitting tools which may slip and cause injury. • Don’t leave tools or parts lying around where someone can trip over them. Mop up oil and fuel spills at once. • Don’t allow children or pets to play in or near a vehicle being worked on.
0•6 The jack supplied with the vehicle tool kit should only be used for changing roadwheels. When carrying out any other kind of work, raise the vehicle using a trolley jack, and always supplement the jack with axle stands positioned under the vehicle jacking points. To change a roadwheel, first remove the spare wheel and jack from their stowage positions. On Saloon, Hatchback and Estate models, the jack and spare wheel are located in the luggage compartment. On P100 models, the jack is located behind the passenger seat, and the spare wheel is located under the rear of the cargo area. Firmly apply the handbrake and engage first gear on manual gearbox models or “P” on automatic transmission models. Place chocks at the front and rear of the wheel diagonally opposite the one to be changed. Where applicable, remove the wheel trim and slacken the wheel nuts using the wheel brace provided in the vehicle tool kit. Position the jack head under the jacking point nearest to the wheel to be changed. Raise the jack until the wheel is clear of the ground, then remove the wheel nuts and the wheel. Fit the spare wheel and secure it with the wheel nuts. Lower the jack until the wheel is just touching the ground, and tighten the wheel nuts moderately tight. Now lower the jack fully and tighten the wheel nuts securely in a diagonal sequence. Where applicable, refit the wheel trim , then withdraw the jack and stow the wheel and jack in thier respective locations. When jacking up the vehicle with a trolley jack, position the jack under one of the relevant jacking point (note that on P100 models, the jackng points for use with a trolley jack are different to those for use with the vehicle jack). Do not jack the vehicle under the sump or or any of the steering or suspension components. Supplement the jack using axle stands. The jacking points and axle stand positions are shown in the accompanying illustrations. Never work under, around or near a raised vehicle unless it is adequately supported in at least two places. Jacking, vehicle support and wheel changing Location of jacking points - Saloon, Hatchback and Estate models A Jacking points for use with vehicle jack B Jacking points for use with trolley jack or axle stands Location of jacking points - P100 models A Jacking points for use with vehicle jack B Jacking points for use with trolley jack or axle stands Rear jacking point - Hatchback model Jack location by front wheel - Hatchback model Axle stand correctly positioned under front jacking point - Hatchback model Roadside repairs
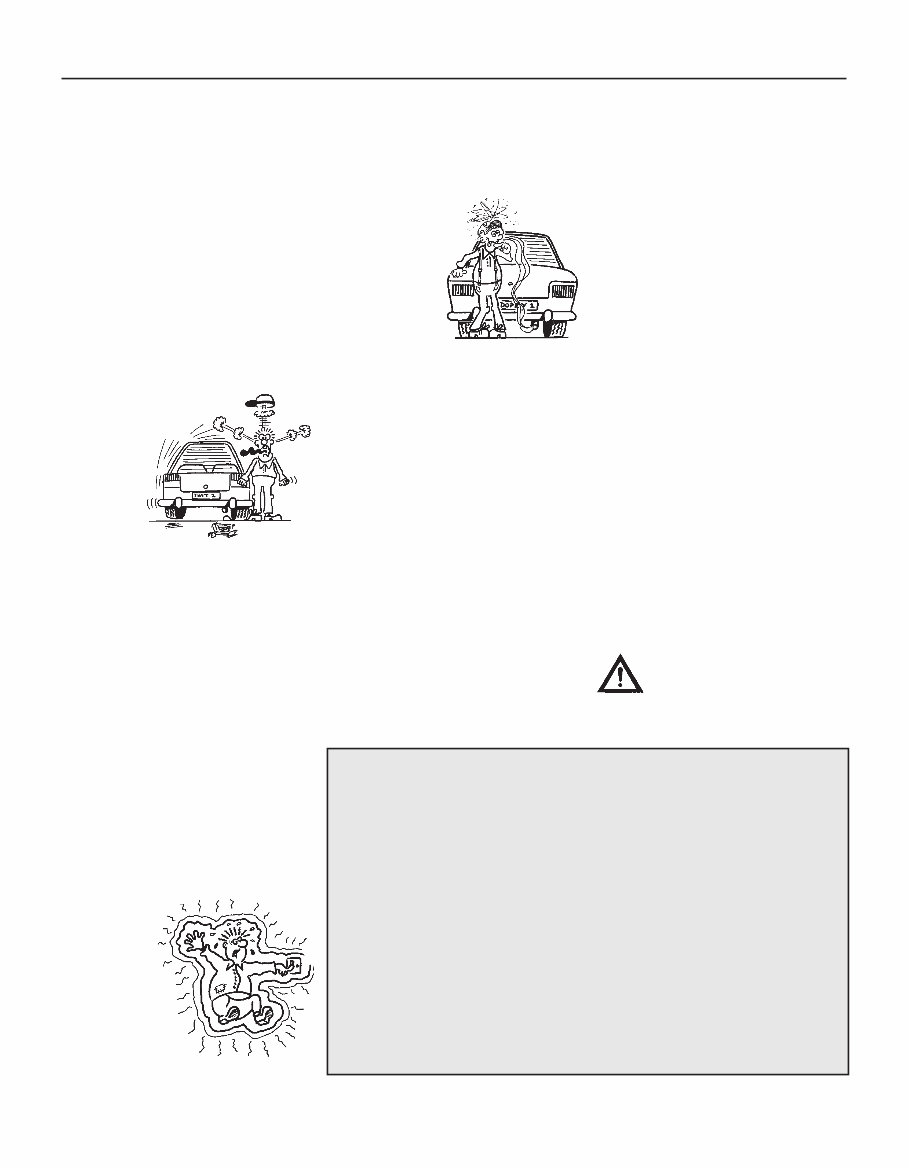
0•7 Rear towing eye - Hatchback model Front towing eye - Hatchback model Towing Towing eyes are fitted to the front and rear of the vehicle for attachment of a tow rope. Always turn the ignition key to position “II” when thew vehicle is being towed, so that the steering lock is released and the direction indicator and brake lamps are operational. Before being towed, release the handbrake and place the gear lever in neutral. On automatic transmission models, the towing speed must not exceed 25 mph (40 kph), and the towing distance must not exceed 12 miles (20 km). For longer distances, or if transmission damage is suspected, the propellor shaft should be removed, or the rear of the vehicle should be lifted clear of the ground. Push or tow starting is not possible on vehicles fitted with automatic transmission. Roadside repairs
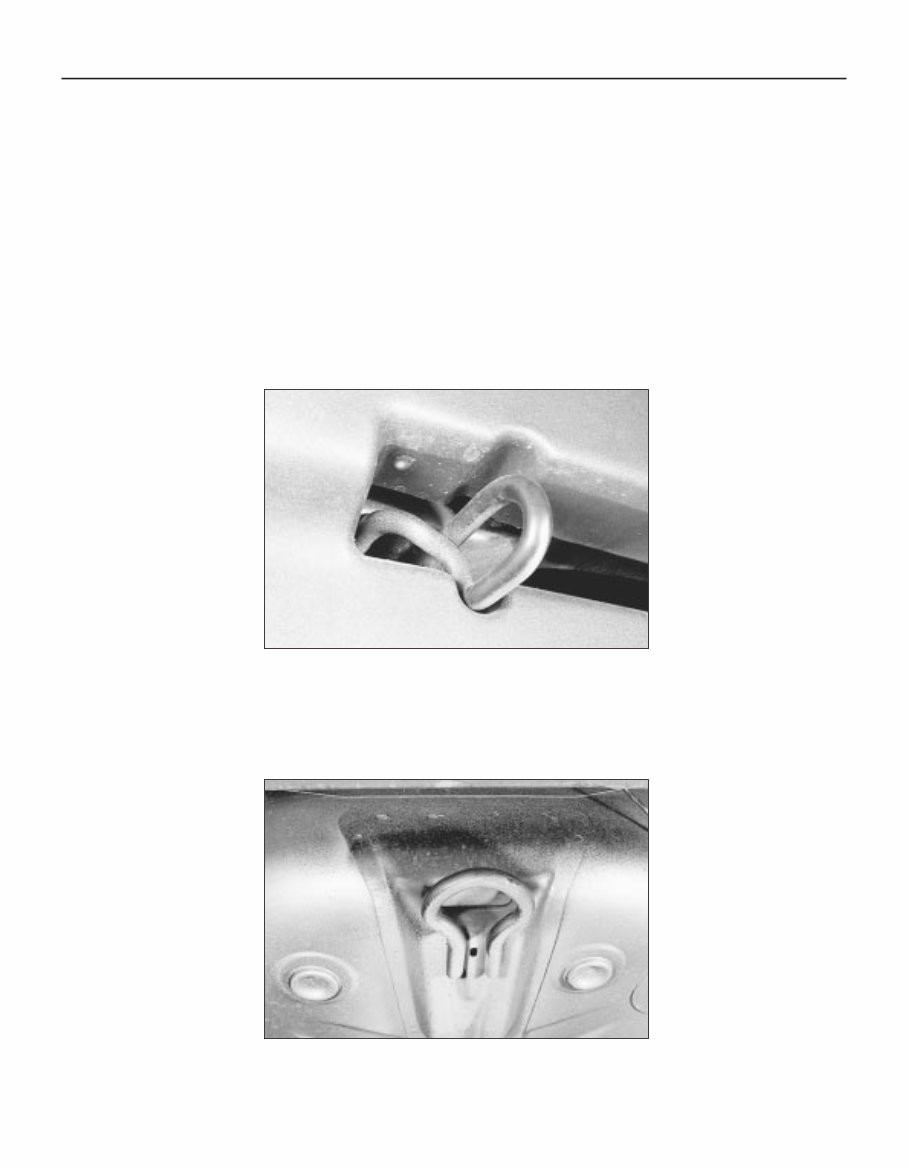
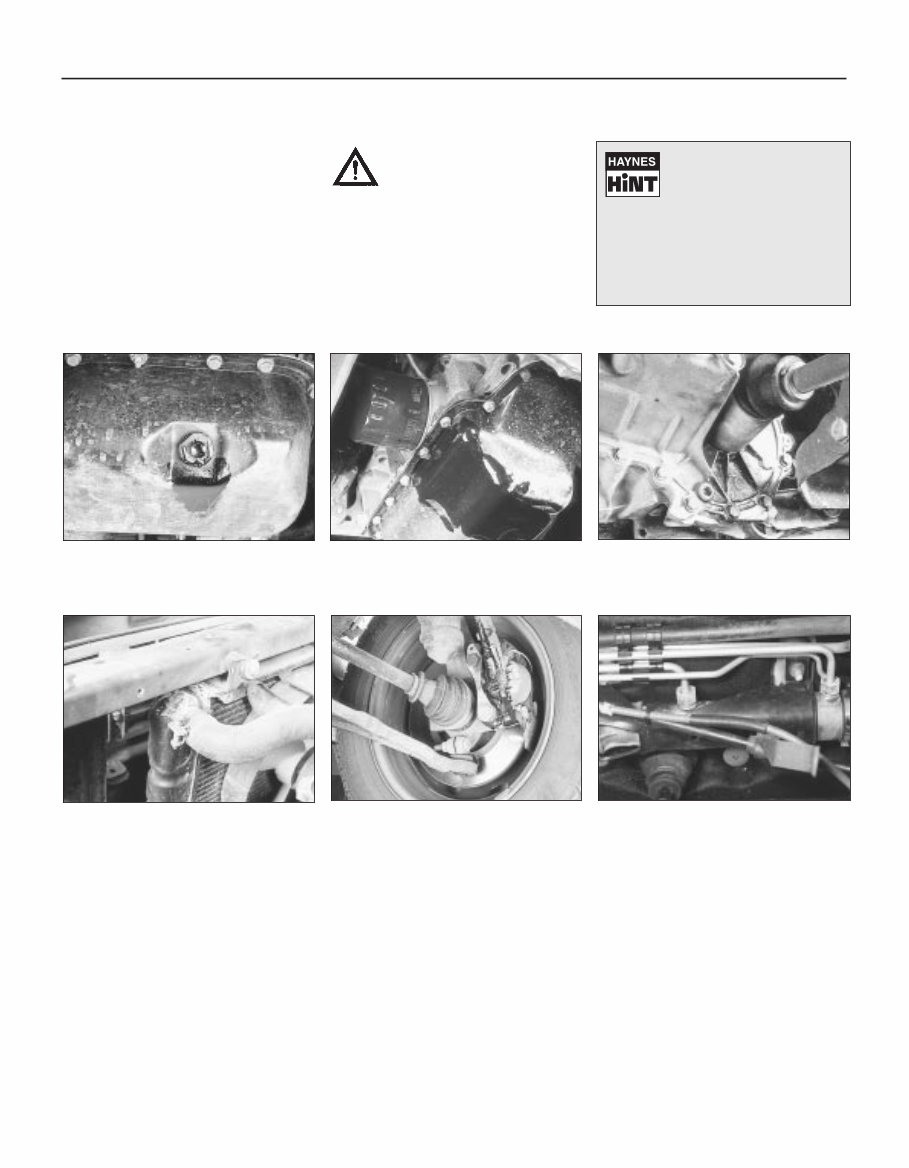
0•8 Roadside repairs Puddles on the garage floor or drive, or obvious wetness under the bonnet or underneath the car, suggest a leak that needs investigating. It can sometimes be difficult to decide where the leak is coming from, especially if the engine bay is very dirty already. Leaking oil or fluid can also be blown rearwards by the passage of air under the car, giving a false impression of where the problem lies. Warning: Most automotive oils and fluids are poisonous. Wash them off skin, and change out of contaminated clothing, without delay. Identifying leaks The smell of a fluid leaking from the car may provide a clue to what’s leaking. Some fluids are distinctively coloured. It may help to clean the car carefully and to park it over some clean paper overnight as an aid to locating the source of the leak. Remember that some leaks may only occur while the engine is running. Sump oil Gearbox oil Brake fluid Power steering fluid Oil from filter Antifreeze Engine oil may leak from the drain plug... ...or from the base of the oil filter. Leaking antifreeze often leaves a crystalline deposit like this. Gearbox oil can leak from the seals at the inboard ends of the driveshafts. A leak occurring at a wheel is almost certainly brake fluid. Power steering fluid may leak from the pipe connectors on the steering rack.
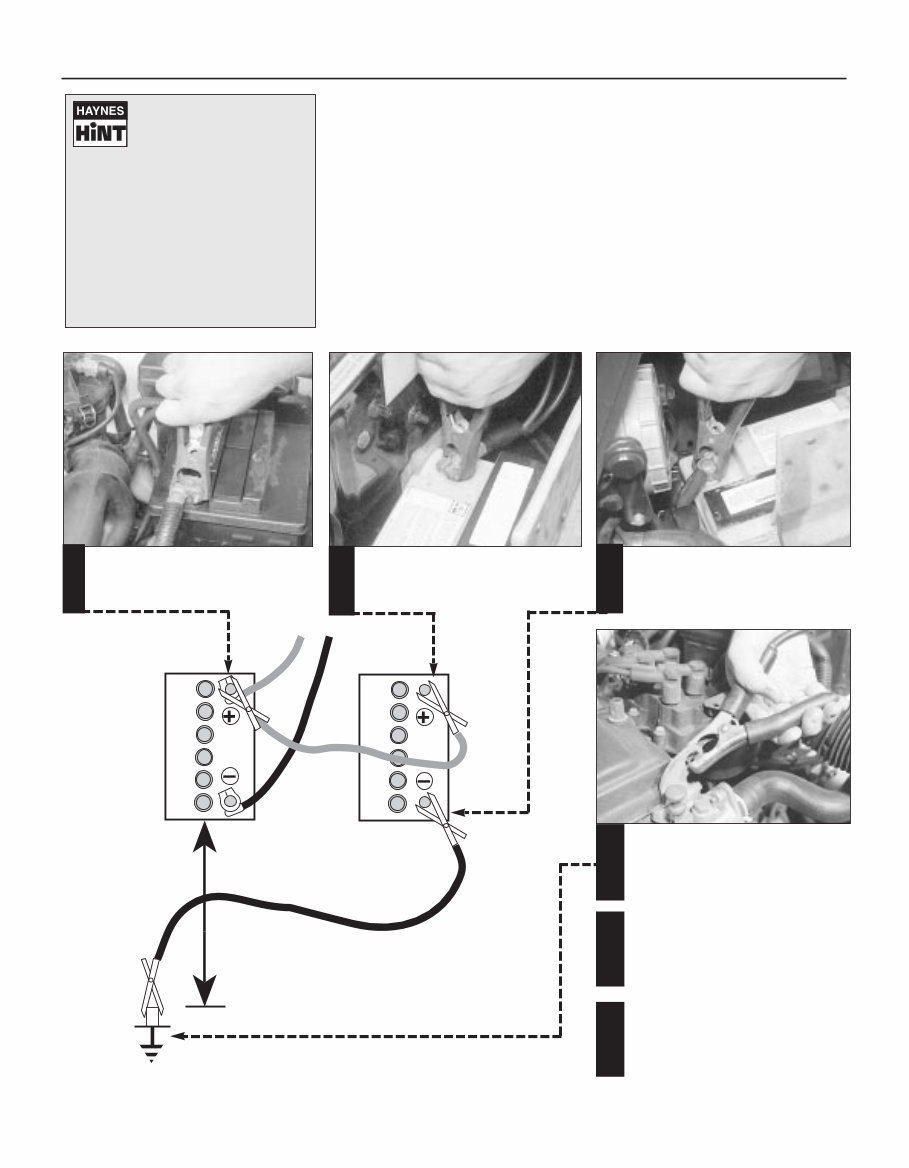
0•9 Roadside repairs When jump-starting a car using a booster battery, observe the following precautions: 4 Before connecting the booster battery, make sure that the ignition is switched off. 4 Ensure that all electrical equipment (lights, heater, wipers, etc) is switched off. 4 Make sure that the booster battery is the same voltage as the discharged one in the vehicle. 4 If the battery is being jump-started from the battery in another vehicle, the two vehcles MUST NOT TOUCH each other. 4 Make sure that the transmission is in neutral (or PARK, in the case of automatic transmission). Jump starting will get you out of trouble, but you must correct whatever made the battery go flat in the first place. There are three possibilities: 1 The battery has been drained by repeated attempts to start, or by leaving the lights on. 2 The charging system is not working properly (alternator drivebelt slack or broken, alternator wiring fault or alternator itself faulty). 3 The battery itself is at fault (electrolyte low, or battery worn out). Connect one end of the red jump lead to the positive (+) terminal of the flat battery Connect the other end of the red lead to the positive (+) terminal of the booster battery. Connect one end of the black jump lead to the negative (-) terminal of the booster battery Connect the other end of the black jump lead to a bolt or bracket on the engine block, well away from the battery, on the vehicle to be started. 1 2 3 4 Make sure that the jump leads will not come into contact with the fan, drive- belts or other moving parts of the engine. 5 Start the engine using the booster battery, then with the engine running at idle speed, disconnect the jump leads in the reverse order of connection. 6 Jump starting
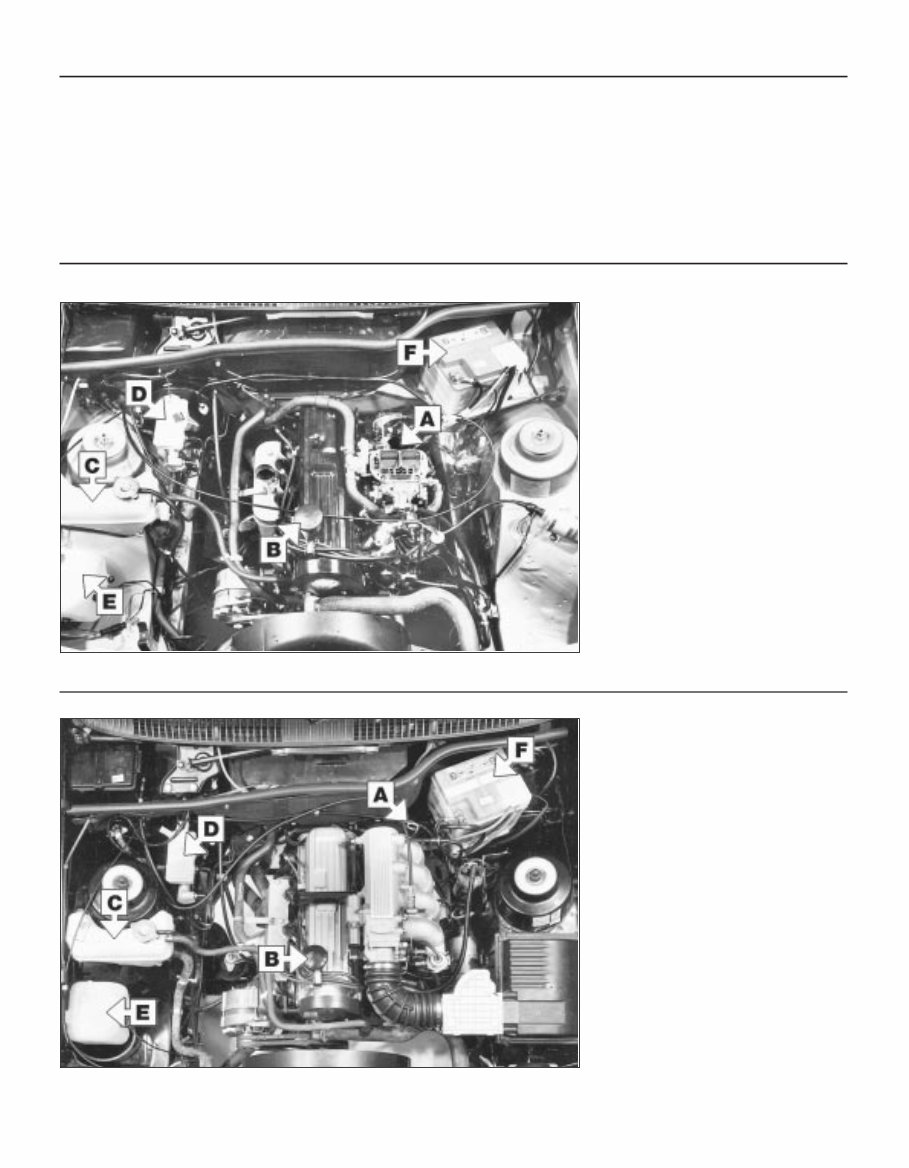
0•10 There are some very simple checks which need only take a few minutes to carry out, but which could save you a lot of inconvenience and expense. These "Weekly checks" require no great skill or special tools, and the small amount of time they take to perform could prove to be very well spent, for example; M Keeping an eye on tyre condition and pressures, will not only help to stop them wearing out prematurely, but could also save your life. M Many breakdowns are caused by electrical problems. Battery-related faults are particularly common, and a quick check on a regular basis will often prevent the majority of these. M If your car develops a brake fluid leak, the first time you might know about it is when your brakes don't work properly. Checking the level regularly will give advance warning of this kind of problem. M If the oil or coolant levels run low, the cost of repairing any engine damage will be far greater than fixing the leak, for example. Underbonnet check points § 2.0 litre OHC Carburettor model (air cleaner removed for clarity) A Location of oil level dipstick B Engine oil filler cap C Coolant expansion tank D Brake fluid reservoir E Windscreen washer reservoir F Battery § 2.0 litre OHC Fuel injection model A Oil level dipstick B Engine oil filler cap C Coolant expansion tank D Brake fluid reservoir E Windscreen washer reservoir F Battery Introduction Weekly checks
This is the Ford Sierra Sapphire 1982-1993 Service Repair Workshop Manual. It contains comprehensive service and repair instructions used by mechanics worldwide. The manual covers all major topics, providing step-by-step instructions, diagrams, illustrations, wiring schematics, and specifications for repairing and troubleshooting the Ford Sierra Sapphire 1982-1993.
The manual is useful for both professional mechanics and DIY enthusiasts with basic mechanical skills. It includes the same specifications and procedures available to an authorized dealer service department. Even car owners with no intention of working on their vehicles will find it valuable for better understanding and discussing repairs with automotive technicians.
Written by the manufacturers, this manual can assist with any necessary repairs. It features accurate, clear, and concise text combined with illustrations, making it suitable for individuals with basic mechanical knowledge to safely and easily service and repair their vehicles.
It is not generic repair information; it is vehicle-specific and used by technicians at dealerships to maintain, service, diagnose, and repair vehicles. The manual is complete and intact, with no missing or corrupt parts or pages.
It includes pictures and easy-to-follow directions on required tools and repair procedures, potentially saving hundreds or thousands of dollars in repair bills. The manual is in PDF format, viewable on various devices, including PCs, Macs, and many phones and e-readers like the Amazon Kindle. It is printable and compatible with all versions of Windows and Mac.
All pages are printable, allowing users to take the necessary pages into the garage or workshop. By following the step-by-step instructions, individuals can save money by performing their own repairs, regardless of skill level.
The manual covers a wide range of systems and components, including general information, engine, transmission, suspension, steering, brakes, body, electrical, heating, ventilation, air conditioning, and more.
It also includes detailed sections on lubrication and maintenance, differential and driveline, vehicle quick reference, cooling, audio/video, and many other components and systems.
Recently Viewed
5,521,897Happy Clients
2,594,462eManuals
1,120,453Trusted Sellers
15Years in Business
Price:
Actual Price:
1982-1993 Ford Sierra Sapphire Service & Repair Manual