

100-01-1 100-01-1 Identification Codes
DESCRIPTION AND OPERATION
Identification Codes
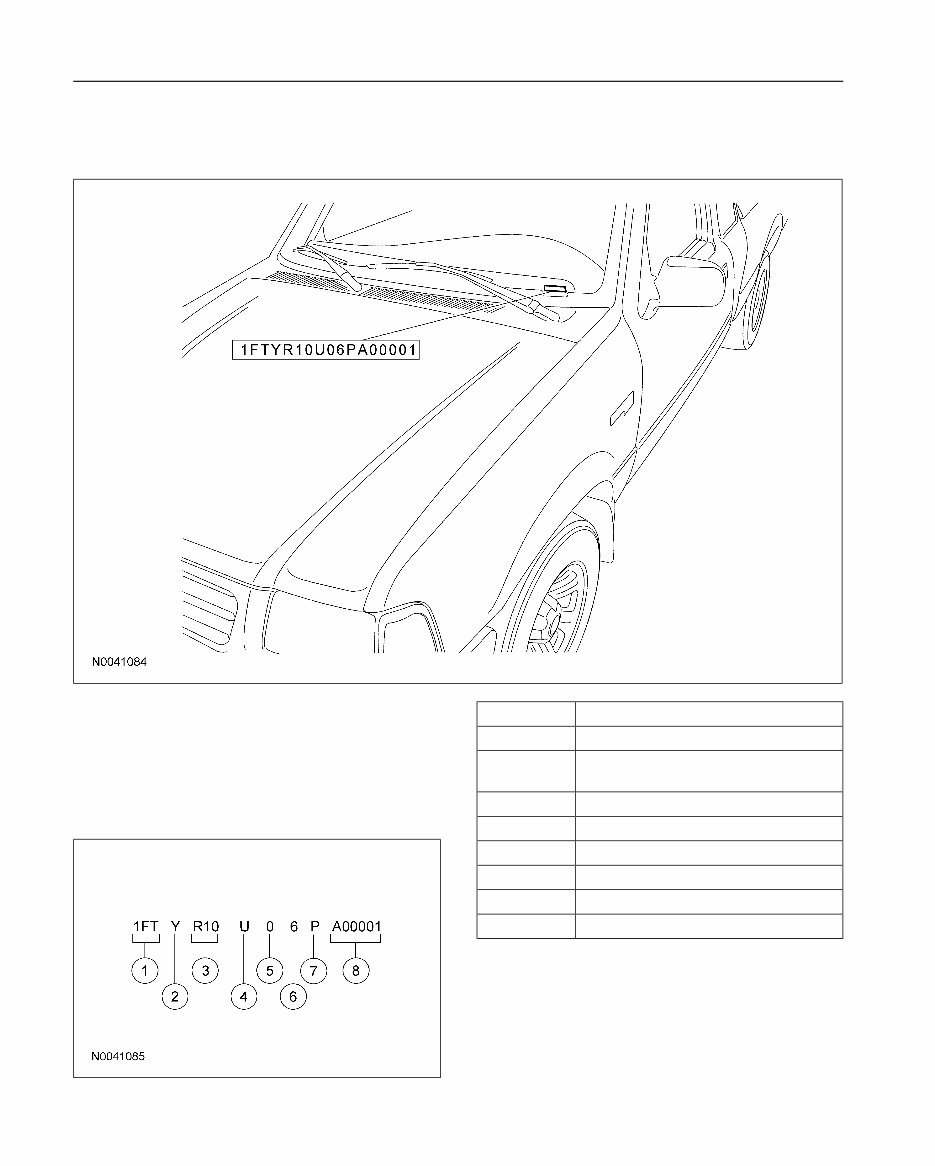
Vehicle Identification Number (VIN) Locator
Item Description
The vehicle identification number (VIN) is a
17-digit combination of letters and numbers. The
1 World manufacturer identifier (WMI)
VIN is stamped on a metal tab riveted to the
2 Brake type and gross vehicle weight
instrument panel, top upper left of the dash. The
rating (GVWR) code
VIN number is also found on the vehicle
3 Vehicle line, series, body type code
certification (VC) label.
4 Engine type code
5 Computer generated check digit
6 Model year code
7 Assembly plant code
8 Production sequence number
100-01-2 100-01-2 Identification Codes
DESCRIPTION AND OPERATION (Continued)
Vehicle Line, Series and Body Type
Vehicle Identification Number
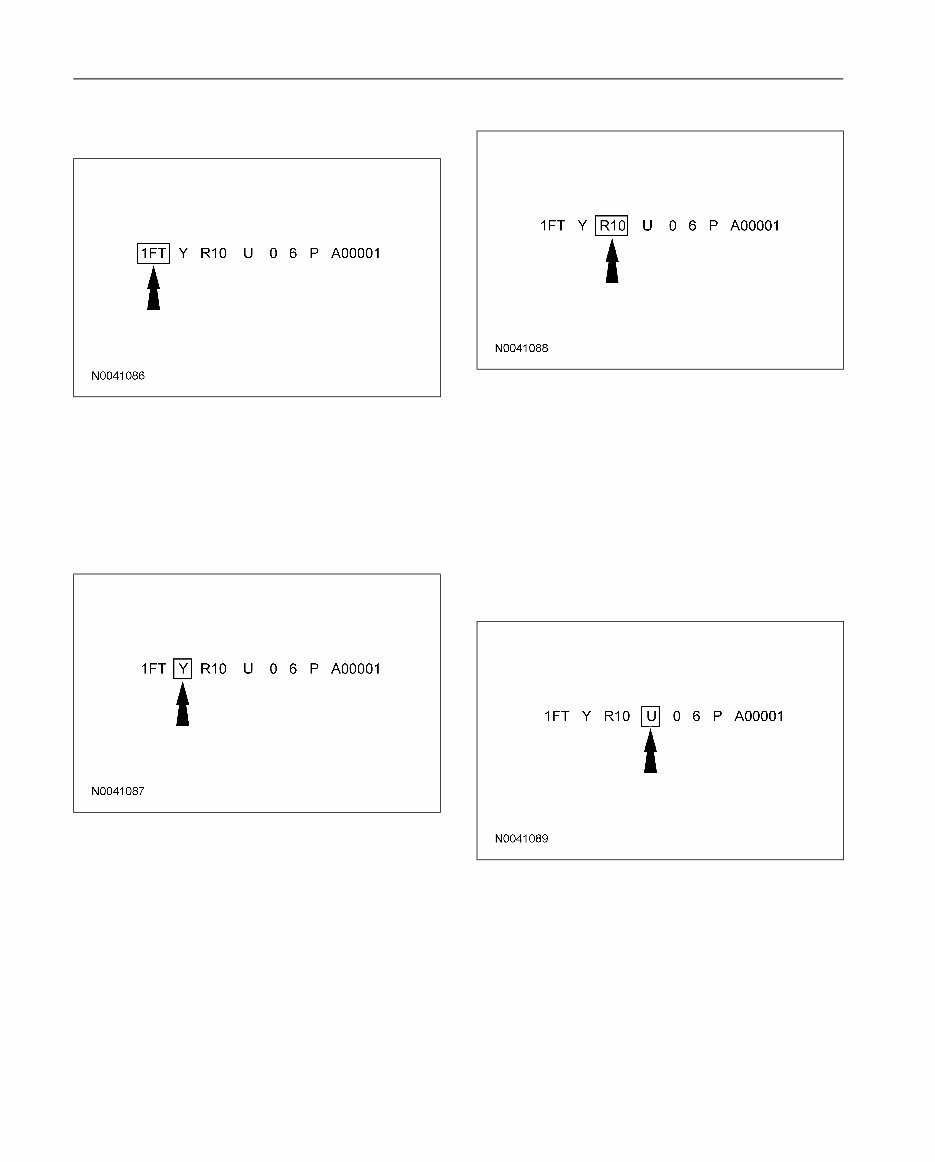
World Manufacturer Identifier (WMI)
Positions 5 through 7 indicate vehicle line, series
and body type.
The first 3 vehicle identification number (VIN)
positions are the world manufacturer identifier
• R10 — 4x2, Regular cab
(WMI).
• R11 — 4x4, Regular cab
• 1FT — Ford Motor Company, USA, truck,
• R14 — 4x2, SuperCab (2-door)
completed vehicle
• R15 — 4x4, SuperCab (2-door)
Brake, Restraint Type and Gross Vehicle Weight
• R44 — 4x2, SuperCab (4-door)
Rating (GVWR)
• R45 — 4x4, SuperCab (4-door)
Engine Code
The fourth VIN position is the vehicle brake type
and gross vehicle weight rating (GVWR) code (all
vehicles use hydraulic brakes).
The eighth VIN position identifies the engine type,
displacement and number of cylinders.
• Y — 4,001 - 5,000 pounds GVWR, active safety
belts (all positions) with driver and front
• D — 2.3L, EFI, 4-cylinder, gas
passenger air bags
• E — 4.0L, EFI, SOHC, V6, gas
• Z — 5,001 - 6,000 pounds GVWR, active safety
• U — 3.0L, EFI, OHV, V6, gas
belts (all positions) with driver and front
passenger air bags
100-01-3 100-01-3 Identification Codes
DESCRIPTION AND OPERATION (Continued)
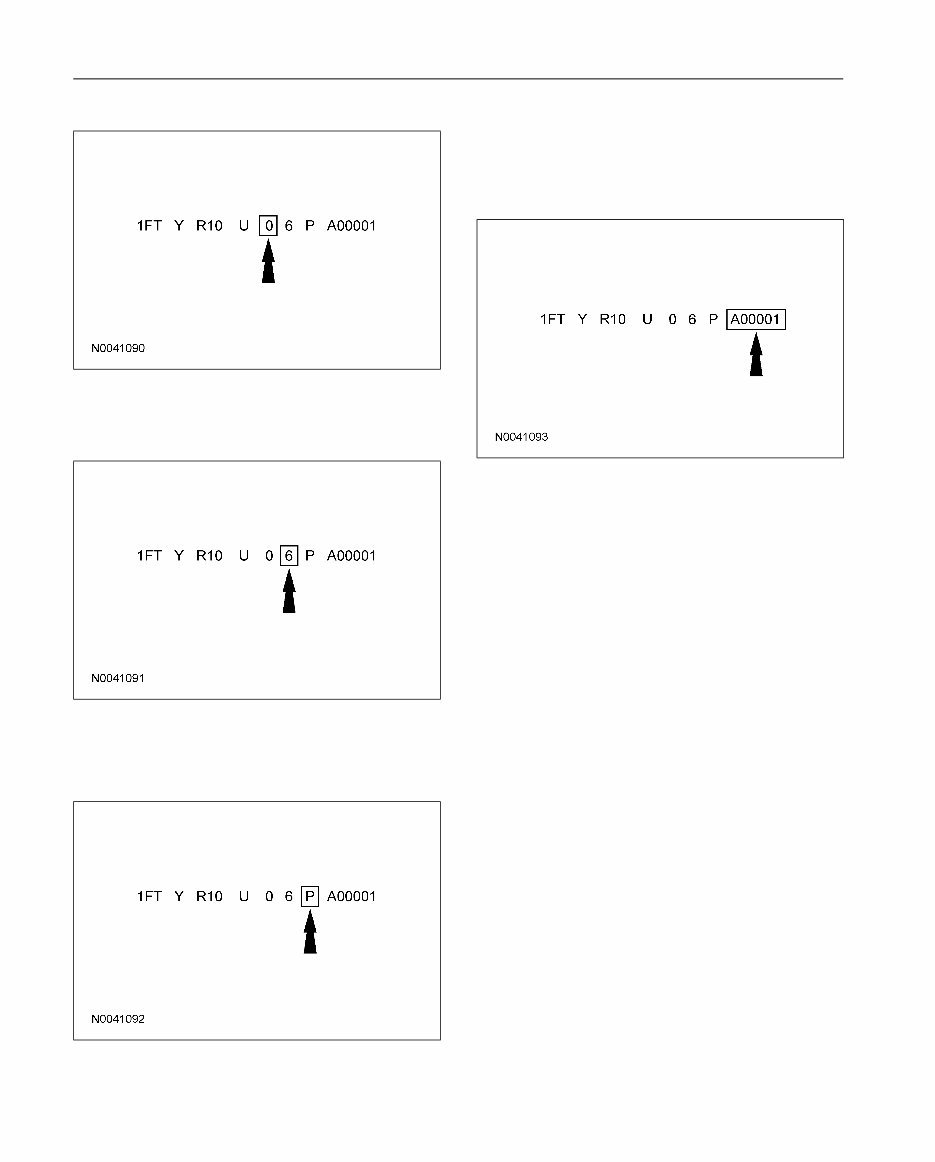
Check Digit
The eleventh VIN position is the assembly plant
code.
• P — Twin Cities (St. Paul, Minnesota)
Production Sequence Number
The ninth VIN position is a government-assigned,
computer-generated check digit.
Model Year
The last 6 VIN positions are an alphanumeric code
for the vehicle build sequence. This is also the
vehicle serial and warranty number.
• Ford Motor Company — A00001-F99999
The tenth VIN position is the model year code.
• 6 — 2006
Assembly Plant
100-01-4 100-01-4 Identification Codes
DESCRIPTION AND OPERATION (Continued)
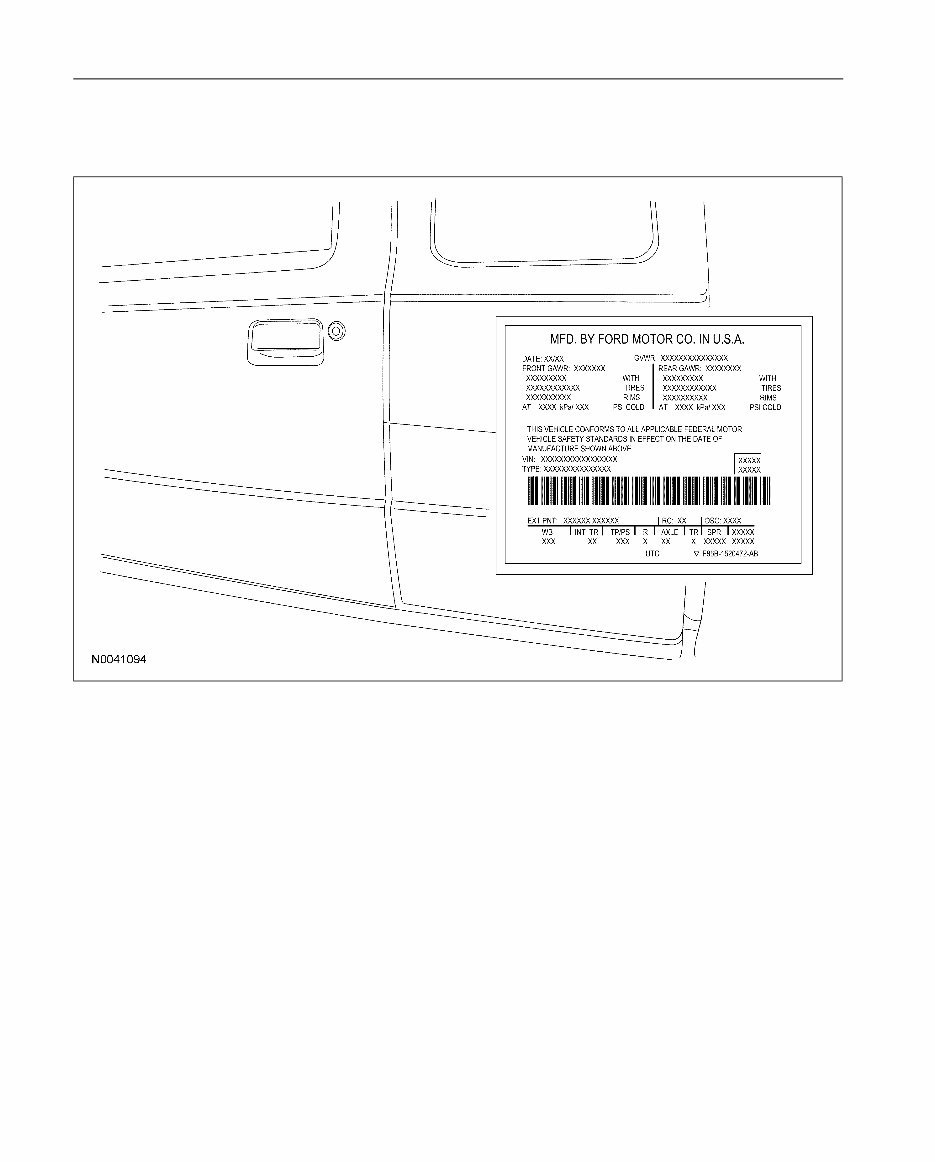
Vehicle Certification (VC) Label
Vehicle Certification (VC) Label Locator
100-01-5 100-01-5 Identification Codes
DESCRIPTION AND OPERATION (Continued)
Paint Code
The upper portion of the vehicle certification (VC)
label contains the manufacturer name, the month
and year of manufacture, the certification statement
and the VIN. It also includes gross vehicle weight
ratings (GVWR).
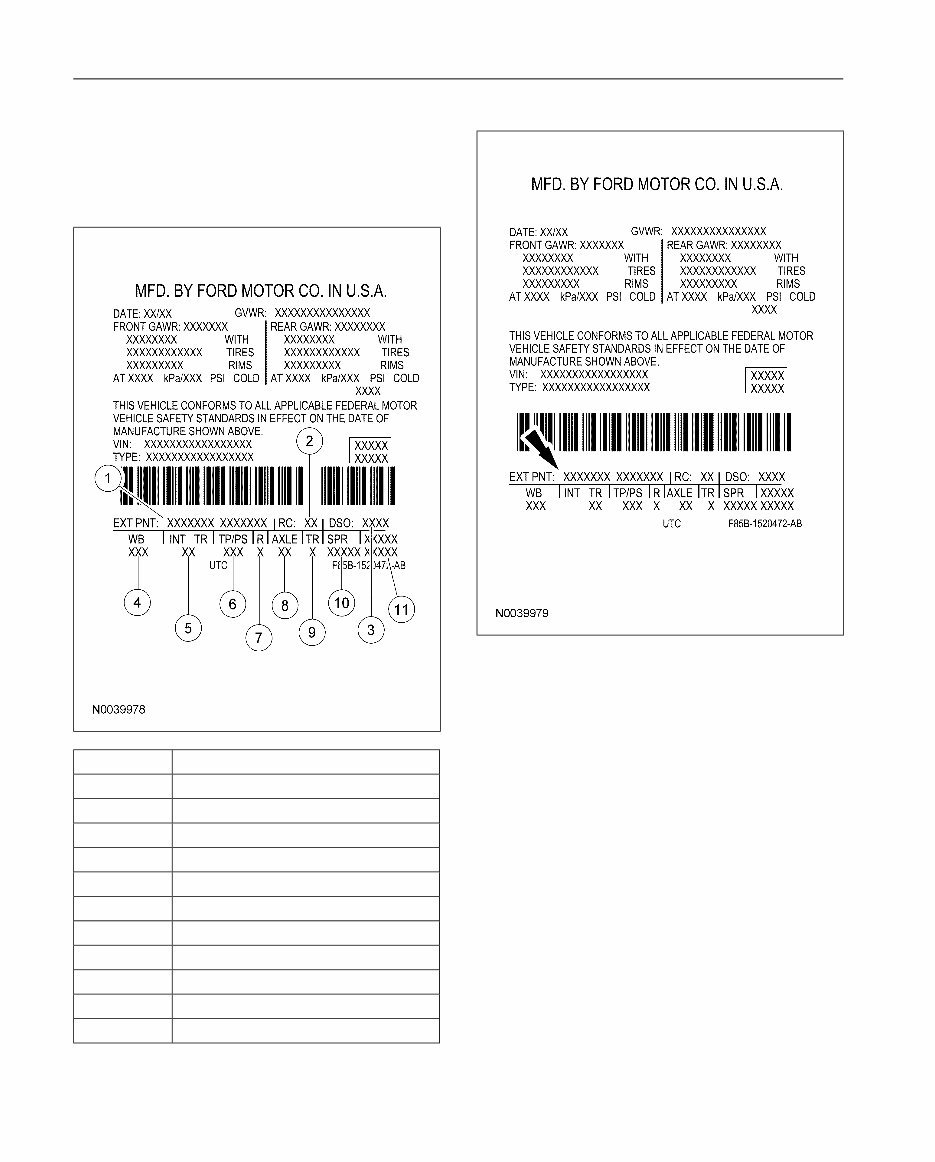
Exterior paint codes may be listed as a 2-part code.
The first set of letters/numbers identify the vehicle
primary body color. The second set of
letters/number (if applicable) identify a 2-tone or
accent body color. All colors are base coat/clear
Item Description coat.
1 Exterior paint code
Primary Body Color
2 Region code
• AQ — Arizona Beige
3 Domestic special order code
• CX — Dark Shadow Gray
4 Wheelbase code
• D3 — Colorado Red
5 Interior trim code
• D6 — Screaming Yellow
6 Tape/paint pinstripe code
• G2 — Redfire
7 Radio code
• SN — Sonic Blue
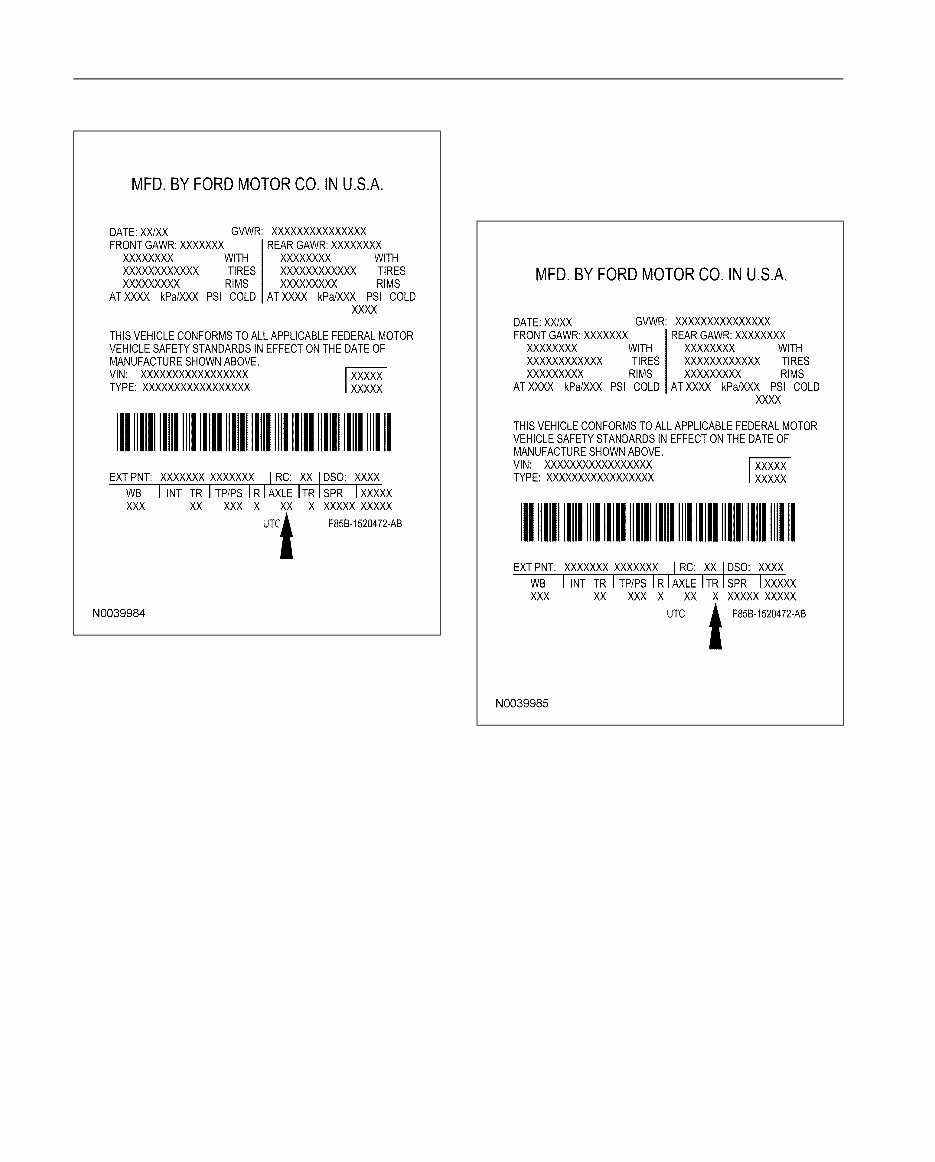
8 Axle code
• UA — Ebony
9 Transmission code
• YN — Silver Metallic #2
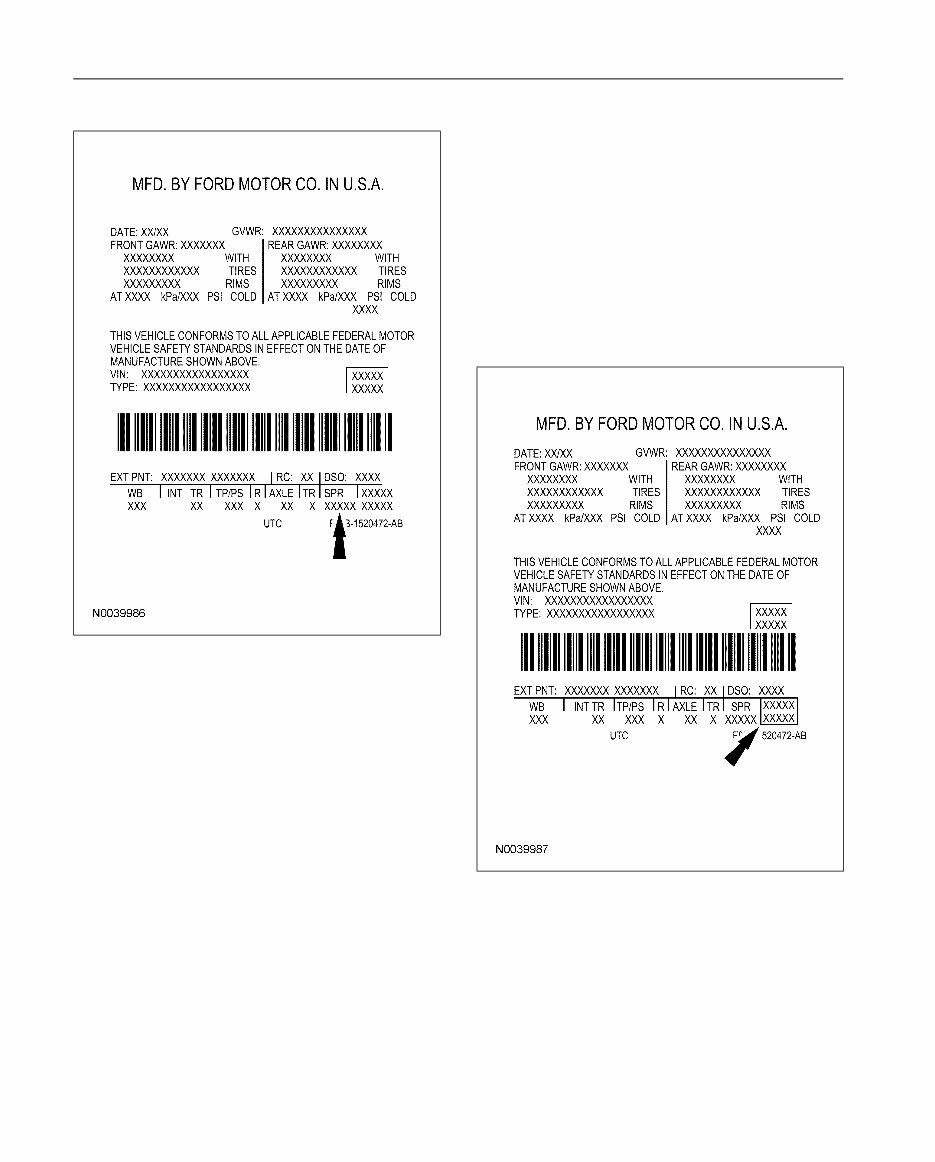
10 Spring code
• YZ — Oxford White
11 Calibration numbering
Accent Body Color
• CX — Dark Shadow Gray
• UA — Ebony
100-01-6 100-01-6 Identification Codes
DESCRIPTION AND OPERATION (Continued)
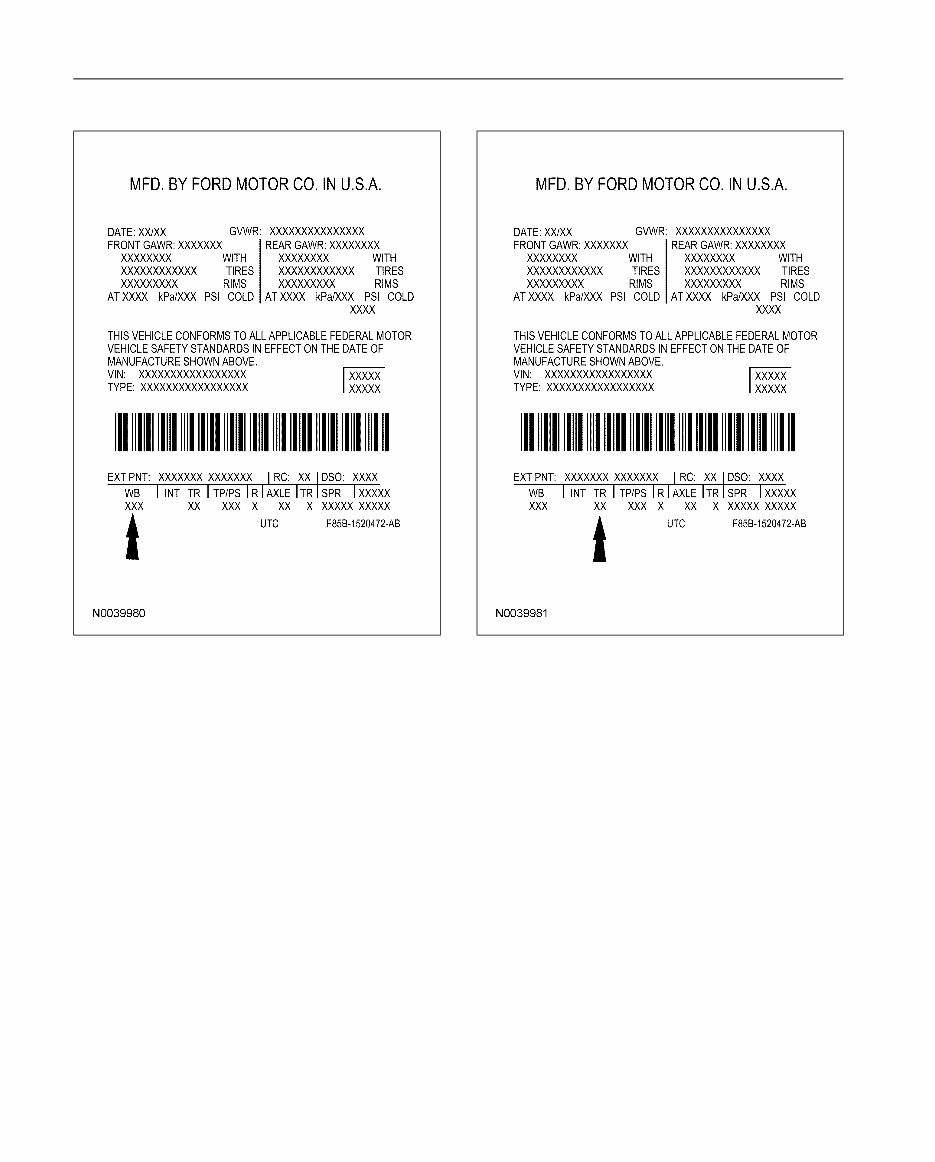
Wheelbase Interior Trim
• 112 — 112-inch (2,845 mm) wheelbase
Interior trim codes are listed as a 2-part code. The
first code listed identifies the trim level. The second
• 118 — 118-inch (2,997 mm) wheelbase
code listed identifies the interior trim color.
• 126 — 126-inch (3,200 mm) wheelbase
Interior Trim Type
• L — Stockton cloth bucket seats
• M — Stockton 2 cloth bucket seats
• Q — Cenery grain vinyl split bench seat
• R — Mortar cloth split bench seat
• S — Mortar cloth bucket seats
• T — Imola leather split bench seat
• U — Imola leather bucket seats
• V — Link weave cloth bucket seats
Interior Trim Color
• B — Ebony
• F — Medium/Dark Flint
• P — Medium Pebble
100-01-7 100-01-7 Identification Codes
DESCRIPTION AND OPERATION (Continued)
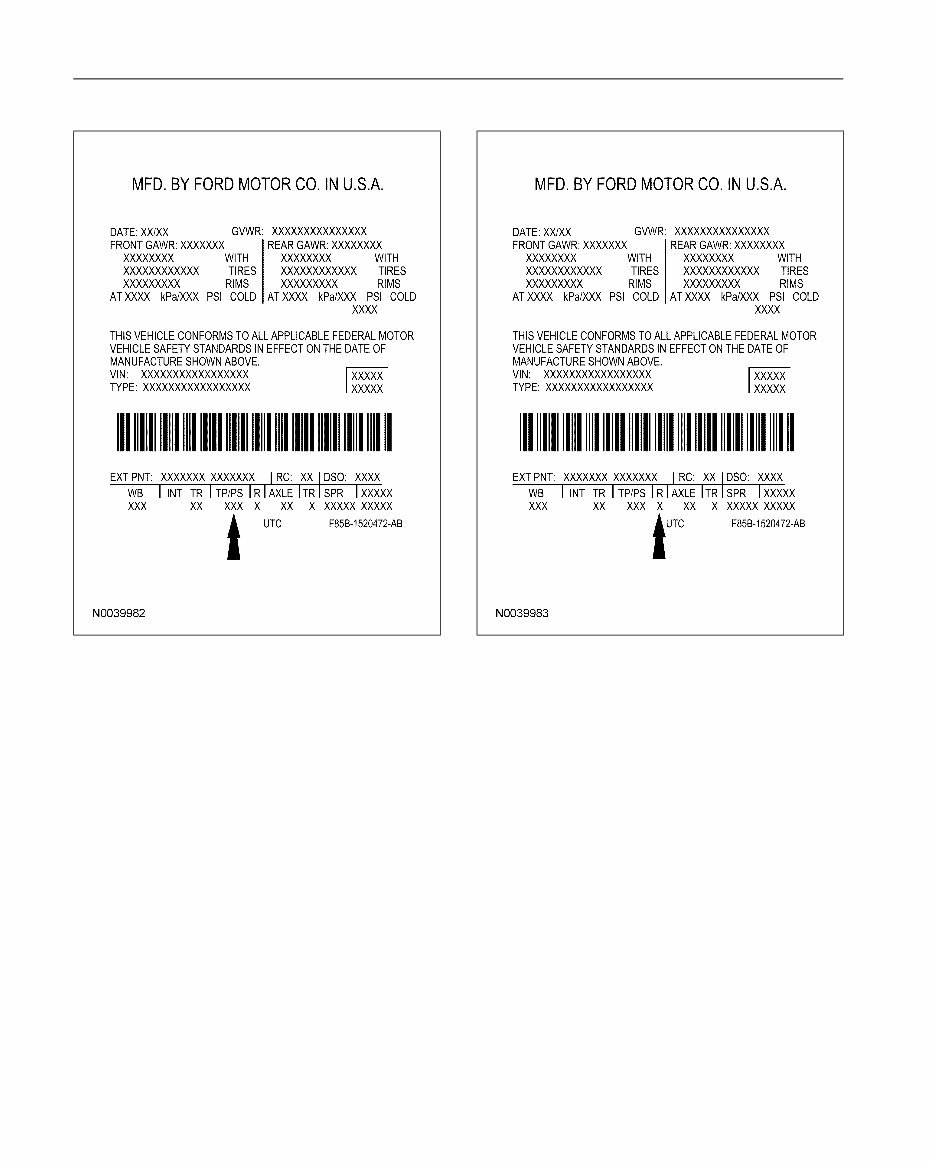
Tape/Paint Stripe Radio Type
• 7 — Electronic AM/FM stereo with clock
Tape and paint stripe codes do not apply.
• B — Premium electronic AM/FM stereo with
6-disc compact disc (CD) changer and MP3
capability
• E — Electronic AM/FM stereo with 6-disc CD
changer and MP3 capability (audiophile sound
system)
• P — AM/FM stereo with CD player and MP3
capability
• W — Premium electronic AM/FM stereo with
cassette, CD player and clock
• Z — AM/FM stereo with CD player and clock
100-01-8 100-01-8 Identification Codes
DESCRIPTION AND OPERATION (Continued)
Axle Code
• R5 — 3.55 limited slip (8.8-inch)
• R6 — 3.73 limited slip (8.8-inch)
• R7 — 4.10 limited slip (8.8-inch)
Transmission Type
The following lists the gear ratios on axles.
• 86 — 3.73 non-limited slip (7.5-inch)
• 87 — 4.10 non-limited slip (7.5-inch)
• 95 — 3.55 non-limited slip (8.8-inch)
• D — 5-speed automatic (5R44E/5R55E)
• 96 — 3.73 non-limited slip (8.8-inch)
• J — 5-speed manual (R1HD)
• 97 — 4.10 non-limited slip (8.8-inch)
• R — 5-speed manual (M5R1)
• F6 — 3.73 limited slip (7.5-inch)
100-01-9 100-01-9 Identification Codes
DESCRIPTION AND OPERATION (Continued)
Spring Codes
• B — F57A-5B326-BC (RH)
• B — F57A-5B327-BC (LH)
• F — F57A-5B326-FC (RH)
• F — F57A-5B327-FC (LH)
Rear Spring Codes
• 3 — 4L54-5560-DA (leaf)
• C — 3L54-5560-GA (leaf)
• K — 4L54-5560-EA (leaf)
Powertrain Calibration Information
Spring codes are listed as a 2-part code. The first
character identifies the front spring/torsion bar code.
The second character identifies the rear spring code.
Front Spring Codes
• 2 — 5L54-5310-BA (coil)
• 3 — 5L54-5310-LA (coil)
• 5 — 5L54-5310-KA (coil)
• A — 5L54-5310-AA (coil)
• C — 5L54-5310-MA (coil)
• D — 5L54-5310-DA (coil)
• E — 5L54-5310-EA (coil)
Front Torsion Bar Codes
• 1 — F67A-5B326-FA (RH)
• 1 — F67A-5B327-FA (LH)
100-01-10 100-01-10 Identification Codes
DESCRIPTION AND OPERATION (Continued)
Protocol 2
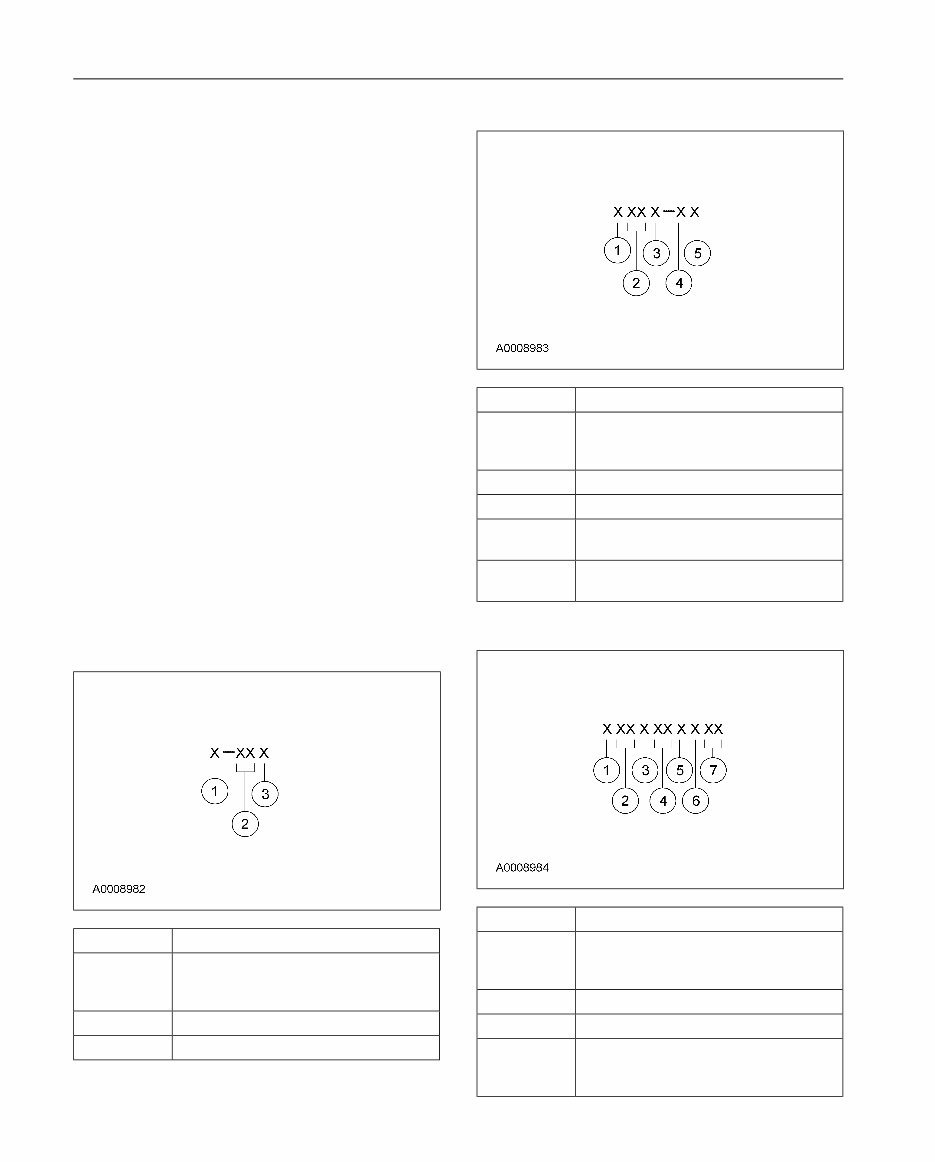
NOTE: Powertrain calibration information is limited
to a maximum of 5 characters per line on the
vehicle certification label. Because of this,
calibration identification consisting of more than 5
characters will wrap to the second line on the
vehicle certification (VC) label.
Powertrain calibration information is printed in the
lower right corner of the vehicle certification label.
Only the base calibration information is printed.
Revision levels will not appear, however, this
information can be found in On Line Automotive
Service Information System (OASIS). For the
current model year, Ford Motor Company is using
three different protocols which describe powertrain
Item Description
base calibration. These protocols are designed to
1 Model year (model year in which
provide worldwide standardization for vehicle
calibration strategy was first
calibration. If the electronic calibration strategy has
introduced)
been used since 1998 and carried into the current
2 Engine code
model year, Protocol 1 will be used. Refer to
3 Transmission code
Protocol 1 below. If the electronic calibration
strategy has been used since 1999 and is carried
4 Emission standard (designates the
into the current model year, Protocol 2 will be used. specific country emission standard)
Refer to Protocol 2 below. Electronic calibration
5 Design level (design level assigned to
strategies introduced in the 2000 or later model
the engine)
years will use Protocol 3. Refer to Protocol 3
below.
Protocol 3
Protocol 1
Item Description
Item Description
1 Model year (model year in which
calibration strategy was first
1 Model year (model year in which
introduced)
calibration strategy was first
introduced)
2 Vehicle code
2 Engine code
3 Transmission code
3 Engine revision level
4 Unique calibration (designates different
hardware to similar vehicles). Example:
tires, drive ratios, etc.
You're Reading a Preview
What's Included?
 Lifetime Access
Fast Download Speeds
Online & Offline Access
Access PDF Contents & Bookmarks
Full Search Facility
Print one or all pages of your manual
$36.99
2003-2006 Ford Ranger Service & Repair Manual
Viewed 39 Times Today

What's Included?
Lifetime Access
Fast Download Speeds
Online & Offline Access
Access PDF Contents & Bookmarks
Full Search Facility
Print one or all pages of your manual
$36.99

Secure transaction
What's Included?
Lifetime Access
Fast Download Speeds
Online & Offline Access
Access PDF Contents & Bookmarks
Full Search Facility
Print one or all pages of your manual
Description
The 2003-2006 Ford Ranger Service & Repair Manual is a comprehensive guide for maintaining and fixing your Ford Ranger vehicle. This manual is specifically designed for the 2003-2006 models, providing detailed instructions and diagrams to assist you in performing various repairs and services.
- Covers the 2003-2006 Ford Ranger models
- Provides step-by-step repair procedures
- Includes detailed diagrams and illustrations
- Offers troubleshooting tips and techniques
- Explains routine maintenance procedures
- Assists in diagnosing and fixing common problems
- Written by automotive experts
Whether you are a do-it-yourself mechanic or a professional technician, this service manual is an essential tool for keeping your Ford Ranger in top condition. With clear instructions and helpful illustrations, you can confidently tackle any repair or maintenance task.


