The maintenance schedule for these vehicles, based on the manufacturer’s recommendations, is as described below - note that the schedule starts from the vehicle’s date of registration. These are the minimum maintenance intervals recommen- ded by the factory for Fiestas driven daily, but subjected only to “normal” use. If you wish to keep your vehicle in peak condition at all times, you may wish to perform some of these procedures even more often. Because frequent maintenance enhances the efficiency, performance and resale value of your vehicle, we encourage you to do so. If your usage is not “normal”, shorter intervals are also recommended - the most important examples of these are noted in the schedule. These shorter intervals apply particularly if you drive in dusty areas, tow a caravan or trailer, sit with the engine idling or drive at low speeds for extended periods (ie, in heavy traffic), or drive for short distances (less than four miles) in below-freezing temperatures. When your vehicle is new, it should be serviced by a Ford dealer service department to protect the factory warranty. In many cases, the initial maintenance check is done at no cost to the owner. Note that this first free service (carried out by the selling dealer 1500 miles or 3 months after delivery), although an important check for a new vehicle, is not part of the regular maintenance schedule, and is therefore not mentioned here. It should be noted that for the 1992 model year, for all models except RS Turbo, the service time/mileage intervals were extended by the manufacturer to the periods shown in this schedule. Although these intervals can be applied retrospectively, owners of earlier vehicles may notice a discrepancy between this schedule and the one shown in the Service Guide supplied with the vehicle. 1•4 Maintenance schedule 1595Ford Fiesta Remake Every 250 miles (400 km) or weekly m Refer to “Weekly Checks”. Every 5000 miles (8000 km) or 6 months, whichever occurs first Note: Frequent oil and filter changes are good for the engine. We recommend changing the oil at the mileage specified here, or at least twice a year if the mileage covered is less. m Renew the engine oil and filter (Section 3). Every 10 000 miles (16 000 km) or 12 months, whichever occurs first Carry out all operations listed above, plus the following: m Check the auxiliary drivebelt (Section 4). m Check under the bonnet for fluid leaks and hose condition (Section 5). m Check the condition of all engine compartment wiring (Sec- tion 6). m Check the valve clearance adjustment - HCS engines only (Section 7). m Check the manual transmission oil level (Section 8). m Check the engine idle speed and mixture - HCS and CVH engines only, where possible (Section 9). m Check the steering, suspension and roadwheels (Section 10). m Check the driveshaft rubber gaiters and CV joints (Section 11). m Check the exhaust system (Section 12). m Check the underbody, and all fuel/brake lines (Section 13). m Check the brake system (Section 14). m Check the security of all roadwheel nuts (Section 15). m Check the doors, tailgate and bonnet, and lubricate their hinges and locks (Section 16). m Check the seat belts (Section 17). m Check the condition of the bodywork, paint and exterior trim (Section 18). m Road test (Section 19). m Check the automatic transmission fluid level (Section 20). Every 20 000 miles (32 000 km) or two years, whichever occurs first Carry out all operations listed above, plus the following: m Renew the spark plugs and check the condition of the HT leads - all engines except Zetec (Section 21). m Clean the idle speed control valve (Weber type) - CVH EFi engines only (Section 22). Every 30 000 miles (48 000 km) or three years, whichever occurs first Carry out all operations listed above, plus the following: m Renew the coolant (Section 23). m Renew the air cleaner filter element and check the air cleaner temperature control system - carburettor engines only (Sec- tion 24). m Check the emission control systems (Section 25). m Renew the spark plugs and check the condition of the HT leads - Zetec engines (Section 21). m Renew the automatic transmission fluid (Section 26). m Check the handbrake adjustment (Section 27). m Check the front wheel alignment (Section 28). Note: If the vehicle is used regularly in dusty or polluted conditions, the air cleaner filter element should be renewed at more frequent intervals. Every 40 000 miles m Renew the timing belt - CVH and PTE engines only (Section 29). Every 60 000 miles m Renew the timing belt - Zetec engines only (Section 29). m Renew the fuel filter (Section 30). Every three years (regardless of mileage) m Renew the brake fluid (Section 31).
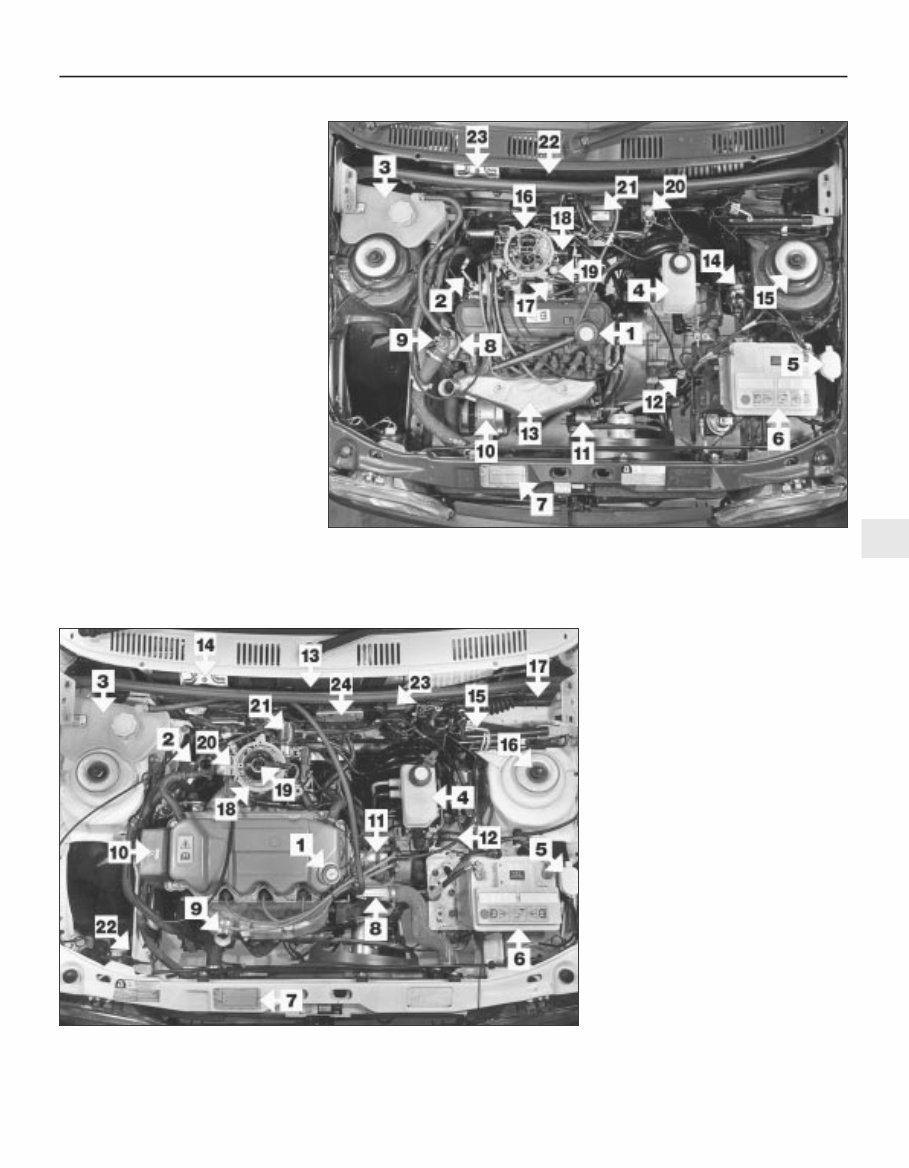
Maintenance – component location 1•5 1 Engine oil filler cap 2 Engine oil level dipstick 3 Cooling system expansion tank 4 Brake fluid reservoir 5 Windscreen/tailgate washer fluid reservoir cap 6 Battery 7 Vehicle identification plate 8 Thermostat housing 9 Pre-heat tube 10 Timing belt cover 11 Distributor 12 Fuel filter 13 Heater blower motor cover 14 Windscreen wiper motor mounting bracket 15 Jack and wheelbrace retaining bolt 16 Top of suspension strut mounting assembly 17 EEC IV engine management module cover 18 CFi unit 19 Fuel injector 20 Fuel pressure regulator 21 Throttle plate control motor 22 Carbon canister 23 Manifold absolute pressure sensor 24 Ignition module 1.1 litre HCS carburettor engine (air cleaner removed for clarity) 1 1595Ford Fiesta Remake 1.4 litre CVH CFi fuel injection engine (air cleaner removed for clarity) 1 Engine oil filler cap 2 Engine oil level dipstick 3 Cooling system expansion tank 4 Brake fluid reservoir 5 Windscreen/tailgate washer fluid reservoir cap 6 Battery 7 Vehicle identification plate 8 Thermostat housing 9 Radiator cooling fan thermal switch multi- plug 10 Alternator 11 Starter motor solenoid 12 CTX automatic transmission fluid level dipstick 13 Exhaust heatshield/airbox 14 Brake pressure control valves 15 Top of suspension strut mounting assembly 16 Carburettor 17 Fuel feed hose 18 Anti-dieselling (fuel-cut off) solenoid connection 19 Throttle kicker 20 Throttle kicker control solenoid 21 Ignition module 22 Heater blower motor cover 23 Windscreen wiper motor mounting bracket
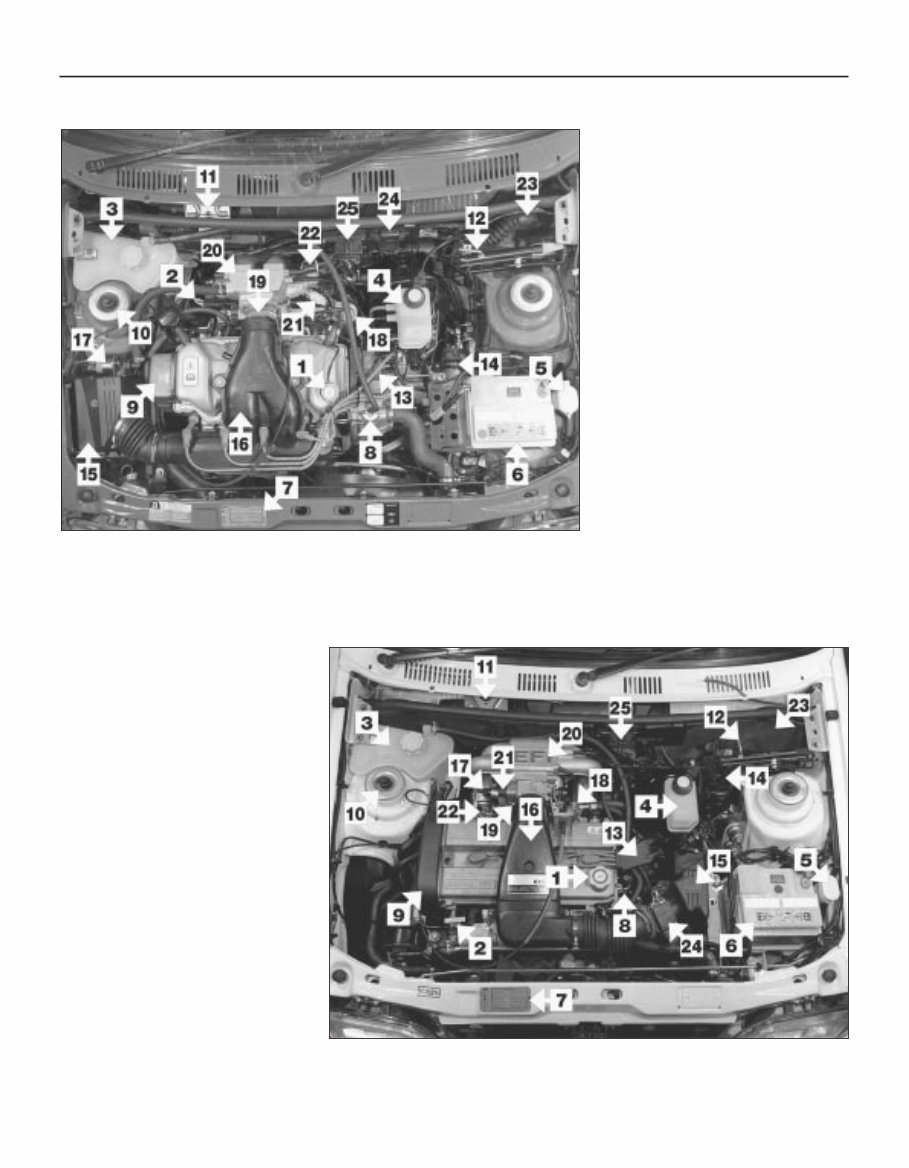
1•6 Maintenance – component location 1.6 litre (XR2i) CVH EFi fuel injection engine 1595Ford Fiesta Remake 1 Engine oil filler cap 2 Engine oil level dipstick 3 Cooling system expansion tank 4 Brake fluid reservoir 5 Windscreen/tailgate washer fluid reservoir cap 6 Battery 7 Vehicle identification plate 8 Thermostat housing 9 Timing belt cover 10 Top of suspension strut mounting assembly 11 Windscreen wiper motor mounting bracket 12 Jack and wheelbrace retaining bolt 13 Distributorless (E-DIS) ignition coil 14 Fuel filter 15 Air cleaner 16 Air inlet duct 17 Idle speed control valve 18 Fuel pressure regulator 19 Throttle housing 20 Upper section of inlet manifold 21 Intake air temperature sensor 22 Fuel trap 23 EEC IV engine management module cover 24 Manifold absolute pressure sensor 25 Ignition module 1.8 litre (XR2i) Zetec SEFi fuel injection engine 1 Engine oil filler cap 2 Engine oil level dipstick 3 Cooling system expansion tank 4 Braking system fluid reservoir 5 Windscreen/tailgate washer fluid reservoir cap 6 Battery 7 VIN plate 8 Thermostat housing 9 Timing belt cover 10 Top of suspension strut mounting assembly 11 Windscreen wiper motor mounting bracket 12 Jack and wheelbrace retaining bolt 13 Distributorless (E-DIS) ignition coil 14 Fuel filter 15 Air cleaner 16 Air inlet duct 17 Idle speed control valve 18 Fuel pressure regulator 19 Throttle housing 20 Inlet manifold 21 Throttle position sensor 22 Fuel system pressure release/test point 23 EEC IV engine management module cover 24 Mass air flow sensor 25 Ignition module
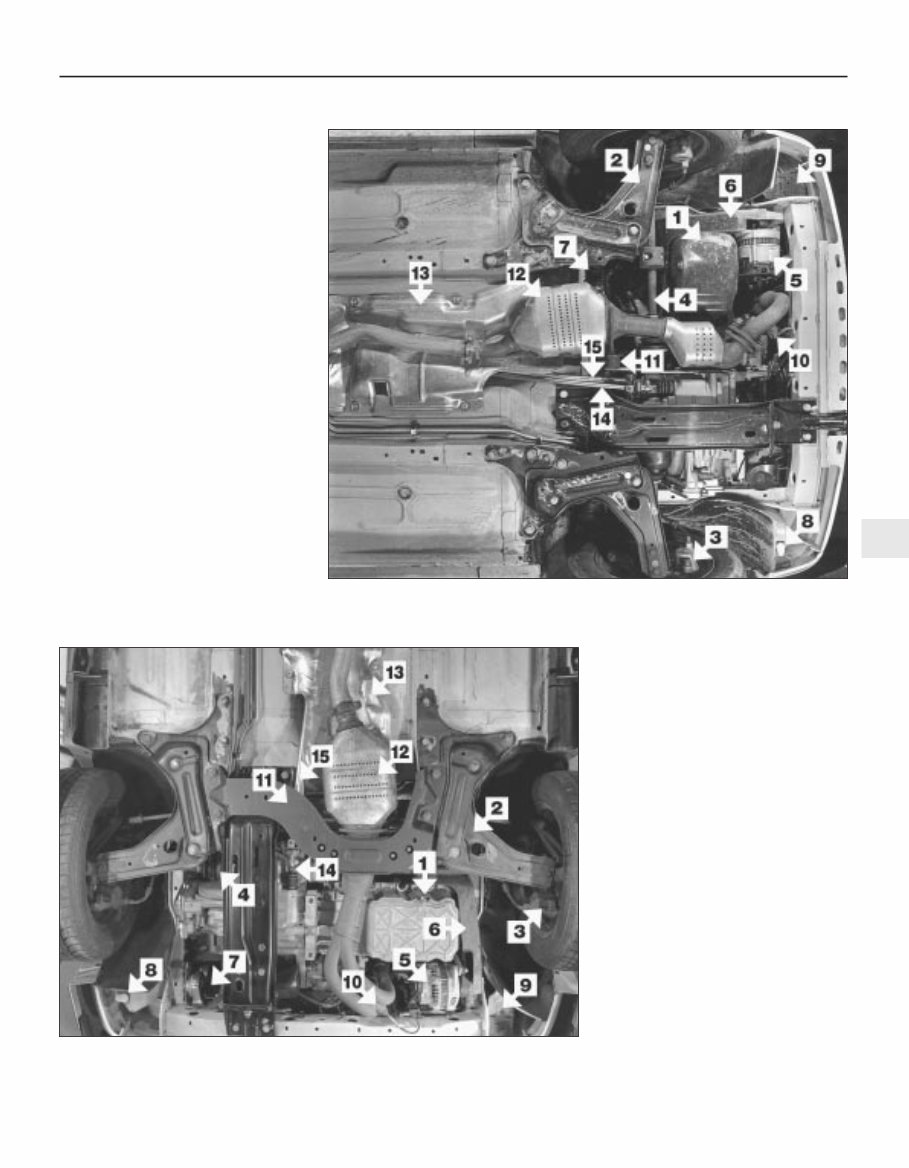
Maintenance – component location 1•7 1 1595Ford Fiesta Remake Front underside view of the 1.4 litre CVH CFi fuel injection model 1 Engine oil sump 2 Front suspension lower arm 3 Brake caliper assembly 4 Driveshaft 5 Alternator 6 Auxiliary drivebelt cover 7 Steering rack gaiter 8 Windscreen/tailgate washer pump 9 Carbon canister 10 Oxygen sensor 11 Catalytic converter (exhaust) rubber insulator mounting 12 Catalytic converter assembly 13 Underbody heatshields 14 Gearchange mechanism shift rod 15 Gearchange mechanism stabiliser bar Front underside view of the 1.8 litre (XR2i) Zetec SEFi fuel injection model 1 Engine oil drain plug 2 Front suspension lower arm 3 Brake caliper assembly 4 Driveshaft 5 Alternator 6 Auxiliary drivebelt cover 7 Horn 8 Windscreen/tailgate washer pump 9 Carbon canister 10 Oxygen sensor 11 Front suspension crossmember 12 Catalytic converter 13 Underbody heat shields 14 Gearchange mechanism shift rod 15 Gearchange mechanism stabiliser bar
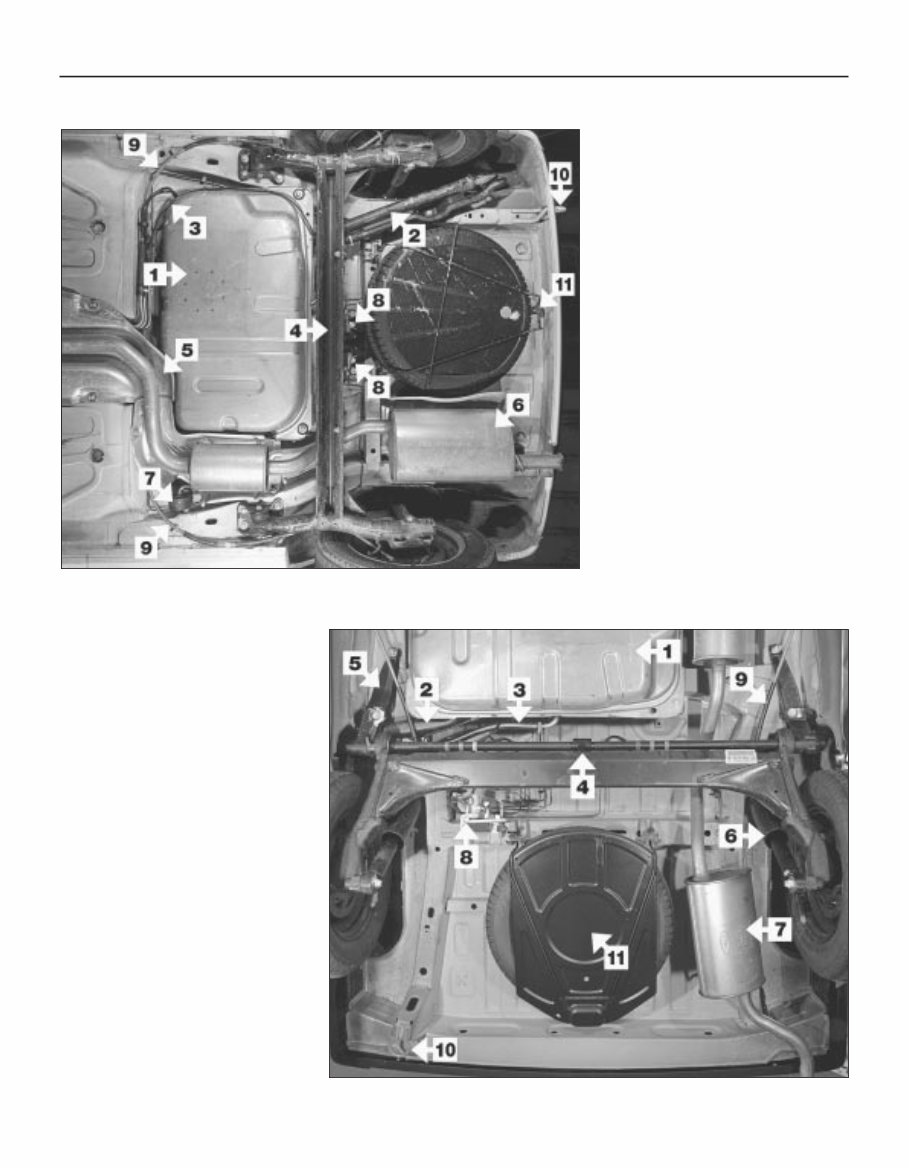
1•8 Maintenance – component location 1595Ford Fiesta Remake Rear underside view of the 1.4 litre CVH CFi fuel injection model 1 Fuel tank 2 Fuel filler pipe 3 Fuel tank ventilation hose 4 Twist beam rear axle assembly 5 Underbody heatshields 6 Exhaust rear silencer 7 Exhaust rubber insulator mounting 8 Load apportioning valves (on vehicles with the anti-lock braking system) 9 Handbrake cable 10 Rear towing eye 11 Spare wheel carrier hook (on the retaining bolt) Rear underside view of the Courier van model 1 Fuel tank 2 Fuel filler pipe 3 Fuel tank ventilation hose 4 Rear axle assembly - spring torsion bars visible 5 Rear axle pivot brackets 6 Rear suspension dampers 7 Exhaust system rear silencer 8 Braking system light-laden valve 9 Handbrake cables 10 Rear towing eye 11 Spare wheel carrier
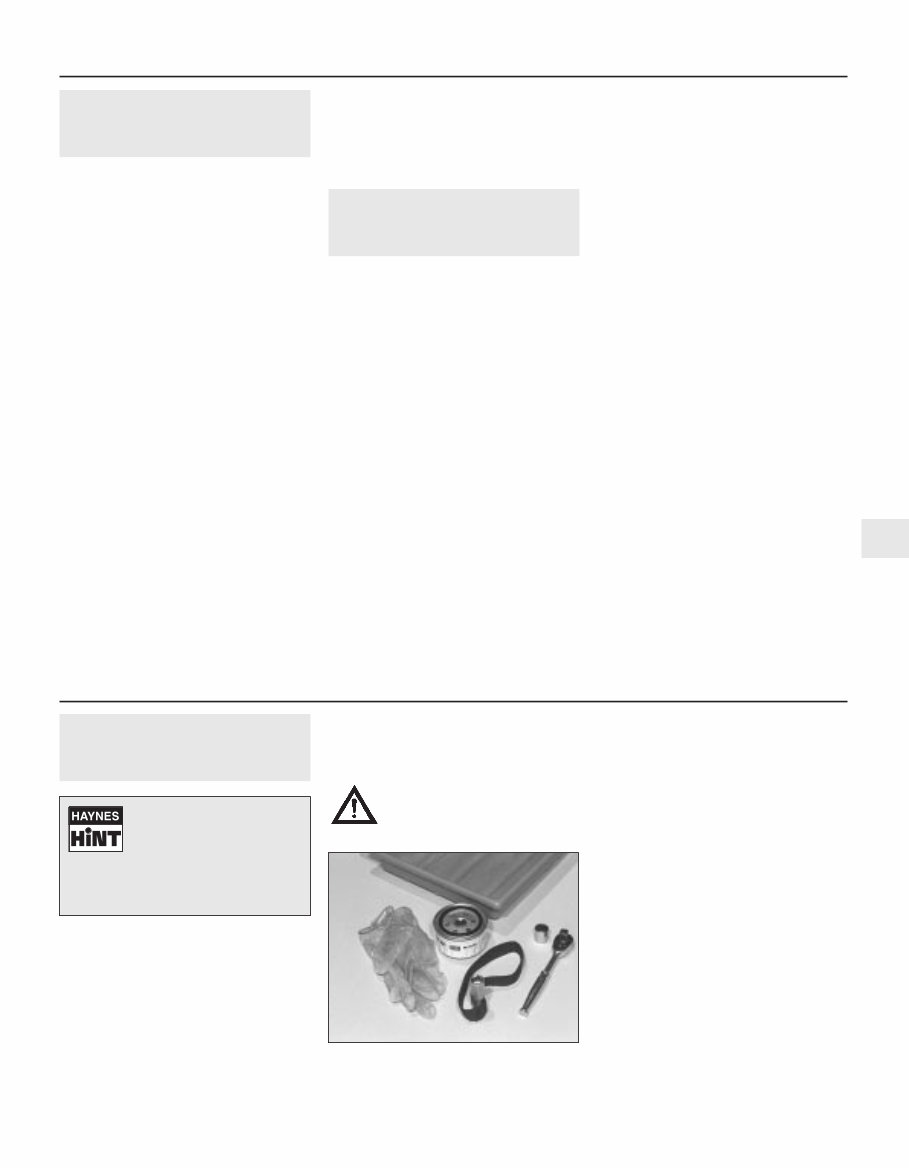
3 Engine oil and filter renewal 1 1 Make sure that you have all the necessary tools before you begin this procedure (see illustration). You should also have plenty of rags or newspapers handy, for mopping up any spills. 2 To avoid any possibility of scalding, and to protect yourself from possible skin irritants and other harmful contaminants in used engine oils, it is advisable to wear gloves when carrying out this work. 3 Access to the underside of the vehicle is greatly improved if the vehicle can be lifted on a hoist, driven onto ramps, or supported by axle stands (see “Jacking and Vehicle Support”). Warning: Do not work under a vehicle which is supported only by an hydraulic or scissors-type jack, or by bricks, blocks of wood, etc. 4 If this is your first oil change, get under the vehicle and familiarise yourself with the position of the engine oil drain plug location in the sump. The engine and exhaust components will be warm during the actual work, so try to anticipate any potential problems while the engine and accessories are cool. 5 The oil should preferably be changed when the engine is still fully warmed-up to normal operating temperature, just after a run (the needle on the temperature gauge should be in the “Normal” sector of the gauge); warm oil and sludge will flow out more easily. Park the vehicle on firm, level ground, apply the handbrake firmly, then select 1st or reverse gear (manual transmission) or the “P” position (automatic transmission). Open the bonnet and remove the engine oil filler cap from the cylinder head cover, then remove the oil level dipstick from its tube (see “Weekly Checks”). 6 Raise the front of the vehicle, and support it securely on axle stands (see “Jacking and Vehicle Support”). Remove the front right- hand roadwheel to provide access to the oil 1 Introduction This Chapter is designed to help the home mechanic maintain his/her vehicle for safety, economy, long life and peak performance. This Chapter contains a master maintenance schedule, followed by Sections dealing specifically with each task in the schedule. Visual checks, adjustments, component renewal and other helpful items are included. Refer to the accompanying illustrations of the engine compartment and the underside of the vehicle for the locations of the various components. Servicing your vehicle in accordance with the mileage/time maintenance schedule and the following Sections will provide a planned maintenance programme, which should result in a long and reliable service life. This is a comprehensive plan, so maintaining some items but not others at the specified service intervals will not produce the same results. As you service your vehicle, you will discover that many of the procedures can - and should - be grouped together, because of the particular procedure being performed, or because of the close proximity of two otherwise-unrelated components to one another. For example, if the vehicle is raised for any reason, the exhaust should be inspected at the same time as the suspension and steering components. The first step of this maintenance programme is to prepare yourself before the actual work begins. Read through all the Sections relevant to the work to be carried out, then make a list and gather together all the parts and tools required. If a problem is encountered, seek advice from a parts specialist or a dealer service department. 2 Intensive maintenance 1 If, from the time the vehicle is new, the routine maintenance schedule is followed closely, and frequent checks are made of fluid levels and high-wear items, as suggested throughout this manual, the engine will be kept in relatively good running condition, and the need for additional work will be minimised. 2 It is possible that there will be some times when the engine is running poorly due to the lack of regular maintenance. This is even more likely if a used vehicle, which has not received regular and frequent maintenance checks, is purchased. In such cases, additional work may need to be carried out, outside of the regular maintenance intervals. 3 If engine wear is suspected, a compression test (refer to Part A, B or C of Chapter 2) will provide valuable information regarding the overall performance of the main internal components. Such a test can be used as a basis to decide on the extent of the work to be carried out. If, for example, a compression test indicates serious internal engine wear, conventional maintenance as described in this Chapter will not greatly improve the performance of the engine, and may prove a waste of time and money, unless extensive overhaul work (Chapter 2D) is carried out first. 4 The following series of operations are those often required to improve the performance of a generally poor-running engine: Primary operations a) Clean, inspect and test the battery (See “Weekly Checks”). b) Check all the engine-related fluids (See “Weekly Checks”). c) Check the condition of the auxiliary drivebelt (Section 4). d) Check and if necessary adjust the valve clearances on HCS engines (Section 7). e) Renew the spark plugs and clean and inspect the HT leads (Section 21). f) Check the condition of the air cleaner filter element and renew if necessary (Section 24). g) Check and if necessary adjust the idle speed and mixture settings - where applicable (Section 9). h) Renew the fuel filter - fuel injection models (Section 30). i) Check the condition of all hoses, and check for fluid leaks (Section 5). 5 If the above operations do not prove fully effective, carry out the following operations: Secondary operations All the items listed under “Primary operations”, plus the following: a) Check the charging system (Chapter 5A). b) Check the ignition system (Chapter 5B). c) Check the fuel system (Chapter 4A, 4B, 4C and 4D). e) Renew the ignition HT leads (Section 21). Maintenance procedures 1•9 3.2 These tools are required when changing the engine oil and filter 1 1595Ford Fiesta Remake Every 5000 miles (8000 km) or 6 months, whichever occurs first Frequent oil changes are the best preventive maintenance the home mechanic can give the engine, because ageing oil becomes diluted and contaminated, which leads to premature engine wear.
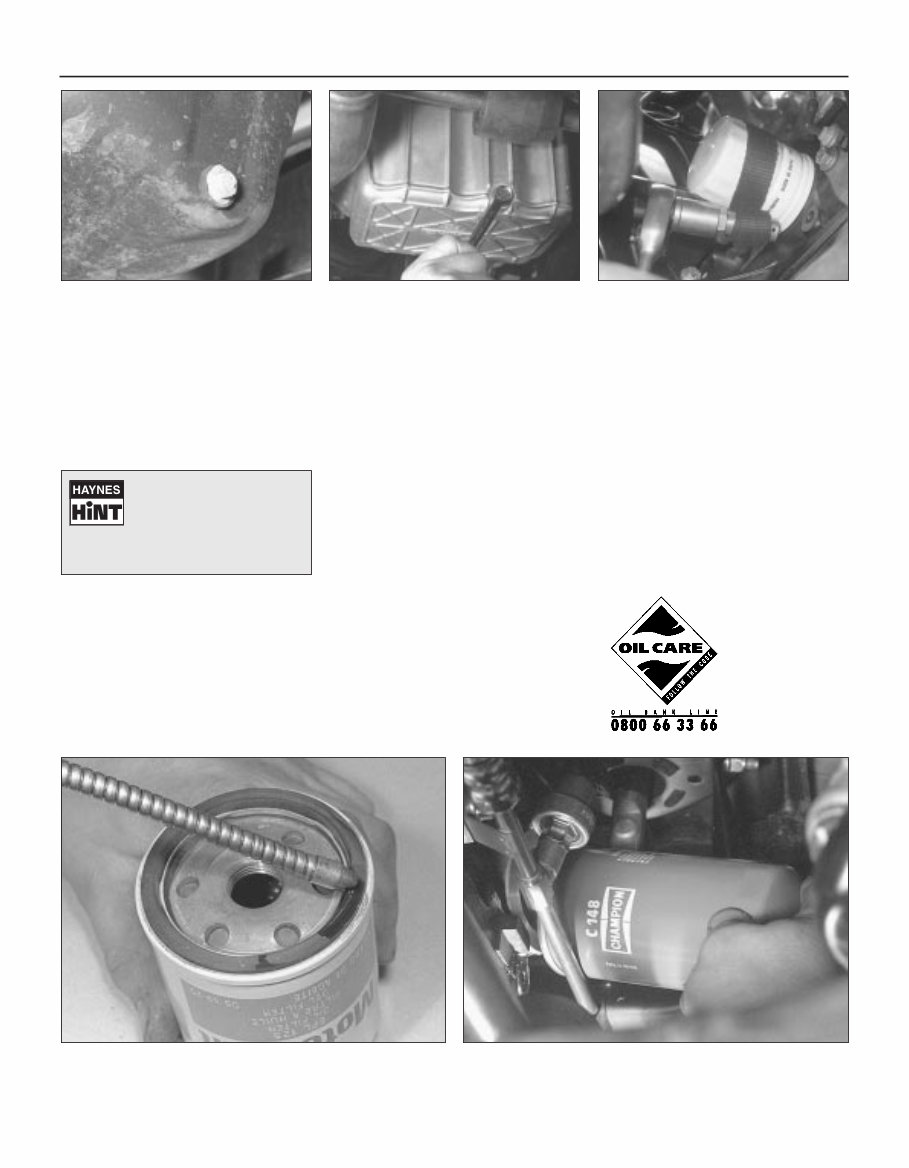
filter; if the additional working clearance is required, remove also the auxiliary drivebelt cover. 7 Being careful not to touch the hot exhaust components, place the drain pan under the drain plug, and unscrew the plug (see illustrations). If possible, try to keep the plug pressed into the sump while unscrewing it by hand the last couple of turns. 8 Allow some time for the old oil to drain, noting that it may be necessary to reposition the pan as the oil flow slows to a trickle. Check the condition of the plug’s sealing washer and renew it if worn or damaged. When the oil has completely drained, wipe clean the drain plug and its threads in the sump and refit the plug, tightening it to the specified torque wrench setting. 9 Reposition the drain pan under the oil filter then, using a suitable filter removal tool, unscrew the oil filter from the cylinder block, oil pump or oil filter adaptor, as applicable; be prepared for some oil spillage (see illustration). Check the old filter to make sure that the rubber sealing ring hasn’t stuck to the engine; if it has, carefully remove it. Withdraw the filter through the wheel arch, taking care to spill as little oil as possible. 10 Using a clean, lint-free rag, wipe clean the cylinder block around the filter mounting. If there are no specific instructions supplied with it, fit a new oil filter as follows. Apply a light coating of clean engine oil to the filter’s sealing ring (see illustration). Screw the filter into position until it seats, then tighten it through a further half- to three-quarters of a turn only (see illustration). Tighten the filter by hand only - do not use any tools. 11 Remove the old oil and all tools from under the vehicle, refit the roadwheel, and lower the vehicle to the ground. 12 Refill the engine with oil, using the correct grade and type of oil, as given in “Lubricants, fluids and tyre pressures”. Pour in half the specified quantity of oil first, then wait a few minutes for the oil to run to the sump. Continue adding oil a small quantity at a time, until the level is up to the lower notch on the dipstick. Adding approximately 0.5 to 1.0 litre (depending on model) will raise the level to the dipstick’s upper notch. 13 Start the engine. The oil pressure warning light will take a few seconds to go out while the new filter fills with oil; do not race the engine while the light is on. Run the engine for a few minutes, while checking for leaks around the oil filter seal and the drain plug. 14 Switch off the engine, and wait a few minutes for the oil to settle in the sump once more. With the new oil circulated and the filter now completely full, recheck the level on the dipstick, and add more oil as necessary. 15 Dispose of the used engine oil safely, with reference to “General repair procedures” in the Reference Sections of this manual. 1•10 Every 5000 miles or 6 months 3.10b Fitting the new oil filter on the Zetec engine 3.10a Lubricate the filter’s sealing ring with clean engine oil before installing the filter on the engine 3.9 Removing the oil filter on the CVH engine using a strap wrench 3.7b Removing the engine oil drain plug on the Zetec engine 3.7a Engine oil drain plug location in the sump on HCS, CVH and PTE engines 1595Ford Fiesta Remake Note: It is antisocial and illegal to dump oil down the drain. To find the location of your local oil recycling bank, call this number free. As the drain plug releases from the threads, move it away sharply, so the stream of oil issuing from the sump runs into the pan, not up your sleeve!
The Ford Fiesta 1997 Repair Service Manual is an essential guide for anyone who owns or works on a Ford Fiesta model from the year 1997. This comprehensive manual provides detailed instructions and illustrations to help you troubleshoot, diagnose, and repair any issues with your vehicle.
Models covered in this manual:
Ford Fiesta Base
Ford Fiesta LX
Ford Fiesta GL
Ford Fiesta Zetec
Ford Fiesta Ghia
Whether you are a professional mechanic or a DIY enthusiast, this repair service manual will be your go-to resource for maintaining and repairing your Ford Fiesta. It covers all aspects of the vehicle, including engine, transmission, suspension, electrical system, and more. With step-by-step instructions and detailed diagrams, you can confidently tackle any repair or maintenance task.
Not only does the Ford Fiesta 1997 Repair Service Manual provide you with the knowledge and guidance you need, but it also includes valuable tips and tricks to make the process more efficient and cost-effective. Save time and money by avoiding unnecessary trips to the mechanic and performing repairs yourself.
Invest in the Ford Fiesta 1997 Repair Service Manual today and ensure that your Ford Fiesta continues to run smoothly for years to come. With its comprehensive coverage and user-friendly layout, it is the ultimate resource for Fiesta owners and enthusiasts. Keep your vehicle in top condition and enjoy worry-free driving with the help of this indispensable manual.