1996-97 ENGINES 4.0L V6 - VIN X ENGINE IDENTIFICATION Engine may be identified by Vehicle Identification Number (VIN). See ENGINE IDENTIFICATION CODES table. VIN is stamped on a metal tab attached to left side of instrument panel, and is visible through the windshield. VIN is also stamped on the Safety Certification Decals (on driver's front door lock panel) and on the Engine Identification Label (on valve cover). The eighth character of VIN identifies the engine, and tenth character indicates model year. All label numbers are necessary for determining correct parts for specific engine. DO NOT remove labels at any time. ENGINE IDENTIFICATION CODES ADJUSTMENTS VALVE CLEARANCE The 4.0L engine uses nonadjustable hydraulic roller lifters and nonadjustable rocker arms. If lifters are excessively worn or noisy, repair or replace as necessary. TROUBLE SHOOTING NOTE: For repair procedures not covered in this article, see ENGINE OVERHAUL PROCEDURES article in GENERAL INFORMATION. Engine Code 4.0L SFI X NOTE: Information on valve clearance check is not available from manufacturer. NOTE: To trouble shoot engine mechanical components, see ENGINE MECHANICAL in BASIC TROUBLE SHOOTING 1996 Ford Explorer 1996-97 ENGINES 4.0L V6 - VIN X 1996 Ford Explorer 1996-97 ENGINES 4.0L V6 - VIN X
REMOVAL & INSTALLATION FUEL PRESSURE RELEASE To release fuel pressure, disconnect negative battery cable. Remove fuel cap to release fuel tank pressure. Remove relief valve cap from fuel rail. Connect fuel pressure gauge to fuel rail, and release fuel into a suitable container. COOLING SYSTEM BLEEDING 1. Fill cooling system with 50/50 mixture of coolant and water. Pause several minutes for circulation. Fill radiator to filler neck seat. Install radiator cap fully, then back off to first stop. 2. Set heater controls to maximum heat. Start engine and operate at 2000 RPM for approximately 3-4 minutes. Turn engine off. Use a protective rag, and carefully remove radiator cap. Add coolant to filler neck seat. 3. Install radiator cap fully, then back off to first stop. Start engine and allow to operate at 2000 RPM until upper radiator hose is warm. Check heater output. Turn engine off. Use protective rag, and carefully remove radiator cap. Add coolant to filler neck seat if necessary. article in GENERAL INFORMATION. CAUTION: When battery is disconnected, vehicle computer and memory systems may lose memory data. Driveability problems may exist until computer systems have completed a relearn cycle. See COMPUTER RELEARN PROCEDURES article in GENERAL INFORMATION before disconnecting battery. WARNING: When engine is operating, NEVER remove radiator cap under any conditions. Failure to follow instruction could damage cooling system or engine, and cause personal injury. Always wrap protective material around radiator cap to avoid injury from hot coolant. 1996 Ford Explorer 1996-97 ENGINES 4.0L V6 - VIN X
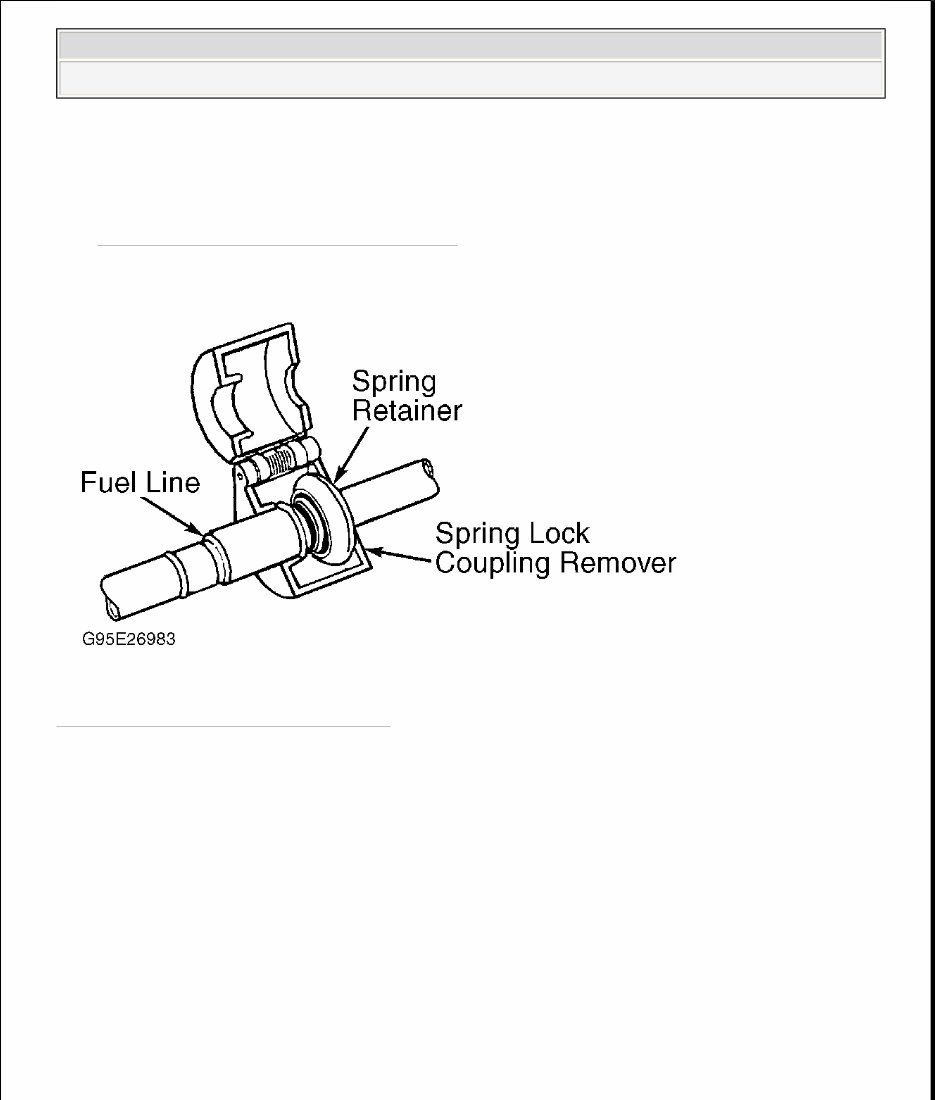
4. Tightly install radiator cap. Remove small cap (large cap is for windshield washer reservoir) on coolant recovery reservoir. Add 1.1 qt. (1L) of 50/50 mixture of coolant and water to reservoir. Install reservoir cap. ENGINE Removal 1. Disconnect negative battery cable. Mark hood hinges and remove hood. Discharge A/C system using approved refrigerant recovery/recycling equipment. Remove air cleaner tube and assembly. Drain cooling system and engine oil. 2. Remove upper and lower radiator hoses. Disconnect radiator fan shroud and position over fan. Remove radiator and fan shroud. Using Fan Clutch Nut Wrench (T84T-6312-D) and Fan Clutch Holder (T84T-6312-C) remove cooling fan. Remove accessory drive belt. 3. Disconnect A/C manifold tube from compressor (if equipped) and plug openings. Unbolt A/C bracket and position compressor, power steering pump and bracket assembly aside. 4. Remove generator and bracket assembly. Disconnect heater hoses from water pump and intake manifold. Disconnect control cables from throttle body. Disconnect necessary vacuum connections. Disconnect necessary wiring harness connections and ground cables. 5. On Ranger, disconnect A/C manifold tube from condenser and receiver-drier, plug openings. On all models, relieve fuel pressure. See FUEL PRESSURE RELEASE . Using Spring Lock Coupling Remover (T81P-19623-G1) for 3/8" line or (T81P-19623-G2) for 1/2" line, disconnect fuel supply and return lines. See Fig. 1 . 6. Raise and support vehicle. Remove A/C manifold bracket. Remove starter. On models with automatic transmission, disconnect flexplate from torque converter, through starter opening. Remove transmission cooler line-to-engine bolts. On all models, disconnect transmission wiring harness connectors. 7. Remove transmission-to-engine bolts. Disconnect exhaust pipes from exhaust manifolds. Lower vehicle. Support transmission. Remove right and left top engine mount nuts. Attach engine hoist and remove engine from vehicle. 1996 Ford Explorer 1996-97 ENGINES 4.0L V6 - VIN X
Installation To install, reverse removal procedure. Evacuate and recharge A/C system (if equipped). Check and top off all fluid levels. Fill and bleed air from cooling system. See COOLING SYSTEM BLEEDING . Fig. 1: Disconnecting Fuel Lines Courtesy of FORD MOTOR CO. INTAKE MANIFOLDS Removal (Upper) 1. Disconnect negative battery cable. Remove air cleaner outlet tube. Remove splash shield to expose throttle linkage. Remove control cable(s) and bracket from throttle body. 2. Disconnect necessary vacuum hoses. Disconnect necessary wiring harness and ground connections. Disconnect heater hose locating bracket and transmission dipstick tube, position aside. 3. Disconnect spark plug wires and harness connectors from coil pack. Remove coil pack and EGR valve. Remove oil dipstick tube. Remove EGR manifold 1996 Ford Explorer 1996-97 ENGINES 4.0L V6 - VIN X
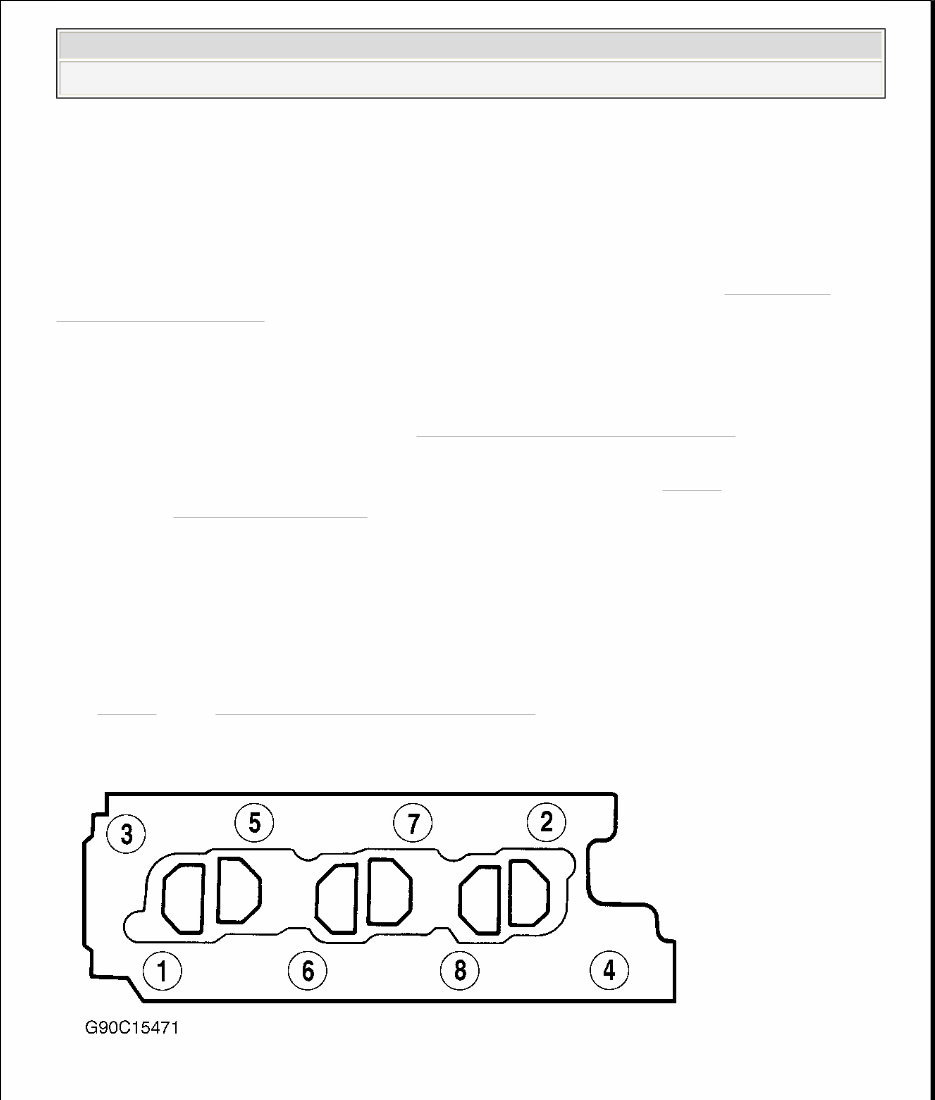
tube. Remove EGR transducer. Remove upper intake manifold retaining bolts. Remove upper intake manifold and gasket. Installation Clean and inspect mounting surfaces. Position NEW gasket on mounting studs. Install upper intake manifold, and tighten bolts to specification. See TORQUE SPECIFICATIONS table. To complete installation, reverse removal procedure. Removal (Lower) With upper intake manifold removed. Disconnect upper radiator hose from intake manifold. Relieve fuel pressure. See FUEL PRESSURE RELEASE . Using Spring Lock Coupling Remover (T81P-19623-G1) for 3/8" line or (T81P-19623- G2) for 1/2" line, disconnect fuel supply and return lines. See Fig. 1 . Remove valve covers. See VALVE COVERS . Drain cooling system. Remove lower intake manifold retaining bolts. Remove lower intake manifold and gasket. Installation Clean gasket mating surfaces. Install intake manifold gaskets. Apply silicone sealer at 4 corners of cylinder block sealing surface. Install lower intake manifold within 15 minutes of silicone sealer application. Tighten bolts in sequence to specification. See Fig. 2 . See TORQUE SPECIFICATIONS table. 1996 Ford Explorer 1996-97 ENGINES 4.0L V6 - VIN X
You're Reading a Preview
What's Included?
Lifetime Access
Fast Download Speeds
Offline Viewing
Access Contents & Bookmarks
Full Search Facility
Print one or all pages of your manual
$36.99
1999 Ford Explorer Service & Repair Manual Software
Introducing the 1999 Ford Explorer Service & Repair Manual in .OVA file format, an essential resource for both professional mechanics and DIY enthusiasts. This manual provides comprehensive information and detailed instructions for servicing and repairing the 1999 Ford Explorer.
With this manual, you will have access to a wealth of knowledge on various systems and components of the 1999 Ford Explorer. Whether you need to perform routine maintenance or tackle a complex repair, this manual will guide you every step of the way.
Some of the key features of the 1999 Ford Explorer Service & Repair Manual include:
Step-by-step instructions for performing various repairs and maintenance tasks
Detailed diagrams, illustrations, and photographs to aid in understanding
Comprehensive troubleshooting guides to help identify and resolve issues
Specifications and torque values for various components
Wiring diagrams and electrical troubleshooting information
Diagnostic codes and procedures for diagnosing and fixing problems
Whether you are a seasoned mechanic or a DIY enthusiast, this manual will be your go-to resource for all your service and repair needs. Say goodbye to expensive repair bills and time-consuming visits to the mechanic – this manual will empower you to take control of your 1999 Ford Explorer's maintenance.
Invest in the 1999 Ford Explorer Service & Repair Manual today and enjoy the peace of mind that comes with knowing you have the knowledge and tools to keep your vehicle in top shape.
Reviews
Q&A
Recently Viewed
5,521,897Happy Clients
2,594,462eManuals
1,120,453Trusted Sellers
15Years in Business
Price:
Actual Price:
1999 Ford Explorer Service & Repair Manual Software




 Lifetime Access




