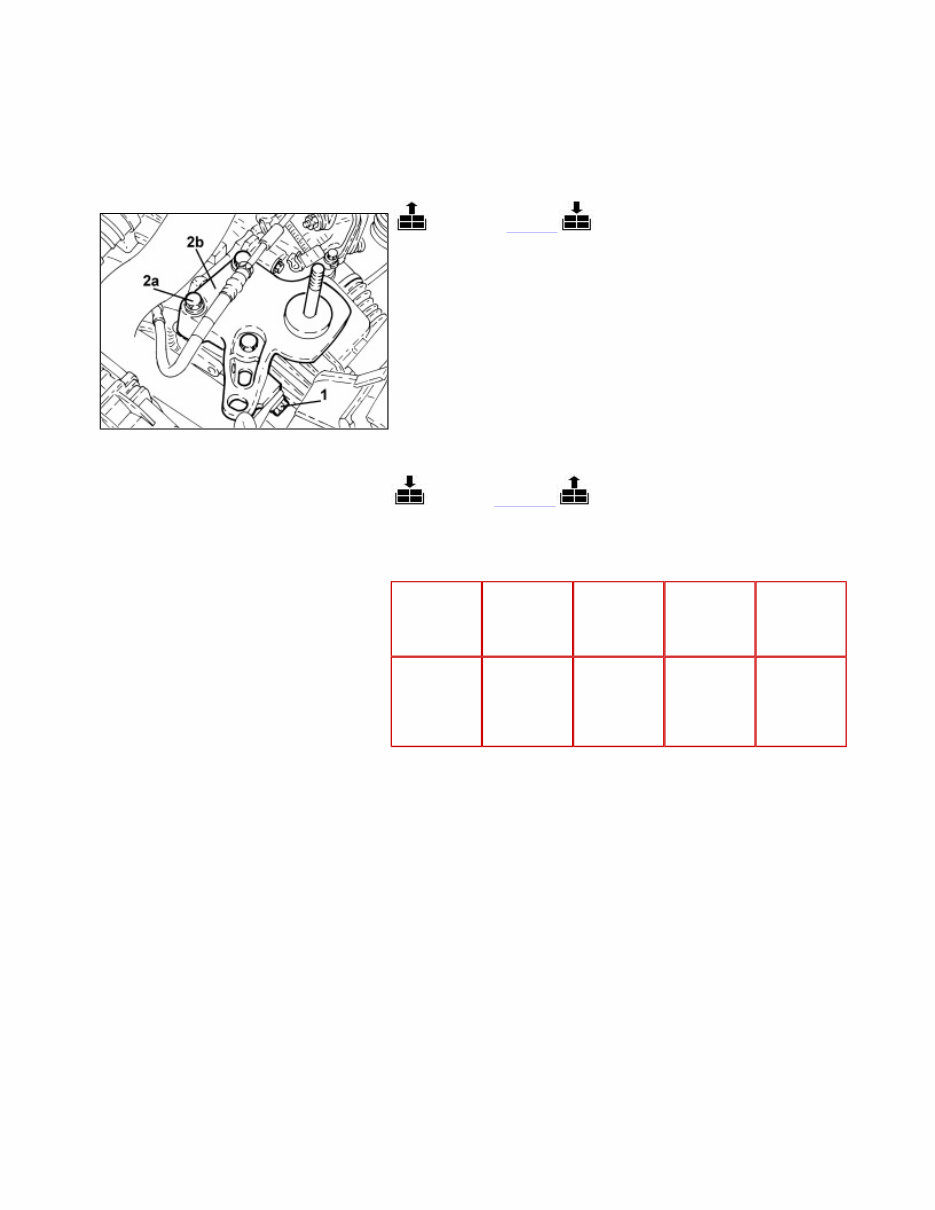
NUOVA BRAVO 1.4 16v POWER UNIT RIGID SUPPORT - GEARBOX SIDE - R.R. 1008A42 Removing ( Refitting ) Op. 7055B54 UNDER ENGINE PROTECTION/GUARD - R.R. Op. 5530B10 BATTERY - R+R Op. 5530B52 BATTERY SUPPORT/DRIP TRAY - R.R Op. 1008B30 GEARBOX SIDE SUPPORT FLEXIBLE MOUNTING(S) - REPLACE 1. Undo the bolt fixing the air pipe to the rigid support. 2. Undo the bolts (2a) and remove the rigid support (2b). Refitting ( Removing ) - Place the rigid mounting in its housing and tighten the bolts to the recommended torque. - Tighten the bolt fixing the air pipe to the rigid support. Op. 1008B30 GEARBOX SIDE SUPPORT FLEXIBLE MOUNTING(S) - REPLACE Op. 5530B52 BATTERY SUPPORT/DRIP TRAY - R.R Op. 5530B10 BATTERY - R+R Op. 7055B54 UNDER ENGINE PROTECTION/GUARD - R.R. Component Fastening dia Value (daNm) Validity Gearbox side power unit rigid support Bolt (to be replaced) M10 5.0 ÷ 6.0 Page 1 of 1 - Contents 8/1/2024 file://C:\ 2024 Kia Soul 2024 Kia Soul 2024 Kia 2024 Kia So 2024 Kia So 2024 Kia So
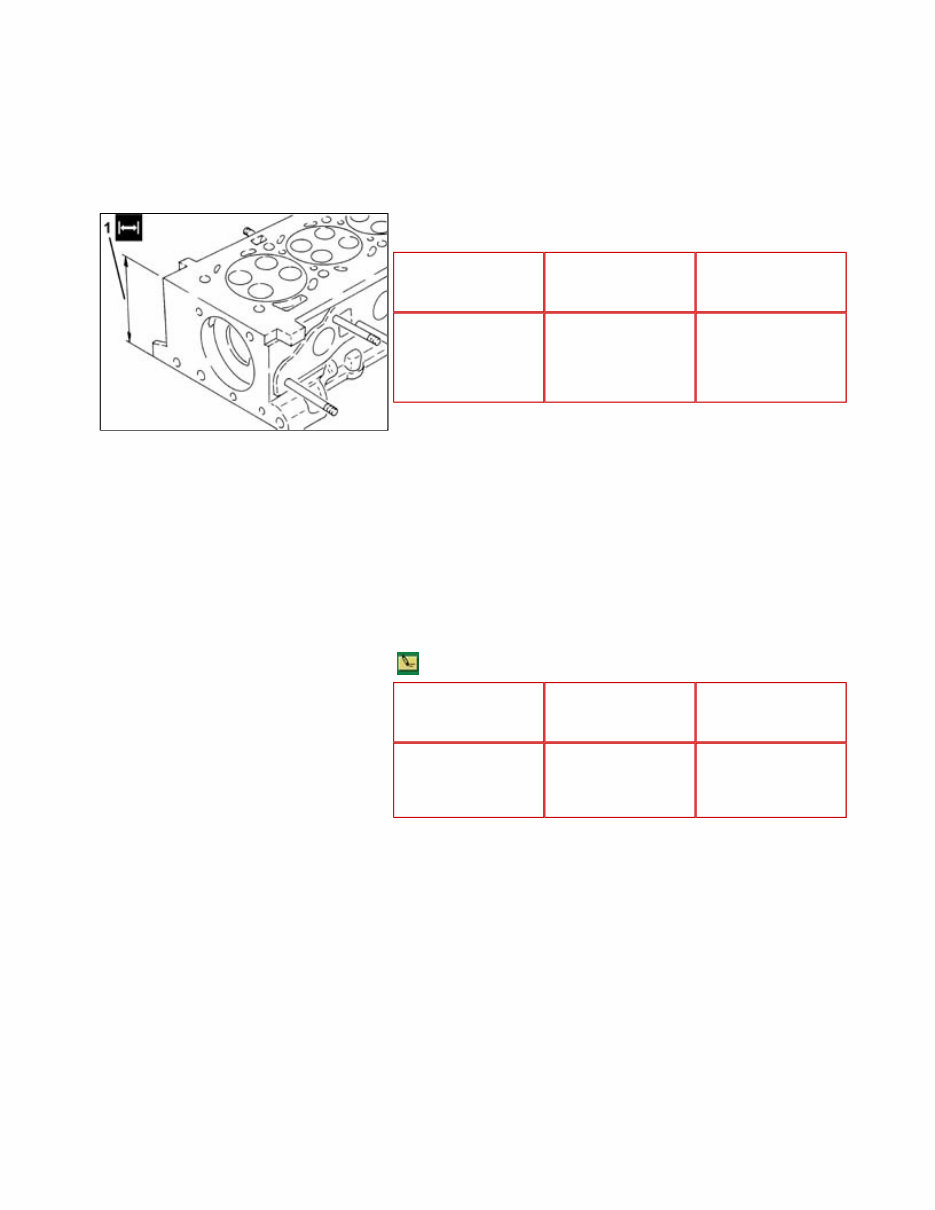
NUOVA BRAVO 1.9 JTD 8v SINGLE CYLINDER HEAD OR (ONE) LEFT OR RIGHT, REMOVED - GRINDING 1016E38 - Check that the planarity of the lower cylinder head plane corresponds to the recommended values. 1. If the lower surface flatness of the lower cylinder head is not within specified values, grind from the nominal head height and then fit a new gasket with the number of notches determined as described below. a - The head may be levelled to 0.1 m if starting from a gasket with no references and using a new gasket with one reference. b - The head may be levelled to 0.2 m if starting from a gasket with no references and using a new gasket with two references. c - The head may be levelled to 0.1 m if starting from a gasket with one reference and using a new gasket with two references. Measurement Value Validity Engine cylinder head lower surface flatness (mm) < 0.1 When within limit conditions (head gasket with 2 notches before levelling), the lower cylinder head surface cannot be levelled. Measurement Value Validity Cylinder head nominal height (mm) 107 +/- 0.05 1.9 JTD 16v Page 1 of 1 - Contents 8/1/2024 file://C:\ html 2024 Kia Soul 2024 Kia Soul 2024 Kia Soul
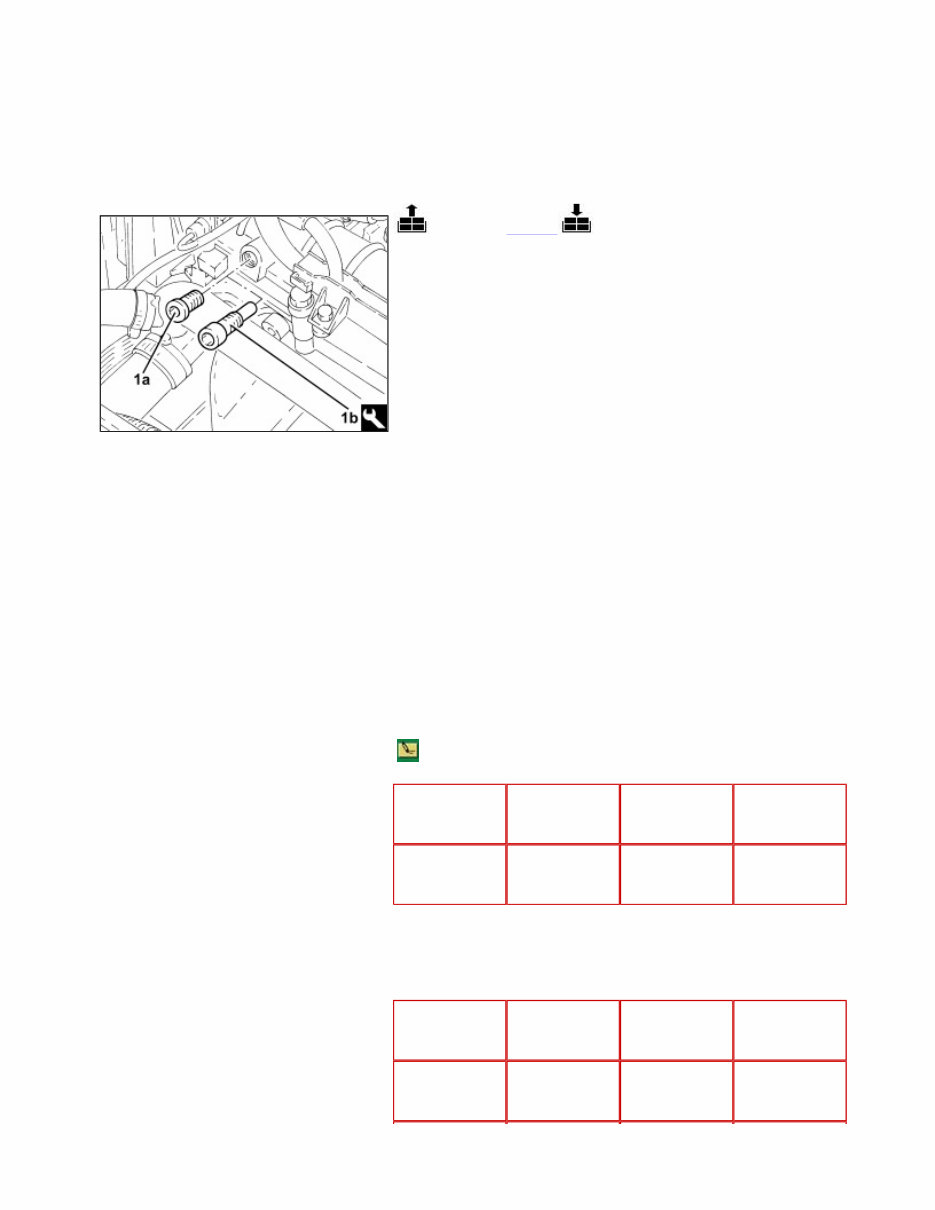
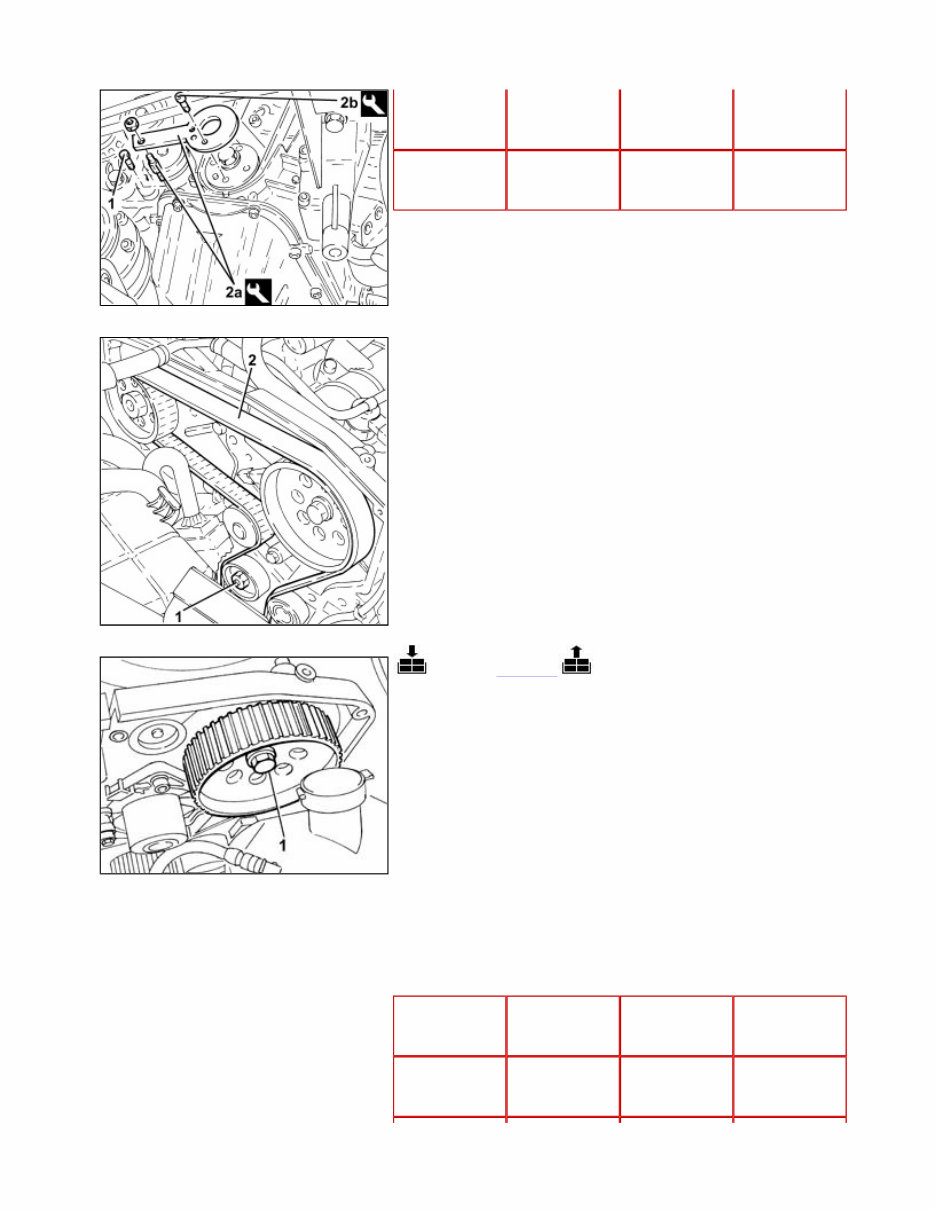
NUOVA BRAVO 1.4 16v TOOTHED TIMING BELT - R + R FOR TIMING ADJUSTMENT OR REPLACEMENT 1032B10 Removing ( Refitting ) - Position the vehicle on a lift. Op. 4450B04 RIGHT FRONT WHEEL - R.R Op. 1016A10 SOUND-PROOFING COVER - R.R Op. 7055B54 UNDER ENGINE PROTECTION/GUARD - R.R. Op. 7055B66 ENGINE COMPARTMENT DUST COVER IN RIGHT FRONT WHEEL ARCH - R.R. Op. 1092G10 SINGLE ENGINE BELT - R.R Op. 1092A10 CRANKSHAFT PULLEY - R + R Op. 1092G14 ENGINE COMPONENT SINGLE BELT MOVING TENSIONER - R + R Op. 1092G20 ENGINE COMPONENT SINGLE BELT FIXED TENSIONER - R + R Op. 1032D12 TIMING SYSTEM PROTECTIVE COVER(S) - R + R 1. Remove the front plug (1a) and fit the camshaft timing tool (1b) to the camshaft housing. Check that the tool is correctly inserted in the housing in the exhaust side camshaft, rotating the crankshaft until the pin for the tool can be heard engaging correctly in the housing in the camshaft. Tool Description Function Validity 1870896900 Templates Engine tuning 1.9 JTD 16v 1. Undo the bolt fixing the crankcase front cover shown in the diagram. 2. Fit the tool (2a) provisionally and fasten it using the calibrated screw (2b) and the nut. Tool Description Function Validity 1860905000 Template Engine tuning 1.9 JTD Page 1 of 4 - Contents 8/1/2024 file://C:\ html 2024 Kia Soul 2024 Kia Soul 2024 Kia Soul
Tool Description Function Validity 1860905010 Calibrated screw Engine tuning 1.9 JTD - Remove the timing tools positioned previously. 1. Loosen the nut retaining the timing belt moving tensioner. 2. Release and remove the toothed timing drive belt. Refitting ( Removing ) 1. Loosen the bolt securing the exhaust side timing belt toothed driven pulley. - Fit the timing drive belt on the drive gear, checking that the belt teeth are correctly inserted in the gear grooves. - Position the template for measuring TDC and fasten it using the calibrated screw. Tool Description Function Validity 1860905000 Template Engine tuning 1.9 JTD Page 2 of 4 - Contents 8/1/2024 file://C:\ html 2024 Kia Soul 2024 Kia Soul 2024 Kia Soul
1. Fully fit the toothed timing drive belt. 2. Use a screwdriver on the tensioner (2a) tab for leverage until the reference (2b) is in the maximum tension position, then lock the nut (2c) fixing the moving tensioner in this position. - Remove the timing tools. 3. Loosen the nut fixing hte moving tensioner and align the moving reference (3a) with the opening (3b), i.e. adjust to nominal tension position and then tighten nut (3c) securing the belt tensioner to torque. 4. Tighten the bolt fixing the exhaust side camshaft toothed driven pulley to the recommended torque. Tool Description Function Validity 1860905010 Calibrated screw Engine tuning 1.9 JTD Component Fastening dia Value (daNm) Validity Timing system moving tensioner Nut M8 2.3 ÷ 2.8 1.9 JTD Component Fastening dia Value (daNm) Validity Driven timing toothed pulley Bolt M12 2.8 ÷ 3.1 + 40° 1.9 JTD - Rotate the crankshaft through two revolutions. - Recheck the timing by refitting the timing tools. - Check the moving timing belt tensioner references are aligned. - Tighten the bolt fixing the previously removed crankcase front cover. Op. 1032D12 TIMING SYSTEM PROTECTIVE COVER(S) - R + R Only fit the exhaust side camshaft template because the intake side template seat is not accessible. Page 3 of 4 - Contents 8/1/2024 file://C:\ html 2024 Kia Soul 2024 Kia Soul 2024 Kia Soul
Op. 1092G20 ENGINE COMPONENT SINGLE BELT FIXED TENSIONER - R + R Op. 1092G14 ENGINE COMPONENT SINGLE BELT MOVING TENSIONER - R + R Op. 1092A10 CRANKSHAFT PULLEY - R + R Op. 1092G10 SINGLE ENGINE BELT - R.R Op. 7055B66 ENGINE COMPARTMENT DUST COVER IN RIGHT FRONT WHEEL ARCH - R.R. Op. 7055B54 UNDER ENGINE PROTECTION/GUARD - R.R. Op. 1016A10 SOUND-PROOFING COVER - R.R Op. 4450B04 RIGHT FRONT WHEEL - R.R - Remove the vehicle from the lift. Page 4 of 4 - Contents 8/1/2024 file://C:\ html 2024 Kia Soul 2024 Kia Soul 2024 Kia Soul
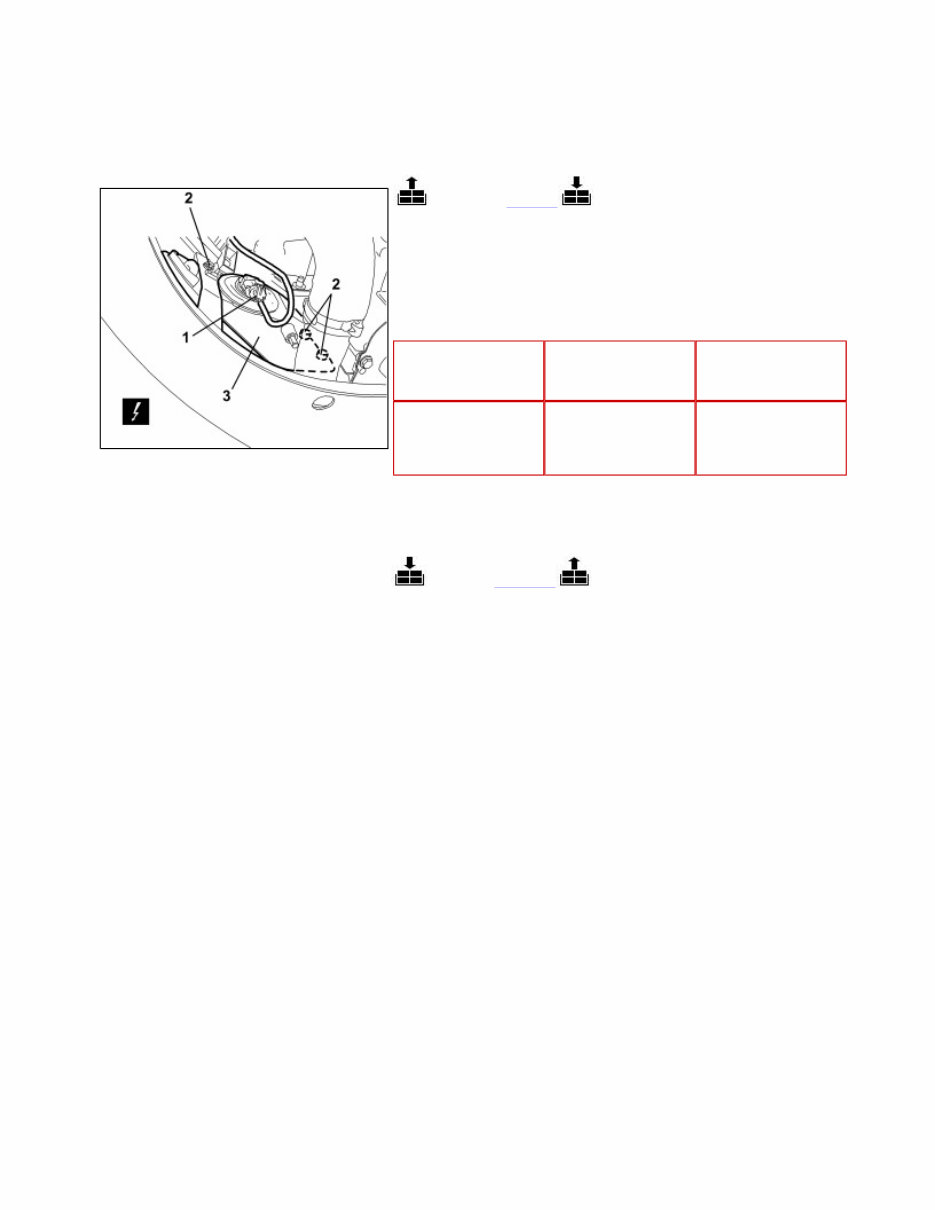
NUOVA BRAVO 1.4 16v LEFT FOG LAMP 5540D12 Removing ( Refitting ) Op. 7055B90 LEFT FRONT WHEEL ARCH LINER - R.R. Op. 5540D15 FOG LIGHT TRIM (ONE), LEFT OR RIGHT - R.R. 1. Detach the electrical connection. 2. Undo the bolts fixing the fog light. 3. Remove the fog light at the front of the vehicle. Description Connector 1 LEFT FOG LIGHT See F015 LEFT FOG LAMP Refitting ( Removing ) - Check that the fog light is not damaged. - Position the fog light. - Tighten the bolts. - Attach the electrical connection. Op. 5540D15 FOG LIGHT TRIM (ONE), LEFT OR RIGHT - R.R. Op. 7055B90 LEFT FRONT WHEEL ARCH LINER - R.R. Op. 5540D38 FOG LIGHT BEAM - ADJUST Page 1 of 1 - Contents 8/1/2024 file://C:\ html 2024 Kia Soul 2024 Kia Soul 2024 Kia Soul
NUOVA BRAVO 1.9 JTD 8v FRONT 12 (Right hand drive, Right hand drive, Right hand drive) Valid for versions with:Right hand drive Full - size Page 1 of 1 - Contents 8/1/2024 file://C:\ html 2024 Kia Soul 2024 Kia Soul 2024 Kia Soul
NUOVA BRAVO 1.4 16v ENGINE NOT FEELING ACCELERATOR PEDAL PRESSURE D009 The customer complains that: The engine does not react when the accelerator pedal is operated Test results 0 PRELIMINARY CHECKS All OK Problems encountered Operation Check that the engine oil level is correct Op. 0010T11 ENGINE OIL - CHECK LEVEL AND TOP UP, IF NECESSARY Check that the air intake/vacuum circuit is working properly by carrying out the See Test 1048OA AIR INTAKE/VACUUM CIRCUIT CHECK Check the condition of the fuel supply circuit and make sure that it is working properly by carrying out the See Test 1040OA Fuel supply circuit check Check the operation of the low pressure supply circuit by carrying out the See Test 1060OB Low pressure fuel supply circuit check Move on to Step 1 Oil level incorrect Restore the correct engine oil level Op. 0010T11 ENGINE OIL - CHECK LEVEL AND TOP UP, IF NECESSARY 1 MODE PARAMETERS CHECK All OK Problems encountered Operation Select the following control unit at the diagnostic equipment: EDC16C39 Diesel electronic injection control unit. Check the value of the following parameters: · Battery voltage See Test 5530BB BATTERY VOLTAGE CHECK · Accelerator pedal · Accelerator position 1 AD/C · Accelerator position 2 AD/C See Test 1068AC ACCELERATOR PEDAL CHECKS End of diagnosis Page 1 of 2 - Contents 8/1/2024 file://C:\ html 2024 Kia Soul 2024 Kia Soul 2024 Kia Soul
· Target Diesel pressure · Measured Diesel pressure See Test 1060GH DIESEL PRESSURE CHECK Page 2 of 2 - Contents 8/1/2024 file://C:\ html 2024 Kia Soul 2024 Kia Soul 2024 Kia Soul
Step confidently into precise DIY fixes with the 2010 FIAT DUCATO Service and Repair Manual, your ultimate companion for tackling maintenance and repairs with ease. This comprehensive guide provides invaluable insight into the intricacies of your Ducato, covering critical components like the timing belt replacement and troubleshooting the ABS system. With user-friendly, detailed instructions and high-quality illustrations, you'll have the confidence to perform complex repairs that would typically require dealership expertise. One standout benefit of this manual is its emphasis on cost-saving strategies, empowering you to reduce labor expenses while ensuring your vehicle remains in peak condition. Whether you're addressing minor issues or undertaking major repairs, this manual equips you with the knowledge to keep your Ducato running smoothly and efficiently.
NOTE: This is a sample. Your actual software manual may differ slightly.
This product is a comprehensive service and repair manual specifically designed for the 2010 FIAT DUCATO model. Whether you are a professional mechanic or a DIY enthusiast, this manual provides you with all the necessary information and step-by-step instructions to effectively maintain, service, and repair your 2010 FIAT DUCATO.
The manual covers various aspects of the vehicle, including its engine, transmission, suspension, brakes, electrical systems, and much more. It is structured in a user-friendly manner, allowing easy navigation and quick access to the required information.
Key features of this service and repair manual:
Comprehensive coverage of all major systems and components
Detailed explanations, diagrams, and illustrations
Troubleshooting guides to help diagnose and fix common issues
Step-by-step procedures for regular maintenance and major repairs
Recommended tools and equipment for each task
Proper torque specifications and fluid capacities
Safety precautions to ensure your well-being while working on the vehicle
Models covered in this manual:
2010 FIAT DUCATO 2.0L Diesel
2010 FIAT DUCATO 2.3L Diesel
2010 FIAT DUCATO 3.0L Diesel
Whether you need to perform routine maintenance, fix a specific problem, or simply gain a better understanding of your 2010 FIAT DUCATO, this service and repair manual is an essential tool that will save you time and money.