GROUP TAB LOCATOR Introduction 0 Lubrication & Maintenance 2 Suspension 3 Differential & Driveline 5 Brakes 7 Cooling 8A Audio/Video 8B Chime/Buzzer 8E Electronic Control Modules 8F Engine Systems 8G Heated Systems 8H Horn 8I Ignition Control 8J Instrument Cluster 8L Lamps 8M Message Systems 8N Power Systems 8O Restraints 8P Speed Control 8Q Vehicle Theft Security 8R Wipers/Washers 8T Navigation/Telecommunication Electrical Diagnostic 8W Wiring 9 Engine 11 Exhaust System 13 Frame & Bumpers 14 Fuel System 19 Steering 21 Transmission and Transfer Case 22 Tires/Wheels 23 Body 24 Heating & Air Conditioning 25 Emissions Component and System Index PCODE Index Service Manual Comment Forms (Rear of Manual)
INTRODUCTION TABLE OF CONTENTS page page VEHICLE CERTIFICATION LABEL DESCRIPTION .......................... 1 VEHICLE IDENTIFICATION NUMBER DESCRIPTION .......................... 2 VEHICLE EMISSION CONTROL INFORMATION (VECI) LABEL DESCRIPTION .......................... 3 INTERNATIONAL SYMBOLS DESCRIPTION .......................... 3 FASTENER IDENTIFICATION DESCRIPTION .......................... 4 FASTENER USAGE DESCRIPTION FASTENER USAGE ..................... 7 THREADED HOLE REPAIR ............... 7 METRIC SYSTEM DESCRIPTION .......................... 8 TORQUE REFERENCES DESCRIPTION ......................... 10 VEHICLE CERTIFICATION LABEL DESCRIPTION A vehicle certification label is attached to every DaimlerChrysler Corporation vehicle. The label certi- fies that the vehicle conforms to all applicable Federal Motor Vehicle Standards. The label also lists: • Month and year of vehicle manufacture. • Gross Vehicle Weight Rating (GVWR). The gross front and rear axle weight ratings (GAWR’s) are based on a minimum rim size and maximum cold tire inflation pressure. • Vehicle Identification Number (VIN). • Type of vehicle. • Type of rear wheels. • Bar code. • Month, Day and Hour (MDH) of final assem- bly. • Paint and Trim codes. • Country of origin. The label is located on the driver-side door shut-face. HB INTRODUCTION 1
VEHICLE IDENTIFICATION NUMBER DESCRIPTION The Vehicle Identification Number (VIN) plate is attached to the top left side of the instrument panel. The VIN contains 17 characters that provide data con- cerning the vehicle. Refer to the decoding chart to determine the identification of a vehicle. To protect the consumer from theft and possible fraud the manufacturer is required to include a Check Digit at the ninth position of the Vehicle Identification Num- ber. The check digit is used by the manufacturer and government agencies to verify the authenticity of the vehicle and official documentation. The formula to use the check digit is not released to the general public. VIN DECODING INFORMATION POSITION INTERPRETATION CODE = DESCRIPTION 1 Country of Origin 1 = Manufactured by DaimlerChrysler Corporation 2 Make D = Dodge 3 Vehicle Type 4 = Multipurpose Passenger Vehicle less Side Airbags 8 = Multipurpose Passenger Vehicle with Side Airbags 4 Gross Vehicle Weight Rating H = 6001-7000 lbs. 5 Vehicle Line D = Durango 4x2 B = Durango 4x4 6 Series 3 = Durango ST 4 = Durango SLT 5 = Durango LIMITED 7 Body Style 8 = Sport Utility 4 Door 8 Engine K = 3.7L 6 cyl. MPI Gasoline N = 4.7L 8 cyl. MPI Gasoline D = 5.7L 8 cyl. SMPI Gasoline 9 Check Digit 0 through 9 or X 10 Model Year 4 = 2004 11 Assembly Plant F = Newark Assembly 12 Thru 17 Vehicle Build Sequence 2 INTRODUCTION HB
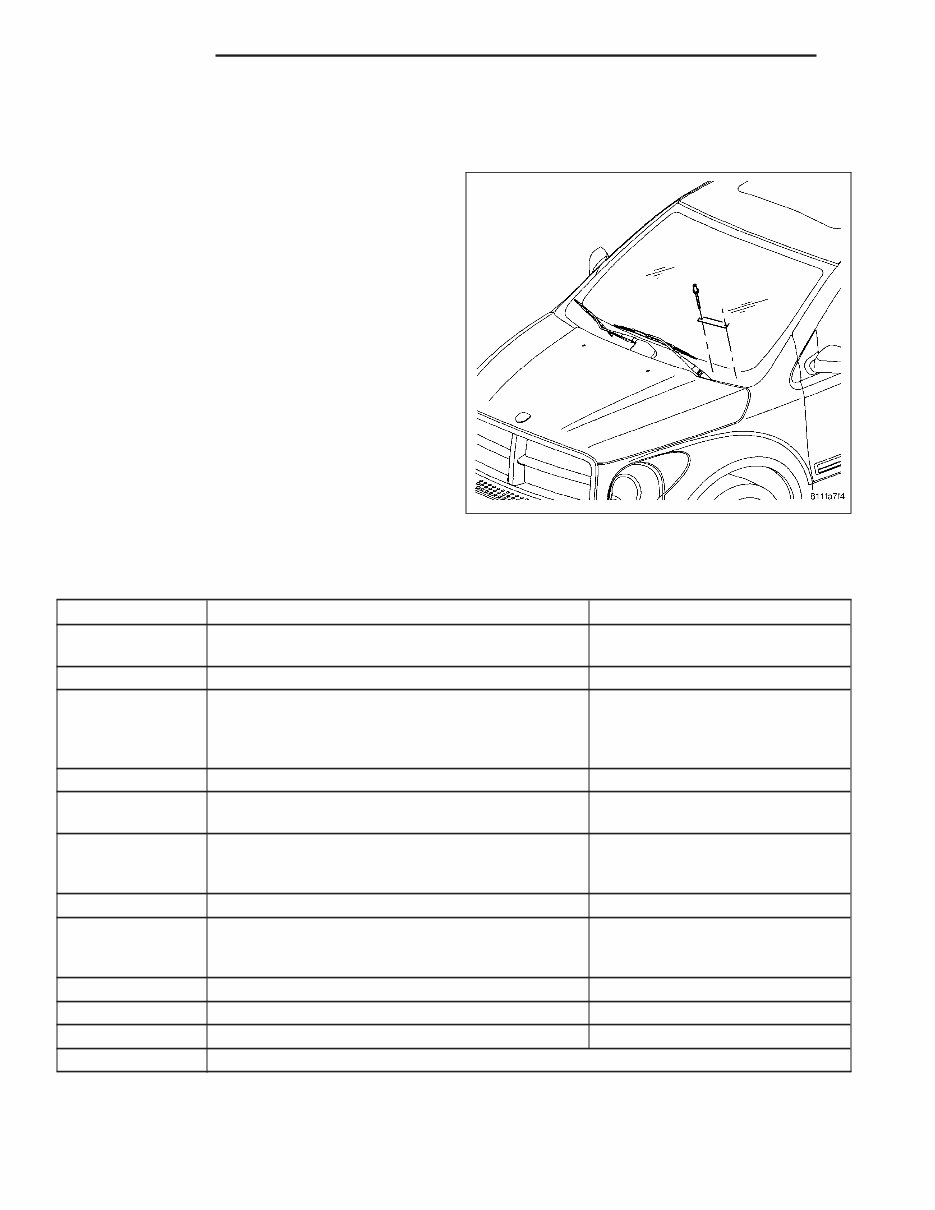
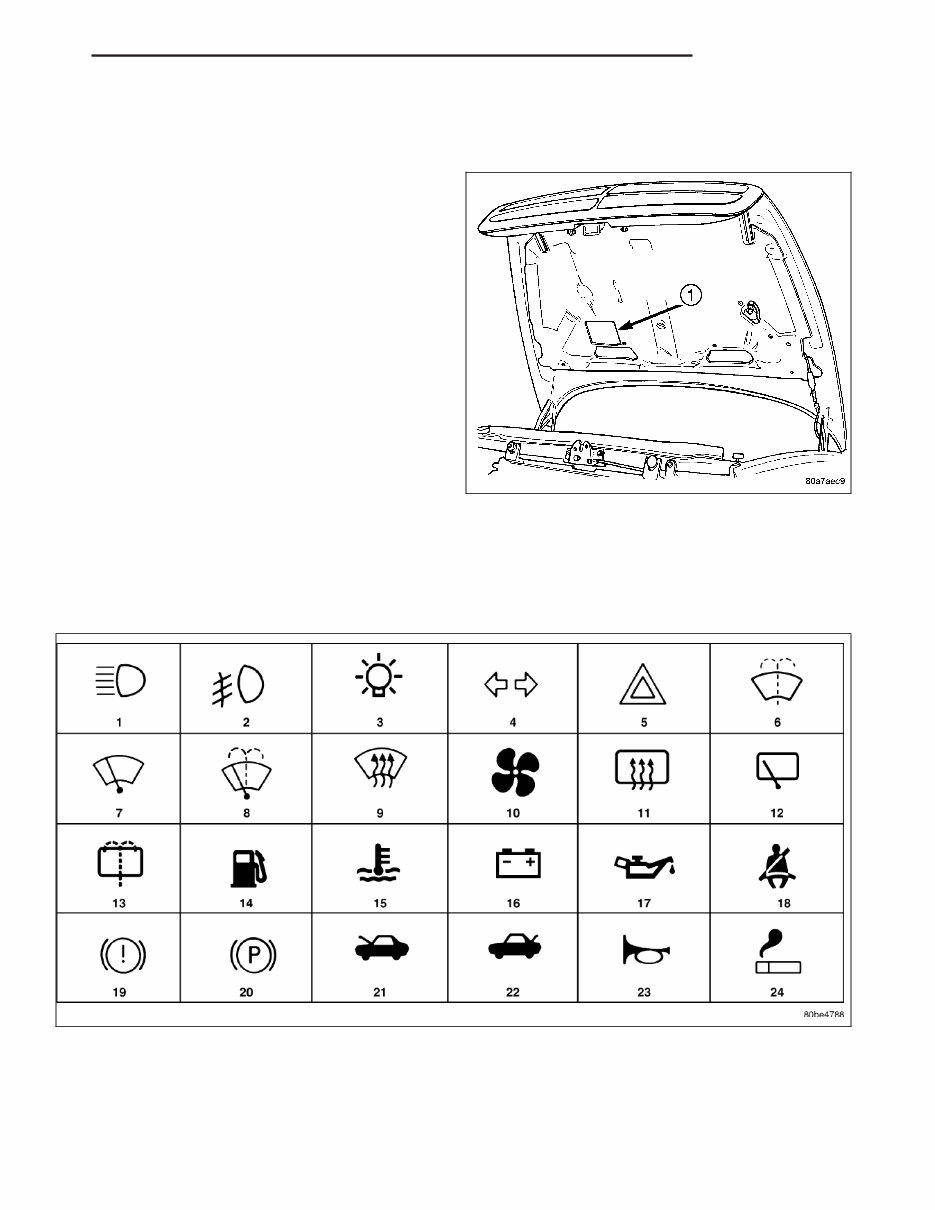
VEHICLE EMISSION CONTROL INFORMATION (VECI) LABEL DESCRIPTION All vehicles are equipped with a combined VECI label. This label is located in the engine compartment. The VECI label contains the following: • Engine family and displacement • Evaporative family • Emission control system schematic • Certification application • Engine timing specifications (if adjustable) • Idle speeds (if adjustable) • Spark plug and gap The label also contains an engine vacuum schematic. There are unique labels for vehicles built for sale in the state of California and the country of Canada. Canadian labels are written in both the English and French languages. These labels are permanently attached and cannot be removed without defacing information and destroying label. INTERNATIONAL SYMBOLS DESCRIPTION The graphic symbols illustrated in the following International Control and Display Symbols Chart are used to identify various instrument controls. The symbols correspond to the controls and displays that are located on the instrument panel. HB INTRODUCTION 3
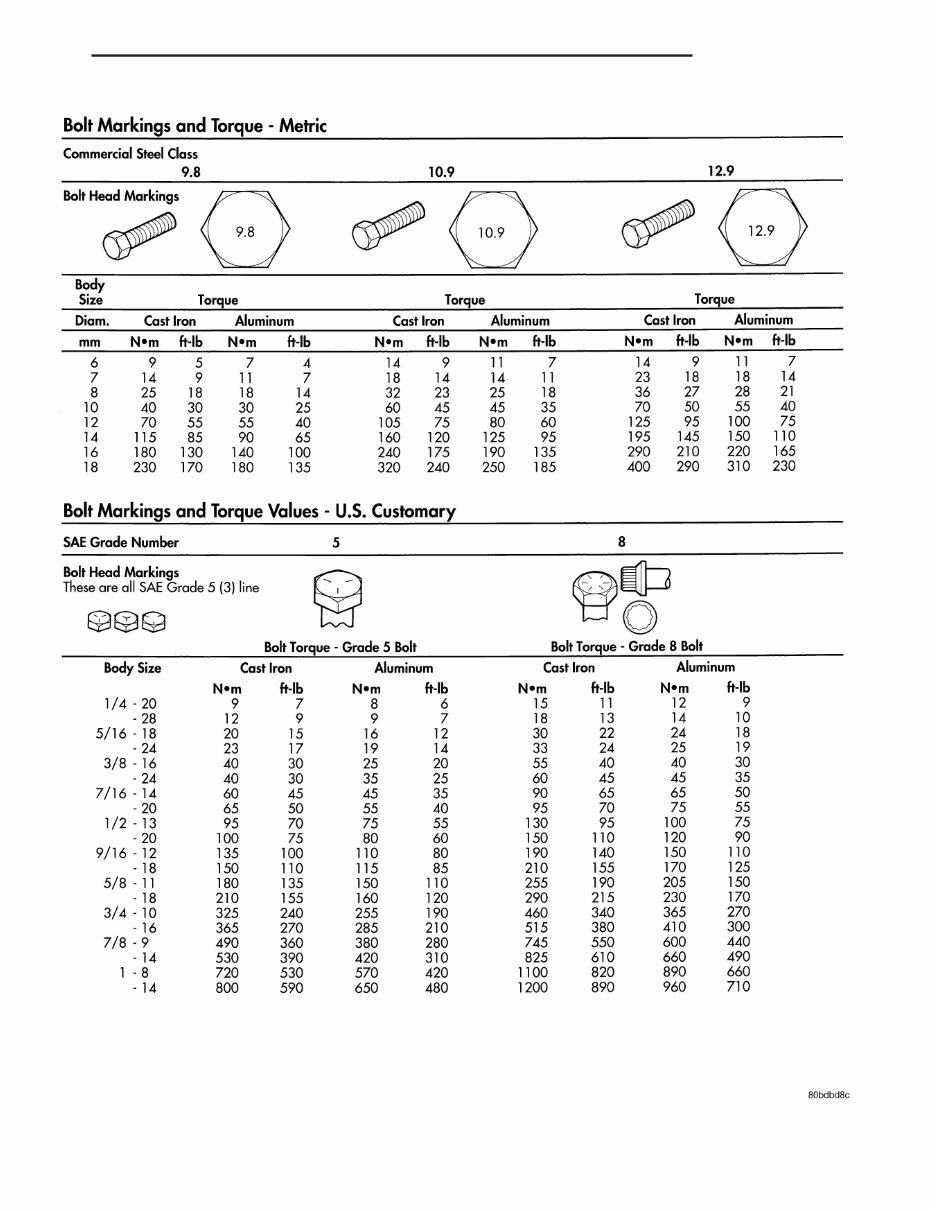
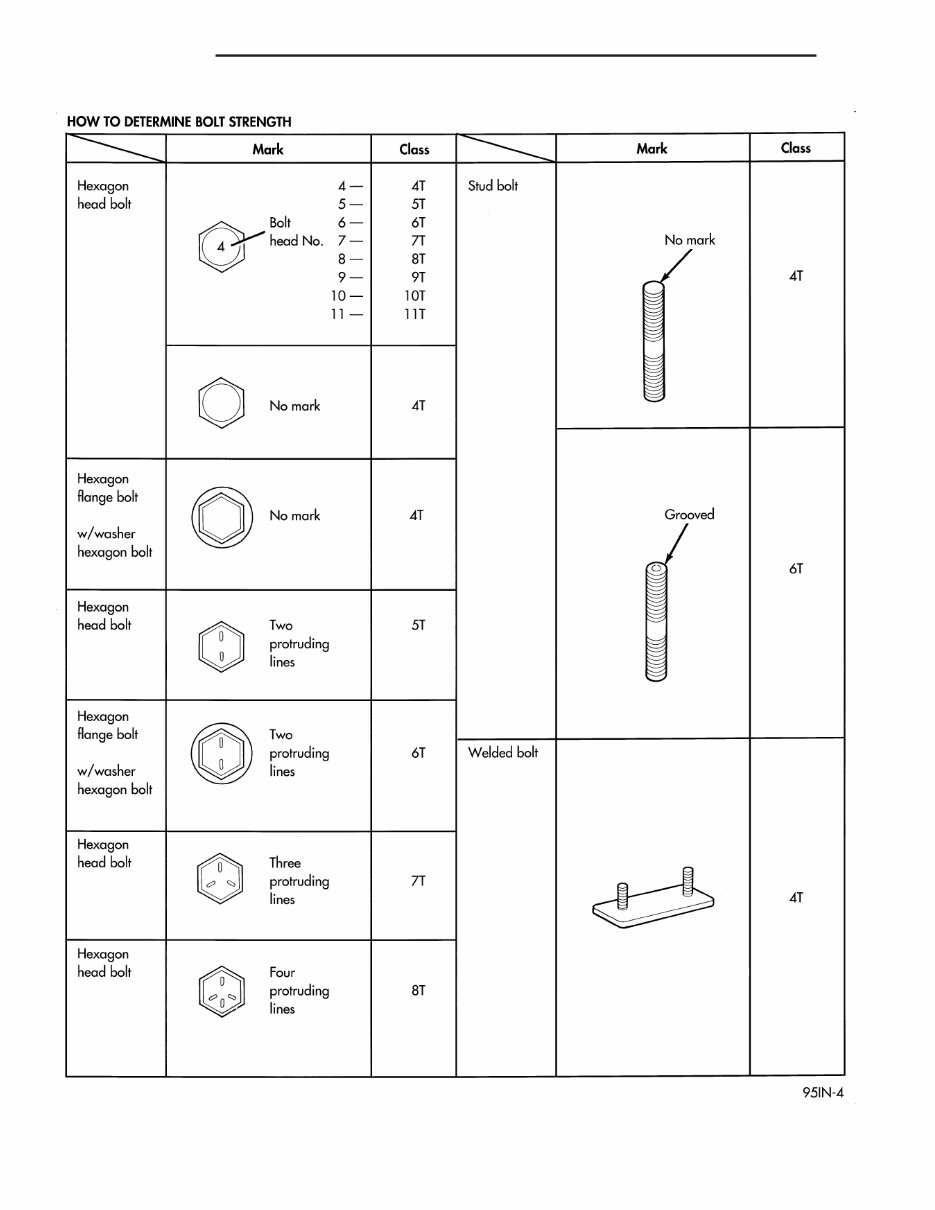
FASTENER IDENTIFICATION DESCRIPTION The SAE bolt strength grades range from grade 2 to grade 8. The higher the grade number, the greater the bolt strength. Identification is determined by the line marks on the top of each bolt head. The actual bolt strength grade corresponds to the number of line marks plus 2. The most commonly used metric bolt strength classes are 9.8 and 10.9. The metric strength class identification number is imprinted on the head of the bolt. The higher the class number, the greater the bolt strength. Some metric nuts are imprinted with a single-digit strength class on the nut face. Refer to the Fastener Identification and Fastener Strength Charts. 4 INTRODUCTION HB
HB INTRODUCTION 5
6 INTRODUCTION HB
FASTENER USAGE DESCRIPTION FASTENER USAGE WARNING: USE OF AN INCORRECT FASTENER MAY RESULT IN COMPONENT DAMAGE OR PERSONAL INJURY. Fasteners and torque specifications references in this Service Manual are identified in metric and SAE format. During any maintenance or repair procedures, it is important to salvage all fasteners (nuts, bolts, etc.) for reassem- bly. If the fastener is not salvageable, a fastener of equivalent specification must be used. THREADED HOLE REPAIR Most stripped threaded holes can be repaired using a HelicoilT. Follow the vehicle or HelicoilT recommendations for application and repair procedures. HB INTRODUCTION 7
METRIC SYSTEM DESCRIPTION 8 INTRODUCTION HB
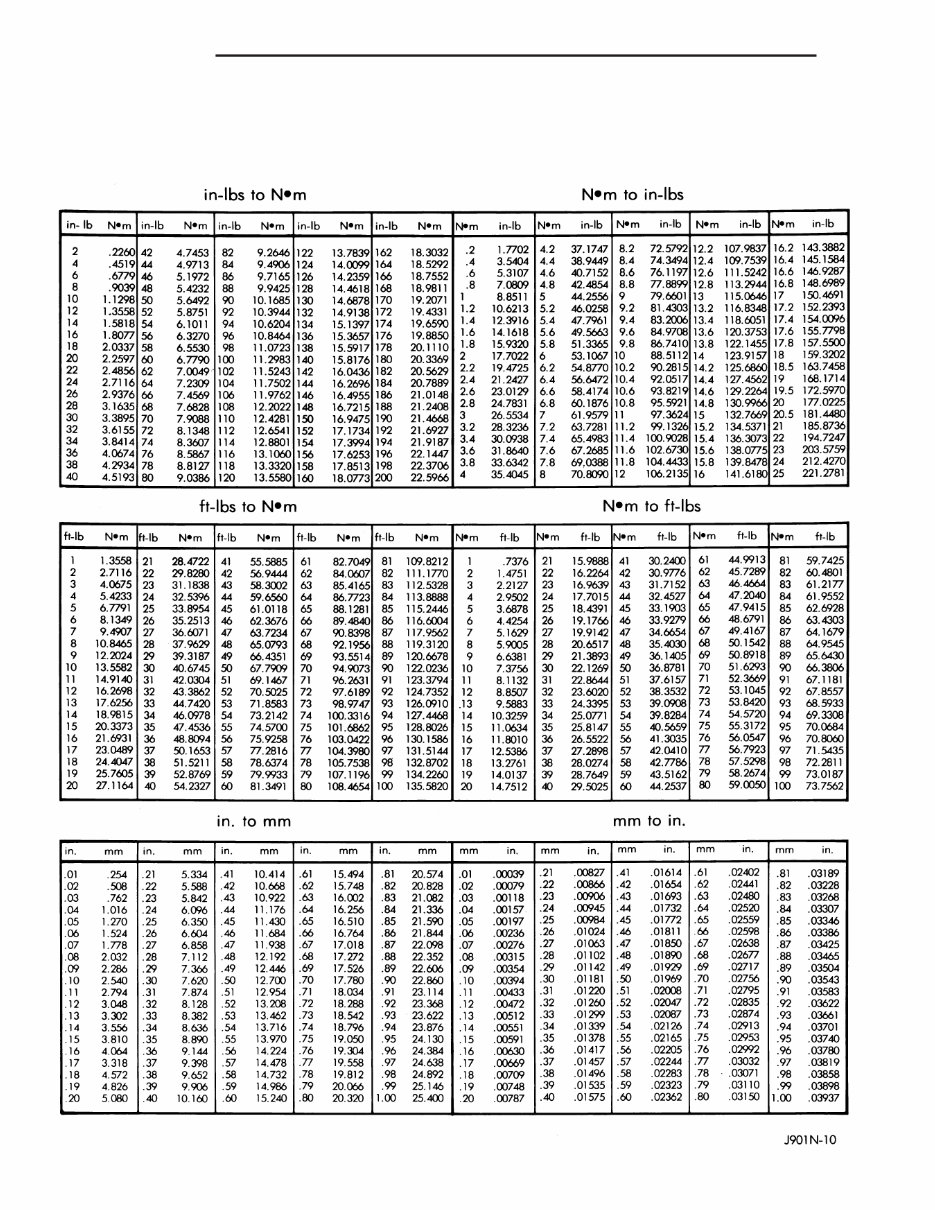
The metric system is based on quantities of one, ten, one hundred, one thousand and one million. The following chart will assist in converting metric units to equivalent English and SAE units, or vise versa. CONVERSION FORMULAS AND EQUIVALENT VALUES MULTIPLY BY TO GET MULTIPLY BY TO GET in-lbs x 0.11298 = Newton Meters (N·m) N·m x 8.851 = in-lbs ft-lbs x 1.3558 = Newton Meters (N·m) N·m x 0.7376 = ft-lbs Inches Hg (60° F) x 3.377 = Kilopascals (kPa) kPa x 0.2961 = Inches Hg psi x 6.895 = Kilopascals (kPa) kPa x 0.145 = psi Inches x 25.4 = Millimeters (mm) mm x 0.03937 = Inches Feet x 0.3048 = Meters (M) M x 3.281 = Feet Yards x 0.9144 = Meters M x 1.0936 = Yards mph x 1.6093 = Kilometers/Hr. (Km/h) Km/h x 0.6214 = mph Feet/Sec x 0.3048 = Meters/Sec (M/S) M/S x 3.281 = Feet/Sec mph x 0.4470 = Meters/Sec (M/S) M/S x 2.237 = mph Kilometers/Hr. (Km/h) x 0.27778 = Meters/Sec (M/S) M/S x 3.600 Kilometers/Hr. (Km/h) COMMON METRIC EQUIVALENTS 1 inch = 25 Millimeters 1 Cubic Inch = 16 Cubic Centimeters 1 Foot = 0.3 Meter 1 Cubic Foot = 0.03 Cubic Meter 1 Yard = 0.9 Meter 1 Cubic Yard = 0.8 Cubic Meter 1 Mile = 1.6 Kilometers Refer to the Metric Conversion Chart to convert torque values listed in metric Newton- meters (N·m). Also, use the chart to convert between millimeters (mm) and inches (in.). HB INTRODUCTION 9
Get your hands on the 2003 Dodge Durango Service & Repair Manual to tackle vehicle issues with ease. Whether you're a professional mechanic or a DIY enthusiast, these manuals provide comprehensive instructions and procedures for fixing your ride. The manual covers a wide range of sections including maintenance, engine, control system, mechanical, fuel service specifications, emission control, and much more. It also includes detailed technical data, diagrams, a complete list of car parts, and images to guide you through the repair process. These manuals are the same as those used by the company's engineers and are essential for maintaining, servicing, diagnosing, and repairing your vehicle.
The manual offers complete step-by-step instructions, diagrams, illustrations, wiring schematics, and specifications to facilitate easy vehicle repairs. It's designed for easy navigation, allowing you to print only the necessary pages and diagrams. Additionally, all pages are printable, enabling you to have the required information with you in your vehicle or workshop. The manual is compatible with various Windows and Mac versions and is available in English language. It's a valuable resource that saves time and empowers you to handle car repairs on your own, keeping you up-to-date and knowledgeable about your vehicle. With its printable format, you can conveniently access the information without worrying about damage or loss.
Whether it's engine mechanical, cooling system, brake system, steering, electrical, or any other aspect of your vehicle, this service repair manual has got you covered. It's a comprehensive resource that equips you with the knowledge and guidance needed to maintain and repair your vehicle effectively. Say goodbye to relying solely on your mechanic and embrace the satisfaction of DIY car repair projects. With its wealth of information and user-friendly format, this manual is a must-have for anyone looking to enhance their car maintenance and repair skills.
Complete coverage of all models and repairs A-Z
Exact same manual used by technicians at dealerships
Printable pages and diagrams for convenience
Compatible with various Windows and Mac versions
Comprehensive details for all vehicle systems and components
Don't miss out on the opportunity to have all the essential car information at your fingertips. Take advantage of the Auto Repair Manual to delve into the realm of your car and become proficient in handling its maintenance and repairs.