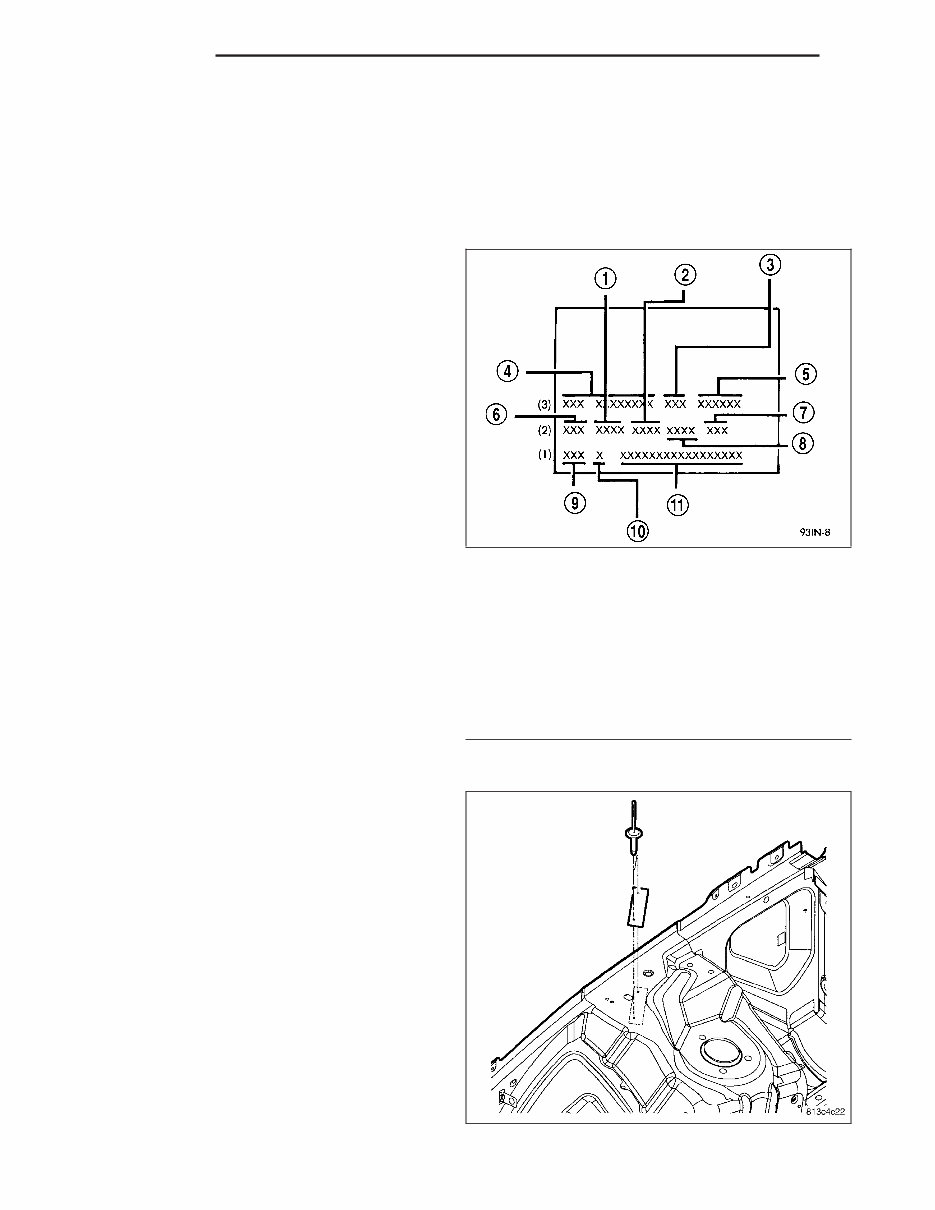
BODY CODE PLATE DESCRIPTION LOCATION AND DECODING The Body Code Plate is located in the engine com- partment on the front right side shock tower mounting front panel. BODY CODE PLATE LINE 3 There are seven lines of information on the body code plate. Lines 4, 5, 6, and 7 are not used to define ser- vice information. Information reads from left to right, starting with line 3 in the center of the plate to line 1 at the bottom of the plate. DIGITS 1, 2, AND 3 Paint procedure DIGIT 4 Open Space DIGITS 5 THROUGH 7 Primary Paint DIGIT 8 AND 9 Open Space BODY CODE PLATE 1 - PRIMARY PAINT 2 - SECONDARY PAINT 3 - VINYL ROOF 4 - VEHICLE ORDER NUMBER 5 - CAR LINE SHELL 6 - PAINT PROCEDURE 7 - ENGINE 8 - TRIM 9 - TRANSMISSION 10 - MARKET 11 - VIN 2 INTRODUCTION LX
DIGITS 10 THROUGH 12 Secondary Paint DIGIT 13 AND 14 Open Space DIGITS 15 THROUGH 18 Interior Trim Code DIGIT 19 Open Space DIGITS 20, 21, AND 22 Engine Code • EER = 2.7 L, V-6 Cylinder, 24 Valve, DOHC, Gasoline, Aluminum Block (MPI) • EGG = 3.5 L, V -6 Cylinder, 24 Valve, High Output, Gasoline, Aluminum Block (MPI) • ESF = 6.1 L, V-8 Cylinder, HEMI, Gasoline (SMPI) • EZB = 5.7 L, V-8 Cylinder, HEMI, Multi-Displacement, Gasoline, DIGIT 23 Open Space BODY CODE PLATE – LINE 2 DIGITS 1 THROUGH 12 Vehicle Order Number DIGITS 13, THROUGH 15 Vinyl Roof Code DIGITS 16 AND 17 Open space DIGITS 18 AND 19 Vehicle Shell Line • LX DIGITS 20 Carline • C = Chrysler • D = Dodge DIGIT 21 Price Class • E = Economy • H = High Line • L = Low Line • M = Medium LX INTRODUCTION 3
• P = Premium • S = Sport • X = Special DIGITS 22 AND 23 Body Type • 48 = Four Door Sedan Tall • 49 =Hatchback Tall BODY CODE PLATE LINE 1 DIGITS 1, 2, AND 3 Transmission Codes • DG6 = 4-Speed Electronic Automatic Transmission • DGJ = 5-Speed Automatic Transmission DIGIT 4 Open Space DIGIT 5 Market Code • C = Canada • B = International • M = Mexico • U = United States DIGIT 6 Open Space DIGITS 7 THROUGH 23 Vehicle Identification Number • (Refer to VEHICLE DATA/VEHICLE INFORMATION/VEHICLE IDENTIFICATION NUMBER - DESCRIPTION) for proper breakdown of VIN code. IF TWO BODY CODE PLATES ARE REQUIRED The last code shown on either plate will be followed by END. When two plates are required, the last code space on the first plate will indicate (CTD) When a second plate is required, the first four spaces of each line will not be used due to overlap of the plates. 4 INTRODUCTION LX
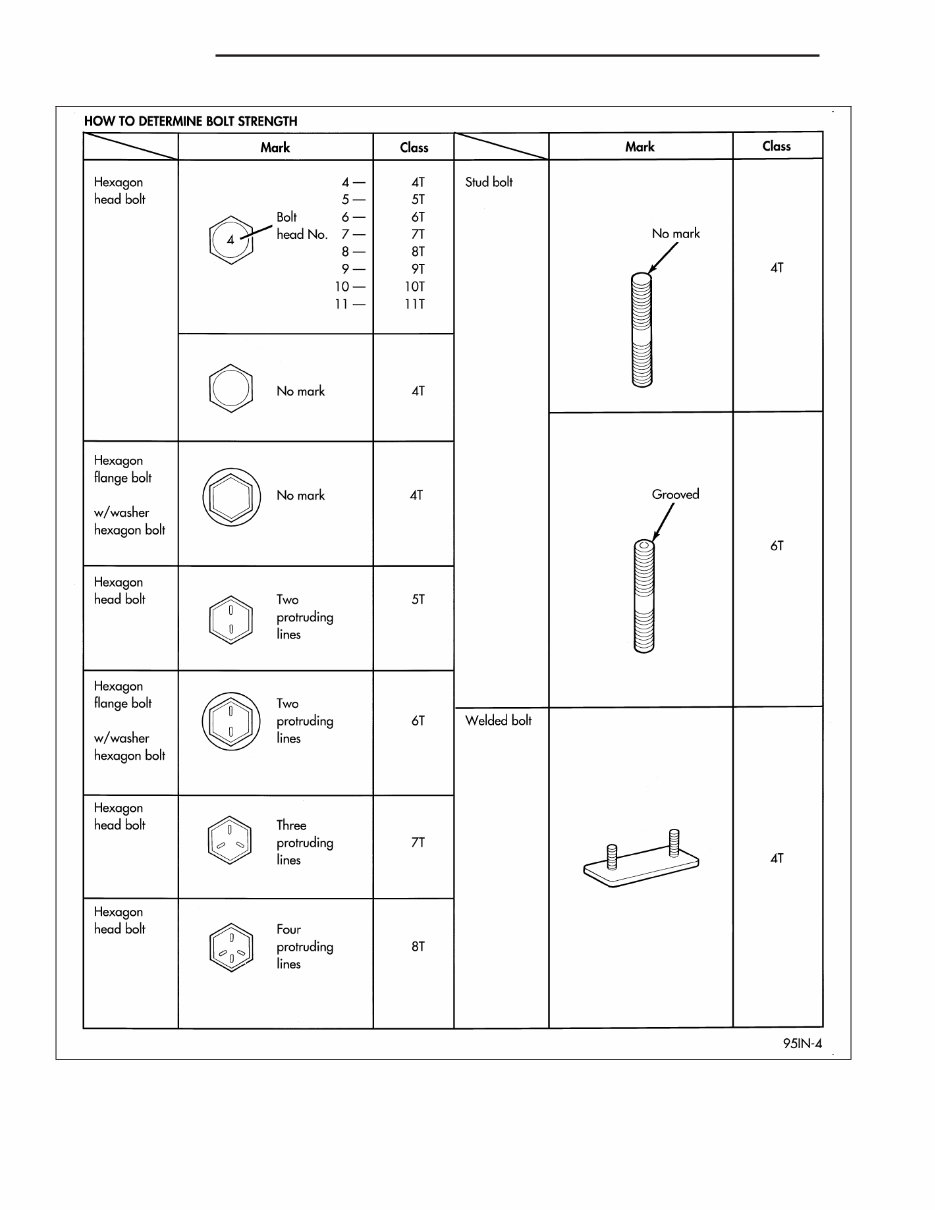
FASTENER IDENTIFICATION DESCRIPTION The SAE bolt strength grades range from grade 2 to grade 8. The higher the grade number, the greater the bolt strength. Identification is determined by the line marks on the top of each bolt head. The actual bolt strength grade corresponds to the number of line marks plus 2. The most commonly used metric bolt strength classes are 9.8 and 10.9. The metric strength class identification number is imprinted on the head of the bolt. The higher the class number, the greater the bolt strength. Some metric nuts are imprinted with a single-digit strength class on the nut face. Refer to the Fastener Identification and Fastener Strength Charts. Bolt Markings and Torques - Metric Bolt Markings 8.8/8.9 10.9 12.9 Bolt Dia. N·m Ft. Lbs. N·m Ft. Lbs. N·m Ft. Lbs. 6 12 105* 14 120* 16 12 8 25 250* 32 23 38 28 10 54 40 60 45 74 55 12 95 70 108 80 135 100 14 155 115 175 130 216 160 16 243 180 324 210 324 240 * Inch Lbs. Bolt Markings and Torques - U. S. Customary Bolt Markings Grade 5 Grade 8 Bolt Dia. N·m Ft. Lbs N·m Ft. Lbs 1/4 - 20 10 95* 14 125* 1/4 - 28 10 95* 17 150* 5/16 - 18 22 200* 30 270* 5/16 - 24 26 240* 33 300* 3/8 - 16 40 30 55 40 3/8 - 24 47 35 60 45 7/16 - 14 68 50 88 65 7/16 - 20 74 55 95 70 1/2 - 13 101 75 135 100 1/2 -20 115 85 150 110 9/16 - 12 135 105 182 135 9/16 - 18 155 115 202 150 5/8 - 11 202 150 263 195 5/8 - 18 215 160 284 210 3/4 - 10 230 170 297 220 3/4 - 16 236 175 304 225 7/8 - 14 405 300 540 400 * Inch Lbs. LX INTRODUCTION 5
6 INTRODUCTION LX
FASTENER USAGE DESCRIPTION DESCRIPTION WARNING: Use of an incorrect fastener may result in component damage or personal injury. Fasteners and torque specifications references in this Service Manual are identified in metric and SAE format. During any maintenance or repair procedures, it is important to salvage all fasteners (nuts, bolts, etc.) for reassem- bly. If the fastener is not salvageable, a fastener of equivalent specification must be used. DESCRIPTION Most stripped threaded holes can be repaired using a HelicoilT. Follow the vehicle or HelicoilT recommendations for application and repair procedures. LX INTRODUCTION 7
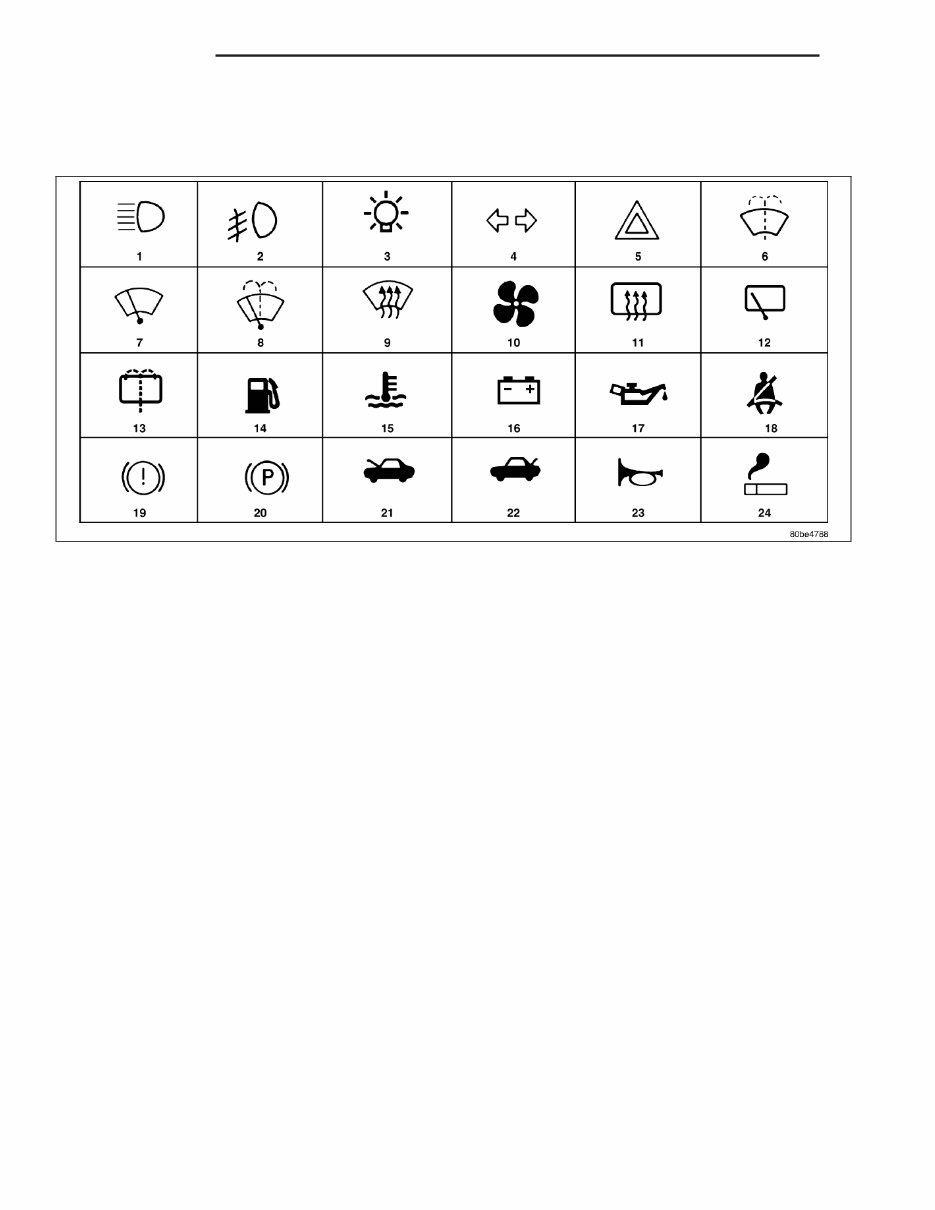
INTERNATIONAL SYMBOLS DESCRIPTION The graphic symbols illustrated in the following International Control and Display Symbols Chart are used to identify various instrument controls. The symbols correspond to the controls and displays that are located on the instrument panel. 8 INTRODUCTION LX
Get your hands on the comprehensive 2006 Dodge Charger Workshop Service Manual, spanning over 9,500 pages. This manual is a complete resource, leaving no room for missing or corrupt sections. It's an ideal investment for both professional mechanics and DIY enthusiasts.
Featuring a wide array of repair procedures from A to Z, this manual is packed with high-quality photos, illustrations, and diagrams. It covers everything from engine and transmission to suspension, brakes, steering, restraints, body, air conditioner, electrical, maintenance, and more.
With the ability to view and print the repair procedures, this Workshop Repair Manual is user-friendly and doesn't require advanced computer skills. Say goodbye to messy manuals prone to wear and tear, as this digital manual offers a convenient solution.
Service Manual Details:
Printable: YES
Requirements: PDF Reader
Language: English
File Type: .PDF
Compatibility: All Versions of Windows, Mac, & Linux
Table of Content (example):
GENERAL INFORMATION
ENGINE
Engine Mechanical
Engine Lubrication System
Engine Cooling System
Engine Control System
Fuel System
Exhaust System
TRANSMISSION/TRANSAXLE
Clutch
Manual Transaxle
Automatic Transaxle
DRIVELINE/AXLE
Front Axle
Rear Axle
SUSPENSION
Front Suspension
Rear Suspension
Road Wheels & Tyres
BRAKES
Brake System
Parking Brake System
Brake Control System
STEERING
Power Steering System
Steering System
RESTRAINTS
Seat Belts
Supplemental Restraint System (SRS)
BODY
Body, Lock & Security System
Glasses, Window System & Mirrors
Roof
Exterior & Interior
Instrumental Panel
Seat
AIR CONDITIONER
Air Conditioner System
ELECTRICAL
Wiring Diagrams
Starting & Charging System
Lighting System
Driver Information System
Wiper, Washer & Horn
Body Control System
Lan System
Audio Visual, Navigation & Telephone System
Auto Cruise Control System
Power Supply, Ground & Circuit Elements
MAINTENANCE
Maintenance
INDEX
Alphabetical Index
For a detailed and reliable resource to repair, maintain, rebuild, refurbish, or restore your vehicle, this Workshop Service Manual is the perfect choice.
Recently Viewed
5,521,897Happy Clients
2,594,462eManuals
1,120,453Trusted Sellers
15Years in Business
Price:
Actual Price:
2006 Dodge Charger Workshop Service Manual 9,560 pages!