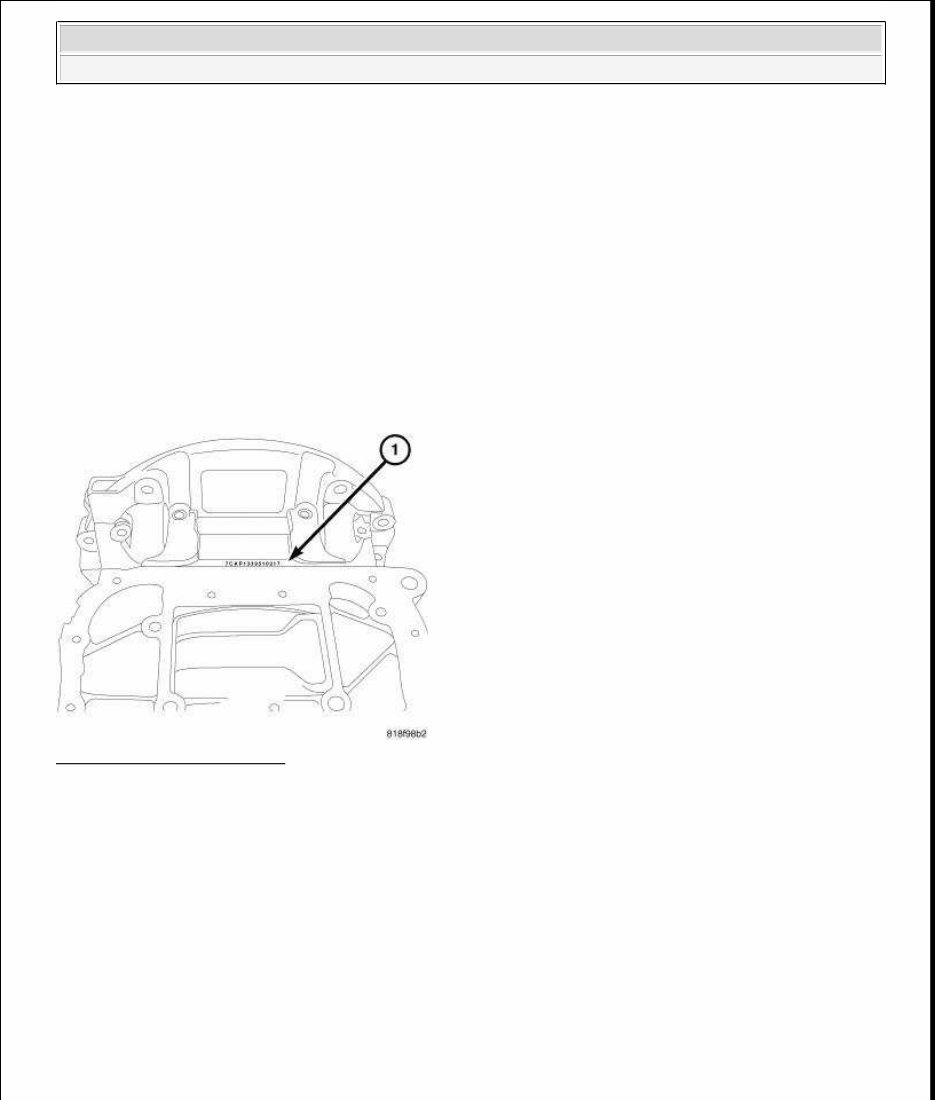
2011 ENGINE 2.4L - Service Information - 200 & Avenger DESCRIPTION DESCRIPTION The 2.4 Liter (148 cu. in.) in-line four cylinder engine is a double over head camshaft design with mechanical lash tappets and four valves per cylinder design. This engine is NOT free-wheeling; meaning that the pistons will contact the valves in the event of a timing chain failure. The cylinders are numbered from front of the engine to the rear. The firing order is 1-3-4-2. Fig. 1: Engine Serial Number Courtesy of CHRYSLER LLC The engine serial number (1) is located on the rear of the cylinder block behind the oil pan. The serial number is visible with the oil pan in place. The serial number contains engine build date information. DIAGNOSIS AND TESTING INTRODUCTION Engine diagnosis is helpful in determining the causes of malfunctions not detected and remedied by routine maintenance. These malfunctions may be classified as either mechanical (e.g., a strange noise), or performance (e.g., engine idles rough and stalls). Refer to the Engine Mechanical and the Engine Performance diagnostic charts, for possible causes and 2011 Chrysler 200 Limited 2011 ENGINE 2.4L - Service Information - 200 & Avenger 2011 Chrysler 200 Limited 2011 ENGINE 2.4L - Service Information - 200 & Avenger
corrections of malfunctions. Refer to MECHANICAL and PERFORMANCE . For fuel system diagnosis. Refer to FUEL SYSTEM article. Additional tests and diagnostic procedures may be necessary for specific engine malfunctions that cannot be isolated with the Service Diagnosis charts. Information concerning additional tests and diagnosis is provided within the following: Cylinder Compression Pressure Test. Refer to CYLINDER COMPRESSION PRESSURE TEST . Cylinder Combustion Pressure Leakage Test. Refer to CYLINDER COMBUSTION PRESSURE LEAKAGE TEST . Engine Cylinder Head Gasket Failure Diagnosis. Refer to DIAGNOSIS AND TESTING - CYLINDER HEAD GASKET . Intake Manifold Leakage Diagnosis. Refer to DIAGNOSIS AND TESTING - INTAKE MANIFOLD LEAKS . Mechanical Valve Tappet Noise Diagnosis. Refer to DIAGNOSIS AND TESTING - MECHANICAL VALVE TAPPET NOISE DIAGNOSIS . Engine Oil Leak Inspection. Refer to ENGINE OIL LEAK INSPECTION . PERFORMANCE CONDITION POSSIBLE CAUSE CORRECTION ENGINE WILL NOT START 1. Weak battery. 1. Test battery. Charge or replace as necessary. Refer to DIAGNOSIS AND TESTING . 2. Corroded or loose battery connections. 2. Clean and tighten battery connections. Apply a coat of light mineral grease to terminals. 3. Faulty starter. 3. Test starting system. Check for codes. (Refer to Appropriate Diagnostic Information) 4. Faulty coil(s) or control unit. 4. Test and replace as needed. (Refer to Appropriate Diagnostic Information) 5. Incorrect spark plug gap. 5. Set gap. Refer to SPECIFICATIONS . 6. Contamination in fuel system. 6. Clean system and replace fuel filter. 7. Faulty fuel pump. 7. Test fuel pump and replace as needed. (Refer to Appropriate Diagnostic Information) 8. Incorrect engine timing. 8. Check for a skipped timing belt/chain. ENGINE STALLS OR IDLES ROUGH 1. Idle speed too low. 1. Test minimum air flow. (Refer to Appropriate Diagnostic Information) 2011 Chrysler 200 Limited 2011 ENGINE 2.4L - Service Information - 200 & Avenger
2. Incorrect fuel mixture. 2. (Refer to Appropriate Diagnostic Information) 3. Intake manifold leakage. 3. Inspect intake manifold, manifold gasket, and vacuum hoses. 4. Faulty ignition coil(s). 4. Test and replace as necessary. (Refer to Appropriate Diagnostic Information) 5. Contamination in Oil Control Valve (OCV). 5. Remove OCV and inspect for contamination. Replace OCV if contaminated. ENGINE LOSS OF POWER 1. Dirty or incorrectly gapped plugs. 1. Clean plugs and set gap. 2. Contamination in fuel system. 2. Clean system and replace fuel filter. 3. Faulty fuel pump. 3. Test and replace as necessary. (Refer to Appropriate Diagnostic Information) 4. Incorrect valve timing. 4. Correct valve timing. 5. Leaking cylinder head gasket. 5. Replace cylinder head gasket. 6. Low compression. 6. Test compression of each cylinder. 7. Burned, warped, or pitted valves. 7. Replace valves. 8. Plugged or restricted exhaust system. 8. Perform exhaust restriction test. Install new parts, as necessary. Refer to DIAGNOSIS AND TESTING . 9. Faulty ignition coil(s). 9. Test and replace as necessary. (Refer to Appropriate Diagnostic Information) ENGINE MISSES ON ACCELERATION 1. Dirty or incorrectly gapped spark plugs. 1. Clean spark plugs and set gap. 2. Contamination in Fuel System. 2. Clean fuel system and replace fuel filter. 3. Burned, warped, or pitted valves. 3. Replace valves. 4. Faulty ignition coil(s). 4. Test and replace as necessary. (Refer to Appropriate Diagnostic Information) ENGINE MISSES AT HIGH SPEED 1. Dirty or incorrect spark plug gap. 1. Clean spark plugs and set gap. 2. Faulty ignition coil(s). 2. Test and replace as necessary. (Refer to Appropriate Diagnostic Information) 3. Dirty fuel injector(s). 3. Test and replace as necessary. (Refer to Appropriate Diagnostic 2011 Chrysler 200 Limited 2011 ENGINE 2.4L - Service Information - 200 & Avenger
MECHANICAL Information) 4. Contamination in fuel system. 4. Clean system and replace fuel filter. CONDITION POSSIBLE CAUSES CORRECTION VALVETRAIN NOISE 1. High or low oil level in crankcase. 1. Check and correct engine oil level. 2. Thin or diluted oil. 2. Change oil to correct viscosity. 3. Thick oil 3. (a) Change engine oil and filter. (b) Run engine to operating temperature. (c) Change engine oil and filter again. 4. Low oil pressure. 4. (a) Check and correct engine oil level. (b) Check pressure regulating valve. 5. Worn cam lobe. 5. Install new camshaft. 6. Worn tappet bucket. 6. Install new select fit tappet bucket. 7. Worn valve guides. 7. Replace cylinder head. 8. Excessive runout of valve seats on valve faces. 8. Grind valve seats and replace valves. CONNECTING ROD NOISE 1. Insufficient oil supply. 1. Check engine oil level. 2. Low oil pressure. 2. Check engine oil level. Inspect oil pump relief valve and spring. 3. Thin or diluted oil. 3. Change oil to correct viscosity. 4. Thick oil 4. (a) Change engine oil and filter. (b) Run engine to operating temperature. (c) Change engine oil and filter again. 5. Excessive bearing clearance. 5. Measure bearings for correct clearance. Repair as necessary. 6. Connecting rod journal out-of- round. 6. Replace crankshaft or grind surface. 7. Connecting rod out-of-round. 7. Replace connecting rod. 8. Misaligned connecting rods. 8. Replace bent connecting rods. MAIN BEARING NOISE 1. Insufficient oil supply. 1. Check engine oil level. 2. Low oil pressure. 2. Check engine oil level. Inspect oil pump relief valve and spring. 2011 Chrysler 200 Limited 2011 ENGINE 2.4L - Service Information - 200 & Avenger
3. Thin or diluted oil. 3. Change oil to correct viscosity. 4. Thick oil 4. (a) Change engine oil and filter. (b) Run engine to operating temperature. (c) Change engine oil and filter again. 5. Excessive bearing clearance. 5. Measure bearings for correct clearance. Repair as necessary. 6. Excessive end play. 6. Check thrust bearing for wear on flanges. 7. Crankshaft journal out-of-round or worn. 7. Replace crankshaft or grind journals. 8. Loose flywheel or torque converter. 8. Tighten to correct torque. OIL PRESSURE DROP 1. Low oil level. 1. Check engine oil level. 2. Faulty oil pressure sending unit. 2. Install new sending unit. 3. Low oil pressure. 3. Check sending unit and main bearing oil clearance. 4. Clogged oil filter. 4. Install new oil filter. 5. Worn parts in oil pump. 5. Replace balance shaft module. 6. Thin or diluted oil. 6. Change oil to correct viscosity. 7. Oil pump relief valve stuck. 7. Remove valve and inspect, clean, or replace. 8. Excessive bearing clearance. 8. Measure bearings for correct clearance. OIL LEAKS 1. Misaligned or deteriorated gaskets. 1. Replace gasket(s). 2. Loose fastener, broken or porous metal part. 2. Tighten, repair or replace the part. 3. Misaligned or deteriorated cup or threaded plug. 3. Replace as necessary. OIL CONSUMPTION OR SPARK PLUGS FOULED 1. PCV system malfunction. 1. Check system and repair as necessary. Refer to VALVE, POSITIVE CRANKCASE VENTILATION (PCV), DIAGNOSIS AND TESTING . 2. Worn, scuffed or broken rings. 2. Hone cylinder bores. Install new rings. 3. Carbon in oil ring slots. 3. Install new rings. 4. Rings fitted too tightly in grooves. 4. Remove rings and check grooves. If groove is not proper width, replace piston. 5. Worn valve guide(s). 5. Replace cylinder head. 6. Valve stem seal(s) worn or 6. Replace seal(s). 2011 Chrysler 200 Limited 2011 ENGINE 2.4L - Service Information - 200 & Avenger
CYLINDER COMBUSTION PRESSURE LEAKAGE TEST The combustion pressure leakage test provides an accurate means for determining engine condition. Combustion pressure leakage testing will detect: Exhaust and intake valve leaks (improper seating). Leaks between adjacent cylinders or into water jacket. Any causes for combustion/compression pressure loss. 1. Check the coolant level and fill as required. DO NOT install the pressure cap. 2. Start and operate the engine until it attains normal operating temperature, then turn the engine OFF. 3. Clean spark plug recesses with compressed air. 4. Remove the spark plugs. 5. Remove the oil filler cap. 6. Remove the air cleaner. 7. Calibrate the tester according to the manufacturer's instructions. The shop air source for testing should maintain 483 kPa (70 psi) minimum, 1, 379 kPa (200 psi) maximum, with 552 kPa (80 psi) recommended. 8. Perform the test procedures on each cylinder according to the tester manufacturer's instructions. While testing, listen for pressurized air escaping through the throttle body, tailpipe and oil filler cap opening. Check for bubbles in the coolant. 9. All gauge pressure indications should be equal, with no more than 25% leakage per cylinder. 10. FOR EXAMPLE: At 552 kPa (80 psi) input pressure, a minimum of 414 kPa (60 psi) should be maintained in the cylinder. CYLINDER COMPRESSION PRESSURE TEST The results of a cylinder compression pressure test can be utilized to diagnose several engine malfunctions. Ensure the battery is completely charged and the engine starter motor is in good operating condition. Otherwise the indicated compression pressures may not be valid for diagnosis purposes. 1. Check engine oil level and add oil if necessary. 2. Drive the vehicle until engine reaches normal operating temperature. Select a route free from traffic and other forms of congestion, observe all traffic laws, and accelerate through the gears several times briskly. 3. Remove engine cover. 4. Disconnect coil electrical connectors and remove coils. damaged. WARNING: Do not remove the pressure cap with the system hot and under pressure because serious burns from coolant can occur. 2011 Chrysler 200 Limited 2011 ENGINE 2.4L - Service Information - 200 & Avenger
5. Remove all spark plugs from engine. As spark plugs are being removed, check electrodes for abnormal firing indicators such as fouled, hot, oily, etc. Record cylinder number of spark plug for future reference. 6. Disconnect injector electrical connectors. 7. Install a suitable compression test gauge into the #1 spark plug hole in cylinder head. 8. Crank engine until maximum pressure is reached on gauge. Record this pressure as #1 cylinder pressure. 9. Repeat the previous step for all remaining cylinders. 10. Compression should not be less than 689 kPa (100 psi) and not vary more than 25 percent from cylinder to cylinder. 11. If one or more cylinders have abnormally low compression pressures, repeat the compression test. 12. If the same cylinder or cylinders repeat an abnormally low reading on the second compression test, it could indicate the existence of a problem in the cylinder in question. The recommended compression pressures are to be used only as a guide to diagnosing engine problems. An engine should not be disassembled to determine the cause of low compression unless some malfunction is present. OIL CONSUMPTION TEST AND DIAGNOSIS Diagnostic Procedures The following diagnostic procedures are used to determine the source of excessive internal oil Consumption, these procedures and tests apply to vehicles with 50, 000 miles or less. Severe service (high ambient temperature, short trips, heavy loading, trailer towing, taxi, off-road, or law enforcement use) may result in greater oil consumption than normal. Sustained high speed driving and high engine RPM operation may result in increased oil consumption. Failure to comply with the recommended oil type and viscosity rating, as outlined in the owner's manual, may impact oil economy as well as fuel economy. Oil consumption may increase with vehicle age and mileage due to normal engine wear. Oil leakage is not the same as oil consumption and all external leakage must be eliminated before any action can be taken to verify and/or correct oil consumption complaints. Verify that the engine has the correct oil level dipstick and dipstick tube installed. Verify that the engine is not being run in an overfilled condition. Check the oil level 15 minutes after a hot shutdown with the vehicle parked on a level surface. In no case should the level be above MAX or the FULL mark on the dipstick. NOTE: Engine oil consumption may be greater than normal during engine break-in. Repairs should be delayed until vehicle has been driven at least 7, 500 miles. NOTE: Because a few drops of external oil leakage per mile can quickly account for the loss of one quart of oil in a few hundred miles, ensure no external engine oil leaks are present. 2011 Chrysler 200 Limited 2011 ENGINE 2.4L - Service Information - 200 & Avenger
OIL CONSUMPTION TEST 1. Check the oil level at least 15 minutes after a hot shutdown. 2. If the oil level is low, top off with the proper viscosity and API service level engine oil. Add one bottle of MOPAR® 4-In-1 Leak Detection Dye into the engine oil. 3. Tamper proof the oil pan drain plug, oil filter, dipstick and oil fill cap. 4. Record the vehicle mileage. 5. Instruct the customer to drive the vehicle as usual. 6. Ask the customer to return to the servicing dealer after accumulating 500 miles, Check the oil level at least 15 minutes after a hot shutdown. If the oil level is half way between the "FULL" and "ADD" mark continue with the next step. 7. Using a black light, re-check for any external engine oil leaks, repair as necessary, if no external engine oil leaks are present, continue with oil consumption diagnosis. OIL CONSUMPTION DIAGNOSIS 1. Check the positive crankcase ventilation (PCV) system. Make sure the system is not restricted and the PCV valve has the correct part number and correct vacuum source (18-20 in. Hg at idle below 3000 ft. above sea level is considered normal). 2. Perform a CYLINDER COMPRESSION PRESSURE TEST and CYLINDER - TO - CYLINDER LEAKAGE TEST using the standard leak down gauge following manufacturers suggested best practices. 3. If one or more cylinders have more than 15% leak down further engine tear down and inspection will be required. TOP 19 REASONS THAT MAY LEAD TO ENGINE OIL CONSUMPTION 1. Tapered and Out-of-Round Cylinders The increased piston clearances permit the pistons to rock in the worn cylinders. While tilted momentarily, an abnormally large volume of oil is permitted to enter on one side of the piston. The rings, also tilted in the cylinder, permit oil to enter on one side. Upon reversal of the piston on each stroke, some of this oil is passed into the combustion chamber. 2. Distorted Cylinders This may be caused by unequal heat distribution or unequal tightening of cylinder head bolts. This condition presents a surface which the rings may not be able to follow completely. In this case, there may be areas where the rings will not remove all of the excess oil. When combustion takes place, this oil will be burned and cause high oil consumption. NOTE: Verify the spark plugs are not oil saturated. If the spark plugs are oil saturated and compression is good it can be assumed the valve seals or valve guides are at fault. 2011 Chrysler 200 Limited 2011 ENGINE 2.4L - Service Information - 200 & Avenger
3. Improper operation of "PCV "system The main purpose of the Positive Crankcase Ventilation (PCV) valve is to recirculate blow-by gases back from the crankcase area through the engine to consume unburned hydrocarbons. The PCV system usually has a one way check valve and a make up air source. The system uses rubber hoses that route crankcase blow by gases to the intake manifold. Vacuum within the engine intake manifold pulls the blow by gases out of the crankcase into the combustion chamber along with the regular intake air and fuel mixture. The PCV system can become clogged with sludge and varnish deposits and trap blow by gases in the crankcase. This degrades the oil, promoting additional formation of deposit material. If left uncorrected, the result is plugged oil rings, oil consumption, rapid ring wear due to sludge buildup, ruptured gaskets and seals due to crankcase pressurization. 4. Worn Piston Ring Grooves For piston rings to form a good seal, the sides of the ring grooves must be true and flat - not flared or shouldered. Piston rings in tapered or irregular grooves will not seal properly and, consequently, oil will pass around behind the rings into the combustion chamber. 5. Worn, Broken or Stuck Piston Rings When piston rings are broken, worn or stuck to such an extent that the correct tension and clearances are not maintained, this will allow oil to be drawn into the combustion chamber on the intake stroke and hot gases of combustion to be blown down the cylinder past the piston on the power stroke. All of these conditions will result in burning and carbon build up of the oil on the cylinders, pistons and rings. 6. Cracked or Broken Ring Lands Cracked or broken ring lands prevent the rings from seating completely on their sides and cause oil pumping. This condition will lead to serious damage to the cylinders as well as complete destruction of the pistons and rings. Cracked or broken ring lands cannot be corrected by any means other than piston replacement. 7. Worn Valve Stems and Guides When wear has taken place on valve stems and valve guides, the vacuum in the intake manifold will draw oil and oil vapor between the intake valve stems and guides into the intake manifold and then into the cylinder where it will be burned. 8. Bent or Misaligned Connecting Rods Bent or misaligned connecting rods will not allow the pistons to ride straight in the cylinders. This will prevent the pistons and rings from forming a proper seal with the cylinder walls and promote oil consumption. In addition, it is possible that a bearing in a bent connect rod will not have uniform clearance on the connecting rod wrist pin. Under these conditions, the bearing will wear rapidly and throw off an excessive amount of oil into the cylinder. 2011 Chrysler 200 Limited 2011 ENGINE 2.4L - Service Information - 200 & Avenger
9. Fuel Dilution If raw fuel is allowed to enter the lubrication system, the oil will become thinner and more volatile and will result in higher oil consumption. The following conditions will lead to higher oil consumption; Excess fuel can enter and mix with the oil via a leaking fuel injector Gasoline contaminated with diesel fuel Restricted air intake Excessive idling 10. Contaminated Cooling Systems Corrosion, rust, scale, sediment or other formations in the water jacket and radiator will prevent a cooling system from extracting heat efficiently. This is likely to cause cylinder distortion thus leading to higher oil consumption. 11. Oil Viscosity The use of oil with a viscosity that is too light may result in high oil consumption. Refer to the vehicle owner's manual for the proper oil viscosity to be used under specific driving conditions and/or ambient temperatures. 12. Dirty Engine Oil Failure to change the oil and filter at proper intervals may cause the oil to be so dirty that it will promote accumulation of sludge and varnish and restrict oil passages in the piston rings and pistons. This will increase oil consumption; dirty oil by nature is also consumed at a higher rate than clean oil. 13. Crankcase Overfull Due to an error in inserting the oil dip stick so that it does not come to a seat on its shoulder, a low reading may be obtained. Additional oil may be added to make the reading appear normal with the stick in this incorrect position which will actually make the oil level too high. If the oil level is so high that the lower ends of the connecting rods touch the oil in the oil pan excessive quantities of oil will be thrown on the cylinder walls and some of it will work its way up into the combustion chamber. 14. Excessively High Oil Pressure A faulty oil pressure relief valve may cause the oil pressure to be too high. The result will be that the engine will be flooded with an abnormally large amount of oil in a manner similar to that which occurs with worn bearings. This condition may also cause the oil filter to burst. 15. Aftermarket Performance Chips and Modification Increasing performance through the use of performance/power enhancement products to a stock or factory engine will increase the chance of excessive oil consumption. 2011 Chrysler 200 Limited 2011 ENGINE 2.4L - Service Information - 200 & Avenger
This service and repair manual is an authoritative source of information for the 2014 Dodge Avenger, offering comprehensive guidance for service professionals and car enthusiasts engaged in maintenance and repair activities. It spans a variety of essential topics, including detailed procedures for working on the engine, transmission, drivetrain, suspension, braking systems, and electrical components. This manual is structured to support the effective repair and maintenance of the 2014 Dodge Avenger, ensuring the vehicle operates at its peak performance.
Included within the manual are step-by-step instructions that detail both routine maintenance tasks and complex repairs, ensuring users have access to the knowledge required for a wide range of service needs. The manual addresses the specific requirements of the Dodge Avenger, focusing on its distinctive engineering and design elements to provide targeted and effective repair strategies.
Accompanied by detailed illustrations, diagrams, and wiring schematics, this manual simplifies complicated mechanical procedures, making it easier for users to follow along and complete tasks accurately. These resources are invaluable for diagnosing problems, performing repairs, and undertaking maintenance work with confidence.
By equipping both seasoned technicians and DIY enthusiasts with detailed information and practical guidance, this manual serves as an essential tool for maintaining the integrity and reliability of the 2014 Dodge Avenger, ensuring it continues to deliver the performance and driving experience Dodge is known for.
Printable: Yes Language: English Compatibility: Pretty much any electronic device, incl. PC & Mac computers, Android and Apple smartphones & tablet, etc. Requirements: Adobe Reader (free)