

2016 Dacia Sandero Service and Repair Manual
What's Included?
Fast Download Speeds
Online & Offline Access
Access PDF Contents & Bookmarks
Full Search Facility
Print one or all pages of your manual

2012-2016 DACIA SANDERO
SERVICE AND
REPAIR MANUAL
- 1 -
5TH GEAR HOUSING: REMOVAL - REFITTING
Note, one or more warnings are present in this procedure
Equipment required
oil recovery tray
parts always to be replaced:
5th gear housing seal
WARNING
To avoid all risk of damage to the systems, apply the safety and cleanliness instructions and operation
recommendations before carrying out any repair:
Manual gearbox: Precautions for the repair ,
Vehicle: Precautions for the repair (01D, Mechanical introduction).
REMOVAL
1. REMOVAL PREPARATION OPERATION
Position the vehicle on a two-post lift Vehicle: Towing and lifting (02A, Lifting equipment).
Remove:
the engine undertray bolts,
the engine undertray,
the front left-hand wheel Wheel: Removal - Refitting (35A, Wheels and tyres),
the front left-hand arch side liner(see Front wheel arch liner: Removal - Refitting) (55A, Exterior protection).
Remove Front axle assembly: Exploded view :
the tie-rod bolt,
the tie rod nut,
the tie rod.
Drain the gearbox (see 21A, Manual gearbox , Manual gearbox oils: Draining - Filling ) .
- 2 -
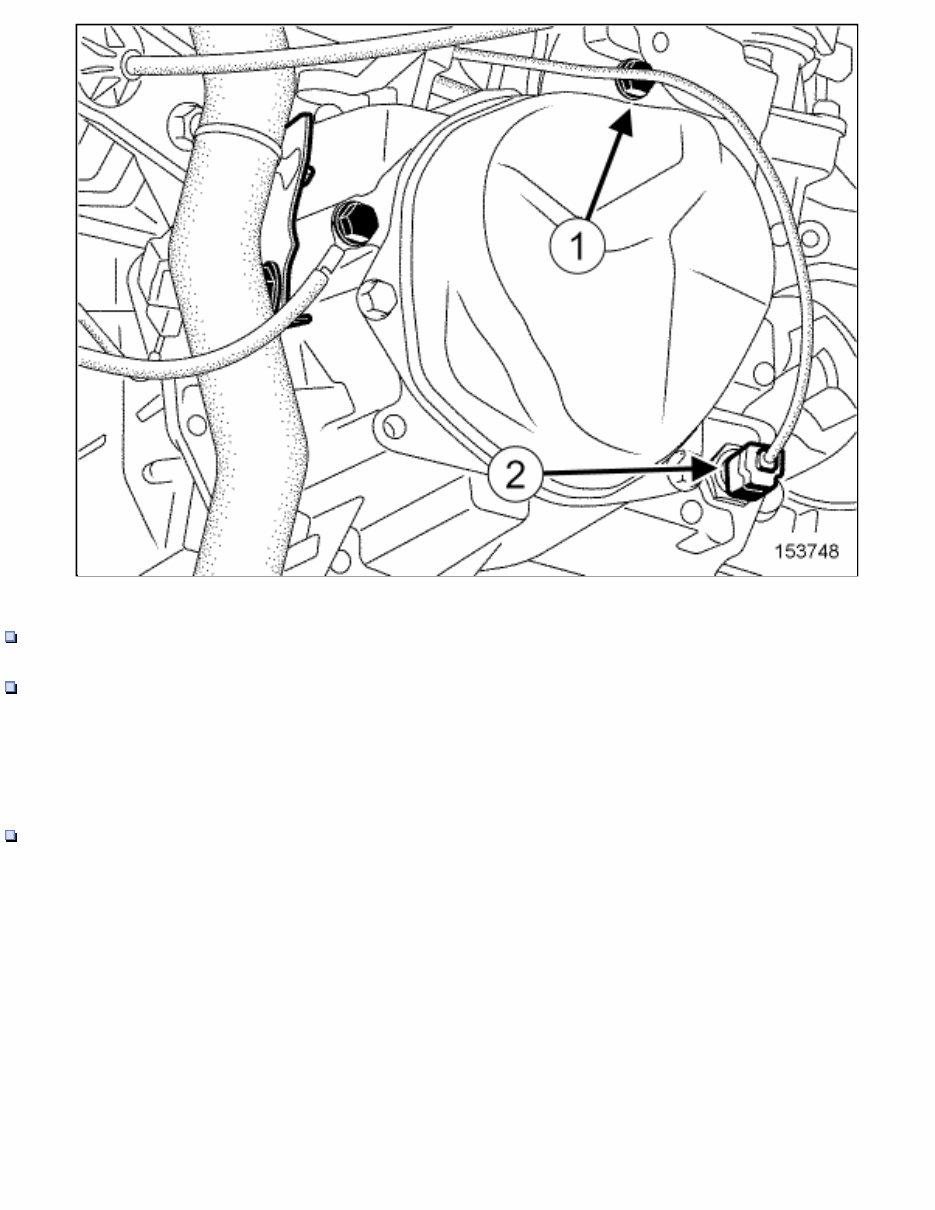
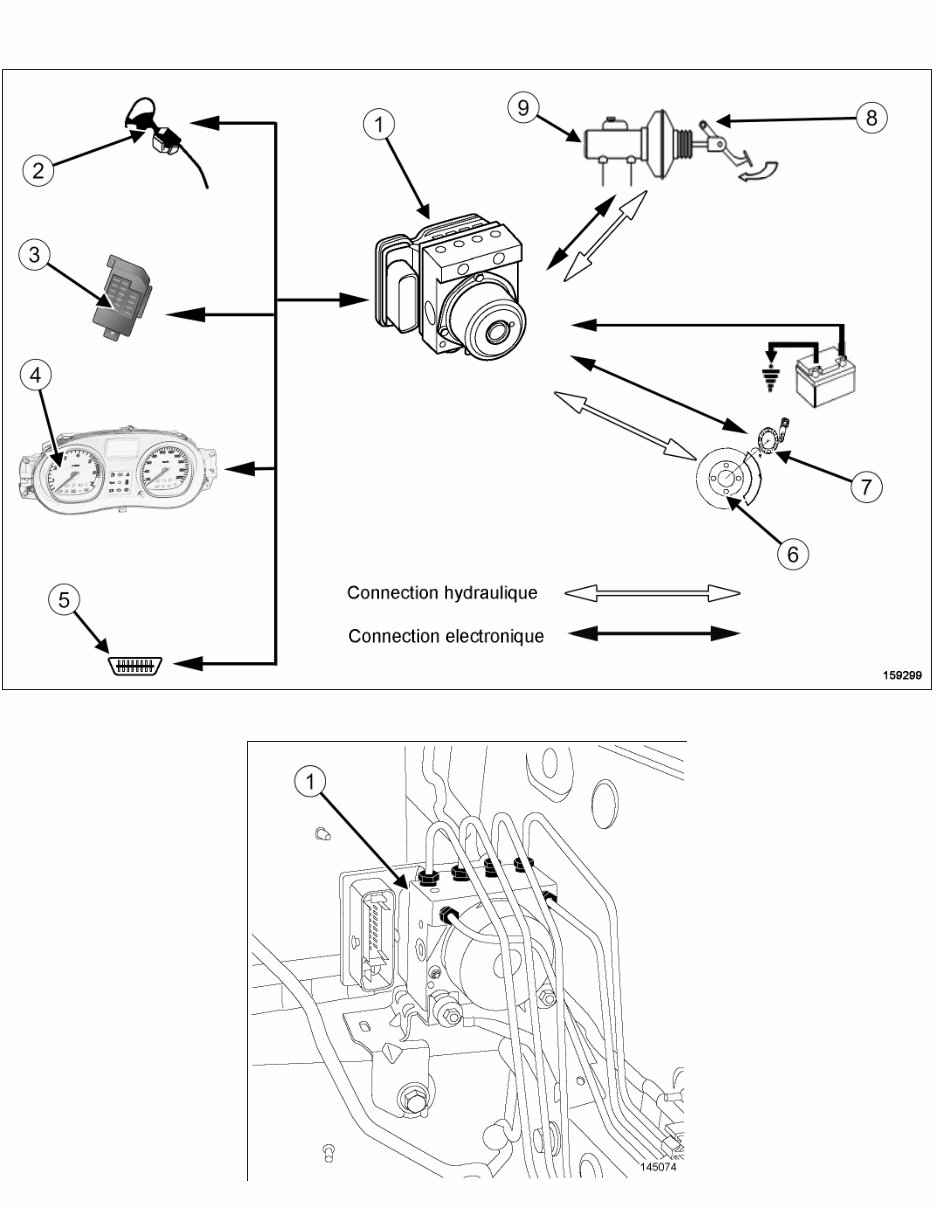
Unclip the wiring(1) of the reverse gear switch on the 5th gear housing.
Disconnect the connector(2) from the reverse gear switch.
2. REMOVAL OPERATION
Fit an oil recovery tray under the 5th gear housing.
- 3 -
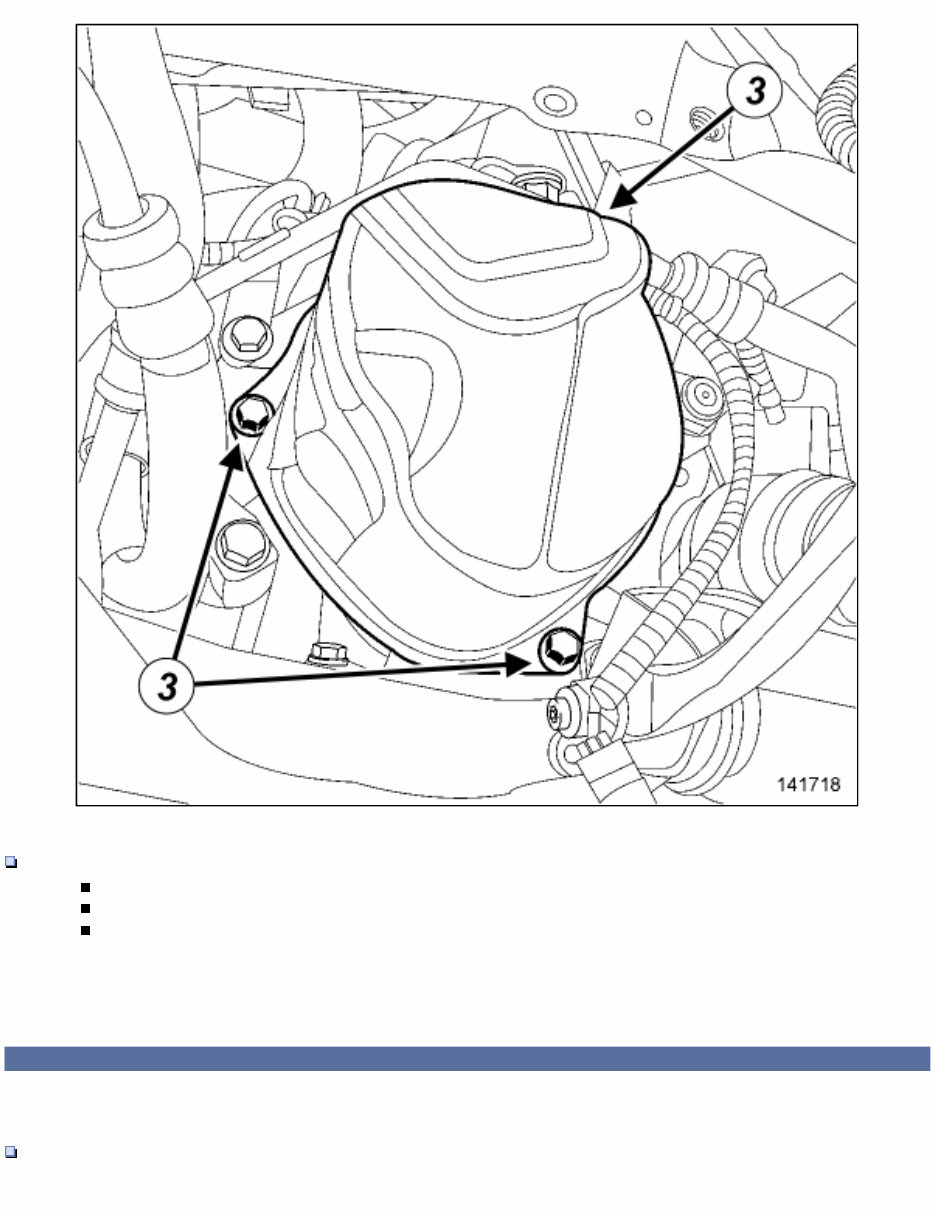
Remove:
the bolts( 3) of the 5th gear housing,
the 5th gear housing,
the seal of the 5th gear housing.
REFITTING
1. REFITTING PREPARATION OPERATION
- 4 -
parts always to be replaced: 5th gear housing seal .
CAUTION
Do not scrape the joint faces of the aluminium, any damage caused to the joint face
will result in a risk of leaks.
CAUTION
To ensure proper sealing, the gasket surfaces must be clean, dry and not greasy
(avoid any finger marks).
Use surface cleaner(see Vehicle: Parts and consumables for the repair) (04B, Consumables - Products) to clean and
degrease the joint face of:
the 5th gear housing,
the mechanism housing.
2. REFITTING OPERATION
Proceed in the reverse order to removal.
Torque tighten the 5th gear housing bolts 25 N.m .
Fill and check the gearbox oil level (see 21A, Manual gearbox , Manual gearbox oils: Draining - Filling ) .
Repair-12x01x03x01-01x37-1-6-1.xml
XSL version : 3.02 du 22/07/11

- 1 -
ABS BODYWORK COMPONENT: PREPARATION AND PAINT RANGE
Note, one or more warnings are present in this procedure
WARNING
Always wear protective gear (gloves, goggles and breathing masks).
Use extra ventilation source.
Note:
Before using the products, consult the manufacturer's technical sheet.
Note:
Never apply pre-treatment primer or primer filler on this type of material.
1. PRE PRIMED PARTS

- 2 -
Steps
Description Special notes
1
Wipe / blow
2
Degrease
Lint-free cloth soaked in antistatic thinner Vehicle: Parts and consumables for the repair
(04B, Consumables - Products). Wipe with a dry lint-free cloth
3
Sand P400 - P500 dry / P400 - P800 with water
4
Wipe / blow
5
Degrease
Lint-free cloth soaked in antistatic thinner Vehicle: Parts and consumables for the repair
(04B, Consumables - Products). Wipe with a dry lint-free cloth
6
Blow / rub with the abrasive finishing pad
7
Apply the finishing paint
2. REPAIRED PARTS
- 3 -
Steps
Description Special notes
1
Wipe / blow
2
Degrease
Lint-free cloth soaked in antistatic thinner Vehicle: Parts and
consumables for the repair (04B, Consumables - Products). Wipe with
a dry lint-free cloth
3
Sand the defect P240 dry / orbital sander (mid speed)
4
Wipe / blow
5
Degrease
Lint-free cloth soaked in antistatic thinner Vehicle: Parts and
consumables for the repair (04B, Consumables - Products). Wipe with
a dry lint-free cloth
6
Apply and sand
polyester mastic if
necessary
Plastic material bodywork component: Repair (50A, General information)
7
Wipe / blow
8
Degrease
Lint-free cloth soaked in antistatic thinner Vehicle: Parts and
consumables for the repair (04B, Consumables - Products). Wipe with
a dry lint-free cloth
9
Smooth
Grey adhesive pad soaked in antistatic thinner Vehicle: Parts and
consumables for the repair (04B, Consumables - Products)
10
Wipe / blow
11
Degrease
Lint-free cloth soaked in antistatic thinner Vehicle: Parts and
consumables for the repair (04B, Consumables - Products). Wipe with
a dry lint-free cloth

- 4 -
12
Apply a bi component
primer
Vehicle: Parts and consumables for the repair (04B, Consumables -
Products)
13
Remove solvent / dry
14
Sand P400 - P500 dry / P400 - P800 with water
15
Wipe / blow
16
Degrease
Lint-free cloth soaked in antistatic thinner Vehicle: Parts and
consumables for the repair (04B, Consumables - Products). Wipe with
a dry lint-free cloth
17
Blow / rub with an adhesive pad
18
Apply the finishing paint
Repair-40x01x45x09-02x65-1-1-1.xml
XSL version : 3.02 du 22/07/11
- 1 -
ABS
You're Reading a Preview
What's Included?
Fast Download Speeds
Online & Offline Access
Access PDF Contents & Bookmarks
Full Search Facility
Print one or all pages of your manual
$37.99
Viewed 73 Times Today


Secure transaction
What's Included?
Fast Download Speeds
Online & Offline Access
Access PDF Contents & Bookmarks
Full Search Facility
Print one or all pages of your manual
$37.99
The 2016 Dacia Sandero Service and Repair Manual is a comprehensive guide for maintaining and repairing Dacia Sandero vehicles. It provides detailed instructions and diagrams for various tasks. This manual is valuable for both professional mechanics and DIY enthusiasts, covering topics such as:
- Engine maintenance and repair
- Transmission and drivetrain
- Electrical system diagnosis and repair
- Brakes, suspension, and steering
- Heating, ventilation, and air conditioning
- Body and interior
Designed for the 2016 models of Dacia Sandero, this meticulously organized manual includes clear instructions, illustrations, and specifications to confidently tackle any service or repair task. Whether it's routine maintenance or troubleshooting, this manual is the perfect companion to keep your vehicle running smoothly and efficiently.


