GROUP TAB LOCATOR Introduction 0 Lubrication & Maintenance 2 Suspension 3 Differential & Driveline 5 Brakes 7 Cooling 8A Audio/Video 8B Chime/Buzzer 8C Clock 8E Electronic Control Modules 8F Engine Systems 8G Heated Systems 8H Horn 8I Ignition Control 8J Instrument Cluster 8L Lamps 8M Message Systems 8N Power Systems 8O Restraints 8P Speed Control 8Q Vehicle Theft Security 8R Wipers/Washers 8T Navigation/Telecommunication 8W Wiring 9 Engine 11 Exhaust System 13 Frame & Bumpers 14 Fuel System 19 Steering 21 Transmission/Transaxle 22 Tires/Wheels 23 Body 24 Heating & Air Conditioning 25 Emissions Control Component and System Index Service Manual Comment Forms (Rear of Manual)
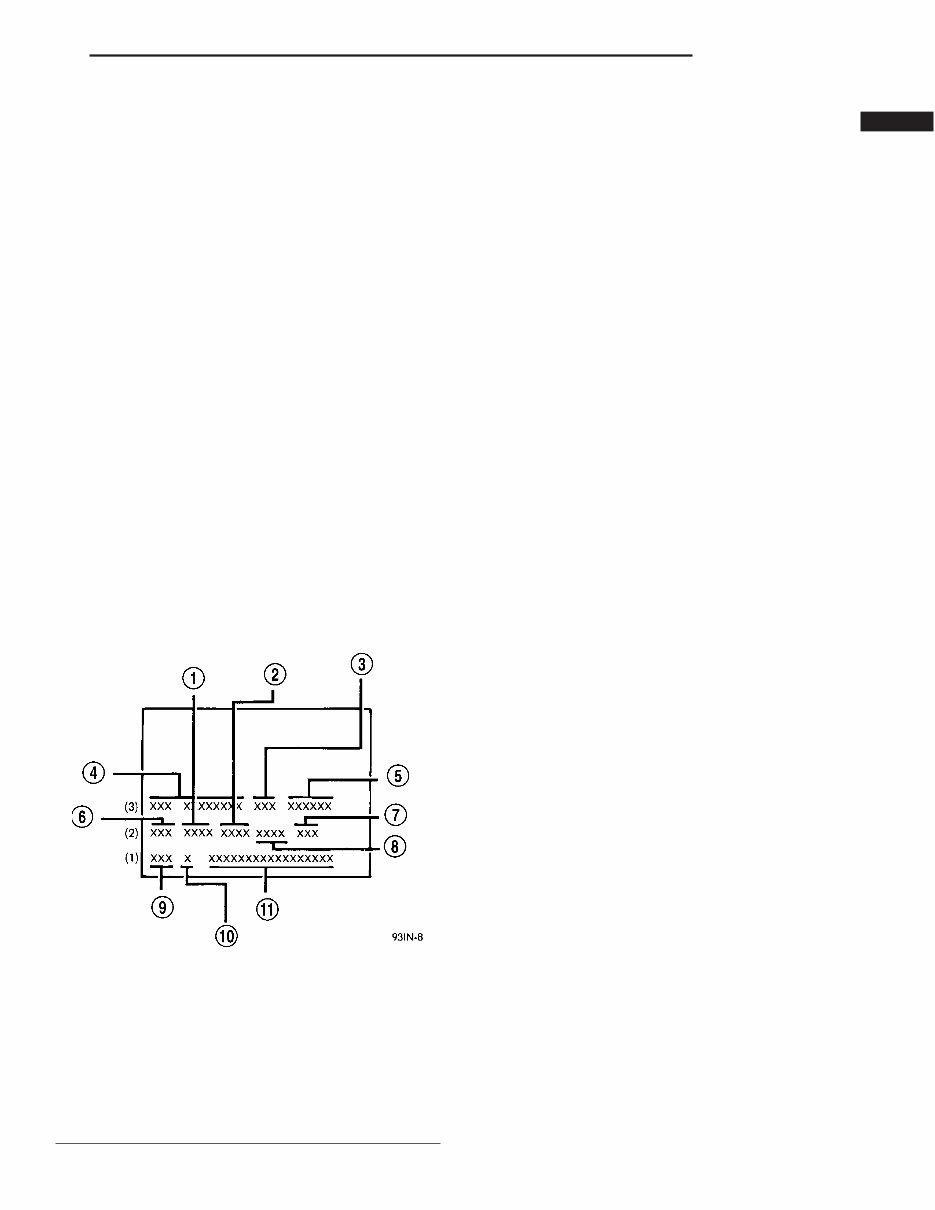
INTRODUCTION TABLE OF CONTENTS page page BODY CODE PLATE DESCRIPTION .......................... 1 FASTENER IDENTIFICATION DESCRIPTION .......................... 2 FASTENER USAGE DESCRIPTION DESCRIPTION - FASTENER USAGE ........ 5 DESCRIPTION - THREADED HOLE REPAIR ..5 INTERNATIONAL SYMBOLS DESCRIPTION .......................... 5 METRIC SYSTEM DESCRIPTION .......................... 5 TORQUE REFERENCES DESCRIPTION .......................... 8 VECI LABEL DESCRIPTION .......................... 9 VEHICLE IDENTIFICATION NUMBER DESCRIPTION .......................... 9 VEHICLE CERTIFICATION LABEL DESCRIPTION ......................... 10 BODY CODE PLATE DESCRIPTION The Body Code Plate (Fig. 1) is located in the engine compartment on the right headlamp mounting bracket. There are seven lines of information on the body code plate. Lines 4, 5, 6, and 7 are not used to define service information. Information reads from leftto right, starting with line 3 in the center of the plate to line 1 atthe bottom of the plate. BODYCODE PLATE – LINE3 DIGITS 1THROUGH 12 V ehicle Order Number DIGITS 13 THROUGH 17 Open Space DIGITS 18 AND 19 V ehicle Shell Line • CS DIGIT 20 Carline • Chrysler FWD • M = Pacifica AWD • F = Pacifica DIGIT 21 Price Class • 5 = P (Premium) • 6 = S (Sport) DIGITS 22 AND 23 Body Type • 8 = Sport Utility 4 Door BODYCODE PLATE LINE2 DIGITS 1, 2AND 3 Paint Procedure DIGIT 4 Open Space Fig. 1 BODY CODE PLATE 1 - PRIMARY PAINT 2 - SECONDARY PAINT 3 - VINYL ROOF 4 - VEHICLE ORDER NUMBER 5 - CAR LINE SHELL 6 - PAINT PROCEDURE 7 - ENGINE 8 - TRIM 9 - TRANSMISSION 10 - MARKET 11 - VIN CS INTRODUCTION 1
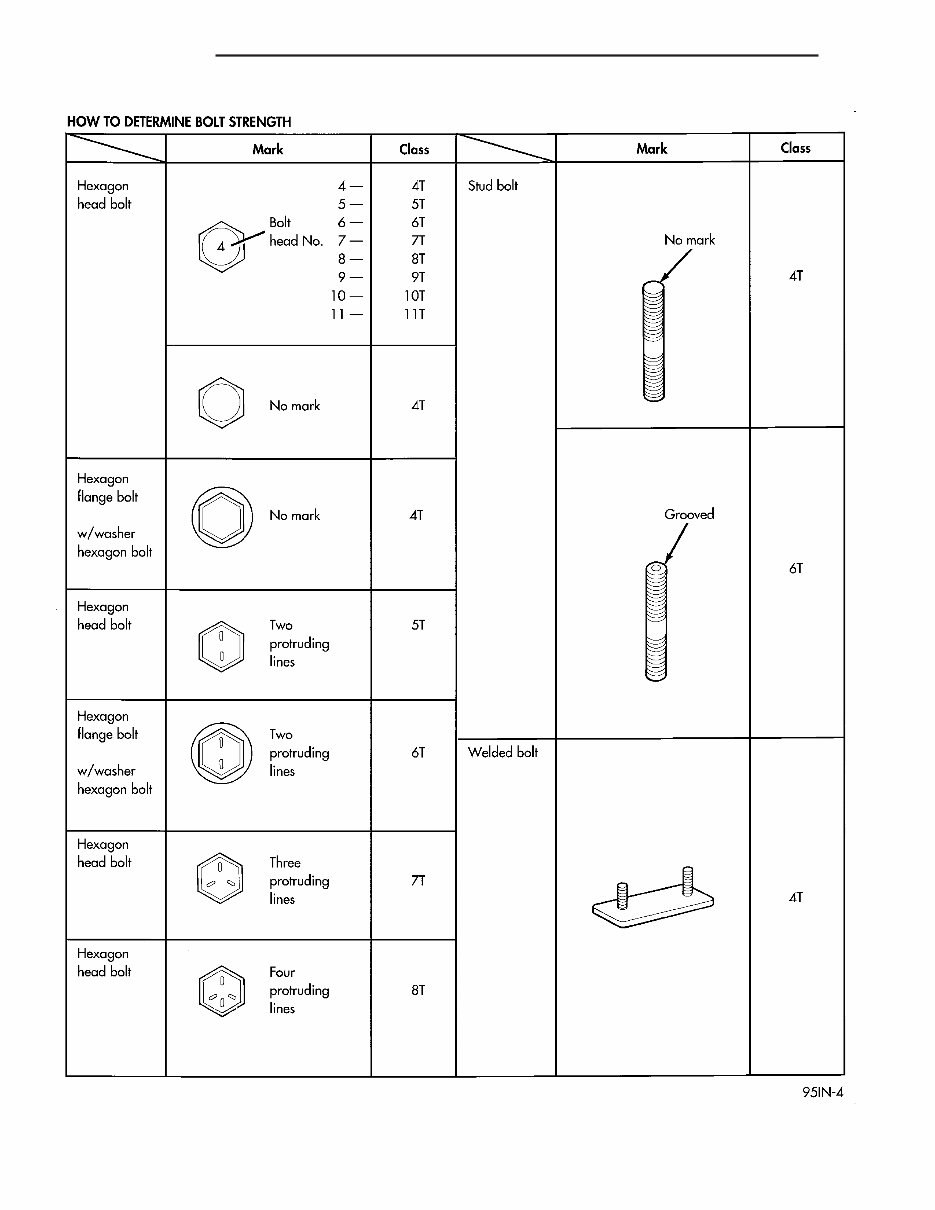
DIGITS 5THROUGH 7 Primary Paint (Refer to 23 - BODY/PAINT - SPEC- IFICATIONS). DIGIT 8 AND 9 Open Space DIGITS 10 THROUGH 12 Secondary Paint DIGIT 13 AND 14 Open Space DIGITS 15 THROUGH 18 Interior Trim Code DIGIT 19 Open Space DIGITS 20, 21, AND 22 Engine Code • EGN = 3.5L 6 Cyl. 24 V alve Gasoline (MPI) DIGIT 23 Open Space BODYCODE PLATE LINE1 DIGITS 1, 2, AND 3 Transaxle Codes • DGB = 4-Speed Automatic Transaxle • DGL = 41AE/TE 4-Speed ElectronicAutomatic DIGIT 4 Open Space DIGIT 5 Market Code • C = Canada • B = International • M = Mexico • U = United States DIGIT 6 Open Space DIGITS 7THROUGH 23 V ehicle Identification Number • Refer to V ehicle Identification Number (VIN) paragraph for proper breakdown of VIN code. IF TWO BODYCODE PLATES ARE REQUIRED The last code shown on either plate will be fol- lowed by END. When two plates are required, the last code space on the first plate will indicate (CTD) When a second plate is required, the first four spaces of each line will not be useddue tooverlap of the plates. FASTENER IDENTIFICATION DESCRIPTION The SAE bolt strength grades range from grade 2 to grade 8. The higher the grade number , the greater the bolt strength. Identification is determined by the line marks on the top of each bolt head. The actual bolt strength grade corresponds to the number of line marks plus 2. The most commonly used metric bolt strength classes are 9.8 and 10.9. The metric strength class identification number is imprinted on the head of the bolt. The higher the class number , the greater the bolt strength. Some metric nuts are imprinted with a single-digit strength class on the nut face. Refer to the Fastener Identification and Fastener Strength Charts. BOLT MARKINGS AND TORQUES - METRIC Bolt Markings 8.8/8.9 10.9 12.9 Bolt Dia. N·m Ft. Lbs. N·m Ft. Lbs. N·m Ft. Lbs. 6 12 105* 14 120* 16 12 8 25 250* 32 23 38 28 10 54 40 60 45 74 55 12 95 70 108 80 135 100 14 155 115 175 130 216 160 16 243 180 324 210 324 240 * Inch Lbs. 2 INTRODUCTION CS BODY CODE PLATE (Continued)
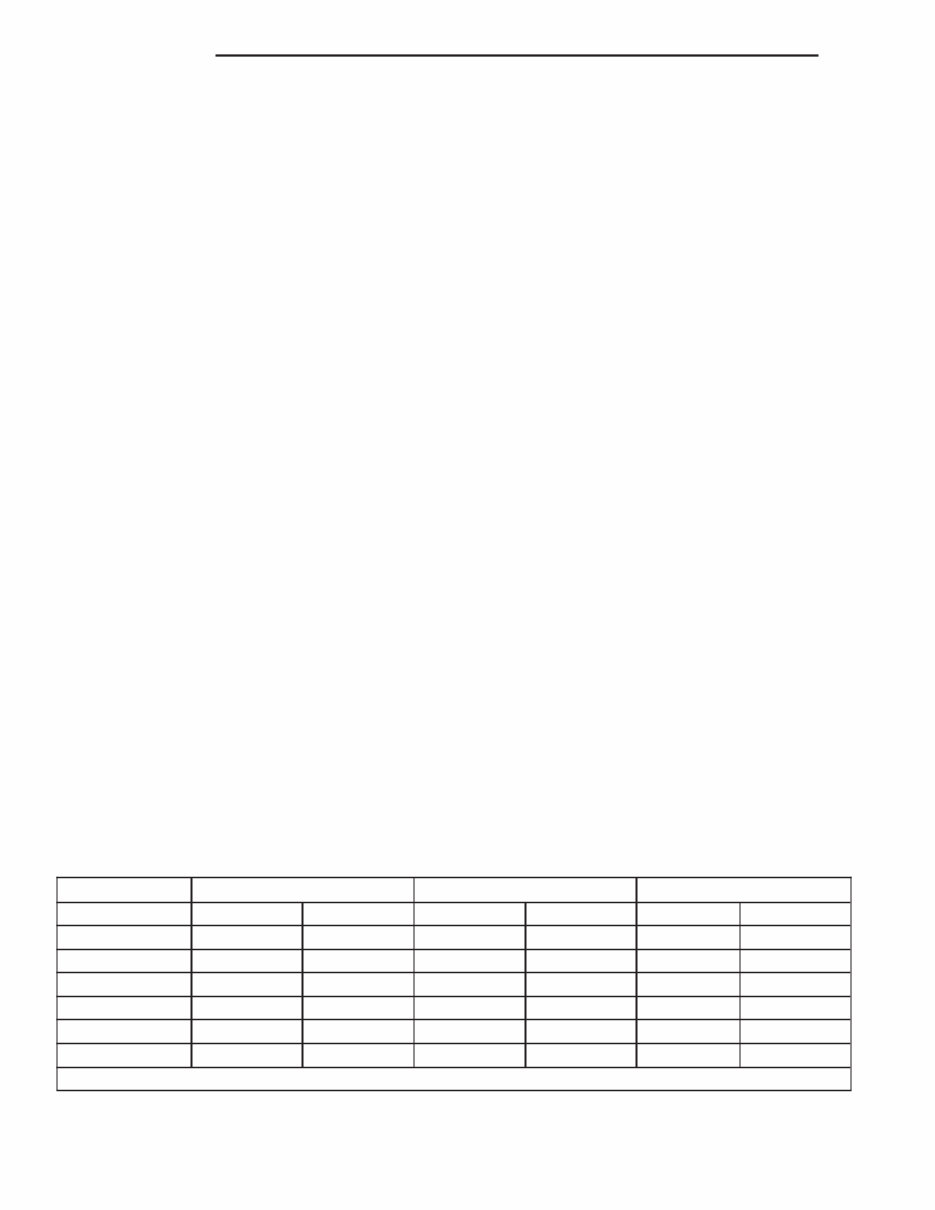
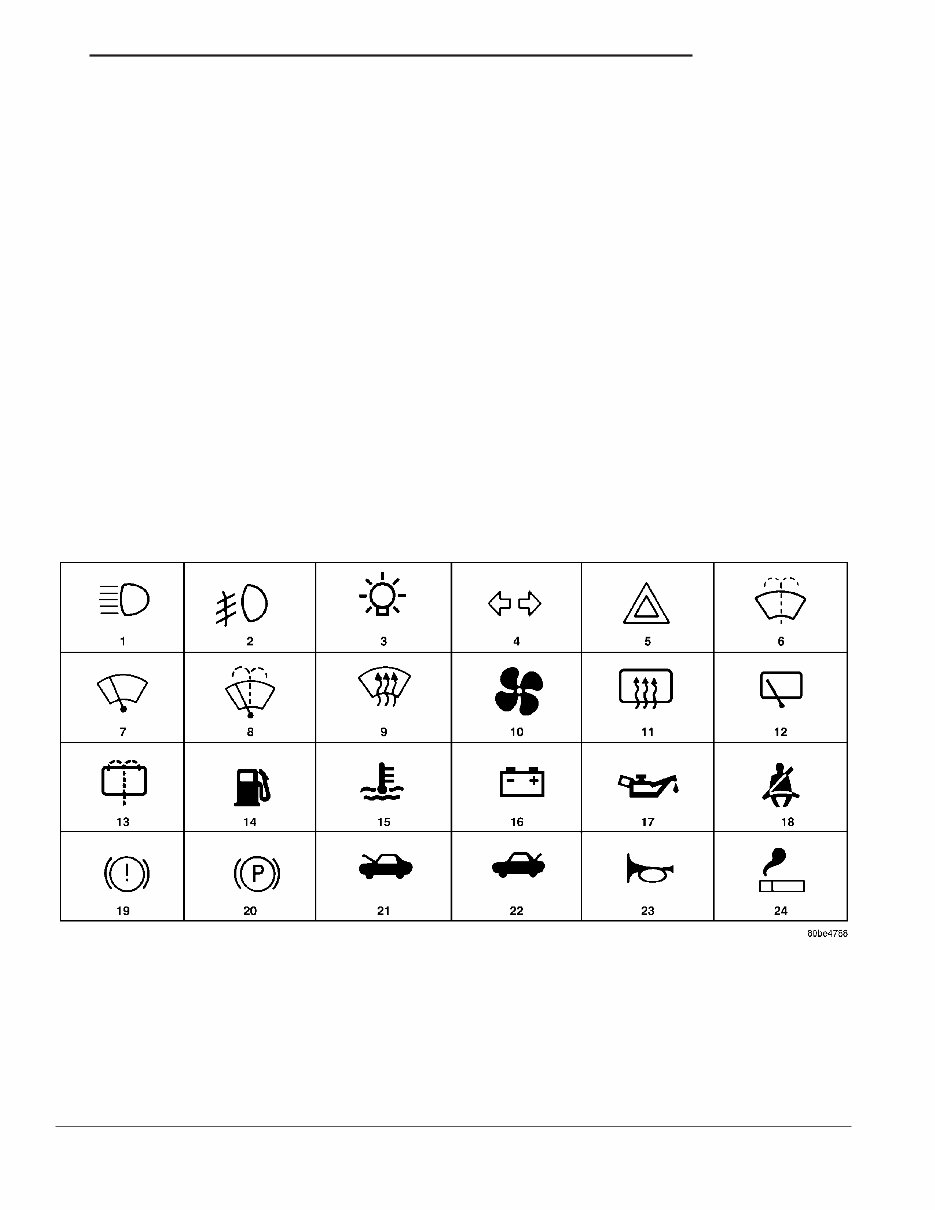
FASTENER USAGE DESCRIPTION DESCRIPTION - F ASTENER USAGE WARNING: USE OF AN INCORRECT FASTENER MAY RESULT IN COMPONENT DAMAGE OR PER- SONAL INJURY. Fasteners and torque specifications references in this Service Manual are identified in metric and SAE format. During any maintenance orrepair procedures, it is importantto salvage all fasteners (nuts, bolts, etc.) forreassembly . If the fastener is not salvageable, a fastener of equivalent specification must be used. DESCRIPTION - THREADED HOLE REPAIR Most stripped threaded holes can be repaired using a Helicoil. Follow the vehicle or Helicoil recommen- dations for application and repair procedures. INTERNATIONAL SYMBOLS DESCRIPTION The graphic symbols illustrated in the following International Control and Display Symbols Chart (Fig.2) are used to identifyvarious instrument con- trols. The symbols correspond to the controls anddis- plays that are located on the instrument panel. METRIC SYSTEM DESCRIPTION The metric system is based on quantities of one, ten, one hundred, one thousand and one million. The following chart will assist in converting metric units to equivalent English and SAE units, or vise versa. Fig. 2 INTERNATIONAL CONTROL AND DISPLAY SYMBOLS 1 High Beam 13 Rear Window Washer 2 Fog Lamps 14 Fuel 3 Headlamp, Parking Lamps, Panel Lamps 15 Engine Coolant Temperature 4 Turn Warning 16 Battery Charging Condition 5 Hazard Warning 17 Engine Oil 6 Windshield Washer 18 Seat Belt 7 Windshield Wiper 19 Brake Failure 8 Windshield Wiper and Washer 20 Parking Brake 9 Windscreen Demisting and Defrosting 21 Front Hood 10 Ventilating Fan 22 Rear hood (Decklid) 11 Rear Window Defogger 23 Horn 12 Rear Window Wiper 24 Lighter CS INTRODUCTION 5
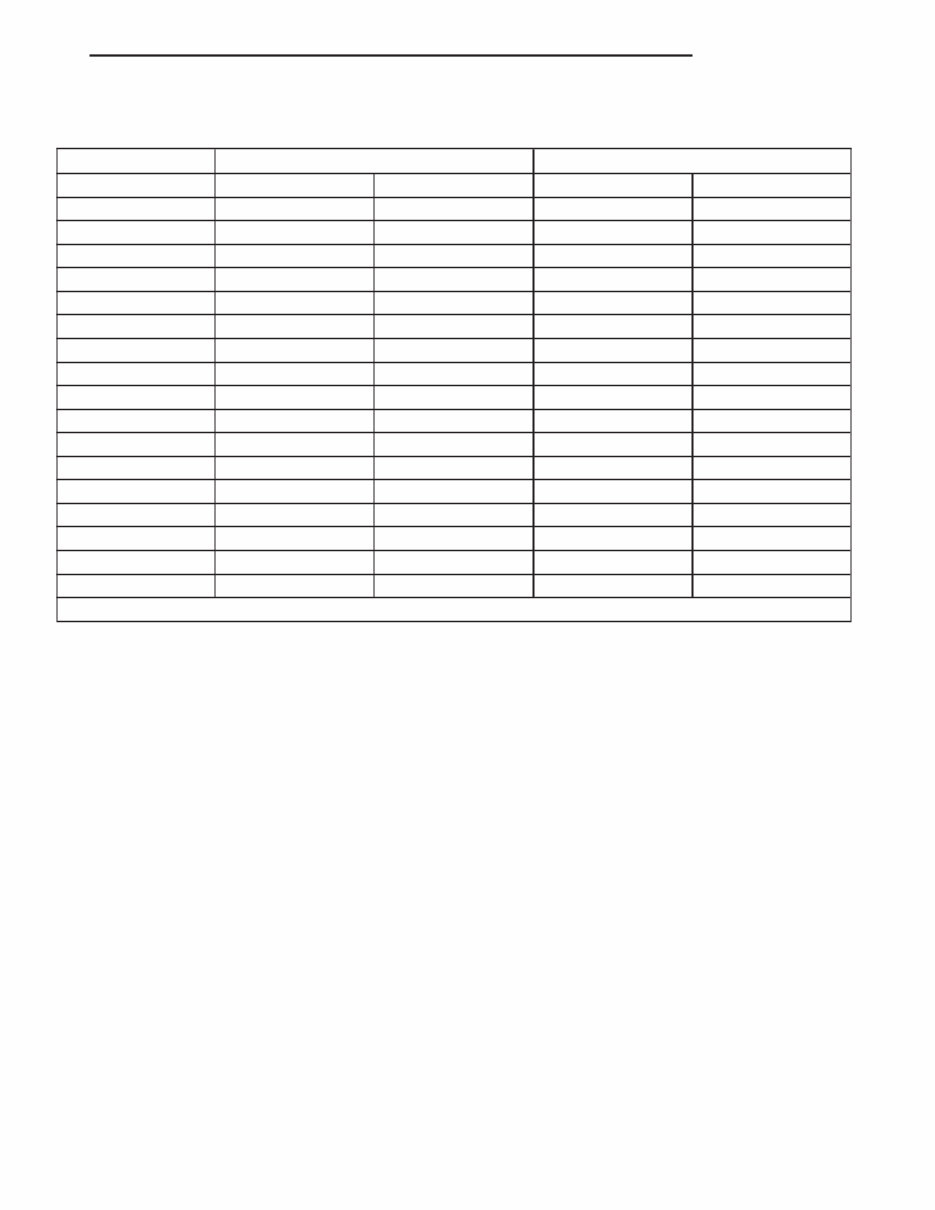
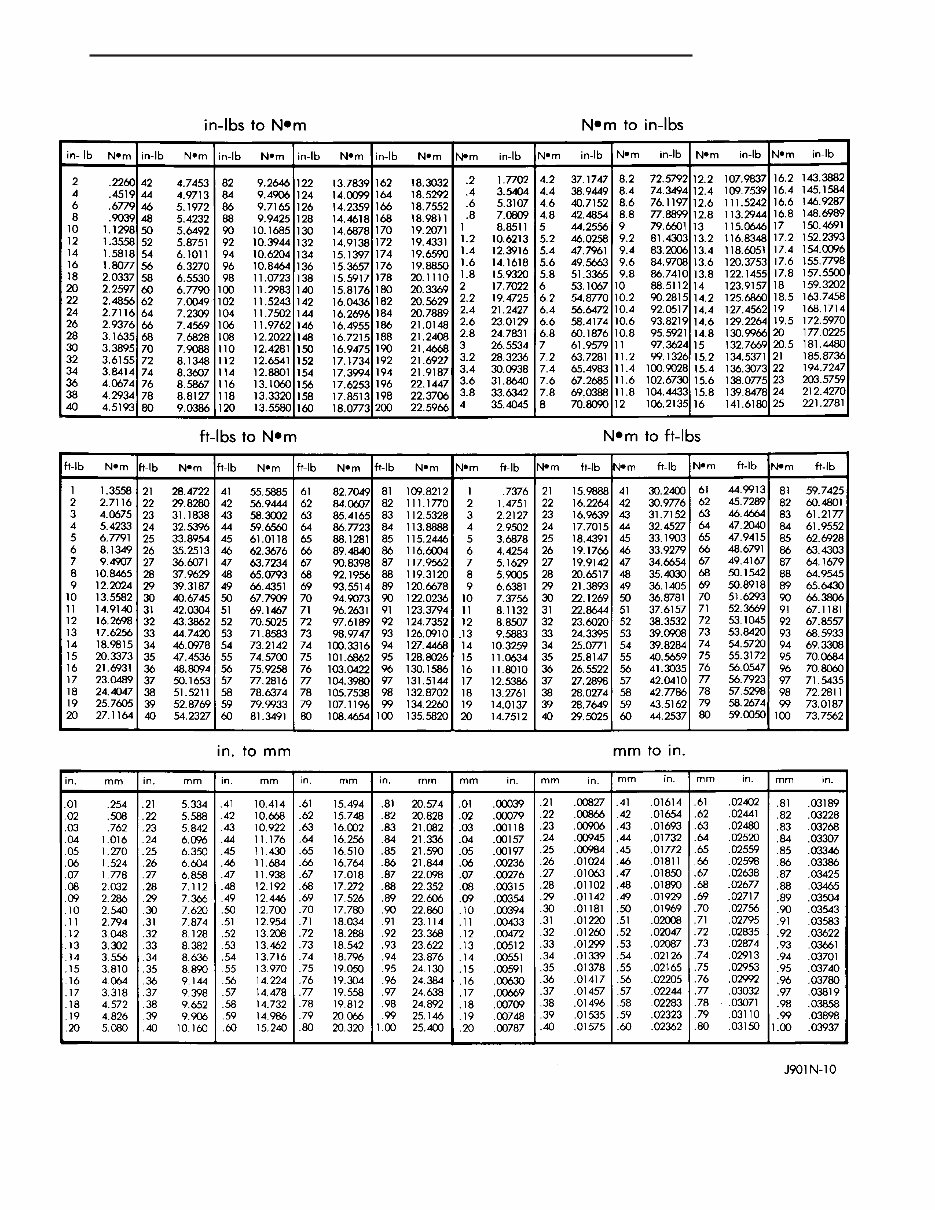
CONVERSION FORMULAS AND EQUIVALENT VALUES MULTIPLY BY TO GET MULTIPLY BY TO GET in-lbs x 0.11298 = Newton Meters (N·m) N·m x 8.851 = in-lbs ft-lbs x 1.3558 = Newton Meters (N·m) N·m x 0.7376 = ft-lbs Inches Hg (60° F) x 3.377 = Kilopascals (kPa) kPa x 0.2961 = Inches Hg psi x 6.895 = Kilopascals (kPa) kPa x 0.145 = psi Inches x 25.4 = Millimeters (mm) mm x 0.03937 = Inches Feet x 0.3048 = Meters (M) M x 3.281 = Feet Yards x 0.9144 = Meters M x 1.0936 = Yards mph x 1.6093 = Kilometers/Hr. (Km/h) Km/h x 0.6214 = mph Feet/Sec x 0.3048 = Meters/Sec (M/S) M/S x 3.281 = Feet/Sec mph x 0.4470 = Meters/Sec (M/S) M/S x 2.237 = mph Kilometers/Hr. (Km/h) x 0.27778 = Meters/Sec (M/S) M/S x 3.600 Kilometers/Hr. (Km/h) COMMON METRIC EQUIVALENTS 1 inch = 25 Millimeters 1 Cubic Inch = 16 Cubic Centimeters 1 Foot = 0.3 Meter 1 Cubic Foot = 0.03 Cubic Meter 1 Yard = 0.9 Meter 1 Cubic Yard = 0.8 Cubic Meter 1 Mile = 1.6 Kilometers Refer to the Metric Conversion Chartto convert torque values listed in metric Newton- meters (N·m). Also, use the chartto convert between millimeters (mm) and inches (in.)(Fig.3). 6 INTRODUCTION CS METRIC SYSTEM (Continued)
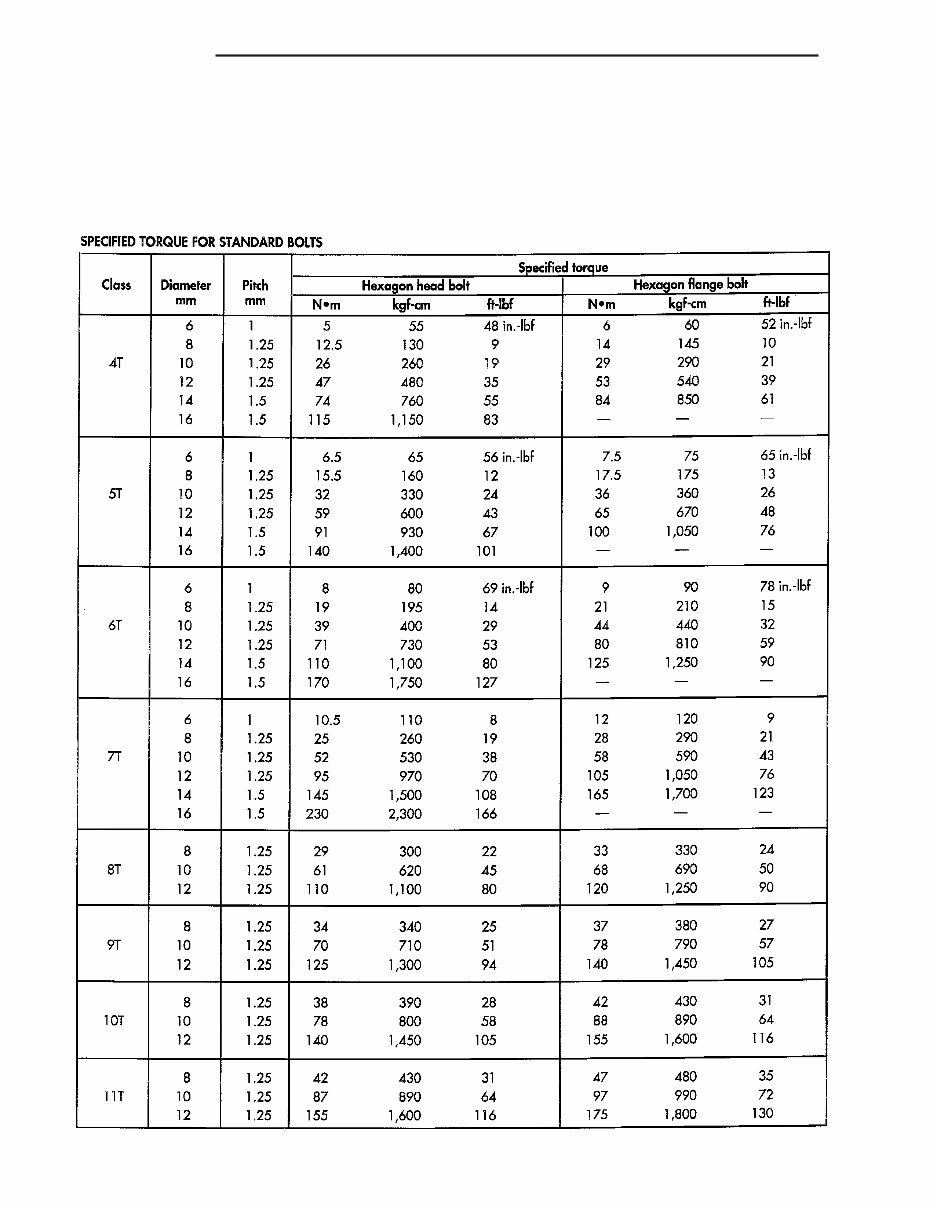
TORQUE REFERENCES DESCRIPTION Individual T orque Charts appear within many or the Groups. Refer to the Standard T orque Specifica- tions Chart for torque references not listed in the individual torque charts (Fig.4). Fig. 4 TORQUE SPECIFICATIONS 8 INTRODUCTION CS
Get your hands on the 2006 Chrysler Pacifica Service & Repair Manual, your reliable resource for diagnosing, maintaining, and repairing your vehicle. Whether you are a professional mechanic or a DIY enthusiast, this manual offers comprehensive, step-by-step instructions and detailed procedures to help you overcome car repair challenges with ease.
Enjoy email customer support while relying on this manual to guide you in correctly fixing your car on the first attempt. It covers a wide range of topics, including:
Maintenance and routine servicing
Engine operation and performance
Control and electrical systems
Mechanical repairs
Fuel service specifications and emission control
Designed for hassle-free repairs, the manual features:
Complete step-by-step instructions
Diagrams, illustrations, and wiring schematics
Hundreds of photos covering repairs from A-Z
Comprehensive technical data including a complete list of car parts
Compatible with all versions of Windows and Mac, this user-friendly manual is fully printable, allowing you to print pages and diagrams for easy reference in your workshop or on the go.
Gain the confidence and satisfaction of completing your own repair projects and maintain your 2006 Chrysler Pacifica with expert tips on:
Steering column and power steering
Air conditioning and brake control systems
Electrical systems and more
Equip yourself with the necessary information and enjoy the convenience of having detailed car repair instructions at your fingertips. Say goodbye to flipping through multiple resources, and rely on this comprehensive repair manual for all your vehicle service needs.
Why wait? Take control of your vehicle’s maintenance and repair tasks with the 2006 Chrysler Pacifica Service & Repair Manual, and experience the ease and satisfaction of handling repairs on your own terms.