GROUP TAB LOCATOR Introduction 0 Lubrication & Maintenance 2 Suspension 3 Differential & Driveline 5 Brakes 7 Cooling 8A Audio/Video 8B Chime/Buzzer 8C Clock 8E Electronic Control Modules 8F Engine Systems 8G Heated Systems 8H Horn 8I Ignition Control 8J Instrument Cluster 8L Lamps 8M Message Systems 8N Power Systems 8O Restraints 8P Speed Control 8Q Vehicle Theft Security 8R Wipers/Washers 8T Navigation/Telecommunication 8W Wiring 9 Engine 11 Exhaust System 13 Frame & Bumpers 14 Fuel System 19 Steering 21 Automatic Transmission 22 Tires/Wheels 23 Body 24 Heating & Air Conditioning 25 Emissions Control Component and System Index DTC Index Service Manual Comment Forms (Rear of Manual)
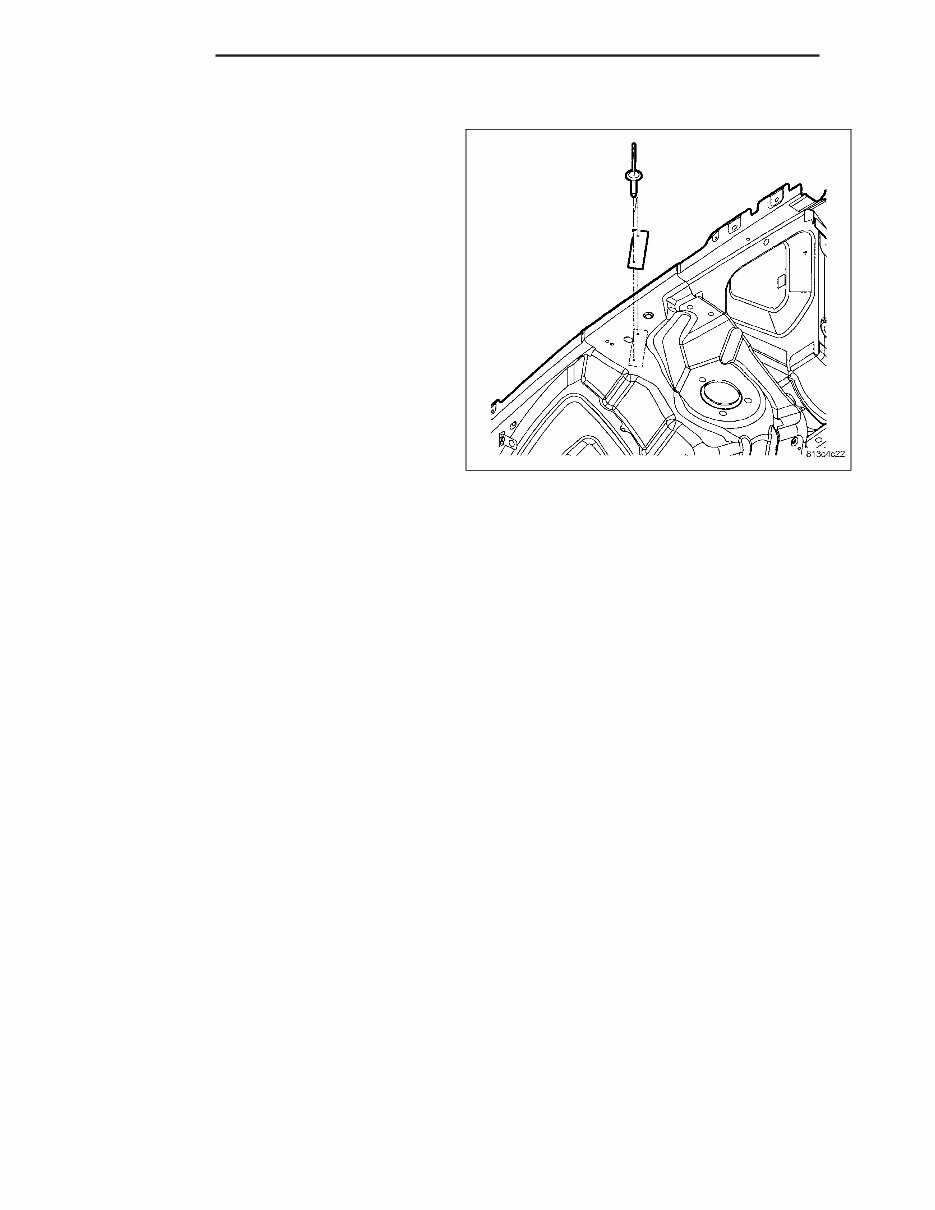
INTRODUCTION TABLE OF CONTENTS page page BODY CODE PLATE DESCRIPTION .......................... 1 FASTENER IDENTIFICATION DESCRIPTION .......................... 5 FASTENER USAGE DESCRIPTION FASTENER USAGE ..................... 8 THREADED HOLE REPAIR ............... 8 INTERNATIONAL SYMBOLS DESCRIPTION .......................... 8 MANUFACTURE PLATE DESCRIPTION .......................... 9 METRIC SYSTEM DESCRIPTION ......................... 10 TORQUE REFERENCES DESCRIPTION ......................... 12 VECI LABEL DESCRIPTION ......................... 13 VEHICLE IDENTIFICATION NUMBER DESCRIPTION ......................... 13 VEHICLE CERTIFICATION LABEL DESCRIPTION ......................... 15 BODY CODE PLATE DESCRIPTION LOCATION AND DECODING The Body Code Plate is located in the engine compartment on the front right side shock tower mounting front panel. LX INTRODUCTION 1
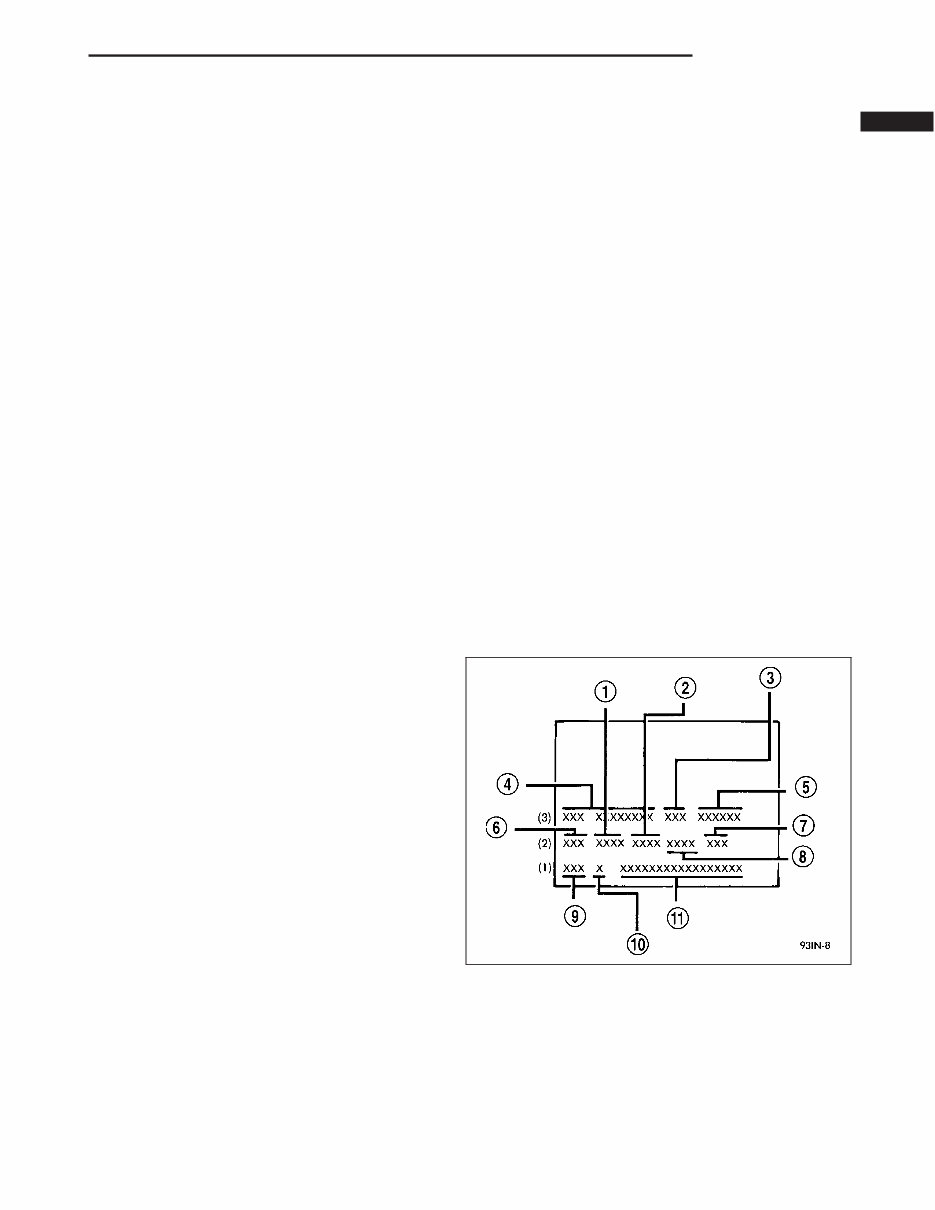
BODY CODE PLATE LINE 3 There are seven lines of information on the body code plate. Lines 4, 5, 6, and 7 are not used to define ser- vice information. Information reads from left to right, starting with line 3 in the center of the plate to line 1 at the bottom of the plate. DIGITS 1, 2, AND 3 Paint procedure DIGIT 4 Open Space DIGITS 5 THROUGH 7 Primary Paint DIGIT 8 AND 9 Open Space DIGITS 10 THROUGH 12 Secondary Paint DIGIT 13 AND 14 Open Space DIGITS 15 THROUGH 18 Interior Trim Code DIGIT 19 Open Space DIGITS 20, 21, AND 22 Engine Code • EER = 2.7 L, Six Cylinder, 24 Valve, DOHC, Gasoline, Aluminum Block (MPI) • EGG = 3.5 L, Six Cylinder, 24 Valve, SOHC, High Output, Gasoline, Aluminum Block (MPI) • EZB = 5.7 L, V-8 Cylinder, HEMI, Multi-Displacement, Gasoline, DIGIT 23 Open Space 2 INTRODUCTION LX
BODY CODE PLATE – LINE 2 DIGITS 1 THROUGH 12 Vehicle Order Number DIGITS 13, THROUGH 15 Vinyl Roof Code DIGITS 16 AND 17 Open space DIGITS 18 AND 19 Vehicle Shell Line • LX DIGITS 20 Carline • C = Chrysler • D = Dodge DIGIT 21 Price Class • E = Economy • H = High Line • L = Low Line • M = Medium • P = Premium • S = Sport • X = Special DIGITS 22 AND 23 Body Type • 48 = Four Door Sedan Tall • 49 =Hatchback Tall LX INTRODUCTION 3
BODY CODE PLATE LINE 1 DIGITS 1, 2, AND 3 Transaxle Codes • DG6 = 4-Speed Electronic Automatic Transaxle • DGJ = 5-Speed Automatic Transaxle DIGIT 4 Open Space DIGIT 5 Market Code • C = Canada • B = International • M = Mexico • U = United States DIGIT 6 Open Space DIGITS 7 THROUGH 23 Vehicle Identification Number • (Refer to VEHICLE DATA/VEHICLE INFORMATION/VEHICLE IDENTIFICATION NUMBER - DESCRIPTION) for proper breakdown of VIN code. IF TWO BODY CODE PLATES ARE REQUIRED The last code shown on either plate will be followed by END. When two plates are required, the last code space on the first plate will indicate (CTD) When a second plate is required, the first four spaces of each line will not be used due to overlap of the plates. 4 INTRODUCTION LX
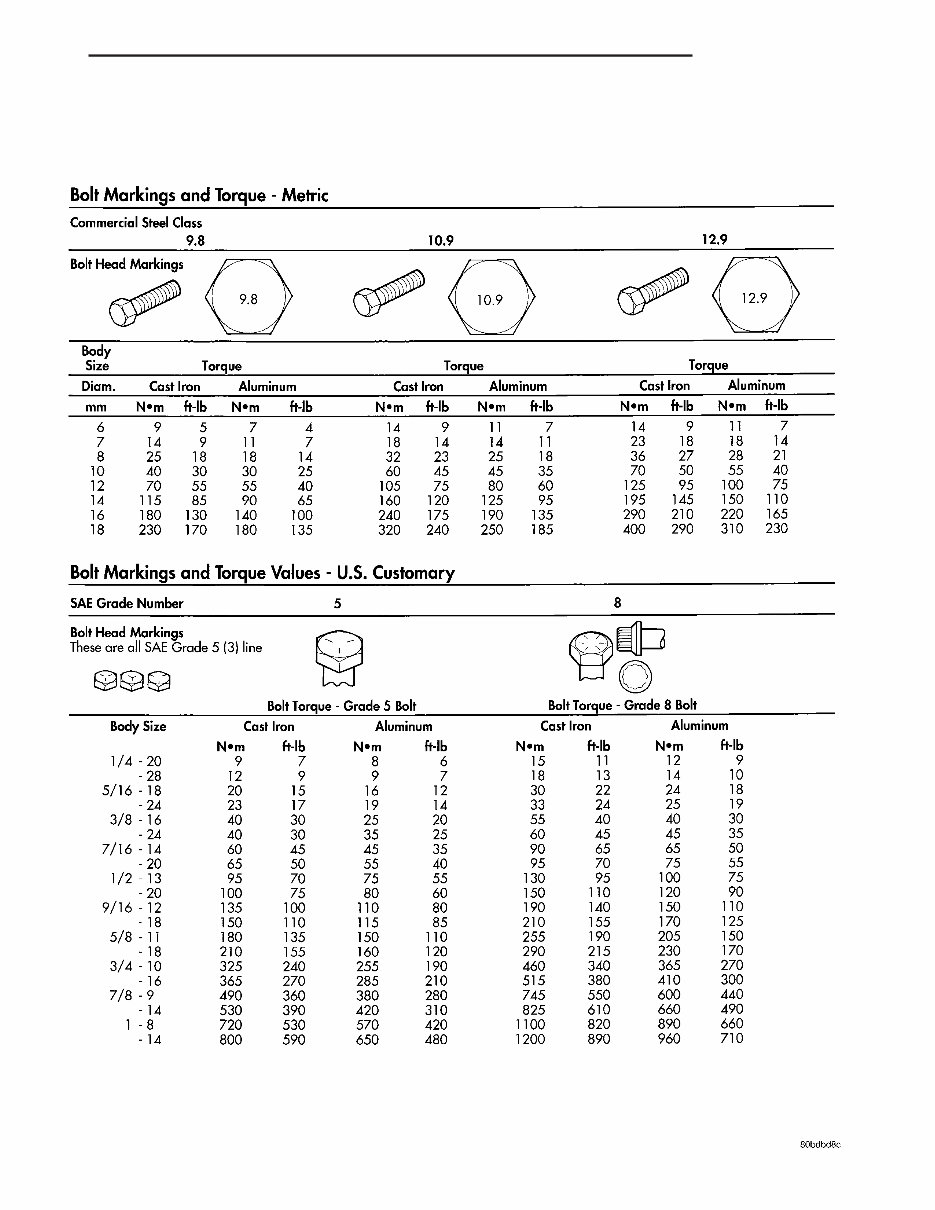
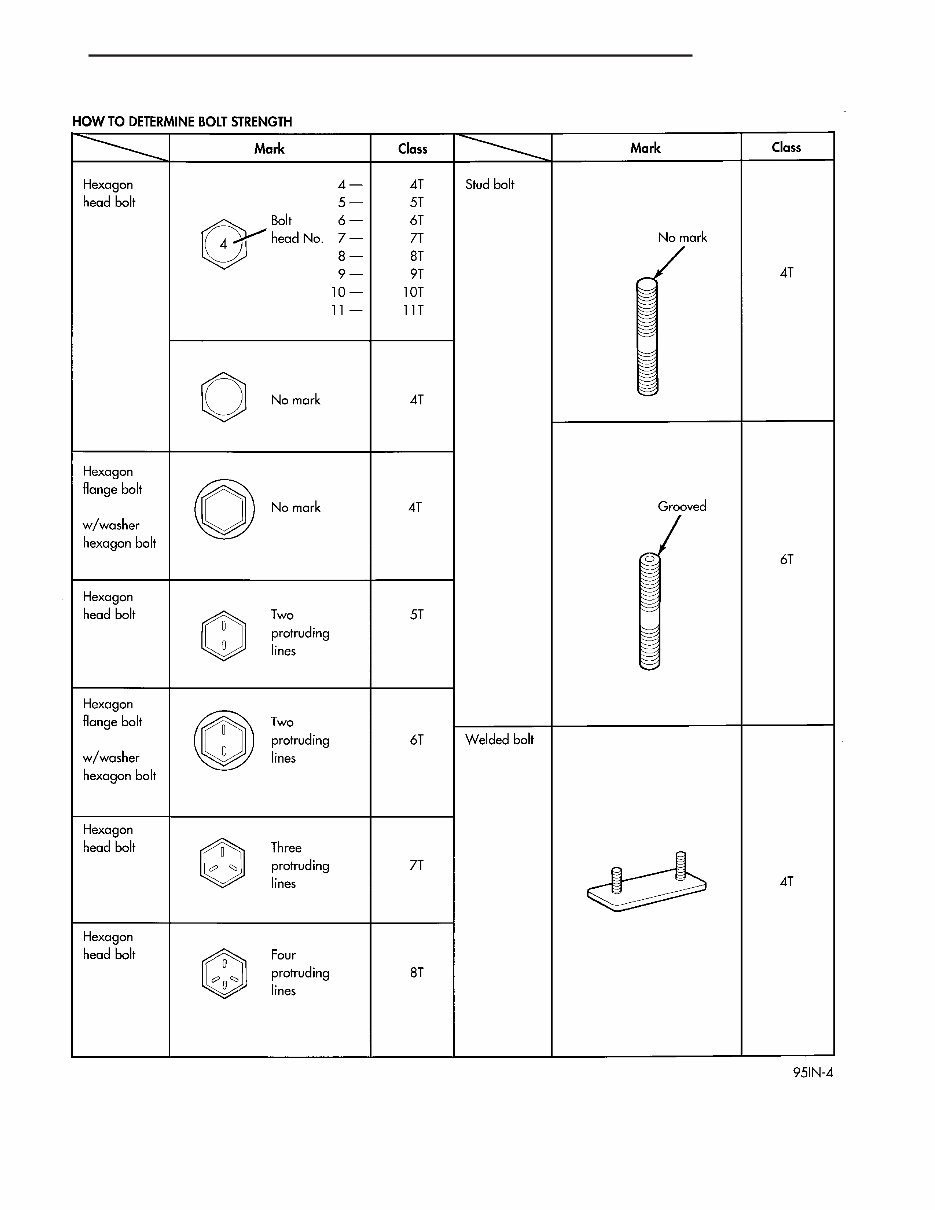
The SAE bolt strength grades range from grade 2 to grade 8. The higher the grade number, the greater the bolt strength. Identification is determined by the line marks on the top of each bolt head. The actual bolt strength grade corresponds to the number of line marks plus 2. The most commonly used metric bolt strength classes are 9.8 and 10.9. The metric strength class identification number is imprinted on the head of the bolt. The higher the class number, the greater the bolt strength. Some metric nuts are imprinted with a single-digit strength class on the nut face. Refer to the Fastener Identification and Fastener Strength Charts. 6 INTRODUCTION LX
LX INTRODUCTION 7
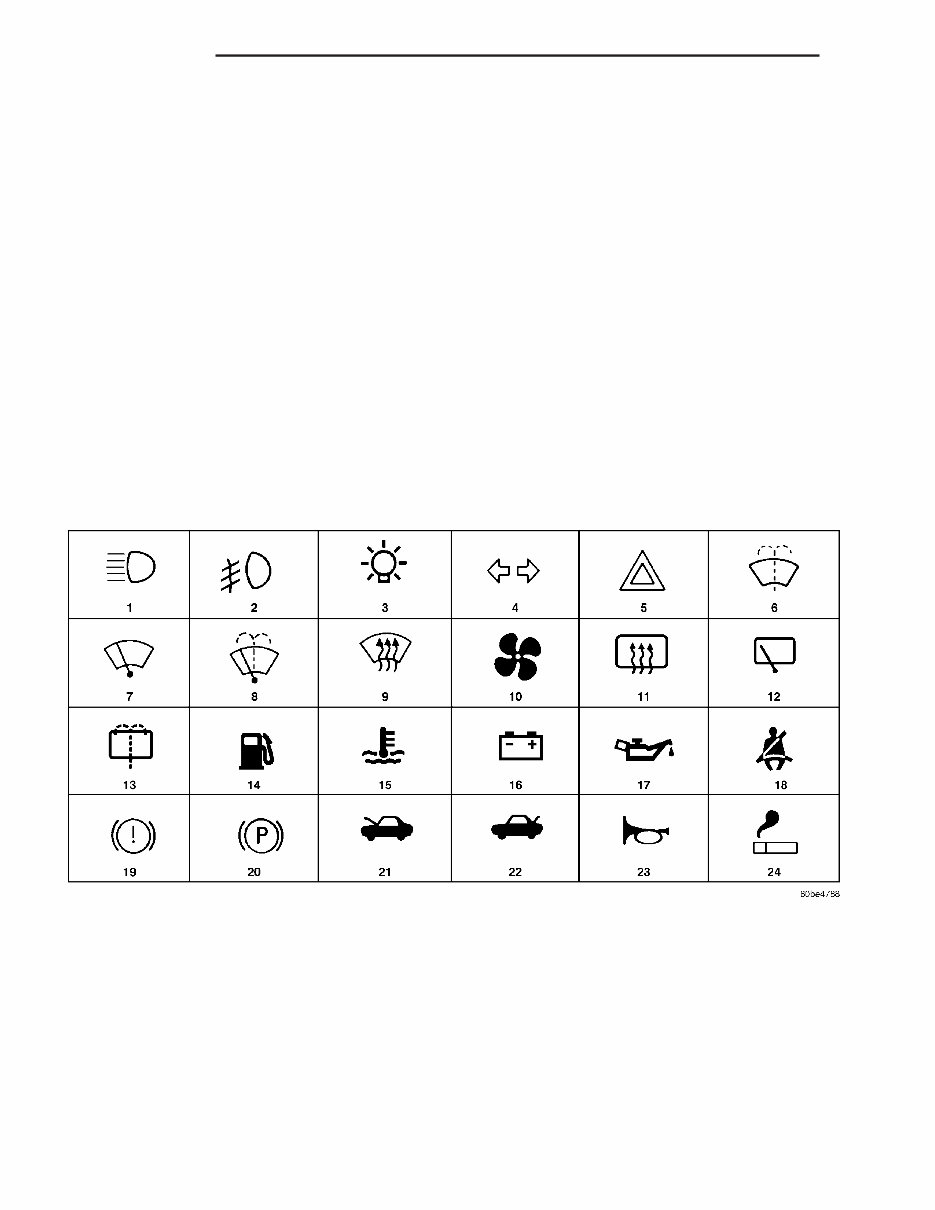
FASTENER USAGE DESCRIPTION FASTENER USAGE WARNING: USE OF AN INCORRECT FASTENER MAY RESULT IN COMPONENT DAMAGE OR PERSONAL INJURY. Fasteners and torque specifications references in this Service Manual are identified in metric and SAE format. During any maintenance or repair procedures, it is important to salvage all fasteners (nuts, bolts, etc.) for reassem- bly. If the fastener is not salvageable, a fastener of equivalent specification must be used. THREADED HOLE REPAIR Most stripped threaded holes can be repaired using a HelicoilT. Follow the vehicle or HelicoilT recommendations for application and repair procedures. INTERNATIONAL SYMBOLS DESCRIPTION The graphic symbols illustrated in the following International Control and Display Symbols Chart are used to identify various instrument controls. The symbols correspond to the controls and displays that are located on the instrument panel. 8 INTRODUCTION LX
You're Reading a Preview
What's Included?
Lifetime Access
Fast Download Speeds
Online & Offline Access
Access PDF Contents & Bookmarks
Full Search Facility
Print one or all pages of your manual
$31.99
2006-2007 Chrysler 300 300C Service & Repair Manual
The Chrysler 300 300C 2006 2007 Workshop Repair Service Manual is the ultimate guide for all owners of these Chrysler models. Whether you are a professional mechanic or a DIY enthusiast, this comprehensive manual is essential for maintaining, repairing, and servicing your vehicle.
With detailed step-by-step instructions and diagrams, this manual covers everything you need to know about the Chrysler 300 and 300C models from 2006 to 2007. From basic maintenance procedures to complex repairs, this manual provides the information and guidance you need to keep your vehicle in top-notch condition.
Key features of the Chrysler 300 300C 2006 2007 Workshop Repair Service Manual:
Easy-to-follow instructions for various maintenance tasks
Comprehensive diagrams and illustrations for better understanding
Detailed troubleshooting guides for identifying and resolving issues
Step-by-step procedures for engine, transmission, electrical, and mechanical repairs
Information on specifications, tightening torques, and fluid capacities
Wiring diagrams for convenient electrical repairs
Essential safety precautions to ensure your well-being while working on the vehicle
No matter if you need to change the oil, replace a faulty component, or perform a major overhaul, the Chrysler 300 300C 2006 2007 Workshop Repair Service Manual has got you covered. Save time and money by having all the necessary information at your fingertips.
Invest in this manual today and take control of your Chrysler 300 or 300C's maintenance and repair needs. Don't let unexpected issues leave you stranded when you have the power to fix them yourself. Order your copy now and become a confident and skilled Chrysler owner!
Reviews
Q&A
Recently Viewed
5,521,897Happy Clients
2,594,462eManuals
1,120,453Trusted Sellers
15Years in Business
Price:
Actual Price:
2006-2007 Chrysler 300 300C Service & Repair Manual






 Lifetime Access




