2009 Chevrolet Traverse Service & Repair Manual Software
What's Included?
Lifetime Access
Fast Download Speeds
Offline Viewing
Access Contents & Bookmarks
Full Search Facility
Print one or all pages of your manual
2009 ACCESSORIES & EQUIPMENT Bolted Exterior Body Panels and Closures - Acadia, Enclave, Outlook & Traverse SPECIFICATIONS FASTENER TIGHTENING SPECIFICATIONS REPAIR INSTRUCTIONS FRONT END UPPER TIE BAR SUPPORT REPLACEMENT Application Specification Metric English Fuel Filler Door Bolts 2.5 N.m 22 lb in Front Door Check Link Bolts 10 N.m 89 lb in Front Door Check Link to Body 20 N.m 15 lb ft Front Door Hinge To Body Bolts 36 N.m 27 lb ft Front Door Hinge To Door Bolts 25 N.m 18 lb ft Front Fender Bolts 9 N.m 80 lb in Front Outer Door Panel Bolts 8 N.m 71 lb in Hood Hinge Bolts 25 N.m 18 lb ft Hood Latch Bolts 10 N.m 89 lb in Liftgate Hinge Bolts 25 N.m 18 lb ft Liftgate Hinge Nuts 25 N.m 18 lb ft Liftgate Strut Anchor 25 N.m 18 lb ft Quarter Panel Bolts 9 N.m 80 lb in Quarter Panel Nuts 9 N.m 80 lb in Rear Door Check Link Bolts 10 N.m 89 lb in Rear Door Check Link to Body Bolt 20 N.m 15 lb ft Rear Door Hinge To Body Bolts 36 N.m 27 lb ft Rear Door Hinge To Door Bolts 25 N.m 18 lb ft Rear Outer Door Panel Bolts 8 N.m 71 lb in Hood Latch Release Cable Bolt 9 N.m 80 lb in Fuel Tank Filler Door Bolt 2.5 N.m 22 lb in Hood Latch Release Handle Screw 10 N.m 89 lb in 2009 Chevrolet Traverse LS 2009 ACCESSORIES & EQUIPMENT Bolted Exterior Body Panels and Closures - Acadia, Enclave, Outlook & Traverse 2009 Chevrolet Traverse LS 2009 ACCESSORIES & EQUIPMENT Bolted Exterior Body Panels and Closures - Acadia, Enclave, Outlook & Traverse
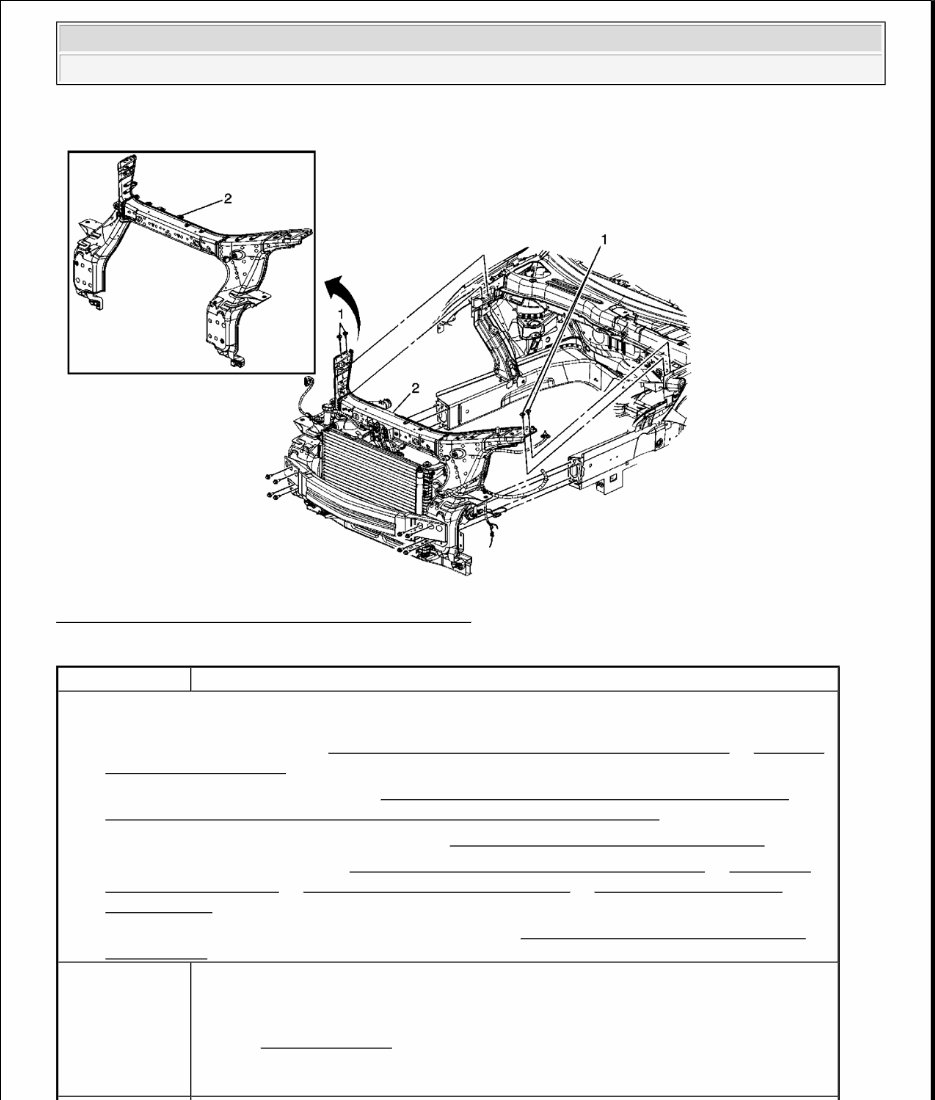
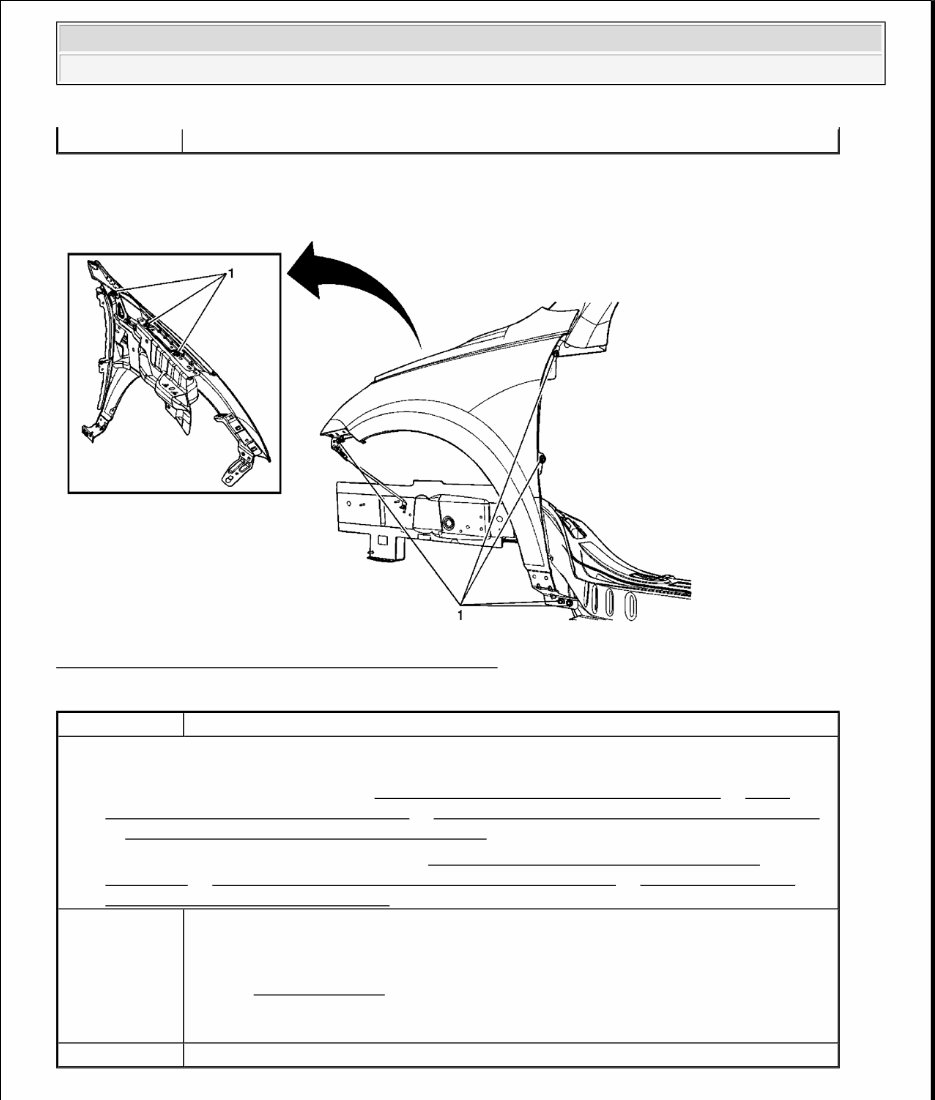
Fig. 1: Identifying Front End Upper Tie Bar Support Courtesy of GENERAL MOTORS CORP. Callout Component Name Preliminary Procedures 1. Remove the radiator. Refer to Radiator Replacement (Acadia, Outlook, Traverse) or Radiator Replacement (Enclave) . 2. Remove the A/C condenser. Refer to Air Conditioning Condenser Replacement (Enclave) or Air Conditioning Condenser Replacement (Acadia, Outlook, Traverse) . 3. Remove the front bumper impact bar. Refer to Front Bumper Impact Bar Replacement . 4. Remove the headlamps. Refer to Headlamp Replacement (Traverse with TVP) or Headlamp Replacement (Acadia) or Headlamp Replacement (Enclave) or Headlamp Replacement (OUTLOOK) . 5. Remove the hood primary and secondary latch. Refer to Hood Primary and Secondary Latch Replacement . 1 Front End Upper Tie Bar Support Bolts (Qty: 4) Tighten: 9 N.m (80 lb in) CAUTION: Refer to Fastener Caution . 2009 Chevrolet Traverse LS 2009 ACCESSORIES & EQUIPMENT Bolted Exterior Body Panels and Closures - Acadia, Enclave, Outlook & Traverse
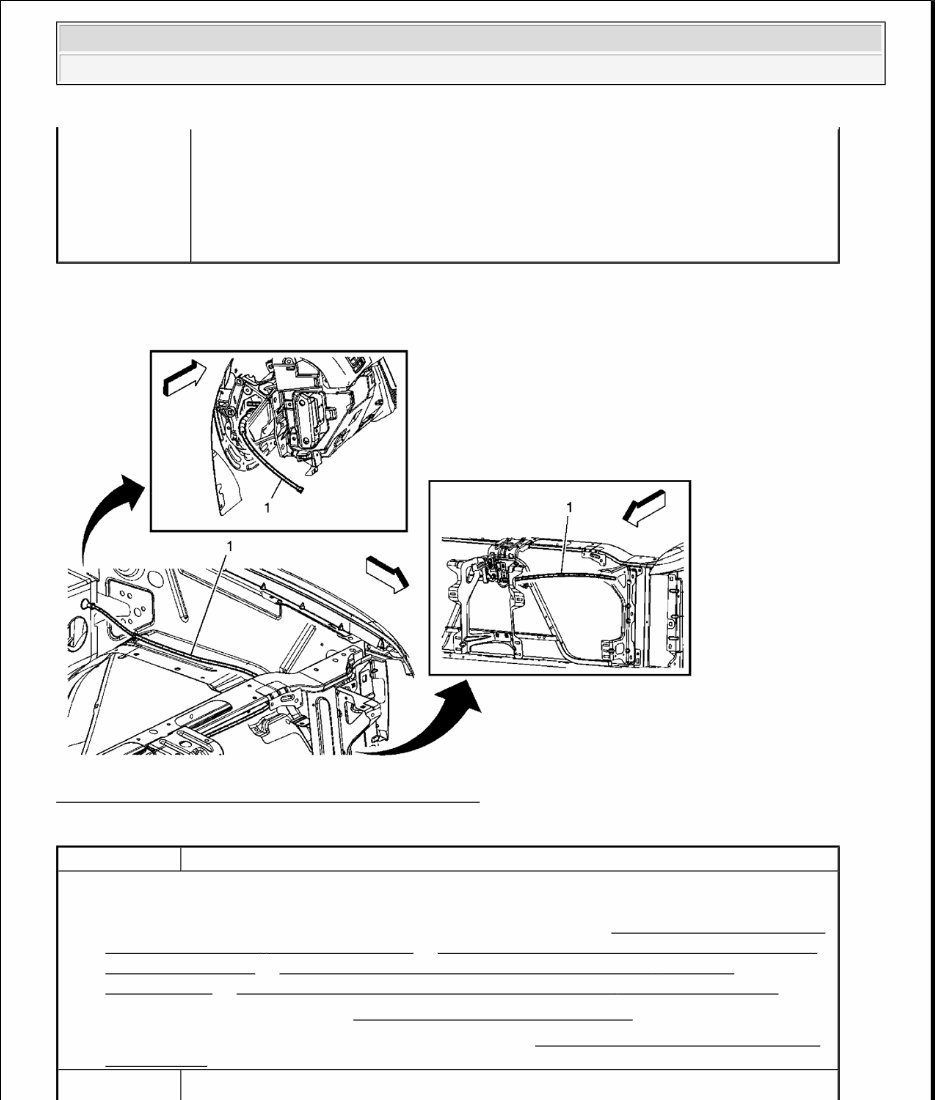
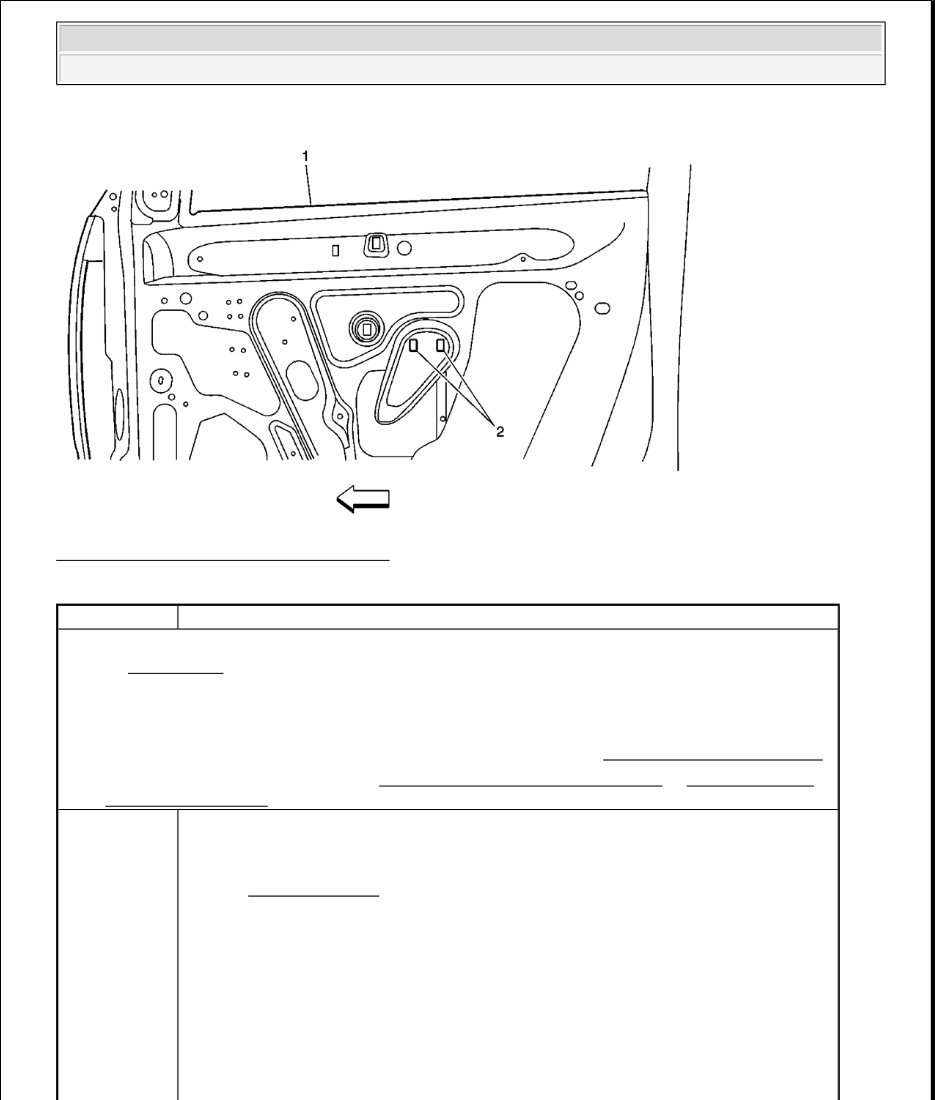
HOOD PRIMARY LATCH RELEASE CABLE REPLACEMENT Fig. 2: Identifying Hood Primary Latch Release Cable Courtesy of GENERAL MOTORS CORP. 2 Front End Upper Tie Bar Support Procedure 1. Disconnect the electrical connectors/harnesses as needed. 2. Transfer any parts as needed. Callout Component Name Preliminary Procedures 1. Remove the Instrument Panel Insulator Panel Replacement. Refer to Instrument Panel Insulator Panel Replacement - Left Side (Acadia) or Instrument Panel Insulator Panel Replacement - Left Side (Enclave) or Instrument Panel Insulator Panel Replacement - Left Side (OUTLOOK) or Instrument Panel Insulator Panel Replacement - Left Side (Traverse) 2. Remove the Air cleaner. Refer to Air Cleaner Assembly Replacement . 3. Remove the Hood Primary and Secondary Latch. Refer to Hood Primary and Secondary Latch Replacement Hood Latch Release Cable 2009 Chevrolet Traverse LS 2009 ACCESSORIES & EQUIPMENT Bolted Exterior Body Panels and Closures - Acadia, Enclave, Outlook & Traverse
FRONT SIDE DOOR REPLACEMENT (LEFT) 1 Procedure 1. Attach mechanic's wire to the existing cable at the latch side to ease installation of the new cab 2. Remove cable by pulling through the dash panel from inside the vehicle. 2009 Chevrolet Traverse LS 2009 ACCESSORIES & EQUIPMENT Bolted Exterior Body Panels and Closures - Acadia, Enclave, Outlook & Traverse
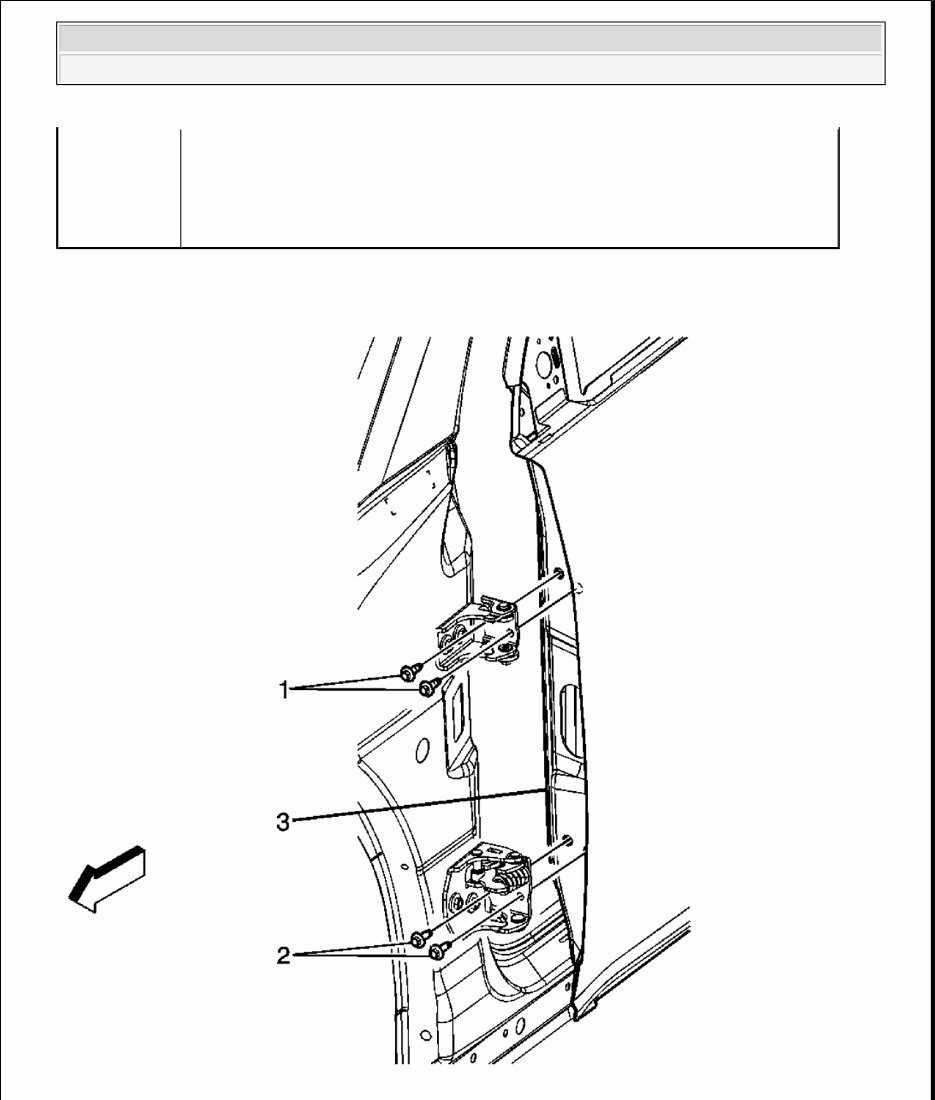
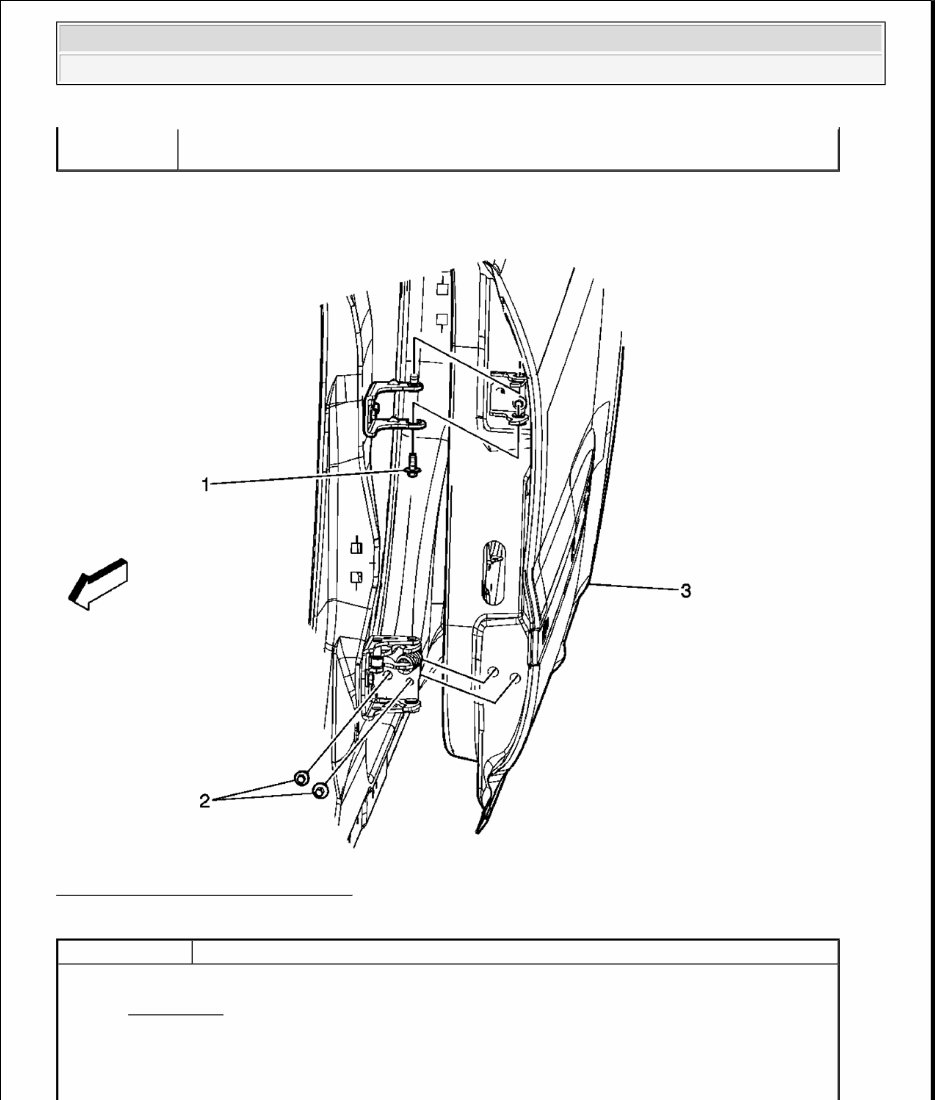
Fig. 3: View Of Door Plate Retaining Bolts Courtesy of GENERAL MOTORS CORP. FRONT SIDE DOOR REPLACEMENT (RIGHT) Callout Component Name Preliminary Procedures 1. Disable the supplemental inflatable restraint (SIR) system. Refer to SIR Disabling and Enabling . 2. Remove the front door trim panel. Refer to Front Side Door Trim Panel Replacement - Left Side (Traverse) or Front Side Door Trim Panel Replacement - Left Side (Acadia) or Front Side Door Trim Panel Replacement - Left Side (Enclave) or Front Side Door Trim Panel Replacement - Left Side (OUTLOOK) . WARNING: Refer to SIR Warning . 1 Front Side Door Upper Hinge Bolt (Qty: 2) Procedure 1. Remove the water deflector. 2. Support the door before removing the hinge bolts. 3. Disconnect the electrical connector, if equipped. 4. With the aid of an assistant, remove the door. Tighten: 8 N.m (71 lb in). CAUTION: Refer to Fastener Caution . 2 Front Side Door Lower Hinge Bolt (Qty: 2) Tighten: 8 N.m (71 lb in). 3 Front Side Door Assembly Procedure 1. When replacing the door it is necessary to transfer all of the internal components. 2. Apply LOCTITE® Blue GM P/N 12345382, or (Canadian P/N 10953489), or equivalent to the fastener prior to installation. 2009 Chevrolet Traverse LS 2009 ACCESSORIES & EQUIPMENT Bolted Exterior Body Panels and Closures - Acadia, Enclave, Outlook & Traverse
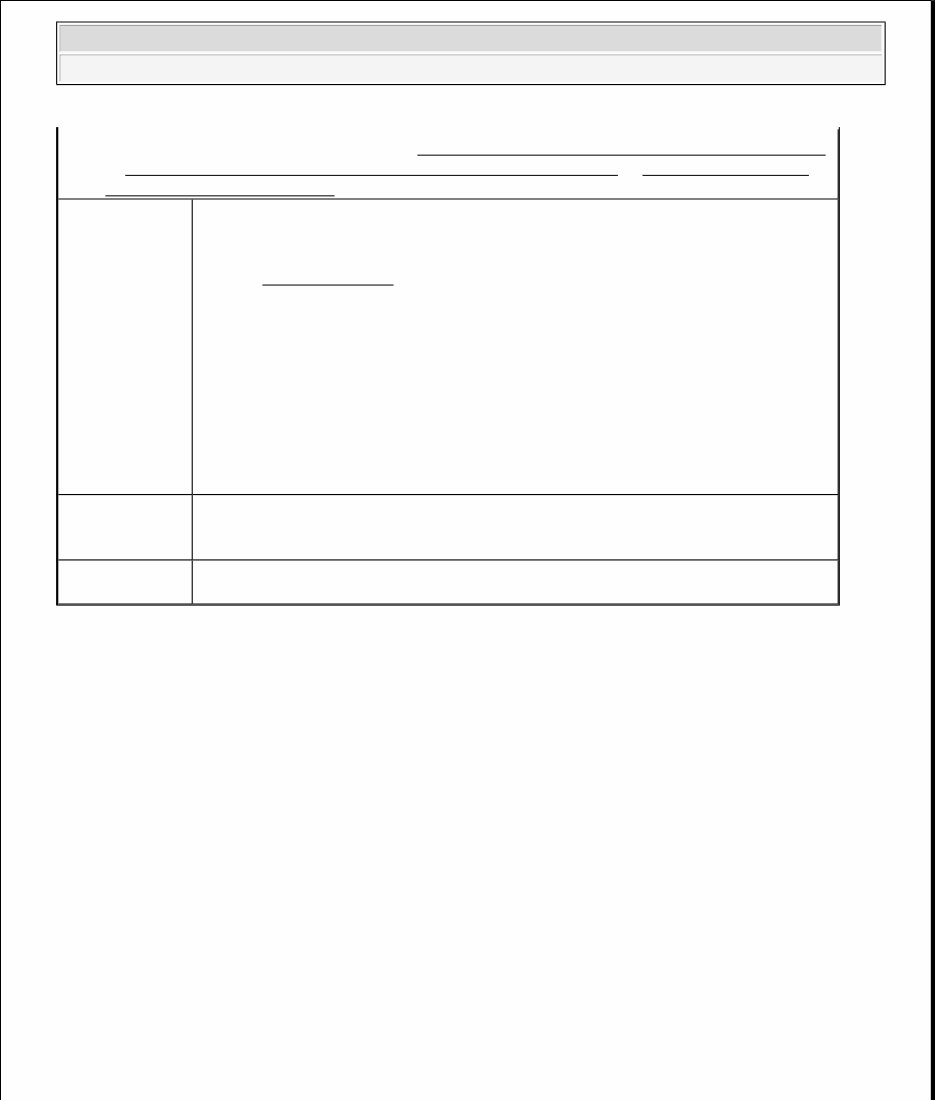
Fig. 4: Identifying Front Side Door (Right) Courtesy of GENERAL MOTORS CORP. Callout Component Name Preliminary Procedures 1. Disable the supplemental inflatable restraint (SIR) system. Refer to SIR Disabling and Enabling . 2. Remove the front side door. Refer to Front Side Door Replacement (Left) or Front Side Door Replacement (Right) . WARNING: Refer to SIR Warning . 1 Front Side Door Rivnut Screws (Qty: 2) Procedure 1. The Chevrolet Traverse front right side door only, BEFORE transferring all of the internal components to the new door it will be necessary to drill holes for rivnuts. 2. Install the rivnuts do the following: 1. Mark to two locating holes in the inner door panel (1), drill two rivnuts holes (2) 25/64 in (10 mm). 2. Install the two rivnuts (2) 6 mm (1/4 in). CAUTION: Refer to Fastener Caution . 2009 Chevrolet Traverse LS 2009 ACCESSORIES & EQUIPMENT Bolted Exterior Body Panels and Closures - Acadia, Enclave, Outlook & Traverse
REAR SIDE DOOR REPLACEMENT Fig. 5: View Of Rear Side Door Hinge Courtesy of GENERAL MOTORS CORP. Tighten: Tighten the rivnuts to 9 N.m (80 lb in). Callout Component Name Preliminary Procedures 1. Disable the supplemental inflatable restraint (SIR) system. Refer to SIR Disabling and Enabling . WARNING: Refer to SIR Warning . 2009 Chevrolet Traverse LS 2009 ACCESSORIES & EQUIPMENT Bolted Exterior Body Panels and Closures - Acadia, Enclave, Outlook & Traverse
FRONT FENDER REPLACEMENT (ACADIA, ENCLAVE, AND OUTLOOK) 2. Remove the rear door trim panel. Refer to Rear Side Door Trim Panel Replacement (Traverse) or Rear Side Door Trim Panel Replacement (Acadia/OUTLOOK) or Rear Side Door Trim Panel Replacement (Enclave) . 1 Rear Side Door Hinge Bolt (Qty: 2) Procedure 1. Remove the water deflector. 2. Support the door before removing the hinge bolts. 3. Disconnect the electrical connector, if equipped. 4. With the aid of an assistant, remove the door. Tighten: 8 N.m (71 lb in) CAUTION: Refer to Fastener Caution . 2 Rear Side Door Hinge Bolt (Qty: 2) Tighten: 8 N.m (71 lb in) 3 Rear Side Door Assembly Tip: When replacing the door it is necessary to transfer all of the internal components. 2009 Chevrolet Traverse LS 2009 ACCESSORIES & EQUIPMENT Bolted Exterior Body Panels and Closures - Acadia, Enclave, Outlook & Traverse
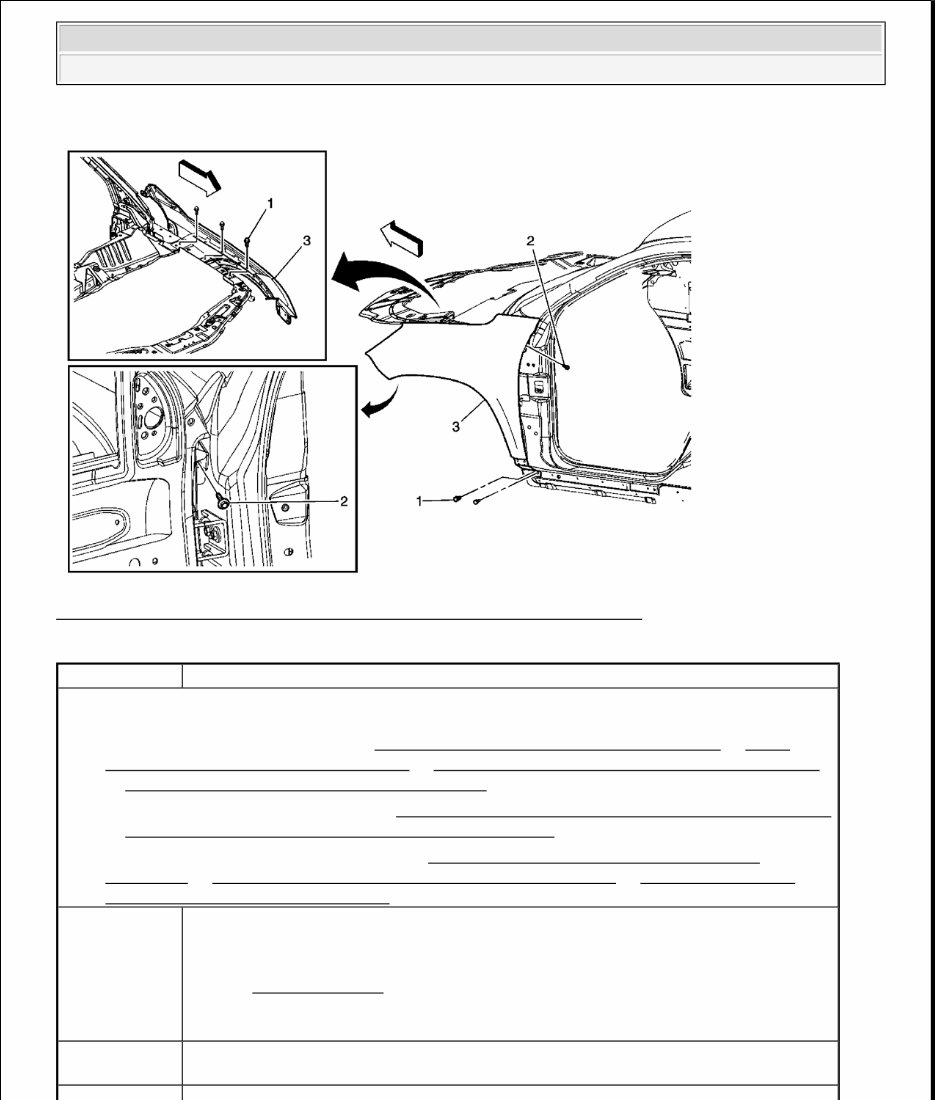
Fig. 6: Identifying Front Fender Components (Acadia, Enclave & Outlook) Courtesy of GENERAL MOTORS CORP. Callout Component Name Preliminary Procedures 1. Remove the bumper fascia. Refer to Front Bumper Fascia Replacement (Acadia) or Front Bumper Fascia Replacement (Enclave) or Front Bumper Fascia Replacement (OUTLOOK) or Front Bumper Fascia Replacement (Traverse) . 2. Remove the wheelhouse liner. Refer to Front Wheelhouse Front Liner Replacement (Traverse) or Front Wheelhouse Front Liner Replacement (Outlook) . 3. Remove the rocker panel molding. Refer to Rocker Panel Front Molding Replacement (Traverse) or Rocker Panel Front Molding Replacement (Acadia) or Rocker Panel Front Molding Replacement (OUTLOOK) . 1 Front Fender Bolt (Qty: 5) Tighten: 3 N.m (25 lb in) CAUTION: Refer to Fastener Caution . 2 Front Fender Bolt Tip: Open the door to access the bolt. 2009 Chevrolet Traverse LS 2009 ACCESSORIES & EQUIPMENT Bolted Exterior Body Panels and Closures - Acadia, Enclave, Outlook & Traverse
FRONT FENDER REPLACEMENT (TRAVERSE) Fig. 7: Identifying Front Fender Components (Traverse) Courtesy of GENERAL MOTORS CORP. 3 Front Fender Callout Component Name Preliminary Procedures 1. Remove the bumper fascia. Refer to Front Bumper Fascia Replacement (Acadia) or Front Bumper Fascia Replacement (Enclave) or Front Bumper Fascia Replacement (OUTLOOK) or Front Bumper Fascia Replacement (Traverse) . 2. Remove the rocker panel molding. Refer to Rocker Panel Front Molding Replacement (Traverse) or Rocker Panel Front Molding Replacement (Acadia) or Rocker Panel Front Molding Replacement (OUTLOOK) . 1 Front Fender Bolt (Qty: 8) Tighten: 3 N.m (25 lb in) CAUTION: Refer to Fastener Caution . 2 Front Fender 2009 Chevrolet Traverse LS 2009 ACCESSORIES & EQUIPMENT Bolted Exterior Body Panels and Closures - Acadia, Enclave, Outlook & Traverse
Discover the comprehensive 2009 Chevrolet Traverse Service & Repair Manual in .OVA file format. This manual equips you with essential information and guidance for servicing and repairing your 2009 Chevrolet Traverse model. Whether you're a professional mechanic or a car enthusiast, this manual is an invaluable resource.
Gain access to detailed step-by-step procedures, diagrams, illustrations, and specifications essential for various maintenance and repair tasks on your Chevrolet Traverse. From routine oil changes to intricate engine repairs, this manual provides comprehensive coverage.
Key features of the 2009 Chevrolet Traverse Service & Repair Manual include:
Extensive coverage of all major vehicle systems and components
Clear and concise instructions for diagnosis, maintenance, and repair
Easy-to-follow diagrams and illustrations for enhanced comprehension
Detailed specifications and torque values for precision
Access to technical service bulletins and recalls for crucial updates
Models covered in this manual:
2009 Chevrolet Traverse LS
2009 Chevrolet Traverse LT
2009 Chevrolet Traverse LTZ
Acquire the 2009 Chevrolet Traverse Service & Repair Manual in .OVA file format today and empower yourself with the knowledge to confidently maintain and repair your vehicle. Rely on the same resource trusted by professionals and take charge of your Chevrolet Traverse's maintenance and repair requirements.
Recently Viewed
5,521,897Happy Clients
2,594,462eManuals
1,120,453Trusted Sellers
15Years in Business
Price:
Actual Price:
2009 Chevrolet Traverse Service & Repair Manual Software