GM – CAMARO 1982-1992 – Repair Guide (Checked by WxMax) 2 This is an essential accessory for do-it-yourself automotive repair. Each vehicle- specific guide includes detailed information and graphics to help you get your car or truck back on the road. Included in most guides: step-by-step instructions with detailed photographs and drawings, wiring diagrams, specification charts and repair tips. 1. Body & Trim 2. Brakes 3. Chassis Electrical 4. Drive Train 5. Engine & Engine Overhaul 6. Engine Controls 7. Engine Performance and Tune-up 8. Fuel System 9. General Information & Maintenance 10. Suspension & Steering Covers all U.S. and Canadian models of GM Camaro 1982-1992.
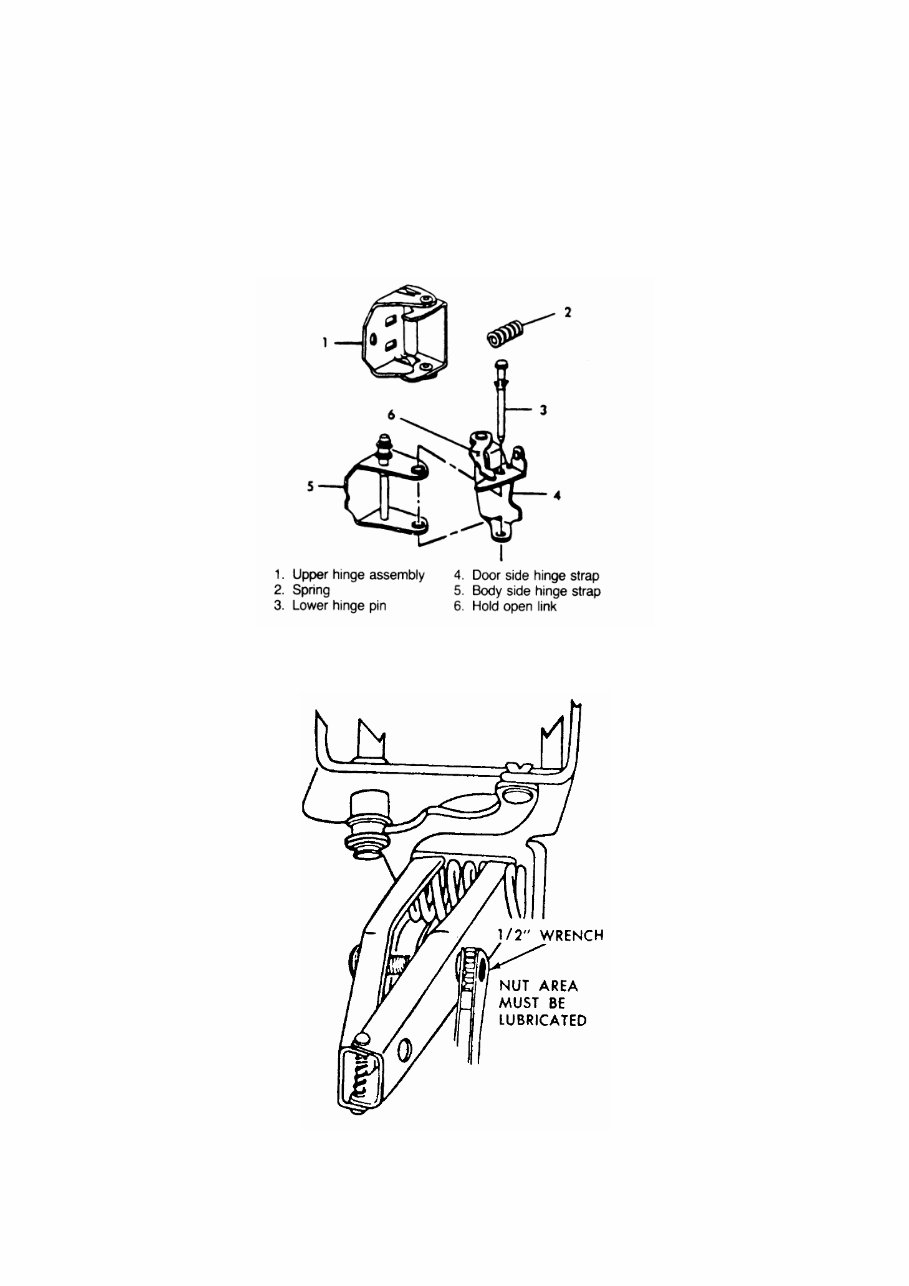
GM – CAMARO 1982-1992 – Repair Guide (Checked by WxMax) 3 BODY & TRIM EXTERIOR DOORS REMOVAL & INSTALLATION Fig. 1: Door hinge Fig. 2: Removing the door hinge spring
GM – CAMARO 1982-1992 – Repair Guide (Checked by WxMax) 4 1. On doors that are equipped with power operated components, do the following: • Remove the door trim panel and inner panel water deflector. • Disconnect the wire harness from all components in the door. • Remove the rubber conduit from the door, then remove the wire harness from the door through the conduit access hole. 2. Tape the area (on the door pillar and body pillar) above the lower hinge with cloth backed body tape. CAUTION - Before performing the following step, cover the spring with a shop cloth or rag to prevent the spring from flying and possibly causing personal injury or damage. 3. Insert a long, flat-blade screwdriver under the pivot point of the hold-open link and over the top of the spring. The screwdriver should be positioned so as not to apply pressure to the hold-open link. Cover the spring with a shop cloth or rag and lift the screwdriver to disengage the spring. The spring can also be removed by using tool J-36604 (or equivalent) door hinge spring compressor tool. The tool is stamped right side and left side. The tool stamped left side is used to service the right-hand hinge spring and vise-a-versa for the tool stamped right side. 4. With the aid of a helper to support the door, remove the lower hinge pin using a soft-headed hammer and locking type pliers. The helper can aid the hinge pin removal by raising and lowering the rear of the door. 5. Insert a bolt into the hole of the lower hinge to maintain the door attachment during upper hinge removal. 6. Using a 13mm socket, remove the upper hinge bolts from the pillar. Remove the bolt from the lower hinge and remove the door from the body. To install: 7. Replace the hinge pin clip. 8. With the aid of a helper, position the door and insert the bolt in the hole of the lower hinge. 9. Bolt the upper hinge to the body. The lower hinge pin is installed with the pointed end down. 10. Remove the screw from the lower hinge and install the lower hinge pin. The use of tool J-36604 or equivalent is recommended for installing the hinge spring. If the spring is installed before installing the lower hinge pin, damage to the hinge bushings may result. 11. If the spring was removed using a screwdriver, install the spring as follows:
GM – CAMARO 1982-1992 – Repair Guide (Checked by WxMax) 5 • Place the spring in tool J-36604 or equivalent. • Place the tool and spring in a bench vise. • Compress the tool in the vise and install the bolt until the spring is fully compressed. • Remove the tool (with the compressed spring) from the vise and install in the proper position in the door lower hinge. A slot in one jaw fits over the hold-open link. The hole on the other jaw fits over the bubble. • Remove the bolt from the tool to install the spring. • Remove the tool from the door hinge (tool will fall out in three pieces). Cycle the door to check the spring operation. 12. Remove the tape from the door and the body pillars. 13. On doors with power operated components: • Install the wire harness to the door through the conduit access hole, then install the rubber conduit to the door. • Connect wire harness to all components in the door. • Install the inner panel water deflector and door trim panel.
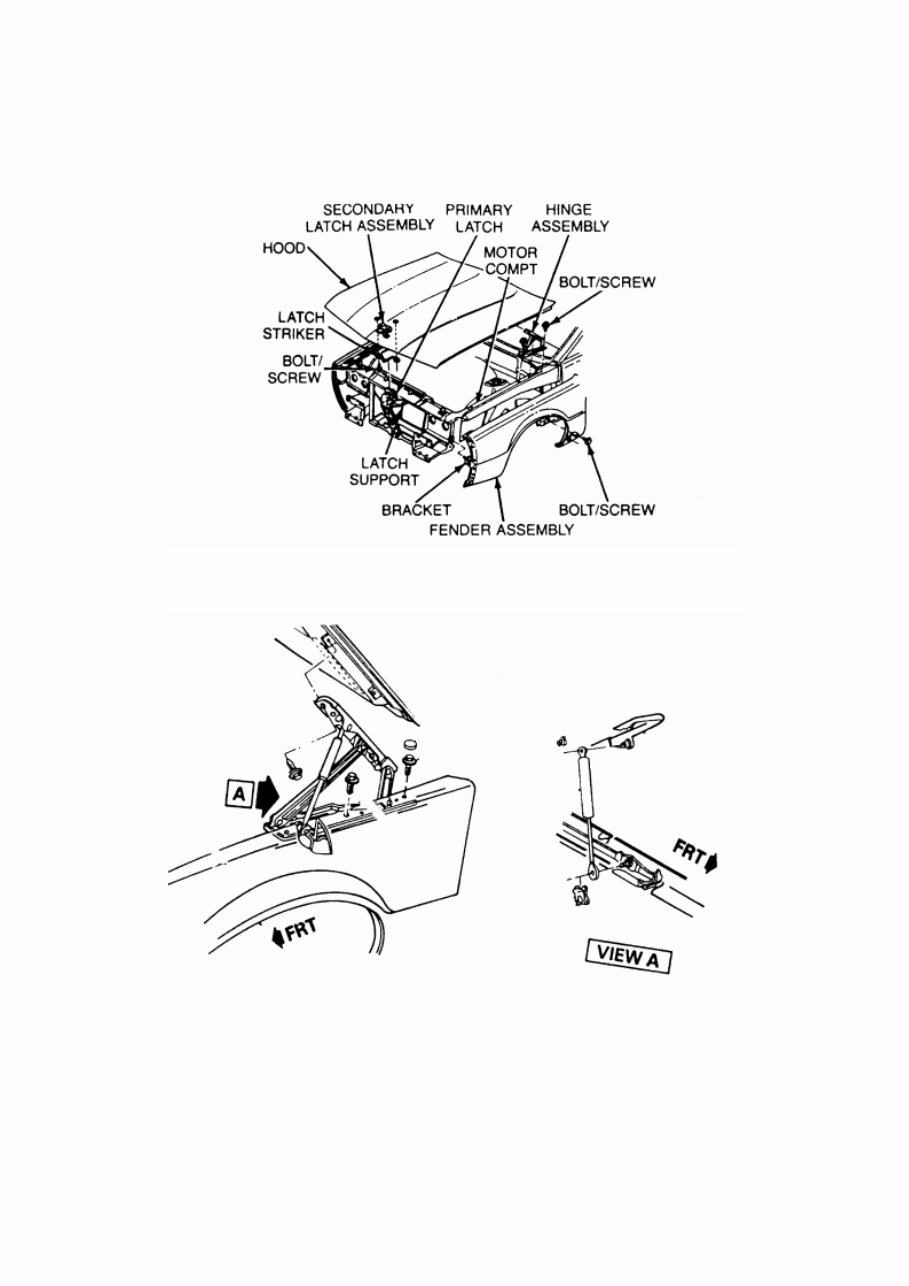
GM – CAMARO 1982-1992 – Repair Guide (Checked by WxMax) 6 HOOD REMOVAL & INSTALLATION Fig. 1: Front end sheet metal Fig. 2: Hood removal 1. Open the hood and mark the position of the hood hinge assembly-to-hood by a scribe, chalk or paint. 2. Remove the hood attaching bolts that are towards the front of the hood. 3. Slowly loosen the remaining hood attaching bolts. 4. With the aid of a helper, remove the bolts and remove the hood. Place the hood on a protected surface.
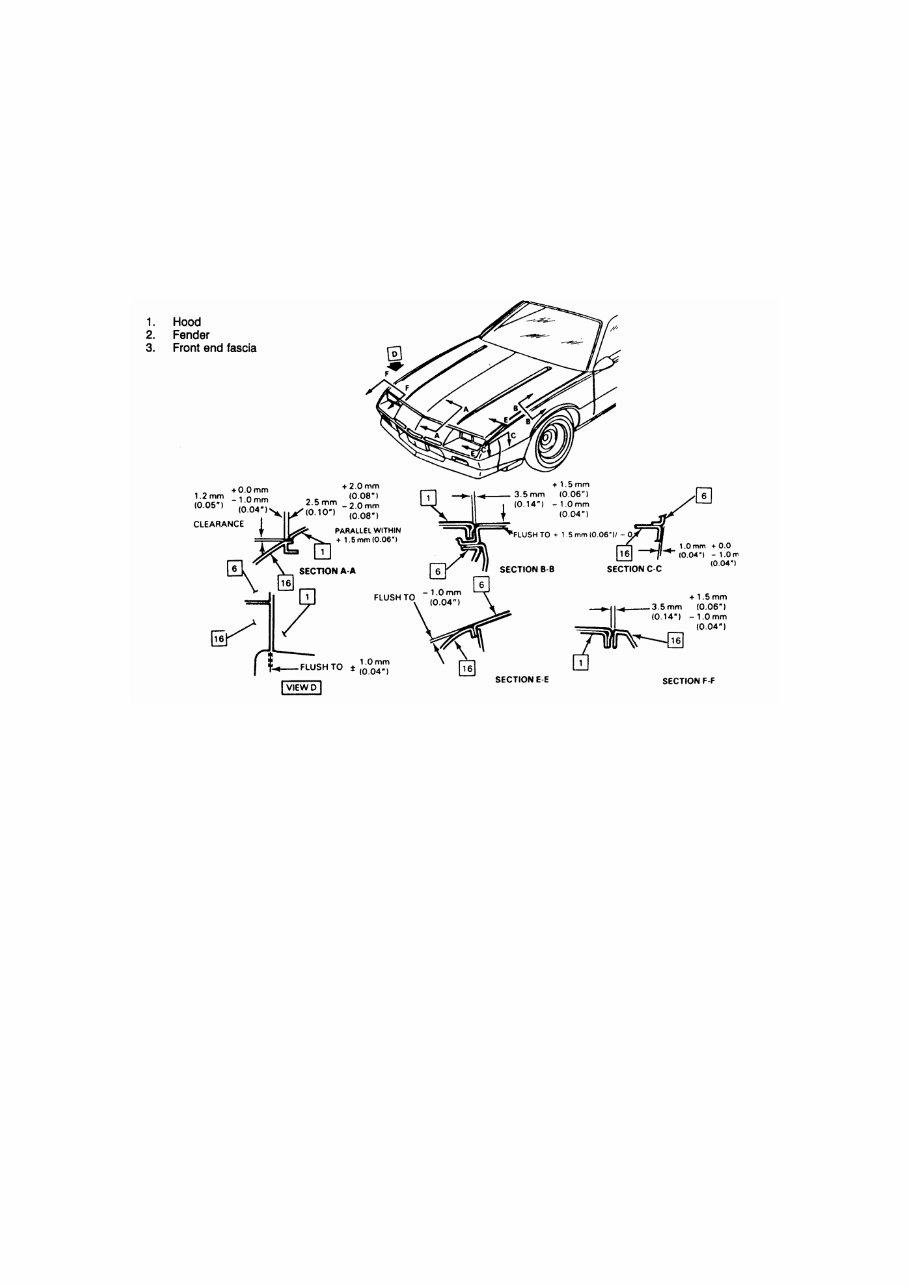
GM – CAMARO 1982-1992 – Repair Guide (Checked by WxMax) 7 5. Position the hood 6. over the hood hinge assembly with the aid of a helper and install the hood attaching bolts finger tight. 7. Align the hood to the matchmarks made earlier and tighten the hood attaching bolts. 8. Close the hood and check align. ALIGNMENT Fig. 3: Hood alignment Slotted holes are provided at all hood hinge attaching points for proper adjustment - both vertically and fore-and-aft. Vertical adjustments at the front may be made by adjusting the rubber bumpers up and down. To adjust the hood fore-and-aft move the hood forward or rearward until the hood clearances are equal and as specified in the illustration. If the hood is not properly coming into adjustment then the body panels may also need to be adjusted. To achieve the best results set the hood to any existing marks and make adjustments one at a time.
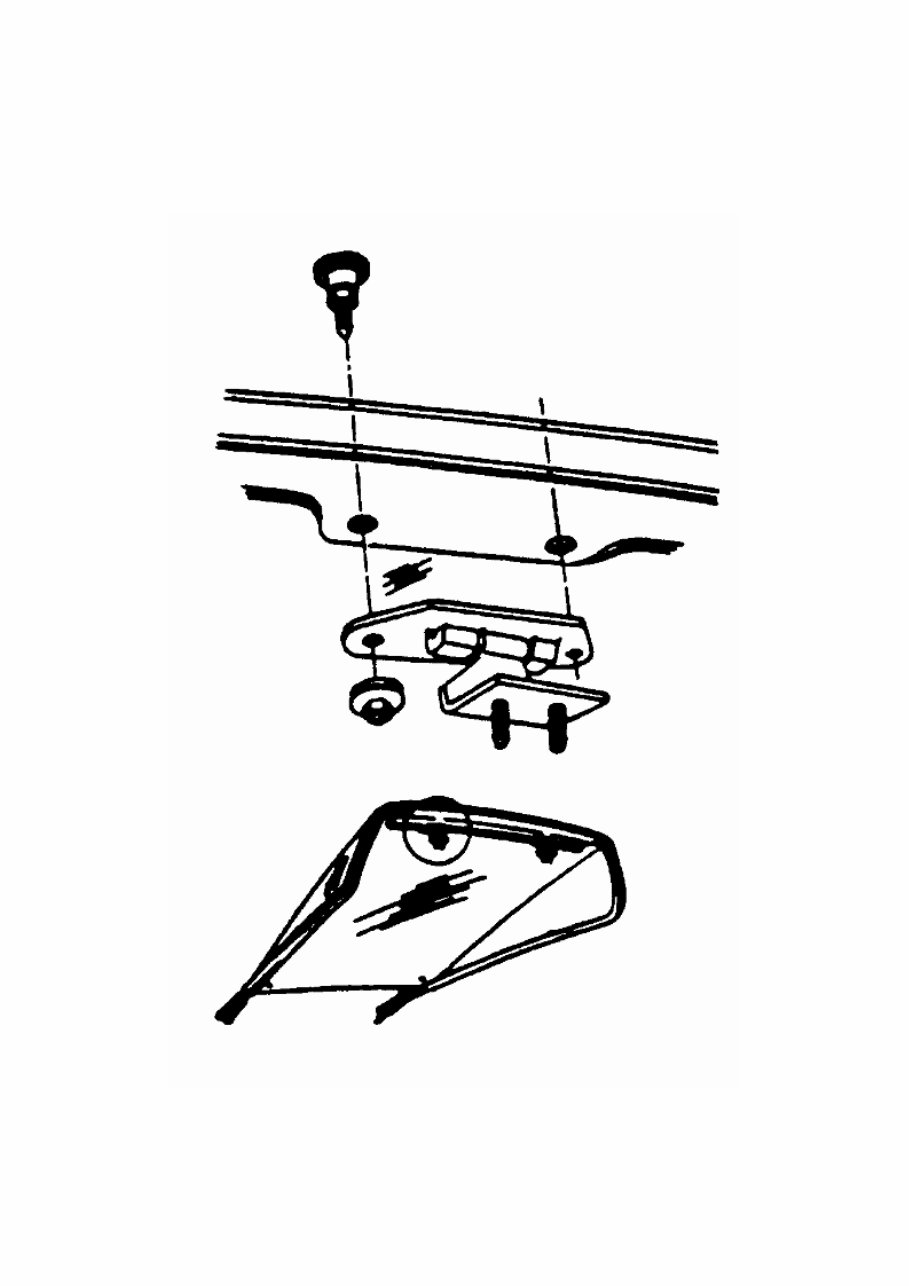
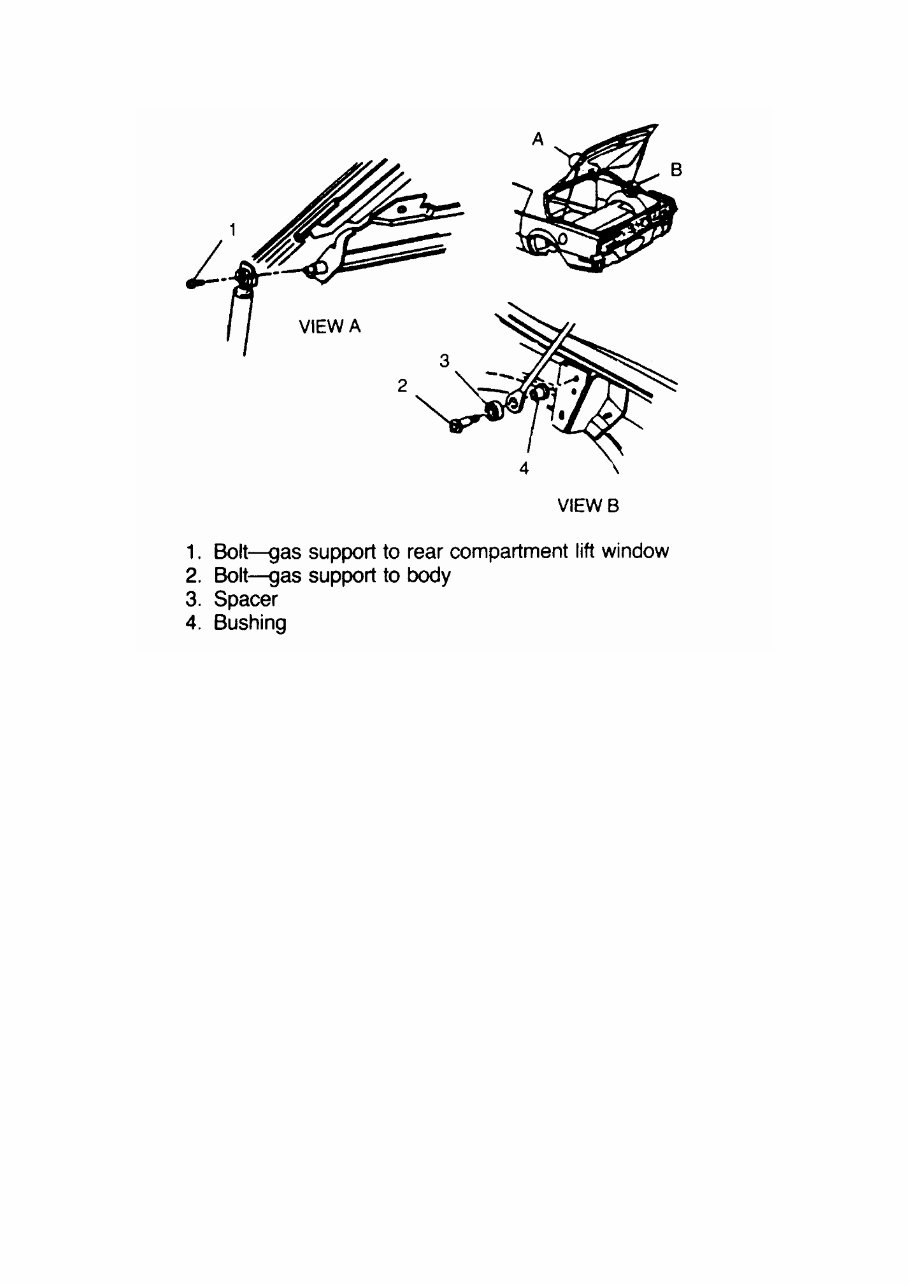
GM – CAMARO 1982-1992 – Repair Guide (Checked by WxMax) 9 Fig. 2: Hatch strut removal 1. Prop the lid open and place a protective covering along the edges of the rear compartment opening to prevent any damage to the painted surfaces. 2. Use a 13mm socket to remove the nuts holding the glass to the hinge. CAUTION - Do not attempt to remove or loosen the gas support assembly attachments with the lid in any position other than fully open as personal injury may result. 3. While a helper supports the glass, disengage the gas supports from the lift window assembly and disconnect the harness connector for the electric grid defogger, if equipped. 4. With the aid of a helper, remove the lift window assembly from the body and place it on a protected surface. 5. Position the lift window assembly to the body with the aid of a helper. Install the attaching bolts and torque to 11 ft. lbs. (16 Nm). CAUTION - Do not over tighten the glass-to-hinge bolts as it could cause the glass to break resulting in personal injury! Always wear safety glasses during this operation
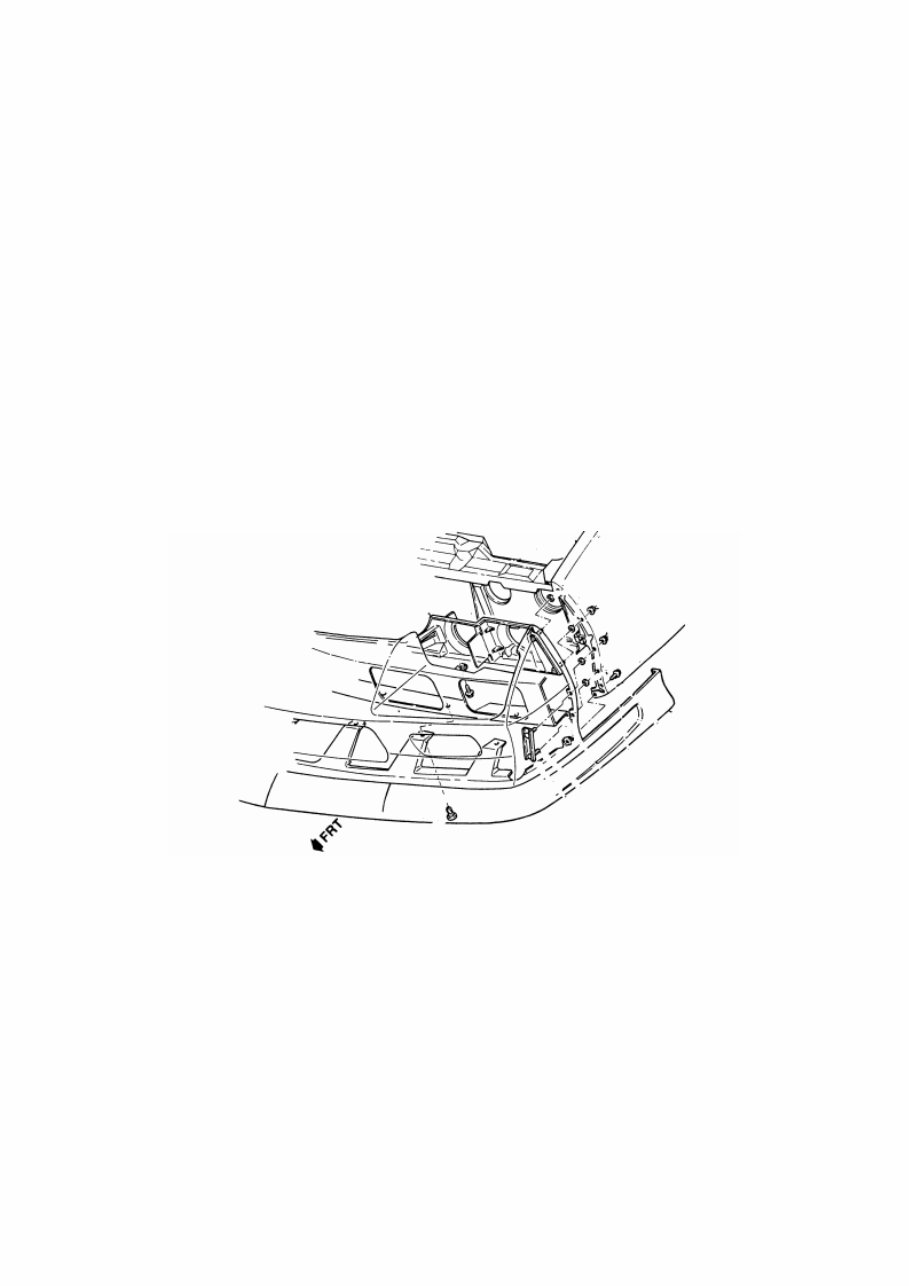
GM – CAMARO 1982-1992 – Repair Guide (Checked by WxMax) 10 6. Connect the harness connector for the electric grid defogger, if equipped, and connect the gas supports to the lift window assembly. 7. Lower the lid and check alignment. ADJUSTMENT The rear compartment lift window assembly height, fore and aft and side adjustments are controlled at the hinge-to-body location. This area of the body has oversize hinge attaching holes in addition to the hinge-to-body spacers. Adjustments at the hinge location must be made with the gas supports disengaged. Additional height adjustment can also be made at the lower panel by adjusting the rubber bumpers. Bolts holding hinge-to-body should be tightened to 15-20 ft. lbs. (20-28 Nm). BUMPERS REMOVAL & INSTALLATION FRONT FASCIA Fig. 1: Front bumper fascia
The 1982-1992 Chevrolet Camaro Service & Repair Manual is a comprehensive guide covering models from 1982 to 1992. Designed for Camaro enthusiasts, owners, and professionals alike, this manual provides detailed instructions and step-by-step procedures for maintaining, repairing, and servicing your vehicle.
Whether you are an experienced mechanic or a DIY enthusiast, this manual is an essential resource to help keep your Camaro in optimal condition. It includes clear diagrams, illustrations, and technical specifications to simplify even the most complex repairs.
The manual covers the following models:
1982 Chevrolet Camaro
1983 Chevrolet Camaro
1984 Chevrolet Camaro
1985 Chevrolet Camaro
1986 Chevrolet Camaro
1987 Chevrolet Camaro
1988 Chevrolet Camaro
1989 Chevrolet Camaro
1990 Chevrolet Camaro
1991 Chevrolet Camaro
1992 Chevrolet Camaro
With this detailed manual, you have all the essential information needed to manage any repair or maintenance task on your Chevrolet Camaro. Trust this service and repair guide to keep your Camaro running smoothly and efficiently.
We're currently collecting product reviews for this item. In the meantime, here are some reviews from our past customers sharing their overall shopping experience.
4.5
Out of 5.0
Overall Rating
89%
of customers that buy from this merchant give them a 4 or 5-Star rating.
Verified Buyer
September 18, 2025 by Sam B. (Ontario, CA)
“Very good”
Verified Buyer
September 18, 2025 by Thomas J. (Östergötland , SE)
“All as exspected.”
Verified Buyer
September 18, 2025 by Glenn B. (Arizona, US)
“Quick and easy purchase.”
Verified Buyer
September 18, 2025 by Nigel B. (Western Australia, AU)
“All good”
Verified Buyer
September 18, 2025 by Robert L. (US)
“Delivery details”
Verified Buyer
September 17, 2025 by Cameron S. (US)
“good”
Verified Buyer
September 17, 2025 by Arthur H. (Maine, US)
“easy”
Verified Buyer
September 17, 2025 by Stig F. (US)
“Easy”
Verified Buyer
September 17, 2025 by wallis B. (Victoria, AU)
“There was a bit of a problem downloading but it was sorted at their end with no problem to me”
Verified Buyer
September 17, 2025 by Jozef B. (US)
“Very satisfying buying on this site. Not my first manual !!”
I've purchased a handful of manuals in the past and they have always helped me resolve any vehicular problems.
Lawrence G.09-15-25 - US
quick and easy
Patrick S.09-15-25 - US
Very good
J B.09-18-25 - US
good
Sam B.09-18-25 - Ontario, CA
Very good
Thomas J.09-18-25 - Östergötland , SE
All as exspected.
Glenn B.09-18-25 - Arizona, US
Quick and easy purchase.
Nigel B.09-18-25 - Western Australia, AU
All good
Robert L.09-18-25 - US
Delivery details
Cameron S.09-17-25 - US
good
Arthur H.09-17-25 - Maine, US
easy
Stig F.09-17-25 - US
Easy
Wallis B.09-17-25 - Victoria, AU
There was a bit of a problem downloading but it was sorted at their end with no problem to me
Jozef B.09-17-25 - US
Very satisfying buying on this site. Not my first manual !!
Linda D.09-17-25 - New York, US
Hope I find easy access.
Greg F.09-17-25 - Victoria, AU
very quick and easy
Ted P.09-17-25 - US
no problems at all
Rory D.09-17-25 - US
Very good
Micheal H.09-17-25 - US
Thanks
Bozhidar R.09-17-25 - Nord Holland , Haarlem, NL
Ik verwachtte een PDF-bestand, maar ik ontving een .ova-bestand en ik kan het ontvangen bestand niet openen.
Les C.09-17-25 - South Carolina, US
Fast and easy
Roger W.09-17-25 - Tennessee, US
Got me what I needed
Todd M.09-17-25 - US
Easy Checkout
Andrew R.09-17-25 - Michigan, US
Quick and easy
Niall F.09-17-25 - CO CORK, IE
All good....bit awkward to navigate
Peeradet A.09-17-25 - US
Good and easy
Pedro G.09-17-25 - US
very fast
Dom K.09-17-25 - US
very easy
Greto M.09-17-25 - US
great
Enkhtugs B.09-16-25 - Ulaanbaatar, Mongolia
ok, tnx
Jan H.09-16-25 - NO
Have some experiens from before
Henry S.09-16-25 - US
Easy to find manual
David G.09-16-25 - Northamptonshire, GB
Got me out of a pickle quick.Order was within minutes, digital format.Thank you
Baruere D.09-16-25 - New York, US
V good
Matt W.09-16-25 - US
Thank you for making such a detailed repair book so convenient
Chuck S.09-16-25 - US
easy, no problems
Michael T.09-16-25 - US
Still to check content but good so far.
Jade G.09-15-25 - US
They popped his screen up before you even look at your manual so I’m not sure yet
James T.09-15-25 - Indiana, US
Awesome
Robert W.09-15-25 - US
Very easy to order
Amanda C.09-15-25 - Worker Region, US
Lost the original manual for my 2188, so I figured I'd try this one out. Download was quick, and it's exactly like the factory booklet I remember. Clear diagrams, solid maintenance info, and even startup procedures. I keep it on the tablet in the cab. Super handy.
Jesus R.09-15-25 - New Mexico , US
5 times Returning Customer That's how satisfied I am.
WILLIAM S.09-15-25 - US
FAST
Christy D.09-15-25 - Worker Region, US
Very decent to be honest
Csaba F.09-15-25 - US
, még nincs tapasztalatom
Herman N.09-15-25 - NL
Nice and Quick
Darren G.09-15-25 - US
Everythings good. Thank you!
M2mostly09-15-25 - ca, US
Works very well to complete my toolset. Even though I have a Mac, they have solutions to accommodate.
B V.09-15-25 - Ohio, US
Great overall experience
Joey G.09-15-25 - MI, US
Easy peasy
Trevor T.09-15-25 - Arizona, US
I've purchased a handful of manuals in the past and they have always helped me resolve any vehicular problems.