Safety Warnings and Symbols You will find a number of safety cautions in this book. We use a box and the word CAUTION to tell you about things that could hurt you if you were to ignore the warning. {CAUTION: These mean there is something that could hurt you or other people. In the caution area, we tell you what the hazard is. Then we tell you what to do to help avoid or reduce the hazard. Please read these cautions. If you don’t, you or others could be hurt. You will also find a circle with a slash through it in this book. This safety symbol means “Don’t,” “Don’t do this” or “Don’t let this happen.” iii
Vehicle Damage Warnings Also, in this book you will find these notices: Notice: These mean there is something that could damage your vehicle. A notice will tell you about something that can damage your vehicle. Many times, this damage would not be covered by your warranty, and it could be costly. But the notice will tell you what to do to help avoid the damage. When you read other manuals, you might see CAUTION and NOTICE warnings in different colors or in different words. You’ll also see warning labels on your vehicle. They use the same words, CAUTION or NOTICE. Vehicle Symbols Your vehicle has components and labels that use symbols instead of text. Symbols, used on your vehicle, are shown along with the text describing the operation or information relating to a specific component, control, message, gage or indicator. If you need help figuring out a specific name of a component, gage or indicator, reference the following topics: • Seats and Restraint Systems in Section 1 • Features and Controls in Section 2 • Instrument Panel Overview in Section 3 • Climate Controls in Section 3 • Warning Lights, Gages and Indicators in Section 3 • Audio System(s) in Section 3 • Engine Compartment Overview in Section 5 iv
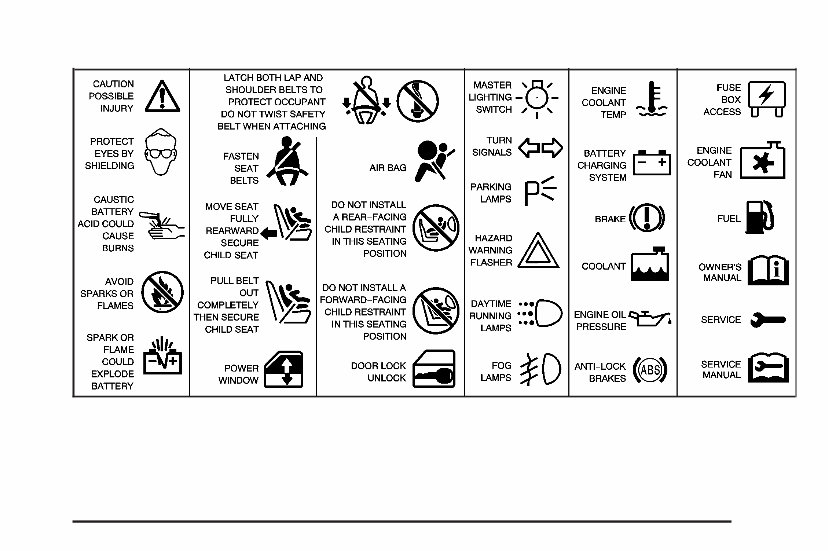
These are some examples of symbols you may find on your vehicle: v
✍ NOTES vi
Front Seats ......................................................1-2 Manual Passenger Seat ..................................1-2 Power Seats ..................................................1-2 Power Lumbar ...............................................1-3 Heated Seats .................................................1-4 Reclining Seatbacks ........................................1-5 Head Restraints .............................................1-7 Rear Seats .......................................................1-7 Rear Seat Operation .......................................1-7 Safety Belts .....................................................1-9 Safety Belts: They Are for Everyone .................1-9 Questions and Answers About Safety Belts ......1-13 How to Wear Safety Belts Properly .................1-14 Driver Position ..............................................1-14 Right Front Passenger Position .......................1-22 Center Front Passenger Position .....................1-22 Rear Seat Passengers ..................................1-24 Rear Safety Belt Comfort Guides for Children and Small Adults .......................................1-27 Safety Belt Extender .....................................1-29 Child Restraints .............................................1-30 Older Children ..............................................1-30 Infants and Young Children ............................1-32 Child Restraint Systems .................................1-36 Where to Put the Restraint .............................1-38 Top Strap ....................................................1-39 Top Strap Anchor Location .............................1-41 Lower Anchorages and Top Tethers for Children (LATCH System) ...........................1-41 Securing a Child Restraint in a Rear Seat Position ...................................................1-43 Securing a Child Restraint in the Center Front Seat Position ............................................1-45 Securing a Child Restraint in the Right Front Seat Position ............................................1-46 Air Bag Systems ............................................1-50 Where Are the Air Bags? ...............................1-53 When Should an Air Bag Inflate? ....................1-55 What Makes an Air Bag Inflate? .....................1-57 How Does an Air Bag Restrain? .....................1-57 What Will You See After an Air Bag Inflates? ...1-58 Passenger Sensing System ............................1-59 Servicing Your Air Bag-Equipped Vehicle .........1-64 Adding Equipment to Your Air Bag-Equipped Vehicle ....................................................1-64 Restraint System Check ..................................1-65 Checking Your Restraint Systems ...................1-65 Replacing Restraint System Parts After a Crash ......................................................1-66 Section 1 Seats and Restraint Systems 1-1
Front Seats Manual Passenger Seat If your vehicle has a manual front passenger split bench seat, you can adjust it with this lever located at the front of the seat. Lift the lever to unlock the seat and use your body to slide the seat to where you want it. Release the lever and try to move the seat with your body to make sure that the seat is locked into place. Power Seats If your vehicle has power seat(s), the controls are located on the outboard edge of the front seats. 1-2
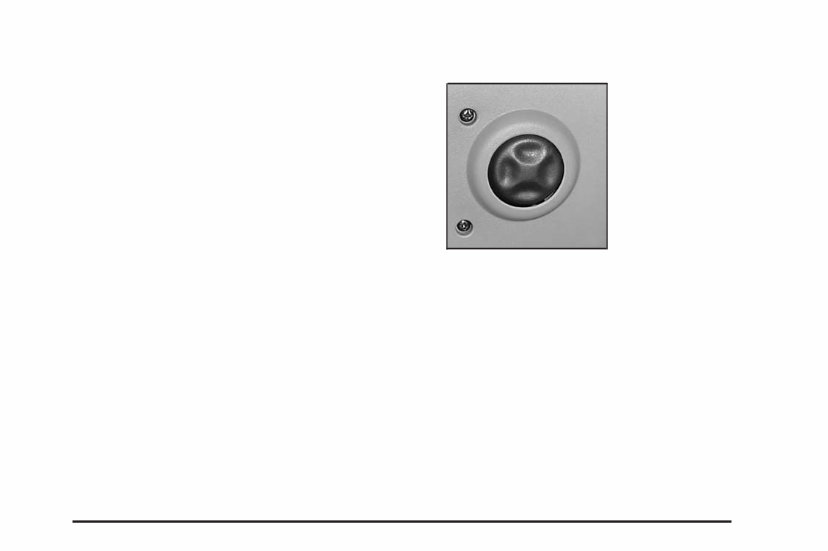
Horizontal Control: This control adjusts the seat cushion. • Raise or lower the front of the seat by raising or lowering the forward edge of the control. Raise or lower the rear of the seat by raising or lowering the rear edge of the control. • Move the seat forward or rearward by moving the whole control toward the front or toward the rear of the vehicle. • Lower or raise the entire seat cushion by moving the whole control up or down. Vertical Control: This control adjusts the seatback. Move the reclining front seatback rearward or forward by moving the control toward the rear or the front of the vehicle. This adjusts the angle of the seatback. For more information on the reclining seatbacks, see Reclining Seatbacks on page 1-5. Your vehicle may have a memory function which allows seat settings to be saved and recalled. See Memory Seat on page 2-88 for more information. Power Lumbar If your vehicle has power lumbar adjustment, you can use it to increase or decrease lumbar support in the lower seatback. The control is located on the outboard side of the seat cushion. • To increase support in the lower back area, press and hold the front of the control. Let go of the control when the lower seatback reaches the desired level of support. • To decrease support in the lower back area, press and hold the rear of the control. Let go of the control when the lower seatback reaches the desired level of support. 1-3
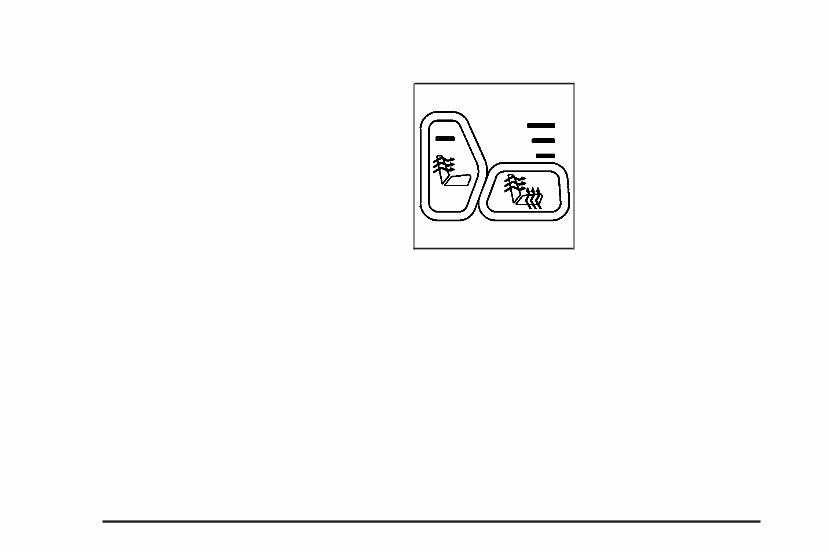
You can also reshape the back wing area of the lower seatback. • To increase support in the wing area of the lower seatback, press and hold the top of the control. Let go of the control when the lower seatback reaches the desired level of support. • To decrease support in the wing area of the lower seatback, press and hold the bottom of the control. Let go of the control when the lower seatback reaches the desired level of support. Heated Seats Your vehicle may have heated front seats. The buttons used to control this feature are located on the front doors. The engine must be running for the heated seat feature to work. To heat the entire seat, press the horizontal button with the heated seat symbol. Press the button to cycle through the temperature settings of high, medium and low and to turn the heated seat off. Indicator lights will glow to designate the level of heat selected, three for high, two for medium, and one for low. 1-4
When it comes to answering questions about your vehicle, the owner’s manual is your go-to resource. This instructional booklet, specific to your model and published by the manufacturer, explains the functionality of every feature in your vehicle, how to operate them, and important considerations to keep in mind.
Additionally, it provides essential information to help you become a better car owner, including basic maintenance procedures, recommended service intervals, and troubleshooting advice. By utilizing the owner's manual maintenance schedule, you can effectively budget for car expenses and ensure the longevity of your vehicle.
Consulting the owner's manual can help you avoid the frustration of learning a new system and save money on car ownership. It contains comprehensive information about your car and proves to be a valuable resource from the first time you use it.
Please note that this is not a generic owner's manual; it is the same manual provided by the manufacturer at the time of purchase, often kept in the glove box. The advantage of this manual is that it is in digital format, eliminating the need to flip through numerous pages to find specific information. It offers the convenience of easy searchability, screenshot capability, and bookmarking, making it a superior alternative to a traditional bound manual.
Furthermore, it is printable and compatible with various electronic devices, including PC and Mac computers, Android and Apple smartphones, and tablets. The only requirement is Adobe Reader, which is available for free.