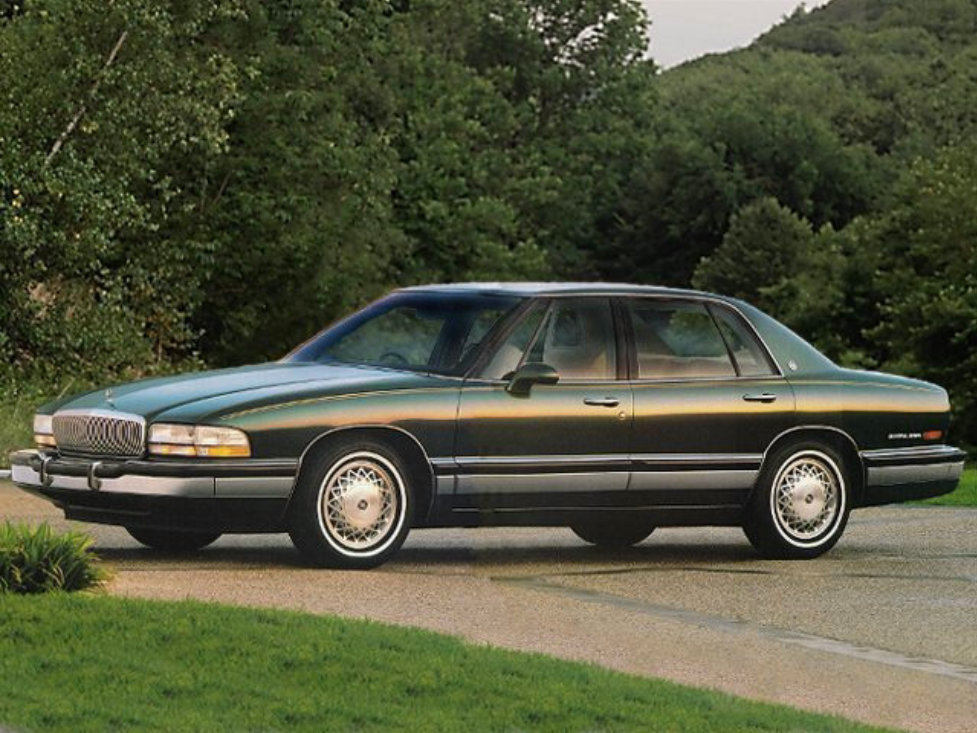
1994 Buick Park Avenue Service & Repair Manual Software
What's Included?
Lifetime Access
Fast Download Speeds
Online & Offline Access
Access PDF Contents & Bookmarks
Full Search Facility
Print one or all pages of your manual
1991-1996 BUICK PARK AVENUE SERVICE AND REPAIR MANUAL
A/C COMPRESSOR OIL CHECKING 1992 GENERAL SERVICING Compressor Refrigerant Oil Checking COMPRESSOR APPLICATIONS (PASSENGER CARS) COMPRESSOR APPLICATIONS (PASSENGER CARS) COMPRESSOR APPLICATIONS (LIGHT TRUCKS & VANS) COMPRESSOR APPLICATIONS (LIGHT TRUCKS & VANS) BODY CODE DESIGNATIONS (PASSENGER CARS) BODY CODE DESIGNATIONS (PASSENGER CARS) Application Compressor General Motors (1) "A" Body Harrison V5 5-Cyl. 2 ) Harrison HR-6 6-Cyl. "B", "D" & "F" Bodies Harrison HR100T/HR110T 4-Cyl. "C", "E", "H" & "K" Bodies (2) Harrison HR-6 6-Cyl. "J", "L" & "N" Bodies Harrison V5 5-Cyl. "W" Body Harrison V5 5-Cyl. 2 ) Harrison HR6 6-Cyl. "Y" Body Nippondenso 10PA20 10- Cyl. (1) Body codes are determined by fourth character of VIN code. (2) HR-6 or HR-6-HE (High Efficiency) compressor may be used. Application Compressor General Motors (1) "C", "G" & "K" Bodies Harrison HR100T/HR110T 4- Cyl. "L" & "M" Series (2) Harrison HR-6 6-Cyl. "S" & "T" Series Harrison HR100T/HR110T 4- Cyl. Harrison V5 5-Cyl. "U" Series Harrison V5 5-Cyl. (1) Series codes are determined by fifth character of VIN code. (2) Harrison HR-6 or HR-6-HE (High Efficiency) compressor may be used. Body Designation (1) Model 1992 Buick Park Avenue A/C COMPRESSOR OIL CHECKING 1992 GENERAL SERVICING Compressor Refrigerant Oil Checking
BODY CODE DESIGNATIONS TRUCKS & VANS BODY CODE DESIGNATIONS (GENERAL MOTORS TRUCKS & VANS) REFRIGERANT OIL Only new, pure, moisture-free refrigerant oil should be used in A/C systems. This oil is highly refined with a very low moisture content. Oil container must be tightly closed at all times when not in use, or moisture from the air will be absorbed into the refrigerant oil. On systems with HFC-134a refrigerant, use Polyalkylene Glycol (PAG) wax-free refrigerant oil. "A" Body Century, Cutlass Ciera & Cutlass Cruiser "B" Body Caprice, Custom Cruiser & Roadmaster "C" Body DeVille, Fleetwood, Ninety-Eight & Park Avenue "D" Body Brougham "E" Body Eldorado, Riviera, Toronado & Trofeo "F" Body Camaro & Firebird "H" Body Bonneville, Eighty-Eight & LeSabre "J" Body Cavalier & Sunbird "K" Body Seville "L" Body Beretta & Corsica "N" Body Achieva, Grand Am & Skylark "W" Body Cutlass Supreme, Grand Prix, Lumina & Regal "Y" Body Corvette (1) Body codes are determined by fourth character of VIN code. Model (1) Designation Astro & Safari 2WD "M" Series 4WD "L" Series Blazer, Pickups, Sierra, Suburban & Yukon 2WD Models "C" Series 4WD Models "K" Series Lumina APV, Silhouette & Transport "U" Series Pickups (S/T) 2WD "S" Series 4WD "T" Series Van "G" Series (1) Series codes are determined by fifth character of VIN code. 1992 Buick Park Avenue A/C COMPRESSOR OIL CHECKING 1992 GENERAL SERVICING Compressor Refrigerant Oil Checking
SERVICING PRECAUTIONS DISCHARGING SYSTEM If compressor has stem-type service valves, it can be isolated and removed without discharging entire system. Otherwise, discharge system completely using approved refrigerant recovery/recycling equipment before loosening any fittings. DISCONNECTING LINES & FITTINGS After system is discharged, carefully clean area around all fittings to be opened. Always use 2 wrenches when tightening or loosening fittings. Some refrigerant lines are connected with a coupling. Special tools may be required to disconnect lines. Cap or plug all openings as soon as lines are removed. DO NOT remove caps until connections of lines and fittings are completed. CONNECTING LINES & FITTINGS Always use a new gasket or "O" ring when connecting lines or fittings. Coat "O" ring with refrigerant oil and ensure it is not twisted during installation. Always use 2 wrenches to prevent damage to lines and fittings. PLACING SYSTEM IN OPERATION After component service or replacement has been completed, evacuate system thoroughly with a vacuum pump. Charge system with proper amount of refrigerant. See the A/C SYSTEM SPECS article in this section. Perform leak test. After system has been leak tested, check system operation. CHECKING COMPRESSOR OIL HARRISON A-6 6-CYLINDER 1. Operate system for several minutes to stabilize system before performing repairs. Turn off engine. CAUTION: When discharging air conditioning system, use only approved refrigerant recovery/recycling equipment. Make every attempt to avoid discharging refrigerant into the atmosphere. NOTE: All HFC-134a based systems use 1/2-16 ACME threaded fittings. NOTE: Different fittings and connections are used on systems using HFC-134a refrigerant. Ensure all replacement parts match the connections of the system being worked on. NOTE: A/C systems normally will not need additional refrigerant oil unless oil loss has occurred due to ruptured lines, leaking compressor seals, compressor overhaul or component replacement. 1992 Buick Park Avenue A/C COMPRESSOR OIL CHECKING 1992 GENERAL SERVICING Compressor Refrigerant Oil Checking
Discharge system using approved refrigerant recovery/recycling equipment, and remove compressor. Remove drain plug. Drain and measure oil. 2. If no oil leak exists, add amount of oil drained plus one ounce. If air conditioning components are replaced, refrigerant oil will need to be added to the system. 3. Add following amounts if components are changed: 2 ounces for accumulator, 3 ounces for evaporator and one ounce for condenser. Install drain plug and compressor. Evacuate and recharge system. Perform leak test. HARRISON HR-6/HR-6-HE 6-CYL, HR100T/HR110T 4-CYL & V5 5-CYL 1. Operate system for several minutes to stabilize system before performing repairs. Turn off engine. Discharge system using approved refrigerant recovery/recycling equipment, and remove compressor. Drain and measure oil. 2. If no oil leak exists and more than one ounce is drained, add drained amount using new oil. If less than one ounce is drained, add 2 ounces of new oil. 3. If air conditioning components are replaced, additional refrigerant oil will need to be added to the system. Add following amounts if components are changed: 3.5 ounces for accumulator, 3 ounces for evaporator and one ounce for condenser. Install drain plug and compressor. Evacuate and recharge system. Perform leak test. NIPPONDENSO 10PA17 10-CYLINDER General Motors 1. Slowly discharge system using approved refrigerant recovery/recycling equipment. Remove A/C compressor, and drain compressor oil. Measure amount drained, and discard oil. 2. If no leaks exists, add same amount of oil drained plus one additional ounce. If excessive leak exists, remove accumulator, and drain oil. Measure amount drained, and discard oil. 3. If amount drained is less than 3 ounces, add 3 ounces. If amount drained is more than 3 ounces, add drained amount. If system components are changed, add specified amount. See 10PA17 COMPONENT REFRIGERANT OIL CAPACITIES (GENERAL MOTORS) table. 10PA17 COMPONENT REFRIGERANT OIL CAPACITIES (GENERAL MOTORS) NIPPONDENSO 10PA20 10-CYLINDER General Motors Component Ounces Compressor (1) Condenser 1.0 Evaporator 3.0 Accumulator 3.5 (1) Drain oil from compressor, and then add drained amount plus one ounce. 1992 Buick Park Avenue A/C COMPRESSOR OIL CHECKING 1992 GENERAL SERVICING Compressor Refrigerant Oil Checking
1) Slowly discharge system using approved refrigerant recovery/recycling equipment. Remove A/C compressor, and drain compressor oil. Measure amount drained, and discard oil. 2) If no leaks exists, add drained amount plus one ounce. If excessive leak exists, remove accumulator, and drain oil. Measure amount drained, and discard oil. 3) If amount drained is less than 3 ounces, add 3 ounces. If amount drained is more than 3 ounces, add drained amount. If system components are changed, add specified amount. See 10PA20 COMPONENT REFRIGERANT OIL CAPACITIES (GENERAL MOTORS) table. 10PA20 COMPONENT REFRIGERANT OIL CAPACITIES (GENERAL MOTORS) PASSENGER CAR REFRIGERANT OIL & R-12 CAPACITIES PASSENGER CAR REFRIGERANT OIL & R-12 CAPACITY LIGHT TRUCK & VAN REFRIGERANT OIL & R-12 CAPACITY Component Ounces Compressor (1) Condenser 1.0 Evaporator 3.0 Accumulator 3.5 (1) Drain oil from compressor, and then add drained amount plus one ounce. Application (1) Oil Ounces R-12 Ounces General Motors (1) "A" Body 9.0 40 "B" Body 6.0 50 "C" Body 8.0 38 "D" Body 6.0 (2) "E" & "K" Body 8.0 38-42 "F" Body 6.0 56 "H" Body 8.0 38 "J" Body 8.0 36 "L" Body 8.0 40-44 "N" Body 8.0 42 "W" Body 8.0 44 "Y" Body 8.0 36 (1) Body codes are determined by fourth character of the VIN code. (2) Information not available from manufacturer. 1992 Buick Park Avenue A/C COMPRESSOR OIL CHECKING 1992 GENERAL SERVICING Compressor Refrigerant Oil Checking
LIGHT TRUCK & VAN REFRIGERANT OIL & R-12 CAPACITY Application (1) (1) Oil Ounces R-12 Ounces "C" & "K" Series 6.0 40 "G" Series Single Unit 8.0 48 Dual Unit 10.5 72 "L" & "M" Series W/Rear Unit 11.0 60 W/O Rear Unit 8.0 48 "S" & "T" Series 8.0 40 "U" Series Single Unit 8.0 51 Dual Unit 8.0 67 (1) Series codes are determined by fifth character of the VIN code. 1992 Buick Park Avenue A/C COMPRESSOR OIL CHECKING 1992 GENERAL SERVICING Compressor Refrigerant Oil Checking
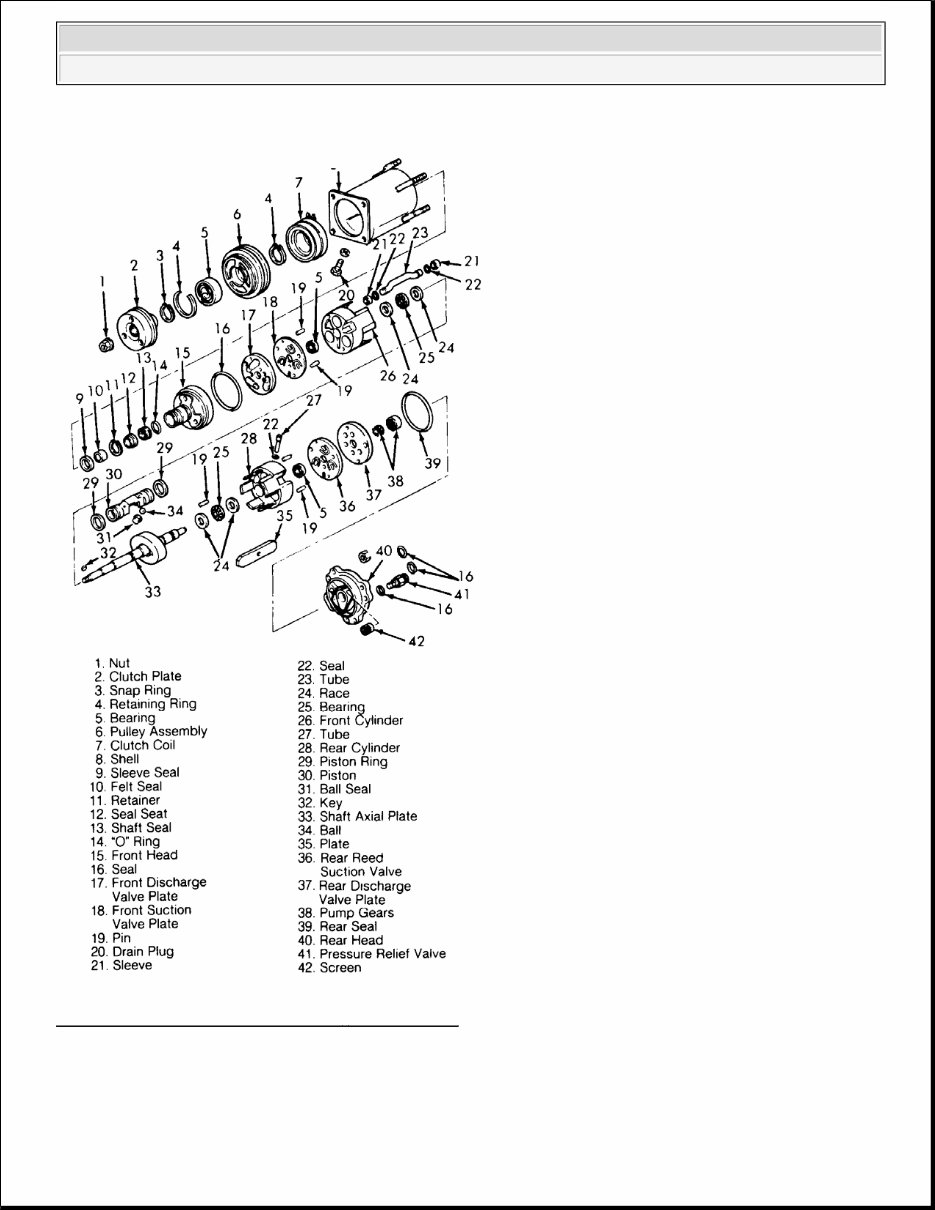
A/C COMPRESSOR OVERHAUL 1992 GENERAL SERVICING Compressor Servicing HARRISON A-6 6-CYLINDER CLUTCH ASSEMBLY Removal 1. Discharge A/C system using approved refrigerant recovery/recycling equipment. Remove compressor. Using Compressor Fixture (J-9396), mount compressor in a vise. Hold clutch plate using Clutch Plate Spanner (J-25030). 2. Remove clutch plate retaining nut. Install Clutch Plate Remover (J-9401-B) into clutch plate and hub. 3. Hold outer area of clutch plate remover. Tighten center bolt until clutch plate can be removed. Remove key from shaft. See Fig. 1 . 4. Remove pulley assembly retaining snap ring. Place Shaft Protector (J-9395) over compressor shaft. Using Puller (J-8433-3) for "V" belts or (J-24092) for multigroove pulleys, remove pulley assembly. 5. If bearing is to be removed from pulley, remove retaining ring from pulley. Drive bearing from pulley using hammer, Bearing Remover (J-9398) and Handle (J-8092). 6. Remove snap ring, and disconnect electrical wiring at clutch coil. Place reference marks on clutch coil and shell for reassembly reference. Using large screwdriver, carefully pry clutch coil from shell. Clutch coil is held on shell with adhesive. 1992 Buick Park Avenue A/C COMPRESSOR OVERHAUL 1992 GENERAL SERVICING Compressor Servicing
Fig. 1: Exploded View of Harrison A - 6 Compressor Courtesy of GENERAL MOTORS CORP. Installation 1992 Buick Park Avenue A/C COMPRESSOR OVERHAUL 1992 GENERAL SERVICING Compressor Servicing
1. Ensure all adhesive is removed from shell and clutch coil. Apply trim detail adhesive on back of clutch coil around clutch coil protrusions. Install clutch coil and snap ring. Ensure reference marks align. 2. Drive bearing into pulley (if removed). Install retaining ring. Install pulley assembly and snap ring. Install clutch plate key in clutch plate, allowing key to protrude about 3/16" from rear of clutch plate. 3. Install clutch plate on compressor shaft. Install Clutch Plate Installer (J-9480-B) in center of shaft. Hold outer area of clutch plate installer. Tighten center bolt to install clutch plate. Ensure key remains in proper location. 4. Press clutch plate onto compressor until clearance between clutch plate and pulley assembly is .022- .057" (.56-1.45 mm). Using spanner, install clutch retaining nut and tighten it to 20 ft. lbs. (27 N.m). Install compressor. Evacuate and recharge system. Perform leak test. SHAFT SEAL Information is not available from manufacturer. HARRISON HR-6/HR-6-HE 6-CYL & V5 5-CYL CLUTCH ASSEMBLY Removal 1. Using Clutch Plate Spanner (J-25030) for HR-6 and HR-6-HE compressors or (J-33027-A) for V5 compressor, hold clutch plate and remove crankshaft nut. Use Clutch Plate Remover/Installer (J-33013-B) to remove clutch plate. See Fig. 4 and Fig. 5 . CAUTION: DO NOT drive on compressor shaft to remove clutch plate, or compressor damage will result. 1992 Buick Park Avenue A/C COMPRESSOR OVERHAUL 1992 GENERAL SERVICING Compressor Servicing
If you are in need of a repair manual for your 1994 Buick Park Avenue, look no further. Our accessible repair manual software is perfect for both professional mechanics and DIY enthusiasts. In the past, traditional service manuals in book format were costly and inconvenient. Our repair manual software provides the same information at a much lower cost and with greater convenience.
Whether you need to fix the brakes, replace suspension components, get the engine running, or perform standard maintenance, this software has you covered. It includes comprehensive service information for the brakes, engine, suspension, steering, drivetrain, electrical systems, heating, air conditioning, and more.
By utilizing this repair manual software, you can save a significant amount of money on vehicle maintenance. Mechanics often charge high fees for their services, but with this software, you can do it yourself. The manual is compatible with Windows, Mac computers, smartphones, and tablets, making it easily accessible for all users.
Recently Viewed
5,521,897Happy Clients
2,594,462eManuals
1,120,453Trusted Sellers
15Years in Business
Price:
Actual Price:
1994 Buick Park Avenue Service & Repair Manual Software