2006 BMW 7-Series E65/E66/E67/E68 Service and Repair Manual
What's Included?
Lifetime Access
Fast Download Speeds
Online & Offline Access
Access PDF Contents & Bookmarks
Full Search Facility
Print one or all pages of your manual
2006-2008 BMW E65, E66, E67, E68 SERVICE AND REPAIR MANUAL
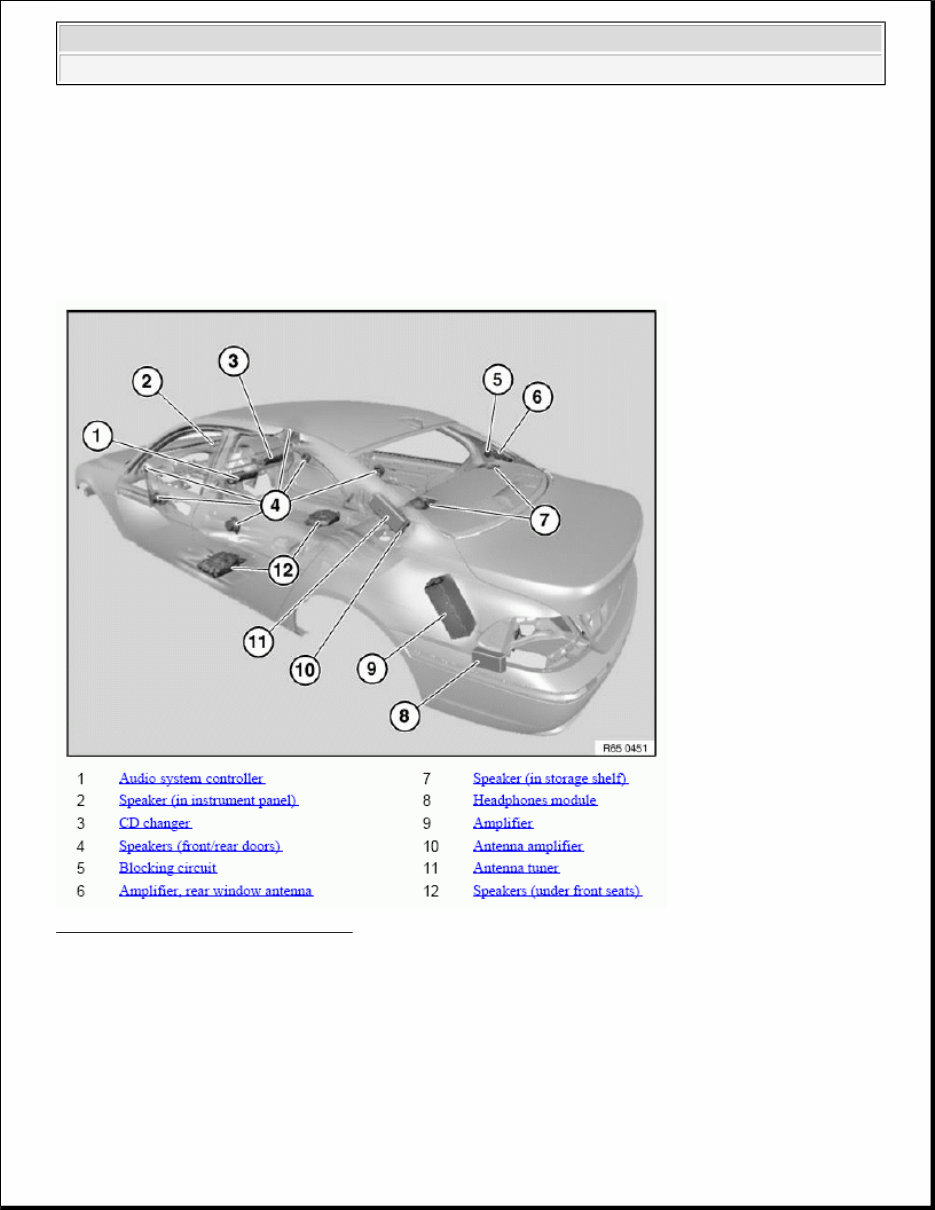
2007-08 ACCESSORIES & EQUIPMENT Audio, Navigation & Anti-Theft - Repair Instructions - 750i, 750Li 10 RADIO 65 00 .. OVERVIEW OF AUDIO COMPONENTS Fig. 1: Identifying Audio Components Courtesy of BMW OF NORTH AMERICA, INC. 11 MONO RADIO 65 11 ... INSTRUCTIONS ON SETTING THE INSTALLATION LOCATION ON THE CD CHANGER NOTE: To ensure trouble-free CD changer operation, ensure both suspension springs 2008 BMW 750i 2007-08 ACCESSORIES & EQUIPMENT Audio, Navigation & Anti-Theft - Repair Instructions - 750i, 750Li 2008 BMW 750i 2007-08 ACCESSORIES & EQUIPMENT Audio, Navigation & Anti-Theft - Repair Instructions - 750i, 750Li
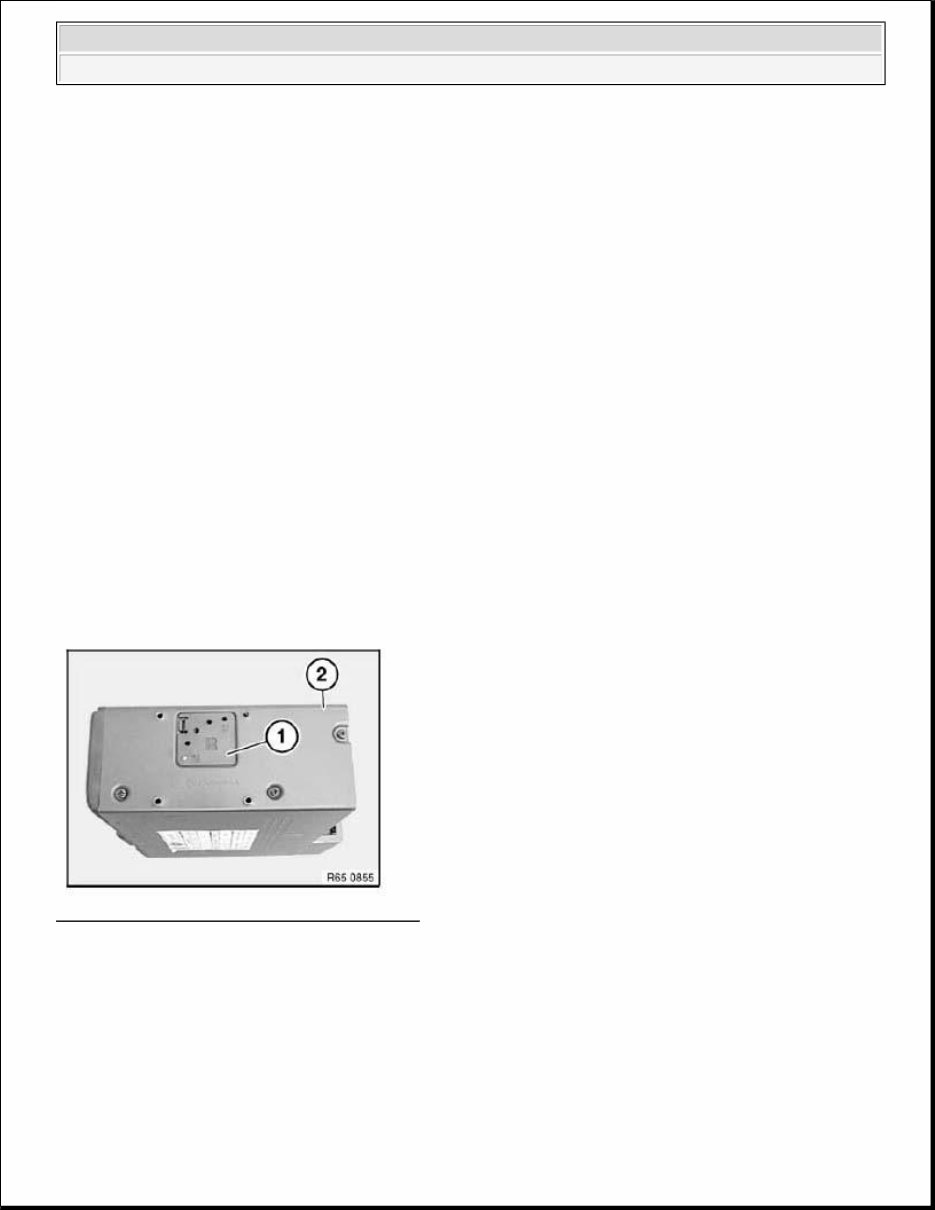
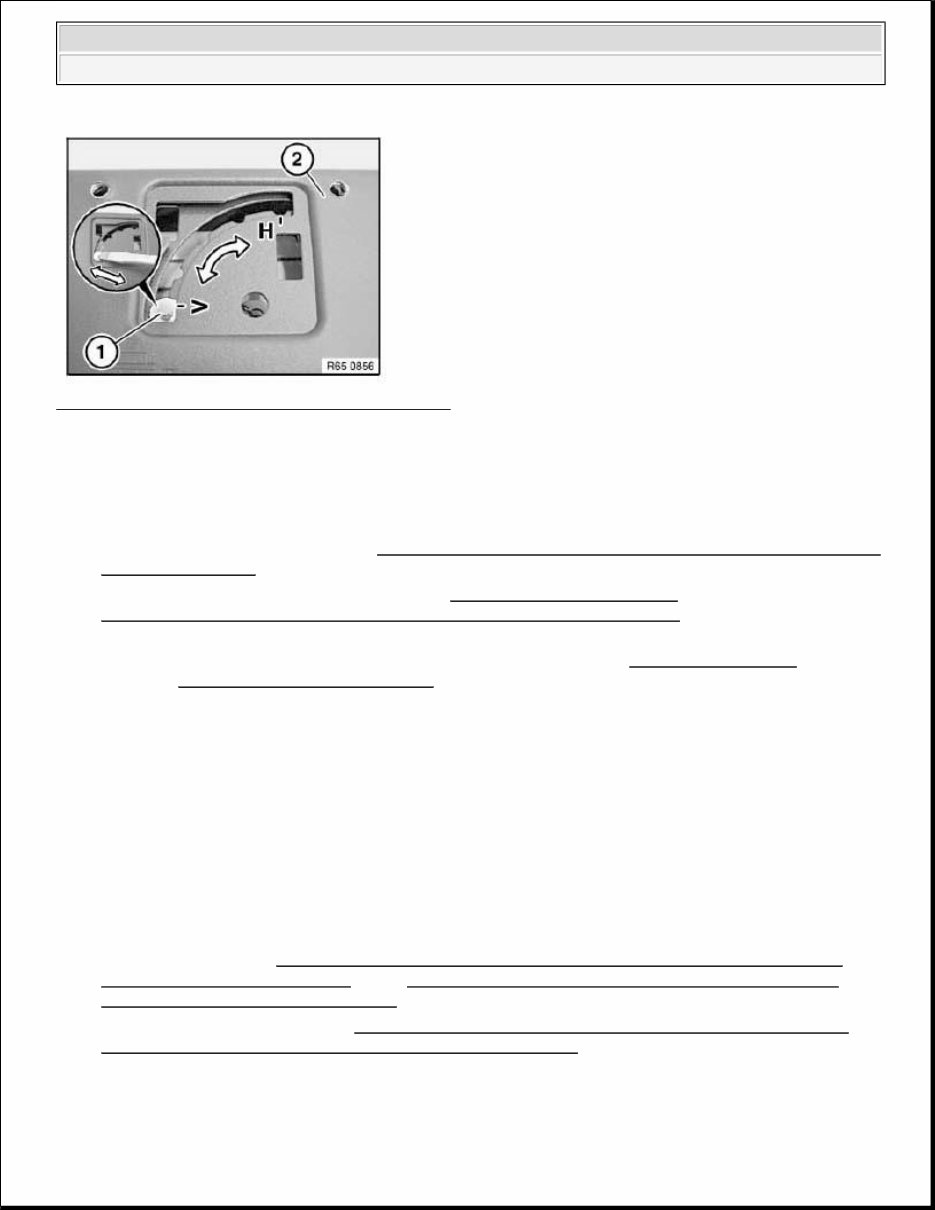
Remove cover cap (1) from CD changer (2). Fig. 2: Identifying Cover Cap On CD Changer Courtesy of BMW OF NORTH AMERICA, INC. Arrange installation location of CD changer (2) with a suitable tool by sliding suspension spring (1) into required position. are correctly positioned (horizontal/vertical). If necessary, correct adjustment. To avoid premature contamination of the CD changer, make sure the magazine compartment flap is permanently closed. NOTE: For purposes of clarity, the following graphics show the CD changer removed. NOTE: Observe the following repair instructions if the magazine cannot be removed from the CD changer. E60, E61, E63, E64: Remove CD changer magazine E83: Ejection via self-diagnosis E87, E90, E91: CD changer must be sent in 2008 BMW 750i 2007-08 ACCESSORIES & EQUIPMENT Audio, Navigation & Anti-Theft - Repair Instructions - 750i, 750Li
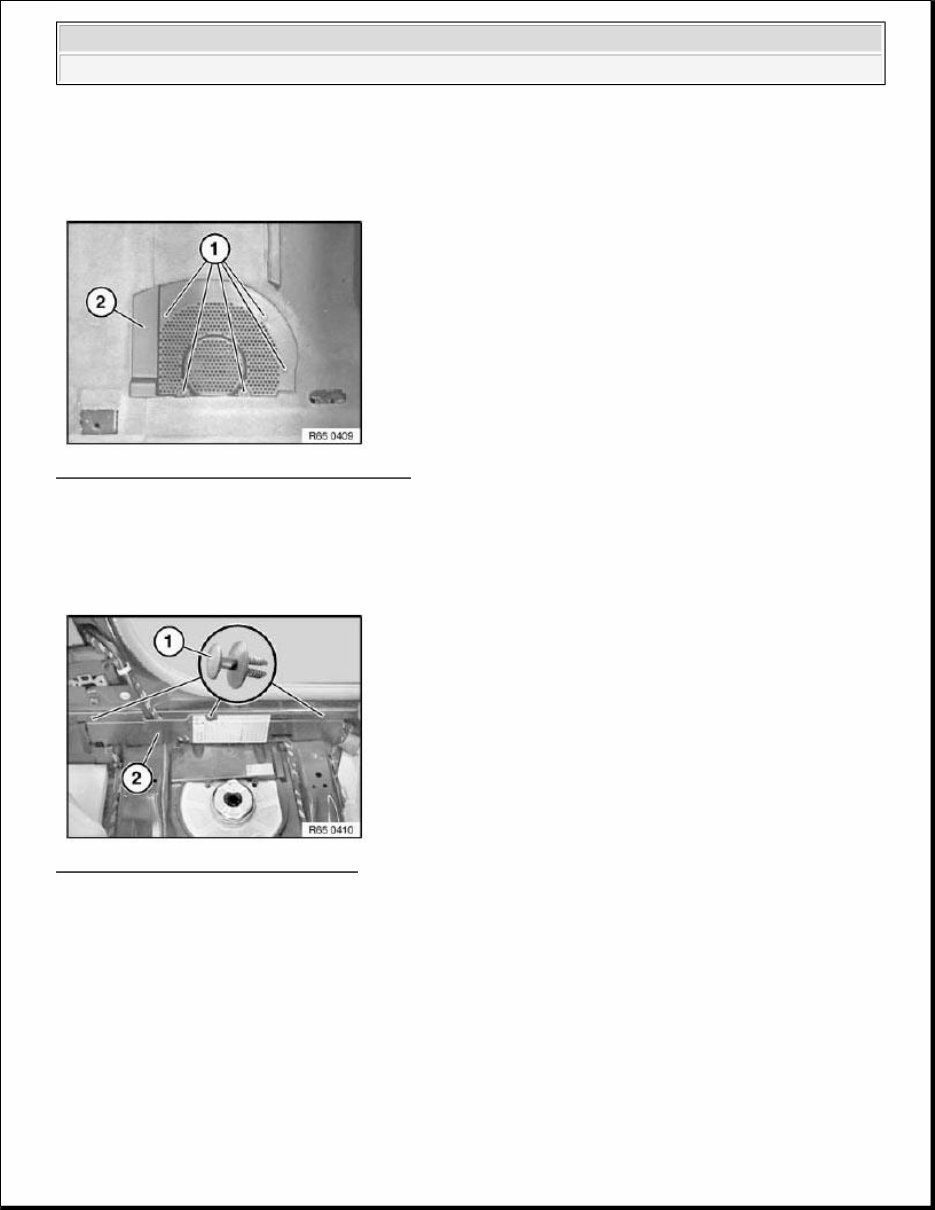
Fig. 3: Identifying CD Changer Suspension Spring Courtesy of BMW OF NORTH AMERICA, INC. 65 11 070 REMOVING AND INSTALLING/REPLACING CD CHANGER Necessary preliminary tasks: Disconnect battery negative lead See 61 20 900 DISCONNECTING AND CONNECTING BATTERY NEGATIVE LEAD Remove trim on instrument panel on right. See 51 45 263 REMOVING AND INSTALLING/REPLACING INSTRUMENT PANEL TRIM ON RIGHT Withdraw CD changer completely from installation slot. Unlock plug connection behind and disconnect. Remove CD changer. 12 STEREO RADIO, AMPLIFIER 65 12 050 REMOVING AND INSTALLING/REPLACING LEFT OR RIGHT CENTRAL BASS SPEAKER (UNDER FRONT SEAT) Necessary preliminary tasks: Remove front seat. See 52 14 000 REMOVING AND INSTALLING LEFT OR RIGHT FRONT SEAT (NORMAL/ELECTRIC) and/or 52 17 000 REMOVING AND INSTALLING LEFT OR RIGHT FRONT SEAT (COMFORT) Remove panel for door pillar. See 51 43 150 REMOVING AND INSTALLING OR REPLACING TRIM FOR LEFT OR RIGHT DOOR PILLAR (BOTTOM) Release screws (1). NOTE: Follow instructions for handling optical fibers . See 61 00 ... NOTES ON HANDLING OPTICAL FIBERS 2008 BMW 750i 2007-08 ACCESSORIES & EQUIPMENT Audio, Navigation & Anti-Theft - Repair Instructions - 750i, 750Li
Remove central bass speaker trim (2). Fold back floor trims. Fig. 4: Identifying Bass Speaker Trim Screws Courtesy of BMW OF NORTH AMERICA, INC. Remove clips (1). Remove cable cover (2). Fig. 5: Identifying Clip & Cable Cover Courtesy of BMW OF NORTH AMERICA, INC. Remove clip (1). Raise rear compartment heating duct (2) slightly in order to remove bass speaker. 2008 BMW 750i 2007-08 ACCESSORIES & EQUIPMENT Audio, Navigation & Anti-Theft - Repair Instructions - 750i, 750Li
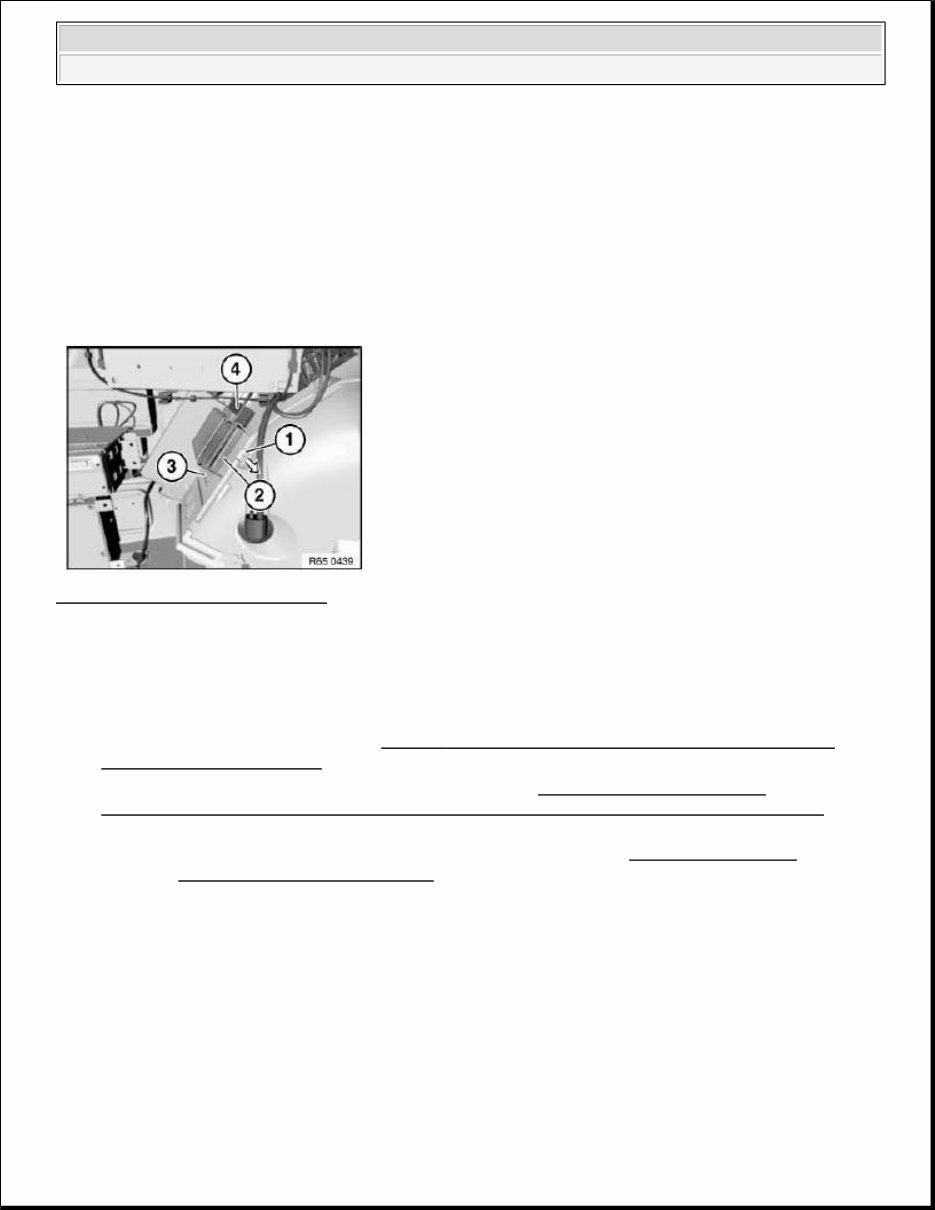
Fig. 6: Removing Clip Courtesy of BMW OF NORTH AMERICA, INC. Unfasten plug connection (1) and disconnect. Release nuts (2) and screws (3). Feed out central bass speaker (4) in direction of arrow and remove. Fig. 7: Feeding Out Central Bass Speaker Courtesy of BMW OF NORTH AMERICA, INC. 65 12 070 REMOVING AND INSTALLING/REPLACING AMPLIFIER Necessary preliminary tasks: Disconnect battery negative lead See12 00 ... INSTRUCTIONS FOR DISCONNECTING AND CONNECTING BATTERY Remove luggage compartment wheel arch trim on left. See 51 47 151 REMOVING AND INSTALLING/REPLACING LEFT LUGGAGE COMPARTMENT WHEEL ARCH TRIM NOTE: Rear compartment heating duct shown removed for purposes of clarity. 2008 BMW 750i 2007-08 ACCESSORIES & EQUIPMENT Audio, Navigation & Anti-Theft - Repair Instructions - 750i, 750Li
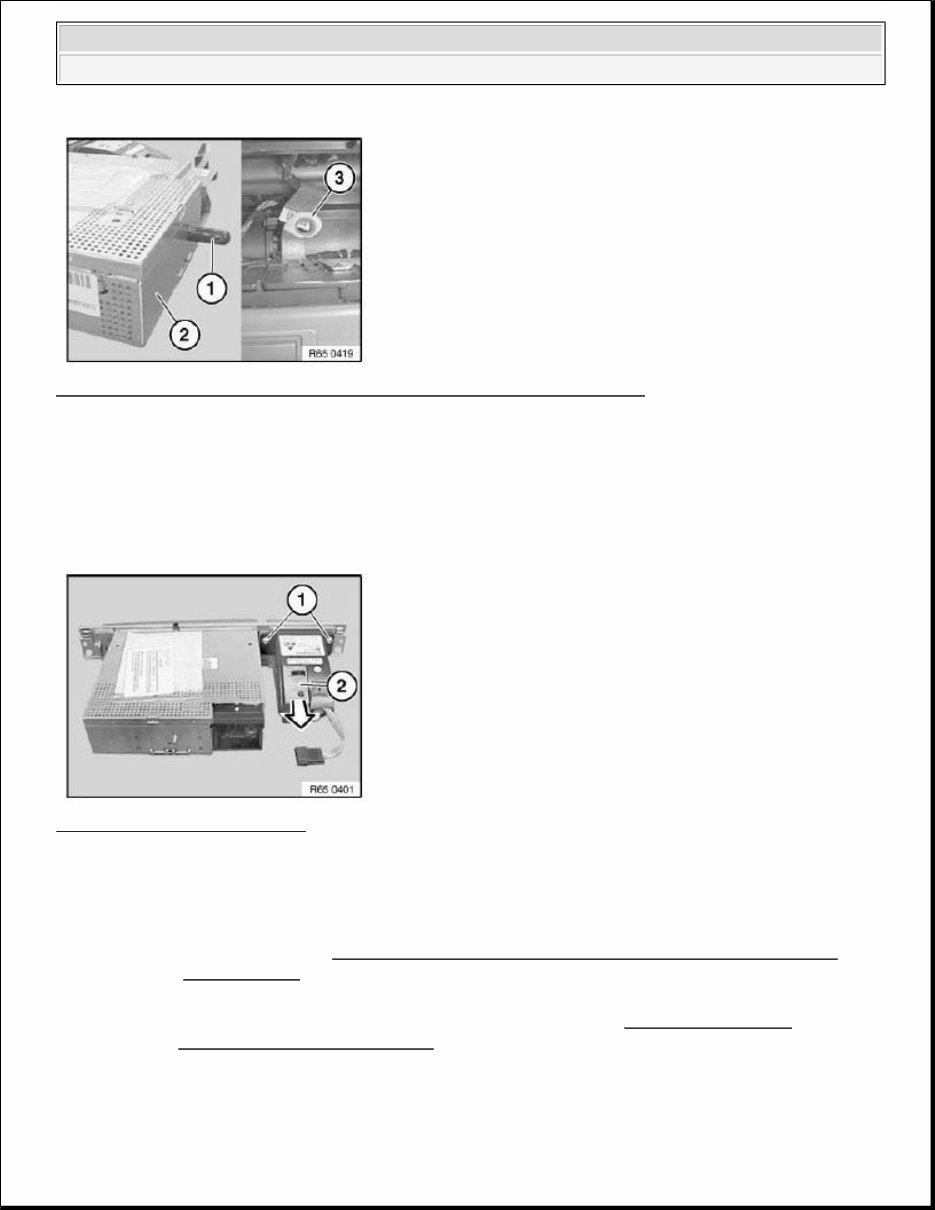
Pull out retaining plate (1) in direction of arrow. Installation: Make retaining plate (1) is correctly seated. Remove amplifier (2) from holder (3). Unfasten plug connection (4) and disconnect. Fig. 8: Pulling Out Retaining Plate Courtesy of BMW OF NORTH AMERICA, INC. 65 12 072 REMOVING AND INSTALLING (REPLACING) AMPLIFIER (TOP HI-FI SYSTEM) Necessary preliminary tasks: Disconnect battery negative lead. See 12 00 ... INSTRUCTIONS FOR DISCONNECTING AND CONNECTING BATTERY Remove luggage compartment wheel arch trim on left. See 51 47 151 REMOVING AND INSTALLING/REPLACING LEFT LUGGAGE COMPARTMENT WHEEL ARCH TRIM Pull out retaining plates (1) in direction of arrow. Installation: Make retaining plates (1) are correctly seated. Remove amplifier (2) from holder (3). Unlock plug connections (4) and disconnect. NOTE: Follow instructions for handling optical fibers . See 61 00 ... NOTES ON HANDLING OPTICAL FIBERS 2008 BMW 750i 2007-08 ACCESSORIES & EQUIPMENT Audio, Navigation & Anti-Theft - Repair Instructions - 750i, 750Li
Fig. 9: Identifying Retaining Plates, Amplifier & Holder Courtesy of BMW OF NORTH AMERICA, INC. Replacement: Carry out coding/programming. Observe following IDC specifications: Programming Coding Car & Key Memory CD "CIP" Fig. 10: Identifying DIS Courtesy of BMW OF NORTH AMERICA, INC. 65 12 200 REMOVING AND INSTALLING (REPLACING) AUDIO SYSTEM CONTROLLER Necessary preliminary tasks: 2008 BMW 750i 2007-08 ACCESSORIES & EQUIPMENT Audio, Navigation & Anti-Theft - Repair Instructions - 750i, 750Li
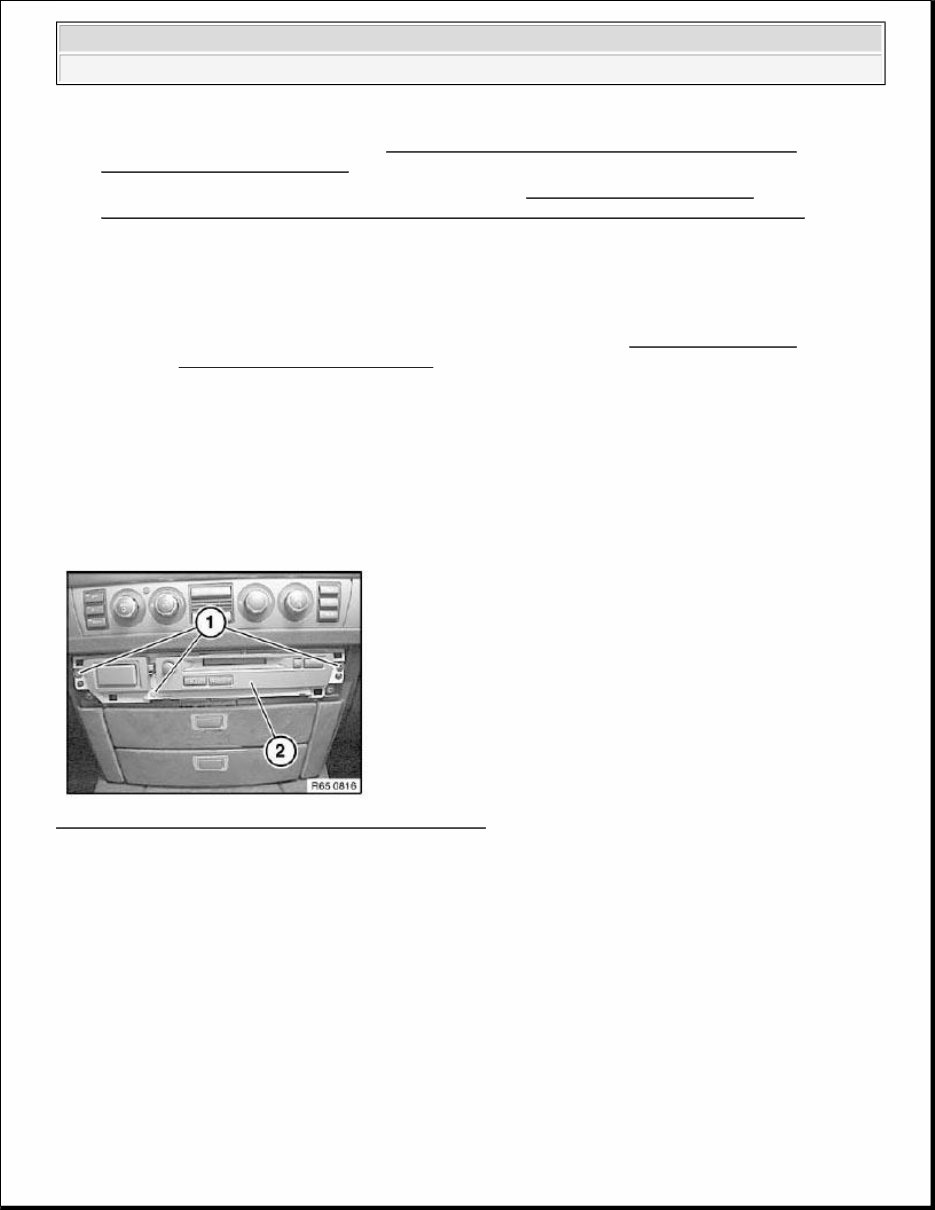
Disconnect battery negative lead . See 61 20 900 DISCONNECTING AND CONNECTING BATTERY NEGATIVE LEAD . Remove decorative trim for audio system controller . See 51 16 175 REMOVING AND INSTALLING/REPLACING DECORATIVE TRIMS (ALL) ON FUNCTION CARRIER . After installation: Replacement only: Carry out coding/programming Release screws (1). Pull out audio system controller (2) towards rear. Disconnect plug connections at the back. Remove audio system controller (2). Fig. 11: Identifying Screws & Audio System Controller Courtesy of BMW OF NORTH AMERICA, INC. Installation: Bearing journal (1) of audio system controller (2) must be seated exactly in mounting (3). NOTE: Follow instructions for handling optical fibers . See 61 00 ... NOTES ON HANDLING OPTICAL FIBERS 2008 BMW 750i 2007-08 ACCESSORIES & EQUIPMENT Audio, Navigation & Anti-Theft - Repair Instructions - 750i, 750Li
Fig. 12: Identifying Bearing Journal, Audio System Controller & Mounting Courtesy of BMW OF NORTH AMERICA, INC. Replacement only: Release screws (1). Remove phone board (2) in direction of arrow from audio system controller. Fig. 13: Removing Phone Board Courtesy of BMW OF NORTH AMERICA, INC. 65 12 230 REMOVING AND INSTALLING DAB TUNER Necessary preliminary tasks: IMPORTANT: Read and comply with notes on protection against electrostatic damage (ESD protection) . See 61 35 ... NOTES ON ESD PROTECTION (ELECTRO STATIC DISCHARGE) . NOTE: Follow instructions for handling optical fibres. See 61 00 ... NOTES ON HANDLING OPTICAL FIBERS . 2008 BMW 750i 2007-08 ACCESSORIES & EQUIPMENT Audio, Navigation & Anti-Theft - Repair Instructions - 750i, 750Li
Get your hands on the 2006 BMW 7-SERIES E65/E66/E67/E68 Service and Repair Manual. Whether you're a professional mechanic or a DIY enthusiast, these auto repair manuals provide comprehensive instructions and procedures to fix your vehicle. With detailed technical data, diagrams, and a complete list of car parts, these manuals are invaluable for immediate repairs and simple part replacements. The step-by-step guides, illustrations, and wiring schematics make it easy for even novice car mechanics to follow along. You can also find a complete list of accessories to enhance your engine's performance.
The repair manuals contain the same information used by the company's engineers and cover all models and repairs from A-Z. They include hundreds of photos and provide complete instructions, wiring schematics, and specifications for easy vehicle repair. These manuals are compatible with Windows Vista32 and 64, XP, ME, 98, NT, 2000, and Mac. They cover maintenance, engine, control system, mechanical, fuel service specifications, emission control, and much more.
These highly detailed repair manuals are printable, allowing you to take the necessary pages and diagrams with you to your vehicle or workshop. You can even enlarge and print specific images as needed. The manuals are compatible with all versions of Windows and Mac, and they are printable. With these manuals, you can save time, become more knowledgeable about your car, and perform simple repairs at your convenience. The printable pages ensure that the manual stays clean and intact, always available for quick reference.
Don't miss out on this opportunity to have all the car information you need at your fingertips. Take control of your car repairs and maintenance with these comprehensive auto repair manuals.
Maintenance
Engine
Control System
Mechanical
Fuel Service Specifications
Emission Control
Intake Exhaust Cooling
Lube
Ignition Starting Charging
Auto Transmission Clutch
Manual Transmission
Transfer Propeller Shaft
Drive Shaft
Differential
Axle Suspension
Tire & Wheel
Brake Control
Brake
Parking Brake
Steering Column
Power Steering
Air Condition
Suppl Restraint System
Seat Belt
Engine Immobilizer
Cruise Control
Wiper & Washer
Door Lock
Meter Audio/Visual
Horn
Windshield/Glass Mirror
Instrument Panel
Seat
Engine Hood/ Door
Exterior & Interior
Electrical
Multiplex/ Can Communication
And much more...
These manuals are a must-have for anyone looking to maintain, service, diagnose, and repair their vehicle with ease. Get your hands on the comprehensive repair manual for the 2006 BMW 7-SERIES E65/E66/E67/E68 and take charge of your car maintenance and repairs.
Recently Viewed
5,521,897Happy Clients
2,594,462eManuals
1,120,453Trusted Sellers
15Years in Business
Price:
Actual Price:
2006 BMW 7-Series E65/E66/E67/E68 Service and Repair Manual