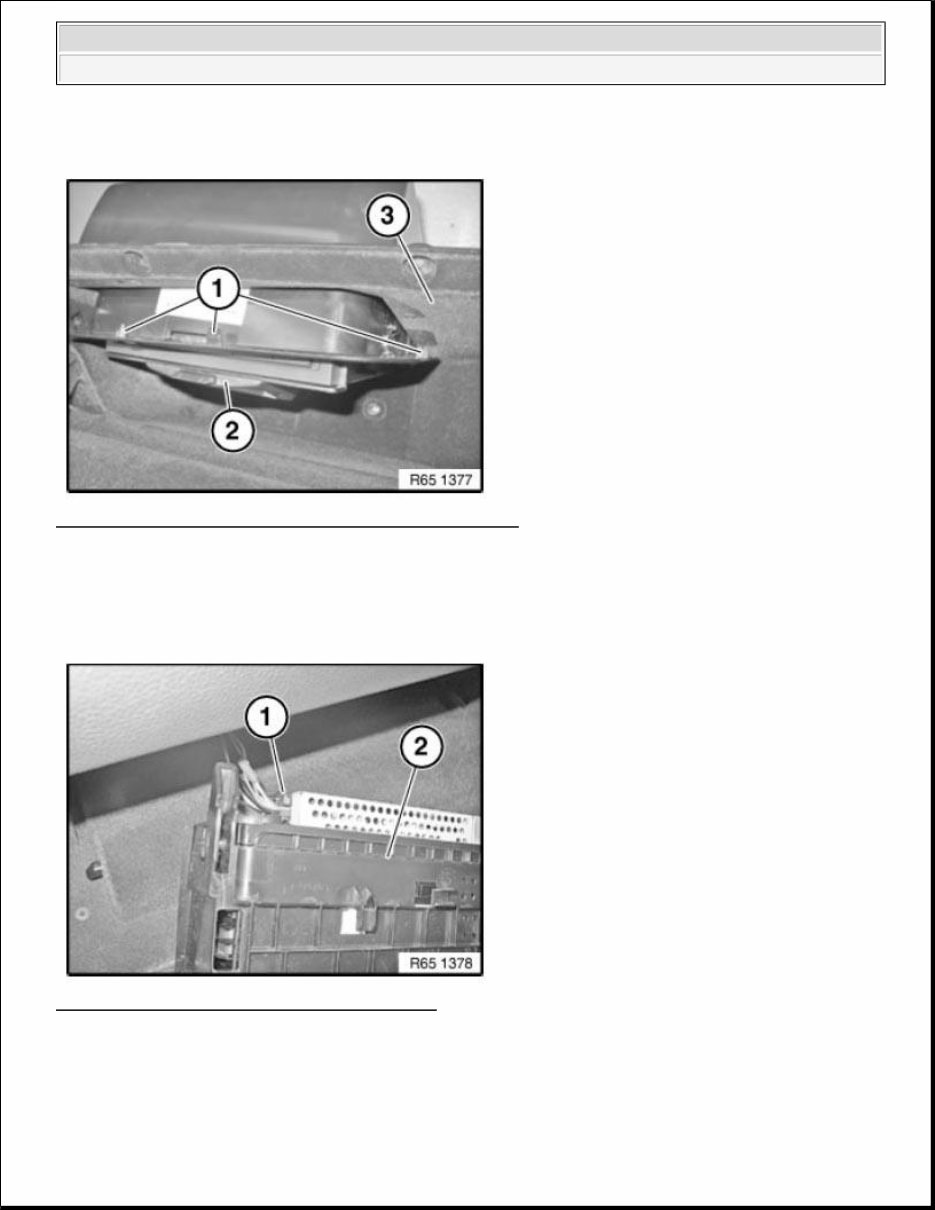
ACCESSORIES AND BODY, CAB Audio, Navigation And Anti-Theft - 550i GT MONO RADIO 65 11 075 REMOVING AND INSTALLING/REPLACING DVD CHANGER Necessary preliminary tasks Clamp off BATTERY NEGATIVE LEAD . Open glove box. Release screws (1). Remove bracket for DVD changer (2) downward. Fig. 1: Removing Bracket For DVD Changer Courtesy of BMW OF NORTH AMERICA, INC. Installation: Make sure bracket of DVD changer (1) is correctly seated in glove compartment (3). IMPORTANT: Read and comply with NOTES on protection against electrostatic damage (ESD protection). NOTE: Comply with notes and instructions on HANDLING OPTICAL FIBRES . 2009-2015 BMW 550i GT REPAIR MANUAL
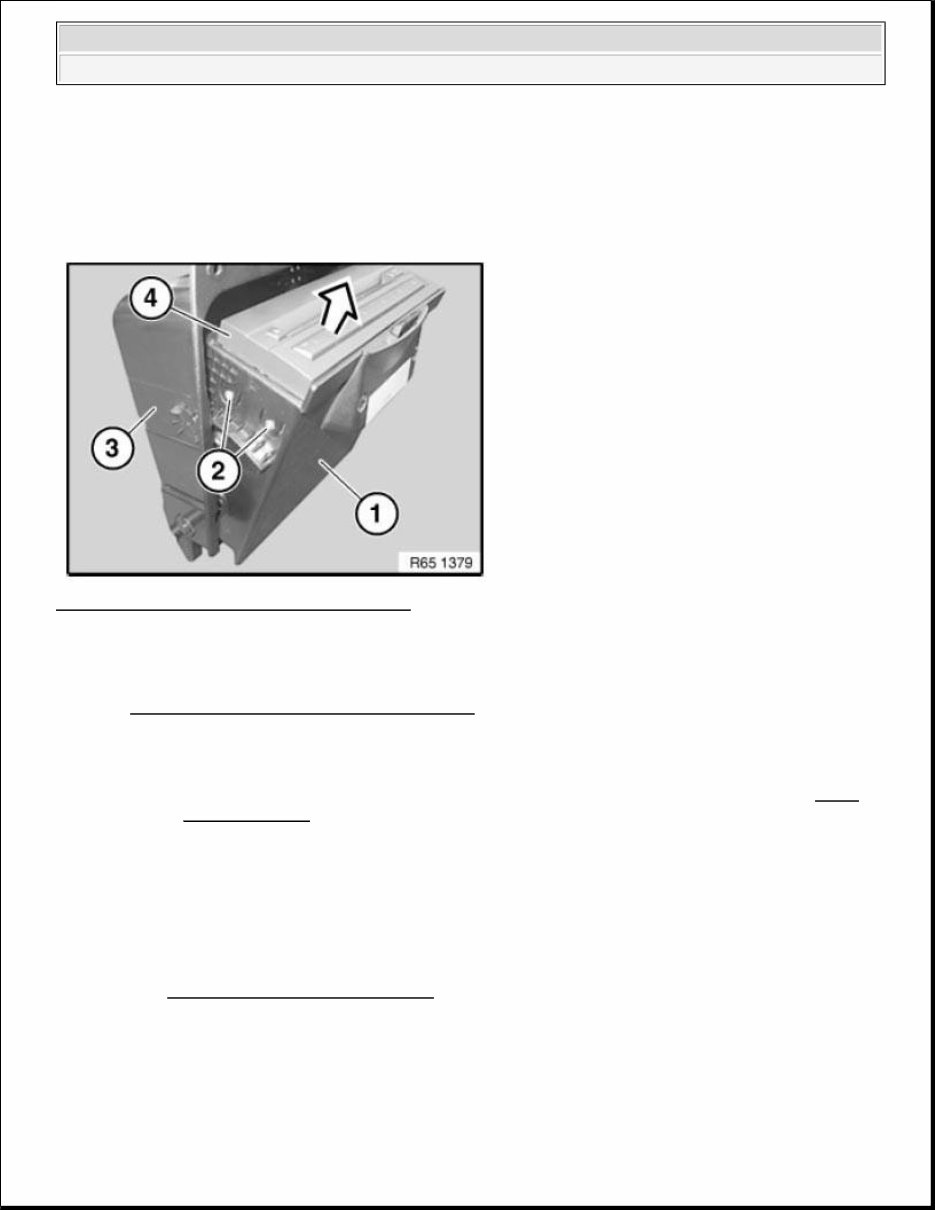
Guide lugs (1) must fit correctly in the corresponding recesses. Fig. 2: Identifying DVD Changer And Glove Compartment Courtesy of BMW OF NORTH AMERICA, INC. Unfasten plug connection (1) and disconnect. Remove bracket (2) with DVD changer. Fig. 3: Identifying Plug Connection And Bracket Courtesy of BMW OF NORTH AMERICA, INC. Replacement: 2010 BMW 550i GT ACCESSORIES AND BODY, CAB Audio, Navigation And Anti-Theft - 550i GT
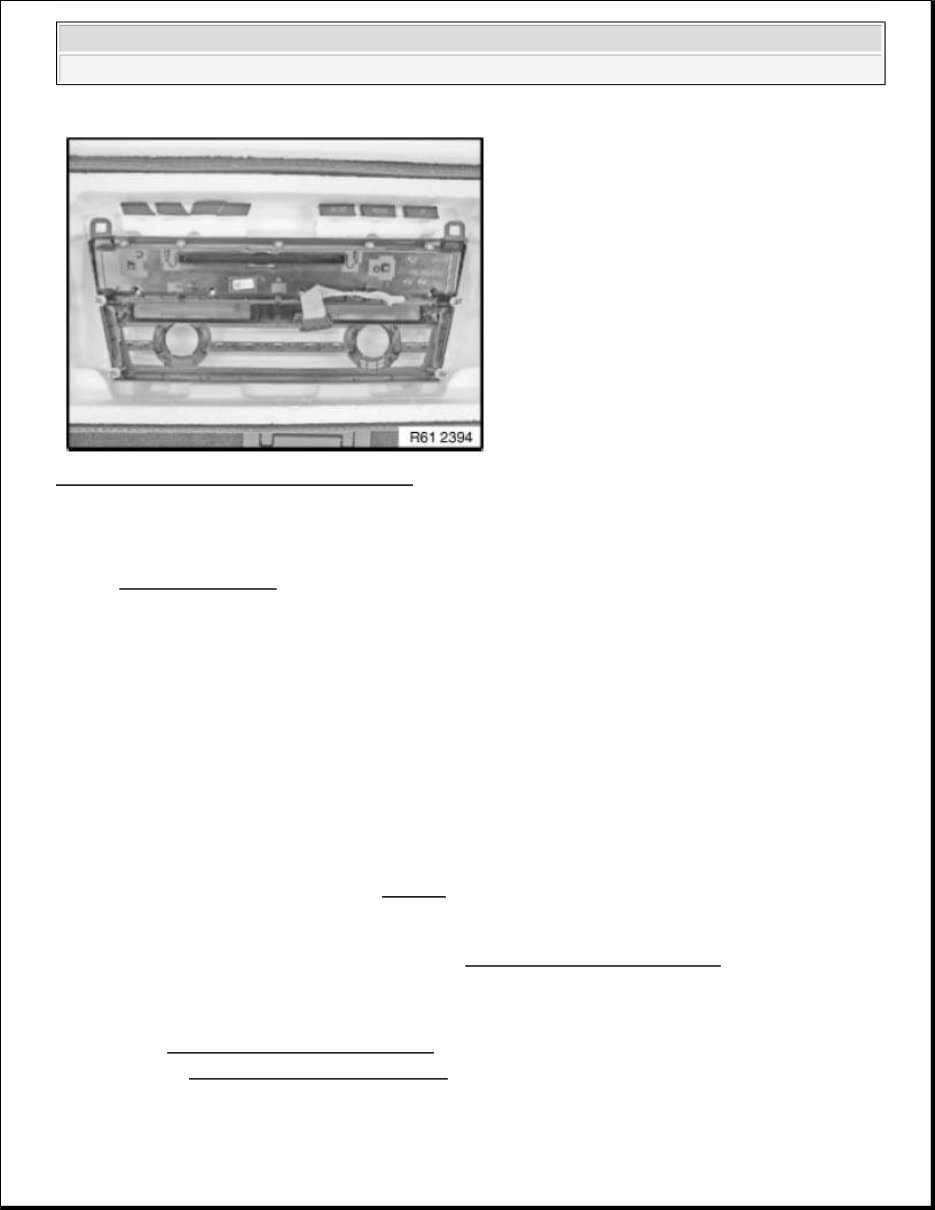
Open fold-down compartment (1). Release left and right screws (2). Pull DVD changer (4) in direction of arrow out of bracket (3). Fig. 4: Pulling DVD Changer Out Of Bracket Courtesy of BMW OF NORTH AMERICA, INC. Replacement: Carry out VEHICLE PROGRAMMING/ENCODING . 61 31 823 REPLACING AUDIO UNIT Necessary preliminary tasks Remove RADIO AND IHKA CONTROLS . IMPORTANT: Read and comply with notes on protection against electrostatic damage (ESD PROTECTION) . IMPORTANT: Use of supplied gloves is mandatory Carry out installation in a dust-free workshop area only. To avoid damage, do not touch or dirty the display area. IMPORTANT: Retrofitting must only be done in the supplied installation cassettes. Use of supplied gloves is mandatory so that there is no damage to the display. 2010 BMW 550i GT ACCESSORIES AND BODY, CAB Audio, Navigation And Anti-Theft - 550i GT
Fig. 5: Identifying Radio And IHKA Controls Courtesy of BMW OF NORTH AMERICA, INC. Installation note: Convert IHKA CONTROLS to new audio unit. STEREO RADIO, AMPLIFIER 65 12 315 REMOVING AND INSTALLING (REPLACING) HU-H There is a hard disk installed in the headunit. Carry out mechanical work on the headunit and adjacent components with care. Avoid subjecting the headunit to vibration/shocks. Necessary preliminary work Remove RADIO AND IHKA CONTROLS . Disconnect NEGATIVE BATTERY CABLE (F03: disconnect both negative battery cables). IMPORTANT: Risk of damage! IMPORTANT: Read and comply with NOTES on protection against electrostatic damage (ESD protection). NOTE: Comply with notes and notes on HANDLING OPTICAL FIBRES . 2010 BMW 550i GT ACCESSORIES AND BODY, CAB Audio, Navigation And Anti-Theft - 550i GT
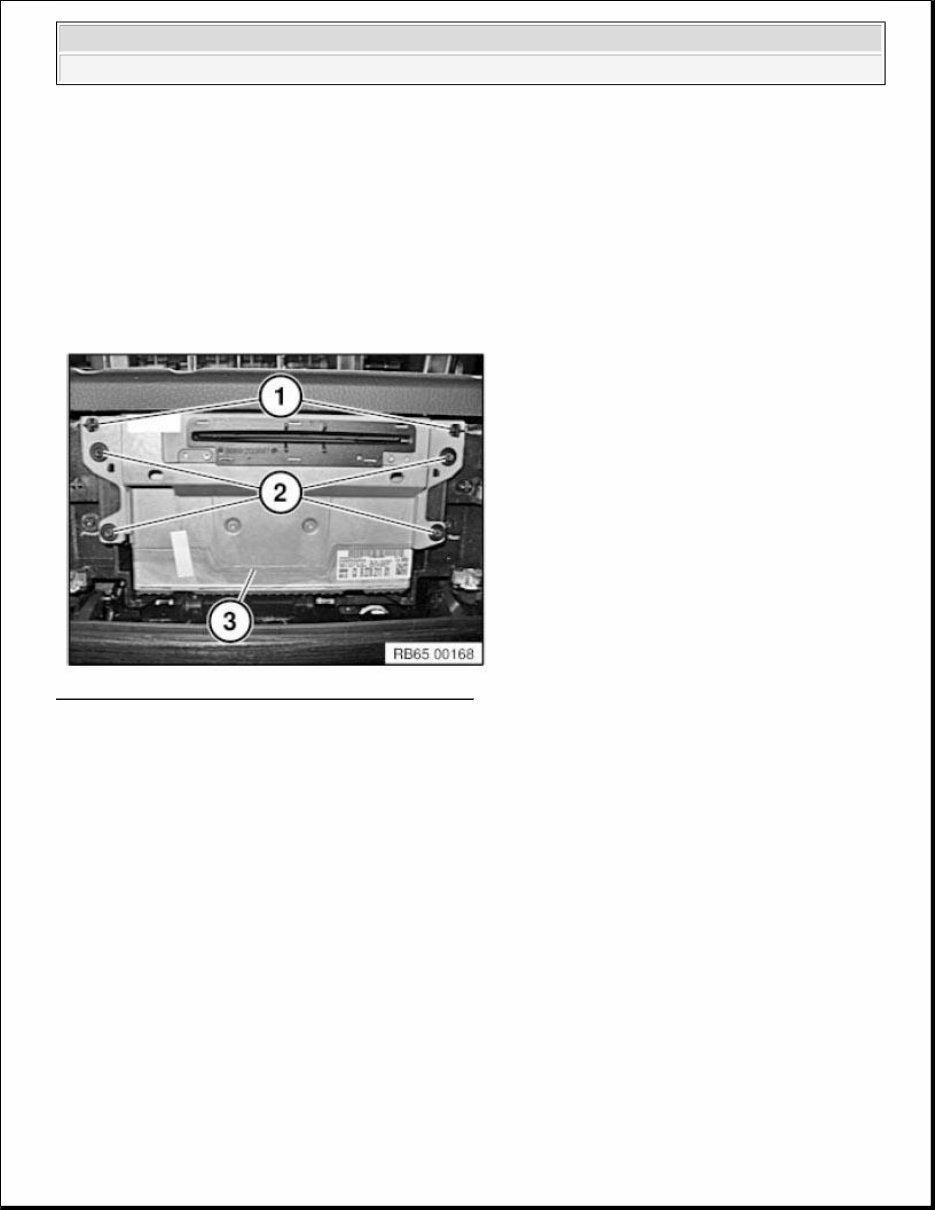
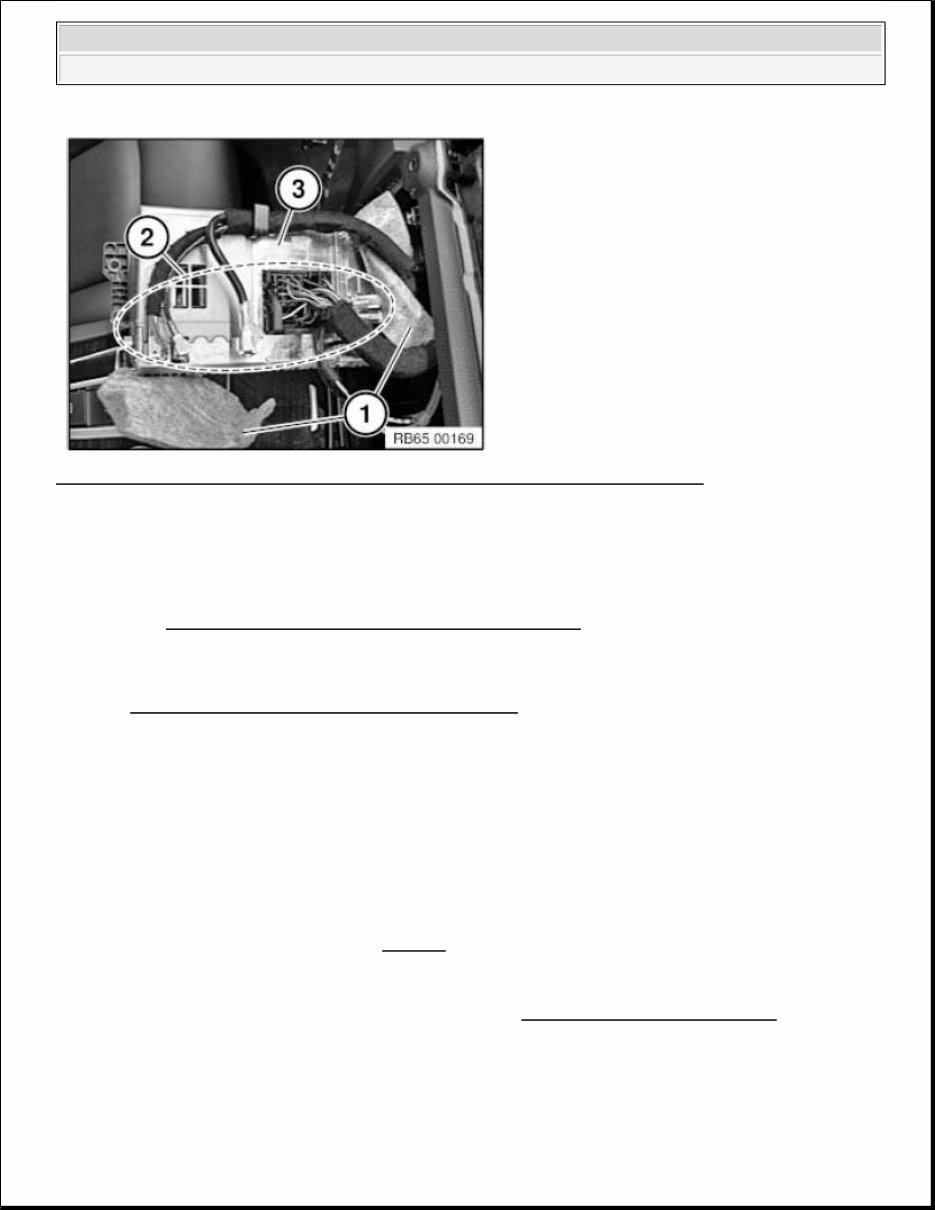
Unfasten screws (2). Pull headunit (3) out of guide. Installation note: Make sure headunit (3) is correctly seated in guide lugs (1). Fig. 6: Identifying Headunit, Guide Lugs And Screws Courtesy of BMW OF NORTH AMERICA, INC. Set the protective nonwoven material (1) aside as shown. Unlock plug connections. (2) and disconnect. Remove headunit (3). NOTE: Picture for example purposes only! 2010 BMW 550i GT ACCESSORIES AND BODY, CAB Audio, Navigation And Anti-Theft - 550i GT
Fig. 7: Identifying Protective Nonwoven Material, Headunit And Plug Connections Courtesy of BMW OF NORTH AMERICA, INC. Only for US models with satellite radio: When replacing the headunit, additional work is required! Refer to REPLACING SATELLITE TUNER, AS OF 09/2009 . Replacement: Carry out VEHICLE PROGRAMMING AND ENCODING . Additionally 1-Series F2x and 3-Series F3x: Load service history: 05 Maintenance and Pre-Delivery Check Service history 65 12 072 REMOVING AND INSTALLING (REPLACING) AMPLIFIER (TOP HIFI SYSTEM) Necessary preliminary work: IMPORTANT: Read and comply with NOTES on protection against electrostatic damage (ESD protection). NOTE: Comply with notes and instructions on HANDLING OPTICAL FIBRES . 2010 BMW 550i GT ACCESSORIES AND BODY, CAB Audio, Navigation And Anti-Theft - 550i GT
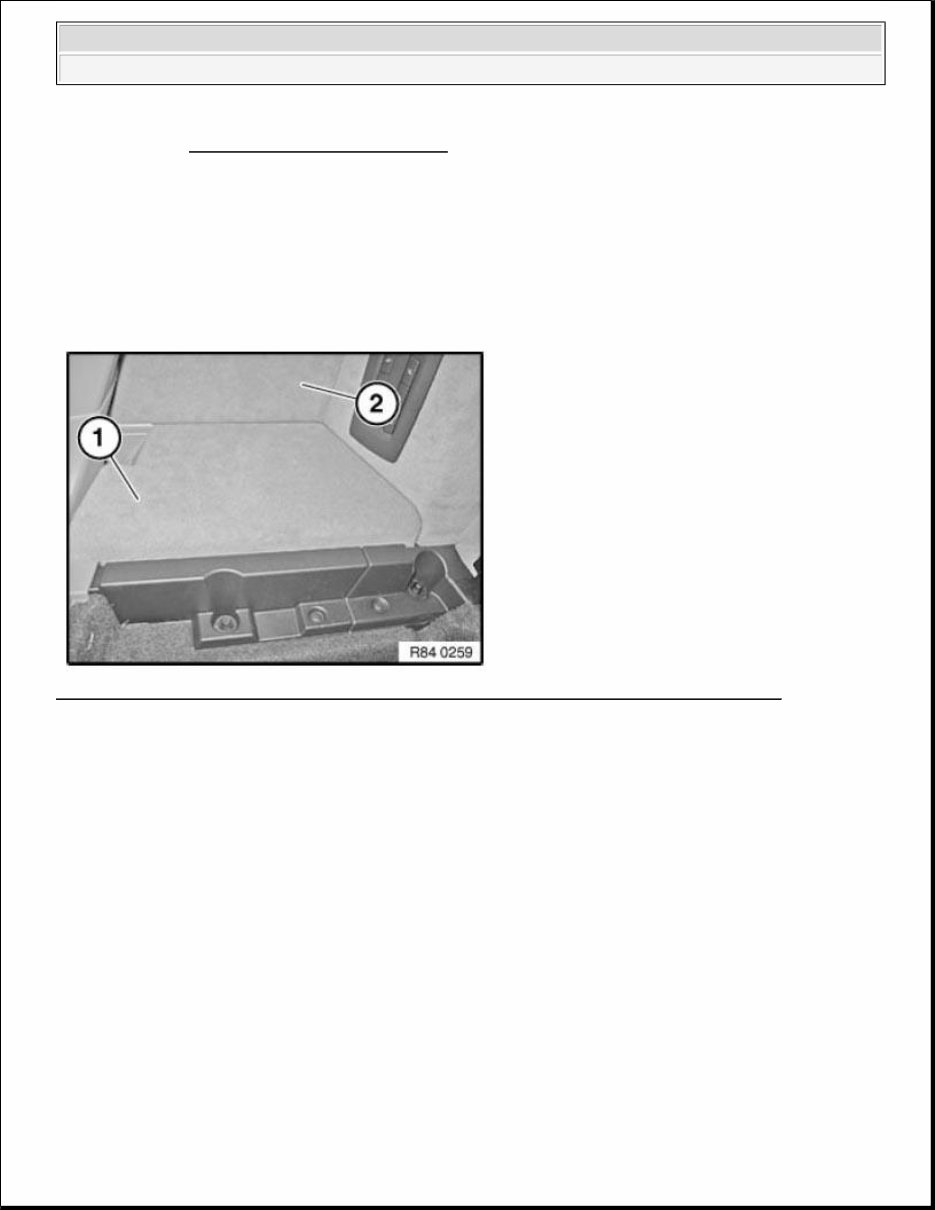
Disconnect NEGATIVE BATTERY CABLE . Remove lid of left luggage compartment trim panel (1). Remove luggage compartment flap (2). Installation note: Make sure lid (1) and flap (2) are correctly seated. Fig. 8: Identifying Luggage Compartment Flap And Left Luggage Compartment Trim Panel Courtesy of BMW OF NORTH AMERICA, INC. Unscrew nuts (1). Lift out expanding rivets (2). Remove left shelf support (3). 2010 BMW 550i GT ACCESSORIES AND BODY, CAB Audio, Navigation And Anti-Theft - 550i GT
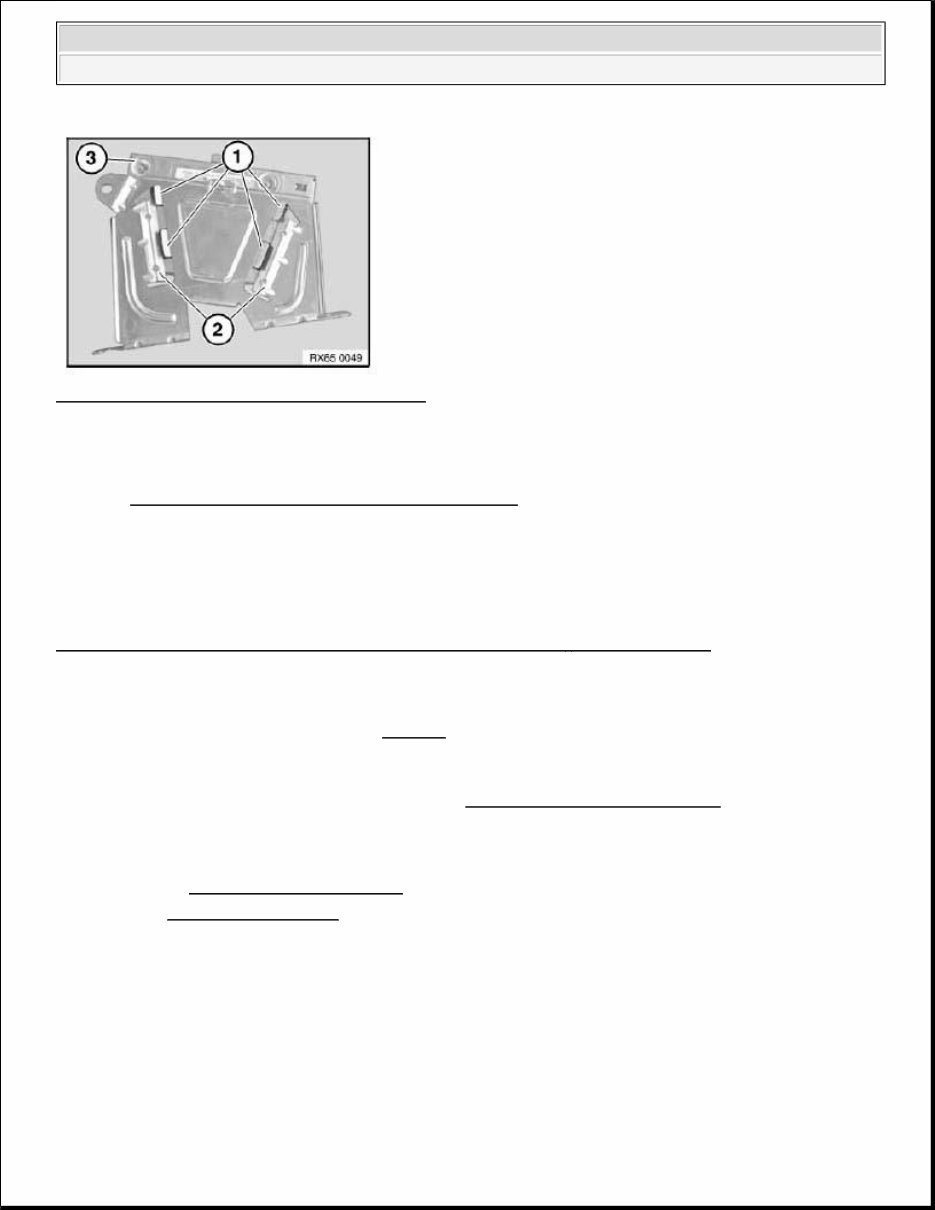
Fig. 9: Identifying Left Shelf Support, Expanding Rivets And Nut Courtesy of BMW OF NORTH AMERICA, INC. Release screw (1). Remove amplifier (2) in direction of arrow from holder (3). Unlock plug connections and disconnect. Fig. 10: Removing Amplifier From Holder Courtesy of BMW OF NORTH AMERICA, INC. NOTE: Until 09/2009 a Top Hifi amplifier with a different pin assignment is installed! 2010 BMW 550i GT ACCESSORIES AND BODY, CAB Audio, Navigation And Anti-Theft - 550i GT
Install cable jumper consisting of socket (1) (BMW Parts Service 6901844) and wire jumper (2) in connector (3). Create wire jumper (2) from wire (cross-section 0.75 mm 2 ) and two stops (BMW Parts Department 1393724). Then connect pins 1 and 2 in the socket (1) with wire jumper (2). Fig. 11: Identifying Cable Jumper, Wire Jumper, Connector And Connector Chamber Courtesy of BMW OF NORTH AMERICA, INC. Installation note: Tabs (1) must be correctly slid into guide (2). Check that amplifier (3) is securely seated. NOTE: Connector chamber (4) is not included in current version and remains unused in new replacement Top HiFi amplifier! NOTE: Picture for example purposes. 2010 BMW 550i GT ACCESSORIES AND BODY, CAB Audio, Navigation And Anti-Theft - 550i GT
Fig. 12: Identifying Tabs, Guide And Amplifier Courtesy of BMW OF NORTH AMERICA, INC. Replacement Carry out VEHICLE PROGRAMMING AND ENCODING . 65 12 053 REMOVING AND INSTALLING/RENEWING CENTRAL BASS SPEAKER - FRONT PASSENGER SIDE - (UNDER FRONT SEAT) Operation is identical to: REMOVING AND INSTALLING CENTRAL BASS SPEAKER - DRIVER'S SIDE 65 12 265 REMOVING AND INSTALLING/REPLACING DVD PLAYER IN REAR CONSOLE Necessary preliminary work Disconnect BATTERY EARTH LEAD . Remove CENTRE CONSOLE . Unlock plug connections (1) and disconnect. IMPORTANT: Read and comply with NOTES on protection against electrostatic damage (ESD protection). NOTE: Comply with notes and notes on HANDLING OPTICAL FIBRES . 2010 BMW 550i GT ACCESSORIES AND BODY, CAB Audio, Navigation And Anti-Theft - 550i GT
When it comes to repairing your 2011 BMW 550I, having a comprehensive Auto Repair Manual can be invaluable. Whether you're a professional mechanic or a DIY enthusiast, these manuals provide detailed instructions and procedures to help you fix your vehicle's problems. They are especially useful for immediate repairs and can save you both time and money. The manual contains technical data, diagrams, a complete list of car parts, and pictures, making it easy for even novice mechanics to follow along. It covers all models and repairs from A-Z, providing step-by-step instructions, wiring schematics, and specifications to facilitate easy vehicle repair. The repair manuals are compatible with various operating systems and are printable, allowing you to take the necessary pages with you to the garage or workshop. With these manuals, you can stay up-to-date and gain more knowledge about your vehicle, ultimately reducing your reliance on professional mechanics for simple repairs. Plus, all email questions are answered within a 24-hour period, ensuring you receive the support you need. These manuals are available for a wide range of makes and models, and some are even offered in Russian. So, if you're looking to enhance the performance of your engine or tackle a do-it-yourself project, these Auto Repair Manuals are an excellent resource to have on hand.
Maintenance
Engine
Control System
Mechanical
Fuel Service Specifications
Emission Control
Intake Exhaust Cooling
Lube
Ignition Starting Charging
Auto Transmission Clutch
Manual Transmission
Transfer Propeller Shaft
Drive Shaft
Differential
Axle Suspension
Tire & Wheel
Brake Control
Brake
Parking Brake
Steering Column
Power Steering
Air Condition
Suppl Restraint System
Seat Belt
Engine Immobilizer
Cruise Control
Wiper & Washer
Door Lock
Meter Audio/Visual
Horn
Windshield/Glass Mirror
Instrument Panel
Seat
Engine Hood/ Door
Exterior & Interior
Electrical
Multiplex/ Can Communication
And much more...
These repair manuals are compatible with all versions of Windows and Mac, and they are printable. They provide a wealth of information, allowing you to take control of your car's maintenance and repairs. With these manuals, you can keep your vehicle in top condition and enjoy the satisfaction of fixing it yourself.