ACCESSORIES AND BODY, CAB
Distance Systems, Cruise control - Repair - 335d
6612 RADIO-CONTROLLED LOCKING SYSTEM
66 12 100 REMOVING AND INSTALLING/REPLACING SLIDE-IN UNIT FOR RADIO CONTROL
KEY
Special tools required
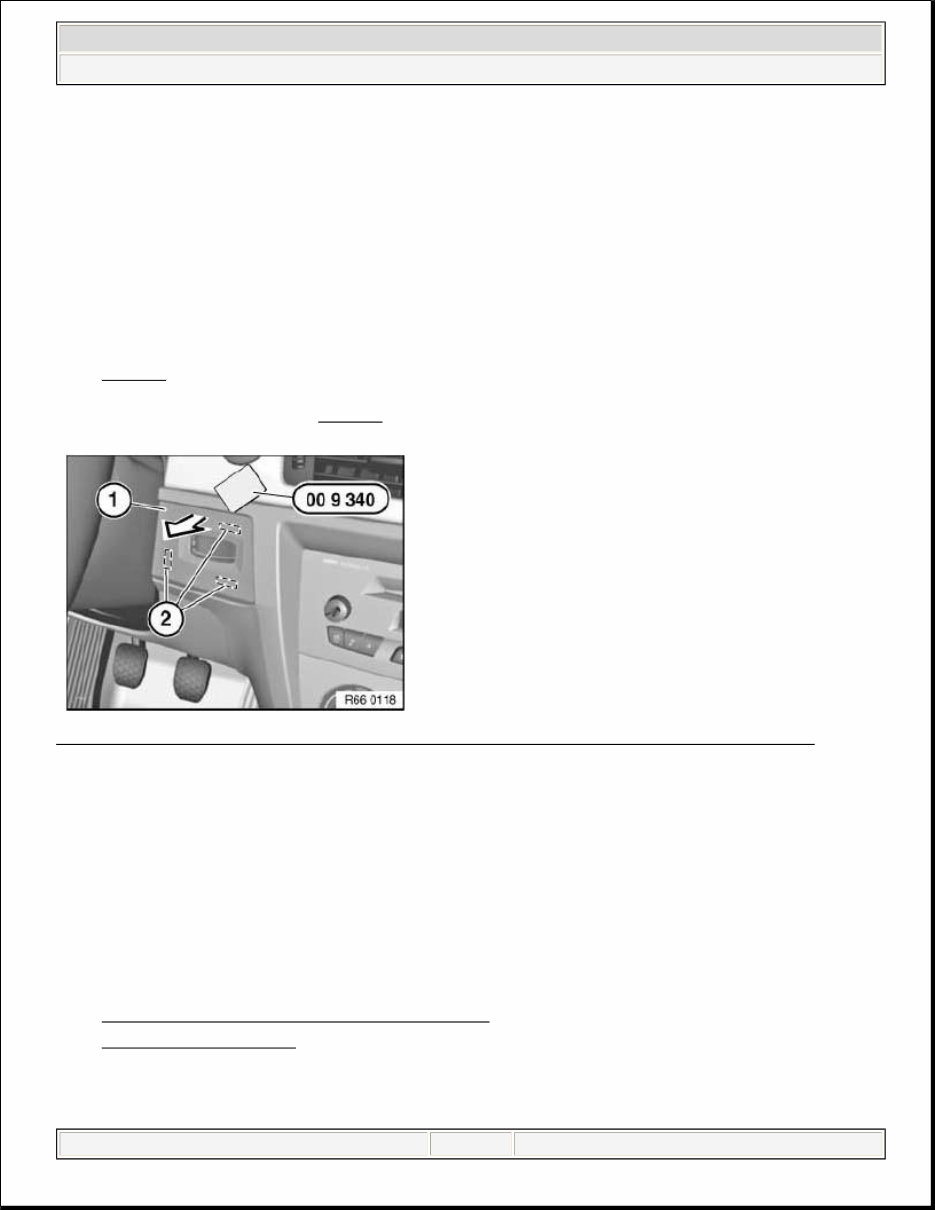
00 9 340
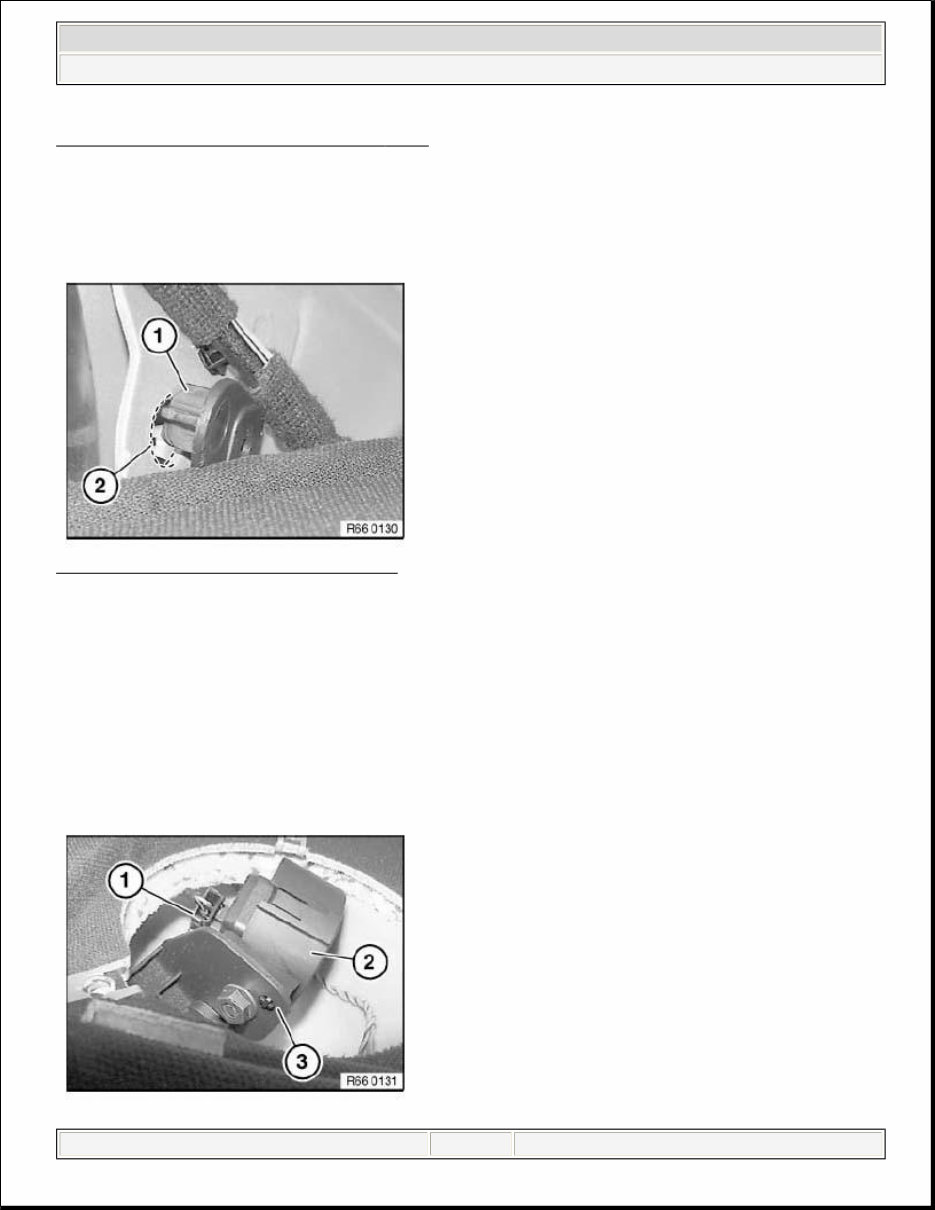
Lever out trim (1) with special tool 00 9 340 at retaining points (2) in direction of arrow.
Fig. 1: Levering Out Trim With Special Tool 00 9 340 At Retaining Points In Direction Of Arrow
Courtesy of BMW OF NORTH AMERICA, INC.
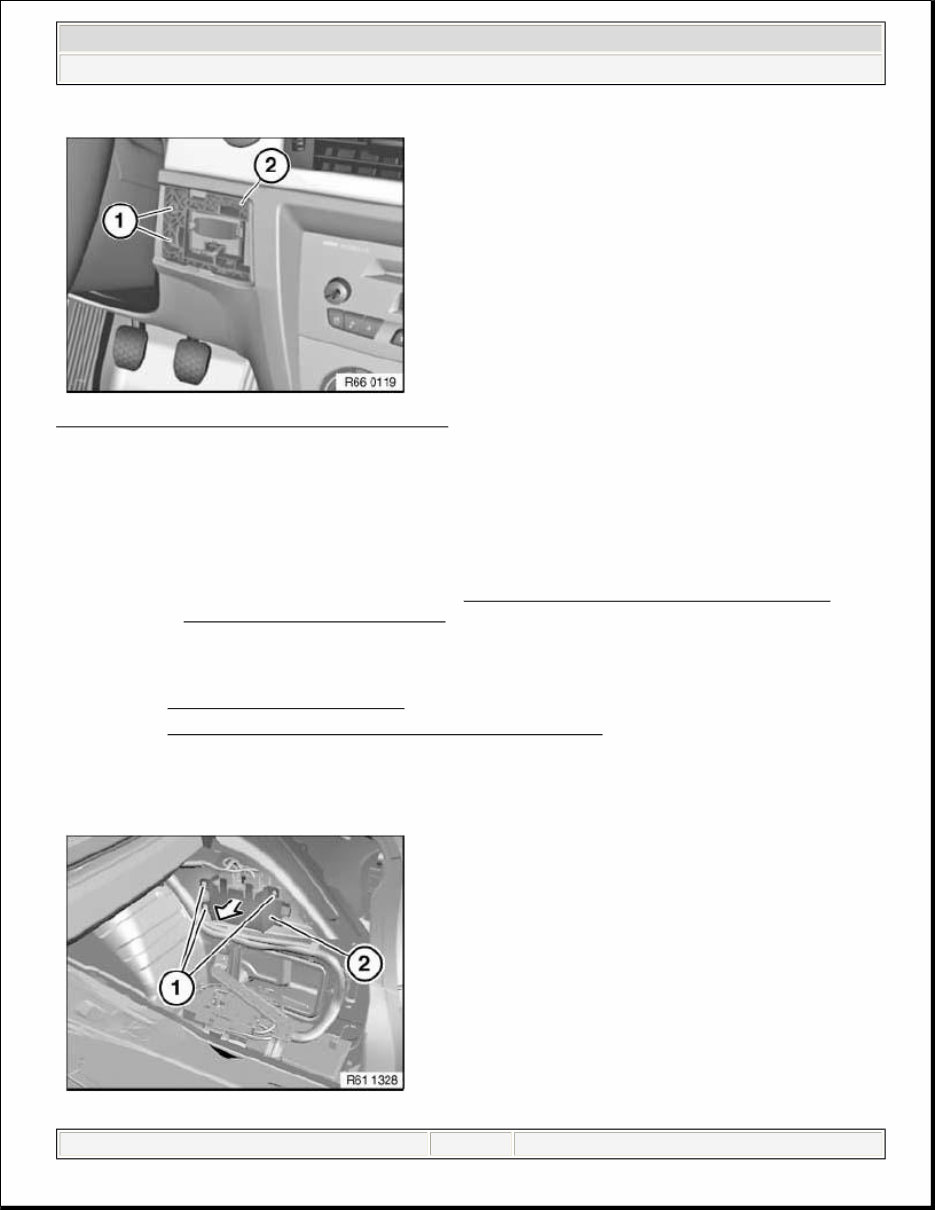
Release screws (1).
Pull back slide-in unit for radio control key (2) with associated ribbon cable.
Replace the ribbon cable if damaged.
The ribbon cable leads to:
CONTROL UNIT FOR CAR ACCESS SYSTEM
START/STOP SWITCH
Remove slide-in unit for radio control ke y (2).
IMPORTANT: Carefully unlock ribbon cable plug connection.
2011 BMW 335d
ACCESSORIES AND BODY, CAB Distance Systems, Cruise control - Repair - 335d
2011 BMW 335d
ACCESSORIES AND BODY, CAB Distance Systems, Cruise control - Repair - 335d
Tuesday, September 09, 2014 2:14:51 PM Page 1 © 2011 Mitchell Repair Information Company, LLC. Tuesday, September 09, 2014 2:14:54 PM Page 1 © 2011 Mitchell Repair Information Company, LLC.
Fig. 2: Identifying Screws And Radio Control Key
Courtesy of BMW OF NORTH AMERICA, INC.
6620 PARK DISTANCE CONTROL
66 20 508 REMOVING AND INSTALLING (REPLACING) CONTROL UNIT (PARK DISTANCE
CONTROL)
Necessary preliminary tasks
Remove TRIM FROM REAR APRON
Remove RIGHT LUGGAGE COMPARTMENT TRIM PANEL
Partially detach insulating mat.
Release screws (1) and pull back device holder (2).
IMPORTANT: Read and comply with notes on PROTECTION AGAINST ELECTROSTATIC
DAMAGE (ESD PROTECTION) .
2011 BMW 335d
ACCESSORIES AND BODY, CAB Distance Systems, Cruise control - Repair - 335d
Tuesday, September 09, 2014 2:14:51 PM Page 2 © 2011 Mitchell Repair Information Company, LLC.
Fi g . 3: Pullin g Back Device Holder
Courtesy of BMW OF NORTH AMERICA, INC.
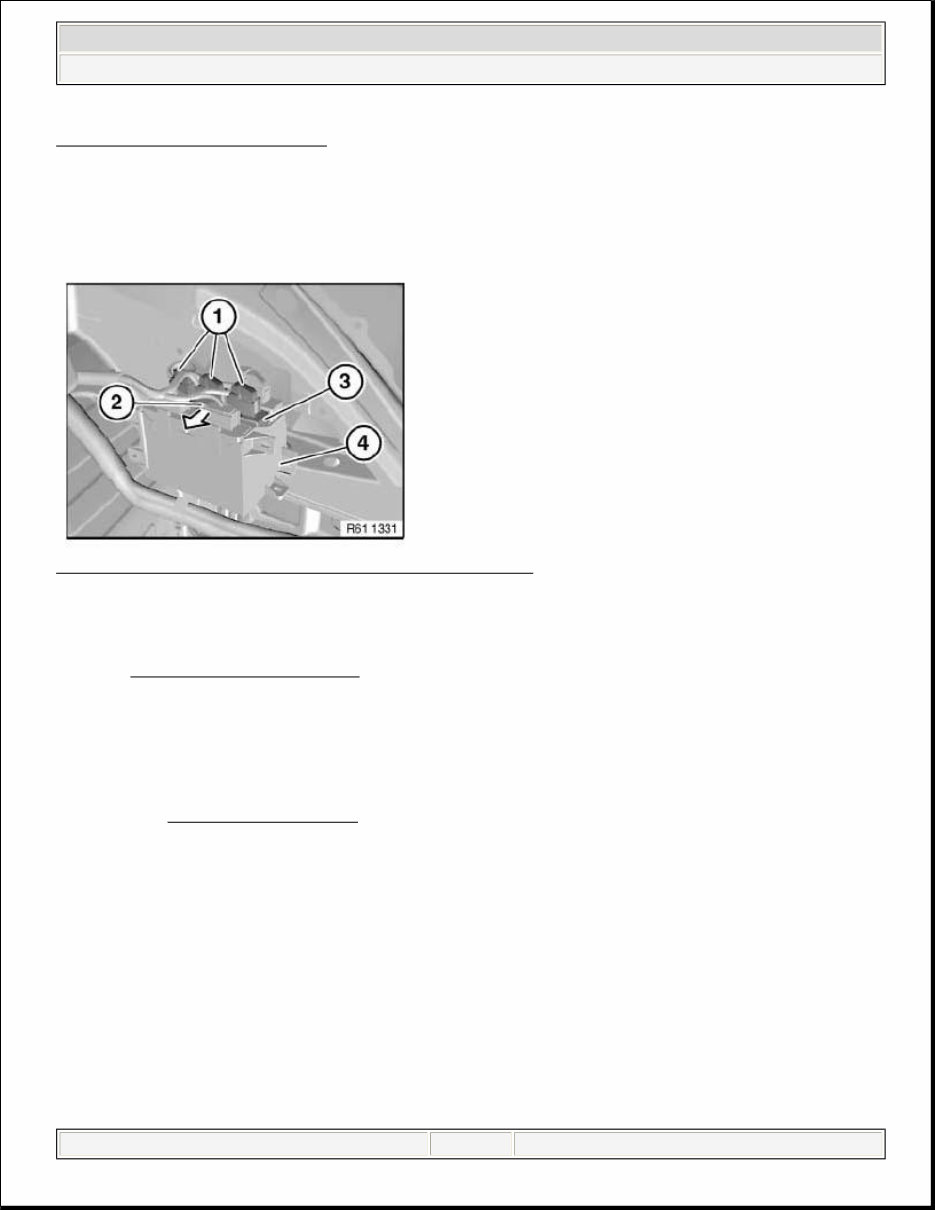
Unlock plug connections (1) and disconnect.
Unlock catch (2) in direction of arrow and remove control unit (3) upwards from device carrier (4).
Fig. 4: Removing Control Unit Upward From Device Carrier
Courtesy of BMW OF NORTH AMERICA, INC.
Replacement:
Carry out PROGRAMMING/CODING .
66 20 540 REMOVING AND INSTALLING/REPLACING A REAR ULTRASONIC TRANSDUCER
(PARK DISTANCE CONTROL)
Necessary preliminary tasks
Remove REAR BUMPER TRIM
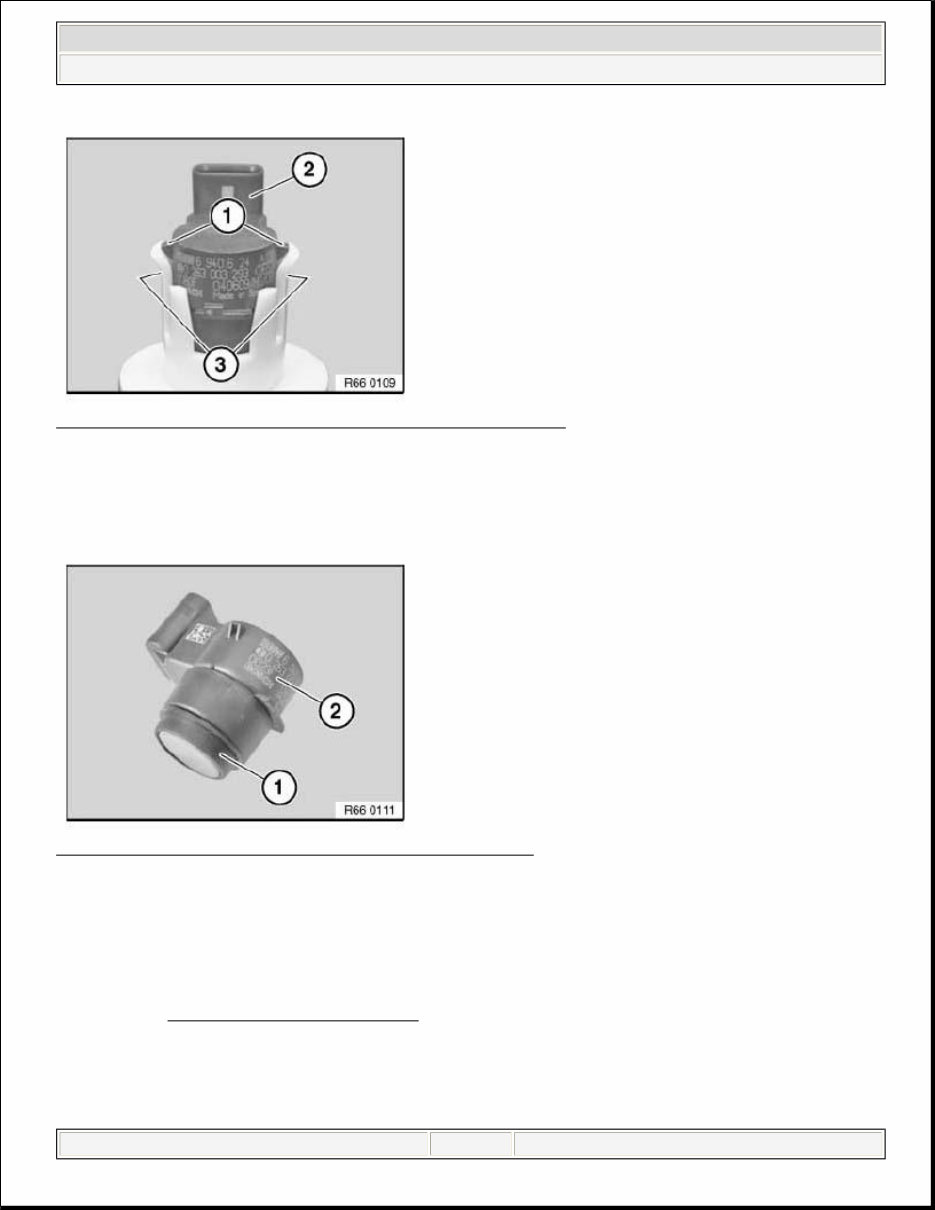
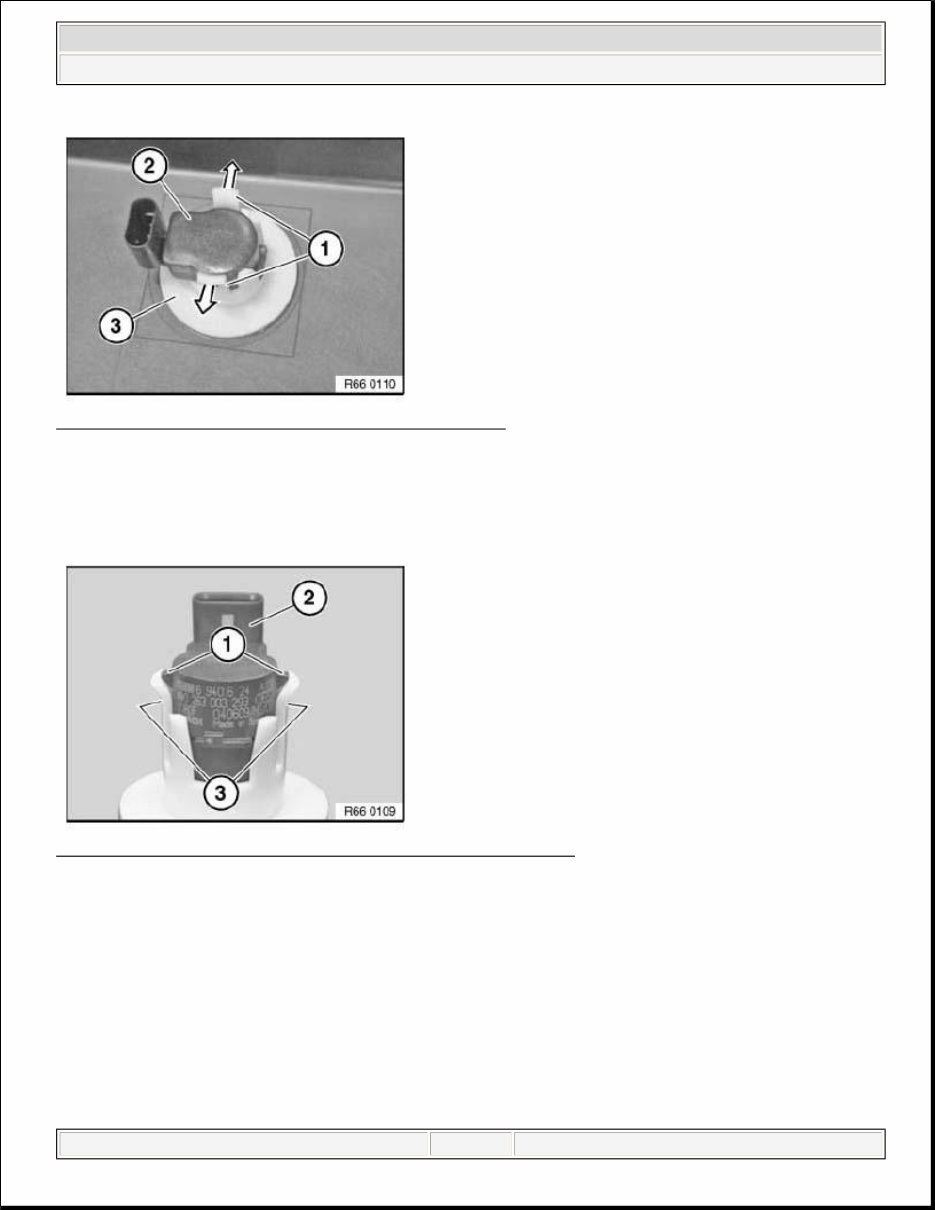
Unlock retainin g tabs (1) in direction of arrow and pull ultrasonic transducer (2) out of holder (3).
2011 BMW 335d
ACCESSORIES AND BODY, CAB Distance Systems, Cruise control - Repair - 335d
Tuesday, September 09, 2014 2:14:51 PM Page 3 © 2011 Mitchell Repair Information Company, LLC.
Fig. 5: Unlocking Retaining Tabs In Direction Of Arrow
Courtesy of BMW OF NORTH AMERICA, INC.
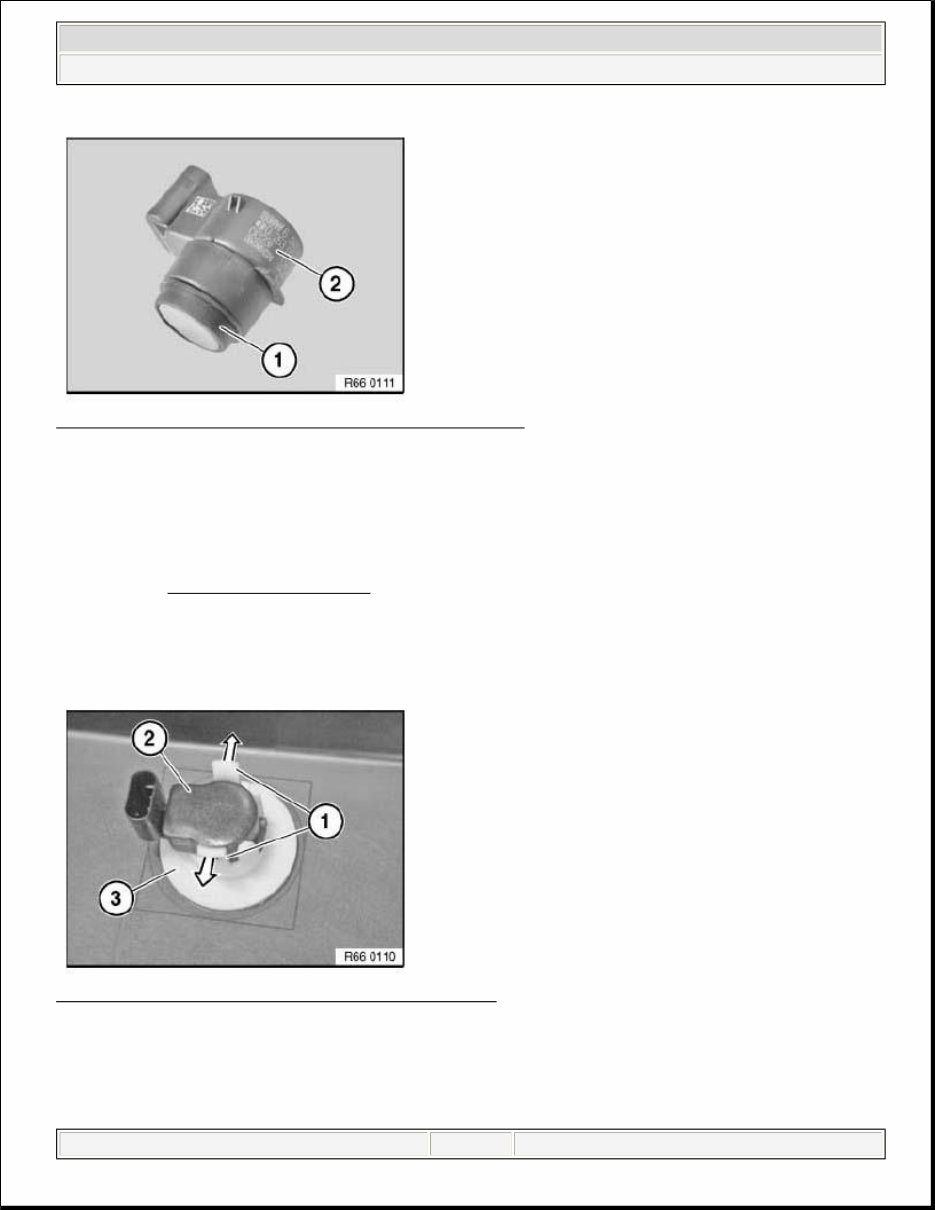
I nstallation:
Retaining hooks (1) of ultrasonic transducer (2) must engage exactly in mountings (3).
Fig. 6: Identifying Hooks, Ultrasonic Transducer And Mountings
Courtesy of BMW OF NORTH AMERICA, INC.
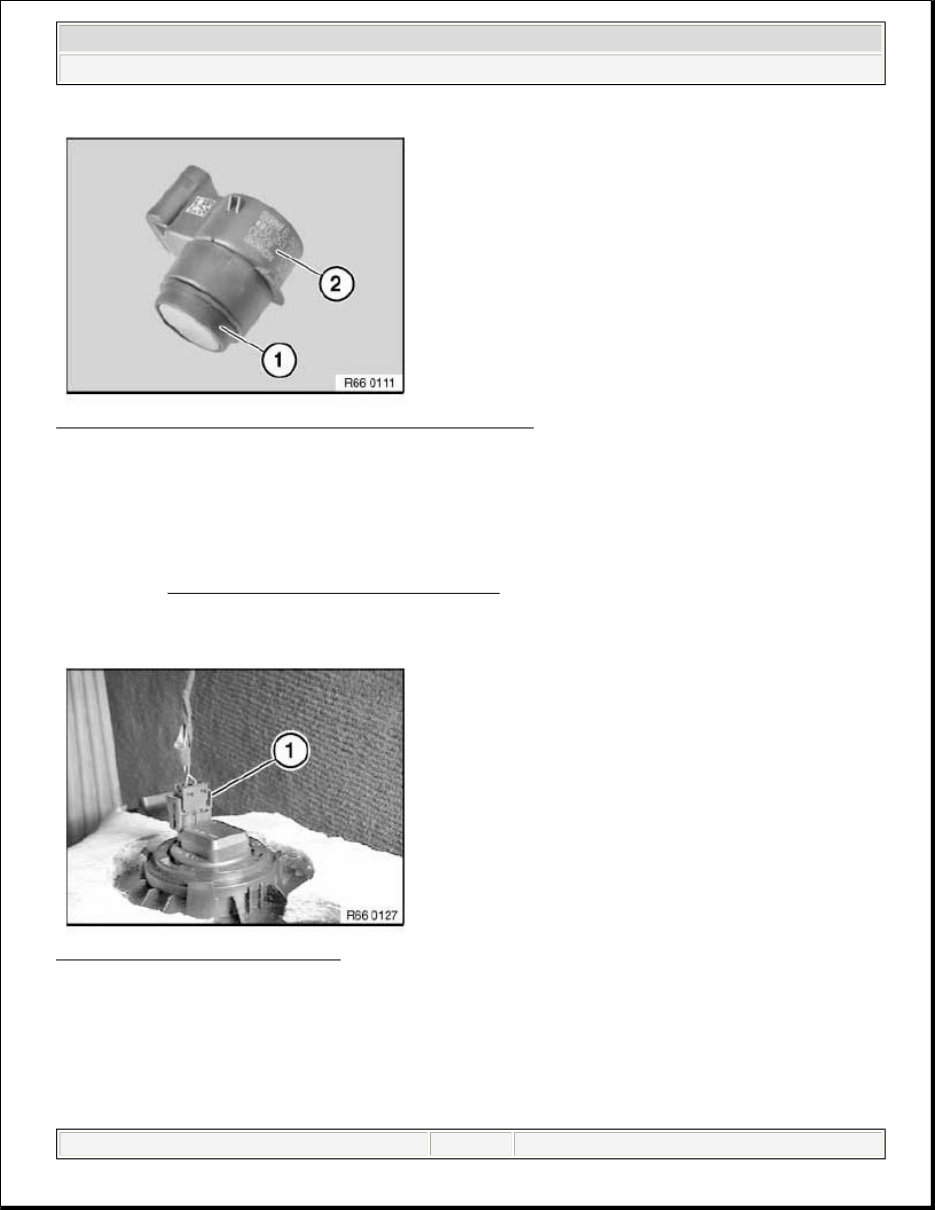
I nstallation:
Make sure rubber rin g (1) is correctl y seated on ultrasonic transducer (2).
2011 BMW 335d
ACCESSORIES AND BODY, CAB Distance Systems, Cruise control - Repair - 335d
Tuesday, September 09, 2014 2:14:51 PM Page 4 © 2011 Mitchell Repair Information Company, LLC.
Fig. 7: Identifying Rubber Ring And Ultrasonic Transducer
Courtesy of BMW OF NORTH AMERICA, INC.
66 20 520 REMOVING AND INSTALLING/REPLACING AN ULTRASONIC TRANSDUCER AT
FRONT (INSIDE) (PARK DISTANCE CONTROL)
Necessary preliminary tasks
Remove FRONT BUMPER TRIM
Disconnect plug connection.
Unlock retaining tabs (1) in direction of arrow and pull ultrasonic transducer (2) out of holder (3).
Fig. 8: Unlocking Retaining Tabs In Direction Of Arrow
Courtesy of BMW OF NORTH AMERICA, INC.
I nstallation:
Retainin g hooks (1) of ultrasonic transducer (2) must en g a g e exactl y in mountin g s (3).
2011 BMW 335d
ACCESSORIES AND BODY, CAB Distance Systems, Cruise control - Repair - 335d
Tuesday, September 09, 2014 2:14:51 PM Page 5 © 2011 Mitchell Repair Information Company, LLC.
Fig. 9: Identifying Hooks, Ultrasonic Transducer And Mountings
Courtesy of BMW OF NORTH AMERICA, INC.
I nstallation:
Make sure rubber ring (1) is correctly seated on ultrasonic transducer (2).
Fig. 10: Identifying Rubber Ring And Ultrasonic Transducer
Courtesy of BMW OF NORTH AMERICA, INC.
66 20 518 REMOVING AND INSTALLING/REPLACING AN ULTRASONIC TRANSDUCER AT
FRONT (OUTSIDE) (PARK DISTANCE CONTROL)
Necessary preliminary tasks
Remove FRONT WHEEL ARCH TRIM (front section)
Disconnect plug connection.
Unlock retainin g tabs (1) in direction of arrow and pull ultrasonic transducer (2) out of holder (3).
2011 BMW 335d
ACCESSORIES AND BODY, CAB Distance Systems, Cruise control - Repair - 335d
Tuesday, September 09, 2014 2:14:51 PM Page 6 © 2011 Mitchell Repair Information Company, LLC.
Fig. 11: Unlocking Retaining Tabs In Direction Of Arrow
Courtesy of BMW OF NORTH AMERICA, INC.
I nstallation:
Retaining hooks (1) of ultrasonic transducer (2) must engage exactly in mountings (3).
Fig. 12: Identifying Hooks, Ultrasonic Transducer And Mountings
Courtesy of BMW OF NORTH AMERICA, INC.
I nstallation:
Make sure rubber rin g (1) is correctl y seated on ultrasonic transducer (2).
2011 BMW 335d
ACCESSORIES AND BODY, CAB Distance Systems, Cruise control - Repair - 335d
Tuesday, September 09, 2014 2:14:51 PM Page 7 © 2011 Mitchell Repair Information Company, LLC.
Fig. 13: Identifying Rubber Ring And Ultrasonic Transducer
Courtesy of BMW OF NORTH AMERICA, INC.
66 20 565 REMOVING AND INSTALLING/REPLACING FRONT SIGNAL SENSOR (PARK
DISTANCE CONTROL)
Necessary preliminary tasks
Remove TRIM PANEL FOR PEDAL ASSEMBLY .
Disconnect plug connection (1).
Fig. 14: Identifying Plug Connection
Courtesy of BMW OF NORTH AMERICA, INC.
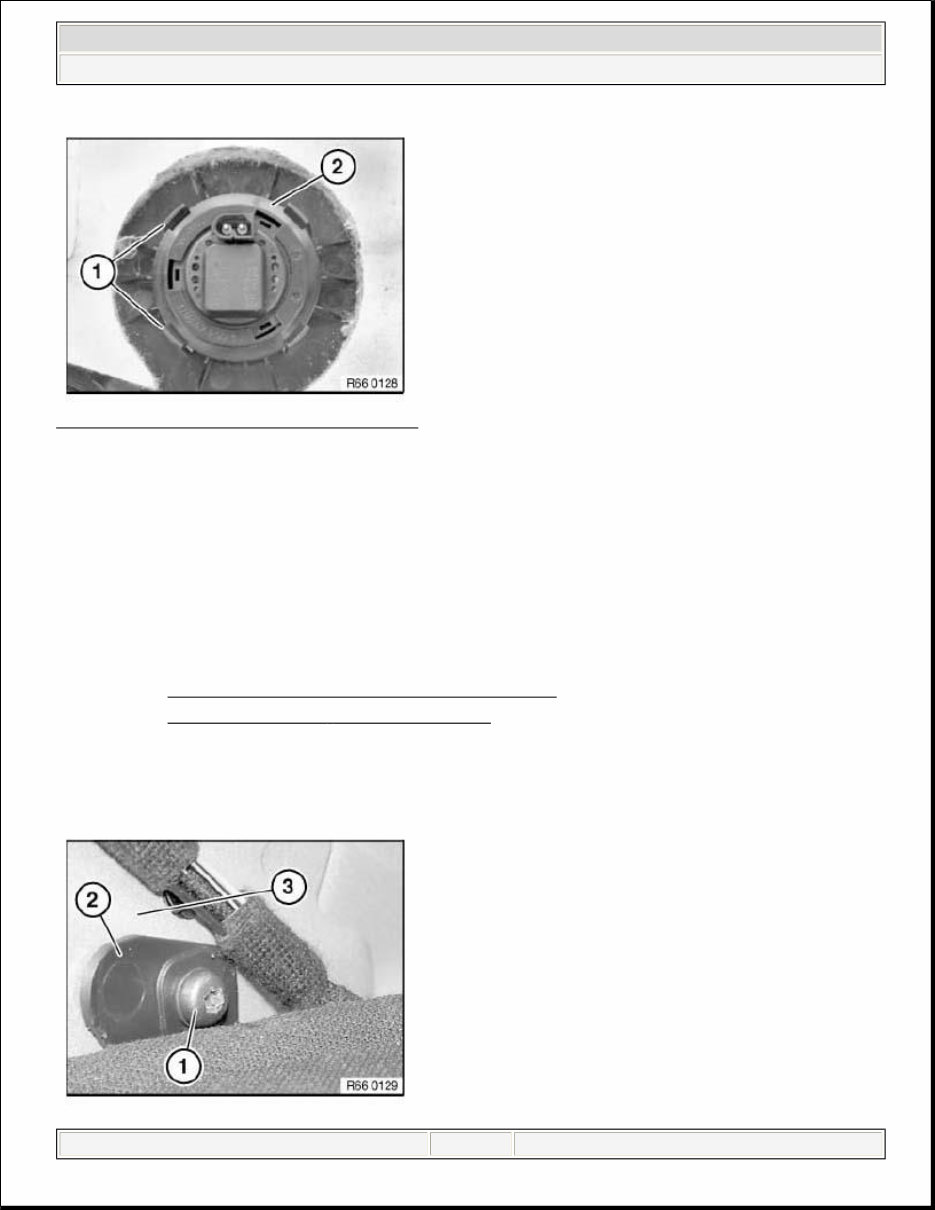
Unclip signal sensor on both sides from fixture (1).
I nstallation:
Si g nal sensor (2) must snap audibl y into retainin g tabs.
2011 BMW 335d
ACCESSORIES AND BODY, CAB Distance Systems, Cruise control - Repair - 335d
Tuesday, September 09, 2014 2:14:51 PM Page 8 © 2011 Mitchell Repair Information Company, LLC.
Fig. 15: Identifying Fixture And Signal Sensor
Courtesy of BMW OF NORTH AMERICA, INC.
66 20 560 REMOVING AND INSTALLING/REPLACING REAR SIGNAL SENSOR (PARK
DISTANCE CONTROL)
Vehicles with HiFi or Top HiFi system:
N o acoustic sensors fitted because the PDC control unit activates the respective speaker on the side of
obstruction.
Necessary preliminary tasks
Remove PANEL FOR ROOF PILLAR AT REAR RIGHT
Remove REAR RIGHT MID - RANGE SPEAKER
Release screw (1).
Remove holder (2) from C-pillar (3) and feed out of rear window shelf.
2011 BMW 335d
ACCESSORIES AND BODY, CAB Distance Systems, Cruise control - Repair - 335d
Tuesday, September 09, 2014 2:14:51 PM Page 9 © 2011 Mitchell Repair Information Company, LLC.
Fi g . 16: Identif y in g Screw, Holder And C - Pillar
Courtesy of BMW OF NORTH AMERICA, INC.
I nstallation:
Holder (1) must snap into guide hole (2) in C-pillar.
Fig. 17: Identifying Holder And Guide Hole
Courtesy of BMW OF NORTH AMERICA, INC.
Disconnect plug connection (1).
Remove signal sensor (2).
Replacement:
Detach signal sensor (2) from holder (3).
If necessary, mark position of signal sensor on holder.
2011 BMW 335d
ACCESSORIES AND BODY, CAB Distance Systems, Cruise control - Repair - 335d
Tuesday, September 09, 2014 2:14:51 PM Page 10 © 2011 Mitchell Repair Information Company, LLC.
You're Reading a Preview
What's Included?
Lifetime Access
Access Contents & Bookmarks
Print one or all pages of your manual