Adhesive Tape Surfaces The vehicle must be at room temperature before the installation of self-adhesive cover, door seal molding, etc. when using adhesive tape. The adhesive surfaces on the body must be free of dirt and grease. Clean the adhesive surfaces using Cleaning Solution -D 009 401 04-. Apply Bonding Agent -D 355 205 A2- on the surface on the body side using the Applicator -D 009 500 25- and let dry. Warm the adhesive areas to approximately 40 (104 °F) using a hot air blower. After installing the covers with adhesive tape, use a roller and press the adhesive tape one more time to make sure it is on securely. After that, pull on the adhesive tape by hand just to make sure it is on. Page 1 of 1 Adhesive Tape Surfaces
Contact Corrosion Contact corrosion can occur if incorrect fasteners (bolts, nuts, washers, etc.) are used. For this reason, only fasteners with a special surface coating are installed. In addition, rubber or plastic parts and adhesives are made of non -conductive materials. If there are doubts as to whether parts are suitable or not, use new parts according to the Parts Catalog. Note The use of original replacement parts is recommended, they are tested and are compatible with aluminum. The use of Audi accessories is recommended. Damage resulting from contact corrosion is not covered by the warranty. Page 1 of 1 Contact Corrosion
Wire Routing and Securing (Edition 09.2015) When loosening, removing or installing hydraulic, pneumatic or electrical line, always make a sketch or take a picture. This ensures installation is the same as the original. Page 1 of 1 Wire Routing and Securing
Center Headlamp Bracket, Removing and Installing Removing – Remove the headlamps. Refer to →Electrical Equipment; Rep. Gr.94. – Remove the luggage compartment tray. Refer to →Body Interior; Rep. Gr.70. – Remove the bolts -arrows-. – Remove the center headlamp bracket -1-. Installing Tightening specifications. Refer to → Chapter „Overview - Headlamp, Wheel Housing Liner and Radiator Mounts“. Install in reverse order of removal. Page 1 of 1 Center Headlamp Bracket, Removing and Installing
Inner Headlamp Bracket, Removing and Installing Removing – Remove the headlamps. Refer to →Electrical Equipment; Rep. Gr.94. – Remove the headlamp adjuster -3- by removing bolt -2-. – Remove the bolts -arrows-. – Remove the inner headlamp bracket -1-. Installing Tightening specifications. Refer to → Chapter „Overview - Headlamp, Wheel Housing Liner and Radiator Mounts“. Install in reverse order of removal. Page 1 of 1 Inner Headlamp Bracket, Removing and Installing
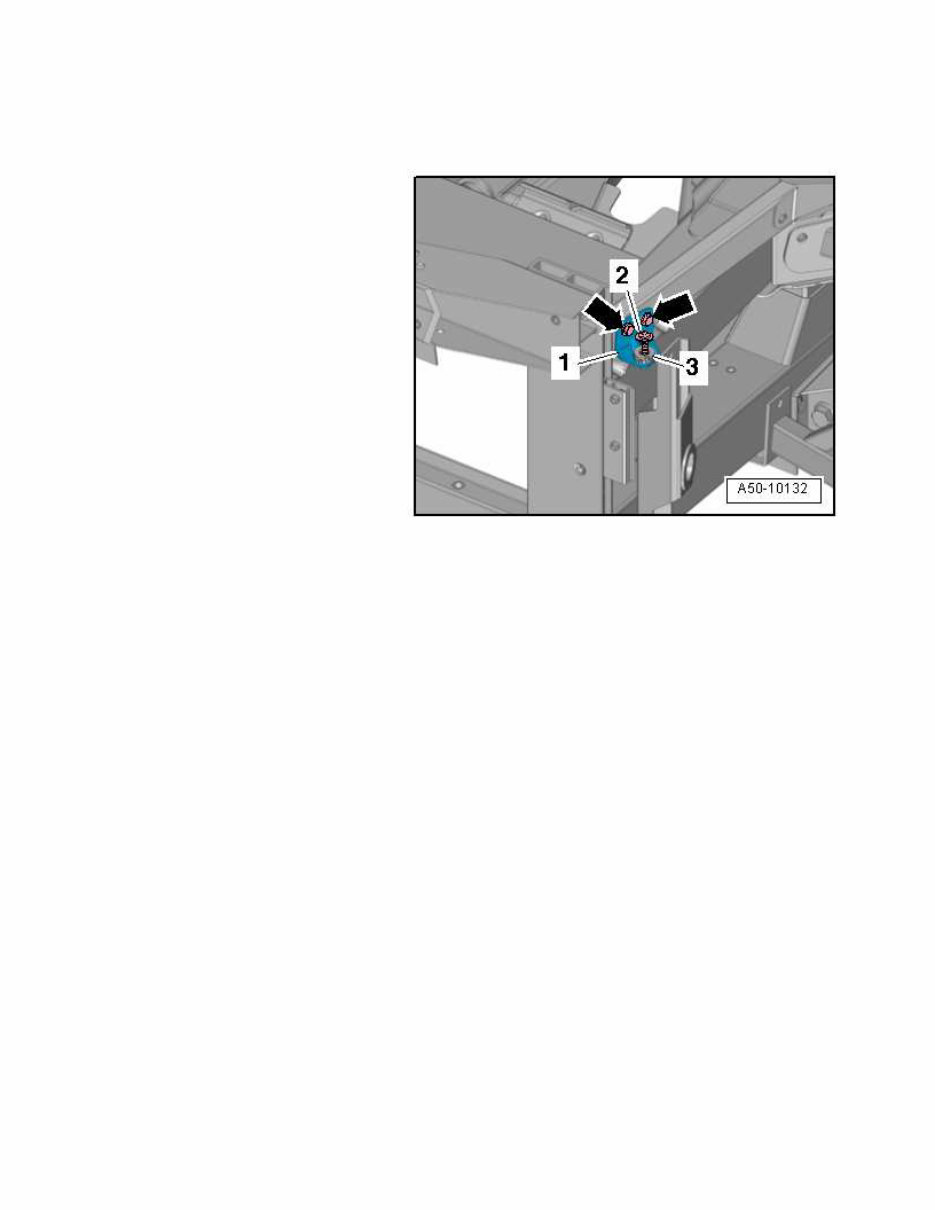
Inner Radiator Bracket, Removing and Installing Removing – Remove the headlamps. Refer to →Electrical Equipment; Rep. Gr.94. – Remove the radiator. Refer to →Engine Mechanical; Rep. Gr.19. – Remove the bolts -arrows- and the inner radiator bracket -1-. Installing Tightening specifications. Refer to → Chapter „Overview - Headlamp, Wheel Housing Liner and Radiator Mounts“. Install in reverse order of removal. Page 1 of 1 Inner Radiator Bracket, Removing and Installing
Lock Carrier, Removing and Installing Removing – Remove the luggage compartment tray. Refer to →Body Interior; Rep. Gr.70. – Remove the luggage compartment release motor. Refer to → Chapter „Rear Lid Central Locking System Motor - V53-, Removing and Installing“. – Remove the hood latch. Refer to → Chapter „Hood Latch, Removing and Installing“. – Remove the bumper cover. Refer to → Chapter „Overview - Bumper Cover“. – Remove the top center bumper mount. Refer to → Chapter „Top Center Bumper Cover Mount, Removing and Installing“. – Remove the bolts -2- and -3-. – Remove the lock carrier -1- while guiding the luggage compartment emergency release cable out. Installing Tightening specifications. Refer to → Chapter „Overview - Lock Carrier“. Install in reverse order of removal. Page 1 of 1 Lock Carrier, Removing and Installing
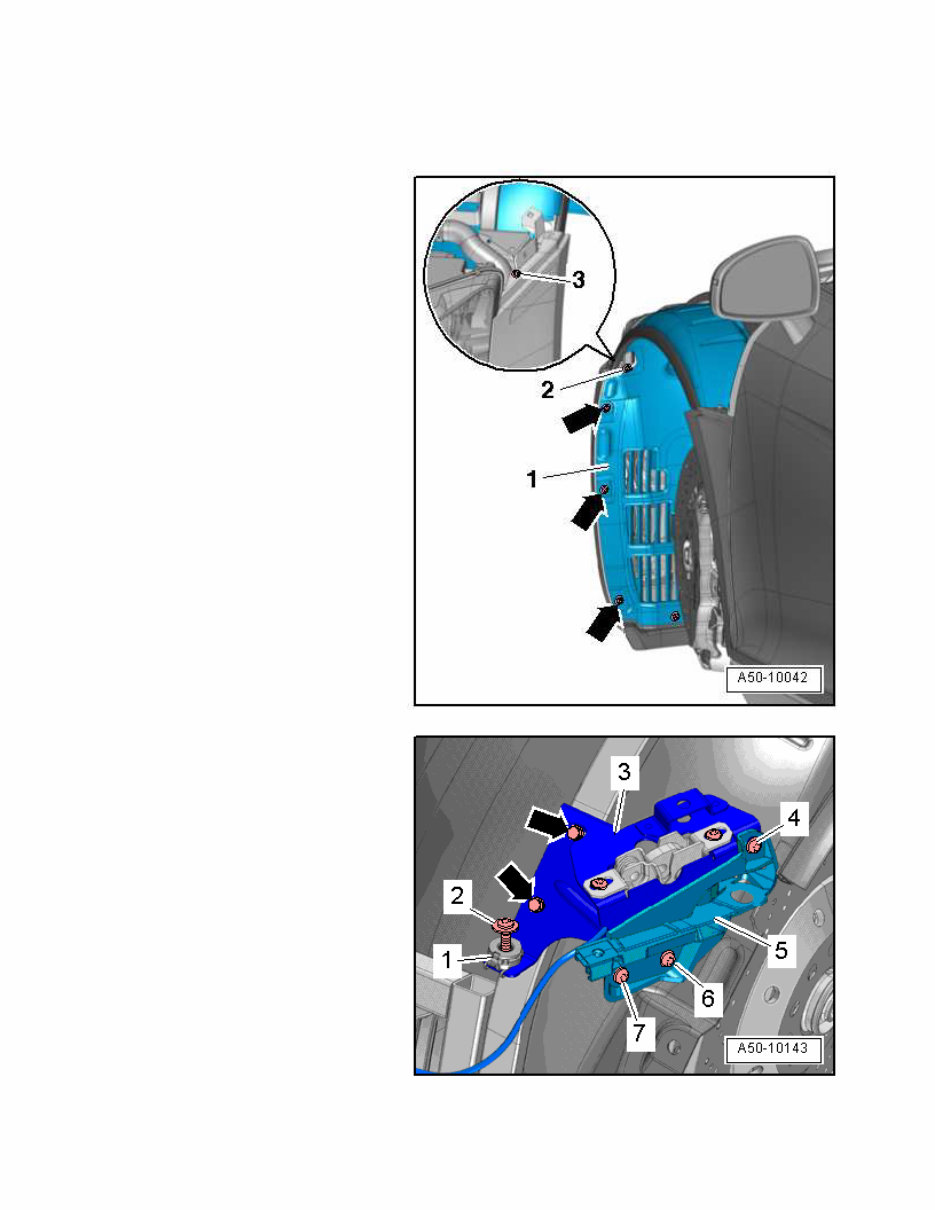
Outer Headlamp Bracket, Removing and Installing Removing – Remove the headlamps. Refer to →Electrical Equipment; Rep. Gr.94. – Remove the bolts -arrows-. – Move the loosened part of the wheel housing liner -1- to the side. – Remove bolts -2- and -3- on the bumper cover bracket. – Remove the lid lock. Refer to → Chapter „Hood Latch, Removing and Installing, Left and Right“. – Remove the bolts -arrows-. – Remove the outer headlamp bracket -3-. – Remove bolts -4, 6 and 7- and the outer bumper cover bracket -5-. – Remove the headlamp adjuster -1- by removing bolt -2-. Installing Tightening specifications. Refer to → Chapter „Overview - Headlamp, Wheel Housing Liner and Radiator Mounts“, → Chapter „Latch and Hood Motor Assembly Overview“. Install in reverse order of removal. Page 1 of 1 Outer Headlamp Bracket, Removing and Installing
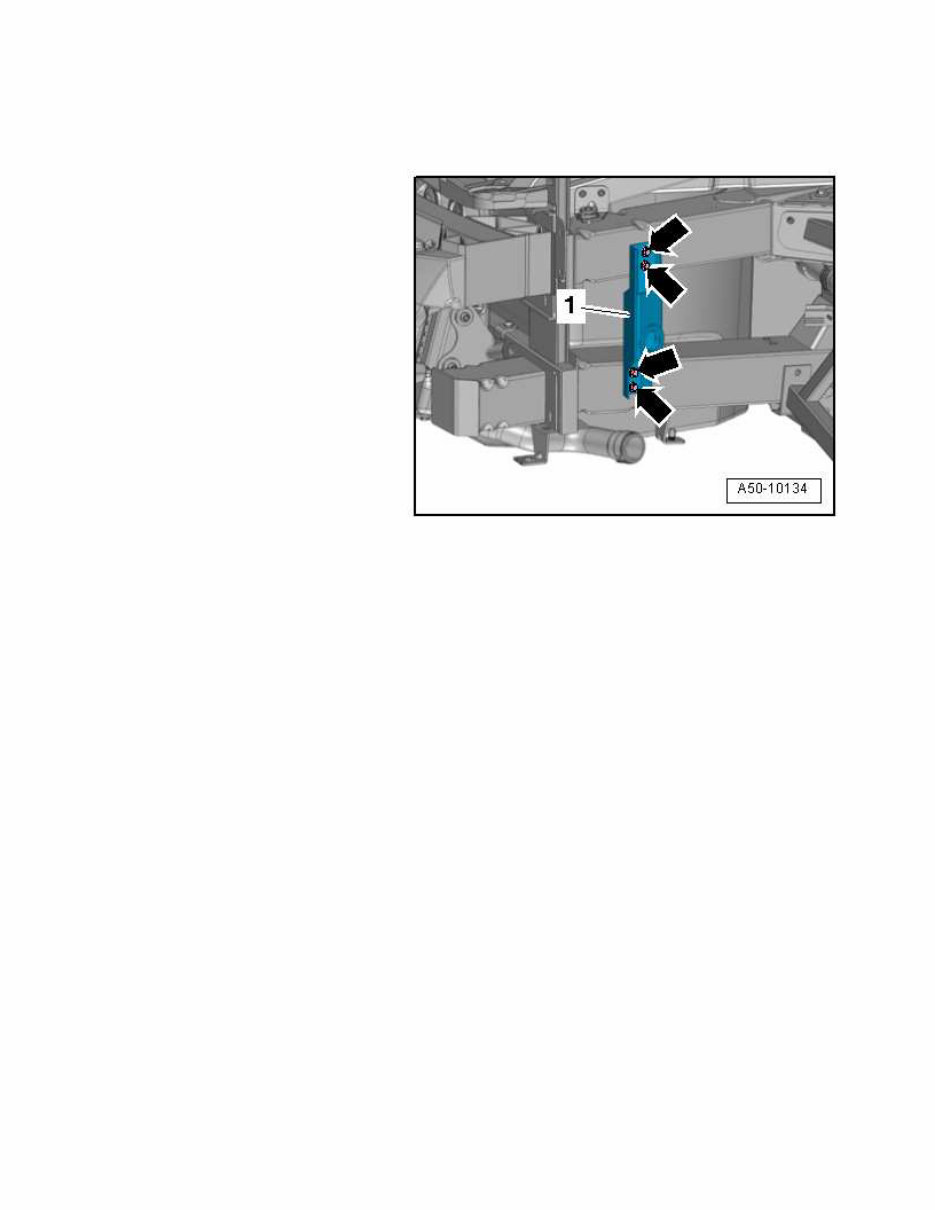
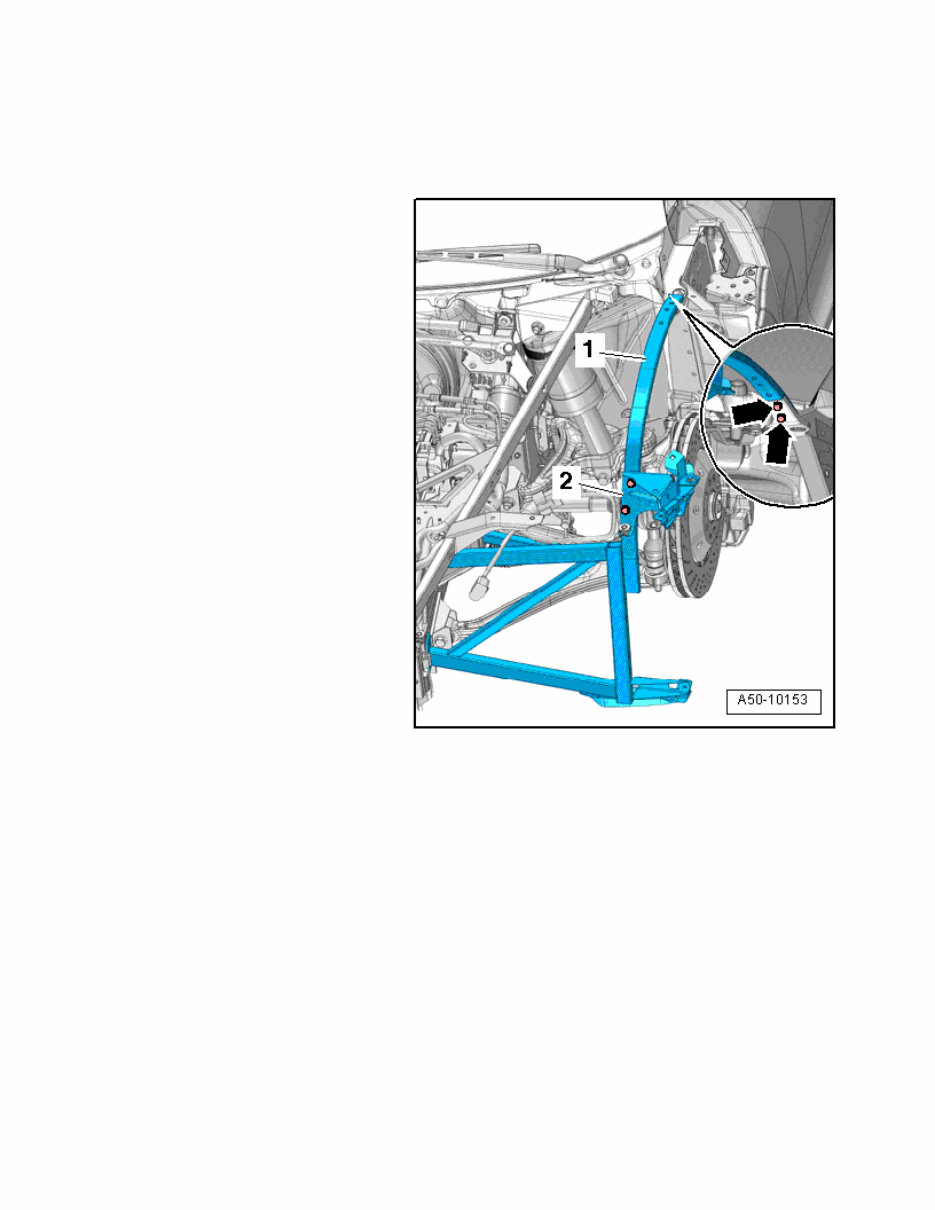
Outer Radiator Bracket and Upper Wheel Housing Liner Bracket, Removing and Installing Removing – Remove the wheel housing liner. Refer to → Chapter „Front Wheel Housing Liners, Removing and Installing“. – Remove the headlamps. Refer to →Electrical Equipment; Rep. Gr.94. – Only loosen and secure the radiator. Refer to →Engine Mechanical, Fuel Injection and Ignition; Rep. Gr.19. – Remove the outer headlamp bracket -2-. Refer to → Chapter „Outer Headlamp Bracket, Removing and Installing“. – Remove the bolts -arrows- on the outer radiator and wheel housing liner bracket - 1-. Page 1 of 2 Outer Radiator Bracket and Upper Wheel Housing Liner Bracket, Removing and Installing
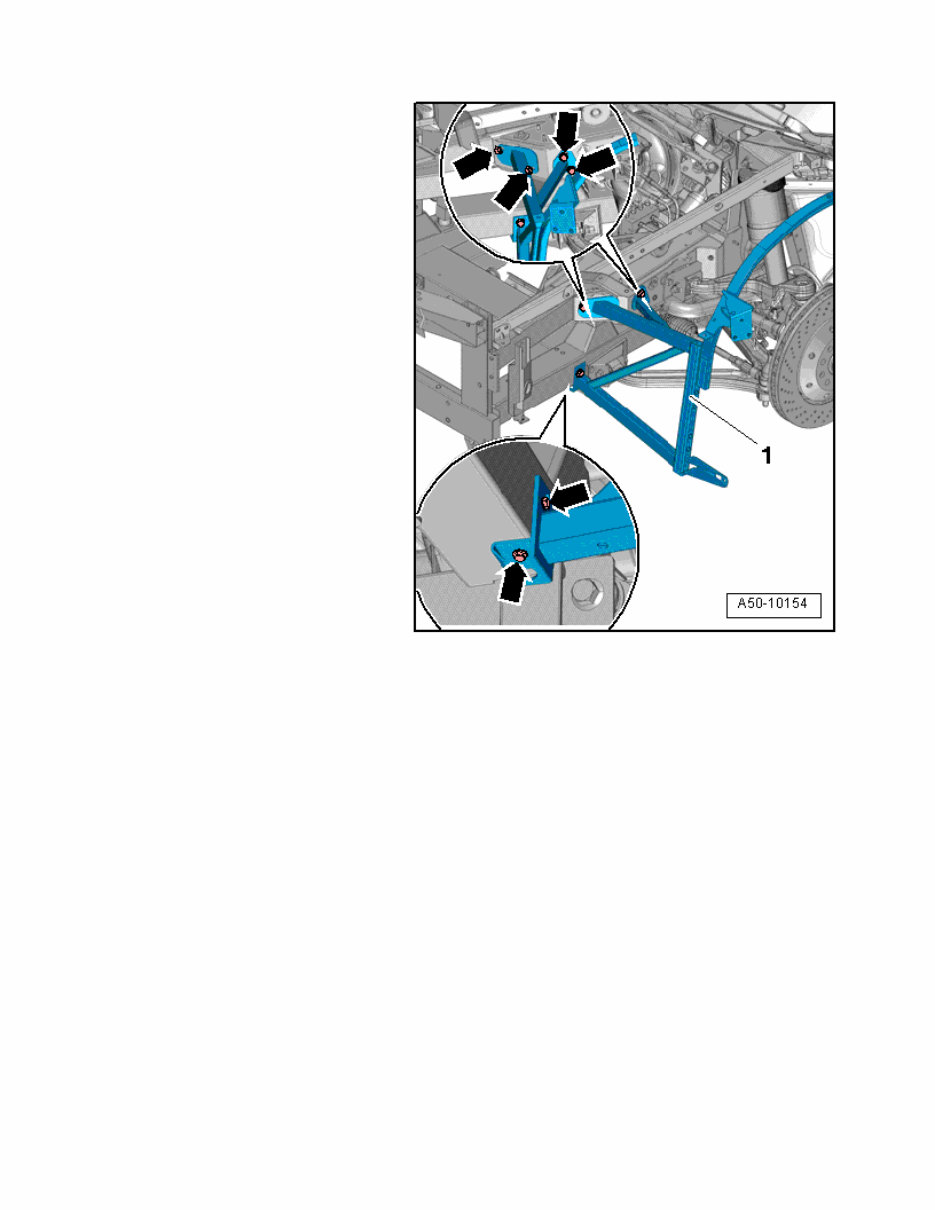
– Remove the bolts -arrows- and remove the outer radiator and wheel housing liner bracket -1- downward. Installing Tightening specifications. Refer to → Chapter „Overview - Headlamp, Wheel Housing Liner and Radiator Mounts“. Install in reverse order of removal. Page 2 of 2 Outer Radiator Bracket and Upper Wheel Housing Liner Bracket, Removing and Installing
This 2012 Audi R8 GT Service & Repair Manual is essential for both professional mechanics and DIY enthusiasts. It comprehensively covers your specific model and its variants, providing troubleshooting and replacement procedures recommended by the manufacturer, along with step-by-step instructions, clear images, and exploded-view illustrations.
Regular maintenance is crucial for the durability of your vehicle. This manual equips you with everything needed for a Do-It-Yourself approach to fixing problems, as some parts will eventually wear out and require replacement, even with proper maintenance.
Dealing with Audi repairs can be challenging, but this car repair manual simplifies the process by offering the manufacturer's recommended troubleshooting charts and replacement procedures. It's a cost-effective solution that enhances vehicle reliability and empowers you to handle repairs independently.
Say goodbye to bulky manuals—this repair manual is the ultimate resource for weekend DIY’ers and professional mechanics working on Audi vehicles!
The 2012 Audi R8 GT Service & Repair Manual includes comprehensive guidance for engine rebuilding, component replacement, wiring diagrams, torque specs, and exploded-view illustrations. Additionally, the manufacturer's troubleshooting charts enable quick identification of issues based on specific symptoms, making it beginner-friendly.
In summary, this 2012 Audi R8 GT Service & Repair Manual is a cost-saving investment that will prove its worth after the first oil change, enabling you to save significantly on repairs and maintenance.